【ES】Agent User Manual_V6.0.4
Agent Installation
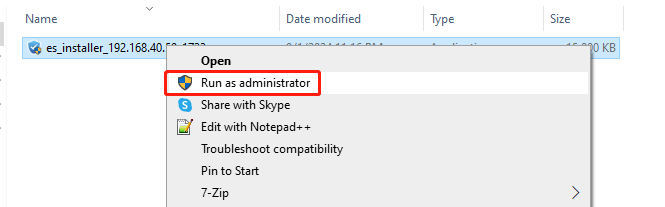
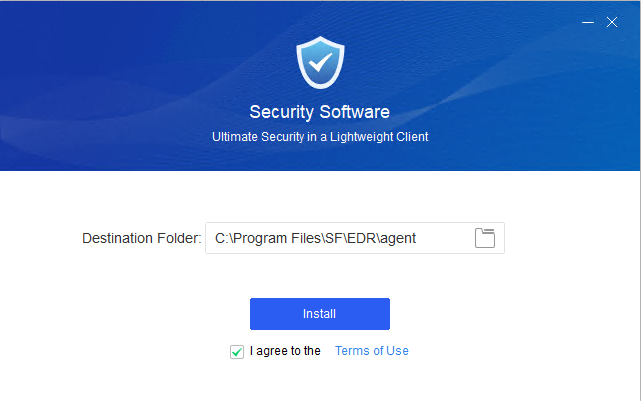
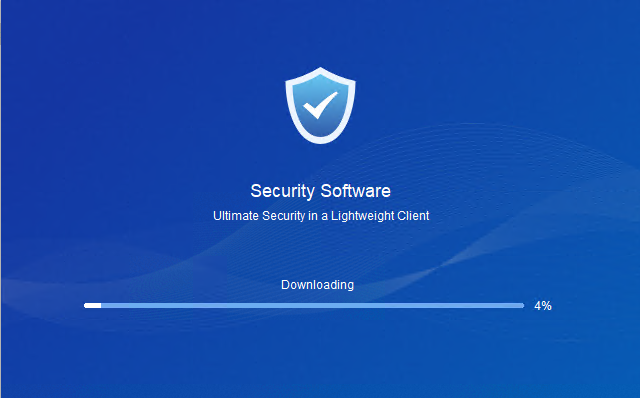
To install the installation package, ensure you run it with administrator privileges. Right-click the file and select Run as administrator from the drop-down menu, as shown below.
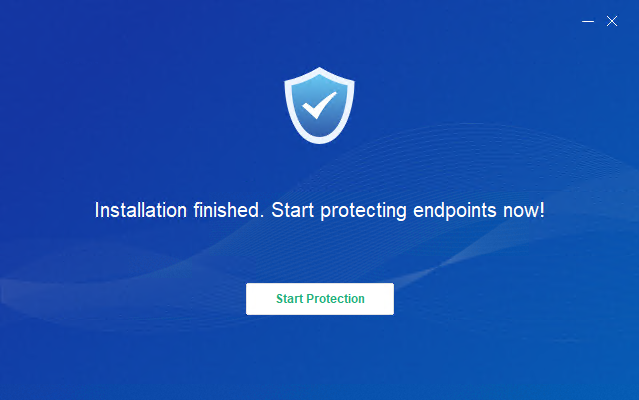
Click Start Protection.
The last step of the installation is to register the endpoint asset information, and the installation is complete.

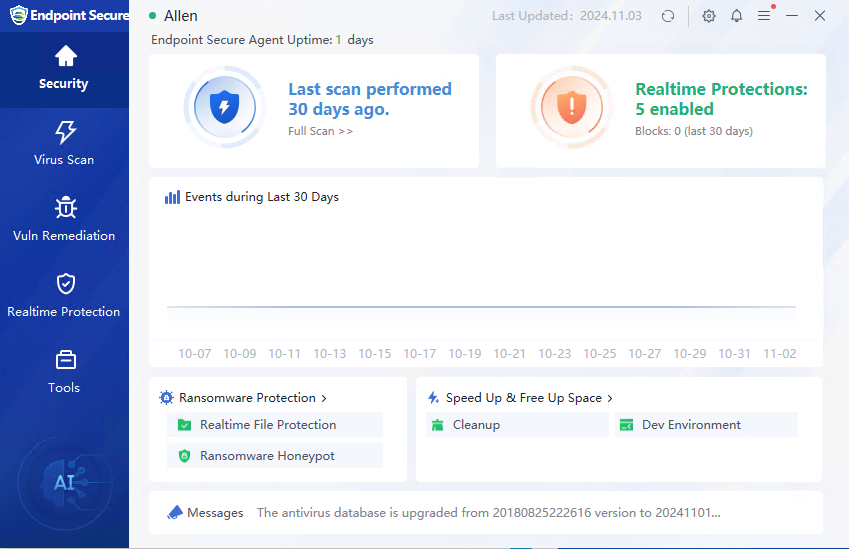
Security
After the agent is installed, you can view the endpoint protection duration, last detection time, real-time protection trend, etc. on the home page, as shown in the figure below.
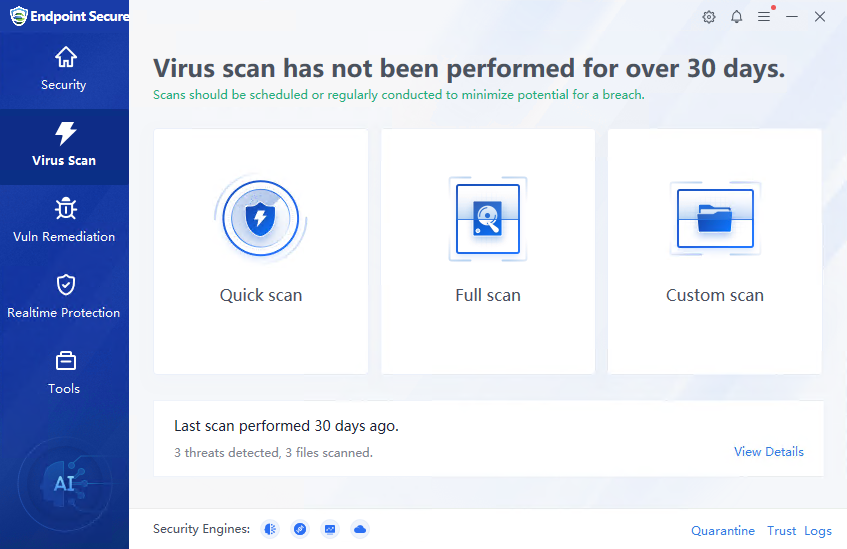
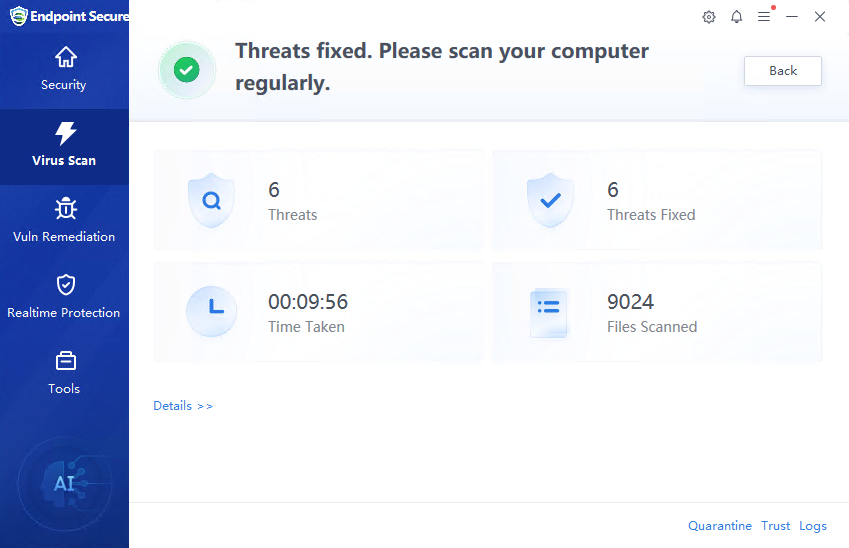
Virus Scan
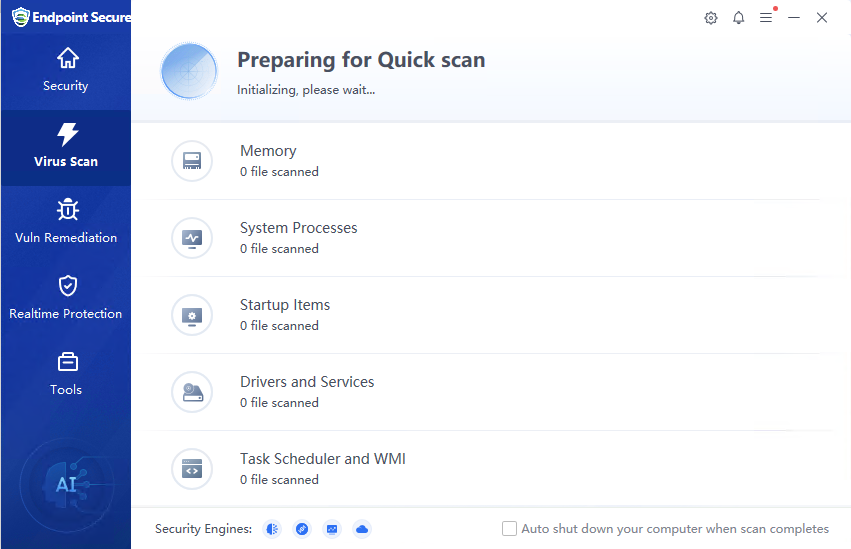
The Virus Scan page allows you to perform Quick scan, Full scan, and Custom scan on the endpoint, as well as view the logs after virus scanning.
Vulnerability Remediation
If the administrator enables Hot Patching for vulnerabilities in the Endpoint Secure Manager settings and prohibits the agent users from modifying it by themselves, the agent will enable the hot patch repair function by default, as shown in the figure below.

Realtime Protection
The Realtime Protection includes Ransomware Protection, System Protection, Advanced Threat Protection, Network Protection, and Others.

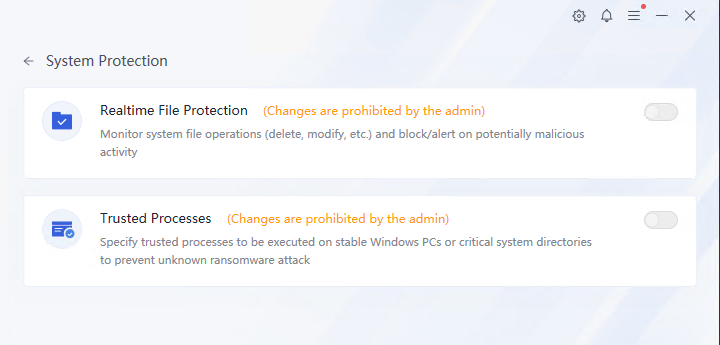
Click System Protection to view system protection details, which include Realtime File Protection and Trusted Processes. The administrator can revoke the endpoint user’s configuration permissions. If the administrator does not allow the endpoint to modify the configuration, the endpoint will prompt "Changes are prohibited by the admin", as shown below.
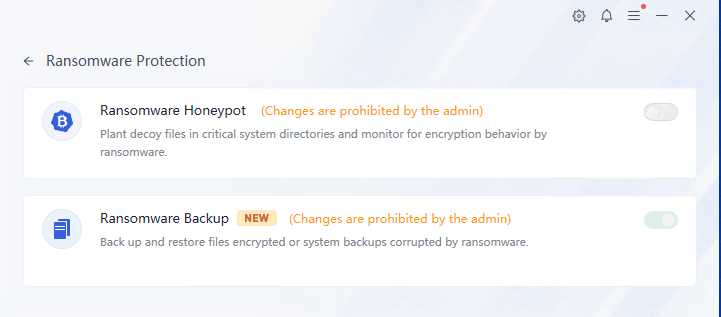
Click Ransomware Protection to view ransomware protection details, including Ransomware Honeypot and Ransomware Backup, as shown below.
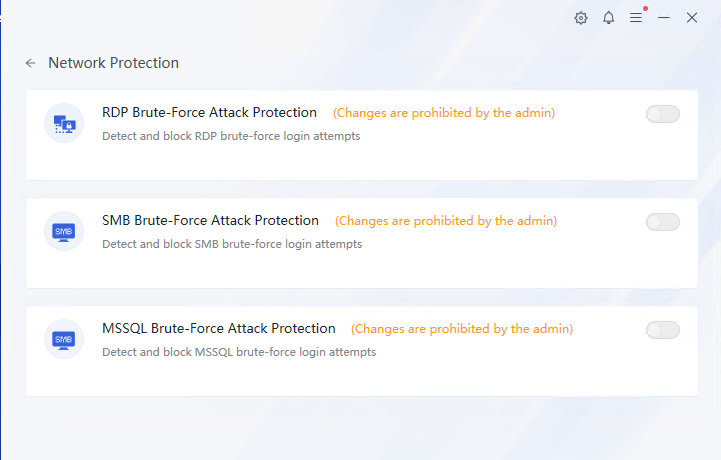
Click Network Protection to view network protection details, including RDP Brute-Force Attack Protection, SMB Brute-Force Attack Protection, and MSSQL Brute-Force Attack Protection, as shown below.
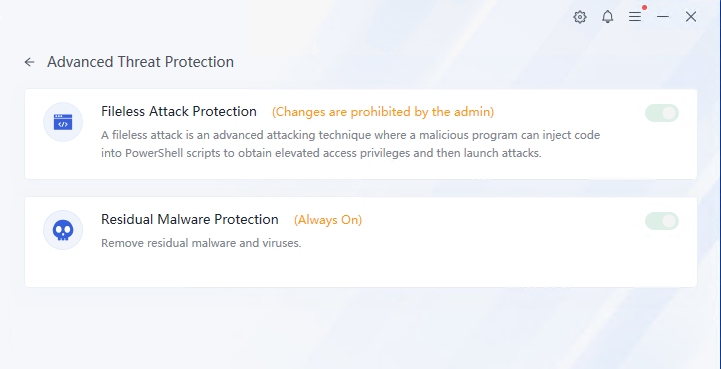
Click Advanced Threat Protection to view advanced threat protection details, including protection against fileless attacks and residual malware.
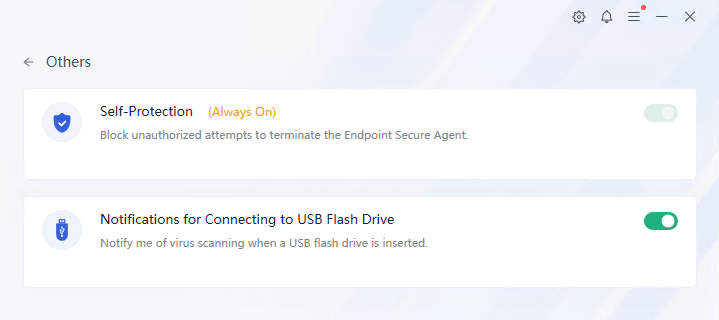
Click Others to view other protection details, including self-protection and endpoint peripheral management, as shown in the following figure.
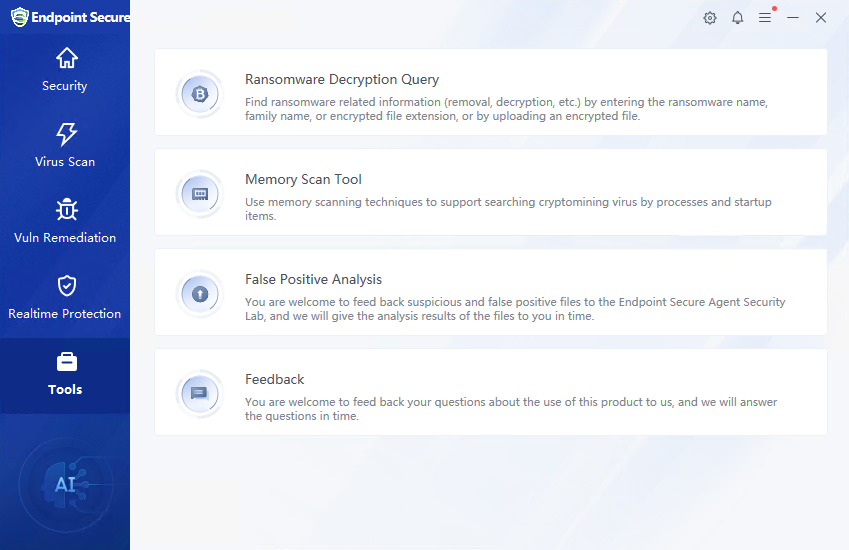
Tools
This page provides common tools such as Ransomware Decryption Query, Memory Scan Tool, and False Positive Analysis.
Settings
Click the Settings icon in the upper right corner of the agent to enter the settings center, as shown below.

The settings center includes Virus Scan, System Protection, Advanced Threat Protection, Network Protection, and Notifications settings. Each function has the same configuration items as the manager, and the administrator can revoke the endpoint user’s configuration rights on the agent. There is a Lock icon on the right side of each policy in the manager’s policy center. If the Lock icon is displayed, the administrator does not allow the endpoint user to configure it separately. At this time, the agent will display a prompt stating "Changes are prohibited by the admin", as shown below.

Virus Scan
The Virus Scan page includes settings for scan mode, scan engines, scan files, and remediation methods.
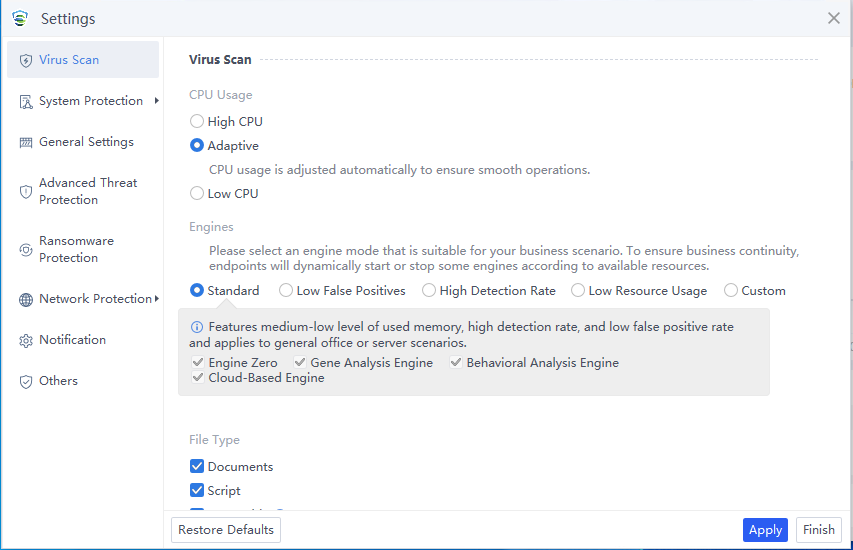
The scan mode can be selected as High CPU, Adaptive, or Low CPU:
High CPU: This type of scanning consumes the most CPU resources, but the scan speed is the fastest.
Adaptive: Dynamically adjust CPU resources based on the CPU usage. It optimizes the scan speed by leveraging ample CPU resources when the CPU usage is low and minimizing resource consumption when the CPU usage is high, thus ensuring smooth service operations.
Low CPU: Scanning with low CPU usage consumes no more than 10% of CPU resources, but the scan speed is the slowest.
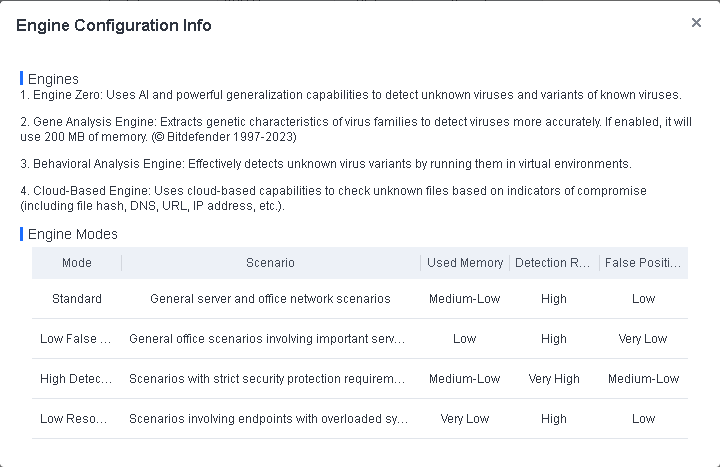
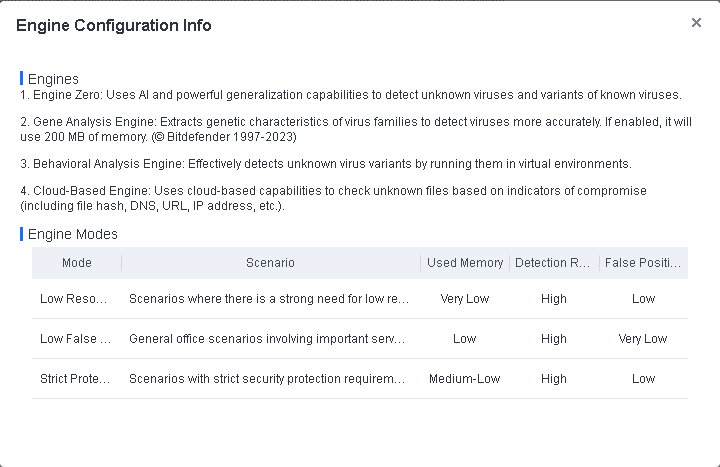
Engines: Four engines are available, including Sangfor Engine Zero, Gene Analysis Engine, Behavioral Analysis Engine, and Cloud-Based Engine. They are grouped into five modes: Standard, Low False Positives, High Detection Rate, Low Resource Usage, and Custom. Select a mode that aligns with your business scenario, as shown in the following figure.
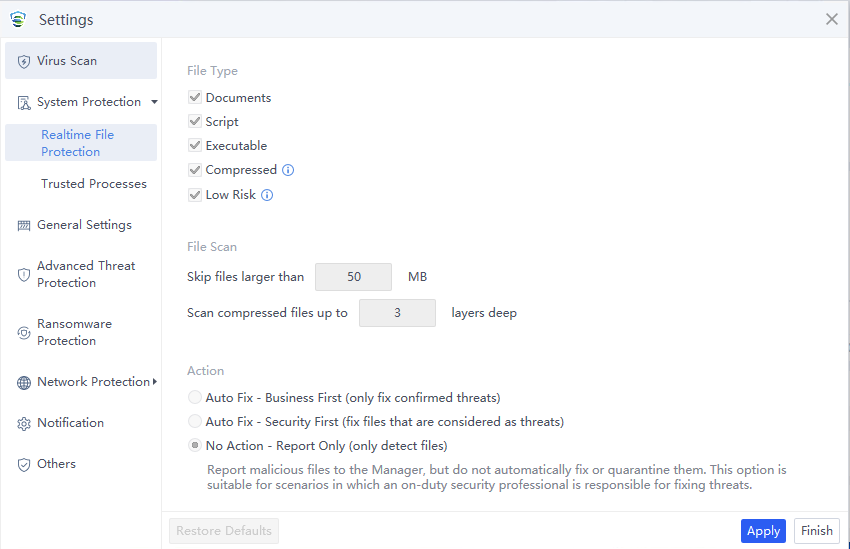
File Scan defines the size of the scanned file and the maximum compression level for scanning, with a maximum of 10 levels.
Disposal method: Set the disposal method after the threat file is found.
Action: You can specify the response to a detected malicious file. The options are Auto Fix – Business First, Auto Fix – Security First, and No Action – Report Only. The default action is Auto Fix – Business First.
Auto Fix – Business First: Automatically fix or quarantine confirmed malicious files based on the default virus detection settings; do not automatically fix or quarantine suspicious files, but report them to Endpoint Secure Manager, allowing endpoint users to fix them.
Auto Fix – Security First: Automatically fix or quarantine all malicious files and allow endpoint users to manually restore files from the Quarantine area. This option is suitable for scenarios with enhanced protection requirements.
No Action – Report Only: Report malicious files to Endpoint Secure Manager, but do not automatically fix or quarantine them. This option suits scenarios where an on-duty security professional is responsible for fixing threats.
System Protection
The System Protection page allows you to configure Realtime File Protection by setting the protection level, scan engines, file types, file scan, and remediation methods.
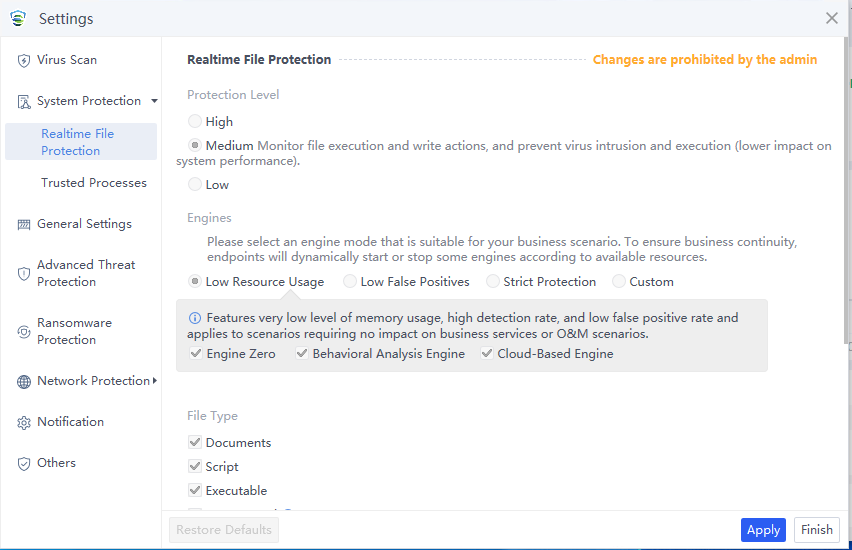
Protection Level: Three protection levels are available against malicious files, with the following differences:
-
High: Monitor all file actions (higher impact on system performance).
-
Medium: Monitor execution and write actions on files, and prevent virus intrusion and execution (lower impact on system performance).
-
Low: Monitor file execution and prevent virus execution (no impact on system performance).
File Type: Available options include Documents, Script, Executable, Compressed, and Low Risk.
Engines: Four engines are available, including Sangfor Engine Zero, Gene Analysis Engine, Behavioral Analysis Engine, and Cloud-Based Engine. They are grouped into four modes: Low Resource Usage, Low False Positives, Strict Protection, and Custom. Select a mode that aligns with your business scenario, as shown in the following figure.
Action: You can specify the response to a detected malicious file. The options are Auto Fix – Business First, Auto Fix – Security First, and No Action – Report Only. The default action is Auto Fix – Business First.
-
Auto Fix – Business First: Automatically fix or quarantine confirmed malicious files based on the default virus detection settings; do not automatically fix or quarantine suspicious files, but report them to Endpoint Secure Manager, allowing endpoint users to fix them.
-
Auto Fix – Security First: Automatically fix or quarantine all malicious files and allow endpoint users to manually restore files from the Quarantine area. This option is suitable for scenarios with enhanced protection requirements.
-
No Action – Report Only: Report malicious files to Endpoint Secure Manager, but do not automatically fix or quarantine them. This option suits scenarios where an on-duty security professional is responsible for fixing threats.
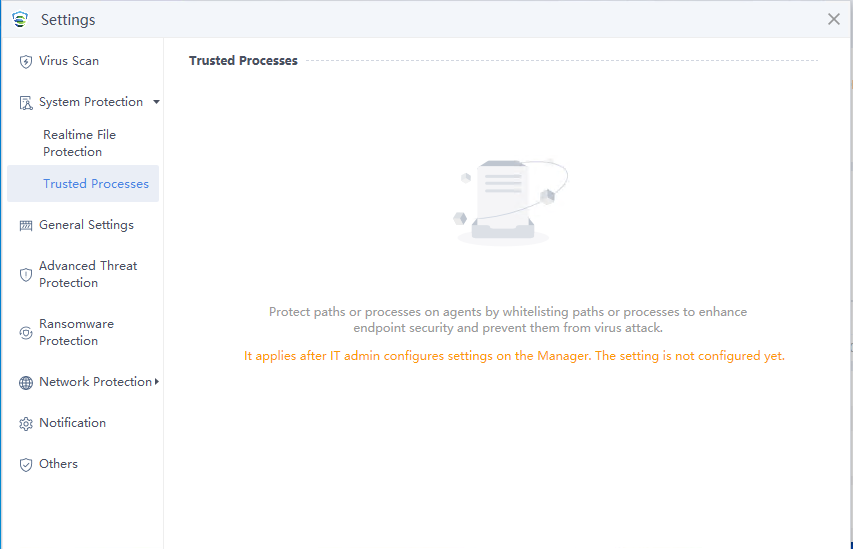
Trusted Processes: Protect paths or processes on agents by whitelisting paths or processes to enhance endpoint security and prevent them from virus attacks.
It applies after the lT admin configures settings on the manager. The setting is not configured yet.
General Settings
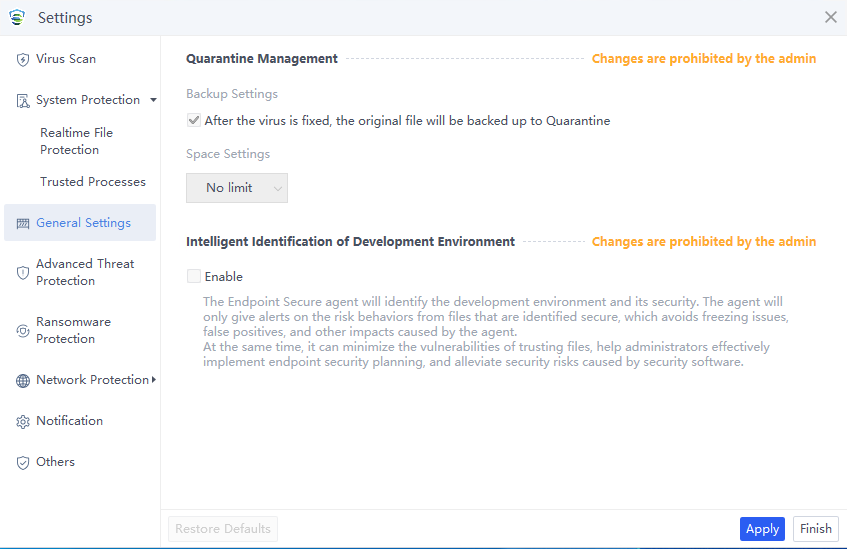
The General Settings page contains the Quarantine Management and Intelligent Identification of Development Environment functions. You can choose whether to back up the original file to the Quarantine area after repairing the file.
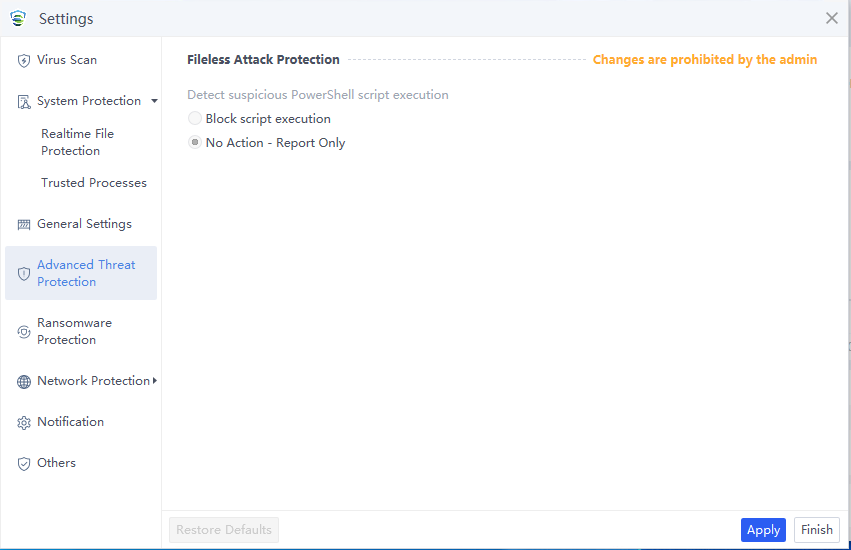
Advanced Threat Protection
The Advanced Threat Protection page includes Fileless Attack Protection settings, where you can choose what actions to take for detected fileless tools.
Ransomware Protection
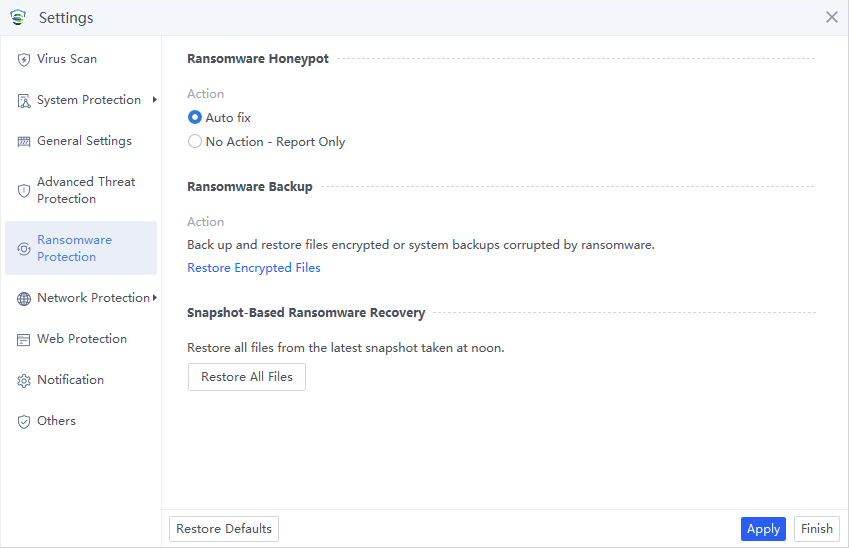
Ransomware Honeypot: The most important feature of ransomware protection, using honeypots to detect suspicious behavior.
Ransomware Backup: This feature is available only when the Ransomware Honeypot is enabled. You can choose whether to enable the Ransomware Backup feature on the manager.
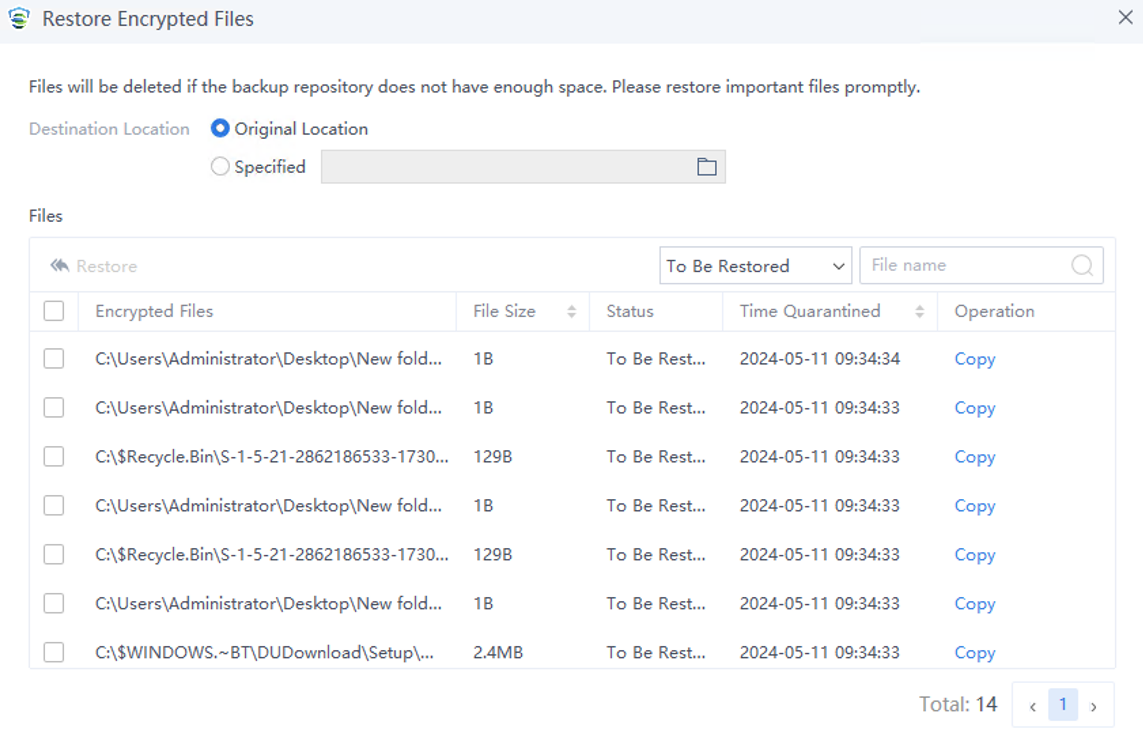
You can click Restore Encrypted Files to restore the backup files if ransomware is detected.
Snapshot-Based Ransomware Recovery: A snapshot of the endpoint is captured at noon daily. The snapshot size cannot exceed the predefined value, typically set at 10% of the disk space by default. You can choose whether to enable the Snapshot-Based Ransomware Recovery feature on the manager. When the ransomware encrypts files on the endpoint, you can click Restore All Files on Endpoint Secure Agent to restore all files from the latest snapshot captured at noon.
Note:
The Snapshot-Based Ransomware Recovery feature is only supported on Windows Server agents.
Network Protection
The Network Protection settings include detection thresholds for RDP brute-force attacks, SMB brute-force attacks, and MSSQL brute-force attacks.
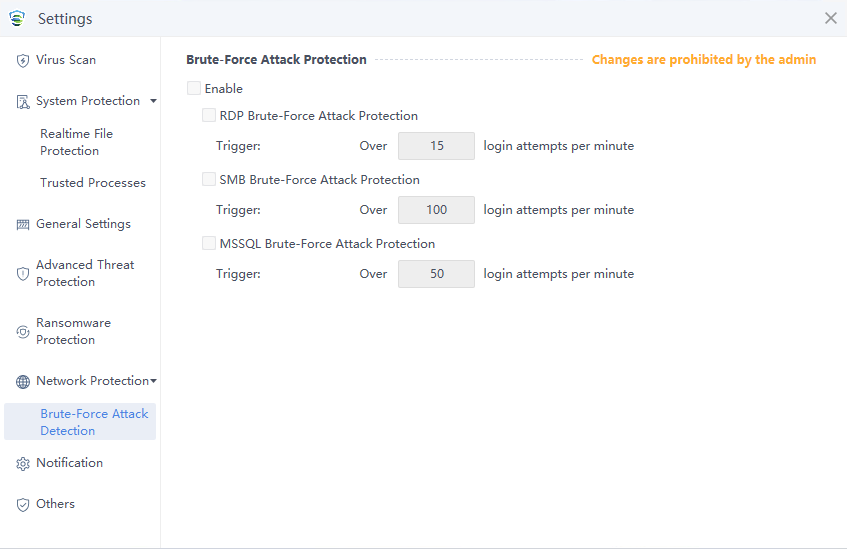
Trigger: You can specify the threshold for identifying a quick brute-force attack. A brute-force attack is identified as a quick attack if the number of consecutive attempts exceeds the specified value within a minute. For RDP and SMB quick brute-force attacks, you can specify an integer in the range of 1 to 100 and an integer in the range of 20 to 1,000, respectively. Slow and distributed brute-force attacks are identified based on an intelligent algorithm.
Web Protection
For Windows Server, you can view the configuration of Webshell Protection.
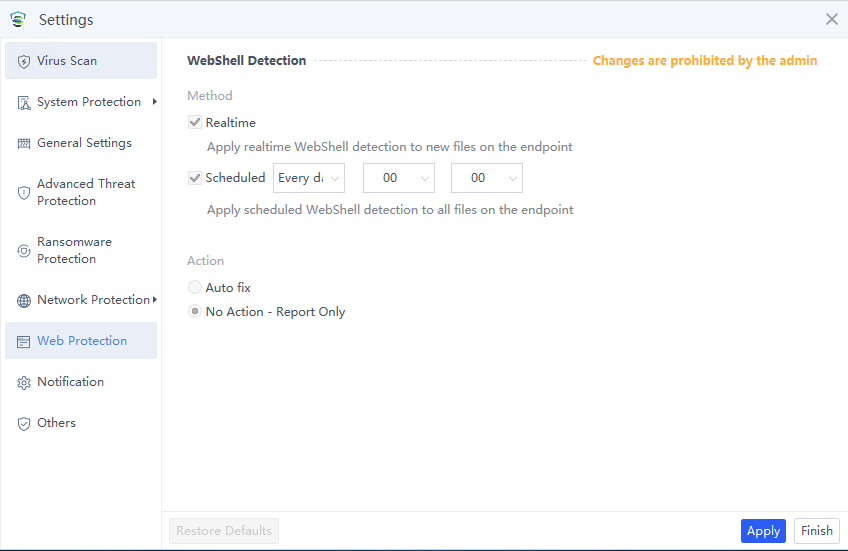
Method: Available options for scan method include Realtime and Scheduled.
Realtime: Scan new files on the endpoint in real time.
Scheduled: Scan all files on the endpoint as scheduled.
Action: You can specify the action for detected web shells. Supported options include Auto fix and No Action – Report Only.
Note:
You can only assess the Web Protection page from the Windows Server agent.
Notification
The Notification page includes settings for Virus scan notifications, Realtime file protection notifications, Hacktool protection notifications, and PowerShell fileless attack notifications. Endpoint users can customize the configurations to choose whether to allow pop-up prompts based on their actual needs.

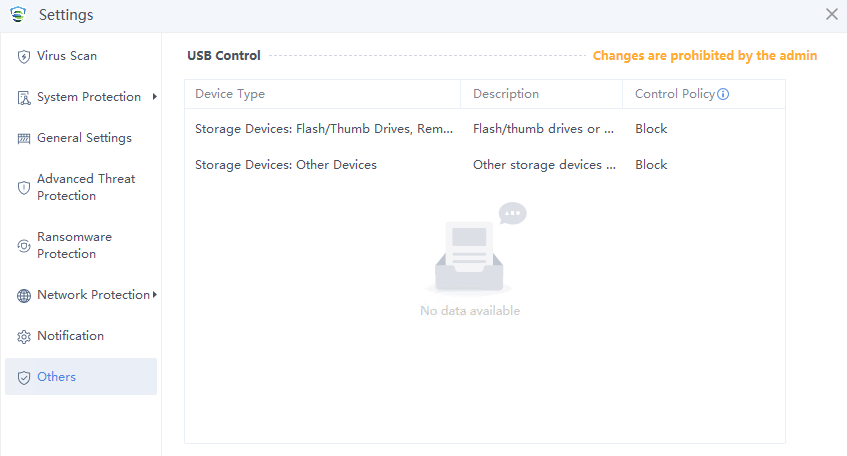
Others
You can view the configuration related to USB Control.
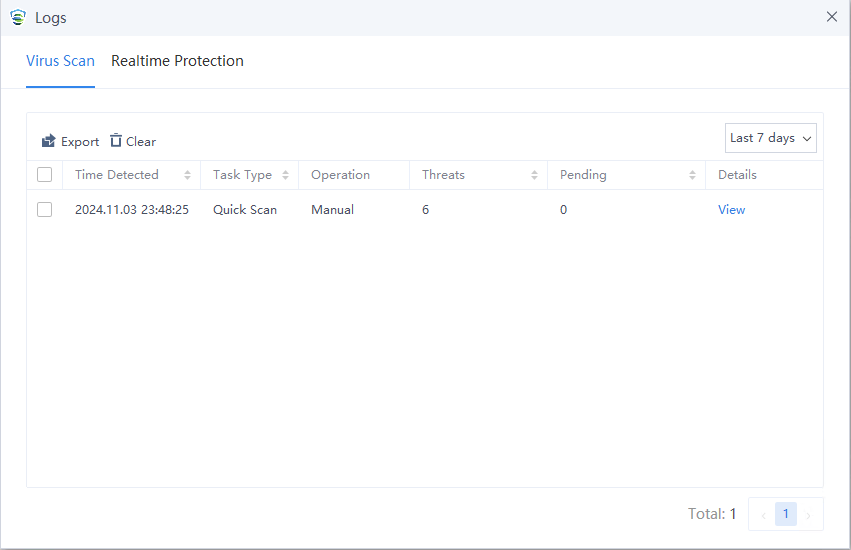
Logs
Click the Menu icon in the upper right corner of the agent to view the logs, as shown below.

The Logs page contains logs for Virus Scan and Realtime Protection.
Realtime Protection logs are security logs generated when threat files are detected after enabling real-time file monitoring.
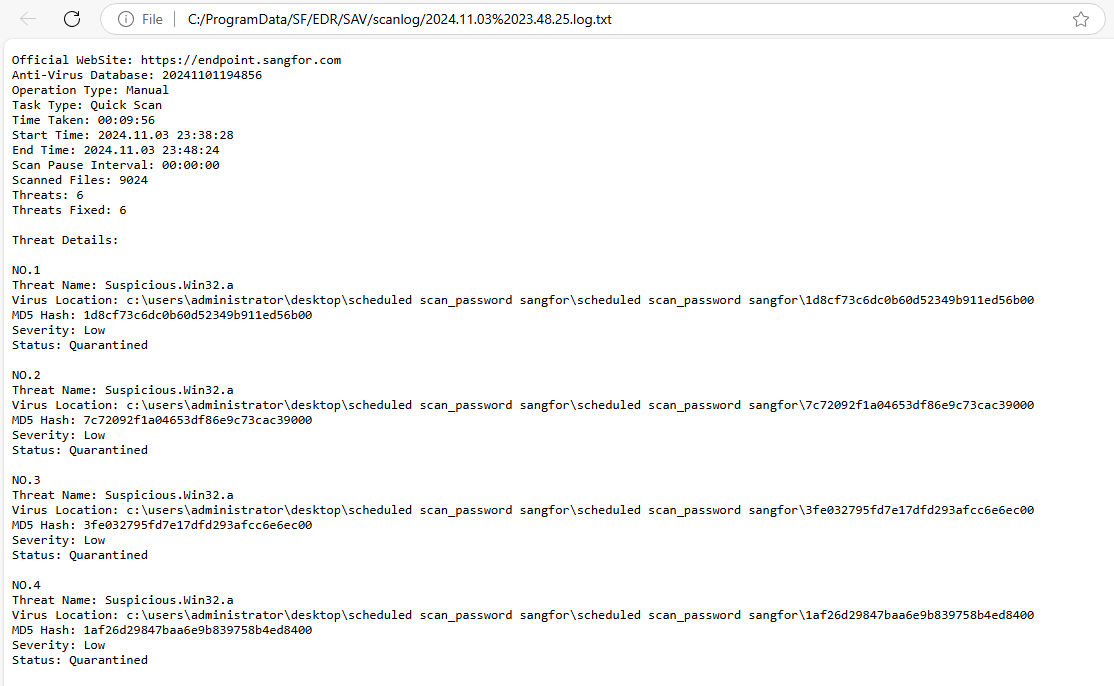
Virus Scan logs refer to the operation logs after virus scans are performed. Click View in the Details column for detailed information about the virus scan, as shown in the figure below.

Quarantine/Trust
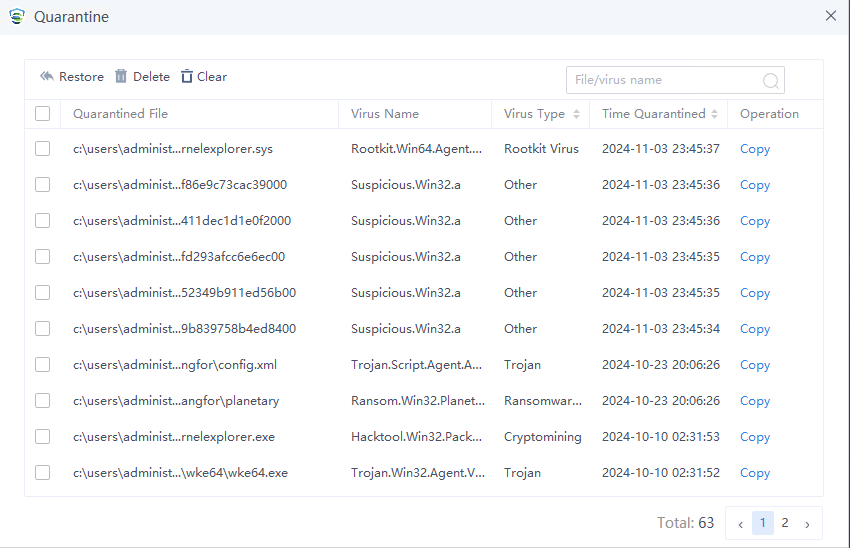
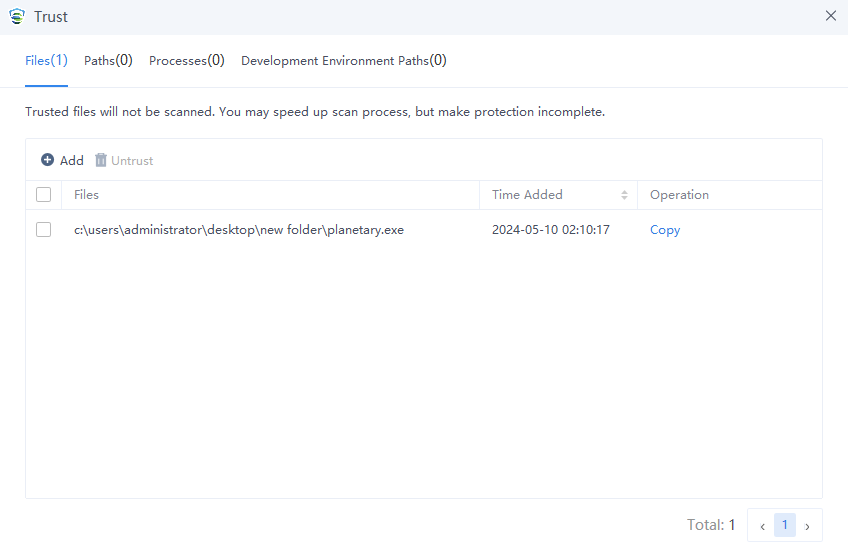
Endpoint Secure detects threat files and moves them to the Quarantine area after processing. You can view these quarantined files. You can add false positive files to the Trust zone. Files added to the Trust zone will automatically bypass virus scanning and real-time file monitoring.
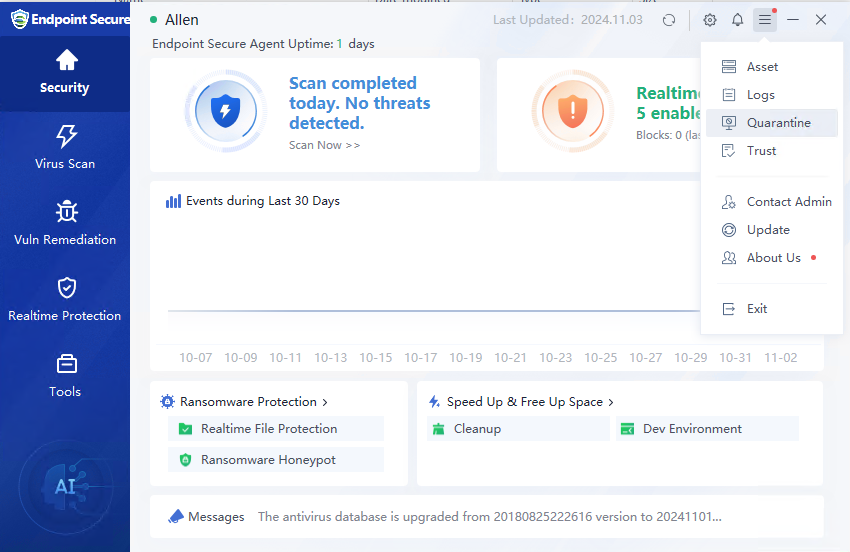
Click the Menu icon in the upper right corner of the agent to open the Quarantine area and Trust zone, as shown below.
After entering the Quarantine area, you can Restore, Delete, or Clear the files in the quarantine, as shown in the figure below.
You can enter the Trust zone and add trusted files, directories, and processes, as shown below.
Taskbar Tray
The tray in the lower right corner of the operating system taskbar provides some quick operations for the Endpoint Secure Agent. Right-click the icon to display the menu, as shown in the following figure.
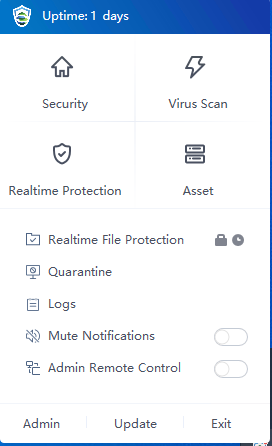
Uptime: X Days: Check the time the endpoint has been protected.
The tray offers shortcuts to functions like Security, Virus Scan, Realtime Protection, Asset, Quarantine, and Logs.
Mute Notifications: If the Mute Notifications mode is enabled, Endpoint Secure will not pop up alerts when it detects threat files. This feature can be configured by the endpoint user individually or by the administrator in the manager.
Admin Remote Control: This determines whether the manager’s administrator is allowed to access the endpoints remotely.
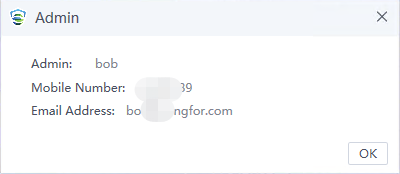
Admin: Click Admin to view the manager’s administrator information. Endpoint Secure users who need assistance can easily find the administrator’s contact information.
FAQs
How to use the Agent for Linux and macOS?
-
For Linux endpoints, an agent with a UI is not available yet.
-
For Mac endpoints, the page functions are relatively brief. Please refer to the agent usage instructions for Windows.