【HCI】Best Practices: SCMT_All Versions
Overview
Background
This document analyzes the migration feasibility of the application and shows a clear migration plan to ensure a smooth migration and a normal operation of the business environment after migration.
From this document, We can learn how to assess the state of the source system before migration and tune the VM after migration.
Project Flow
The migration flow chart is shown below:

Refer to the above flowchart to sort out the overall operation process of the project to reduce misoperations during the migration. The specific details is shown in the following table:
| Migration Process | Steps | Responsible | Time | Remarks |
|---|---|---|---|---|
| Early project | Environmental research | Sangfor | / | Conduct research on the customer’s business system to be migrated, and clarify the migration object and target. |
| Early project | Migration assessment | Sangfor | / | Organize and evaluate the environmental research information, plan the migration mode of each business system, and clarify the migration impact. |
| Environmental confirmation | Source System Check | Sangfor | / | List of physical hosts to be migrated. Confirm business dependencies and their importance. |
| Environmental confirmation | Network Environment Check | Sangfor | / | Check whether the migration link is normal. View network topology connectivity. |
| Environmental confirmation | HCI Cluster Check | Sangfor | / | Check whether the target HCI cluster status and resource information match the plan. |
| Business Verification Before Migration | Business Check | customer | / | Check whether the original business system can be powered on migration. Before migration, check whether the original business server can be restarted. |
| Business Verification Before Migration | Business Data Backup | customer | / | Back up the original business system data for easy restoration and rollback. |
| Migration environment preparation | Migration Platform Deployment | customer | 15 mins | Deploy the SCMT migration platform as the server. |
| Migration environment preparation | Install Source Software | customer | 5 mins per physical host | Install the source plug-in for the business system to be migrated. |
| Migration environment preparation | Migration Destination | Sangfor | 5 mins per physical host | Add the HCI cluster as a virtual management center, or deploy recovery boot media for virtual machines. |
| Migration environment preparation | Network Check | customer | / | Check whether the port required for migration is accessible. |
| Data Migration/Backup | Start Data Migration/Backup | Sangfor | Configure a migration or backup plan and start data transfer. | |
| Business Switching | Mark Data Checkpoint | customer | / | It is used to check the integrity of service data after switching. |
| Business Switching | Stop Business Service | customer | 3 mins | Shut down business services (such as shutting down the database/tomcat, etc.) at the source before business switching, and do not shut down the operating system at the source or disconnect the network. |
| Business Switching | Switch to HCI | Sangfor | / | Switch the business to the HCI and check the VM status of the target. |
| Business Verification | VM Check | Sangfor | 5 mins /physical host | Check whether the migrated VM can be powered on. |
| Business Verification | Business Function Verification | customer | / | Verify whether the business can start and whether the service is accessible. |
| Business Verification | Business Data Verification | customer | / | Verify the integrity of business data and checkpoint data consistency. |
| Business Verification Failed | Troubleshoot | customer | / | If the business fails to start after the migration, coordinate the business side to troubleshoot the problem. |
| Business Verification Failed | Migration Rollback | Sangfor | 5 mins | If there is no progress in troubleshooting, you can urgently start the rollback and switch the business to the source. |
| Business Verification Successful | Best Practice Check | Sangfor | 10 mins | Check whether the virtual machines of the customer’s important business are configured according to best practices and whether the configuration guarantee is enabled. |
| Data Protection | Configure Backup Policy | customer | / | After the source business machine migrates to the HCI for the first time and detects that the business is running normally, configure a backup policy for the business machine to protect the data. |
Basic Environment Research
During the formulation of this plan, Sangfor will cooperate with your company’s application system administrators, network administrators, and relevant users to determine the usage environment (including server hardware configuration, system and software version, network configuration, etc.) and the operation of the migration application system. The status (including resource usage, concurrent users, business cycle, etc.) are investigated to determine the scope of business system migration, such as:
- The list of business systems.
- The service system hardware resources.
- The business system software deployment.
- The service system application dependencies.
- The service system downtime, etc.
Application Information Collection
Basic Information
System evaluation and analysis will systematically use environmental research, evaluation tools, or interviews to evaluate the system’s infrastructure and application layers.
Hardware Information
Clarify the list of business systems and their hardware configuration, including CPU model, CPU frequency, number of CPUs, memory capacity, network card bandwidth, storage capacity, and storage environment.
Collect the following content information of the business system to be migrated:
| Information | Description |
|---|---|
| The physical/virtualization platform where the source resides. | Assess whether they can migrate using the SCMT. |
| CPU model, frequency, quantity, and memory capacity. | Evaluate whether the computing power and resources of the HCI meet the usage requirements. |
| Disk type (local/iSCSI/FC), data size. | Calculate the specific data transfer time according to the amount of data. |
| The number of network cards, bandwidth, MAC address, and IP address/mask. | Make necessary configuration changes to the migrated VM. |
| Other device information, such as encryption card, graphics card, authorization, etc. | Special compatibility processing for the migrated VM. |
| The contact of the IT system person in charge. | Clarify the person responsible for the migration. |
Software Information
Clarify the list of business systems and the software configuration, including operating system version, system authorization method, application software version, application authorization method, business access address/port, and file system format.
Collect the following content information of the business system to be migrated:
| Information | Description |
|---|---|
| Operating system version number, login information, login policy | Necessary information for migration verification or system startup. |
| Business software version, service name, features (cluster/stand-alone) | Assess the customer’s business status and customize the migration plan. |
| Business access method, security policy, start and stop method | Necessary information for business system verification. |
| External service address, port, domain name | Necessary information for business system verification. |
| Person in charge of business management, manufacturer, contact information | Clarify the person responsible for the migration of the business side. |
Business Load
Clarify the Business load of the business system, including CPU/memory usage average and peak value; network throughput average and peak value; storage usage trend, pressure average, and peak value; the number of concurrent business users, business data increment and peak period, etc.,
Collect the following content information of the business system to be migrated:
| Information | Description |
|---|---|
| Average CPU/memory usage, peak usage during peak hours | Expand or shrink virtual machine specifications after evaluating business migration |
| The average usage of network bandwidth, peak usage during peak hours | Evaluate whether a bandwidth guarantee is required for important services |
| Storage usage trends, IO pressure during peak periods | Planning Storage Quotas and Storage Characteristics for Migrated Virtual Machines |
| Number of concurrent business users, business increment, peak period | Used to analyze customer business bottlenecks and optimize virtual machines |
Windows Load Collecting Method
Use the Performance monitor to monitor and collect the Windows operating system’s memory, CPU, IO, and network-related connection information.
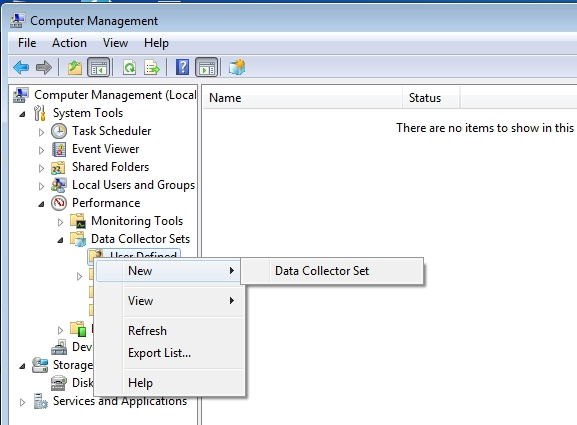
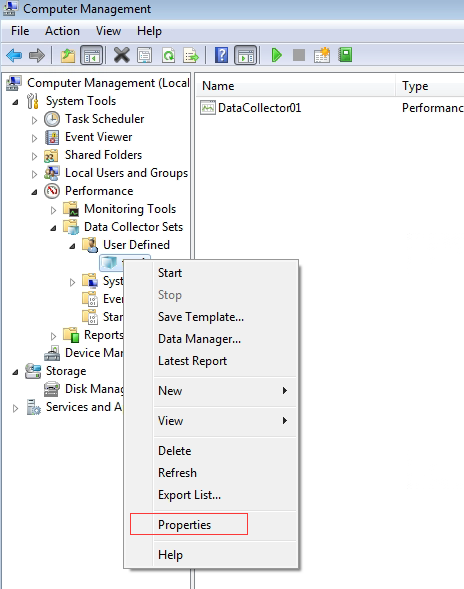
- Navigate to Computer Management > System Tools > Performance > Data Collector Sets > User Defined, right-click, and select New > Data Collector Set.
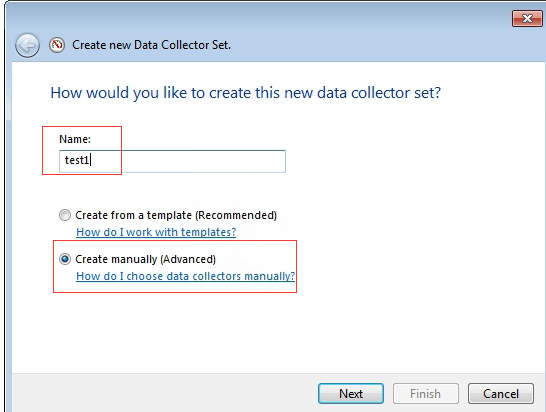
- Insert a custom name, select Create manually (Advanced), and click Next.
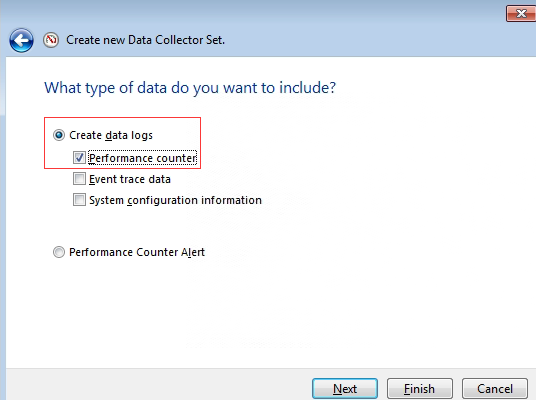
- Select Create data logs and Performance counter.
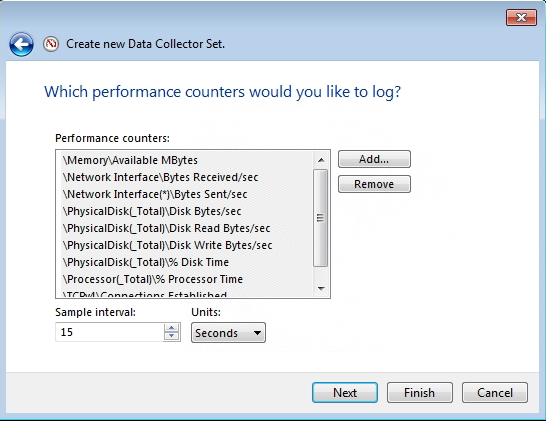
- Adjust the collection Sample interval, and click Add to add a performance counter.
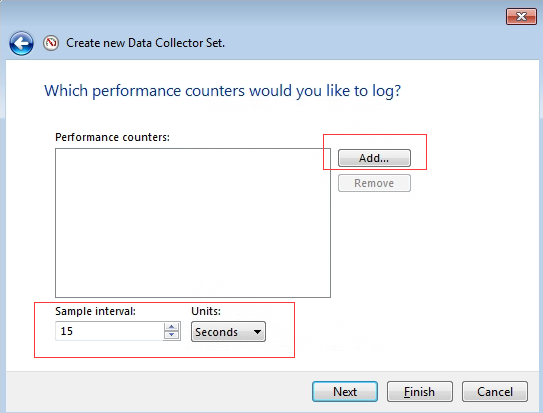
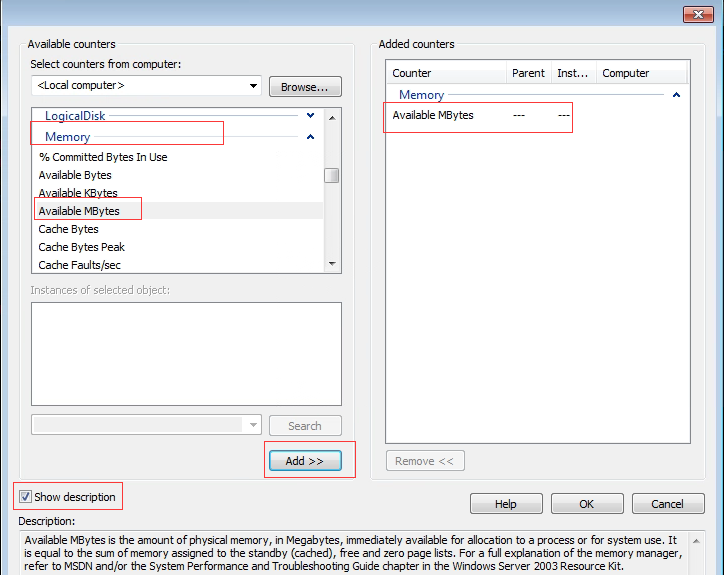
- Add the performance counters to be collected. Firstly, check the Show Description checkbox to see the description of the selected indicator; Secondly, select the indicator item to be added. For example, find the Memory item, then looks for the Available Mbytes (the description of the indicator can be found in the Description section at the bottom). Next, click the Add button to add the Available Mbytes counter to the counter list on the right; Finally, click OK after all counters are selected.
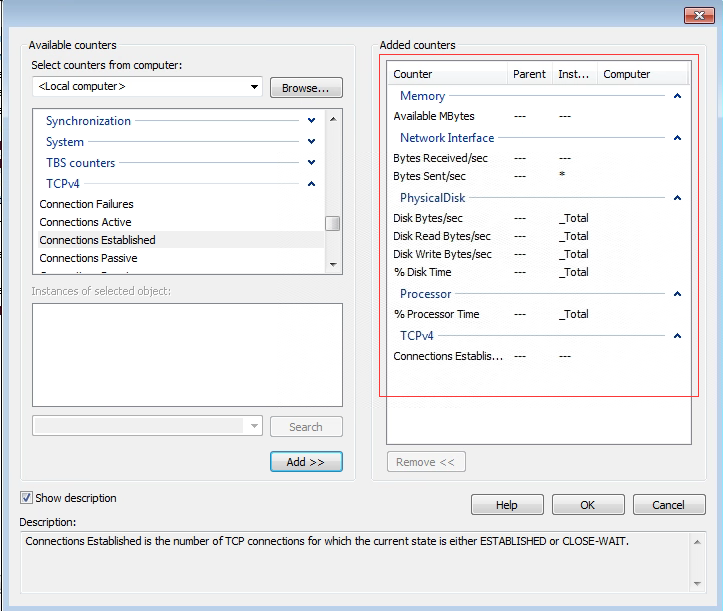
The counters of CPU, memory, IO, network, and TCP connections are added in the figure below. The corresponding relationship and description of the counters are shown in the table below.
Note:
There are many counters, and we only need to monitor the CPU, memory, IO, network, and TCP connections counters.
| Counter | Instance |
|---|---|
| Memory | Available MBytes |
| Network Interface(*) | Bytes Received/sec |
| Network Interface(*) | Bytes Sent/sec |
| Network Interface(*) | Bytes Total/sec |
| PhysicalDisk | % Disk Time |
| PhysicalDisk | Disk Bytes/sec |
| PhysicalDisk | Disk Read Bytes/sec |
| PhysicalDisk | Disk Write Bytes/sec |
| Processor | % Processor Time |
| TCPv4 | Connections Established |
- After confirming that all counters to be monitored have been added, click Next.
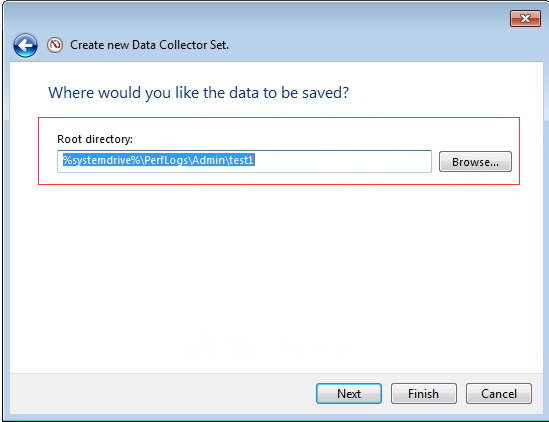
- Select the save location for counter monitoring and click Finish.
- Find the successfully added counter under the User Defined, right-click, and select Properties.
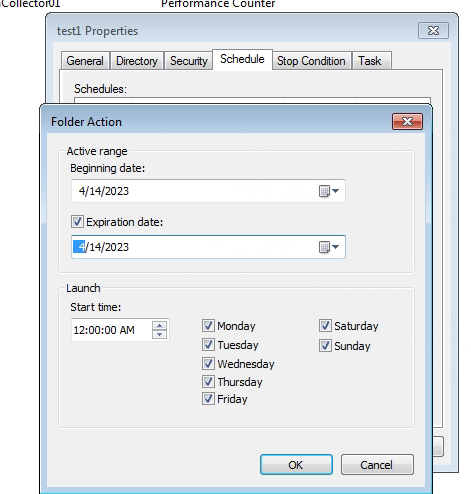
- After that, select the Schedule tab to configure. Then, click Apply and OK.
Note:
The Schedule page is more critical. To collect the business pressure of the client server, it needs to be continuously collected for some time, such as a week. The collection plan can be formulated on the plan page, and you can discuss it with the customer to decide the collection time. Generally, it is recommended to set the schedule to 7 days.
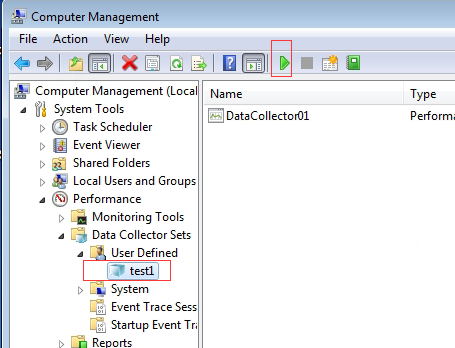
- Click the Start button to start collecting, as shown below.
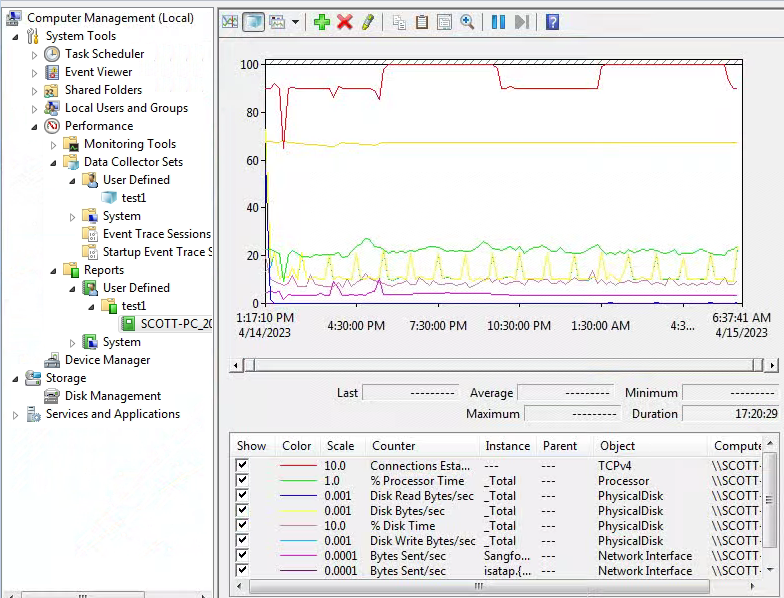
- To find the report, navigate to Computer Management > System Tools > Performance > Reports > User Defined. You can see the maximum value, minimum value, and average value of each performance counter and a line graph of each indicator.
Linux Load Collecting Method
Using the performance monitoring tools on the customer’s original environment for load information collection is recommended. If there is no monitoring tool on the client side, it is recommended to use the sysstat tool to monitor and collect the CPU, memory, and network of the Linux/ubuntu system.
- Download the software package corresponding to the operating system from the official website of nmon. Download link:
http://nmon.sourceforge.net/pmwiki.php?n=Site.Download
Note:
When downloading the nmon software package, you must select the correct platform architecture. Currently, all X86-64bit Linux servers are running on hyper-converged systems. However, there may not be an exact matching version. Therefore, you can download the same architecture, adjacent version, or operating system of the same source.

- Download nmon Analyser to analyze the performance data collected by nmon visually. Download link:
http://nmon.sourceforge.net/pmwiki.php?n=Site.Nmon-Analyser

- Upload the downloaded nmon software to the target Linux server.

-
Rename the nmon tool and give it executable permissions
# mv nmon16m_x86_64_rhel8 nmon
# chmod +x nmon -
Use the command to output the nmon information to a file. The format of the output file is hostname_time.nmon.
#./nmon -f -s 5 -c 300
| Parameter Description | |
|---|---|
| -s 5 | Collect data every 5 seconds. |
| -c 300 | Collect 300 times (collect once every 5 seconds, collect 300 in total, which means collecting for 25 minutes). |
| -f | Generated data file. Names include the time the file was created. |
Note:
In the actual customer environment, the application server or database server load is collected, and the data of the peak performance day is generally collected. Collecting data every 5 seconds is recommended, and calculate the specific number of collections. For example, the calculation formula for collecting one day is: 60/5 6024= 17280 times (60 seconds per minute divided by 5 seconds each time, multiplied by 60 minutes per hour, multiplied by 24 hours).
-
Use the command to check whether the collection of performance counters is complete, and only the nmon task of gerp is echoed to indicate that it has been completed.
#ps -ef | grep nmon -
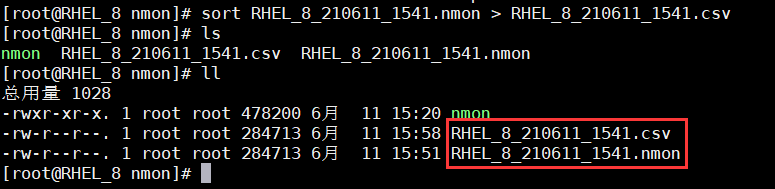
Use the sort command to convert the generated file into a CSV file and download it locally.
# sort xxxx.nmon > xxxx.CSV
- Unzip the downloaded nmon analysis package to generate two files: the instruction and the analysis tool.

-
Double-click to open the nmon analyzer v65.xlsm tool (excel can open the tool), and click EnableEdit.
-
Click the Analyze nmon data button to select the CSV file collected by nmon for data analysis.

-
After the analysis is complete, click Save to save the analyzed Excel file in the CSV file’s directory.
-
After saving, the Excel file of the analysis result will be opened automatically, as shown in the figure below.

Each sheet page contains a large amount of information. The description and information collection methods of the main sheet pages are shown in the table below.
| Sheet page | Description |
|---|---|
| BBBP | Contains operating system hardware and software, modules, kernel, and other information. |
| DISK_SUMM | Contains the maximum, minimum, and average values of disk IO. |
| CPU_ALL | Contains CPU usage. |
| MEM | memory usage. |
| NET | The maximum value, minimum value, and average network I/O value. |
| SYS_SUMM | Summarized disk IO and CPU indicators, you can get the maximum and average value of CPU and disk IO. |
Application Dependency Analysis
Application Type
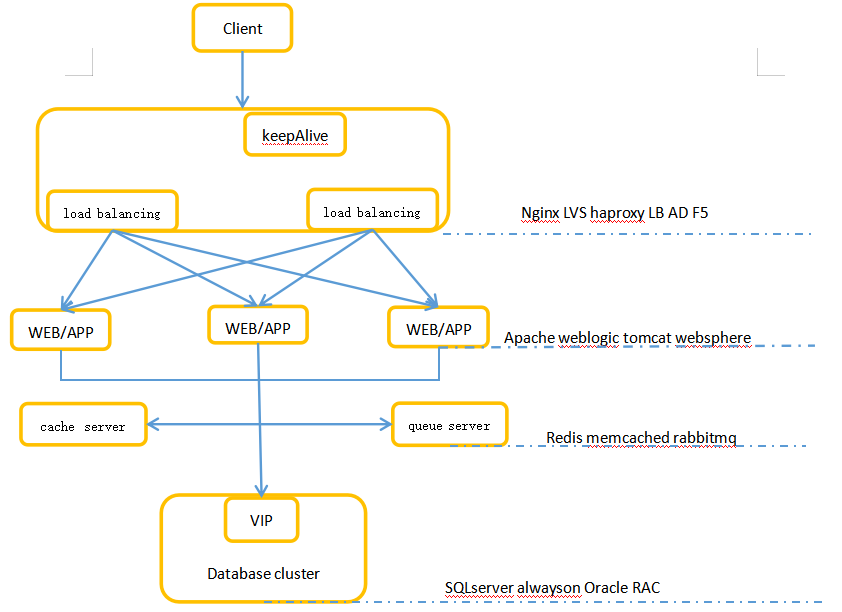
Clarify the application type and importance of the business system to be migrated, including load, front-end web service, middleware, cache/queue server, back-end database, and other independent businesses.
| System category | common service |
|---|---|
| load | Nginx、LVS、Haproxy… |
| web | Apache、WebLogic、Nginx、tomcat、WebSphere… |
| application | OA、kingdee、LIS、CIS、ERP… |
| cache class | Redis、Memcached、RabbitMQ… |
| database class | MSSQL、MySQL、Oracle、DM… |
Guidance Framework
Before business migration, sort out the access relationship of each business system to determine the order of system migration and activation. There may be scenarios where some businesses need to be migrated, and some businesses retain the original environment. You must ensure it is accessible between the migrated business system and the original environment. A business dependency needs to be provided for the complex application logic scenarios, for example:
Business Switching Window
Task time
The task time refers to the time from the start of data migration/backup/synchronization to the end of the task after the deployment of the reliable cloud migration tool, which varies according to the data volume and migration method of each business system. The migration process will slightly impact the source business system during the task time, mainly due to the resource occupation of the source system by the client plug-in during data transmission. However, the main impact time depends on the size of the migrated data and the customer’s downtime switching time.
Switching Time
Switching time refers to the time when business switching starts after business data migration/backup/synchronization is completed, and it varies according to different migration methods. When the service needs to be switched from the source end to the target end, to ensure data consistency before and after the service switch, the source end service needs to be closed during the switch.
Migration Evaluation
Resource Evaluation
CPU Configuration Evaluation
Evaluation Principles:
-
The main frequency of the HCI host is recommended to be higher than the original server or keep the same level and not lower than 2.0 GHz.
-
The reasonable average utilization rate of CPU resources is 30% to 70%, and it can also be kept below 80% during peak business hours.
-
When the average CPU utilization is lower than 30%, you can reduce the number of vCPUs.
When the average CPU utilization is higher than 70%, or the peak value is higher than 80%, you can adjust the CPU configuration according to the following formula:
Adjusted configuration size ≈ original configuration size * original average CPU usage * 2
For example, if the original CPU configuration is 8C, the average utilization rate is 80%, and the calculated CPU size is: 8*0.8*2=12.8C, then it can be increased to 12C after migration.
- After the database server is migrated, it is not recommended to reduce the CPU configuration. Instead, you can observe whether the CPU configuration needs to be decreased after running for some time. If the CPU usage of the original system is too high (more than 70%), you can increase the CPU configuration of the original system.
Memory Configuration Evaluation
Evaluation Principles:
-
The reasonable average utilization rate of memory is 30% to 70%, and it can also be kept below 80% during peak business hours.
When the average memory utilization is lower than 30% or higher than 70% or the peak value is higher than 80%, you can adjust the memory configuration:
Adjusted configuration size ≈ original configuration size * original average memory usage * 2
For example, suppose the original memory configuration is 16G. In that case, the average utilization rate of the original memory is 20%, and the calculated memory size is: 16*0.2*2=6.4G, then it can be adjusted to 6G after migration. -
The application server’s memory configuration after the migration is recommended to be no less than 8G. If the memory size calculated above is 6.4G and less than 8G, configure it according to 8G.
-
The database server’s memory can be increased during migration to the cloud, but it is not recommended to reduce it. Reducing database server memory may render the database unstartable. The specific configuration needs to be calculated by a professional DBA, and the memory configuration of the Oracle database server cannot be changed during migration.
Disk Configuration Evaluation
Evaluation Principles:
-
Keeping the number of disks consistent with the original business system is recommended, and not changing them (unless it is a special circumstance).
-
The size of the disk is evaluated according to the amount of existing data. If the usage rate of a single disk exceeds 70%, the configuration can be adjusted according to the following algorithm: Adjusted configuration size ≈ original usage size + data increment/day *365*3 (can be reserved for 3 to 5 years)
-
The disk allocation is evaluated according to the performance requirements of the business system. Therefore, the pre-allocated disk method for important business systems with high-performance requirements is recommended. For non-important business systems, it is recommended to use a dynamically allocated disk method.
-
The disk where the database file resides is recommended to use pre-allocating method to improve the IO throughput.
Note:
All databases deployed in a cluster cannot be migrated using P2V. However, you can contact a professional DBA for data plane migration.
Resource Overview
CPU overprovision:
- It is recommended that the number of vCPUs of all virtual machines on a single server not exceed twice the total number of threads of the server’s physical CPU.

For example, if the server in the figure above has 2 physical CPUs, each with 8 cores and 16 threads, and the total number of physical CPU threads is 32, it is recommended to configure no more than 64 vCPUs.
- The maximum number of vCPUs of a single virtual machine can be configured as the total number of physical threads of the largest CPU host in the cluster. For example, the virtual machine on the server in the above figure can be configured with a maximum of 32 vCPUs.
Memory overprovisioning:
Memory resources are relatively fixed, and memory over-allocation is prohibited in the production environment. The configured memory of all virtual machines on the physical server must not exceed the configurable memory of the server.
Resource Planning
According to the above evaluation data, the resources required for migration and the existing resources of the target HCI platform are summarized. It is recommended that the resources required for migration should not exceed 50% of the resources of the existing HCI platform.
Note:
The Sangfor migration platform server will occupy 16 cores and 32G memory resources.
Environment Assessment
Network Requirements
- During the migration process, it is required that the network delay between the source and the HCI platform where the server is located is within 50ms, and the packet loss rate is within 5%.
- To meet the migration needs of different network conditions, the Migration Client supports two connection modes:
- During the point-to-point migration of the active mode, the migration of the client plug-in needs to access ports 80, 20000-20047, and other ports of the SCMT Platform, and the port 80, 20000-20003 of the SCMT Platform is required for HA Backup/backup migration Ports. Access to these ports must be allowed if there is a firewall or DNAT.
- In the passive mode, the SCMT Platform accesses the port of the migration client. You can manually enter the port number on the interface for downloading the migration client. The default is 3345. If there is a firewall or DNAT in the link, access to these ports needs to be allowed.
Compatibility Requirements
-
Agent migration supports mainstream Windows and Linux 32/64-bit operating systems.
-
Supports migration of the following file systems:
- ext2, ext3, ext4, xfs
- FAT, FAT32, exFAT, NTFS, Refs
- Support the migration of the following file device formats:
- LVM, raw
- Soft raid5, GPT, MBR, dynamic volume, spanned volume, striped volume
-
For detailed compatibility information, please refer to SCMP Compatibility List-20211214.
-
Migration of cluster applications, such as Oracle RAC and SQL Server failover clusters, is not supported. Only stand-alone applications can be migrated.
Migration Specifications
Different types of businesses start at different times when starting a business service. In general, the business’s downtime in the point-to-point migration mode is 5-10 minutes, the business’s downtime in the HA Backup migration mode is about 1 minute, and the business’s downtime in the backup migration mode is about 15 minutes.
| Item | Description |
|---|---|
| Maximum Concurrent Migration Tasks | There is no limit. When the system resources of the SCMT platform are insufficient, the migration tasks will have a queuing mechanism. Until there are enough available resources, the migration tasks in the process of switching will continue to switch. As the number of switching migration tasks increases, the switching time will vary and increase accordingly. |
| Migration Speed | Depending on the migration network bandwidth and storage performance, the migration rate can reach 110MB/s in a gigabit environment, 300MB/s in a 10G network environment, and 35MB/s in an agent-free environment. The block size of data migrated by the migration tool is 64K sequential read and write, and this block size can evaluate the storage performance of the source and destination. |
Migration Methods
Comparison of Migration Methods
| Migration method | Applicable scene | downtime | others |
|---|---|---|---|
| point-to-point migration | Recommended for general scenarios | 5 to 10 minutes | Automatically pull up the target end. There is no need to deploy migration storage. |
| HA Backup migration | High business continuity requirements | 1 minute | Use a CDP protection strategy. |
| backup migration | A large amount of data, small bandwidth, physical handling | 15 minutes |
Point-To-Point Migration
Scenario
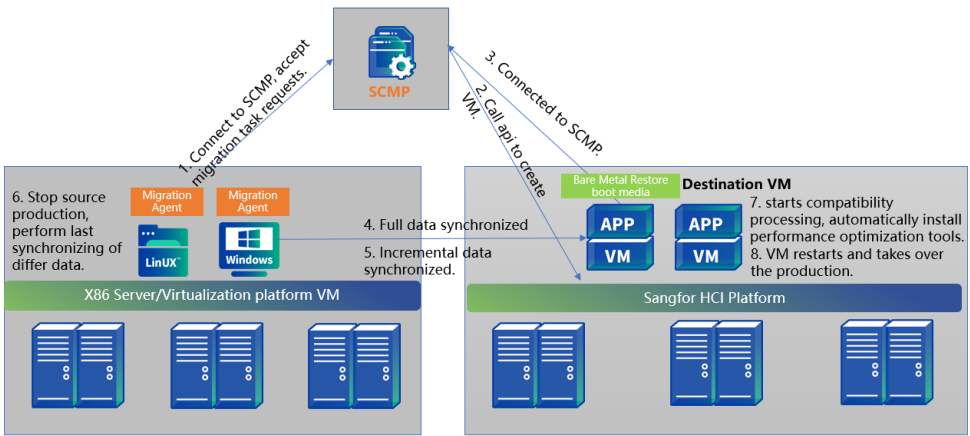
For physical machine migration, agent migration is supported in the source machine, and data is copied point-to-point between the source machine and the target machine. The point-to-point migration method uses the migration agent to directly transfer the source data to the target machine to migrate the source end to the target machine as a whole. This method does not need to back up the source-end system. While the source-end data is being transmitted to the hyper-converged platform, the HCI starts the target-end virtual machine to receive the migrated data. It supports regular synchronization of incremental data and manual synchronization of incremental data to ensure manual control of the business witching window period. Mainly applicable to the following scenarios:
- Most business is recommended to use this method to migrate, and the service will be interrupted for about 5 to 10 minutes during the business switching.
- It supports entire machine migration of stand-alone databases but does not support cluster databases (Oracle RAC, SQLServer clusters, etc.);
- RDS databases, container platforms (docker, K8s), and big data platforms do not support migration.
Time and Impact
The amount of data synchronized by the SCMT for the first time is the actual size of the virtual machine disk. (For example, if the virtual disk of a VM is allocated 100GB and the actual used size is 50GB, then the data volume for the first full data synchronization is 50GB), and the data volume for subsequent incremental synchronizations is the changed data volume after full synchronization. After the data synchronization, the source business service must be stopped and switched to the target end. The interruption time caused by the point-to-point migration business switching is about 5 to 10 minutes.
| Migration Phase | Contents | Time/Impact |
|---|---|---|
| Preparations before migration | 1.1 Deploy the migration tool server(the migration tool server only needs to be prepared once) (10 minutes). 1.2 Install the agent on all sources (2 minutes/set). 1.3 Create a virtual machine at the destination (2 minutes/set). |
About 20 minutes. No impact on the original business. |
| Data copy migration | 2.1 Full data replication. 2.2 Multiple incremental data replication – automatic or manual synchronization |
– The total amount of data/migration speed (the maximum migration speed is 100MB/s in a Gigabit environment and 500MB/s in a 10 Gigabit environment); – During the entire transmission process, the CPU usage rate of the agent on the source end is less than 3%; – The peak value of memory consumption is <260MB; it is recommended that the available memory of the source machine be more than 1GB before migration; – By default, the source storage performance is limited to 30%, and the read queue depth is 4, which can be adjusted manually; – By default, the bandwidth occupation of the source network is limited to 300Mbps, which can be adjusted manually. |
| Business switching | 3.1 Manually stop the source machine business (2 minutes). 3.2 Before the switching, synchronize the last difference data and perform the switch operation (1 to 2 minutes). 3.3 Restart the target machine (automatic compatibility processing, VMtools injection) (2 minutes). 3.4 Business network changes (as needed, about 2 minutes). 3.5 Business recovery, carried by the HCI VM to run the business (2-5 minutes). |
The source service stops about 5 to 10 minutes. |
Migration Risk
- The migration task will not be affected if the source/target network is interrupted for less than 15 minutes. After the network status returns to normal and online again, the incremental data will be automatically resumed.
- Data synchronization fails when the source/target network is interrupted for more than 15 minutes. After the network status returns normal, continue to upload incremental data manually or automatically(wait for a synchronization time point).
- When the source/target end shuts down and restarts or exits and reconnects, data synchronization fails, which does not impact the source end business. After recovery, upload the full amount of data manually or automatically (wait for a synchronization time point).
- If the server is restarted or shut down during migration, data synchronization will fail, and the business at the source end will not be affected. After recovery, continue to upload the full amount of data manually or automatically (wait for a synchronization time point).
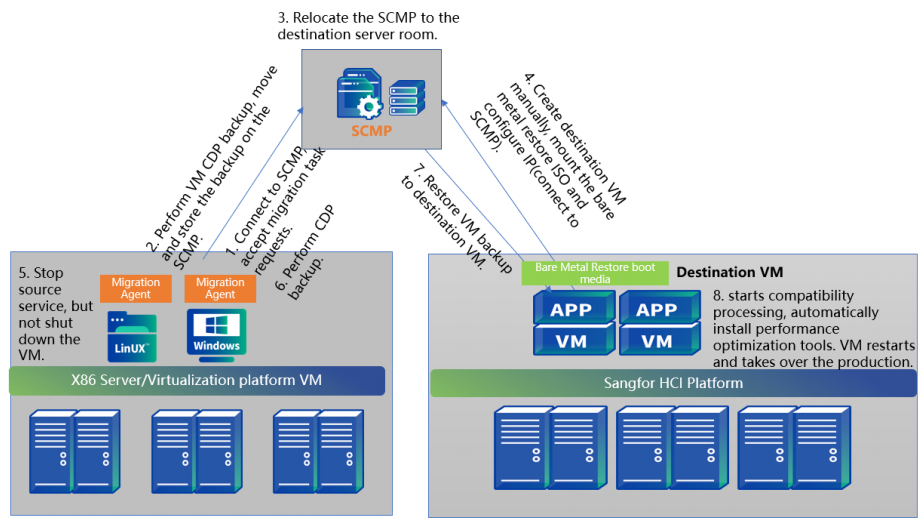
HA Backup Migration
Scenario
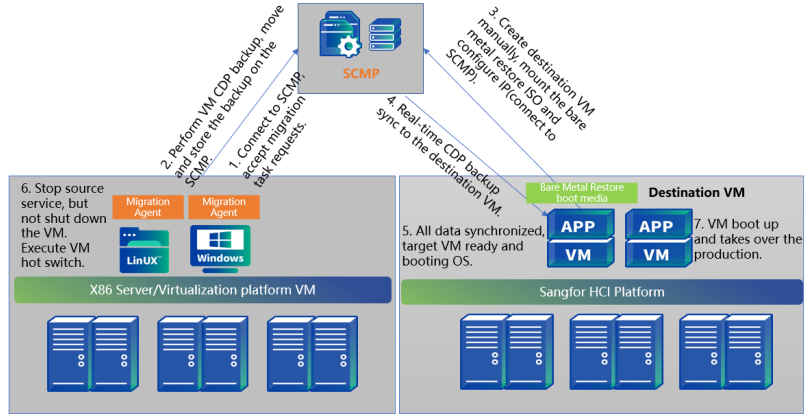
HA backup migration uses the CDP backup function to continuously back up source data to the migration server and then synchronize it to the target virtual machine. This method will synchronize the data from the source to the target end in real time through CDP, minimizing migration and switching time.
Main scenarios:
- The switching time of the operating system caused by HA Backup migration is within 1 minute, and the specific interruption time is related to the startup time of business services;
- Suitable for core businesses with high business continuity requirements;
- The backup space of the migration server configuration needs to be 1.5 times.
Time and Impact
The amount of data synchronized by the SCMT for the first time is the actual size of the virtual machine disk. (For example, if the virtual disk of a virtual machine is allocated 100GB and the actual used size is 50GB, then the data volume for the first full data synchronization is 50GB), and the data volume for subsequent incremental synchronizations is the changed data volume after full synchronization. After the data synchronization is complete, it is necessary to stop the business service at the source end and switch it to the target end. The interruption time caused by the business switching to the HA Backup migration mode is about 1 minute.
| Migration Phase | Contents | Time/Impact |
|---|---|---|
| Environment preparation before migration | 1.1 Deploy migration tool server (the migration tool server only needs to be prepared once, 10 minutes). 1.2 Install agent in all sources (2 minutes/set). 1.3 Create a CDP backup for the source (depending on the amount of data). 1.4 Create a virtual machine at the destination (2 minutes/set). |
– During the backup process, the CPU usage of the agent on the source end is less than 3%; – Peak memory consumption < 260MB |
| Copy migration | 2.1 The source end CDP is backed up, and the data is transferred to the migration server through the agent. 2.2 Manually create the target machine at the target end, mount the bare metal recovery boot medium, and start and configure the IP address to connect with the migration tool. 2.3 Create an HA Backup plan for the target machine. 2.4 The data flow of the source virtual machine is pushed to the target machine in real-time by the migration server. 2.5 After all the data is synchronized, the target machine is ready. It has been automatically injected into VMtools, compatibility processing, and is in the state of booting and loading OS. |
– The total amount of data/migration speed (the maximum migration speed is 100MB/s in a Gigabit environment and 500MB/s in a 10 Gigabit environment); – During the entire transmission process, the CPU usage rate of the agent on the source end is less than 3%; – The peak value of memory consumption is <260MB; it is recommended that the available memory of the source machine be more than 1GB before migration; – By default, the source storage performance is limited to 30%, and the read queue depth is 4, which can be adjusted manually. – By default, the bandwidth occupation of the source network is limited to 300Mbps, which can be adjusted manually. |
| Business switching | 3.1 Download the HA Backup switching task. 3.2 The source machine stops the application service but does not shut down (about 10s). 3.3 The target machine is activated and officially takes over the business (about 20-30s). |
The source service stops within 1 minute. |
Migration Risk
CDP preparation stage:
-
In the CDP full backup phase, the backup task will not be affected if the source network is interrupted for less than 15 minutes. After the network status is restored, the incremental data will be automatically resumed.
-
During the CDP full backup phase, the backup task fails if the source network is interrupted for more than 15 minutes. After the network status is restored, the incremental data will be automatically resumed.
-
In the CDP full backup phase, the source or server is shut down or restarted, and the backup task fails. After the source status recovers, it will automatically restart to back up the full amount of data.
-
The CDP protection stage will enter the incremental backup mode when the source network is interrupted for 2 minutes, or the log cache space is full. After the network is restored, perform an incremental backup first and then continue CDP protection.
-
During the CDP protection phase, it will fail when the source end shuts down or restarts. Therefore, after restoring the source, perform an incremental backup first and continue the CDP protection.
-
During the CDP protection stage, restarting/shutdown of the server has no impact on the business of the source end. After restoring the server, perform the incremental backup first, and continue the CDP protection.
HA Backup transfer phase:
-
The transmission task is interrupted if the network interruption is less than 15 minutes, but the source end is not affected. After the network is restored, the data will automatically continue to upload incremental data.
-
The data transmission task fails if the network is interrupted for more than 15 minutes. After the network is restored, manually rebuild the HA Backup task.
-
The server restarts/shuts down, and the transfer task fails. After the server recovers, manually rebuild the HA Backup task.
Backup Migration
Scenario
Backup recovery uses the backup function to back up the source data to the tool server and then restore the system to the migration target virtual machine through the backup file saved on the server. Compared with point-to-point migration and HA Backup migration, business downtime is longer.
It is mainly applicable to the following scenarios:
- This method is for scenarios where the amount of data at the source end is extremely large, the bandwidth of the target end is relatively small, and the data transmission time is unacceptable; the migration tool deployed on the physical machine can be completed first in the high-bandwidth environment at the source end Backup, and then move to the target side for incremental backup, and then restore to complete the migration.
- It is suitable for migration scenarios where the data volume is large, the bandwidth is small, and physical handling is required; the interruption time is about 15 to 30 minutes.
- The backup space of the migration server configuration needs to be 1.5 times.
Time and Impact
The amount of data synchronized by the SCMT for the first time is the actual size of the virtual machine disk. (For example, if the virtual disk of a virtual machine is allocated 100GB and the actual used size is 50GB, then the data volume for the first full data synchronization is 50GB), and the data volume for subsequent incremental synchronizations is the changed data volume after full synchronization. After the data synchronization is complete, the business service at the source end needs to be stopped and switched to the target end. The interruption time caused by the business switching to the backup migration mode is about 15 minutes.
| Migration Phase | Contents | Estimated Time |
|---|---|---|
| Environment preparation before migration | 1.1 Deploy the migrate all-in-one server(the migration tool server only needs to be prepared once, 10 minutes). 1.2 Install agent on all sources (2 minutes/set). 1.3 Create a full backup strategy for the source machine (depending on the data amount). 1.4 Create a virtual machine at the destination (1 minute/set) |
– About 30 minutes; – During the backup process, the CPU usage of the agent on the source end is less than 3%; – Peak memory consumption < 260MB. |
| Data copy migration | 2.1 The source backup is completed, and the data is transferred to the migration server through the agent. 2.2 Manually create the target machine at the target end, and mount the bare metal recovery boot medium. Then, start and configure the IP address to connect with the migration tool. 2.3 During the backup and recovery process, VMtools and compatibility processing are automatically injected. |
-Total data/migration speed; (The maximum migration speed in a gigabit environment is 100MB/s, and the maximum migration speed in a 10-gigabit environment is 500MB/s). -During the entire transmission process, the CPU usage rate of the agent on the source end is less than 3%; -The peak value of memory consumption is <260MB; it is recommended that the available memory of the source machine be more than 1GB before migration; -By default, the source storage performance is limited to 30%, and the read queue depth is 4, which can be adjusted manually; -By default, the bandwidth occupation of the source network is limited to 300Mbps, which can be adjusted manually; In the final handover stage, the service needs to be shut down. |
| Business switching | 3.1 The source machine stops the application service, but does not shut down (about 10s) 3.2 Restore the backup to the target PE (depending on the amount of data) 3.3 The target machine is activated and officially takes over the business. |
-Total data/migration speed; (The maximum migration speed in a gigabit environment is 100MB/s, and the maximum migration speed in a 10-gigabit environment is 500MB/s). – During the entire transmission process, the CPU usage rate of the agent on the source end is less than 3%; – The peak value of memory consumption is <260MB; it is recommended that the available memory of the source machine be more than 1GB before migration; – By default, the source storage performance is limited to 30%, and the read queue depth is 4, which can be adjusted manually; – By default, the bandwidth occupation of the source network is limited to 300Mbps, which can be adjusted manually; In the final handover stage, the service needs to be shut down. |
Migration Risk
-
The backup task will not be affected if the source network is interrupted for less than 15 minutes. After the migration server returns online, the incremental data will be automatically resumed.
-
Suppose the source end network is interrupted for more than 15 minutes. In that case, the task will be interrupted, and the incremental data will be automatically resumed after the source end status is restored.
-
The restart/shutdown of the server during the migration process has no impact on the business of the source end. After the server status recovers, retransmit the full amount of data.
Migration Order
Design the migration sequence of the entire system according to the dependencies between business systems and the characteristics of the business system itself. In the actual migration, it is recommended to start from easy to difficult, from simple to complex, to complete all the migration work better. It is recommended to follow the migration sequence as follows:
- Stand-alone application system
- Application stack application system
- Application dependency system
- Prioritize the dependent application system, and migrate the database and other migrated systems first.
| Name | Switching time (sequence) | Estimated migration time |
|---|---|---|
| Database-MySQL | 10:30 | 30 mins |
| WEB service | 11:20 | 10 mins |
Configuration Planning
Design the migrated virtual machine configuration based on the business resource assessment results, focusing on the following items.
VM Resource Allocation
According to the resource evaluation method, the resource allocation planning of the business system is carried out, which mainly includes information such as the number of CPU and memory, the size and number of disks, and the disk format.
| Name | CPU | Disk Size | Disk Format |
|---|---|---|---|
| Enterprise Portal WEB1 | vCPU=2*8 memory=32G | 100G(system disk) | Dynamic provisioning |
| Enterprise Portal WEB1 | vCPU=2*8 memory=32G | 1T(data disk) | Dynamic provisioning |
| Enterprise Portal WEB2 | vCPU=2*8 memory=32G | 200G(system disk) | Dynamic provisioning |
Important VM Protection
According to the importance of the business system, configure guarantees for important virtual machines, mainly including information such as important virtual machine marks, huge page memory, and storage policy guarantees.
Essential VM Assurance provides the following capabilities:
-
Memory guarantee: Disable the memory recycling mechanism, prioritize guaranteeing memory usage, and improve business performance.
-
Storage guarantee: When a failure occurs, data reconstruction is prioritized; when data is balanced, data from other virtual machines is preferentially transferred. Selecting a high-performance storage strategy is recommended to ensure the best performance.
-
Continuity guarantee: When the physical host fails, it will be started first to shorten the service interruption time; when the resources of the physical host are insufficient, other virtual machines will be dispatched first to free up resources for important virtual machines to ensure stable business operation.
| Name | Whether it is an important virtual machine | huge-page memory | Storage Policy |
|---|---|---|---|
| Enterprise Portal | yes | yes | 3_replica_high_performance |
| Enterprise Portal | no | yes | 2_replica |
VM Advanced Configuration
According to the characteristics of the business system, decide whether to enable features such as Use CPU from host, CPU hot add, and Resource Scheduling.
Use CPU from host: CPU pass-through function. The VM enabling this function will use the instruction set of the host CPU, which can improve the CPU computing performance.
CPU/Memory Hot Add: Enable this feature to support increasing CPU and memory quotas while the virtual machine runs.
Resource Scheduling: Add the virtual machine to the list and support automatically adding corresponding resources to the virtual machine when the CPU or resource usage exceeds the threshold.
| Name | Host CPU | CPU Hot Add | Memory Hot Add | DRX |
|---|---|---|---|---|
| Enterprise Portal | yes | yes | yes | yes |
| Enterprise Portal | no | yes | yes | no |
VM Scheduling Policy
According to the service characteristics of the business system, formulate corresponding scheduling strategies for it. Scheduling strategies include aggregation, mutual exclusion, VM group mutual exclusion, VM group to VM group, and other strategies.
VM-VM Affinity: The selected VM must/preferably run on the same physical server.
VM-VM Anti-Affinity: The selected VM must/preferably run on different physical servers.
VM-Group Anti-Affinity: The VM in the selected VM groups must run on different physical servers
VM-Host Affinity: The VM in the selected cloud VM group must run on multiple specified physical servers.
| Name | Scheduling strategy |
|---|---|
| Enterprise Portal 1 | Must run on Physical Host A. |
| Enterprise Portal 2 | Mutually exclusive with Enterprise Portal WEB1. |
Migration Implementation
Check Before Migration
Before the start of the migration project, check the status of the source business system:
- Check whether the source end business system is running;
- Check whether its remaining resources allow the agent to be installed;
- Check the network environment of the migration source and target; Check the health status of the target HCI platform environment;
- On the migration server, check the connection status of the source and target.
Migration Methods
The SCMT supports three migration methods for physical machines, namely:
- Point-to-point migration (recommended)
- HA Backup migration
- Backup Migration
For detailed operations of each migration method, please refer to Sangfor SCMT(Sangfor Cloud Management Tool) User Manual.
Rollback
After the migration is complete, check the business running status and verify whether the business running status is normal, then shut down the source-end network, and the target-side new business enters the trial operation stage. If no abnormalities are found for some time, the source-end business can be shut down.
However, suppose the business verification fails and cannot process for a long time. In that case, the emergency business rollback solution needs to be enabled to roll back the migrated business to the source server. The overall operation process can refer to the following steps:
- Shut down the target virtual machine on the HCI.
- Restore the network connection status of the source operating system.
- If the backup is kept before the switchover, the source end can be restored to the backup point before the switchover.
- Start the source-side business service according to the business dependencies.
- Check whether the source end services are running and the service data is normal.