【SCP】POC Test Guide_V6.10.0
Overview
Test Target
-
Verify a simple and user-friendly system operation.
-
Validate the SCP platform’s management capabilities, including the ability to manage the lifecycle of VMs.
-
Validate the SCP platform’s operational capabilities, including hierarchical and decentralized management, account authentication management, and image management.
-
Validate advanced features of the SCP platform, including the Cloud Security Center, Application Center, and Cloud Security Services Platform.
Test Schedule
| Test Time | |
|---|---|
| Test Location | |
| Test Personnel | |
| Test Personnel Phone Number |
Testing Standards
Before testing, it is necessary to carefully review the functional items that need to be tested and remove unnecessary test content. Confirm whether the testing environment has been prepared. During testing, it is necessary to confirm the process/results of the tested content with the user one by one and take screenshots accordingly for future reference in preparing the test report. After testing, the overall test report should be submitted to relevant personnel for result confirmation.
Testing Environment
Topological Environment
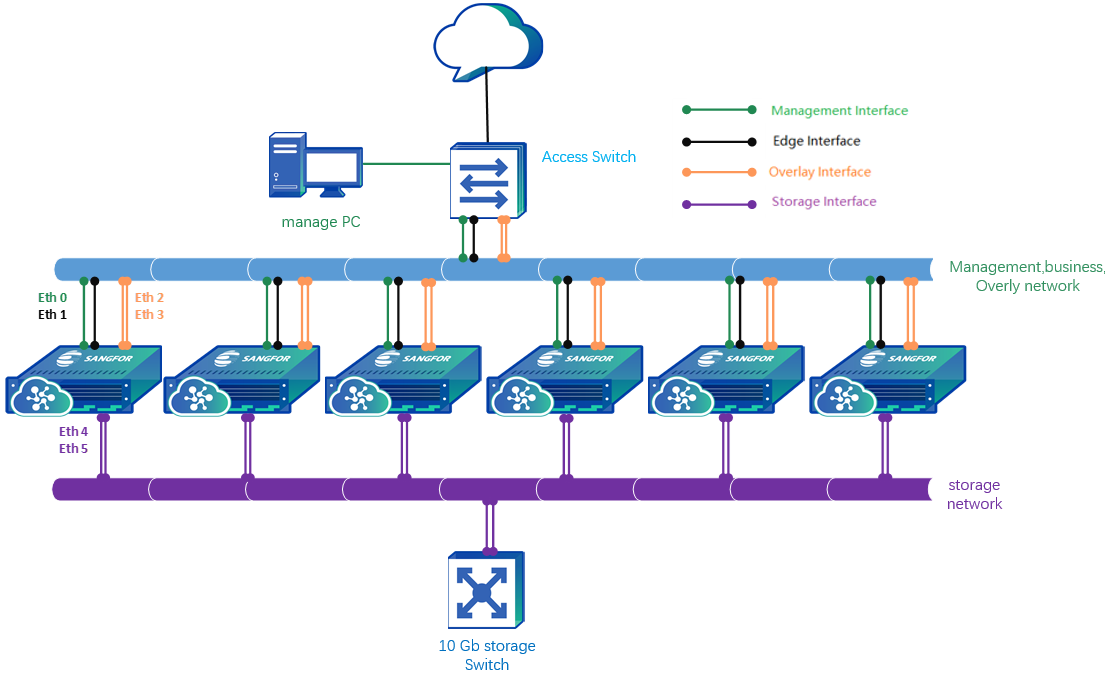
Using 6 hosts as an example, following the topology below, you will need to prepare 4 Gigabit Layer 2 switches. Ensure that the management switch and the business switch are connected so that the management network segment and the business network segment can communicate with each other (or reuse a Gigabit switch that supports VLAN isolation and allow access from the business VLAN to the management VLAN).
Installation and Deployment
Client Environment Deployment
To complete the environment setup for the client PC required for testing, follow the steps below:
-
Install the Chrome web browser on the client PC.
-
Configure the IP address of the client PC, then select a folder, enable file sharing, and disable the firewall.
Deployment of Basic Resource Pool
Refer to the " SANGFOR_HCI_v6.9.0_User_Manual_EN" to deploy the cluster environment. After completing the deployment, perform the following steps to test the cluster environment:
-
Log in to the hyper-converged control console, click on [One-Click Detection/Start Detection], and wait for the detection to complete.
-
Address the faults and alarms detected.
-
Proceed to the next step only after there are no faults.
SCP Deployment
Refer to the " SANGFOR_SCP_v6.9.0_User_Manual_EN " for the deployment of the cloud computing platform environment.
-
If you need to test the capability to manage multiple resource pools or connected domain, coordinate the deployment of multiple HCI resource pools.
-
If you need to test VMware cluster management or migration capabilities, prepare the VMware vCenter environment.
-
If you need to test homogenous disaster recovery capabilities, coordinate the deployment of at least two hyper-converged resource pools.
-
If you need to test the reliability of the SCP cluster, coordinate the deployment of three SCP platforms to form a cluster.
-
If you need to test the ability to deploy SCP platform in a primary-secondary configuration, coordinate the deployment of two hyper-converged resource pools and two SCP platforms.
-
If you need to test other components such as NFV, DMP, aOPS, etc., install the corresponding components and activate the licenses.
Configuration of Public Service Resources
Configure public resources, including VPC interfaces and elastic IP pools, for use in subsequent test cases:
-
Log in as "admin" to the SCP system management portal. In the [Network/Network Deployment] management interface, click on
<VPC Network Port Planning>to configure the VPC network ports for the resource pool. -
In the [Network/IP and Bandwidth] interface, click
<Create>. Enter the name of the elastic IP pool, associate it with all resource pools, select the line type (in this PoC, the line type is merely a label and can be chosen arbitrarily), set the total bandwidth to 1000Mbps, and set the elastic IP range for HCI Cluster 1 to (172.16.200.200-172.16.200.220) and for HCI Cluster 2 to (172.16.200.221-172.16.200.240).
SCP Platform Testing
Platform Management
User Management
| Test items: Platform Management |
Test Sub-Item: User Management |
|
|---|---|---|
| Test Purpose | Supports three administrator roles, creating three administrators, each responsible for managing SCP resources: 1. System Administrator: Possesses all platform business privileges, without user and role management, and operation audit rights. 2. Security Administrator: Holds security management permissions, such as account authorization, role management, password policies, two-factor authentication, IP address control policies, and more. 3. Audit Administrator: Has permissions for log management. |
|
| Preconditions | Completing the deployment the SCP platform. | |
| Test Steps | 1. Log in to the SCP system management portal with admin. Go to Users and Access Management> Users > Platform Administrators. Click new, enter the name xitong, select the role as System Administrator, enter the login username xitong, and after entering other relevant information, click OK. 2. Log in to the SCP system management portal with "admin." Go to User and Access Management > Users > Platform Administrators. Click new, enter the name anquan, select the role as Security Administrator, enter the login username anquan, and after entering other relevant information, click OK. 3. Log in to the SCP system management portal with admin. Go to User and Access Management > Users > Platform Administrators. Click new, enter the name shenji, select the role as Audit Administrator, enter the login username shenji, and after entering other relevant information, click OK. 4. Log in to the SCP system management portal with admin. Go to User and Access Management > Users > Tenants, and create a tenant named "test" following the wizard. Set quotas for Public Resources > Storage > Private VM Images to 100G, Resource Pool Quotas > virtual machine Set the quota to be sufficient to create 2 virtual machines, and various types of storage in Resource Pool Quotas > Storage to 200G. 5. Log in to the SCP system management portal with "xitong." create a VM named "test1" following the wizard. Assign test1 to the "test" tenant. 6. Log in to the SCP system management portal with "anquan." Go to User and Access Management > Users > Tenants, click Set Quotas on the "test" tenant, and set Public Resources > Storage > Private VM Images to 200G. 7. Log in to the SCP system management portal with "shenji." Go to Management > Operation Audit and view the audit logs. |
|
| Expected Results | 1. System Administrator "xitong" can create VMs and assign them to tenants. 2. Security Administrator "anquan" successfully configured the tenant’s permissions. 3. Audit Administrator "shenji" can view the logs of the Security Administrator updating the quotas for the "test" tenant and the logs of the System Administrator creating VMs. |
|
| Test Conclusion | 口 PASS 口 Partial Pass 口 FAIL 口 Not Tested | |
| Notes |
Password Policy
| Test items: Platform Management |
Test Sub-Item: Password policy |
|
|---|---|---|
| Test Purpose | Administrators can establish password policies to enforce requirements for password length, complexity, and expiration for system administrators, tenants, and tenant user. | |
| Preconditions | Completing the deployment of the SCP platform. | |
| Test Steps | 1. Log in to the SCP system management portal with the "admin" account, and go to Management > Security > Login Policies > Account and policies. Configure the password policy as follows: Enable Disallow Specified Common Passwords and enter "Sangfor@123"; Enable Under the user lockout conditions, set the Max Password Retry Attempts to 3. 2. Navigate to Users and Access Management > Users > Platform Administrators, click new, enter any name, role, login username, email, and phone information, then enter the password as "Sangfor@123," and click OK. 3. Access Users and Access Management > Users/Platform Administrators, click new, enter the name as "sangfor," any role, login username, email, and phone information, then enter the password as "Test@123," and click OK. Next, log in to the platform using the "sangfor" account, deliberately enter the wrong password, and click Login Now. 4. Refer to steps 2/3 for creating and testing tenants and tenant sub-accounts to see if the results are the same. |
|
| Expected Results | 1. After completing step 2, it will prompt Password cannot be a commonly used platform password. 2. After completing step 4 and entering the wrong password three times, the fourth attempt will prompt User has been locked. |
|
| Test Conclusion | 口 PASS 口 Partial Pass 口 FAIL 口 Not Tested | |
| Notes |
Hierarchical and Decentralized Management
Tenants and Quotas
| Test items: Hierarchical and Decentralized Management |
Test Sub-Item: Tenants and Quotas |
|
|---|---|---|
| Test Purpose | This use case establishes a Virtual Data Center Administrator (Tenant) to verify the creation of a tenant and the setting of department quotas. | |
| Preconditions | 1. Complete the deployment and authorization of the SCP platform. 2. On the [Network Deployment] interface, complete the <VPC Gateway>. |
|
| Test Steps | 1. Log in to the SCP system management portal with "admin" and go to Users and Access Management > Users > Tenants. Click new, set the organization name to Finance Department, set the username as "cwb," and configure other relevant information, then click Next. 2. Allocate the corresponding resource pool for this tenant and create a VPC network. 3. Set resource pool quotas for the tenant, such as CPU: 10 cores, Memory: 40GB, Storage: 500GB. 4. After clicking Confirm, the organization administrator "cwb" is created. |
|
| Expected Results | 1. Log in to the SCP with the "cwb" account and enter the tenant management interface. 2. Click on the upper right corner Edit Resource to view Resource Pool Quotas, where you can see CPU: 10 cores, Memory: 40GB, Storage: 500GB, with actual usage of 0 resources. |
|
| Test Conclusion | 口 PASS 口 Partial Pass 口 FAIL 口 Not Tested | |
| Notes |
Tenants User
| Test items: Hierarchical and Decentralized Management |
Test Sub-Item: Tenants user |
|
|---|---|---|
| Test Purpose | This use case establishes tenant user. | |
| Preconditions | Complete the deployment of the SCP platform. | |
| Test Steps | 1. Log in to the SCP with the "cwb" account, enter the tenant management interface, and click on the upper right corner Users and Access Management to enter the user creation interface. 2. Click new to add a user named "xc". 3. Log out of the "cwb" user and log in to the SCP with the "xc" user. |
|
| Expected Results | login successful with the tenant user "xc". | |
| Test Conclusion | 口 PASS 口 Partial Pass 口 FAIL 口 Not Tested | |
| Notes |
Permission Policy
Specific Resource Allocation
| Test items: Hierarchical and Decentralized Management |
Test Sub-Item: Specific Resource Allocation |
|
|---|---|---|
| Test Purpose | This use case validates that the admin administrator’s permission control granularity extends to the allocation of specific virtual machines for regular platform administrators. | |
| Preconditions | 1. Completed the deployment of the SCP platform. 2. A public image has been uploaded. 3. A regular platform system administrator, "admA," has been created. |
|
| Test Steps | 1. Platform Administrator Permissions Configuration: Log in to the platform with the administrator account "admin," then go to the Users and Access Management > Permission Policies interface. 2. Click new select the service as "VM Template," and choose Specific Resources as the resource. 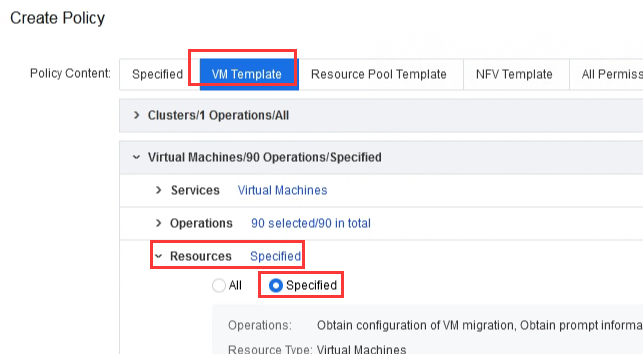
3. In the Edit VM page Click Add Resources, select the virtual machines you want to allocate, andthen click ok. 4. Associate permissions with the user "admA." |
|
| Expected Results | 1. In the 5th step, you can see the list of virtual machines. 2. In the 6th step, all operations on the virtual machines assigned to oneself are functioning properly. |
|
| Test Conclusion | 口 PASS 口 Partial Pass 口 FAIL 口 Not Tested | |
| Notes |
Module Permission Control
| Test items: Hierarchical and Decentralized Management |
Test Sub-Item: Module Permission Control |
|
|---|---|---|
| Test Purpose | The admin administrator can assign resource permissions to different members, different organization administrators, and tenant user. The limited permission scope includes over 100 types of permissions, including VMs, resource pools, NFV, and more. Admin can only set permissions for platform administrators and cannot set permissions for tenants. Tenants can set permissions for co-administrators but cannot set permissions for tenant user. | |
| Preconditions | 1. Completed the deployment of the SCP platform. 2. A cloud server public image has been uploaded. 3. A regular platform administrator, "adm_img," has been created. 4. A tenant "cwb" for the Finance Department has been created, and a tenant co-administrator, "cwb_img," has been created. |
|
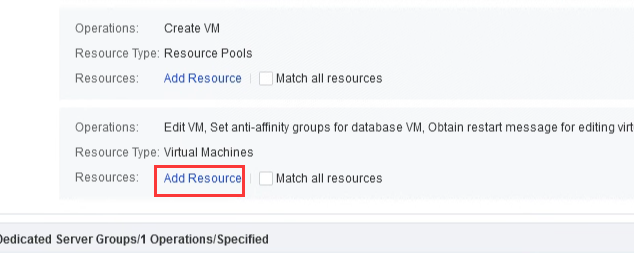
| Test Steps | 1. Platform Administrator Permission Configuration: Log in to the platform with the administrator account "admin," then go to the User and Access Management > Permission Policies. 2. You can see five built-in permission policy templates in the platform, namely Security Admin, aSEC Admin Audit Admin, aNI Admin, and System Admin. 3. Click on a specific permission management policy to view the various permissions assigned to it. 4. Click new select the service as Image, and select Images under operations; click Add Permission, select the service as Resource Pools, and select Resource Pools under the operations then click Finish. 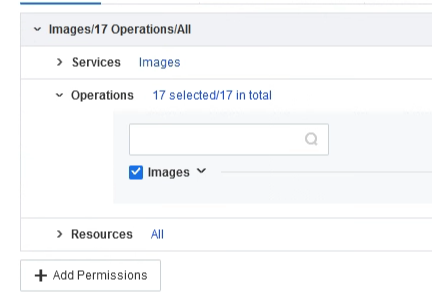 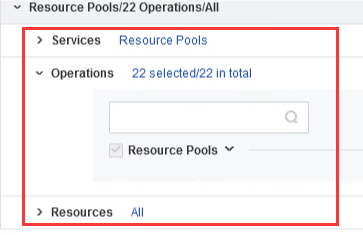 5. Name the permission "Image_Administrator" and associate it with the user "adm_img." 6. Log in to the WEB UI with the user "adm_img" and go to the virtual machine interface. 7. Access the Images > Public VM Images interface, view the images, and upload an image of your choice. 8. Tenant Permission Configuration: Log in to the tenant management portal with the tenant "cwb," then go to the User and Access Management > Permission Policies interface in the upper right corner. 9. Click new select the service as Image, and select Images under operations; click Add Permission, select the service as Resource Pools, and select Resource Pools’ under the operations then click Finish. 10. Name the permission "Image_Administrator" and associate it with the co-administrator "cwb_img." 11. Log in to the tenant portal with the co-administrator "cwb_img" and go to the virtual machine interface. 12. Access the Images >Public Images interface, view the images, and upload an image of your choice. |
|
| Expected Results | 1. In the 3rd step, clicking on the permissions provides detailed explanations of the permissions. 2. In the 6th and 11th steps, you cannot see the list of VMs and receive a notification that you lack the permission. 3. In the 7th and 12th steps, you can view the images and successfully upload an image. |
|
| Test Conclusion | 口 PASS 口 Partial Pass 口 FAIL 口 Not Tested | |
| Notes |
Quota Limitation
| Test items: Hierarchical and Decentralized Management |
Test Sub-Item: Quota Limitation |
|
|---|---|---|
| Test Purpose | This test case validates the tenant quota management functionality. | |
| Preconditions | 1. Completed the deployment of the SCP platform. 2. A public image has been uploaded.3. A tenant, "cwb," has been created. |
|
| Test Steps | 1. Logged in to the SCP portal using the tenant account "cwb." 2. Clicked on the left-top menu and, in Virtual Machines, clicked new to create a new VM using an uploaded image. Configured it with 16 cores and 64GB of memory, and checked if there was an error prompt on the interface. 3. Modified the configuration to 4 cores and 4GB of memory, clicked OK, and checked if it was created successfully. |
|
| Expected Results | 1. When creating a VM with 16 cores and 64GB of memory, encountered an error due to insufficient tenant quotas. 2. When creating a VM with 4 cores and 4GB of memory, the VM was created successfully. |
|
| Test Conclusion | 口 PASS 口 Partial Pass 口 FAIL 口 Not Tested | |
| Notes |
Resource Billing
| Test items: Hierarchical and Decentralized Management |
Test Sub-Item: Resource Billing |
|
|---|---|---|
| Test Purpose | This test case validates the billing management functionality (supporting custom unit prices). | |
| Preconditions | Tenant "cwb" has been created. | |
| Test Steps | 1. Log in to SCP with "admin," click the Bills button in the upper right corner to access the Setting interface. 2. In lndividual Tenant Pricing, add the tenant cwb, set pricing for Resource Pool Resources, and configure pricing for CPU/memory/storage resources as 1, then save the changes. 3. In Tenant, enable the Billing Service for the cwb. 4. Start one VM under the tenant cwb and run it for one hour. Notes: By default, all tenants follow global pricing rules, but individual pricing for tenants is allowed. |
|
| Expected Results | 1. After one hour, in the Consumption Overview interface, you can see the usage of all resources, which can be exported. 2. In Tenant Billing Details, you can see the billing details for the Finance Department’s organization, which can be exported. |
|
| Test Conclusion | 口 PASS 口 Partial Pass 口 FAIL 口 Not Tested | |
| Notes |
Account Disabled
| Test items: Hierarchical and Decentralized Management |
Test Sub-Item: Account Disabled |
|
|---|---|---|
| Test Purpose | After the tenant’s usage period expires, the admin administrator and the operations administrator can manually freeze the tenant’s account (data will not be deleted, restricting tenant logins). This test case validates the platform administrator’s ability to manage tenant accounts. (To test the operations administrator’s ability to disable tenant functionality, ensure that the tenant belongs to the corresponding operations administrator). | |
| Preconditions | A "cwb" tenant has been created. | |
| Test Steps | 1. Log in to the System Management Portal of SCP using the "admin" account, navigate to the upper right corner Users and Access Management/Users/Tenants. Select the "cwb" tenant, click More, and choose Disable Account. 2. Create a new tenant ‘yfb’. 3. Open the Self-Service Portal, log in to the "cwb" tenant, and check if you can log in. 4. Open the Self-Service Portal, log in to the "yfb" tenant, and check if you can log in. |
|
| Expected Results | 1. The "cwb" tenant cannot log in. 2. The "yfb" tenant can log in normally. 3. Log in to the System Management Portal of SCP using the "admin" account, navigate to User and Access Management > Users > Tenants. Select the "cwb" tenant, click More, and choose Enable Account. 4. At this point, the "cwb" tenant can log in normally. |
|
| Test Conclusion | 口 PASS 口 Partial Pass 口 FAIL 口 Not Tested | |
| Notes |
Account Authentication Management
OTP Authentication
| Test items: Account authentication management |
Test Sub-Item: OTP authentication |
|
|---|---|---|
| Test Purpose | The SCP platform supports enabling OTP authentication, requiring both account/password and OTP verification codes for administrator or tenant logins to enhance platform user security. | |
| Preconditions | 1. download the Google Authenticator APP application on their mobile phones. 2. Ensure that the SCP platform system time and the mobile phone time are consistent (with no more than a 30-second time difference). |
|
| Test Steps | 1. Log in with "admin" to the SCP System Management Portal, go to system > Security > Login policies. Click Login Protection, and select Enable for the login protection policy. 2. Configure the authentication method, and the first time OTP registration is required. Click OTP Registration to start the registration process. 3. After installing the application (Google Authenticator APP) on your mobile device, use the app to scan the SCP platform’s QR code to obtain a six-digit verification code. 4. Manually input the six-digit verification code on SCP and click OK to complete the OTP registration. 5. Log out of the admin user, and then log in again using the admin account. 6. Log in with "admin" to the SCP Sys.tem Management Portal. |
|
| Expected Results | When logging in again as admin, it prompts for the OTP verification code, and after inputting the code, the admin user successfully logs in. 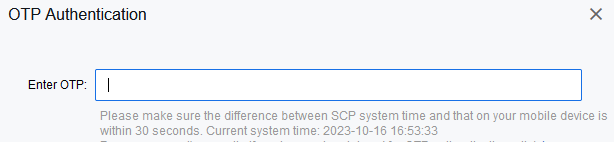 |
|
| Test Conclusion | 口 PASS 口 Partial Pass 口 FAIL 口 Not Tested | |
| Notes |
SSO Authentication
| Test items: Account authentication management |
Test Sub-Item: SSO authentication |
|
|---|---|---|
| Test Purpose | The SCP cloud computing platform supports integration with a CAS (Central Authentication Service) server, allowing for single sign-on (SSO) capabilities when combined with the customer’s existing account authentication system and role assignments. This test case validates the SSO single sign-on setup functionality. | |
| Preconditions | The SCP platform deployment is complete.Users have provided a CAS authentication server for testing. | |
| Test Steps | 1. Log in with "admin" to the SCP System Management Portal, go to User and Access Management > SSO Settings. 2. Basic Settings: SSO: Check "Enable." Entry Name: CAS Login Entry. Version: cas_v2. Login URL: https://CAS_address/cas/login?service=https://SCP_platform_address/sso/cas/callback Ticket Validation URL: https://CAS_cloud_address/cas/p3/serviceValidate?ticket={ticket}&service=https://SCP_platform_address/sso/cas/callback 3. Advanced Settings: Login Username: cas:user. Name: cas:user. Email: cas:email. Auto Registration: Check "Enable." 4. Click <Save Changes>.5. Open the Self-Service Portal and proceed to log in. |
|
| Expected Results | In the Self-Service Portal, you will see the CAS Login Entry prompt. Clicking on it will redirect to the CAS authentication page. | |
| Test Conclusion | 口 PASS 口 Partial Pass 口 FAIL 口 Not Tested | |
| Notes |
LDAP Authentication
| Test items: Account authentication management |
Test Sub-Item: LDAP authentication |
|
|---|---|---|
| Test Purpose | The customer has their own LDAP server and wishes to complete tenant account authentication using their own account system. This test case validates the LDAP server configuration functionality. | |
| Preconditions | The customer has provided an LDAP server for authentication integration testing. | |
| Test Steps | 1. Ensure that the LDAP server’s IP address can communicate with SCP properly. 2. Log in as "admin" to the SCP platform and go to System Management > Authentication. 3. Correctly fill in the LDAP server information, as shown below: Server Name: sangfor IP Address: (LDAP_IP) Port: 389 Administrator Full Path (DN): cn=administrator,cn=users,dc=sangfor,dc=com Administrator Password: (LDAP password) After filling out the information, perform a connectivity test. 4. Click Save to save the configuration information. 5. Click the <Import> button and select the users zhangsan and wangwu under the Users organizational unit to import them.6. In the LDAP user list interface, click Add Role to add the tenant role to zhangsan and the tenant sub-account role to wangwu, with zhangsan as the associated tenant. Notes: The LDAP server must be Windows Server 2012 version. The imported user names cannot be admin or SCP. If LDAP users do not have email and phone numbers on the LDAP server, default email and phone information will be generated in SCP upon import. |
|
| Expected Results | 1. The LDAP server VM was successfully imported and established communication with SCP. 2. The LDAP server configuration is completed. 3. Connectivity testing passed and the configuration was successfully saved. 4. Two users were successfully imported, and their information is visible in the LDAP user list. 5. The zhangsan user is successfully observed in the tenant section, and the wangwu user is successfully observed in the tenant sub-account section. |
|
| Test Conclusion | 口 PASS 口 Partial Pass 口 FAIL 口 Not Tested | |
| Notes |
Mail Configuration
| Test items: Account authentication management |
Test Sub-Item: Mail configuration |
|
|---|---|---|
| Test Purpose | This test case guides the admin to configure the email server, enabling email authentication and alert functions. | |
| Preconditions | The DNS configured in the SCP platform should be able to resolve the email server’s domain name. | |
| Test Steps | 1. Log in to the SCP system management portal as "admin" and navigate to system > SMTP Server. 2. Enter the sender’s email, SMTP server address, and port. 3. Check "Server requires authentication" and enter the username, with the password field set to the email client’s authorization code. Click Save to make the changes. 4. Click Test Email, and enter the email address where you want to receive the test email. |
|
| Expected Results | The email server configuration is successful, and you will receive the test email. | |
| Test Conclusion | 口 PASS 口 Partial Pass 口 FAIL 口 Not Tested | |
| Notes |
Image Management
Upload Public Image
| Test items: Image management |
Test Sub-Item: Upload public image |
|
|---|---|---|
| Test Purpose | SCP supports the upload of public images that can be provided to various resource pools. This scenario tests the uploading of public images in the SCP platform. | |
| Preconditions | Pre-download the cloud server image. | |
| Test Steps | 1. Log in as ‘admin‘ to the SCP system management portal and go to Compute > Images > Public Images. 2. Click Upload Image, select the local image to be uploaded as required, enter the name, choose the corresponding operating system, and select All for the resource pool. 3. Click OK to upload. |
|
| Expected Results | You can view the uploaded images in the Compute > Images > Public Images page. | |
| Test Conclusion | 口 PASS 口 Partial Pass 口 FAIL 口 Not Tested | |
| Notes |
Create Public Image
| Test items: Image management |
Test Sub-Item: Create public image |
|
|---|---|---|
| Test Purpose | SCP supports creating template images from cloud servers, which can be used by various resource pools. This scenario demonstrates the process of creating a template image from a cloud server in SCP. | |
| Preconditions | In SCP, deploy a cloud server and install performance vmtool. | |
| Test Steps | Locate one VM, keep it powered off, click More > Create Image, enter a name, description, select All Resource Pools, and click OK. | |
| Expected Results | Once the image creation is complete, you can view the uploaded image on the Images > Public Images page. | |
| Test Conclusion | 口 PASS 口 Partial Pass 口 FAIL 口 Not Tested | |
| Notes |
Upload Private VM Image
| Test items: Image management |
Test Sub-Item: Upload private image |
|
|---|---|---|
| Test Purpose | Both the admin administrator and the tenant administrator can directly upload images to the tenant. In this case, the image becomes a private image and occupies the tenant’s private image space. This test case verifies the functionality of uploading private images by the tenant. | |
| Preconditions | tenant has been created and has sufficient private image space quota. | |
| Test Steps | 1. Log in to the cloud computing platform SCP as cwb and navigate to computer > Images > Private VM Images. 2. Click Upload Image, select the local cloud server image file, choose the operating system version, and click Start Upload. 3. After the upload is complete, log in to the SCP platform as admin and go to Products and Services > Images > Private Images to view. |
|
| Expected Results | 1. When the tenant uploads a private image, admin can view the uploaded image in the private image list. 2. Check the tenant’s image space capacity usage. |
|
| Test Conclusion | 口 PASS 口 Partial Pass 口 FAIL 口 Not Tested | |
| Notes |
Create Private VM Image
| Test items: Image management |
Test Sub-Item: Create private VM image |
|
|---|---|---|
| Test Purpose | The tenant supports creating private images for tenant use. This test case verifies the tenant’s ability to create private images. | |
| Preconditions | 1. The tenant has been created and has sufficient private image space. 2. The tenant has deployed a VM and install performance vmtool. |
|
| Test Steps | 1. Log in to the SCP portal with the tenant account ‘cwb‘ and go to Compute. 2. Shut down the selected VM, click More and then Create Image. Enter a name, description, operating system, and resource pool, then click ok. |
|
| Expected Results | Admin or the tenant can view the created image in Compute > Images > Private Images. | |
| Test Conclusion | 口 PASS 口 Partial Pass 口 FAIL 口 Not Tested | |
| Notes |
Private VM Image Distribution
| Test items: Image management |
Test Sub-Item: Private VM image distribution |
|
|---|---|---|
| Test Purpose | Tenants can contact admin to convert a private VM image into a public image, which can be distributed for use by all tenants. This test case verifies admin’s ability to convert a private image into a public image. | |
| Preconditions | 1. A private VM image has already been uploaded or created in the private VM image directory. 2. tenant account cwb exists. 3. Create a new tenant account ‘yfb‘. |
|
| Test Steps | 1. Log in to SCP as ‘admin‘ and go to Images > Private Images. 2. Select a private image, click More, choose Convert to Public Image, edit the public image name, and confirm. 3. After converting to a public image, log in to the portal with the tenant ‘yfb‘ and view the private VM image. |
|
| Expected Results | The private image is successfully converted into a public image, and the ‘yfb‘ tenant can see the converted public image. | |
| Test Conclusion | 口 PASS 口 Partial Pass 口 FAIL 口 Not Tested | |
| Notes |
Resource Management
Create VM in Batches
| Test items: resource management |
Test Sub-Item: Create VMs in batches |
|
|---|---|---|
| Test Purpose | Admin can create VM in batches based on public or private images. This test case verifies the functionality of creating cloud servers. | |
| Preconditions | A public cloud server image has been uploaded. | |
| Test Steps | 1. Log in to the SCP system management portal as the administrator ‘admin‘ and go to Compute. 2. Click Create to create new cloud servers. Select an image, configure the batch creation quantity as 2, set CPU, memory, and other parameters, create 2 disks, set disk 1 allocation as dynamic, and disk 2 allocation as thin. Connect the network to the default physical exit, choose French (France) as the keyboard layout, and then click Next. 3. Fill in the ‘Name‘, select a group, and set a username and password, then click Next.4. After clicking ok, the cloud servers will begin to create. |
|
| Expected Results | 1. In the computer > virtual machines list, you will see 2 cloud servers created successfully in batches. 2. Check the VM details and you can see that disk 1 is dynamically allocated, and disk 2 is thinly allocated. 3. Access the cloud server console and press keys ‘a, m, q,’ to discover that the input corresponds to ‘q, ; a,’ and is consistent with French keyboard input. |
|
| Test Conclusion | 口 PASS 口 Partial Pass 口 FAIL 口 Not Tested | |
| Notes |
VM Allocation and Deallocation
| Test items: resource management |
Test Sub-Item: VM allocation and deallocation |
|
|---|---|---|
| Test Purpose | Admin administrators can allocate and deallocate, allocating self-created VM for tenant use or deallocate tenant VM resources to the admin account. Deallocate VM will disconnect the VM network. | |
| Preconditions | Admin has created a VM in the default group.Allocate sufficient quotas for the tenant to run VM. | |
| Test Steps | 1. Log in with the ‘admin‘ account to the SCP system management portal. 2. In Compute > virtual machines, find the VM, click More > Allocate, choose the tenant ‘cwb’ in the pop-up page, and click OK. 3. After completion, log in with the account ‘cwb‘ to the portal. In the tenant’s VM list, you can see the allocated cloud server. 4. Log in with the ‘admin‘ account to the SCP system management portal, find the previously allocated VM in VM list, click More > deallocate, and in the pop-up page select deallocate. 5. After completion, log in with the account ‘cwb‘. In the tenant’s VM list, you won’t be able to see the deallocated VM. |
|
| Expected Results | 1. After completing step 3, you can see the allocated cloud server in the tenant’s VM list. 2. After completing step 5, you won’t be able to see the deallocated cloud server in the tenant’s cloud server list. |
|
| Test Conclusion | 口 PASS 口 Partial Pass 口 FAIL 口 Not Tested | |
| Notes |
VM Backup
| Test items: resource management |
Test Sub-Item: VM backup |
|
|---|---|---|
| Test Purpose | Tenants can regularly backup their own cloud servers, meeting the requirements for data availability. This test case verifies the server backup functionality. | |
| Preconditions | 1. The SCP platform has been deployed, and a backup pool has been created. 2. Tenant has been created, and sufficient backup space quota has been allocated. 3. The tenant has already created VM. |
|
| Test Steps | 1. Log in to the SCP using the tenant’s account (cwb). 2. In Disaster Recovery > Scheduled Backup > Scheduled Backup Policy, click Create. 3. Configure the backup frequency, supporting weekly backup, daily backup, hourly backup, as well as configuring the duration and retention period of backups. 4. Select the resource pool where the VM to be backed up is located, and then select the VM to be backed up, and click Next. 5. Configure the name and description of the backup strategy, click Next, and then after clicking OK, the backup policy is configured. 6. Select the backup policy just created, and click Backup let the VM backup immediately. 7. Wait for the backup to complete, login to the VM and delete a file. 8. Check the backup the VM just backed up, click Restore, select Overwrite the existing one, and click Next, select the restore backup node, and then click OK. 9. Enter the password for the tenant’s cwb account, and click OK to start the recovery of the cloud server. 10. Wait for the recovery to complete, start the VM, and log in to the VM to check if the deleted file has been restored. |
|
| Expected Results | 1. After the backup is completed, you can see the backed-up. 2. After the recovery is completed, start the VM and log in the VM to check that the deleted file has been restored. |
|
| Test Conclusion | 口 PASS 口 Partial Pass 口 FAIL 口 Not Tested | |
| Notes |
Backup File Retrieval
| Test items: resource management |
Test Sub-Item: Backup file retrieval |
|
|---|---|---|
| Test Purpose | In the process of operating business systems, users may accidentally delete a file within a cloud server or a file might become corrupted due to malware, potentially leading to the loss of important data. This can be mitigated by using the file recovery feature from backups, allowing for the efficient retrieval of lost or damaged files and data. This test case verifies the file recovery feature after a cloud server experiences file loss. The file recovery functionality is supported for both Windows and Linux operating systems. | |
| Preconditions | A backup has been created for the test cloud server of the tenant cwb. | |
| Test Steps | 1. Log in to the SCP using the tenant account ‘cwb’. 2. Login into the VM, delete a specific file. 3. In the VM details page find the backup file, click Browse Files, and confirm in the popup dialog box select the deleted file and click Download File. 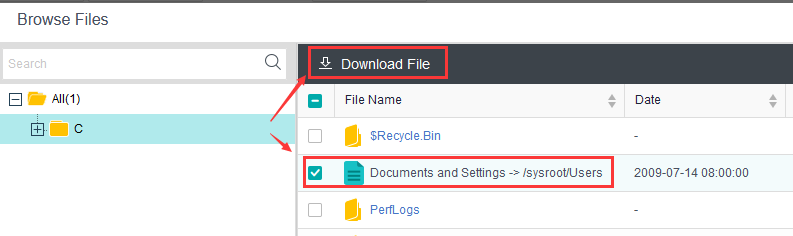 4. Check the downloaded file. |
|
| Expected Results | The download is successful. | |
| Test Conclusion | 口 PASS 口 Partial Pass 口 FAIL 口 Not Tested | |
| Notes |
VM Disk Encryption
| Test items: resource management |
Test Sub-Item: VM disk encryption |
|
|---|---|---|
| Test Purpose | Administrators can enable disk encryption for important cloud servers. After encryption, virtual disks cannot be used by other operating systems, and the cloud server is restricted from cloning, exporting, creating images, and other operations, enhancing data security. | |
| Preconditions | 1. A VM specifically created for testing disk encryption has been set up within the tenant cwb. 2. All disks for the cloud server used for disk encryption must be virtual disks. |
|
| Test Steps | 1. Log in with the "admin" account to the SCP system management portal. In Management > Security/Disk Encryption, click Enable, then select the encryption algorithm. By default, it is recommended to choose AES-256. For situations requiring security level 2.0, select the domestic SM4-128 encryption algorithm. 2. In VM list, locate the VM to shut down the VM. 3. Click More > Enable Disk Encryption. Enter the admin password and click OK. 4. Try clicking More > Clone, More > Export, and More > Create Image to view the results. |
|
| Expected Results | 1. The disk encryption is enabled successfully. 2. When clicking More > Clone, it’s observed that the option cannot be selected, with a message indicating that the cloud server has enabled disk encryption, and cloning is not supported. 3. Clicking More > Export reveals that the option cannot be selected, with a message indicating that the cloud server has enabled disk encryption, and exporting is not supported. 4. When clicking More > Create Image, it shows that the option cannot be selected, with a message indicating that the cloud server has enabled disk encryption, and creating images is not supported. |
|
| Test Conclusion | 口 PASS 口 Partial Pass 口 FAIL 口 Not Tested | |
| Notes |
Key Pair Management
| Test items: resource management |
Test Sub-Item: Key pair management |
|
|---|---|---|
| Test Purpose | Using a username and password to log in to a cloud server is a less secure authentication method, as it carries the risk of brute force attacks, and security cannot be guaranteed. Key pairs are a secure and convenient way of authentication. The SCP platform provides cloud server key pair management functionality, allowing users to remotely log in to cloud servers using a private key. This test case verifies the SCP platform’s key pair management feature. | |
| Preconditions | 1. The SCP platform already has a Linux system image (built-in image). 2. For this test case, the HCI version needs to be 6.3.0 or higher. |
|
| Test Steps | 1. Log in to the SCP system management portal using the "admin" account and go to Products and Services > Cloud Servers. Click Create to start creating a new cloud server. 2. Choose a built-in image for the Linux system, configure the cloud server’s CPU, memory, network, and other information. 3. In the system information section, create a key pair. Select Automatically create a new key pair as the creation type, enter the key pair’s name, and click OK. This will download a private key file to your local PC. 4. After confirming the information, complete the creation of the cloud server. 5. Open your local SSH tool (e.g., Mobaxterm), create a new SSH connection, and enter the cloud server’s IP address and login username. 6. Select Use Private key and choose the private key file downloaded in step 3. 7. Proceed with the login. |
|
| Expected Results | The client can remotely SSH into the cloud server using the private key and cannot use an account password. | |
| Test Conclusion | 口 PASS 口 Partial Pass 口 FAIL 口 Not Tested | |
| Notes |
VM Expiration Date
| Test items: resource management |
Test Sub-Item: VM Expiration Date |
|
|---|---|---|
| Test Purpose | Verify the VM expiration function. | |
| Preconditions | Had create SCP and the relate user has the quota. | |
| Test Steps | 1. Log in to the SCP console as admin and set the number of advance warning days for the VM to 4 days. 2. Enter the products and services page, create VM vm1, and set the usage period to 7 days. 3. Set the SCP system time to 3 days later and check the status of VM vm1. 4. Set the SCO system time to 7 days later and check the status of VM vm1. |
|
| Expected Results | 1. Setup successful. 2. The VM is created successfully, and the expiration time of the VM list is displayed as a specific date 7 days later. 3. The VM generates an "expiration soon" alarm log. 4. The VM generates an "expired" alarm log, but the VM will not be shut down. |
|
| Test Conclusion | 口 PASS 口 Partial Pass 口 FAIL 口 Not Tested | |
| Notes |
VM Time Sync
| Test items: resource management |
Test Sub-Item: VM Time Sync |
|
|---|---|---|
| Test Purpose | Verify the function VM time sync with the SCP time. | |
| Preconditions | The VM has been created and vmtool have been installed. | |
| Test Steps | 1. Power on the VM and set the VM’s time to a incorrect time. 2. Login SCP with “admin” go to System > data and time > Time Sync Between VMs and Cluster , enable Periodic time sync , Interval set to 64 seconds. 3. Wait about 2 mins check the VM’s time. |
|
| Expected Results | ||
| Test Conclusion | 口 PASS 口 Partial Pass 口 FAIL 口 Not Tested | |
| Notes |
VM Reset Password
| Test items: resource management |
Test Sub-Item: VM reset password |
|
|---|---|---|
| Test Purpose | When the username/password of the VM is lost, the SCP platform can be used to forcibly change the password of the VM and quickly restore the VM password. | |
| Preconditions | The VM has been created and vmtool have been installed. | |
| Test Steps | 1.Use "admin" to log in to the system management portal of SCP and enter virtual machine. Find the VM and click More. 2.Click Reset Password and enter the new password ‘toor’ to be set. 3.After successful execution, enter the VM console and use root/toor to enter the VM. |
|
| Expected Results | Use password ‘toor’ to enter the VM successfully. | |
| Test Conclusion | 口 PASS 口 Partial Pass 口 FAIL 口 Not Tested | |
| Notes |
Tenants Resource Management
VPC Network
| Test items: Tenants resource management |
Test Sub-Item: VPC network |
|
|---|---|---|
| Test Purpose | Tenants can plan the network within their own VM data center and deploy corresponding network devices and NFV components. | |
| Preconditions | 1. The tenant "cwb" has been configured. | |
| Test Steps | 1. Use the tenant account "cwb" to log in to the SCP self-service portal and click Networking > Topology to see the current virtual network topology. 2. Drag a subnet to the network topology and configure the name, network segment and other information. |
|
| Expected Results | 1. Tenants can only see the tenant’s own network topology and cannot see the network topology of other tenants. 2. The tenant is able to successfully create the subnet. |
|
| Test Conclusion | 口 PASS 口 Partial Pass 口 FAIL 口 Not Tested | |
| Notes |
VPC Network Uses Elastic IP to Publish Services Externally
| Test items: Tenants resource management |
Test Sub-Item: VPC network uses elastic IP to publish services externally |
|
|---|---|---|
| Test Purpose | This test case verifies that the VPC network uses elastic IP to publish services to the outside world. | |
| Preconditions | 1. Tenant "cwb" has been configured, and two Elastic IP quotas have been allocated. 2. An Ubuntu image has been imported to verify web business services. |
|
| Test Steps | 1. Log in to the SCP’s self-service portal using the tenant account "cwb". Click on computer > virtual machine, create a VM Build a web service, and connect the network interface to the tenant’s subnet. 2. In computer >virtual machine, find the newly created VM, click on More > Associate Elastic IP, then choose to create a new Elastic IP, select the route and bandwidth, and click Confirm. 3. Confirm that the bound Elastic IP address is 172.16.200.200 |
|
| Expected Results | To configure a computer with the IP address 172.16.200.150, connect it to the same VLAN as the physical output of the HCI cluster’s switch. Then, access http://172.16.200.200 to open a web website. | |
| Test Conclusion | 口 PASS 口 Partial Pass 口 FAIL 口 Not Tested | |
| Notes |
Using Port Mapping in VPC Network to Deploy Services
| Test items: Tenants resource management |
Test Sub-Item: Using port mapping in VPC network to deploy services |
|
|---|---|---|
| Test Purpose | This test case verifies the use of port mapping in the VPC network to externally deploy business functionality. | |
| Preconditions | 1. The tenant "cwb" has been configured, and two Elastic IP quotas have been allocated. 2. An image has been imported to verify web business services. |
|
| Test Steps | 1. Log in to the SCP self-service portal using the tenant account "cwb," click on computer > virtual machine, create a VM with web services, and connect the network interface to the tenant’s subnet. 2. Click on Networking > Topology to access the network topology page. 3. Click on EIP" for the network egress to associate the Elastic IP address with the network egress. 4. Click on Configure > Port Mapping for the network egress, click Create, fill in the Description, select Enable for the status, choose the recently bound "172.16.200.201" for the Elastic IP address, select TCP for the transfer protocol, enter 80 for the Elastic IP port, choose the Resource IP for the internal IP address, and select the cloud server created earlier, fill in 80 for the internal IP port, and then click Confirm. |
|
| Expected Results | Set up a computer with the address "172.16.200.150" and connect it to the same VLAN as the physical egress of the HCI cluster’s switch. Then, access http://172.16.200.201 to open a web website. | |
| Test Conclusion | 口 PASS 口 Partial Pass 口 FAIL 口 Not Tested | |
| Notes |
VPC East-West Distributed Firewall
| Test items: Tenants resource management |
Test Sub-Item: VPC East-West Distributed Firewall |
|
|---|---|---|
| Test Purpose | This test case verifies the access control between VMs in the same subnet under the tenant VPC network. | |
| Preconditions | Create two test VM vm1 and vm2 inside the tenant VPC and connect to the tenant subnet. | |
| Test Steps | 1. Open the self-service portal and log in with the tenant cwb. 2. Under the tenant’s VPC network, create two cloud servers named "Cloud Server A" and "Cloud Server B”, and choose the same subnet for their network interfaces to keep them in the same Layer 2 environment. 3. (First Connectivity Test) After creation, log in to Cloud Server A and ping the IP address of Cloud Server B to check if the ping is successful. 4. Go to security Services > Distributed Firewall, select the VPC network under the resource pool, and click Create Policy to create a new distributed firewall policy. Click Configure Rules > Create for the newly created policy. a. Name: Custom b. Source: Specify Cloud Server A. c. Destination: Specify Cloud Server B. d. Service: Connectivity (ping) e. Action: Deny f. Status: Enable 5. (Second Connectivity Test) Log in to Cloud Server A again and ping the IP address of Cloud Server B to check if the ping is successful. 6. Edit the distributed firewall policy rule to change the action to Allow. 7. (Third Connectivity Test) Log in to Cloud Server A once more and ping the IP address of Cloud Server B to check if the ping is successful. |
|
| Expected Results | 1. In the first connectivity test, Cloud Server A can ping Cloud Server B. 2. In the second connectivity test, Cloud Server A cannot ping Cloud Server B. 3. In the third connectivity test, Cloud Server A can ping Cloud Server B. |
|
| Test Conclusion | 口 PASS 口 Partial Pass 口 FAIL 口 Not Tested | |
| Notes |
Direct Connect
| Test items: Tenants resource management |
Test Sub-Item: Direct Connect |
|
|---|---|---|
| Test Purpose | Some of the local business cannot be migrated to the cloud, while certain business operations are deployed within the cloud’s VPC. Intercommunication between local business and VPC-based business can be achieved through an Direct Connect. Test Topology: The local PC has an IP address of 192.200.244.100/24 and needs to communicate with the VPC’s subnet 1 belonging to the tenant "cwb" in the cloud. This test case is designed to validate the functionality of the Direct Connect. |
|
| Preconditions | The SCP platform has already created the "cwb" tenant, and the tenant has set up a VM VM1 using an IP address within the subnet 192.168.1.0. Configuration for the business switch is as follows: (1) The interface for communication with the local PC should be configured as "Access" with a VLAN of 244. (2) The interface for communication with the physical external connection should be configured as "Trunk" to allow all VLANs. (3) The switch should have an interface configured for VLAN 192 with an IP address of 192.168.1.254, and another interface configured for VLAN 244 with an IP address of 192.200.244.254. |
|
| Test Steps | Log in to the SCP console as an admin, select networking and click on Direct Connect to access the Enterprise Dedicated Line list interface. Click on Dedicated Line Outbound Planning, enter the name as "Subnet 1 Dedicated Line Outbound," set the physical outbound as Default Physical Outbound, and click OK to save the configuration. Click Create, enter the name as Subnet 1 Enterprise Dedicated Line, select the VPC network of the cwb tenant, choose Subnet 1 as the subnet, and select Subnet 1 Dedicated Line Outbound as the dedicated line outbound. Set the VLAN ID to 192. cwb logs in from the tenant interface, selects networking clicks on Network Topology, accesses the internal router, and proceeds with the configuration. Click on "Static Routes" and create a route with the following configuration. 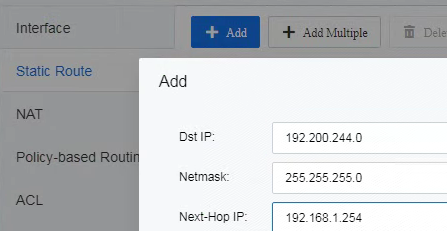 Start a ping from the local PC to 192.168.1.10. |
|
| Expected Results | The local PC can successfully ping the VM1 located within the VPC in the cloud. | |
| Test Conclusion | 口 PASS 口 Partial Pass 口 FAIL 口 Not Tested | |
| Notes |
Work Order Management
Apply for a Work Order
| Test items: Work order management |
Test Sub-Item: Apply for a work order |
|
|---|---|---|
| Test Purpose | Tenant user can request resources by applying for a work order through the self-service portal. These requests need to be approved by the organization administrator before the requested resources can be used. This test case verifies the functionality of tenant user applying for a VM work order. | |
| Preconditions | Tenant "cwb" and its tenant user account "xc" have already been created. | |
| Test Steps | 1. Log in to the SCP self-service portal using the "xc," and click on request in the virtual machine section. 2. Choose the Resource Pool, configure the Image, specify CPU and memory sizes, select storage type, VPC network, and provide basic information for the VM. After providing a reason for the application, click OK. 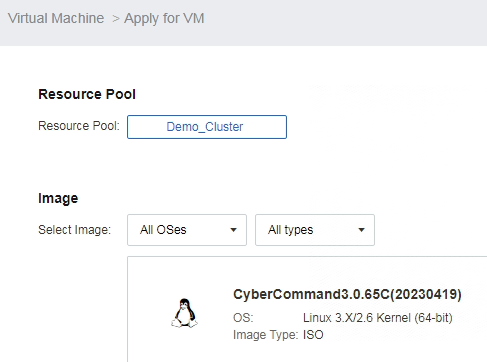 3. Log in to the SCP platform as "admin", click on Work Orders in the top right corner, where you can see work order records. Click Approve, and after clicking Approve, the tenant sub-account will automatically have a VM created. |
|
| Expected Results | After "admin" approves the work order, resources will be automatically created for the tenant sub-account. | |
| Test Conclusion | 口 PASS 口 Partial Pass 口 FAIL 口 Not Tested | |
| Notes |
Withdrawing a Work Order
| Test items: Work order management |
Test Sub-Item: Withdrawing a work order |
|
|---|---|---|
| Test Purpose | After a tenant user applies for a VM and realizes that the application is not reasonable (e.g., the VM configuration is too low), they can withdraw the work order on their own without requiring approval from the approver. This test case verifies the functionality of a tenant sub-account withdrawing a work order for a VM. | |
| Preconditions | Tenant "cwb" and its user "xc" have already been created. | |
| Test Steps | 1. Log in to the SCP self-service portal using the "xc" and click on request in the virtual machine section. 2. Choose the Resource Pool, configure the Image, specify the number of VMs, CPU and memory sizes, select storage type, CPV network, and provide basic information for the VM, along with the reason for the application. Click OK. 3. Log in as the "admin" user, and in the upper right corner, click on Work Orders to check the work order records. 4. Log in as the "xc" user, and in the upper right corner of the page, click on Work Orders Find the work order for the VM application and click cancel, then confirm the withdrawal. |
|
| Expected Results | The work order is successfully withdrawn. | |
| Test Conclusion | 口 PASS 口 Partial Pass 口 FAIL 口 Not Tested | |
| Notes |
Change Work Order
| Test items: Work order management |
Test Sub-Item: Change work order |
|
|---|---|---|
| Test Purpose | Tenant user may need to modify the configuration of VMs, and this can be done by logging into the self-service portal, where the configuration changes are requested. These changes need to be approved by the organization administrator before the corresponding resources can be utilized. This test case verifies the functionality of modifying VM configurations with a work order. | |
| Preconditions | A VM has already been created within the tenant user of the tenant. | |
| Test Steps | 1. Using the tenant user, click on More > change Configuration for the VM. Input the desired changes for the VM configuration, such as increasing the CPU, increasing memory, and adding a 20GB disk. Provide a reason for the application and click Submit. 2. Log in as "admin" to the self-service portal, go to the overview interface, and click on Pending Work Orders. Here, you can see the work order for the VM configuration changes requested by the "xc" account. Click on Approval, and on the Approve Work Order page that appears, click Approve. |
|
| Expected Results | Using the "xc" account, access the VM, and you can see that the VM’s configuration has been successfully changed. At the same time, on the interface, there is a work order notification. You can see that the status of the work order for modifying the VM configuration has changed to Completed. | |
| Test Conclusion | 口 PASS 口 Partial Pass 口 FAIL 口 Not Tested | |
| Notes |
Customized Work Order Flow
| Test items: Work order management |
Test Sub-Item: Customized work order flow |
|
|---|---|---|
| Test Purpose | Admins have the ability to define the approval workflow for work orders based on business processes. This test case validates the functionality of custom approval workflows. | |
| Preconditions | Tenant "cwb" and its tenant user "xc" have already been created. | |
| Test Steps | 1. Log in to the SCP platform using the admin account. Click on Work Orders in the upper right corner and navigate to Workflow Templates Create a new approval workflow with the work order type apply for VM and select the "cwb" tenant. Click Next. 2. Select "Approver 1" as "Tenant cwb" and add "Approver 2" as "admin." Complete the setup. 3. Log in to the SCP self-service portal using the "xc," and in the "virtual machine" section, click on "request". 4. Choose the Resource Pool configure the Image, specify CPU and memory sizes, select storage type, VPC network, and provide basic information for the VM, along with the reason for the application. Click OK. 5. Log in as the "cwb" user, and in the upper right corner, click on Work Orders to access work order records. Click Approval, and then select Approve. 6. Log in as "admin" to the SCP platform, click on Work Orders in the upper right corner, and access work order records. Click Approval, and after clicking Approve, a VM will be automatically created for the "xc." |
|
| Expected Results | Custom approval workflow is successfully set up. Tenants have the ability to approve work orders for their tenant user. Admin can automatically create resources for the sub-account after approving the work order. |
|
| Test Conclusion | 口 PASS 口 Partial Pass 口 FAIL 口 Not Tested | |
| Notes |