【VDI】Citrix Desktop Replacement Solutions_V5.9.1
Introduction
Citrix Mainstream Delivery Modes
Citrix Desktop has rich and flexible delivery solutions to meet the desktop usage needs of different users in office scenarios. Its mainstream delivery modes and application scenarios are shown in the following table.
| Delivery Mode | Provisioning Method | Main Application Scenarios |
|---|---|---|
| Virtual Applications | MCS/PVS | Lightweight task-oriented desktops, such as call centers and Internet access, where terminals are mostly Windows fat clients. |
| Shared desktop | MCS/PVS | Operation and maintenance desktop, light office. |
| Static non-persistent desktop/Random non-persistent desktop | MCS (main)/PVS (minor) | Standard office desktop. |
| Static persistent desktop | MCS | Development desktop, 3D design desktop, personalized office desktop. |
| Remote PC (Physical Machine) | Physical Machine | Overload graphic design desktop, financial report desktop. |
Citrix PVS Desktop
Citrix has two desktop provisioning methods: MCS and PVS. The desktop preparation logic of MCS is basically the same as our linked clone preparation logic, and user data is stored locally on the desktop. Therefore, this document will not introduce the MCS mode but will focus on the desktop working characteristics of the PVS mode.
PVS desktop is the desktop provisioning method promoted by Citrix. Its working logic is similar to the previous diskless workstation. It supports four delivery modes: virtual application (Windows Server), shared desktop (Windows Server), random non-persistent desktop (pooled VDI desktop), and static non-persistent desktop (non-persistent desktop). The overall architecture is shown in Figure 1. Based on its working characteristics, it has the following advantages for customers:
- A PVS desktop is a natural recovery desktop. Most desktop failures can be resolved by restarting it. Meanwhile, the UPM function can strip all user data to NAS storage. Large-scale desktop patch/software upgrades and other operation and maintenance operations can be completed by updating templates, greatly reducing the difficulty of operation and maintenance.
- The PVS server maintains template images (vDisk) in a unified manner, and virtual machines can be distributed in any virtualization cluster, solving the problem of large-scale deployment of VDI.
- The virtual machine has no system disk, so there is no need to consider the space occupied by the virtual machine’s system disk. Meanwhile, template images are stored centrally, which effectively simplifies the complexity of storage planning.
- Virtual machines give priority to using the server’s local memory as a write cache, greatly reducing storage performance requirements. One SAS 15K Hard Disk Drive (HDD) can support 500 virtual desktops concurrently, reducing construction costs.

The main functions of each functional component of the PVS desktop are as follows:
-
MTD: It is a VM template. After the administrator completes the configuration of the desktop environment, it is converted into a template image.
-
vDisk: Template image used by the PVS desktop, read-only.
-
PVS Store: Storage space for vDisks, usually network-shared storage, to be provided to multiple PVS servers to ensure that the mirrored data obtained by each server is consistent.
-
PVS: PVS is a system image server for desktops. It provides all the required system data for the desktops and supports multiple deployments. It not only shares the desktop access pressure but also provides disaster recovery and redundancy.
a) Write Cache: Write cache space allocated in the RAM of the PVS server, used to cache vDisk data obtained from the PVS Store, improving the throughput performance of the PVS while reducing the access pressure on the PVS Store.
-
DHCP server: Allocate IP addresses to virtual machines and provide PVS server address information to virtual machines using PXE boot mode.
-
VM: A virtual machine that has no system disk and is booted from the network.
a) RAM: Virtual machine memory, part of which is used as running memory and part of which is used as write cache to store user configuration (User Profile) required for virtual machine operation.
b) Write Cache Disk: The local virtual disk of the virtual machine, which is used as the overflow storage space when the virtual machine’s RAM (write cache) is full.
c) PvD: When using static desktop scenarios, an optionally assigned persistent personal vDisk that records user changes to the virtual desktop. It has been deprecated in the latest version.
- NAS: Support Citrix UPM, used to store separated user profiles and data.
Replacement Solution Guide
Citrix Infrastructure Component Replacement
The correspondence between Citrix’s main infrastructure components and Sangfor VDI components is as follows:

A typical Citrix deployment architecture is as follows:

Sangfor can perform the same architecture replacement in the following way:

Desktop Replacement Solution Overview
According to the provisioning method and data distribution characteristics of Citrix Desktops in different scenarios, the following replacement solutions are currently available:
| Replacement Solution | Applicable scenarios | Advantages and Disadvantages of the Solution |
|---|---|---|
| Template migration + NAS data conversion, all desktops rebuild | PVS mode desktop | Advantages No need to deploy templates from scratch, improving deployment efficiency. Most data and application configurations are seamlessly inherited, with little impact on users. Disadvantages The configuration and data of some special applications cannot be inherited for the time being and can only be rebuilt, such as the Outlook index. |
| Whole machine migration and release | MCS mode desktop | Advantages The user’s existing working environment is completely preserved, and there is no need to reinstall software or migrate data, which has little impact on users. Disadvantages Migration takes a long time, and there will be certain compatibility issues that need to be dealt with in the early stages. The migrated VMs are all fully prepared, and the storage space occupied is more than that of linked clone preparation. Migration requires additional fees and investment costs increase. Template management is not supported. If the system disk is damaged without backup, it cannot be quickly restored by resetting the system disk. You can only reallocate a new desktop. |
| Template migration, all desktops rebuild, manual data migration by users | All | Advantages No need to deploy templates from scratch, improving deployment efficiency. No need to migrate data on the server side, so the implementation workload is relatively small. Disadvantages It is equivalent to changing a new computer. Users need to migrate their own data and redeploy their own personalized software, which has a certain impact on the current business development. During the period when users migrate data, the existing network will be under great pressure of network traffic, and the data migration efficiency will be relatively low. |
| Original desktop management and release (still in the pre-research stage, not ready for delivery at this time) |
MCS desktop for VMware platforms | Advantages Directly leverage the original VMware platform, without the need to purchase a large number of new servers and reinstall servers, investment and implementation costs are minimized, relatively easy and fast to deliver. Disadvantages Due to protocol constraints, the current peripheral support is limited, and the system’s ability to handle weak network conditions is insufficient (will be improved next year). Does not support the power management of virtual machines (under development). Does not support distributed firewall functions. Does not support IOM monitoring. |
Desktop Replacement Solution Workflow Description
PVS Replacement: Template Migration + NAS Data Conversion, All Desktops Rebuild
This solution applies to the smooth migration of Citrix Desktops prepared in PVS mode. The migration working logic is shown in the following figure:

The key steps of desktop migration prepared in Citrix PVS mode are as follows:
- The Citrix PVS template is migrated to the Sangfor Hyper-Converged Infrastructure (HCI) through the Sangfor Cloud Migration Tool (SCMT) migration platform V2V and converted into a template. A virtual machine system base image is generated, and virtual desktops are prepared in batches through linked cloning.
- The user configuration data separated by Profile MGT synchronization technology and stored on NAS is converted into a Sangfor UPM configuration container file through the Convert tool (the conversion does not affect the original data) and then mounted to the Sangfor virtual desktop to realize user configuration migration.
- The user configuration data stored on the NAS separated by the Profile MGT redirection technology can be directly mounted to the Sangfor virtual desktop through the Sangfor UPM redirection configuration, thereby realizing user redirection data migration.
- For Citrix network disks mapped to virtual machines using NAS, you can reuse the domain controller’s policy and mount it to Sangfor VDI, realizing the migration of disk mounting.
MCS Replacement: Whole Machine Migration and Release
This solution is suitable for migrating Citrix Desktops prepared in MCS mode to the Sangfor platform and releasing them, while also migrating the complete working environment and data of the user’s original Citrix Desktop to the Sangfor platform. The switching logic is roughly shown in the following figure:

This solution for migrating Citrix Desktops prepared in MCS mode to Sangfor VDI Platform is as follows:
- Deploy the Sangfor VDI Platform and publish blank virtual desktops (without system).
- Use the SCMT platform in a point-to-point proxy mode to migrate the Citrix Desktop system and data one by one to the blank virtual desktop of the Sangfor platform.
- Uninstall the Citrix components in each migrated virtual machine and replace them with Sangfor VDI Agent, and they can be used as normal desktops.
Template Migration, All Desktops Rebuild, and Manual Data Migration by Users
This solution is the normal solution for our daily replacement projects. Migrating only the Citrix templates to improve desktop template creation efficiency. Data migration is done by the users themselves, and we do not handle it. Therefore, it is theoretically applicable to all Citrix deployment modes. The implementation method is the standard VDI platform deployment and construction process, and it will not be detailed further here.
The Original Desktop Management and Release (Not Recommended Due to Unmet Requirements)
This solution is suitable for Citrix deployed in VMware. The desktops prepared in MCS mode on the V Sphere platform are switched to the Sangfor platform for release, and the Citrix-related components are quickly offline, paving the way for the entire platform to be completely switched to Sangfor desktops. The switching logic of this solution is roughly shown in the following figure:

The steps for switching Citrix Desktops prepared in MCS mode to Sangfor VDI Platform are as follows:
- Deploy Sangfor Hyper-Converged Infrastructure (HCI) and complete the connection between HCI and VMware to the vSphere platform to manage Citrix MCS virtual machines on the VMware platform (such as power on, power off, backup, etc.).
- Deploy the Virtual Desktop Controller (VDC) and connect it to HCI, so that the VDC can manage the power of Citrix MCS mode virtual machines.
- Uninstall the Citrix components in Citrix MCS mode virtual machines one by one and replace them with Sangfor VDI Hosting PC Agent, so that Citrix desktops can be connected to Sangfor VDC, accept VDC policy management, and be released by VDC for users to access and use.
- At this point, the management components of the Citrix platform, except AD DS can be taken offline.
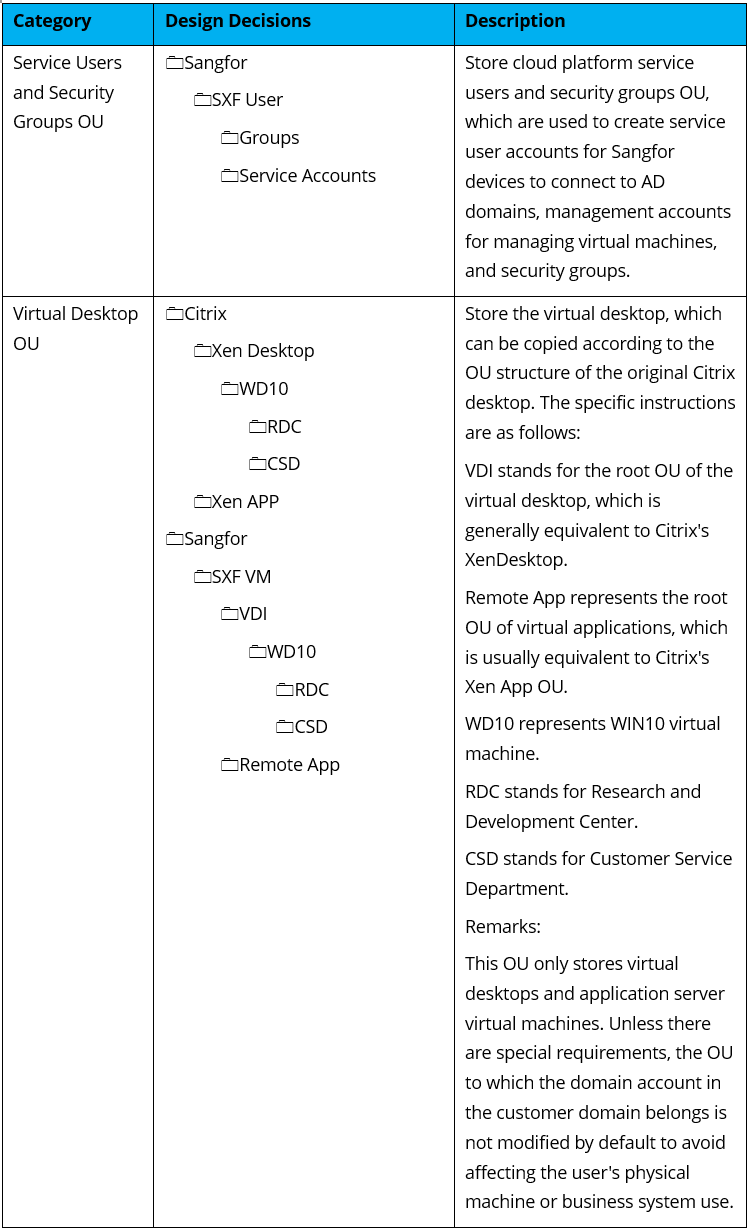
AD Domain OU and Group Policy Design
Since Citrix itself is a product tightly coupled with Microsoft AD domain, this chapter will mainly explain how to plan reasonable OU and group policies for virtual machines on the Sangfor platform on the customer’s existing domain when replacing Citrix, to meet customer management requirements without affecting the normal use of other devices in the customer’s domain.
OU Design
To facilitate the management and maintenance of virtual desktops on the newly built VDI platform and avoid affecting existing devices in the domain, it is recommended to build an independent OU unit at the same level as the OU to which the Citrix device belongs in the domain for management.
Group Policy Design
To allow the new desktop to inherit the same policy controls as the original Citrix Desktop, and meanwhile avoid some useless policies on the Citrix Desktop from affecting the use of the new desktop, it is recommended to design according to the following policy.
| Application | Description |
|---|---|
| Linking an existing policy set | After analyzing the policies, confirm that the directly usable policy sets can be connected directly to the newly created virtual machine OU for application. |
| Create a new policy set | After analyzing the policies, if it is confirmed that there are unnecessary policy configurations, it is recommended to create a new policy set under the newly created virtual machine OU. Then, set up the policy configurations that are applicable to the new desktop in order to apply them. |
Steps
Create OU on the domain and connect it to the existing group policy of Citrix as follows:
- Create a new OU in the AD domain, which should be at the same level as the root OU of Citrix.


- Confirm all group policies linked to the OU where the Citrix Desktop is located. Policy sets that will not affect the normal use of the new desktop can be directly linked and referenced in the new OU.


UPM Solution Design
In virtual applications, shared desktops, PVS desktops, and Remote PC scenarios, Citrix uses UPM technology to solve the problem of user personalized configuration. This chapter will mainly explain how to design a user profile management solution after replacing the Citrix Desktop to achieve the same user data retention effect as Citrix (excluding user-installed software).
UPM3.0
This solution is suitable for replacing Citrix’s PVS desktop (i.e. non-persistent desktops and pooled desktops). To smoothly inherit the user’s existing data on the PVS desktop, we need to adopt a solution that separates the user’s personalized configuration from the data and saves them all on Citrix’s existing NAS.
The UPM3.0 policy design is as follows:
| Policy Type | Policy Configuration | Remarks |
|---|---|---|
| User Profile Redirection – Redirection paths | %USERPROFILE% | The root directory where user personalized data is stored. Redirecting this directory can retain most user system settings, personalized configurations, and data. |
| User Profile Redirection – Redirection paths | Non-standard software configuration storage path, such as C:\XXXAPP\CONFIG | Some software developers fail to comply with the regulations and store the software configuration in a private directory, such as the self-built directory on the C drive, instead of the user configuration file directory. These configuration files need to be redirected separately to be retained. |
| User Profile Redirection – Excluded Paths | %TEMP% | Temporary user files do not need to be saved for a long time. Excluding them can reduce the size of data that needs to be redirected and reduce NAS space usage. |
| User Profile Redirection – Excluded Paths | Citrix UPM policy configuration | The data path enabled for exclusion synchronization on the original Citrix Desktop can be configured as an exclusion path to reduce the amount of data that needs to be synchronized by UPM. |
| User Profile Redirection – Excluded Paths | Desktop, documents, and other user data paths that Citrix UPM originally used to redirect to separate and save | To inherit the original data directories of the Citrix Desktop with redirection configuration enabled, you need to exclude these directories from UPM and use the folder redirection policy to identify and inherit them. |
| User Profile Redirection – User Profile Storage Path | Third-party virtual drive \\NAS domain name\VHDX shared directory |
To inherit the user application configuration data saved by the Citrix UPM synchronization policy, it is necessary to create a new VHDX shared directory on the existing NAS to uniformly store the UPM3.0 VHDX configuration containers that have been converted and sealed by the batch tool for us to mount directly. |
| Folder Redirection | Desktop, documents, and other user data paths that Citrix UPM originally used to redirect to separate and save \\NAS domain name\user data shared directory\%username% |
Citrix UPM uses redirection to separate user data stored on NAS. You can directly use UPM3.0 folder redirection to mount the corresponding directory. In order to ensure normal recognition and mounting, you must add the % username% parameter to the original Citrix redirection path. For example, if the original Citrix redirection path is \\nas-s\ homedir$ Then we need to configure \\nas-s\homedir$\%username% |
FSlogix
This solution is suitable for replacing Citrix XEN APP (virtual application), shared desktop, and remote PC scenarios. Since the UPM technology supporting our products in the related scenarios is still imperfect, to inherit Citrix’s original data to the greatest extent, we need to use FSlogix to achieve it.
The FSlogix policy configuration is as follows:
| Policy Type | Data Configuration | Remarks |
|---|---|---|
| FSlogix Configuration | Enable FSlogix | Activate the FSlogix function. FSlogix will strip all data in the %userprofile% directory to the VHDX disk for unified storage, thereby realizing the storage of most user system settings, personalized configurations, and data. |
| FSlogix Configuration | Configuring the virtual disk storage location (VHD Location) \\NAS domain name\FS-VHDX shared directory |
To inherit the user application configuration data saved by the Citrix UPM synchronization policy, it is necessary to create a new VHDX shared directory for FSLOGIX on the existing NAS to store the FSlogix VHDX configuration containers that have been converted and sealed by the batch tool, so that we can directly mount them through FSlogix. |
| FSlogix Configuration | Exclusion List Refer to the exclusion path of Citrix UPM policy configuration. |
Reduce the amount of data that needs to be stripped and stored, optimize FSlogix work efficiency, and reduce VHDX disk space usage. |
| FSlogix App Masking | Redirection Paths | Some software developers fail to comply with the regulations and store the software configuration in a private directory, such as a self-built directory on the C drive, instead of the user configuration file directory. These configuration files need to be separately configured and saved to an independent network shared path through the redirection path of app masking. |
| Network Disk Mounting | Mounting Citrix through Citrix UPM redirects the user data directory stored on NAS. | FSlogix cannot inherit the user data retained by Citrix UPM redirection, so it is necessary to mount this data directory to the user as a network disk to facilitate the user’s use of the data on the previous platform. |
Migration Operation Guide
Pre-Migration Preparations
-
Obtain network and authorization information according to the following table:
Network Requirements:
The network of the Citrix MCS/PVS desktop needs to be able to communicate with the virtual desktops of the SCMT platform and the HCI platform. It is best to be in the same network segment. In addition to the IP required for the virtual desktop, at least 3 additional available IPs need to be reserved for use by the HCI platform and supporting components (such as SCMT).
Device Name Login Address Account Password Virtual Desktop Controller (VDC) Sangfor Hyper-Converged Infrastructure (HCI) Sangfor Cloud Migration Tool (SCMT) Service Account Requirements:
Account Name Permission Requirements Account Password NAS Service Account 1. Ability to access NAS storage path
2. Full control over data stored in Citrix
3. Ability to read user account information on the domainDomain Connection Account Has read permissions for all OUs in the domain and has the permissions to add domains Platform Service Account Citrix platform (XenCenter, vSphere)
PVS Server Console (only required for PVS migration)VM Service Account VM Template Local Administrator -
Obtain the association between the virtual machine and the user.
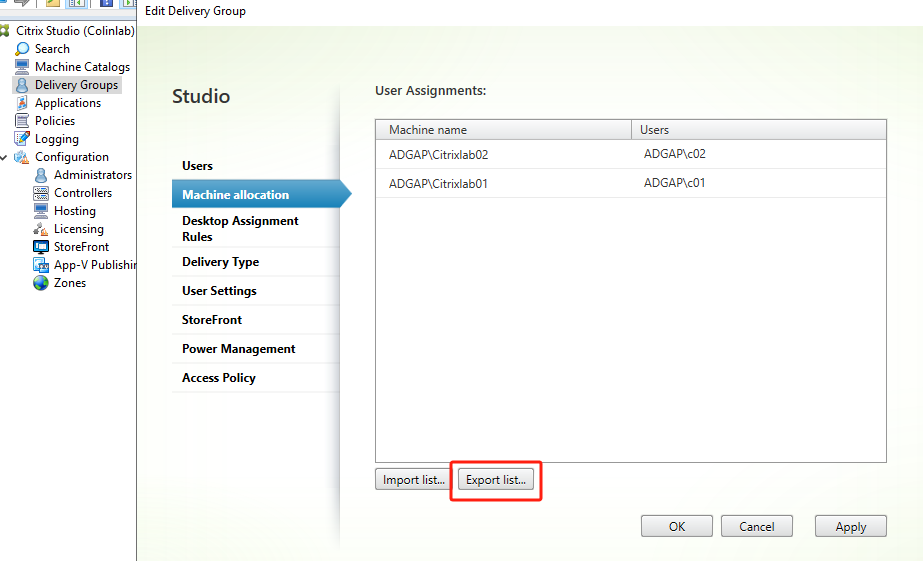
Log in to DDC (Citrix Studio) and edit the Delivery Groups. On the Machine allocation tab, click Export list.
Citrix Template Migration
This chapter will mainly explain how to migrate the desktop template of the Citrix platform to the Sangfor VDI Platform for use as a template. This method can also be used to migrate other vendors’ desktop templates.
PVS Template Migration
The template migration process of the Citrix platform is as follows:
- Citrix VM Template Preparation
- PVS VM template
a) Open the PVS console (Citrix Provisioning), find the PVS VM template under Device Collections, and verify its vDisk file. Then, right-click the template and select Properties. In the Target Device Properties dialog box, select Maintenance for Type.


b) In the PVS console, open the storage directory and find the vDisk file corresponding to the PVS VM template. Right-click the vDisk file and select Versions. In the vDisk Versions dialog box, click the New button to create a new version for it. This version is in the Maintenance mode.


c) Open XenCenter, and start the PVS VM template. Select the first maint (maintenance) version to start, and log in to the desktop using the local administrator account.

d) Use the V2V migration tool to power on the PVS VM template for migration. Create a new VDI-type virtual machine on the HCI platform, perform point-to-point migration, and shut down the source virtual machine during the switching process.
e) Start the migrated VM template on the HCI platform to verify whether it can run normally and whether the local administrator can log in to the desktop. If it is normal, disconnect it from the network, change its computer name, and exit the Domain to Workgroup mode (it must be disconnected from the network, otherwise it will affect the trust relationship between the original Citrix platform VM template and the domain, but it will not affect the use of the original template and facilitate rollback).
f) Uninstall all Citrix-related components in the VM template on the HCI platform and install Sangfor VDI Agent.
g) Power on the virtual machine and add it to the domain. After checking that everything is OK, shut it down and convert it to a template on the VDC for use.
Precautions
Depending on the startup boot method of the PVS desktop template, some PVS templates may have additionally allocated a bdm disk for booting and a wcdisk disk for the write cache. These two disks will be migrated to the HCI platform together during migration. After completing the migration and confirming that the virtual machine can run normally on the HCI platform, these two disks can be deleted directly.
MCS Template Migration
Power on the MCS template and use the V2V migration tool to perform online migration. The migration steps are similar to MCS machine migration. Please refer to Chapter 5.3.2 MCS Whole Machine Migration.
Note:
The difference is that the migration task selects the newly created virtual machine (VDI type) of HCI and adds the step of converting the template in VDC.
Citrix Resource Migration
PVS and New Deployment Solutions
For PVS resources and newly created solutions, resources can be distributed in batches through templates after the template migration.
MCS Whole Machine Migration
- Power on all MCS desktops that need to be migrated and install the SCMT migration client.
- Create a new migration task on the SCMT platform and use point-to-point agent migration to complete the migration and switching of the MCS desktop (set HCI to automatically create a migration target machine, and shut down the source machine after the migration is completed).
- Uninstall the Citrix agent component and virtualization optimization tool from the migrated virtual desktop and replace them with our agent component.
Importing Resources After Migration
After completing the template migration, select the batch import/new resource plan according to the different plans to match the number of concurrent desktop users and complete the association of user relationships.
PVS and New Deployment Solutions
Distribute resources in batches according to the migrated template, assign users exclusive desktop usage rights, and prepare a CSV table of the user-desktop binding relationships based on the user-desktop correspondence on the Citrix platform. Import it into the VDC virtual machine management interface to achieve the automatic binding of users and desktops.
MCS Whole Machine Import
- Use the virtual machine type conversion tool to convert the virtual machine to a VDI-type virtual machine and associate it with the template machine created in the first step.
- Create a dedicated desktop resource in VDC mode, use the previously migrated VM template A as the template, and import all migrated virtual machines into this resource.
- Assign exclusive desktop usage rights to users, and prepare a CSV table of the user-desktop binding relationships based on the user-desktop correspondence on the Citrix platform. Import it into the VDC virtual machine management interface to realize the automatic binding of users and desktops.
Citrix User Data Migration
MCS whole machine migration is completed and ready for use, as described in Chapter 5.4.2 MCS Whole Machine Import. For PVS and the newly created scenarios, personal data needs to be imported for users.
PVS (NAS Data Conversion)
User Configuration Data Conversion
Environment Preparation:
- Add the data conversion server (Windows Server 2016) to the customer’s existing AD domain.
- Obtain a NAS administrator account (with full control over the Citrix Desktop data storage directory on the NAS, such as the ctxadmin account) and use this account to log in to the data conversion server.
- Ensure that the remaining available storage space of the NAS is sufficient to store the converted user configuration data VHD (X) files. (For example, if you want to convert 100G of data for 10 people, the remaining available space of the NAS cannot be less than 100G. Considering storage stability, the remaining available space after deducting the space required for conversion should not be less than 10% of the storage space.)
- Mount the Citrix UPM synchronization directory on the NAS to the data conversion server as a network disk to facilitate confirmation of the data source content.
- Create a new shared directory on the NAS to store the converted data. This directory also needs to be mounted to the data conversion server as a network disk to facilitate checking the conversion results.
Steps:
- Log in to the VDC console and navigate to Resources > Services > Resources. Edit the resource that needs to inherit Citrix UPM data. Press f12 to enter the Elements tab and search for rcid. Then, record the resource name and rcid value.

-
Use the NAS domain administrator account (such as ctxadmin) to log in to the UPM conversion server, and run the conversion tool with administrator privileges. Set the Citrix synchronization directory as the source directory, and the newly created shared directory for storing conversion data as the destination directory. Then, start the conversion operation and wait for the tool to complete the conversion.
a) The tool supports three operation modes: One User Convert, User Convert, and Custom Convert:
i. One User Convert: Can convert a single user’s profile.

- Citrix UPM Path: The directory where Citrix saves user configuration. It is the top-level directory for a single user.

-
Sangfor UPM Path: The path of the third-party virtual drive. It is the storage path after UPM data conversion.
-
Desktop Resource Name: The name of the Sangfor VDI resource.
-
Desktop Resource ID: The ID of the Sangfor VDI resource.
-
VHD Storage Capacity(GB): The Sangfor VHD capacity.
b) User Convert: All user configuration files in the same directory can be batch converted into UPM data files of the same desktop resource.

- Citrix UPM Path: The directory where Citrix saves user configuration. It is the user’s parent directory.

-
Sangfor UPM Path: The path of the third-party virtual drive. It is the storage path after UPM data conversion.
-
Desktop Resource Name: The name of the Sangfor VDI resource.
-
Desktop Resource ID: The ID of the Sangfor VDI resource.
-
VHD Storage Capacity(GB): The Sangfor VHD capacity.
c) Custom Convert: Multiple user profiles can be converted into UPM data files of different desktop resources according to needs.

- Citrix UPM Path: The directory where Citrix saves user configuration. It is the user’s parent directory.

-
Sangfor UPM Path: The path of the third-party virtual drive. It is the storage path after UPM data conversion.
-
VHD Storage Capacity(GB): The Sangfor VHD capacity.
-
User Information Path: User-defined user information file. Generally, the desktop configurations for different Citrix offices are saved in the same directory. The ini file format is as follows: UserNames must end with a comma (,).
[Resource0]
ResourceId = 11
ResourceName = CTXUPM
UserNames = c01,c02,c03,
[Resource1]
ResourceId = 887
ResourceName = Office Pool Desktop
UserNames = c01,c02,c03,c04,

- Set the VDC policy sets and enable the user profile redirection policy. In User Profile Storage Path, set Storage Path to Third-Party Virtual Drive, and enter the storage path after the UPM configuration conversion is completed.

a) If the customer prefers not to store the UPM file on the NAS and instead wants to store it on the local personal disk, the path after the UPM configuration is converted needs to be set to Auto Migrate User Storage, and the Storage Path in User Profile Storage Path needs to be set to Personal Drive. After the user logs in to the desktop for the first time, the agent will automatically migrate the UPM configuration file to the local personal disk for storage.

User Work Data Redirection Inheritance
Environment Preparation:
- Citrix DDC Operation Permissions
Refer to Chapter 3 AD Domain OU and Group Policy Design to complete the preparations for OU and basic group policy in the AD domain.
Steps:
- Open the Citrix DDC console (Citrix Studio) and enter the policy management page. Find the User Profile Management policy, verify the configuration of the redirection policy, and record the redirection directory and target path.
- On the VDC, edit the policy set associated with the virtual machine. Enable folder redirection and configure the corresponding paths for all folders enabled for redirection on Citrix.
-
Sangfor redirection configuration path = Citrix redirection configuration path + %username%
If the original Citrix redirection path is \\nas-s\homedir$
Then we need to configure it as \\nas-s\homedir$\%username%
Precautions:
- The UPM policy of the VDC needs to add the directory originally redirected by Citrix to the excluded paths and select the Disable desktop redirection option when restoring the desktop resource creation.

Mount the Original Citrix Desktop Network Disk
Environment Preparation:
Refer to Chapter 3 AD Domain OU and Group Policy Design to complete the preparations for OU and basic group policies in the AD domain.
Steps:
- Verify the original Citrix Desktop user network disk mount path.
- On the AD domain, create a new group policy under the OU where Sangfor Desktop is located, name it Citrix Netdisk. Go to User Configuration > Preferences > Windows Settings > Drive Maps page, and click New > Mapped Drive to create a new mapped drive policy. Set the location to the original Citrix network disk path, select Mark as and fill in Original Desktop Network Disk. Set the drive letter to Y and keep the rest of the configuration as default.

- If it is determined that Citrix’s network data disk needs to be mounted to inherit user data files, it is recommended that the virtual desktop edge-connected interface use 10G. Meanwhile, the network path for the virtual desktop to access the network storage server should be as consistent as possible with the path of the existing Citrix Desktop (such as being in the same two-layer environment, and not going through the core switch, etc.) to prevent network performance bottlenecks from affecting the network disk usage experience. It is not recommended to migrate the network storage server currently used by Citrix to the VDI platform for operation. However, if the customer’s network storage server is a Windows file server, it might be necessary to deploy a new file server on the VDI platform. At this time, a set of independent 10G network ports (at least dual Gigabit) on the VMP platform need to be provided for the file server to use, to prevent the file server traffic from crowding out the normal business bandwidth of the virtual machine.
New Deployment (Manual Data Migration by Users)
VDI Native Migration Capabilities
The data can be migrated through the built-in data migration capability of Sangfor VDI, since the value of VDI lies in the features of no local data storage, simplified operation and maintenance, and mobile office. The file transfer capability of VDI is limited. The built-in data migration capability of VDI is suitable for small amounts of user data, such as within 1G per user. If the data of each user is extremely large, it is recommended to use the enterprise network disk, NAS, FTP, and other transmission methods mentioned in this article.
According to the user system construction plan, after the entire virtual desktop platform is deployed and has passed the use test and adjustment of some users, it is ready to migrate all user data to the Sangfor VDI smoothly. To minimize the risks brought by data migration, Sangfor has formulated a detailed user data migration plan.
The migration of user data requires that the data currently accumulated by the user on the personal PC (XXX brand VDI) be completely migrated to the virtual desktop. Due to the critical nature and non-loss requirement of the data, the data migration plan is particularly important.
The user’s data mainly includes the user’s office files, personal data, etc. Sangfor recommends that before starting data migration, the user should first centrally collect and classify the files of their physical PC (XXX brand VDI) to a disk other than the C drive, or store them on other hard disks.
The data migration process requires a window period for migrating data. During the window period, the corresponding permissions are enabled, such as enabling the Disk Mapping and Clipboard Copy policies within 1 month.
Migration Method 1: Disk Mapping
Enable disk mapping permissions on the VDC console and install the Sangfor VDI client on the user’s PC (XXXX brand VDI). After the user accesses Sangfor VDI, the local disk of the PC (XXXX brand VDI) mapped to the virtual machine is visible, and the data of the local disk of the PC (XXXX brand VDI) can be directly copied to the Sangfor virtual machine.

For the local disk mapping policy, you can select the Read-only or Read/Write mode as needed, as shown in the following figure:

Note:
PC hard drive:
Log in to the local disk of the PC where the client is located, excluding network disks.
Enable Read/Write mode: Allow bidirectional reading and writing of data between the virtual machine and the PC’s hard drive.
Enable Read-only mode: Allow reading of data on the PC’s hard drive, but not allow writing of data to the PC’s hard drive.
This function is only applicable to VDI clients on Windows, semi-clientless Windows, and Linux.
Migration Method 2: Clipboard Copy
Install the VDI client on the user’s PC (XXX brand VDI) and enable the clipboard policy on the Sangfor VDC console. You can directly copy the data of the local PC to the virtual machine.
To copy the file, right-click it and select the Copy icon.

In Sangfor VDI, select the location where you want to store the data. Right-click and select the Paste icon.

The data is being copied using the clipboard.

The data has been copied to the desired location.

The administrator can modify the Shared clipboard policy via the VDC web control as needed. The options include Bidirectional, Virtual to Local, and Local to Virtual, as shown in the following figure:

Shared clipboard:
-
Bidirectional: Allow the virtual machine to copy data with the local computer.
-
Virtual to Local: Allow the data from the virtual machine to be copied to the local machine.
Max Characters (local to virtual): Allow a maximum of XX characters of text to be copied from the local machine to the virtual machine at a time. -
Local to Virtual: Allow the local data to be copied to the virtual machine. Max Characters (virtual to local): Allow the virtual machine to copy a maximum of XX characters of text to the local machine at a time.
-
A Chinese or English character occupies the width of one character, and so is a space. 0 means data duplication is not allowed.
Private Enterprise Network Disk Migration Solution
If the customer has a private enterprise network disk, data migration can also be achieved by utilizing the customer’s existing private network disk.
Most private network disks have PC clients and mobile clients, and support web browsers. They can also be integrated with virtual desktops and virtual application solutions, and use a unified identity for mobile access. They can be smoothly and securely accessed from multiple locations, and can be seamlessly switched between physical PCs, virtual desktops, virtual applications, and mobile endpoints.
When using a private cloud disk, you can first install a PC client on a physical PC or use a web document portal to synchronize various business and learning documents in different locations to the private cloud, thereby avoiding data loss problems at the source. Through the synchronization mechanism, security mechanism, and historical version of the private network disk, the convenience and security of document backup are improved.
After the data is backed up, it can be seamlessly accessed on virtual desktops, virtual applications, and mobile endpoints.
NAS Service Migration Solution
After the virtual desktop and application platform are built, the file server and virtual desktop domain server of the virtual desktop NAS are online. We can first create a personal data disk on the NAS server for each user’s virtual desktop, then grant the external access permissions for the user device side to access the NAS file server. Each user accesses through CIFS according to the name of his or her personal data disk and uploads personal data directly from the PC to the personal data disk. Upon completion of the data upload, the user can log in to the virtual desktop directly to see it.
The advantage of this solution is its speed. Users only need to upload to their personal data disk; there is no need to download it again on the virtual desktop. The disadvantage of this solution is that it takes a long time when the personal data is large. If the local PC crashes or the network is terminated during the transmission, the user must retransmit because there is no resumption of interrupted transfers and data verification.
FTP Service Migration Solution
Establish an FTP file server on the server side and configure it in advance to use the active directory for authentication. Create an independent FTP folder for each user and enable access permissions to FTP on the user device side. When the user switches to the virtual desktop, the user places all data centrally on the FTP server. After logging in to the virtual desktop, the user files are centrally deleted from the FTP server. The user data will be deleted from the FTP after being moved. This migration solution is executed on a departmental basis. After the migration of a single department, the department data is centrally deleted to avoid the huge storage space occupation caused by this.
The advantage of this solution is that it is easy to use and does not require much training. In addition, the use of software such as FlashFXP for uploading can support resuming interrupted transfers to ensure the integrity of user data. The disadvantage of the solution is that each user needs to perform two processes: uploading from the local PC to FTP and downloading from FTP to the virtual desktop, which will take up time and network space.
Migration Summary Evaluation and Technical Support
PVS Resource Migration
| Classification | Specific Steps | Operation Method | Evaluation |
|---|---|---|---|
| Citrix Migration Preparations | 1. Obtain licensing information and network information | Manual | Non-critical time factors |
| Citrix Migration Preparations | 2. Export the association between virtual machines and users | Manual | Non-critical time factors |
| Source VM Environment Preparations | 1. SCMT client installation | Manual | Only template installation is required. Non-critical time factors. |
| Source VM Environment Preparations | 2. PVS VM template preparations | Manual | Non-critical time factors |
| Template Migration | 1. Template V2V migration | Manual | Migrate only one server. Non-critical time factors. |
| Template Migration | 2. Domain processing | Manual | Non-critical time factors |
| Template Migration | 3. Component processing | Manual | Uninstall only the template. Non-critical time factors. |
| Template Migration | 4. Convert to VDI template | Manual | Non-critical time factors |
| Import and Use | 1. Create new resources and batch-create virtual machines | Manual | Non-critical time factors |
| Import and Use | 2. VDC completes domain connection | Manual | Non-critical time factors |
| Import and Use | 3. Complete user and resource allocation | Manual | Non-critical time factors |
| Import and Use | 4. NAS data migration | Tool | UPM data involves copying, and the data size for a single user will not exceed 2G. Overall, it does not require much manpower. It is mainly in testing. |
Therefore, according to the PVS migration, the manpower is focused on testing the UPM data inheritance.
Specific work arrangements: Preliminary research (1 man-day) + preparation work and small batch template switching (1 man-day) + trial operation (X man-day, generally within 1-2 weeks to ensure stable operation) + volume migration (about 1,500 virtual machines per man-day, 3T data volume).
MCS Resource Migration
| Classification | Specific Steps | Operation Method | Evaluation |
|---|---|---|---|
| Citrix Migration Preparations | 1. Obtain licensing information and network information | Manual | Non-critical time factors |
| Citrix Migration Preparations | 2. Export the association between virtual machines and users | Manual | Non-critical time factors |
| Source VM Environment Preparations | 1. SCMT client installation | Manual | Both templates and virtual machines need to be installed. There is currently no standardized batch-processing solution. Manual processing takes about 10 minutes per unit. Batch processing takes about 60 minutes for 100 units. |
| Source VM Environment Preparations | 2. MCS VM template preparations | Manual | Non-critical time factors |
| Template Migration | 1. Template V2V migration | Manual | Migrate only one server. Non-critical time factors. |
| Template Migration | 2. Domain processing | Manual | Non-critical time factors |
| Template Migration | 3. Component processing | Manual | Uninstall only the template. Non-critical time factors. |
| Template Migration | 4. Convert to VDI template | Manual | Non-critical time factors |
| Resource Migration | 1. Whole machine migration (including component processing) | Manual | Data volume: 100 virtual machines, 200G each 10G network migration, speed 300MB/s It takes about 19 hours. Component uninstallation: Currently about 0.5h for Win 7 and about 0.5h for Win 10. About 1 hour per unit. Batch processing takes about 60 minutes for 100 units. |
| Resource Migration | 2. Machine attribute conversion | Manual | Non-critical time factors |
| Import and Use | 1. Create new resources and import virtual machines | Manual | Non-critical time factors |
| Import and Use | 2. VDC completes domain connection | Manual | Non-critical time factors |
| Import and Use | 3. Complete user and resource allocation | Manual | Non-critical time factors |
Therefore, based on the evaluation of 100 MCS virtual machines with 200G data, the actual migration manpower is approximately:
Preliminary research (1 man-day) + preparation work and small batch switching of templates (1 man-day) + trial operation (X man-day, generally running for 1-2 weeks to ensure stable operation) + volume migration (about 15 virtual machines per man-day, 3T data volume).
It takes about 3 hours to migrate 3TB of data, and about 2 hours to uninstall and install components (limited by the customer’s storage and network capabilities, a good storage 10G network is about 390MB/s, pay attention to the customer’s actual business).
Tools and Technical Support
| Type | Applicable Stage | Technical Support |
|---|---|---|
| SCMT client batch-processing tool | Applicable to the mass migration of MCS machines. Unified distribution of SCMT clients for multiple machines. | Currently not available, can only be installed manually. |
| Citrix component uninstallation tool Sangfor component installation tool |
1. Single-point uninstallation of the PVS template 2. MCS whole machine batch uninstallation 3. MCS overall batch installation |
Currently, you can contact Sangfor Technical Support or Colin Wang (65128) to obtain the single-point uninstallation tool; Sangfor components (vmtools, VDI agent) need to be installed manually. |
| Virtual machine type conversion tool | Converting an MCS machine to a VDI virtual machine. MCS whole machine and template binding. |
You can contact Sangfor Technical Support or Colin Wang (65128) to obtain the script and operation method. |