【VDI】Floating Pool Mode & UPM Guide_V5.9.1
Background
Supported VDI Versions & Operating Systems
| OS/ VDI |
Windows Server 2008 | Windows Server 2012 | Windows Server 2016 | Windows Server 2019 | Windows Server 2022 | Win7 | Win10 | Win11 |
|---|---|---|---|---|---|---|---|---|
| 5.5.6 | Y | Y | Y | N | N | Y | Y | Y |
| 5.9.0 | Y | Y | Y | Y | Y | Y | Y | Y |
| 5.9.1 | Y | Y | Y | Y | Y | Y | Y | Y |
Prerequisites
According to the following scenarios, customers are required to do the below preparations:
- Prepare Windows images, such as Windows 10/11 images and Windows server images.
- Prepare a Windows server as a virtual storage server.
- Windows server requires activation of Terminal Services license.
- Prepare an AD domain server.
- Prepare an AD domain administrator privilege account.
Note:
Make sure customers prepare the above things in advance.
Scenarios
Scenario 1: Floating Pool Mode/ Private Disks in Floating Pool/ Virtual Drive

| Scenarios | Version Required |
|---|---|
| Floating Pool Mode/ Private Disks in Floating Pool/ Virtual Drive | VDI 5.5.6 or above |
| Item | Function Enabled | VDC Configuration |
|---|---|---|
| 1 | Resource | Create a floating pool VM resource. |
| 2 | Private Disks in Floating Pool | Enable private disk. |
| 3 | AD domain (optional) | 1. Join template VM to AD domain (Reference PC joins the AD domain). 2. Configure an LDAP Server. 3. Join VM to the AD domain. 4. Specify the IP address and DNS address for VM or prepare a DCHP server. 5. Use AD domain user to log in to VDI. |
| 4 | Virtual Drive | 1. Create a file server. 2. Create a virtual storage server. 3. Add a virtual drive to the user. |
Scenario 2: Floating Pool Mode/ UPM/ Private Disks in Floating Pool

| Scenarios | Version Required |
|---|---|
| Floating Pool Mode/ UPM/ Private Disks in Floating Pool | VDI 5.9.1 or above |
| Item | Function Enabled | VDC Configuration |
|---|---|---|
| 1 | Resource | Create a floating pool VM resource. |
| 2 | Private Disks in Floating Pool | Enable private disk. |
| 3 | UPM | 1. Enable profile redirection. 2. Select the redirection path as a private disk. |
| 4 | AD domain (optional) | 1. Join template VM to AD domain (Reference PC joins the AD domain). 2. Configure an LDAP Server. 3. Join VM to the AD domain. 4. Specify the IP address and DNS address for VM or prepare a DCHP server. 5. Use AD domain user to log in to VDI. |
Scenario 3: Floating Pool Mode/ UPM/ UPM Drive (Virtual Drive)

| Scenarios | Version Required |
|---|---|
| Floating Pool Mode/ UPM/ UPM Drive (Virtual Drive) | VDI 5.9.1 or above |
| Item | Function Enabled | VDC Configuration |
|---|---|---|
| 1 | Resource | Create a floating pool VM resource. |
| 2 | UPM Drive | 1. Deploy the UPM Drive server. 2. Create a UPM Drive. |
| 3 | UPM | 1. Enable profile redirection. 2. Configure a specific path to be redirected. 3. Select the redirection path as UPM Drive. |
| 4 | AD domain (optional) | 1. Join template VM to AD domain (Reference PC joins the AD domain). 2. Configure an LDAP Server. 3. Join VM to the AD domain. 4. Specify the IP address and DNS address for the VM or prepare a DCHP server. 5. Use AD domain user to log in to VDI. |
Scenario 4: Floating Pool Mode/ UPM/ 3rd-Party Drive

| Scenarios | Version Required |
|---|---|
| Floating Pool Mode/ UPM/ 3rd-Party Drive | VDI 5.9.1 or above |
| Item | Function Enabled | VDC Configuration |
|---|---|---|
| 1 | Resource | Create a floating pool VM resource. |
| 2 | 3rd-Party Drive | Prepare 3rd-Party Drive, for example, NAS. |
| 3 | UPM | 1. Enable profile redirection. 2. Configure a specific path to be redirected. 3. Select the redirection path as 3rd-Party Drive. |
| 4 | AD domain (optional) | 1. Join template VM to AD domain (Reference PC joins the AD domain). 2. Configure an LDAP Server. 3. Join VM to AD domain. 4. Specify the IP address and DNS address for VM or prepare a DCHP server. 5. Use AD domain user to log in to VDI. |
Scenario 5: Floating Pool Mode/ UPM/ FSLogix

| Scenarios | Version Required |
|---|---|
| Floating Pool Mode/ UPM/ FSLogix | VDI 5.9.1 or above |
| Item | Function Enabled | VDC Configuration |
|---|---|---|
| 1 | Resource | Create a floating pool VM resource. |
| 2 | Storage | Prepare a storage, for example, NAS. |
| 3 | FSLogix | 1. Enable FSLogix. 2. Configure a specific path to be redirected. |
| 4 | AD domain | 1. Join template VM to AD domain (Reference PC joins the AD domain). 2. Configure an LDAP Server. 3. Join VM to the AD domain. 4. Specify the IP address and DNS address for VM or prepare a DCHP server. 5. Use AD domain user to log in to VDI. |
This scenario supports the user profile redirection function and can take effect across different resources.
VDC Configuration
Create Floating Pool Mode VM
- Log in to the VDC console and navigate to Resources > Services > Resources. On the Resources page, click New and select Virtual Desktop.


- On the Add Virtual Desktop Resource page, complete the settings in the Basics section as required, where Work Mode must be set to Desktop.

- On the Virtual Machine tab, complete the settings in the Basics section as required. In Desktop Type, select Nonpersistent. Then, check the Enable floating pool (non-persistent) checkbox.

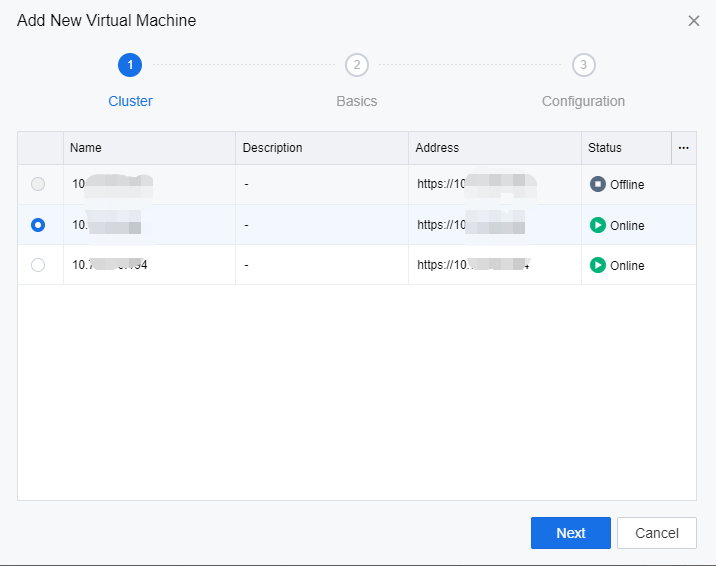
- In the Add New Virtual Machine section, click New. On the Add New Virtual Machine page, select an HCI cluster to deploy the virtual desktops from this resource and click Next.

- On the Basics tab, complete the settings as required and click Next.

- On the Configuration tab, complete the settings as required and click Submit.

- Click Save to complete the configuration for creating virtual desktop resources.
Create Private Disks in the Floating Pool
Method 1:
On the Virtual Machine tab, complete the settings in the Private Disk section as required.

Method 2:
Access the VDC console from a physical machine and go to Resources > Assets > Private Disks in Floating Pool. In the toolbar of the Private Disks in Floating Pool page, click New. In the Add New Private Disk window, select a resource and complete the corresponding private disk settings.


Refer to Chapter 4.4.1 of the user manual for more detailed configurations.
Create UPM Drive (Virtual Drive)
File Server Deployment
Step 1: Add a role and feature.
- Open Server Manager, go to Dashboard, and click Add roles and features.

- On the Before You Begin page, click Next.

- On the Installation Type page, select Role-based or feature-based installation and click Next.

- On the Server Selection page, choose Select a server from the server pool, and click Next.

- On the Server Roles page, find and select File Server, File Server Resource Manager, and Remote Desktop Service, then click Next. Note that a dialog box will appear when you select the File Server Resource Manager. In this case, click Add Features.


- On the Features page, click Next.

- On the Remote Desktop Services page, click Next.

- Select Remote Desktop Session Host, click Add Features in the dialog box, and click Next.


- On the Confirmation page, click Install.
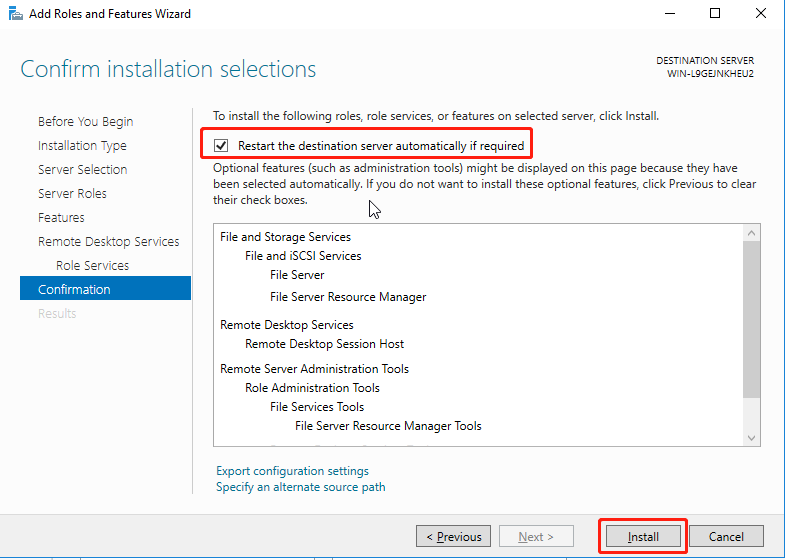
- After the installation is completed, click Close and restart the server.
Step 2: Install Agent on a file server.
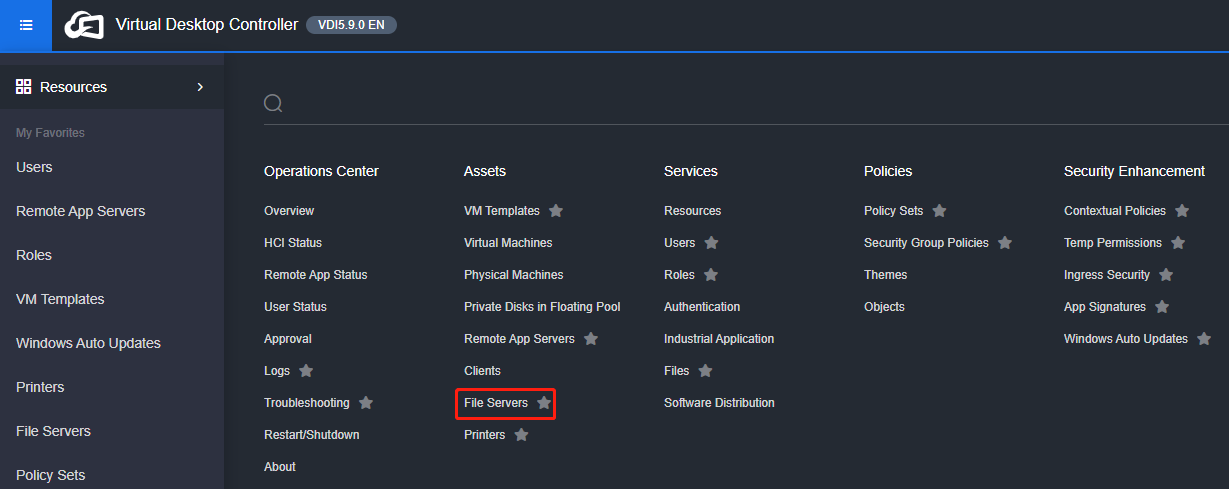
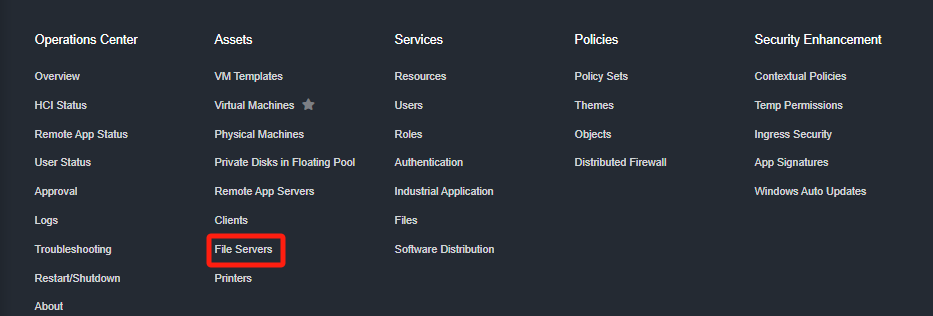
- Log in to the VDC console on the file server VM and go to Resources > Assets > File Servers. On the File Servers page, click Download Agent to download the Agent file.

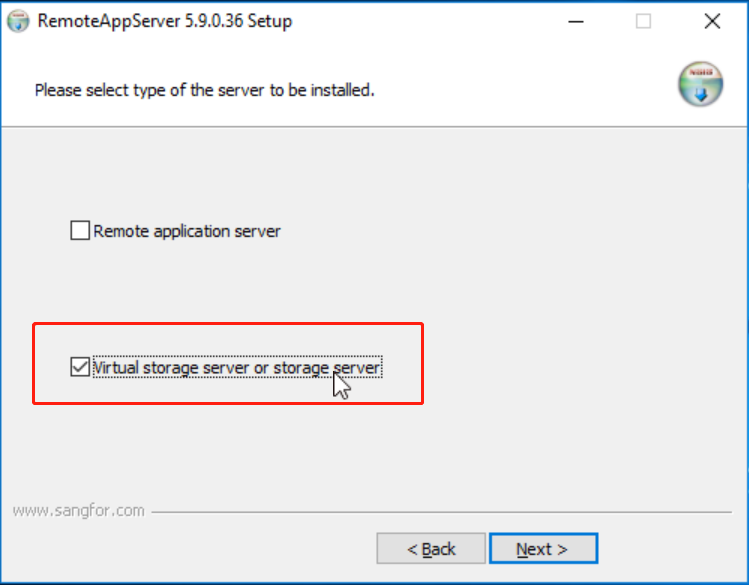
- Execute the Agent file SFRemoteAppServerInstall.exe, click Next, select the Virtual storage server or storage server checkbox in the window displayed, and complete the installation as prompted. Then, the VM will restart automatically.

Step 3: Configure shared directories.
- Log in to the file server VM and create three new folders: A personal drive (private), a public drive (public) for virtual desktops, and a directory for user profiles (upm).

- Configure the private directories.
Ensure the shared directories to be created are accessible to local users of the file server. The following describes how to create a shared directory using the private directory as an example:
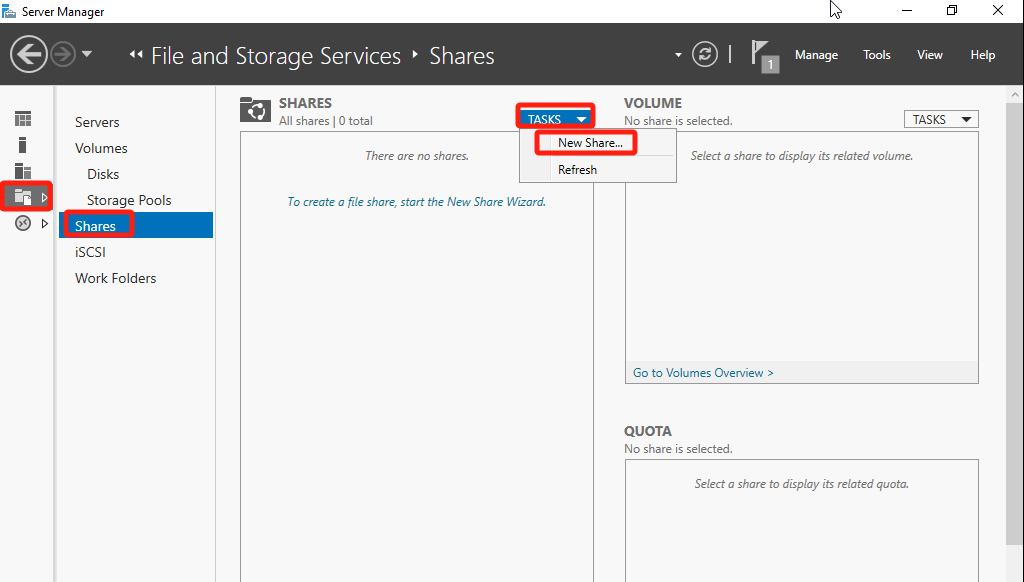
a) Open Server Manager, navigate to File and Storage Services > Shares, click TASKS, and select New Share.


b) On the Select Profile page, select SMB Share – Quick and click Next.

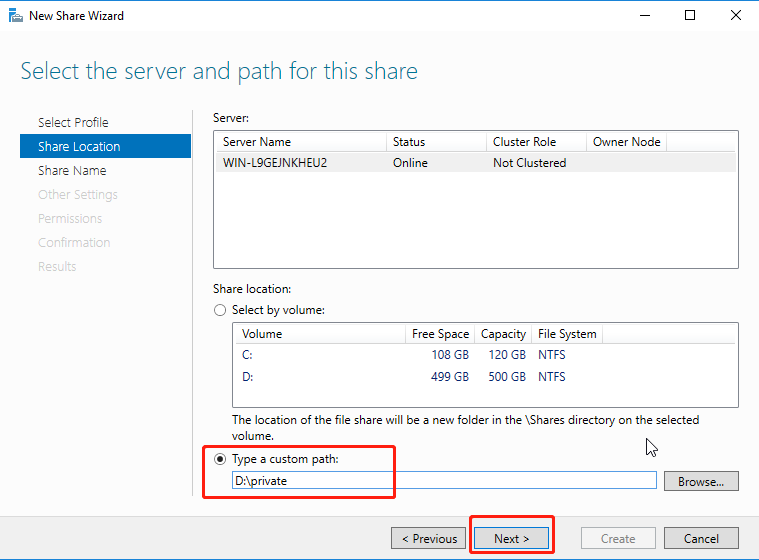
c) On the Share Location page, select Type a custom path, and click Browse. Select the newly created private directory, and click Next.
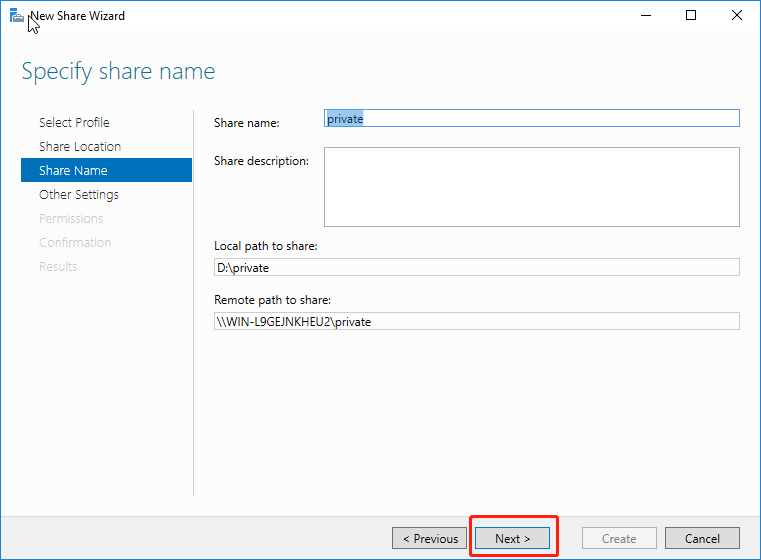
d) On the Share Name page, enter a name in the Share name field and click Next.
e) On the Other Settings page, select Allow caching of share and click Next.

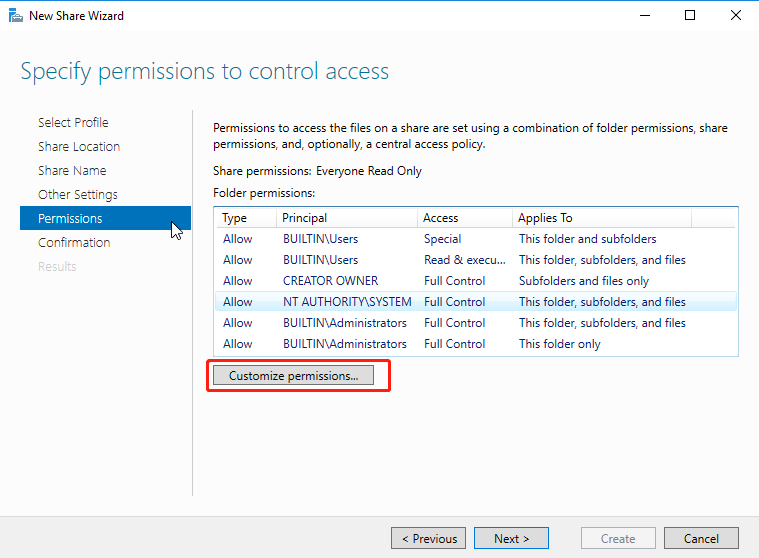
f) On the Permissions page, click Customize permissions.
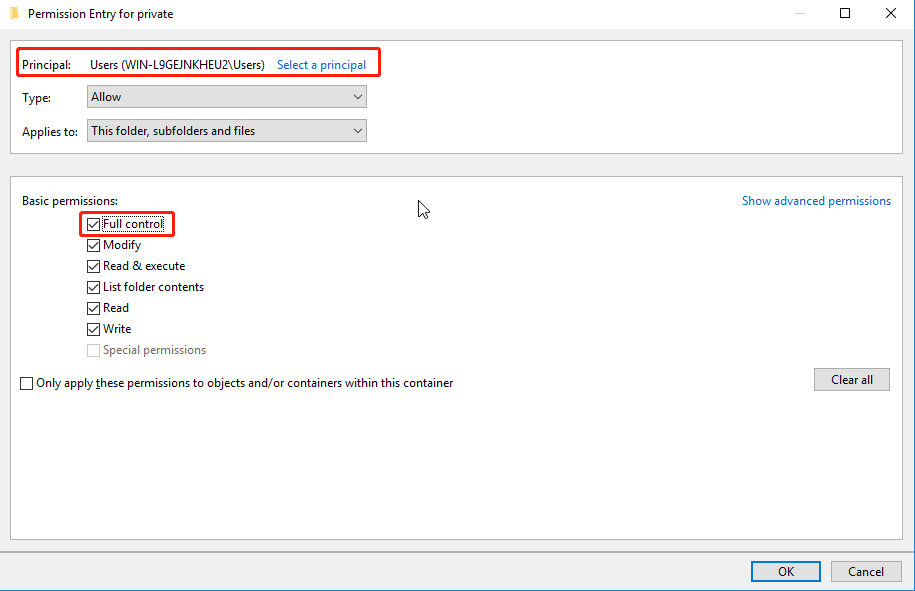
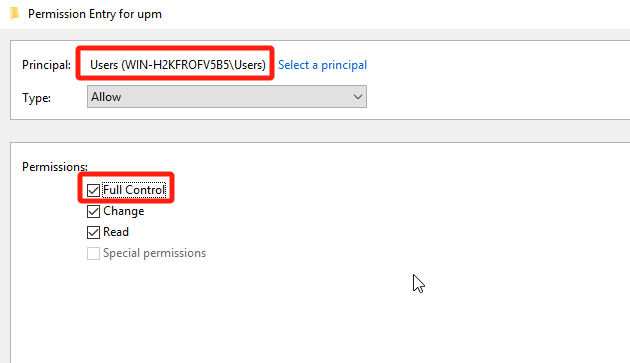
g) On the Advanced Security Settings for private page, under the Permissions tab, click Add and grant full control permissions on this directory to the Users security group of the file server.

h) On the Advanced Security Settings for private page, under the Share tab, click Remove to remove the permissions granted to the Everyone security group, and grant full control permissions to the Users security group of the file server. Then, click OK.


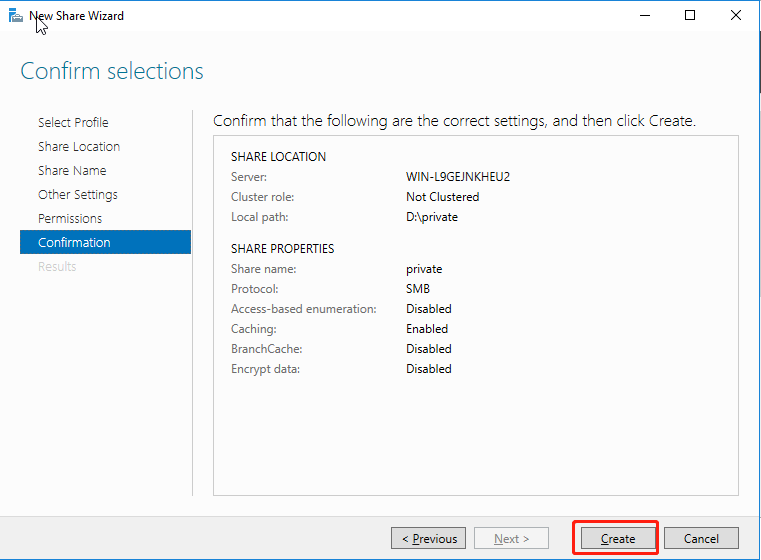
i) On the Confirmation page, click Create. When the creation is completed, close the page.
- Configure the public directory.
The public directory of virtual desktops is configured to be accessed by the accounts specified on VDC. Therefore, the virtual desktop user’s access to the public directory is the same as access permission granted to the specified accounts.
a) Open Computer Management, navigate to System Tools > Local Users and Groups > Users, and add the public-rx and public-rw users.

b) Open Server Manager, go to File and Storage Services > Shares, click TASKS, and select New Share.

c) On the Select Profile page, select SMB Share – Quick and click Next.

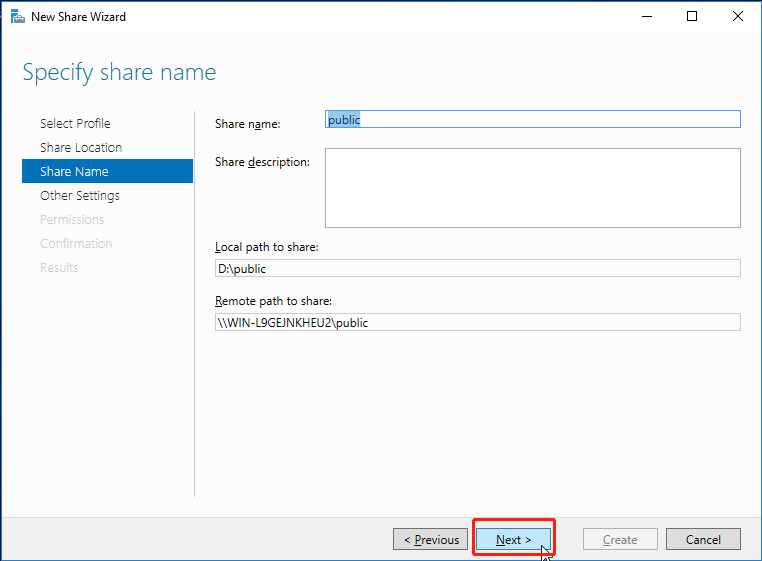
d) On the Share Location page, select Type a custom path, and click Browse. Select the newly created public directory, and click Next.

e) On the Share Name page, enter a name in the Share name field and click Next.
f) On the Other Settings page, select Allow caching of share and click Next.

g) On the Permissions page, click Customize permissions.

h) On the Advanced Security Settings for public page, under the Permissions tab, click Add and grant public-rw users full control permissions and public-rx users read permissions for the folder.


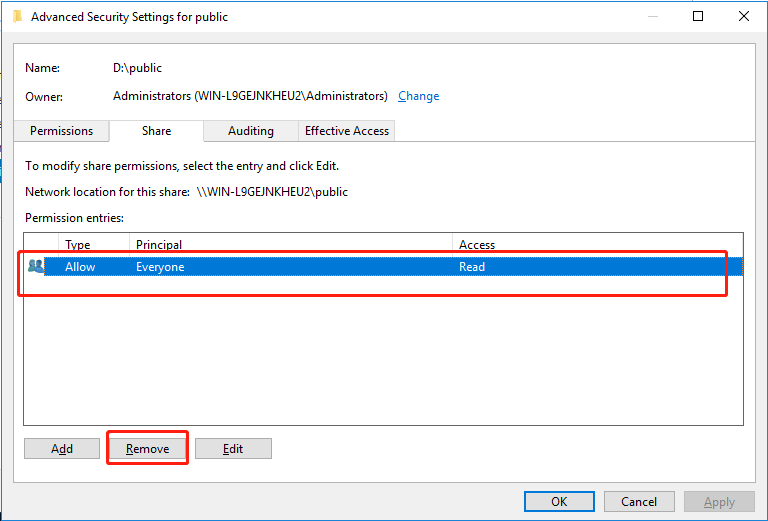
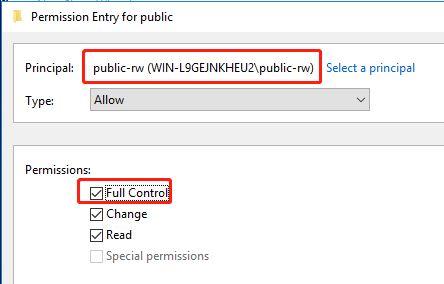
i) On the Advanced Security Settings for public page, under the Share tab, click Remove to remove the permissions granted to the Everyone security group, and grant full control permissions to the public-rw users and the read-only permission to the public-rx users. Then, click OK.

j) On the Confirmation page, click Create. When the creation is completed, close the page.

- UPM Directory Configuration
The UPM directory configuration requires only the creation of a shared directory accessible to local users of the file server, which can be configured as follows:
a) Open Server Manager, go to File and Storage Services > Shares, click TASKS, and select New Share.
b) On the Select Profile page, select SMB Share – Quick in the File share profile and click Next.

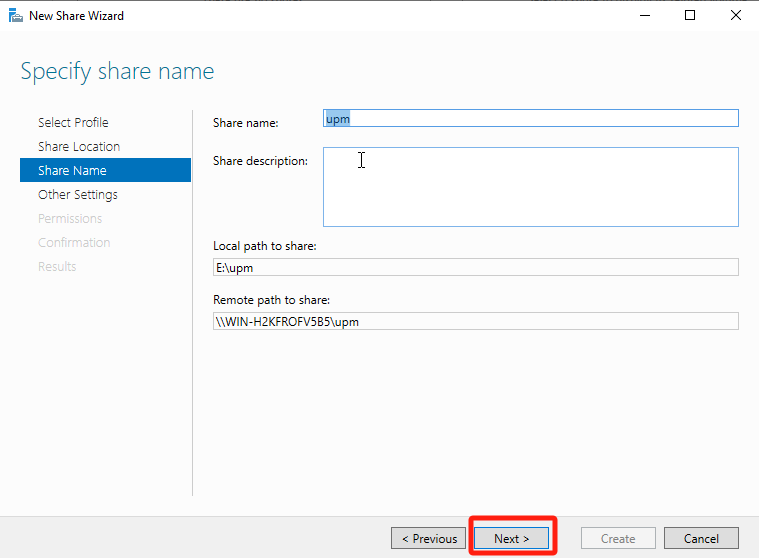
c) On the Share Location page, check the Type a custom path checkbox, select the created UPM directory (upm), and click Next.

d) On the Share Name page, fill in the Share name field and click Next.
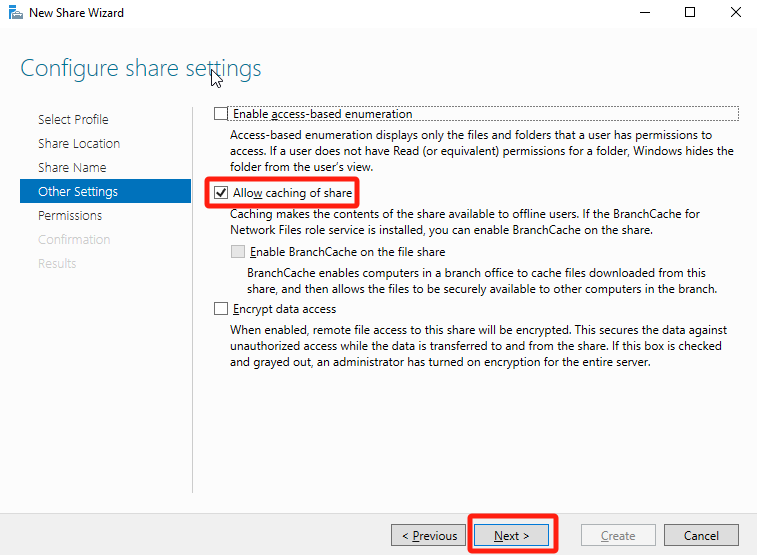
e) On the Other Settings page, select Allow caching of share and click Next.
f) On the Permissions page, click Customize permissions.

g) On the Advanced Security Settings for upm page, under the Permissions tab, click Add to give the local Users security group of the file server full control permissions over the folder.
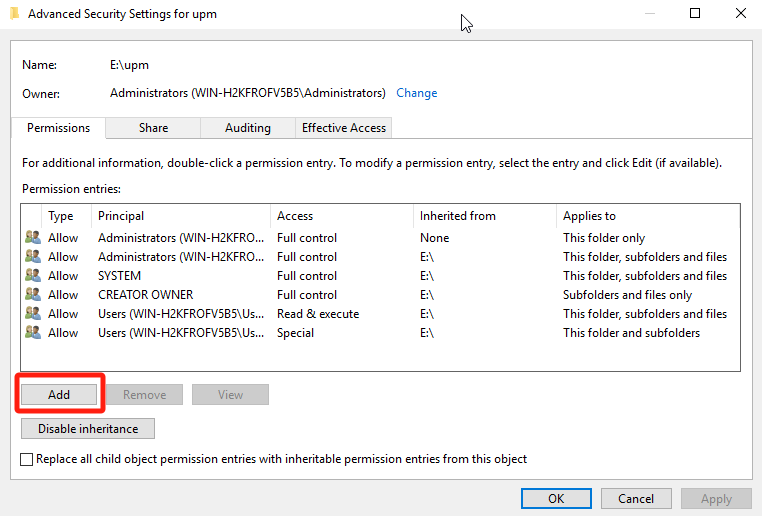

h) On the Advanced Security Settings for upm page, under the Share tab, click Remove to remove the permissions of the Everyone security group, and grant full control permissions to the local Users security group of the file server. Then, click OK.

i) Finally, click Create on the Confirmation page. Close the page when the creation is complete.

- Configure quotas.
Administrators can set quotas for shared folders that serve as virtual desktop private drives and remote app private_remoteapp directories, limiting the amount of data users can store in the shared directory. The configuration process is as follows:
- Create a quota template.
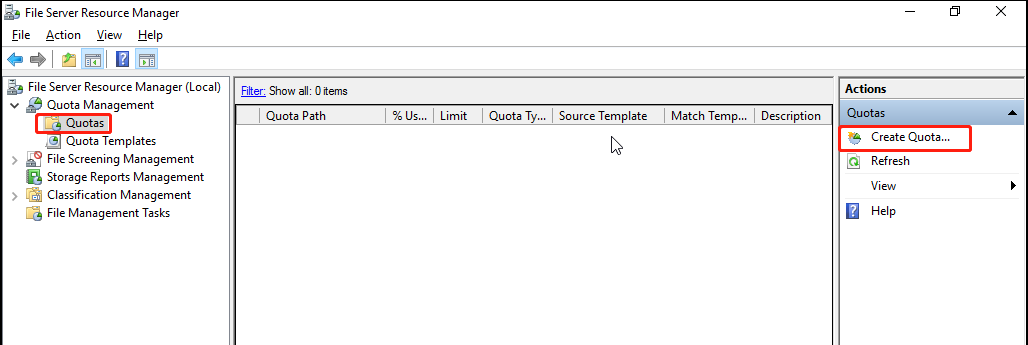
a) Open Server Manager, click Tools, and select File Server Resource Manager.

b) Navigate to Quota Management > Quota Templates and click Create Quota Template.

c) On the Create Quota Template page, in the Copy properties from quota template (optional) drop-down list, select 100 MB Limit and click Copy. Enter a name in the Template name field and change the value of Limit to 5 GB. Then, select the Hard quota: Do not allow users to exceed limit checkbox and click OK.

Note:
The shared directory quota template specifies the maximum storage space users can use in the shared directory. In actual scenarios, you can configure the template based on the service requirements and name it after its space limit to facilitate subsequent configuration and maintenance.
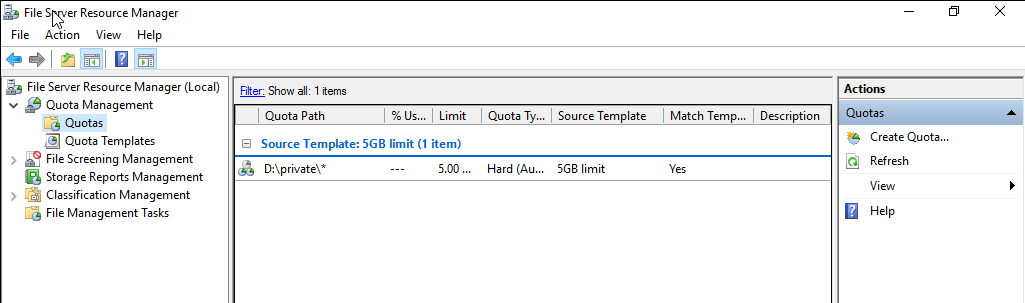
d) Go back to the Quota Templates page. You will see the newly created quota template.

- Create quotas on shared directories.
a) Open File Server Resource Manager, go to Quota Management > Quotas, and click Create Quota.
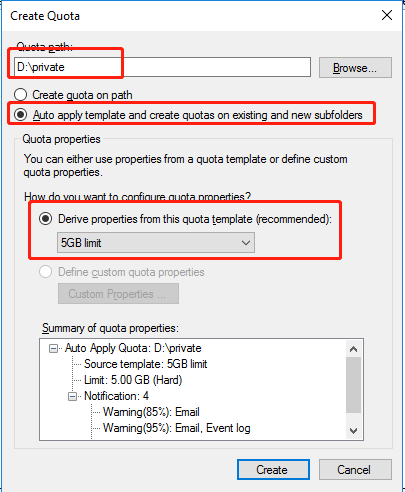
b) In the Quota path, click Browse and select the private (private_remoteapp) directory. Then, select Auto apply template and create quotas on existing and new subfolders, Derive properties from this quota template (recommended), and 5GB limit, and click Create.
Virtual Storage Server Creation
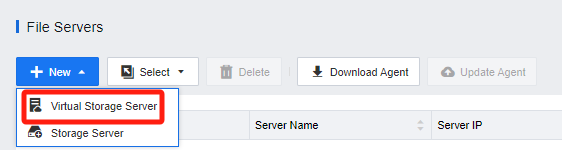
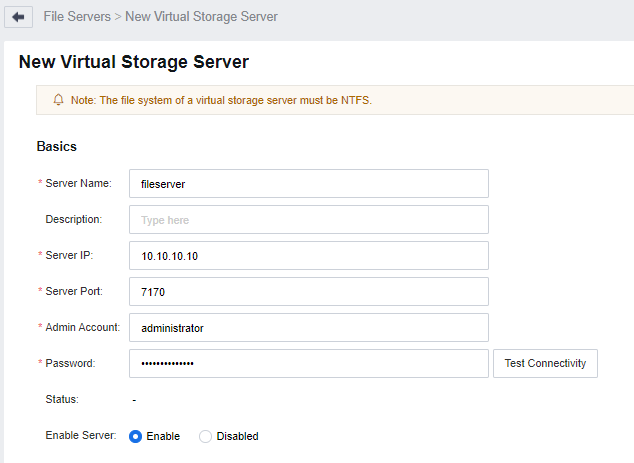
- Log in to the VDC console, navigate to Resources > Assets > File Servers, click New, and select Virtual Storage Server to enter the New Virtual Storage Server configuration interface.
- Fill in the basic attributes of the virtual storage server according to the actual scenario, and then click Test Connectivity to verify the connection. A message will pop up showing the connection status.
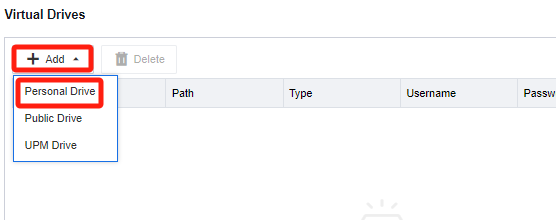
- Add Personal Drive.
a) In the Virtual Drives list, click Add, and select Personal Drive to enter the Add Personal Drive configuration window.
b) Select the shared directory created on the virtual storage server for the personal drive and click OK.

Note:
After the virtual storage server connection test is successful, the shared directories on the virtual storage server will be displayed here for you to choose from. If the connection to the virtual storage server fails, the directories will fail to be fetched.
- Add Public Drive.
a) In the Virtual Drives list, click Add, and select Public Drive to enter the Add Public Drive configuration window.

b) Select the shared directory created on the virtual storage server for the public drive and click OK.
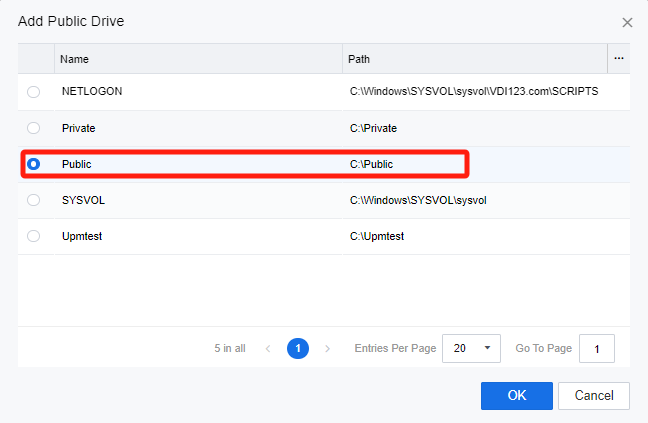
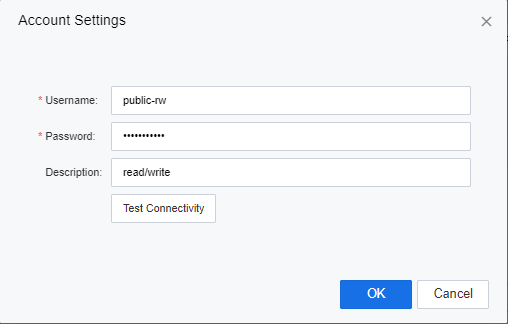
c) Fill in the Username and Password to access the public drive. Click Test Connectivity to verify the connection. A message will pop up showing the connection status. Then, click OK to proceed.

Note:
When adding a public drive storage resource, the configured directory account determines the user’s operation permissions on the drive data when accessing it through the virtual desktop. For example, for an account with read/write permissions, the user has read/write permissions on the public drive data through the virtual desktop, and for an account with read-only permissions, the user only has read permissions on the public drive data through the virtual desktop.
- Add UPM Drive.
a) In the Virtual Drives list, click Add, and select UPM Drive to enter the Add UPM Drive configuration window.

b) Select the shared directory created on the virtual storage server for the UPM drive and click OK.

Note:
After the virtual storage server connection test is successful, the shared directories on the virtual storage server will be displayed here for you to choose from. If the connection to the virtual storage server fails, the directories will fail to be fetched.
Add Virtual Drive to User
- Log in to the VDC console and navigate to Resources > Policies >Policy Sets. Edit the policy sets that you need to enable the virtual drive policy. In the Policy Options section, under the Virtual & Local Desktop Policy > Virtual Drive tab, check the Virtual Drive checkbox.

- Virtual desktops have been connected to port 443 for the service IP address of the Report Center.


Configure User Profile Redirection
- Log in to the VDC console and navigate to Resources > Policies > Policy Sets. Click Edit to edit the target policy set. On the Edit Policy Set page, in the Policy Options section, select the Virtual & Local Desktop Policy > Profile Redirection > User Profile Redirection tab. Check the User Profile checkbox.

- In the Redirection Paths section, click Add. In the Custom Path window, select the path type and configure the paths for redirection as required. The following describes how to configure the paths by Path Type:
a) Common Path
Common paths include the configuration file paths of commonly used browsers, IMEs, and user data paths. Select the desired paths and click OK.

b) Custom Path
The type of custom paths can be Folder, File, or Registry. Select a type and add custom paths as required.
Folder (The following describes how to configure a path for redirecting user data of the Chrome browser):
i. Set Path Type to Custom Path and Type to Folder.
ii. Enter the user data path of the Chrome browser in the Path field and click OK.

File (The following describes how to configure a path for redirecting a text file):
i. Set Path Type to Custom Path and Type to File.
ii. Enter the file storage path (including the file name) in the Path field and click OK.

Registry:
i. Set Path Type to Custom Path and Type to Registry.
ii. Enter the registry path in the Path field and click OK.

c) Redirection Result
i. After folder and file redirection, the hidden directory sangforupm is generated in the private disk, as shown in the following figure.

ii. After registry redirection, HKEY_USERS\SF-UPM is generated, as shown in the following figure.

- In the Excluded Paths section, click Add. In the Custom Path window, specify subdirectories or files to be excluded from redirection for directories that have been configured as required. In the current version, an excluded path can only be of the Folder or File type, but not the Registry type.
a) Folder
i. Set Path Type to Custom Path and Type to Folder.
ii. Enter the path to the folder that needs to be excluded from redirection in the Path field and click OK.

b) File
i. Set Path Type to Custom Path and Type to File.
ii. Enter the path to the file that needs to be excluded from redirection in the Path field and click OK.

- After completing the configuration, you need to define the storage path. In the User Profile Storage Path, select one of the three storage types available on the drop-down list.
Personal Drive: The virtual machine must enable the personal drive.
Third-Party Virtual Drive: The customer provides a third-party NAS storage path, which applies to the scenario where the customer utilizes the old NAS and has a domain-controlled unified identity system.
UPM Virtual Drive: UPM Drive must be added to the VDC file server.

Configure Folder Redirection
- Log in to the VDC console, enter the Resources > Policies > Policy Sets, and click Edit to edit the policy group that needs to enable the folder redirection function. Then, navigate to the Virtual & Local Desktop Policy > Profile Redirection > Folder Redirection tab.

- Default folders are for configuration options. Select the folder that needs to be redirected. Then, click Set to enable and select the redirection path.

- For batch setup, you can select multiple folders and click the Set button at the top to specify the redirection path.

Configure FSLogix
For detailed configuration instructions, please log in to the VDC console and navigate to Resources > Policies > Policy Sets to edit the policy set that needs to enable the user profile redirection feature. In the Policy Options section, under the Virtual & Local Desktop Policy > Profile Redirection > FSLogix tab, click the Instructions button in the upper-right corner to download the FSLogix configuration guide, as shown in the following figure.

Configure an LDAP Server
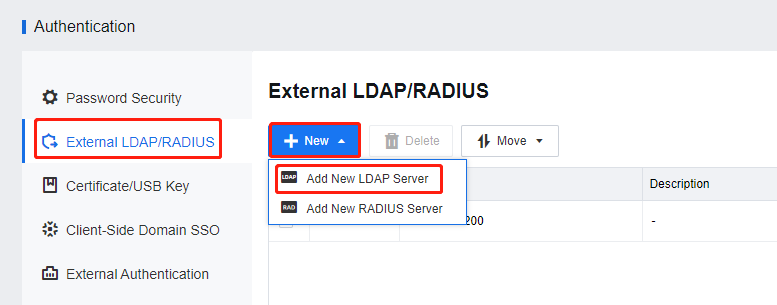
- Log in to the VDC console. Navigate to Resources > Services > Authentication, and select External LDAP/RADIUS in the left pane. Then, click New and select Add New LDAP Server.

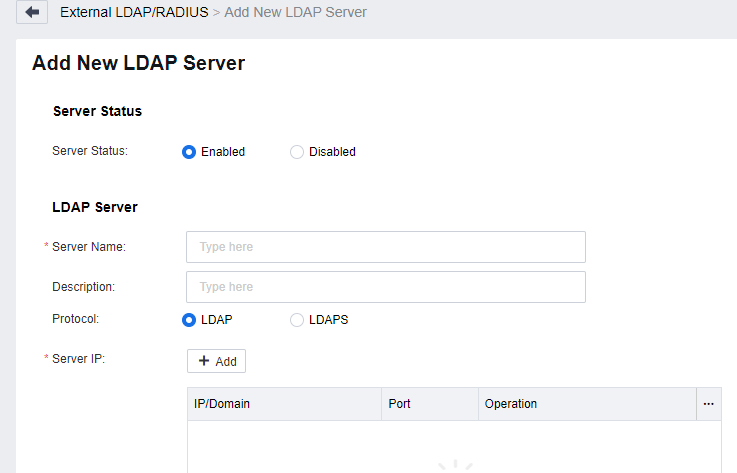
- On the Add New LDAP Server page, configure the LDAP server-related parameters as required and click Save.
a) Configure the Server Status and LDAP Server settings, as shown in the following figure.
b) In the User Basics section, set the related information.

c) In the Authentication Settings section, configure the related settings.

Join VM to AD Domain
-
Log in to the VDC console and navigate to Resources > Services > Resources. On the Resources page, click New and select Virtual Desktop. Alternatively, click Edit corresponding to the target virtual desktop resource.
-
On the Domain and SSO tab, check the Join VM to AD domain checkbox, set Server IP, Server Domain Name, Admin CN, and Admin Password, then click Test Connectivity. Alternatively, select a domain server that has been integrated with VDC to have relevant information automatically filled.

- After the settings are completed, the virtual desktops deployed from the resource will automatically join the corresponding AD domain upon restart.
Specify the IP Address and DNS Address for the VM
Log in to the VDC console and navigate to Resources > Assets > Virtual Machines. On the Virtual Machines page, click Edit to enter the Edit Virtual Machine > Basics tab, as shown in the following figures.


Troubleshooting
User Profile Redirection Fails
- If User Profile Redirection and Startup Programs are enabled simultaneously, ensure the redirection paths are not duplicated. Otherwise, the user profile redirection function will not take effect.
Joining VM to AD Domain Fails
- Ensure the preferred DNS is a domain server IP and pings the domain controller in the VM.
- Make sure the template VM joins the AD domain in advance.