【VDI】Physical Machine Configuration Guide_V5.9.1
Background
Supported VDI Versions
| Physical Machine | |
|---|---|
| VDC 5.9.0 & HCI 6.9.0 | Y |
| VDC 5.9.1 & HCI 6.9.1 | Y |
Prerequisites
According to the following scenarios, customers are required to complete the below preparation:
- Deploy HCI 6.9.0 or above.
- Deploy a hardware VDC (Virtual Desktop Controller).
- Prepare a physical machine with the graphics card.
- Network configuration: Enable TCP port 8871 and TCP ports 8800-8809.
- Prepare a PC client or an STD-620.
Note:
- Make sure customers meet the requirements above in advance.
- For Items 1 and 2, choose according to the scenario required. Meeting either condition is sufficient.
Scenarios
Scenario 1: Configure a Physical Machine/ Hardware VDC
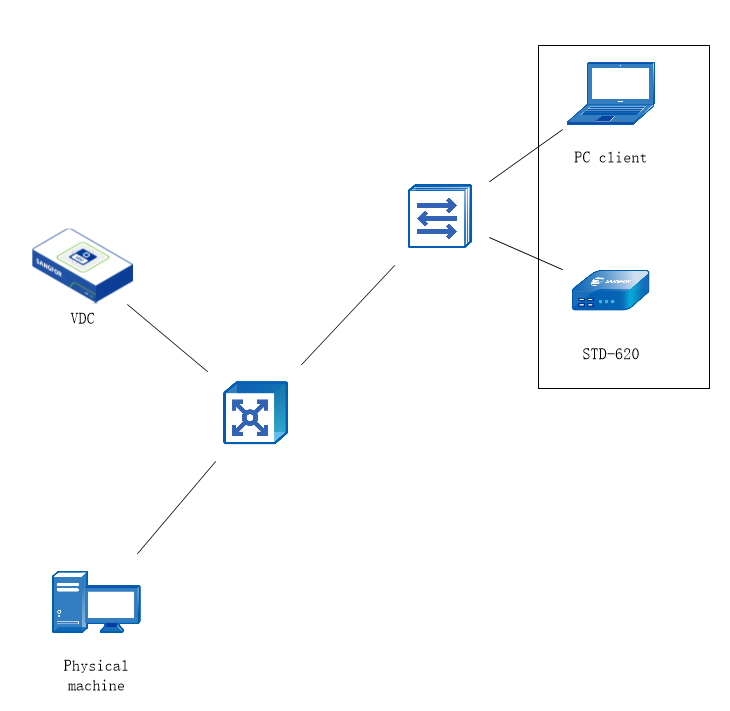
| Scenario | Configure a physical machine/ hardware VDC |
|---|---|
| Versions Required | VDI 5.9.0 or above |
| Item | Function Enabled | Configuration |
|---|---|---|
| 1 | VDC | Deploy a hardware VDC and import the license file to the VDC. |
| 2 | Physical machine | Install the agent on the physical machine. |
| 3 | Resources | Create physical machine resources. |
| 4 | Policy sets | Create physical machine policy sets. |
| 5 | Roles | Create roles to associate with users. |
Scenario 2: Configure a Physical Machine/ Software VDC & HCI

| Scenario | Configure a physical machine/ software VDC & HCI |
|---|---|
| Versions Required | VDI 5.9.0 or above |
| Item | Function Enabled | Configuration |
|---|---|---|
| 1 | VDC | Create a software VDC and import the license file to the VDC. |
| 2 | Physical machine | Install the agent on the physical machine. |
| 3 | Resources | Create physical machine resources. |
| 4 | Policy sets | Create physical machine policy sets. |
| 5 | Roles | Create roles to associate with users. |
VDC Configuration
Create a Software VDC
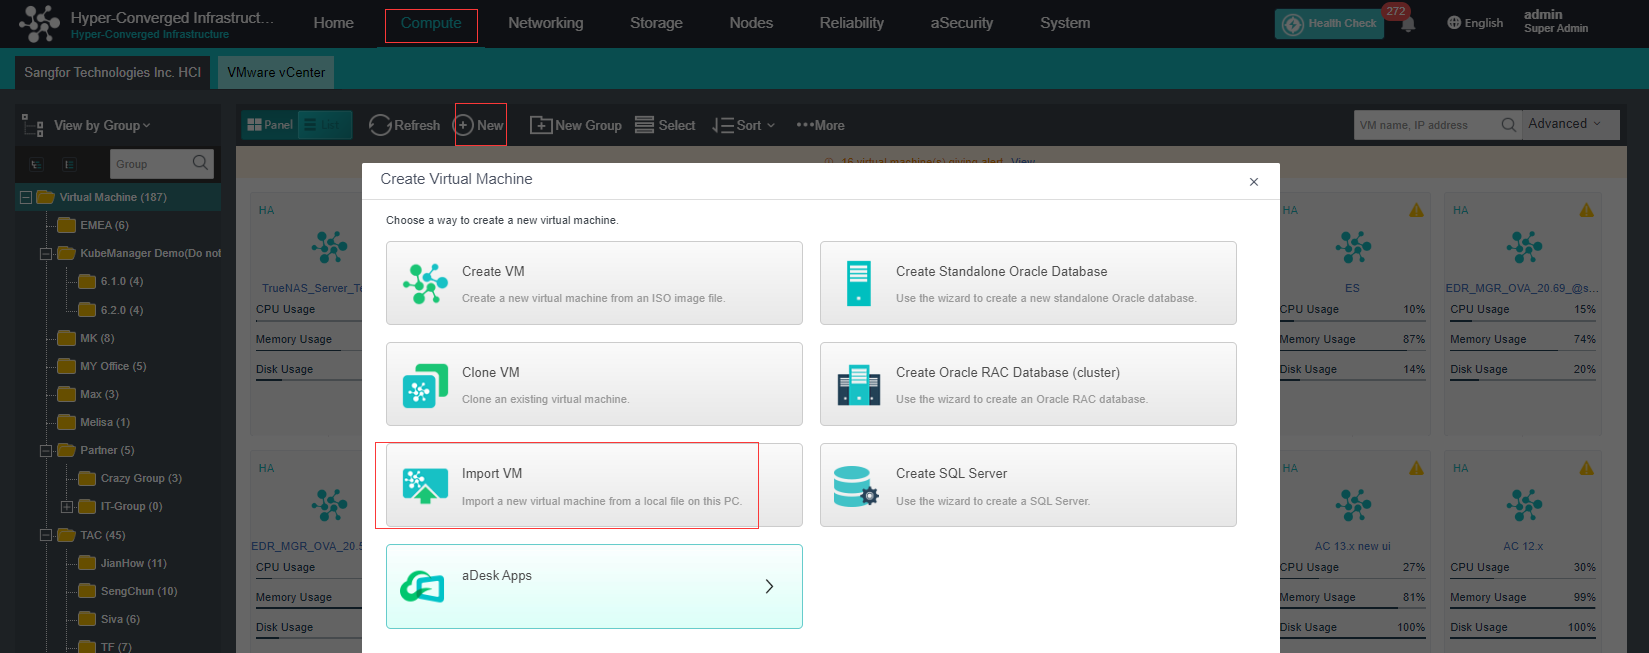
- On the Hyper-Converged Infrastructure (HCI) console, navigate to Compute > Sangfor Technologies Inc. HCI and click New. On the Create Virtual Machine page, click Import VM to import a VM.
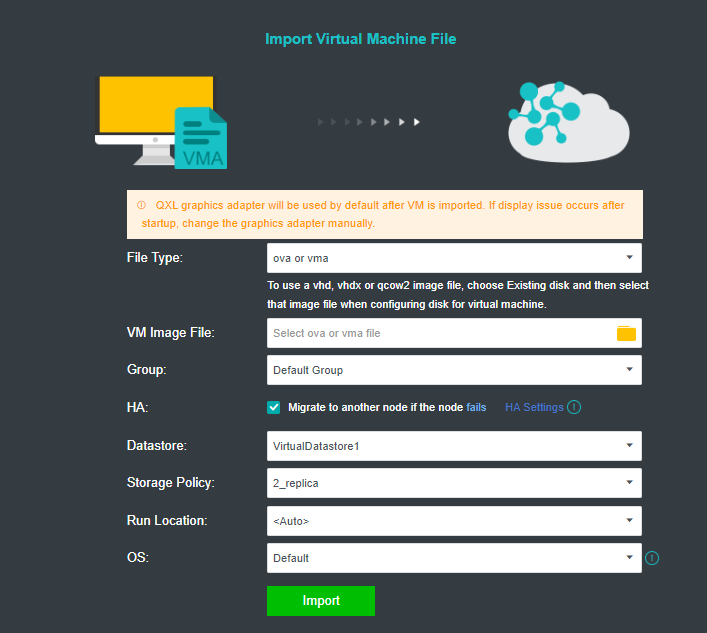
- On the Import Virtual Machine File page, select your local software VDC VMA image and the datastore, then click Import.
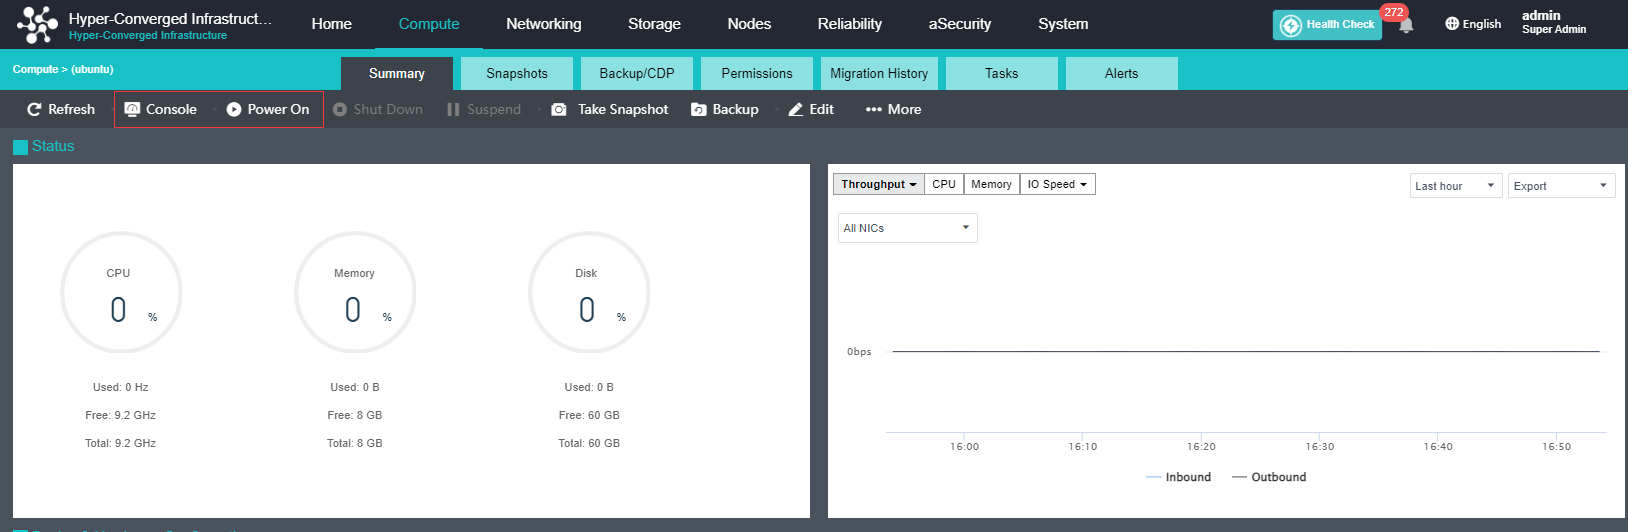
- After the VM is imported, click Summary. On the Summary tab, click Power On to start the VM and click Console to enter the VDC VM console.
Configure the Management IP Address of Software VDC
- On the console of the VDC VM, select Network Setup Wizard and OK, then press Enter.

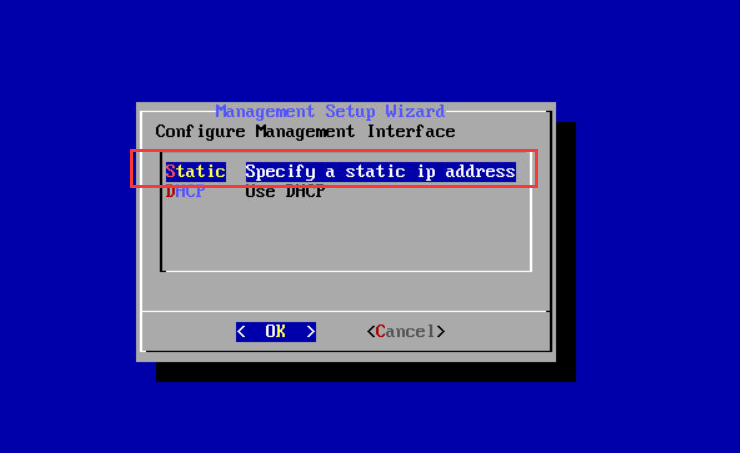
- On the Management Setup Wizard screen, select Static Specify a static ip address and OK, then press Enter.
- On the Static ip configure screen, specify a management IP address and a DNS. Select OK, and press Enter to save the settings.

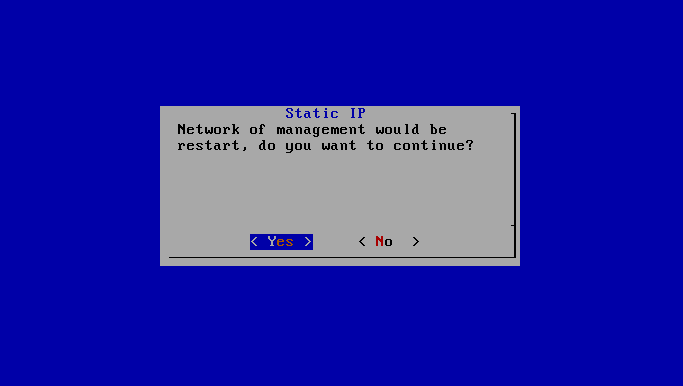
- On the Static IP screen, select Yes to restart the management network for the static IP address configured in the preceding step to take effect.
Verify the Deployment
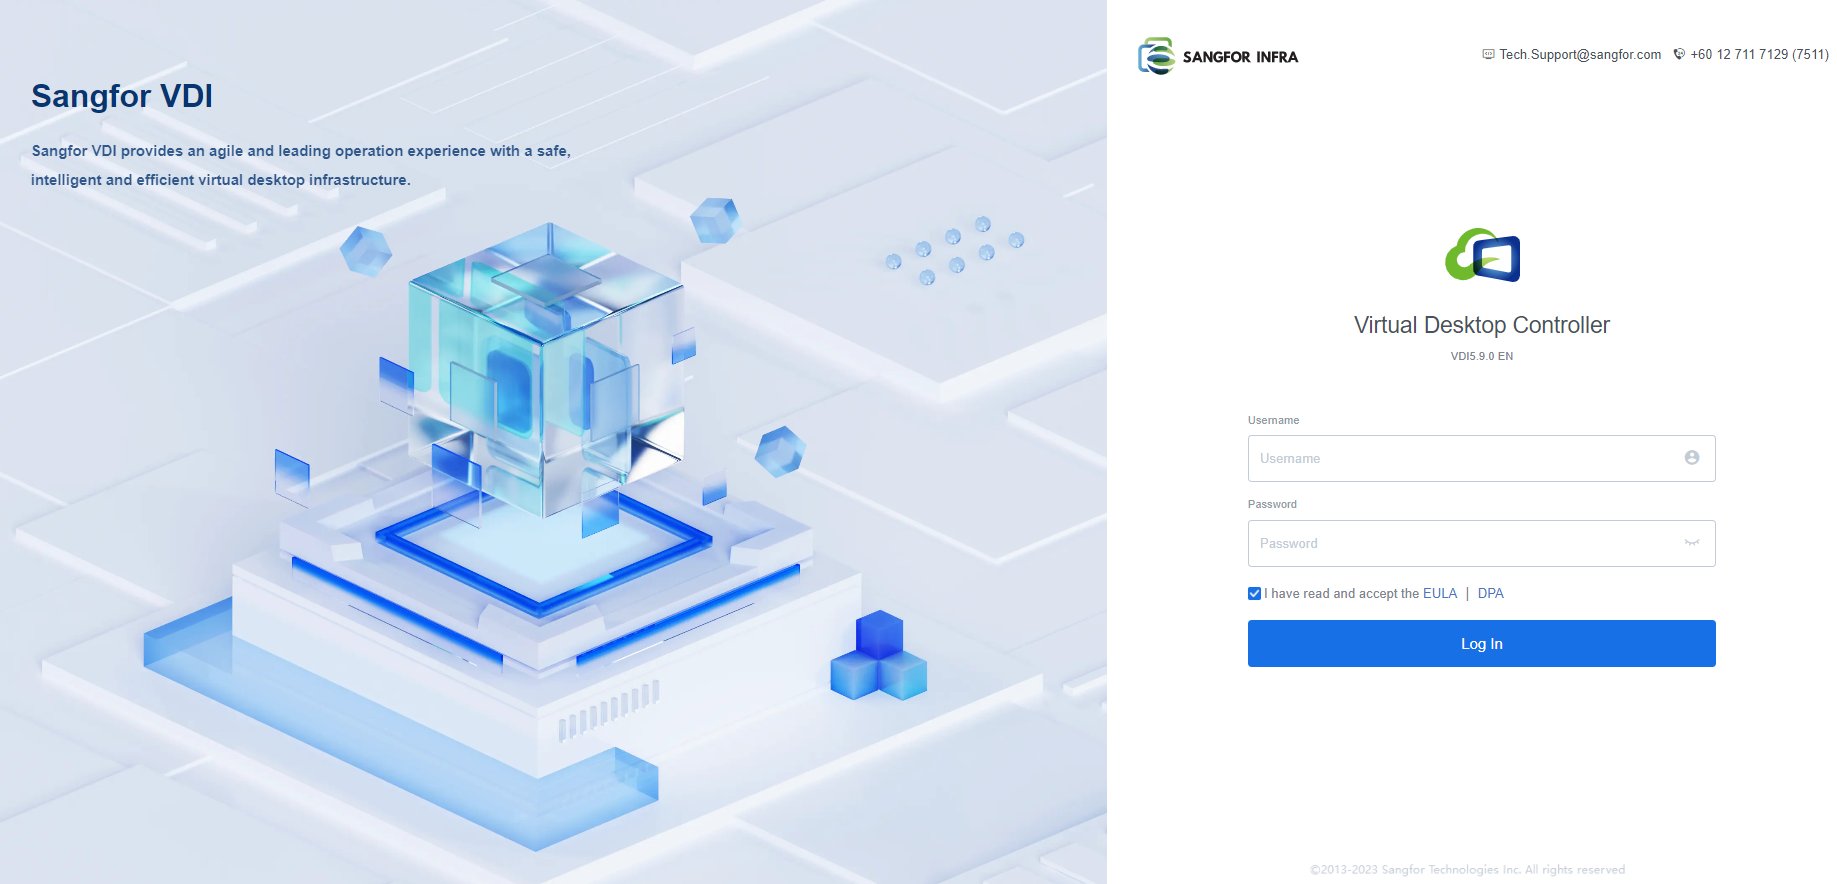
- After completing the deployment, visit VDC’s management URL (https://Management IP address:4430) with a browser. You will see the login page of the management console if the deployment is successful.
Note:
It is recommended to use Chrome or Firefox browsers to visit the VDC console.
Install Agent on the Physical Machine
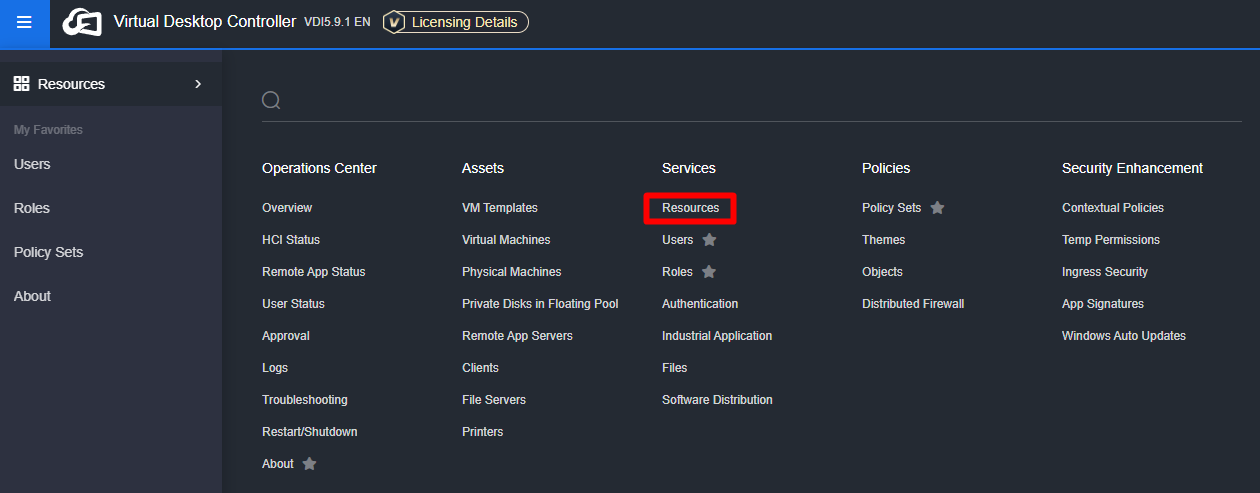
- Access the VDC console from a physical machine and go to Resources > Assets > Physical Machines.

- On the Physical Machines page, click More and select Download Physical Machine Agent Program.

-
Download the agent from the VDC console, as shown in the following figure.

-
Install the agent and configure the VDC Address. The installer automatically specifies the VDC Address as the IP address from which it is downloaded, as shown in the following figure.

Note:
As the installer is in MSI format, please wait 40 seconds for Windows to verify its signature (a Windows mechanism for MSI files) after double-clicking the installer during the initial installation.
- Restart the physical machine after the agent is installed. Then, go to Resources > Assets > Physical Machines on the VDC console. The physical machine is grouped under Unassigned.
Create Physical Machine Resources
- Log in to the VDC console and navigate to Resources > Services > Resources.
- On the Resources page, click New and select Virtual Desktop.
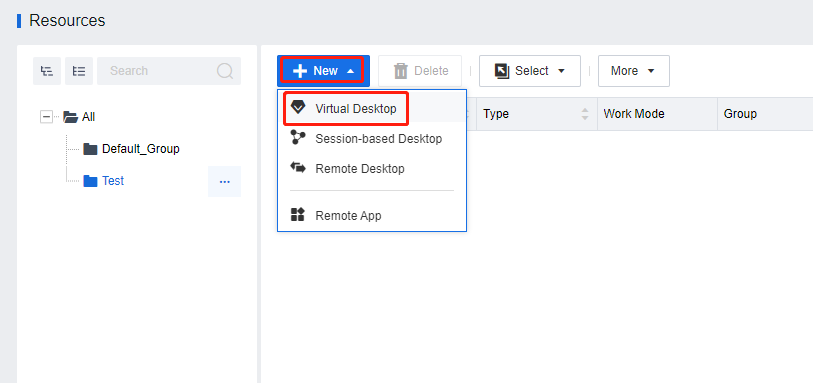
- Complete the settings in the Basics section as required and set Work Mode to Physical Machine.
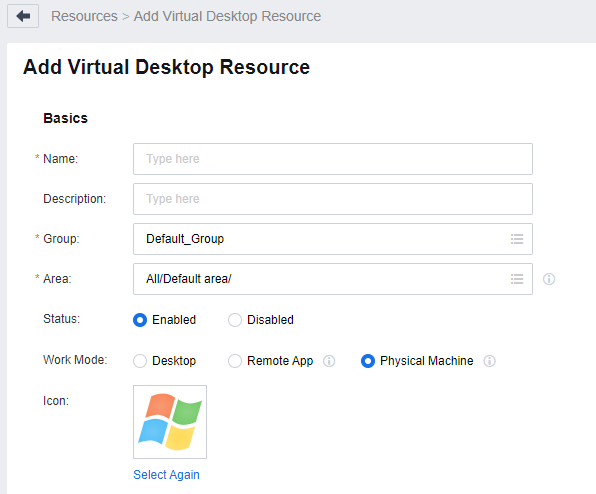
- Complete the settings in the Physical Machine Configuration section as required.

- In the Auto Login section, select Auto login to PC and configure the login method as required to ensure that the managed physical machines can be automatically logged in when users log in to VDI.
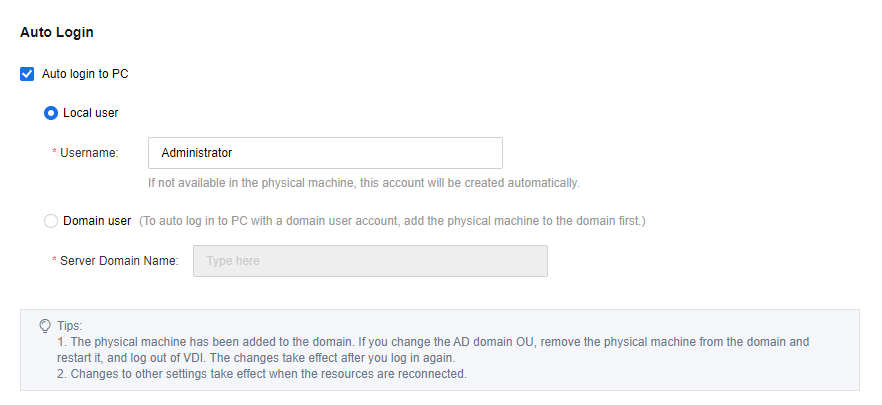
Note:
The difference between local and domain users for the Auto login to PC settings is as follows:Local user
This configuration is used for auto-login by default, and the specified local accounts of the managed physical machines are required for login. If no specified accounts exist, the agent will automatically create the accounts.Domain user
Auto login as domain users can be enabled to ensure that the domain policies apply to domain users when the managed physical machines join the domain. A domain user account consistent with the VDI account is required to log in to the virtual desktop. Administrators need to enter the domain name used for auto login.Auto login as domain users can be enabled to ensure that the domain policies apply to domain users when the managed physical machines join the domain. A domain user account consistent with the VDI account is required to log in to the virtual desktop. Administrators need to enter the domain name used for auto login.
- Click Save to complete the configurations for creating physical machine resources.
Create Physical Machine Policy Sets
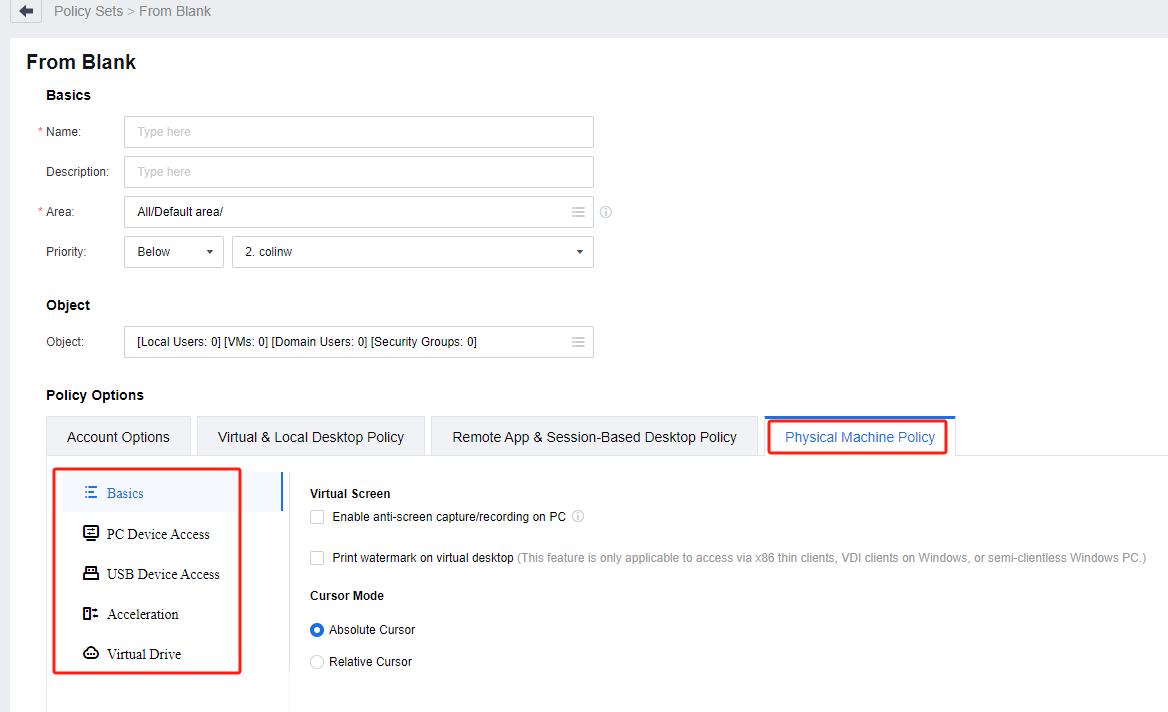
- Log in to the VDC console. Navigate to Resources > Policies > Policy Sets.

- On the Policy Sets page, click New and select From Blank.

- On the From Blank page, complete the settings in the Basics and Policy Options sections as required. Then click Save.
Create Roles to Associate with Users
- Log in to the VDC console. Go to Resources > Services > Roles.

- On the Roles page, click New, and select Add New Role.

- On the Add New Role page, complete the settings in the Basics section as required.

- Click Edit under Associated Resources. Select the physical machine resources and add them as required. At this time, the users associated with this role have permission to use the added resources.

- In the Basics section, click the list icon at the end of the Associated User field. Select the users and add them as required.

Precautions
Unsupported Features in Physical Machines
- The UPM function is not supported.
- USB peripherals are not supported, except for USB flash drives.
- Disabling sound from the server/ local PC is not supported.
You can refer to the link for more details about the features.