【VDI】Remote App Configuration Guide_v5.9.6
Platform Deployment
Deployment Requirements
Version Requirement
It is recommended that versions 5.9.6 and above be used first, which can support the protocol V2.0. The new protocol reconstructs the client-side screen window and frame scheme, greatly improving the screen display and operation experience. The versions before 5.9.6 are using protocol V1.0.
Deployment Mode Requirements
-
Remote application project delivery essentially delivers VDC and Windows Server servers. VDC acts as a remote application controller, and the physical Windows Server acts as an application server. Applications deployed on Windows Server servers can be released to VDI users through VDC. Usually, it is enough to follow the regular VDI deployment process (deploying HCI, VDC, Windows Server virtual machines), which is classified as follows:
-
Hardware or software VDC + physical Windows Server
-
Hardware or software VDC + Windows Server virtual machine
-
You can use a physical Windows server as an application server or a virtual machine as an application server (supported virtualization platforms include HCI and other third-party virtualization platforms. It is recommended to use the SANGFOR HCI platform, which supports application server batch management capabilities).
-
Support for accessing remote applications using direct connection and connecting via VDC proxy.

Endpoint/Application Server Requirements
In the remote app scenario, the endpoint obtains the application on the application server through the network. The following are the requirements for the application server and the access endpoint:
Access Endpoint
| Endpoint Type | Remark |
|---|---|
| Windows PC (Win7/Win10/Win11) | Protocol V2.0 is supported; protocol V1.0 (SRAP2.0) is supported. |
| ARM thin client (std-200) | Protocol V2.0 is not support; protocol V1.0 (SRAP1.0) is supported. |
| X86 thin client | Not supported. |
| Mobile endpoint (Android\ IOS) | Protocol V2.0 is not supported; protocol V1.0 is supported |
| Linux client (e.g. Ubuntu) | Protocol V2.0 is supported; protocol V1.0 (SRAP1.0) is supported, but dual-screen display is not supported. |
| MAC client | Protocol V2.0 is supported; protocol V1.0 (SRAP1.0) is supported, but dual-screen display is not supported. |
Application server
| Server Type | Remark |
|---|---|
| Windows sever 2016\2019\2022 | Recommended. Protocols V1.0/V2.0 is supported. |
| Windows server 2012R2\2012\2008R2\2008 | It is not recommended because only protocol V1.0 is supported. |
| Windows sever 2003 | Not supported. |
Recommended Combination
When using Windows, Linux client, or MAC client, the application server shall use Windows Server 2016\ 2019\ 2022 version. Protocol V2.0 can be used in this combination, and the picture quality, operation experience, stability, and bandwidth consumption are significantly optimized.
Network Requirements
For the remote app scene delivery, you must pay attention to the communication and port restrictions between the client, application server, and VDC.
The remote app differs from the virtual desktop: remote application is through the client, and the remote application server directly communicates for application screen transmission, rather than the client accessing the HCI aDesk communication interface to obtain the screen.
The specific port restrictions are as follows:
- The network between the client and the application server can be reached:
- When using the protocol V1.0(SRAP1.0), the client accesses port 7172 of the application server by default (if it is occupied, use port 7200; if the 7200 port is also occupied, use 7201, and so on).
- When using the protocol V1.0(SRAP2.0), the client accesses port 7171 of the application server by default (if it is occupied, use port 7200; if the 7200 port is also occupied, use 7201, and so on).
- When using protocol V2.0, the client accesses port 8801-9001 of the application server by default.
- The remaining ports are the same as in the VDI scenario.
VDC needs to periodically access the agent port of the application server (the default is 7170, which can be modified manually).
Note: If the security requirements of the customer’s intranet are high (for example, some ports will be disabled by default), please ensure that the ports are available during the above communication process.
Licensing Instructions
VDI License
The VDI license is the user access license on the VDI product. The number of VDI access licenses required equals the number of concurrent VDI users at the customer.
RDS License
RD license (also known as TS license/terminal service license), which controls the access license of remote application sessions on the application server, requires customers to purchase genuine Microsoft licenses and configure relevant licenses according to the Windows Server system in use. Sangfor does not provide Microsoft licenses and configurations.
Remote Desktop Session Host: The server where the application is deployed is also known as RD Session Host. After the Remote Desktop Session Host role is installed on the server, it becomes the Remote Desktop Session Host. Applications published on VDC need to be deployed on this host, and users establish a remote application session by connecting to this host to use the applications deployed on this host.
License Server: After installing the Remote Desktop Licens**ing** role on the server, it becomes the license server. The license server is used to issue relevant RD authorizations to the RD session host, and the RD license purchased by the customer needs to be set up on the license server; the RD session host and the license server can be set to the same one, but this is usually not recommended, which may lead to license confusion. The license server can provide licenses for multiple RD session hosts at the same time.
Remote Desktop License: The RD license requires customers to buy from Microsoft. The number of licenses needs to meet the maximum concurrence of accessed users. The license types are divided into per user and per device. The per-user license type needs to be used in the Remote app delivery project.
Windows Server License
Since the application server needs to be hosted on Windows Server, the system activation license for Windows Server itself also needs to be purchased from Microsoft, and SANGFOR does not provide Microsoft license and configuration.
VDC deployment
The remote app controller is VDC, and the relevant deployment of VDC can be referred to the SANGFOR_VDC_v5.9.6_User Manual.
Windows Server Application Server Deployment
Application server deployment requirements:
- The server system supports Windows Server 2008 to 2022 (It is recommended to use Windows Server 2016 and above because it supports protocolV2.0, which will provide a better experience).
- Install remote desktop services (terminal service) on the server. You need to set up the association between the RD session host and the license server if there are multiple servers.
- A remote desktop license has been configured on the server(a Microsoft RD license is required).
Setting Up a Windows Server
Scenario
Set up a server environment to host applications, which can be deployed using physical or virtual machines.
Precautions
- The Remote app supported server systems: Windows Server 2008 to 2022. (It is recommended to use Windows Server 2016 and above because it supports protocolV2.0, which will provide a better experience).
- In the 3D Remote app scenario, the remote application server needs to use Winserver2019 and above (such as 2019, 2022) so that the graphics card driver of GRID 15.2 and above can be used to get a better software experience.
Steps
Install the relevant operating system on the server host. If it is a virtualized environment, please follow the virtual machine creation instructions of the corresponding virtualization product to complete the operating system installation.
Note: When creating or importing a winserver virtual machine, you need to select the aDdesk **Apps**. Otherwise, it will not be recognized in the VDC VM templates.
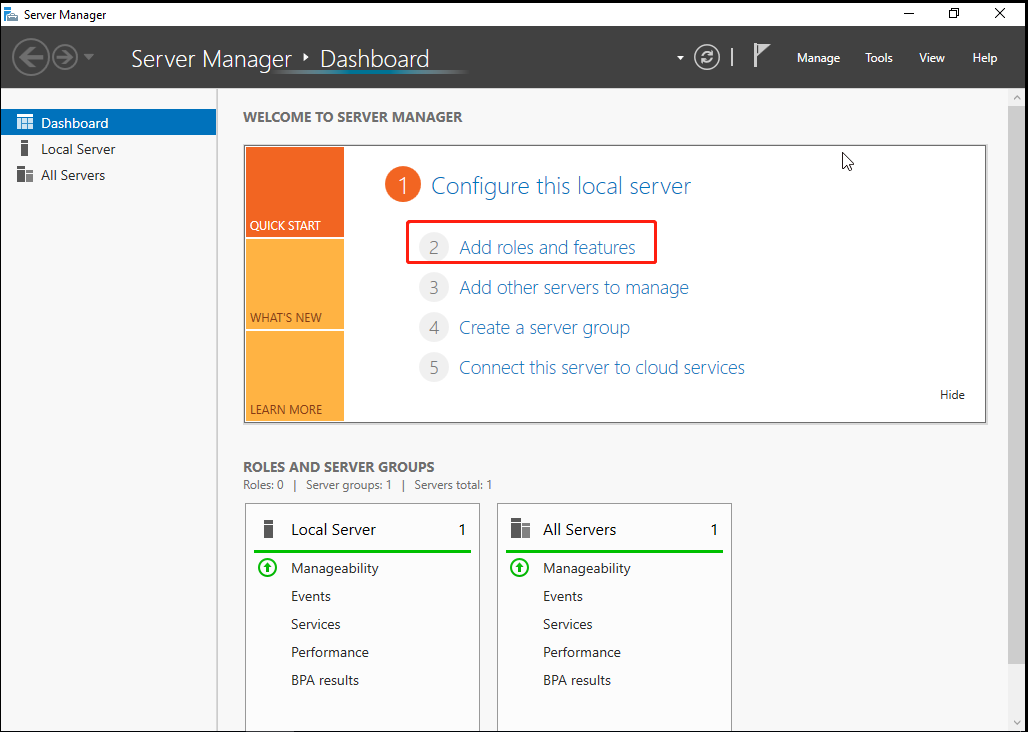
Deploy RD Session Host
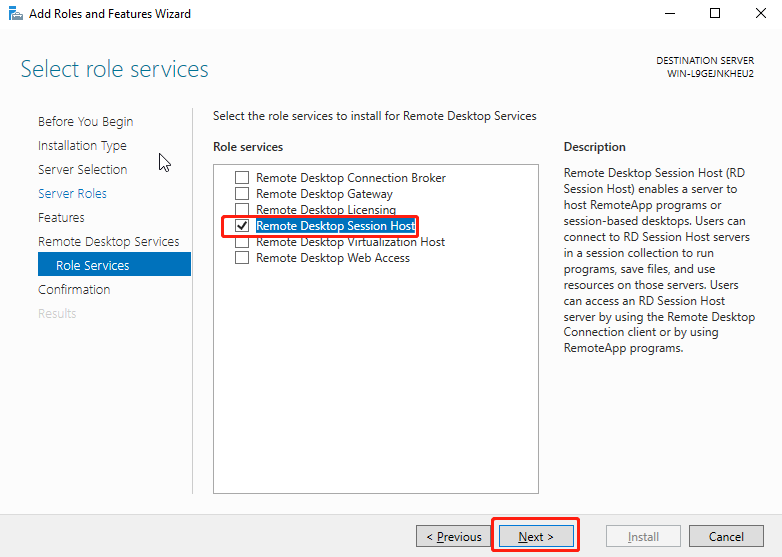
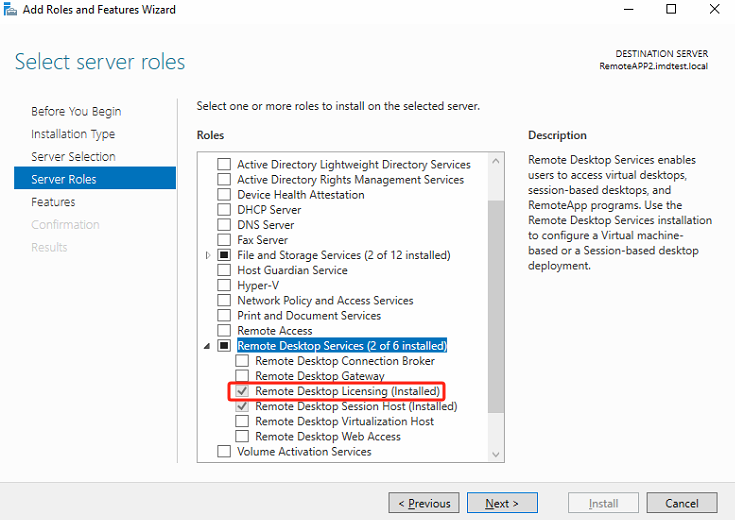
After completing the system, you need to install the role of Remote Desktop Service > Remote Desktop Session Host. The server that installs the role service will act as the RD session host, the application server, to provide relevant resources for the client’s access.
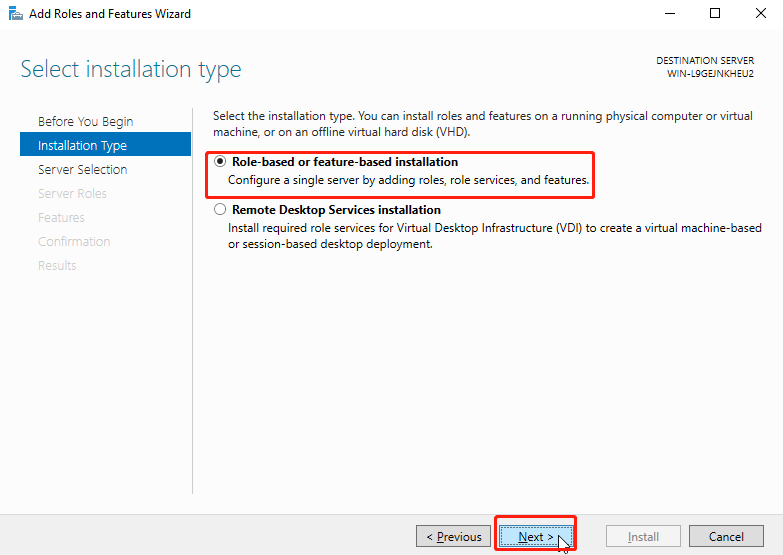
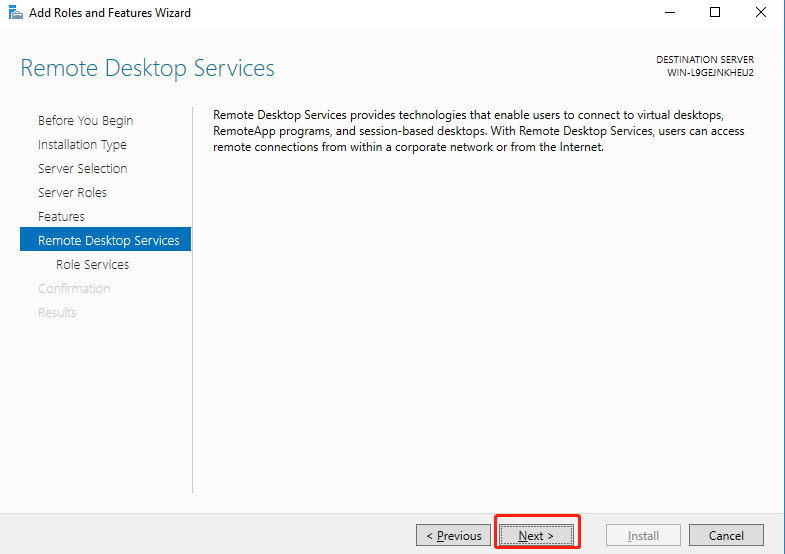
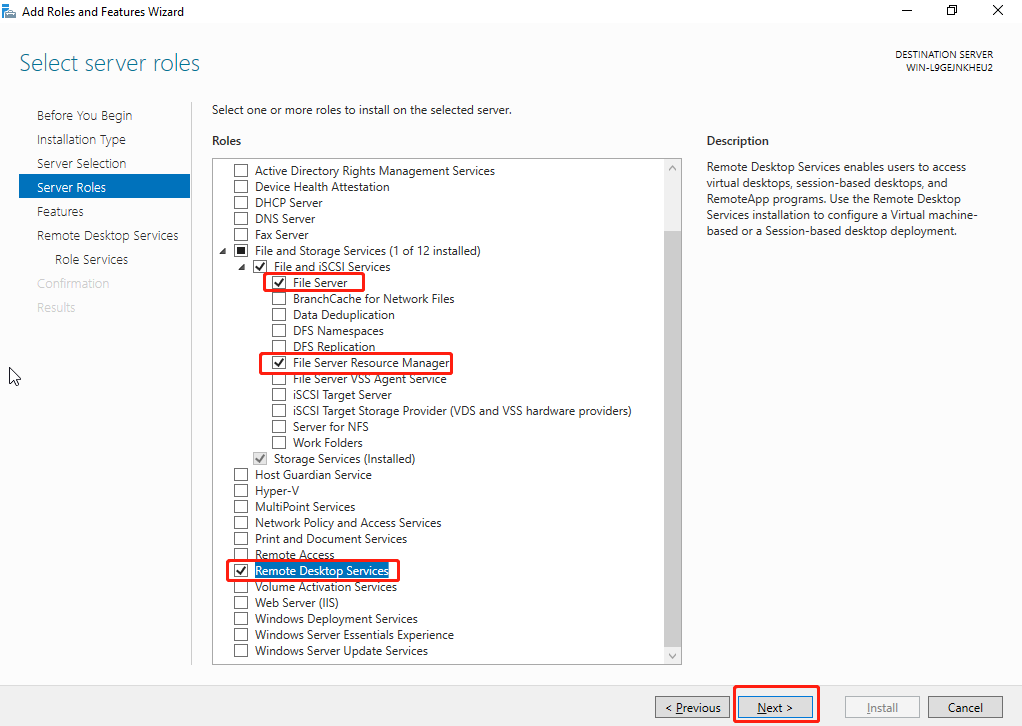
Add roles and features to the server, as shown in the figure below.
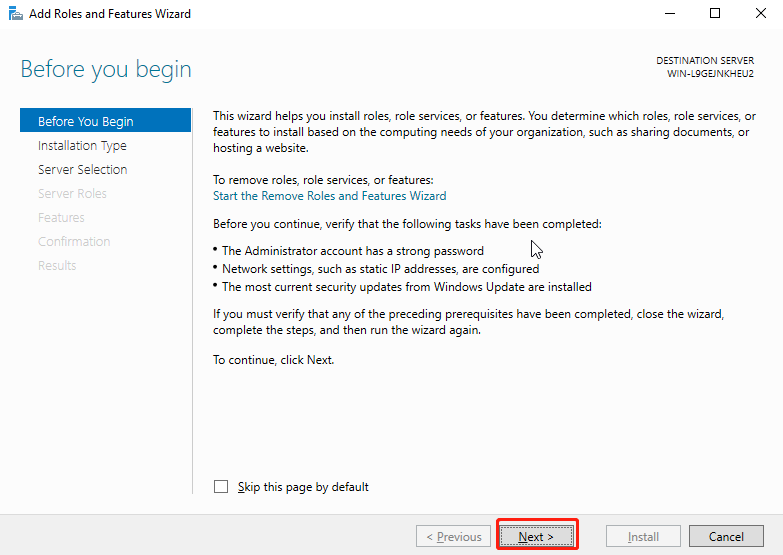
No action is required. Click Next.
- Select Role-based or feature-based installation, and click Next.
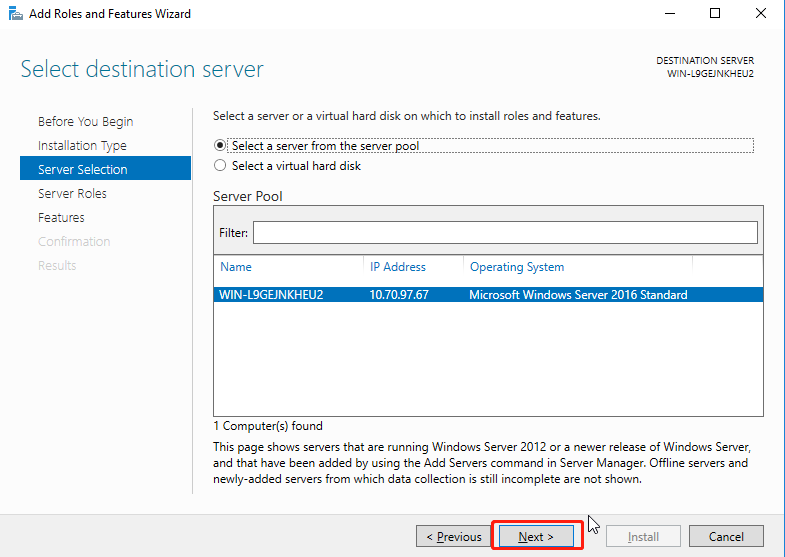
Select the server and click Next.
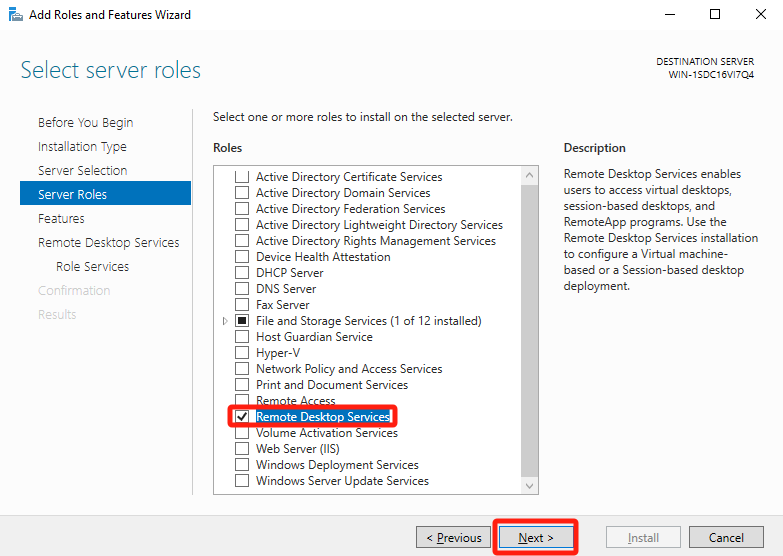
- Check Remote Desktop Services, and click Next.
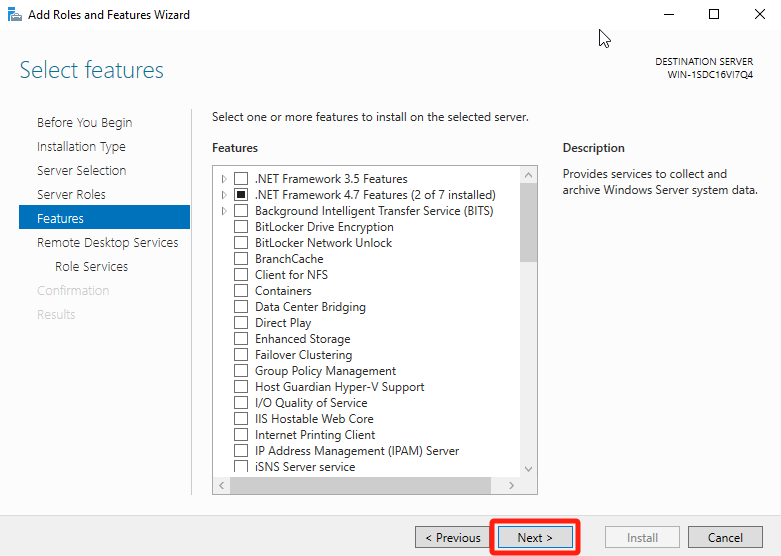
No action required, click Next.
No action required, click Next.
Select Remote Desktop Session Host, and click Next.
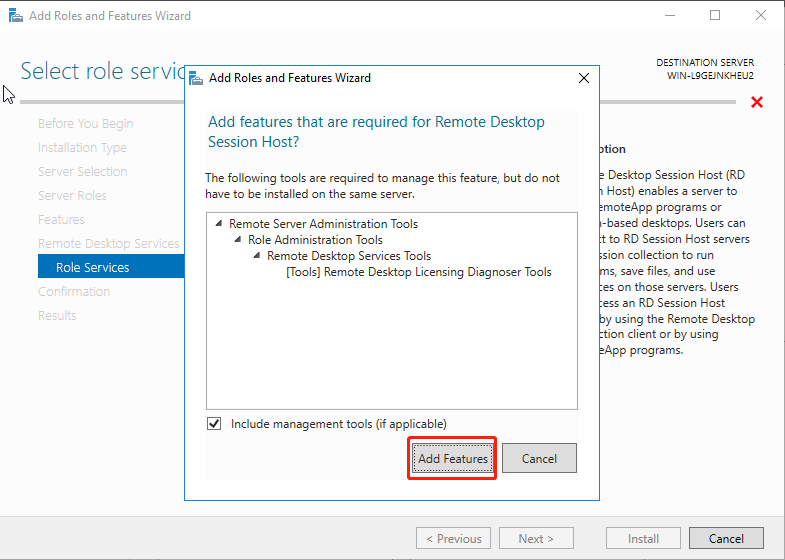
Click Add Features.
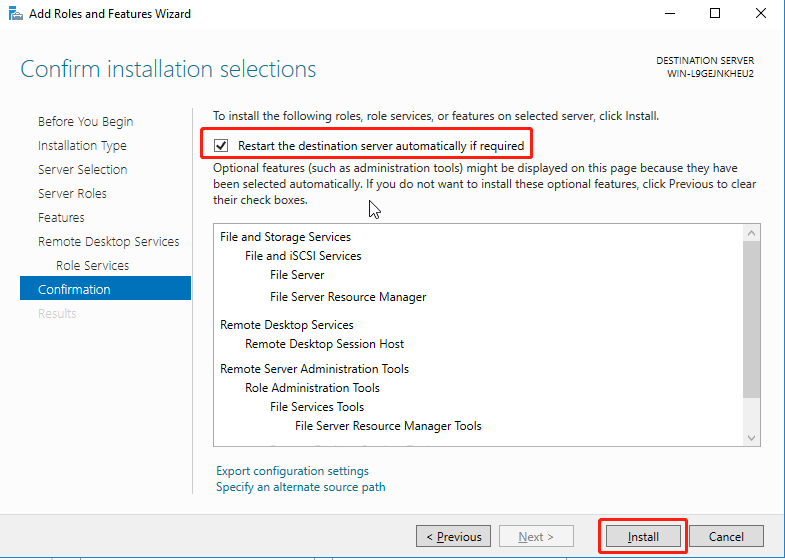
Click Install and wait for the installation to complete.
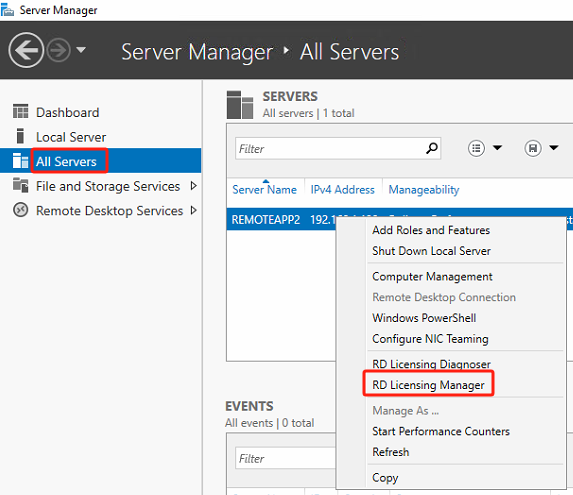
Deployment License Server
After deploying the RD session host, the license server needs to be deployed on the intranet to authorize the RD session host, that is, the user access license. The host that installs the role of Remote Desktop Services > Remote Desktop Licensing is the license server. The license server can be the same server as the RD session host, or it can be deployed separately on other hosts.
Here is an introduction to the installation and deployment license server for windows sever 2022.
Install the Remote Desktop Session Host role according to the steps in the section to install Remote Desktop Licensing.
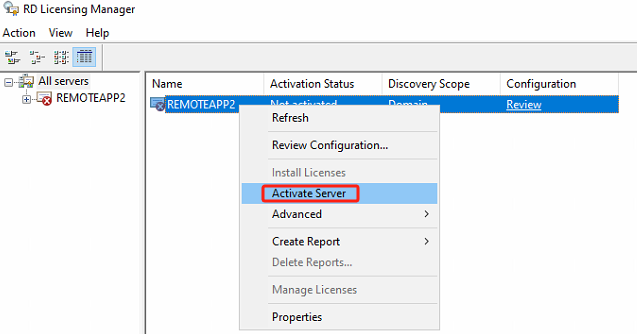
After the installation of Remote Desktop **Licensing is complete, open the RD Licensing Manager**.
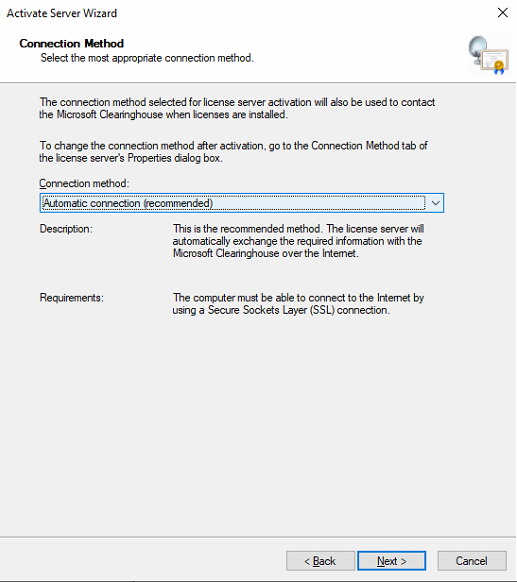
Right-click the license server you want to activate, then click Activate Server. The Server Activation Wizard will launch.
Click Next.
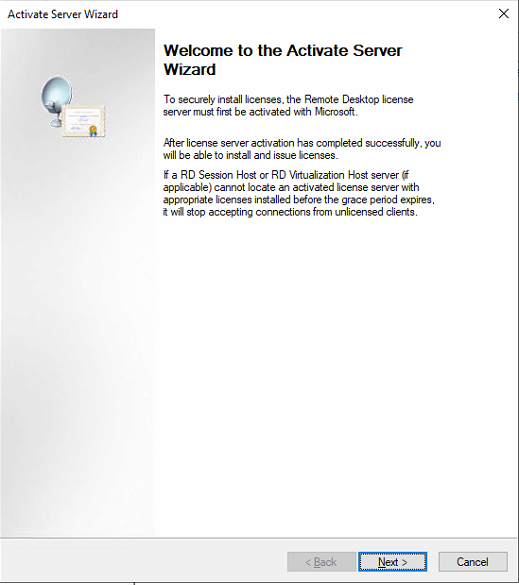
In the Connection Method list on the Connection Method page, select Automatic connection (recommended) and click Next. (This method requires server networking. If the server is not connected to the network, please use another connection method).
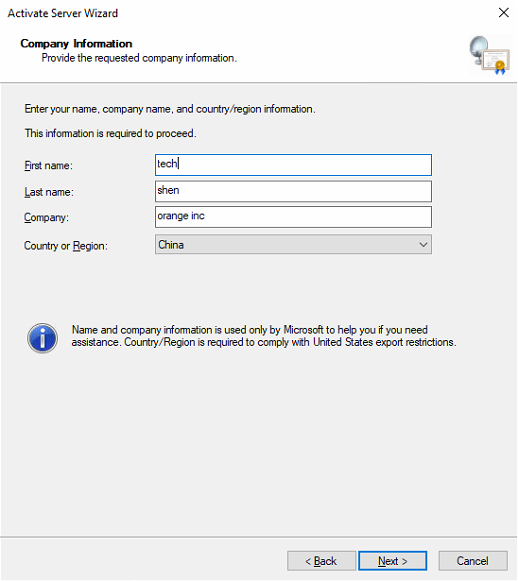
On the Company Information page, type your name and company, select a country or region, and then click Next.
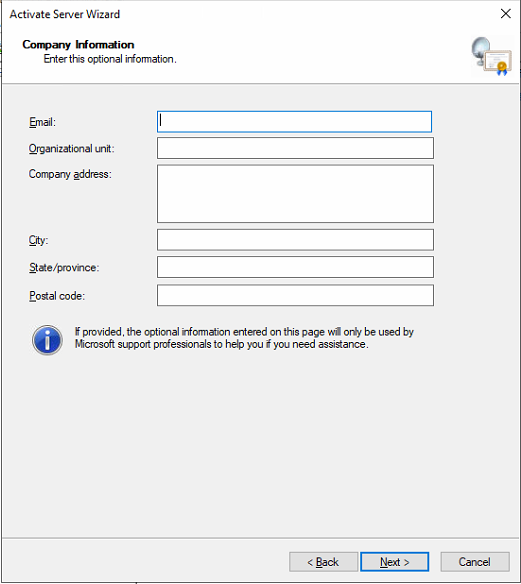
- Specify any additional information to provide, such as email and company address. This information is optional.
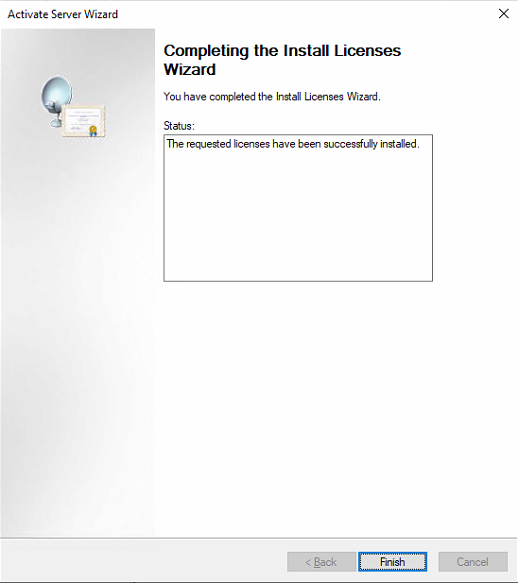
After completing the activation, the next step is to start the license installation wizard.
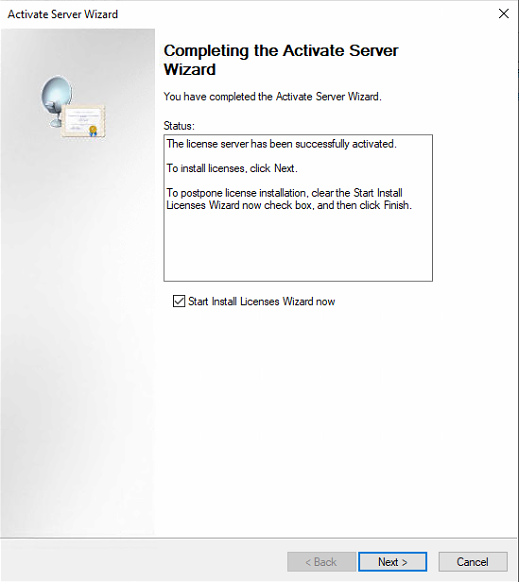
Select the License program and continue according to the operation guidelines .
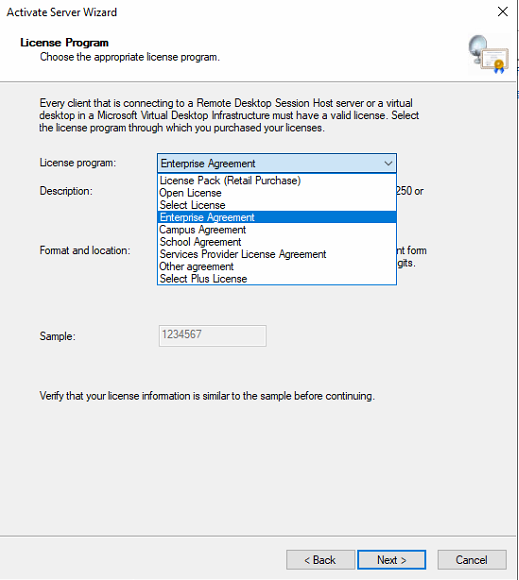
Select the product version and license type (must select the RDS P**er User** CAL license type).

The deployment is complete.
Configure RD License
After deploying the RD Session Host and License Server, you need to configure the RD license:
- Specify the Remote Desktop license mode on the RD Session Host server.
- Specify the license server to be used by the RD Session Host server.
The steps are as follows:
-
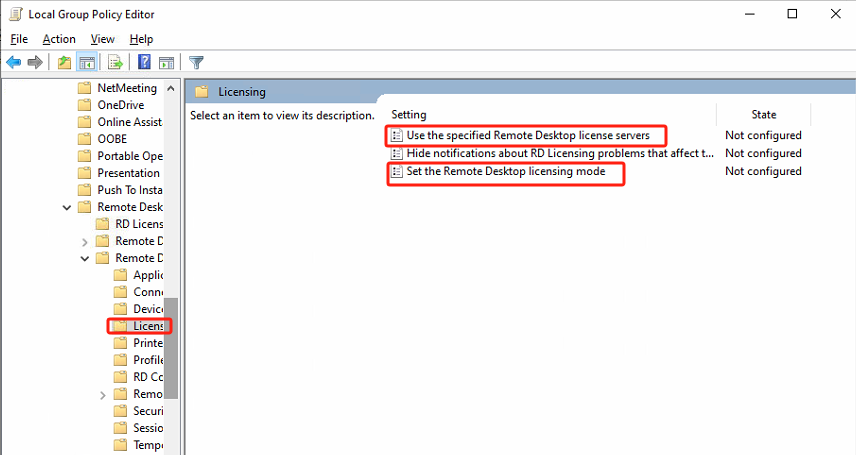
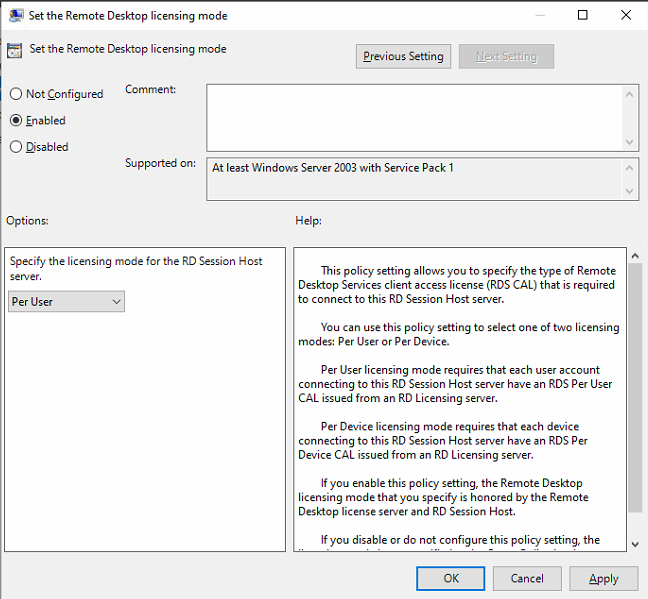
Select Computer Configuration > Administrative Templates > Windows Components > Remote Desktop Services > Remote Desktop Session Host > Licensing in Computer Local Group Policy (gpedit.msc), find Use the specified Remote Desktop license servers and Set the Remote Desktop licensing mode.
-
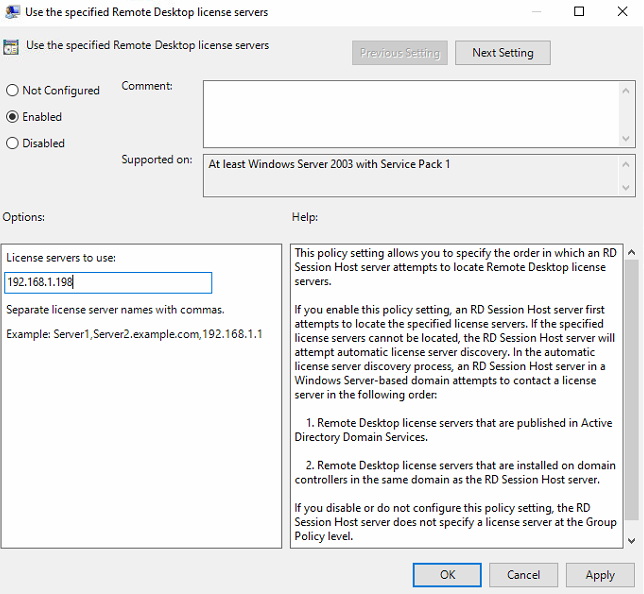
Set Use the specified Remote Desktop license servers to Enabled, and in License servers to use, set the IP or hostname of the license server.
-
Enable Set the Remote Desktop licensing mode and Specify the licensing mode for the RD Session Host to Per User.
-
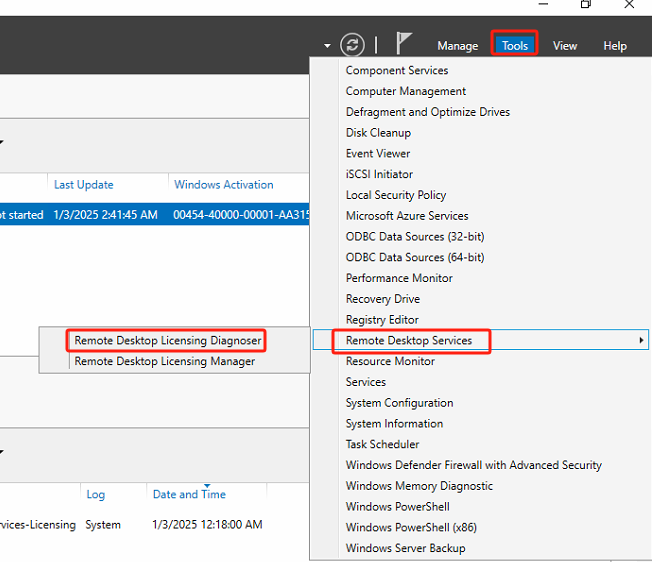
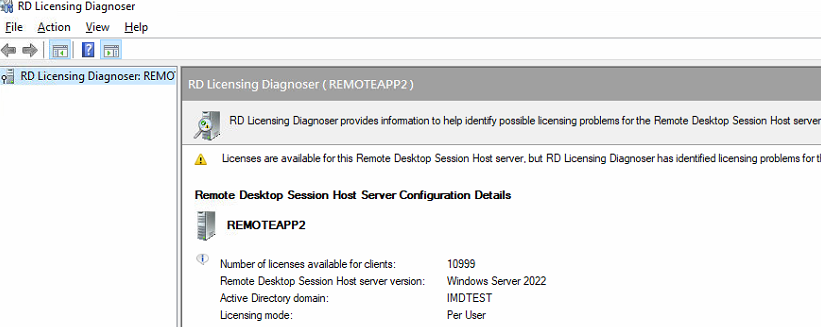
Run Remote Desktop Licensing Diagnoser to confirm that the configuration is complete.
Install vmtools and Agent Components
Scenario
On the RD (Remote Desktop) session host, install HCI’s vmtools and the VDI Remote app’s agent. This installation enables the VDC to manage the server.
Steps
- On the RD session host, proceed to install HCI’s vmtools. Then, within the Windows Server environment, load the vmtools and double-click on the installer to complete the installation process.
Log in to the VDC console. Navigate to the section for downloading the agent of the remote application server, and specifically select the agent corresponding to the Protocol V2.0 for download.
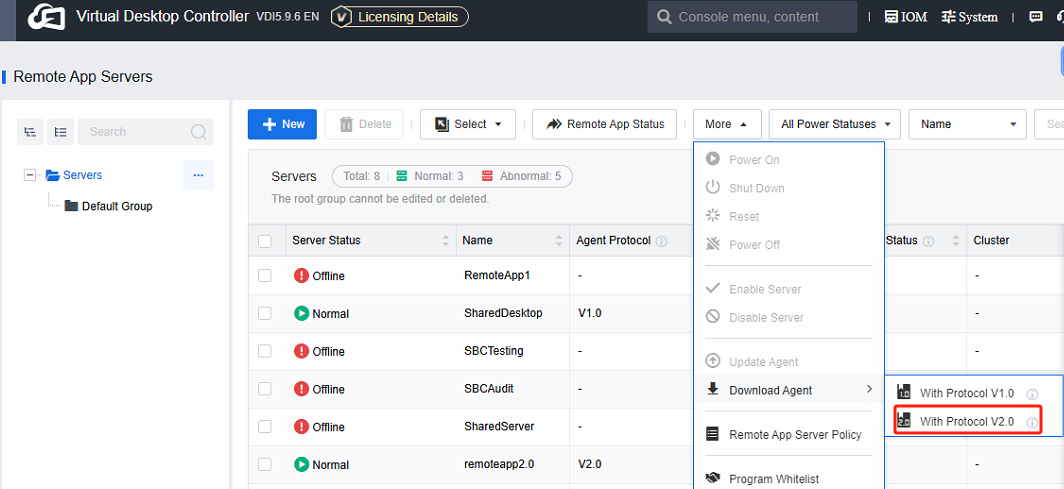
Note: Protocol V1.0 Agent: The agent within the Remote app 1.0 protocol offers support for remote applications and shared desktops. However, when it comes to aspects like image quality, operational experience, and stability, remote applications in this version are not better than those in V2.0.
The Protocol V2.0 Agent**:** It is specifically designed for the Remote app 2.0 protocol. It functions solely to support remote applications. The application server is required to run on Windows Server 2016 and above versions.
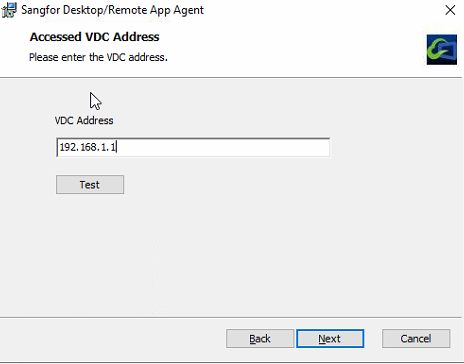
Double-click on the installation package to initiate the Agent installation within the RD session host environment.
Note: Firstly, you are required to install Remote Desktop Services. Otherwise, the installation of the agent will fail.
-
During the installation process, you will be prompted to enter the VDC address. It is advisable to proceed with the installation only after a successful test.
-
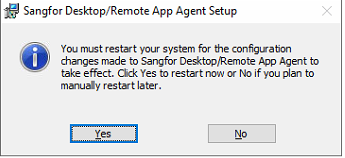
Upon completion of the installation, the system must be restarted for the changes to take effect.
-
After the restart, there will be a RemoteAppServer program on the desktop, which will run after opening it.
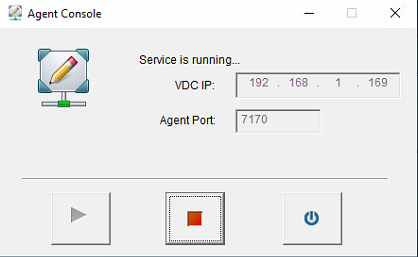
Note: The Agent default port is 7170. VDC will periodically try to connect to this application server port and establish a long connection.
The application server should be accessible from both the VDC and client networks.
- Component has been successfully installed.
NVIDIA Driver Installation and Licensing (optional)
Scenario
Beginning with VDI 5.9.6, 3D applications can be deployed as remote applications. In contrast to 2D applications, 3D applications necessitate using graphics card resources. To meet this requirement, a graphics card must be added to the remote application server within the HCI environment. Subsequently, the graphics card driver must be installed on the remote application server, and a license must be obtained. The implementation steps are identical to those in the 3D VDI scenario.
Precautions
After integrating the graphics card into the remote application server, the virtual machine screen becomes inaccessible from the HCI console. This is attributed to the security isolation mechanism inherent in the 3D protocol. In such a scenario, using mstsc.exe to access the remote application server is advisable. It enables users to carry out essential operations, including installing drivers and software.
- For a better software experience in the 3D Remote app scenario, it is necessary to use Windows Server 2019 and above (including 2019 and 2022) for the remote application server, which allows the use of graphics card drivers of GRID 15.2 and above.
Steps
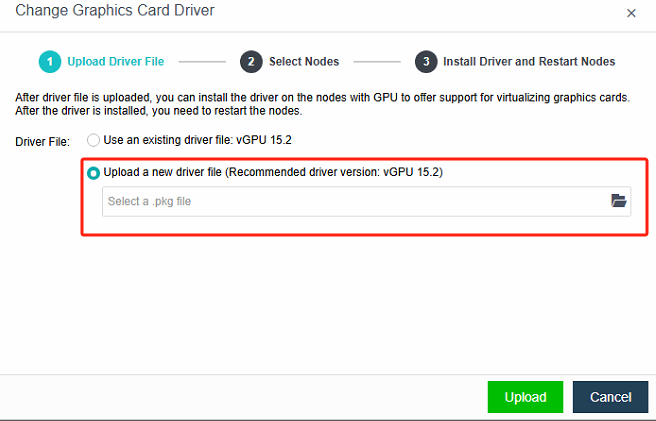
NVIDIA drivers can be categorized into platform drivers and internal virtual machine drivers. For HCI (Hyper-Converged Infrastructure), you are required to manually install the platform drivers. Specifically, the GRID 15.2 drivers should be installed on HCI. On the Nodes > Graphics Card**s > Change** Graphics Card Driver interface, choose to upload a new driver file and then follow the subsequent steps to import it.
-
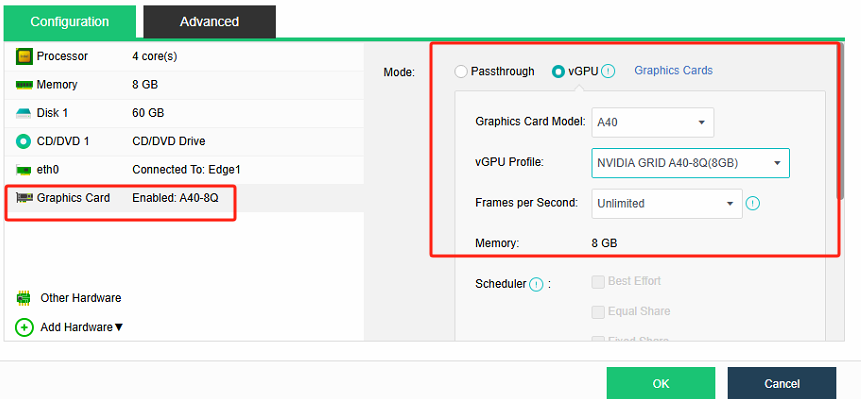
Add a graphics card into a remote application server within the HCI environment.
-
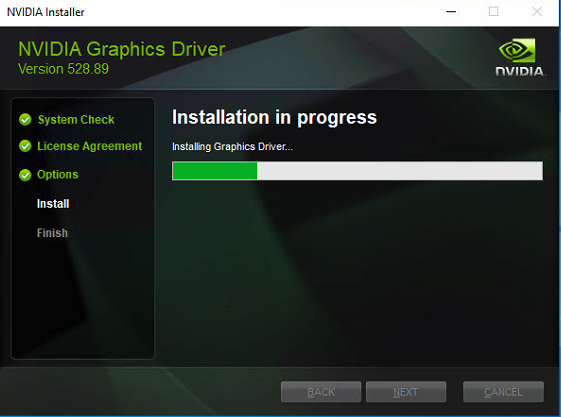
Use the Remote Desktop Connection (mstsc) to access the application server remotely. Then, transfer the downloaded virtual machine graphics card driver into the application server. After that, double-click on the driver file to initiate the installation process. It should be noted that there is a version correspondence between the Nvidia platform driver and the virtual machine driver. For instance, the virtual machine driver corresponding to GRID 15.2 is version 528.89(the same as win11). You can refer to the link for details regarding the version correspondence.
-
After the installation of the platform and the virtual machine graphics card driver are completed, it becomes necessary to set up an NVIDIA license server and obtain the corresponding licensing. You can refer to the link for the relevant steps.
-
Install the necessary 3D software.
Storage Server Deployment (optional)
Scenario
The storage server offers Remote App users both personal and public directories, facilitating the storage of users’ personal data.
Steps
- When creating a new Windows Server virtual machine on an HCI environment, selecting a version within the 2016 – 2022 range is advisable.
To install the Remote Desktop Services role and File Services role on Windows Server, click on the corresponding checkboxes to proceed with the installation.
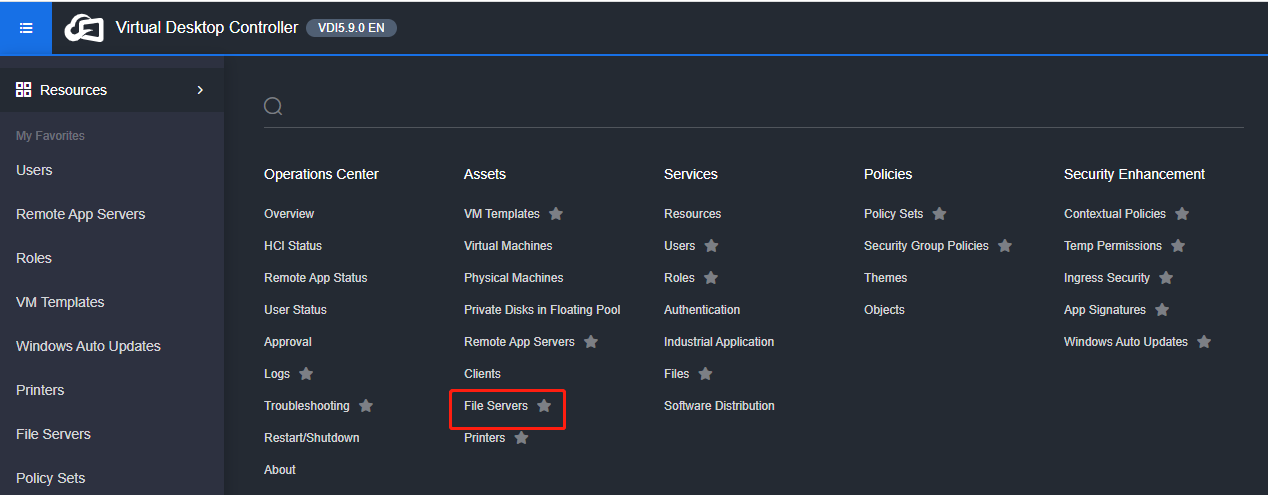
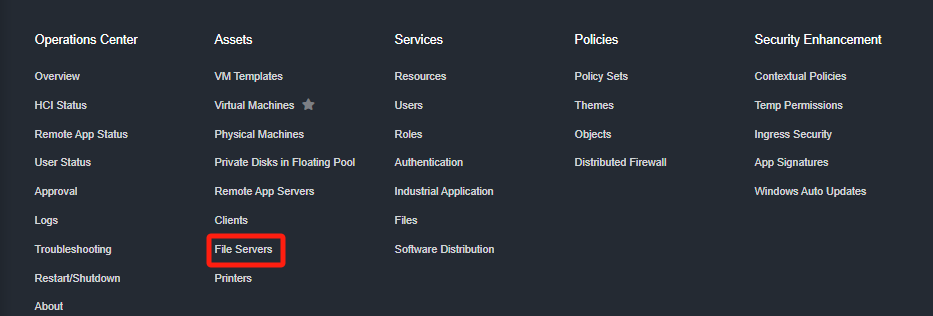
Once the server role has been installed, access the VDC console. Navigate to Asset**s > File Servers** to download the file server agent and install it within the Windows Server virtual machine. After the installation process is finished, restart the virtual machine.
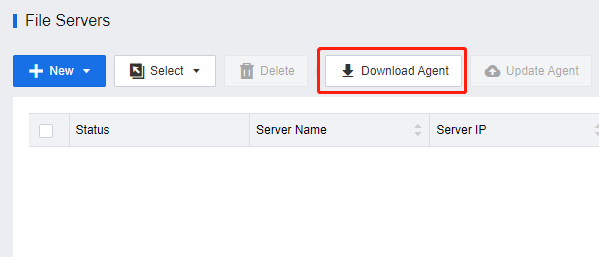
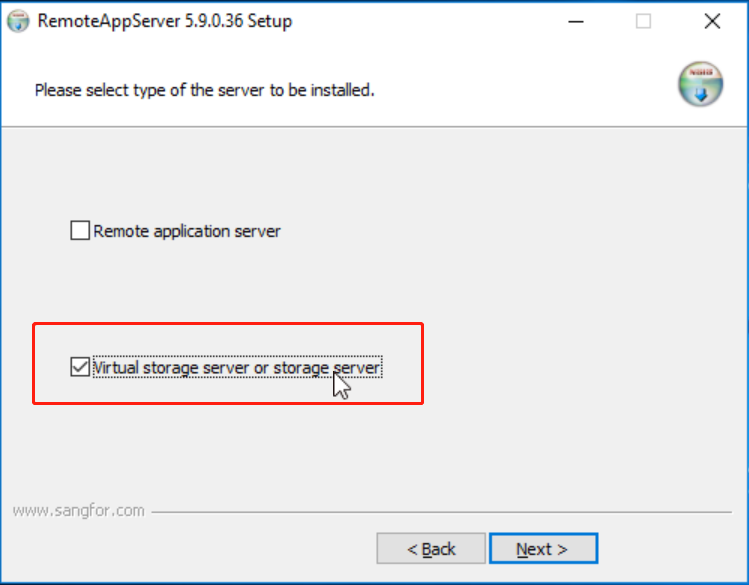
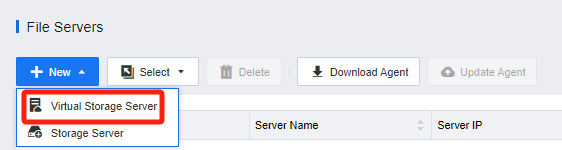
Note: When installing the server agent, select Virtual storage server or storage server.
- The deployment of the storage server is complete.
- Refer to 3.1.4 Storage Directory on Remote Server for features and configuration.
Remote Application Resource Deployment
Create an Application Resource Pool
Create a Server Resource Pool
Creating Batch Server
Scenario
This solution is highly suitable for scenarios demanding the batch creation of application servers. Creating application server virtual machines on HCI initiates the process, and these virtual machines are transformed into templates via VDC. Finally, numerous application server virtual machines are derived from these templates. Through this streamlined workflow, the batch creation and centralized management of multiple application servers become highly efficient and straightforward.
Precautions
- Only available to virtual machine servers that support HCI platforms. Other third-party virtualization platforms or physical servers do not support batch mode.
- The Windows Server virtual machine template prohibits adding AD domains, and the virtual machine deployed by the template can add AD domains.
Steps
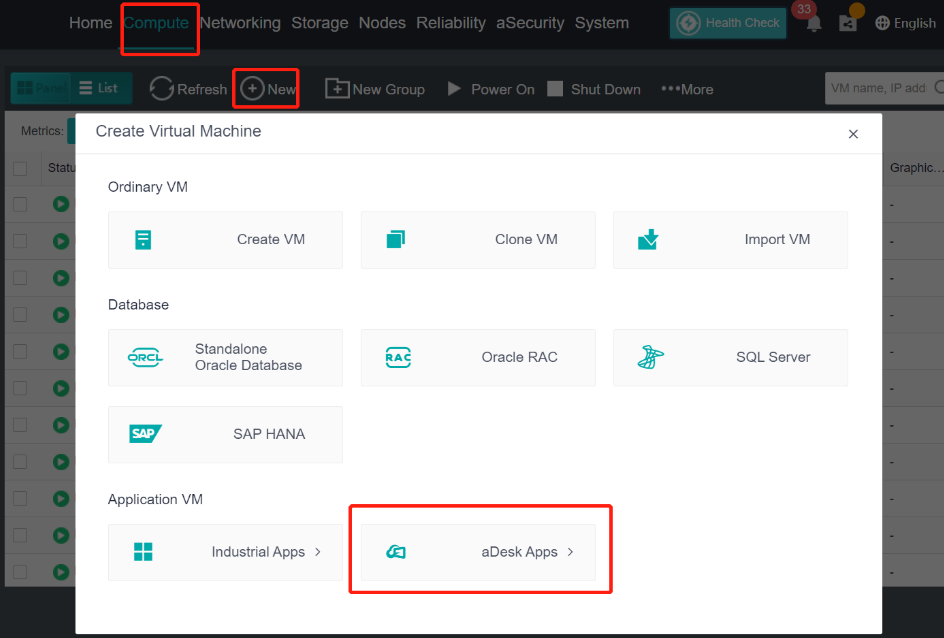
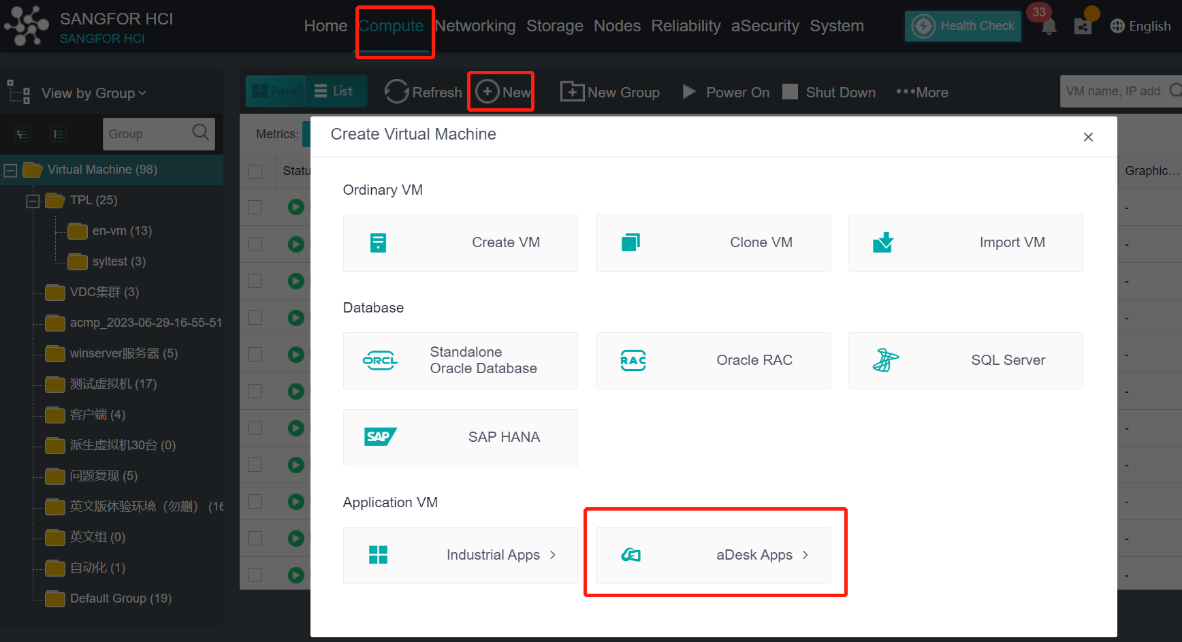
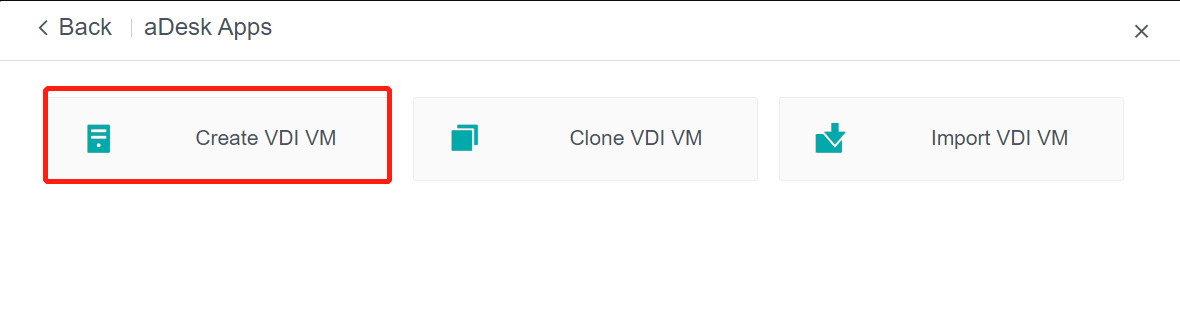
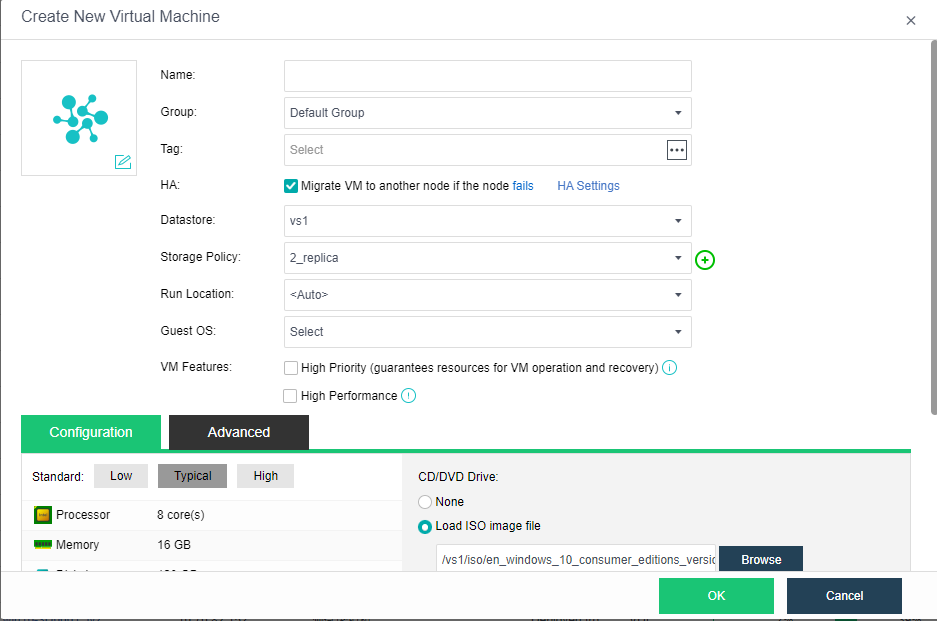
Log in to the HCI console and go to Compute. Click New and select aDesk Apps on the Create Virtual Machine window. In the aDesk Apps window, click Create VDI VM.
In the Create New Virtual Machine window, set parameters such as the name, guest OS, hardware specifications, and installation image, and click OK. Then, start the VM and install the operating system. For details, see the Sangfor HCI User Manual.
- After installing the operating system, install vmTools and agent for remote app servers according to the VM template type. For details about how to install vmTools and agent for remote app servers, see section 1.4.5.
- After installing agent, install service software as required and then shut down the VM.
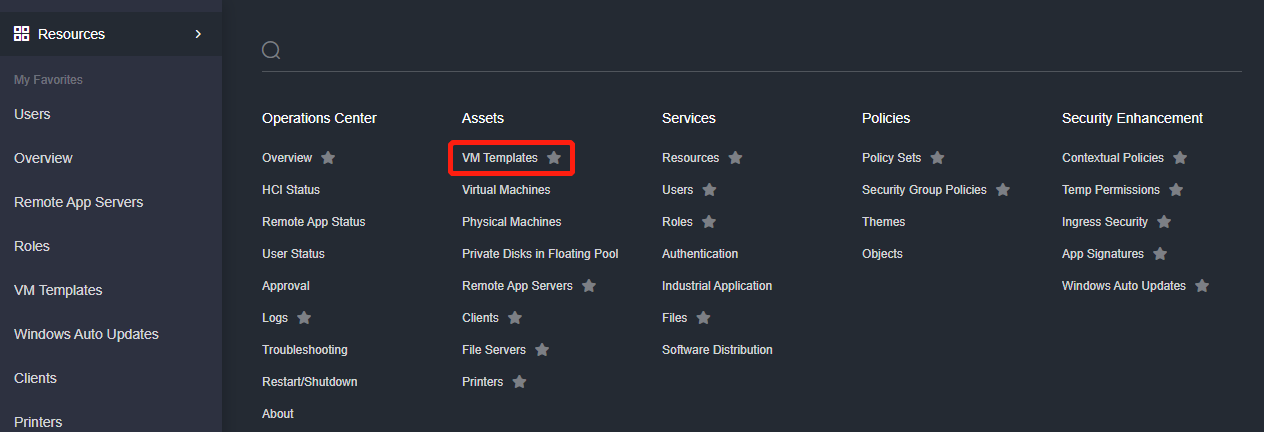
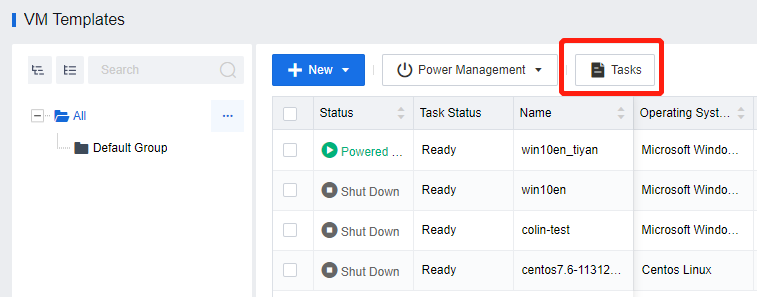
Log in to the VDC console and go to Assets > VM Templates. On the VM Templates page, click New and select Convert to VM Template.
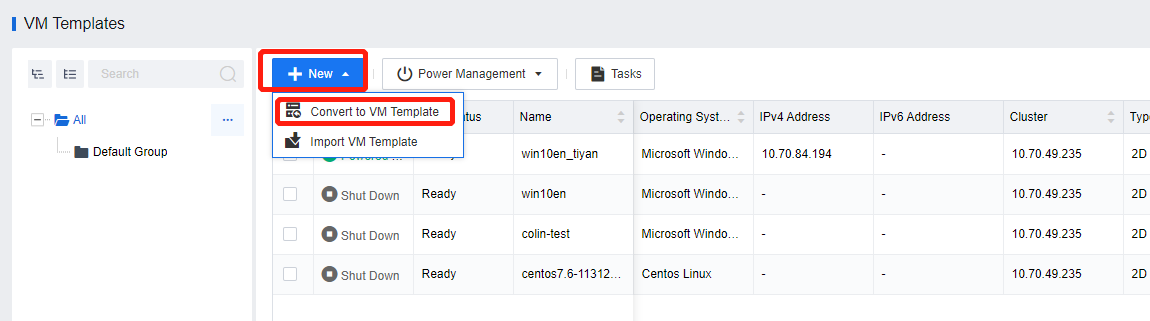
On the Convert to VM Template page, select the target VM and the HCI cluster where the VM is created, set other parameters based on the actual scenario, and click Save. In the confirmation window, click OK.

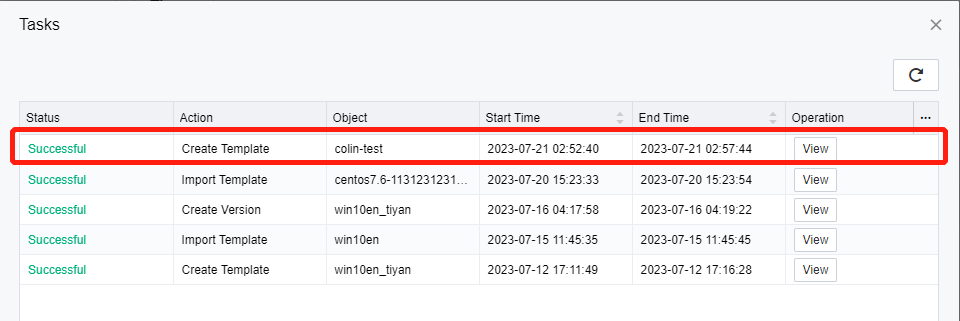
Click Tasks to view the template conversion progress in the Tasks window.
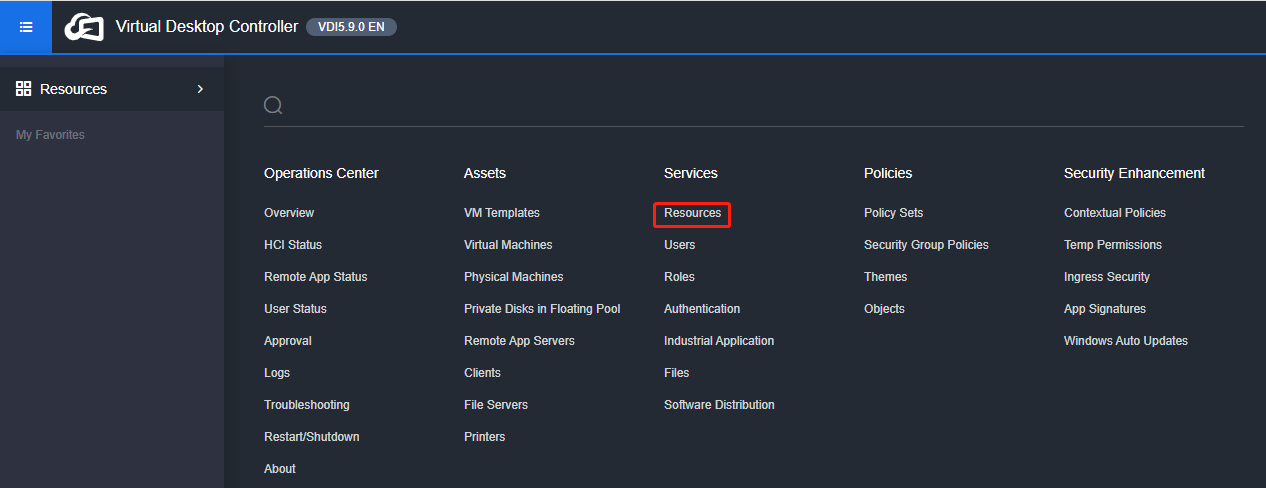
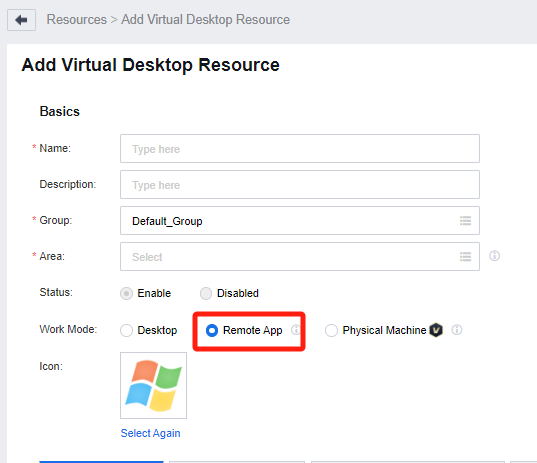
Log in to the VDC console and go to Services > Resources. On the Resources page, click New and select Virtual Desktop.
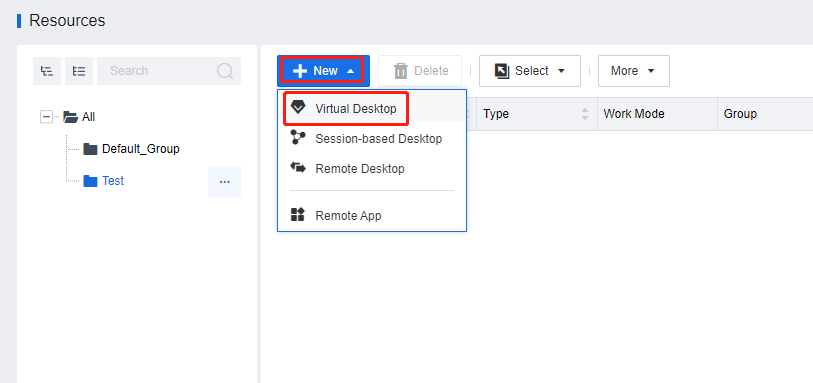
On the Add Virtual Desktop Resource page, complete the settings in the Basics section as required, where Work Mode must be set to Remote App. (This step aims to create remote application servers in batches.)
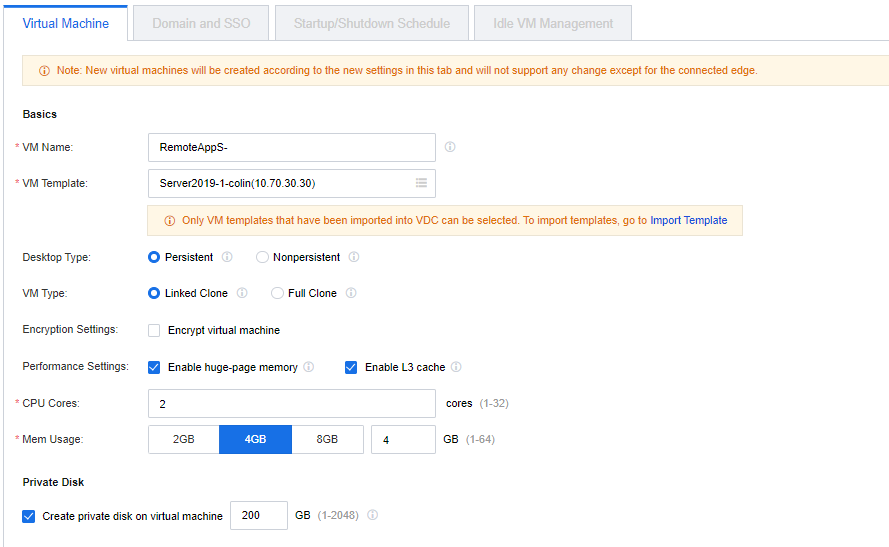
On the Virtual Machine tab, complete the settings in the Basics and Private Disk sections as required.
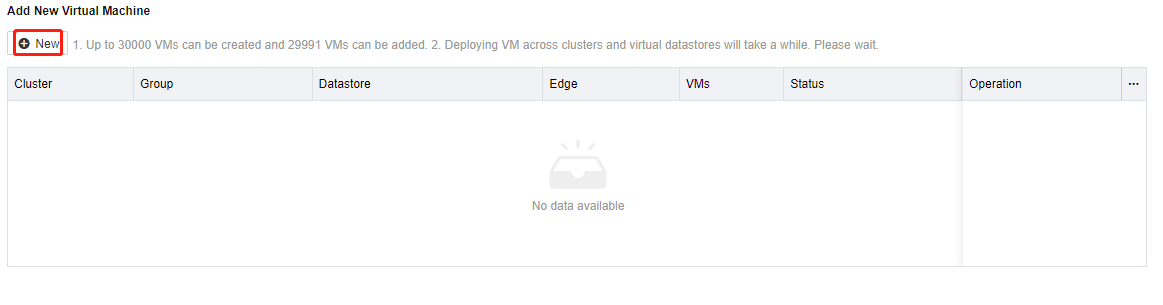
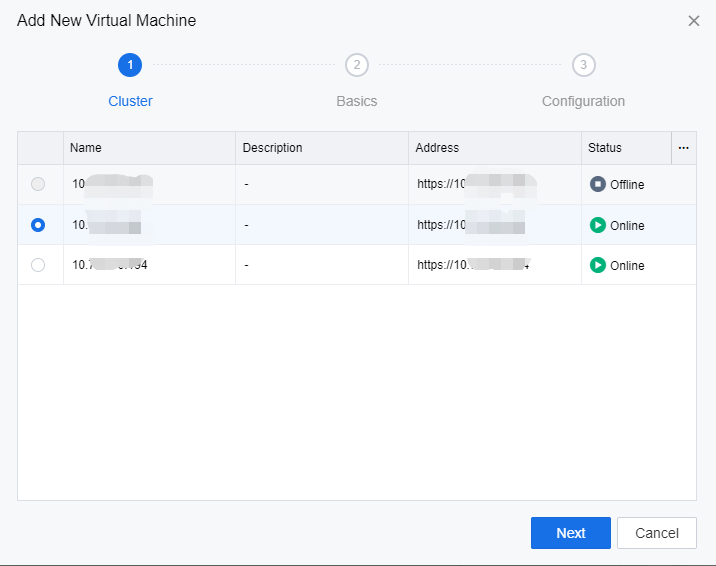
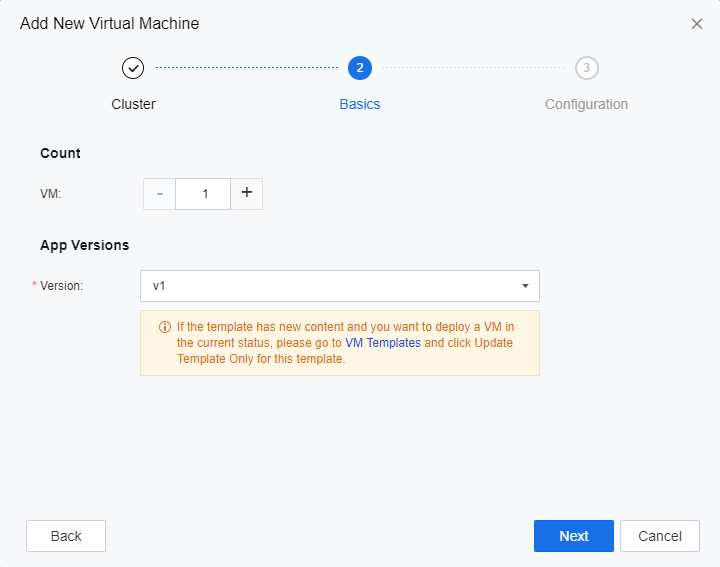
In the Add New Virtual Machine section, click New. On the Add New Virtual Machine page, select an HCI cluster to deploy the remote app servers from this resource and click Next.
On the Basics tab, complete the settings as required and click Next.
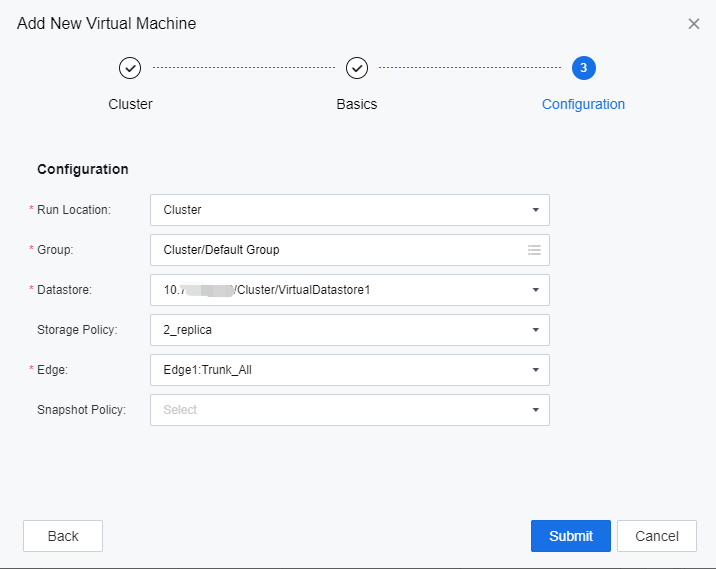
On the Configuration tab, complete the settings as required and click Submit.****
Click Save to complete the configuration for creating remote app server resources.
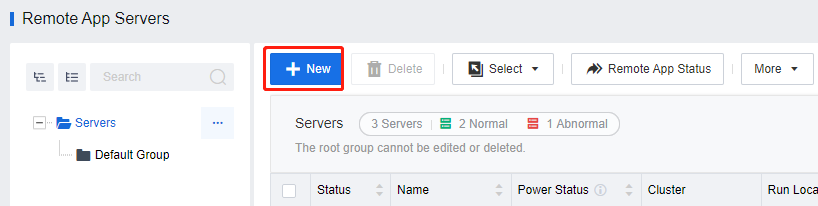
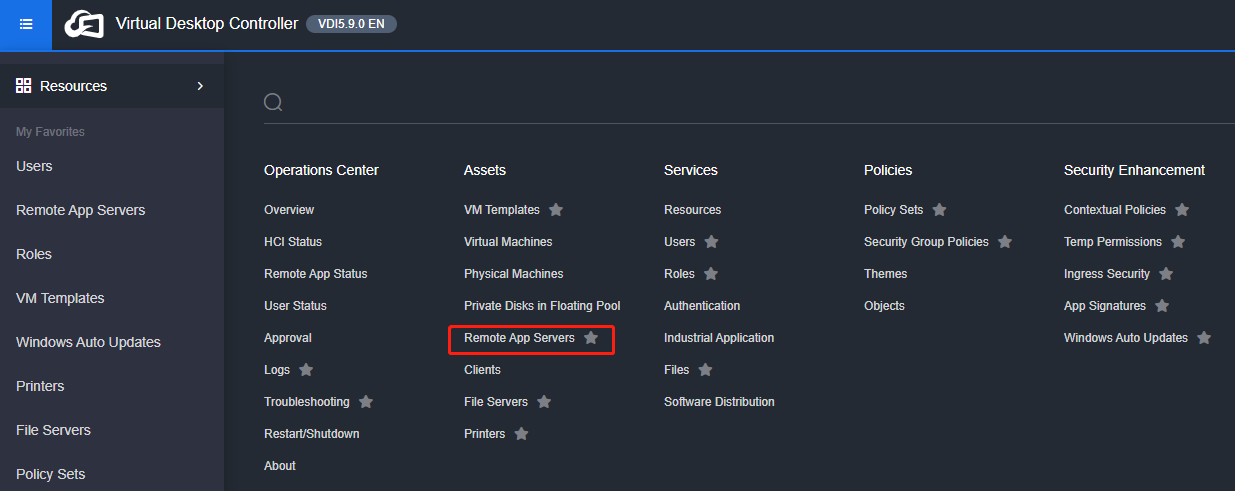
Log in to the VDC console and go to Assets > Remote App Servers. On the Remote App Servers page, click New.

On the Add Server page, manage the remote access servers in Batch.
- In this mode, you must configure the basic attributes of the server collection, select a remote app server template, and select remote app servers deployed from the template based on the service requirements.
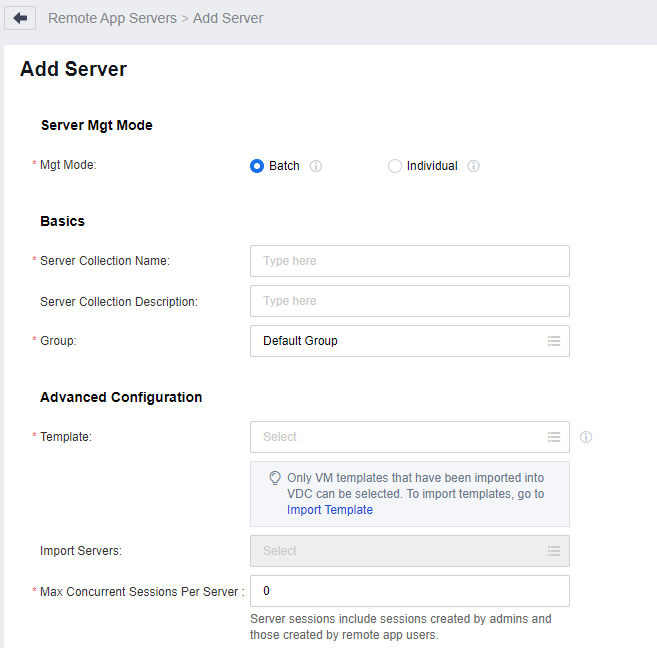
Note: Max Concurrent Sessions Per Server: This parameter specifically shows the number of remote application sessions that are capable of being connected simultaneously on just one server. For example, if it is set to 30, then as many as 30 individuals can simultaneously access and use remote applications on this particular server. When set to 0, it implies that there is no limit on the number of concurrent sessions, meaning an unrestricted number of people can connect to use the remote applications on that server.
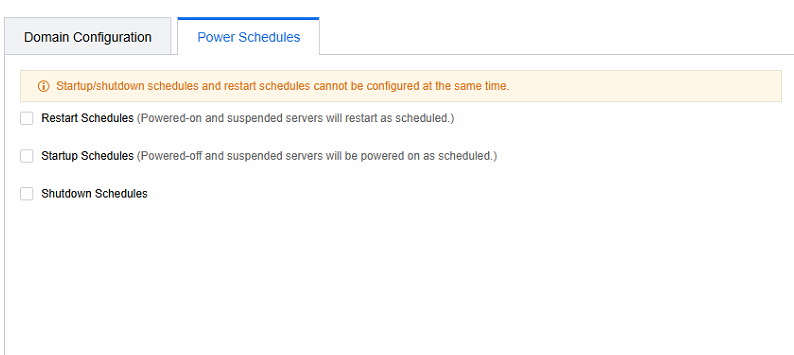
- Based on the customer’s specific requirements, customize the configuration for the application server, along with the Domain Configuration and Power Schedules.
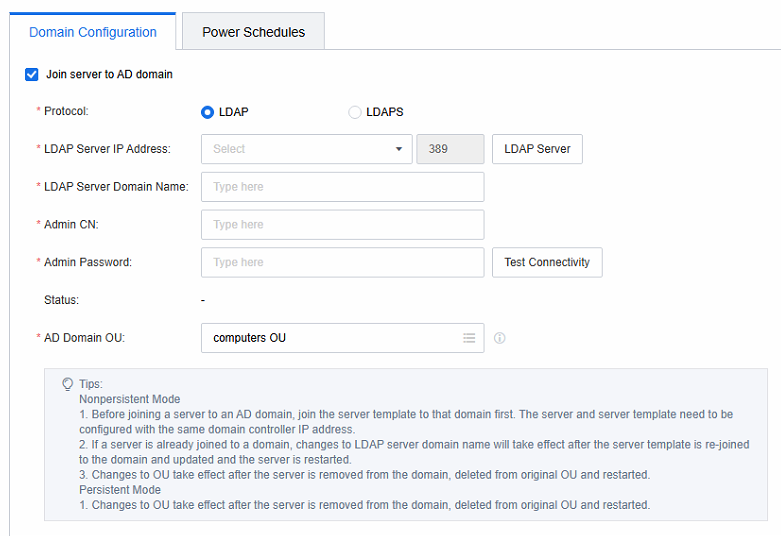
Note: The application server has joined the AD domain. Change the LDAP server address and LDAP server domain name. Please manually return the application server to the AD domain and restart it.
The application server has joined the AD domain. If you change the AD domain OU, please manually exit and restart the application server from the AD domain. Delete the application server under the original AD domain OU and restart the application server to take effect.
For other configuration changes, restart the application server to take effect.
Click Save, enter the VDC admin password, and automatically restart the imported virtual machine server to take effect.
Creating Individual Server
Scenario
Applicable to application servers or physical servers created on third-party virtualization platforms. Manage it individually through VDC.
Precautions
- Application servers derived from VDC can also be managed individually, but managing them in batches is recommended.
- The Windows Server virtual machine template prohibits adding AD domains, and the virtual machine deployed by the template can add AD domains.
Steps
Log in to the VDC console and go to Assets > Remote App Servers. On the Remote App Servers page, click New.

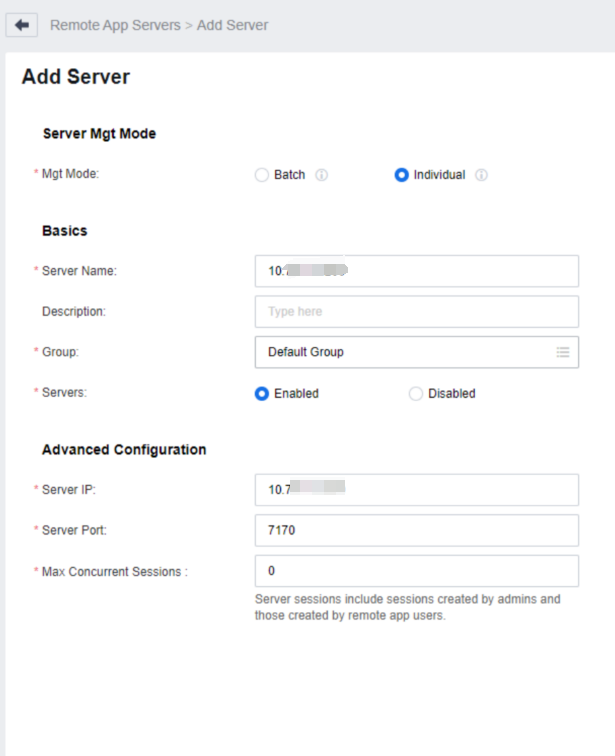
On the Add Server page, select the Mgt mode as Individual.
- In this mode, you must set the basic attributes of each remote app server and specify the access IP address and port number based on the service requirements.
Creating Application Resources
Scenario
Install relevant software on the remote application server and manage application resources uniformly through VDC.
Precautions
Application resources need to be associated with the corresponding user through roles before they can be used.
Steps
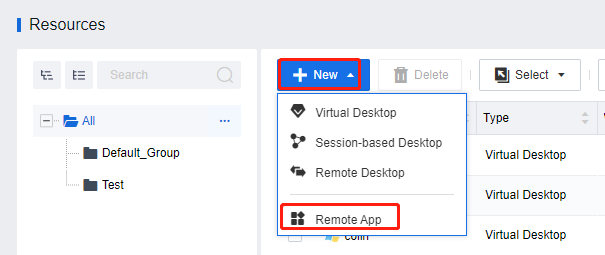
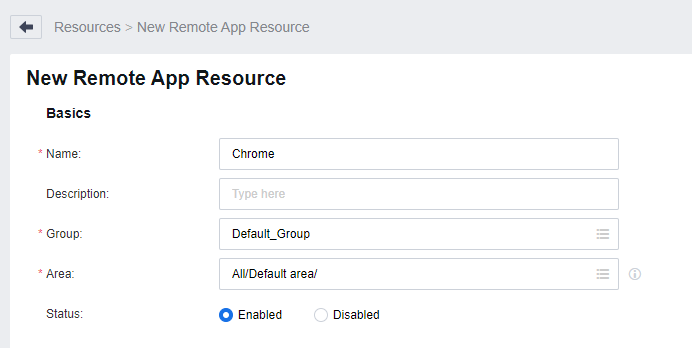
Log in to the VDC console and go to Services > Resources. Click New and select Remote App to enter the New Remote App Resource page and complete the settings as required.

Complete the settings under Basics as required.
Complete the settings under Server and App. The configuration methods are as follows:
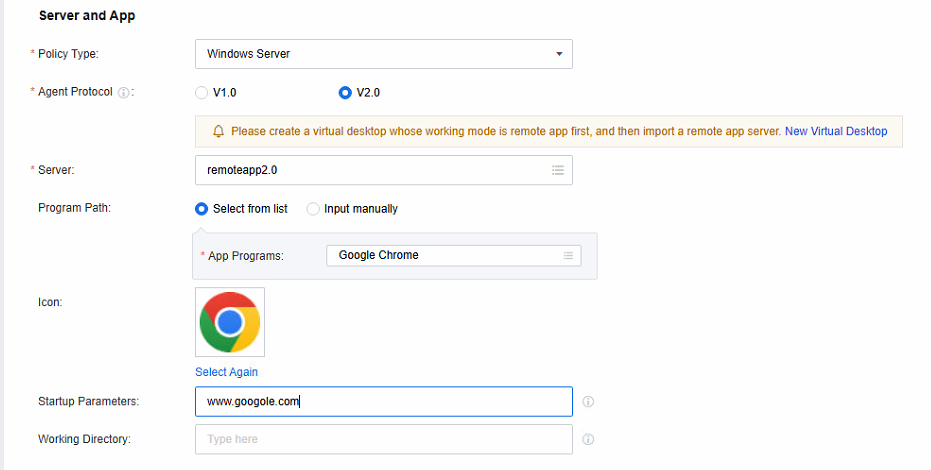
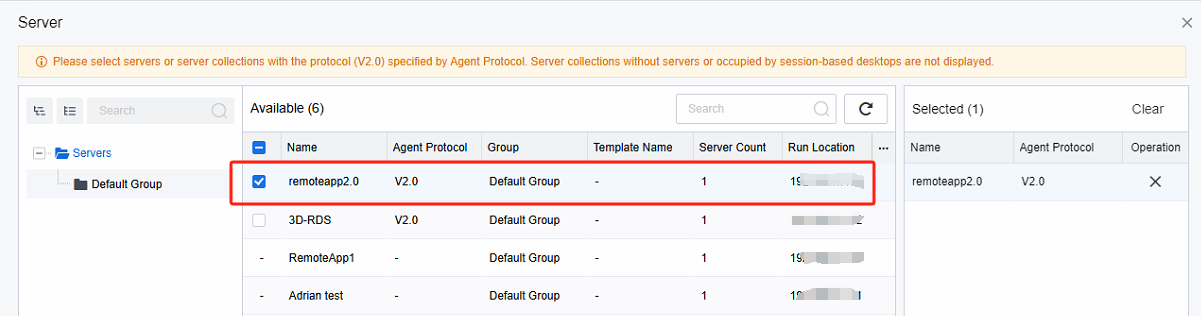
Click in Server to enter the Server window, select the Windows Server collection or the Windows Server app server individually managed by VDC where the apps to be published are located, and click OK to save the operation.

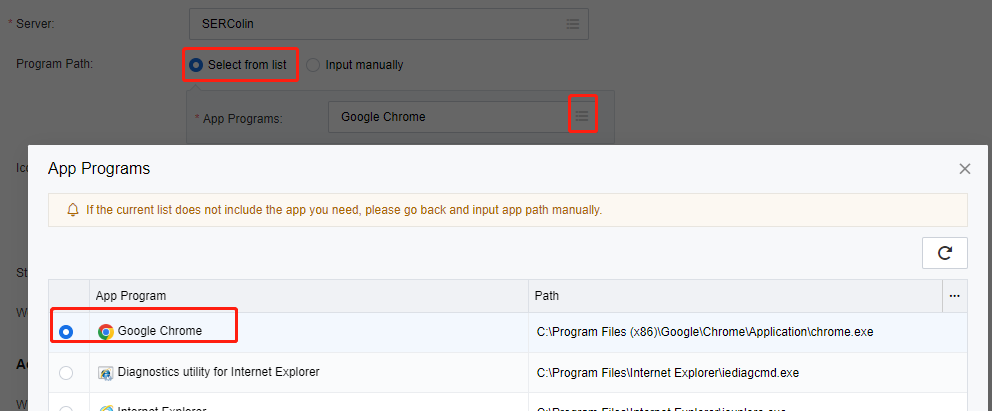
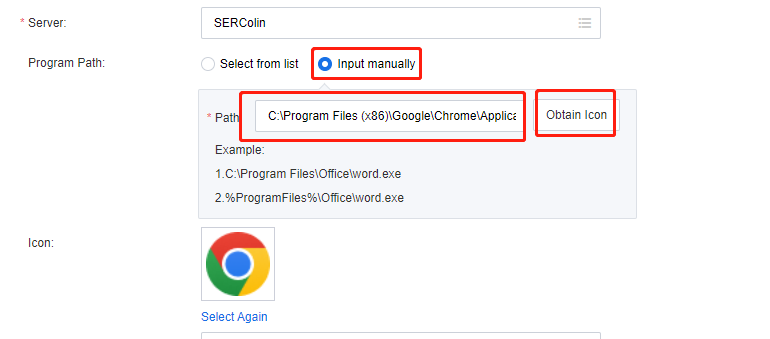
In Program Path, select Select from list or Input manually as required. Their configuration methods are as follows:
Select from list: Click in App Programs to enter the App Programs window, and select the app programs to be published.

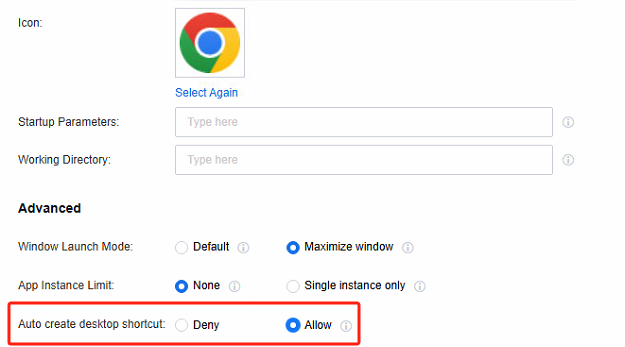
Input manually: Select Input manually and enter the EXE file installation paths of the apps that need to be published. Click Obtain Icon in Path, and VDC will automatically obtain the icons of corresponding EXE files from the app servers.
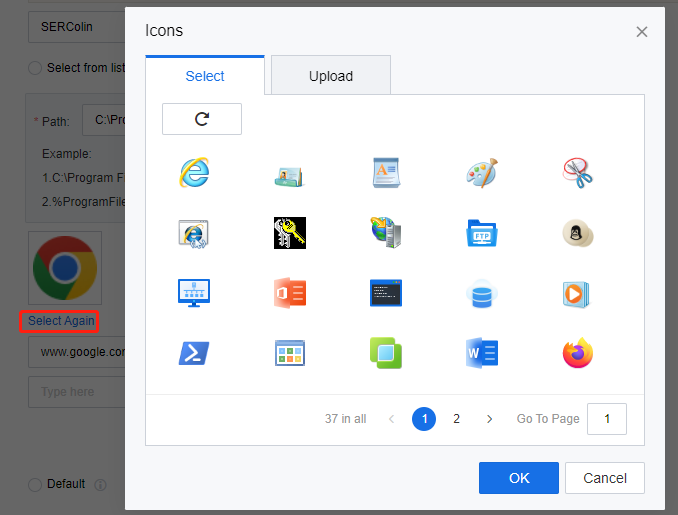
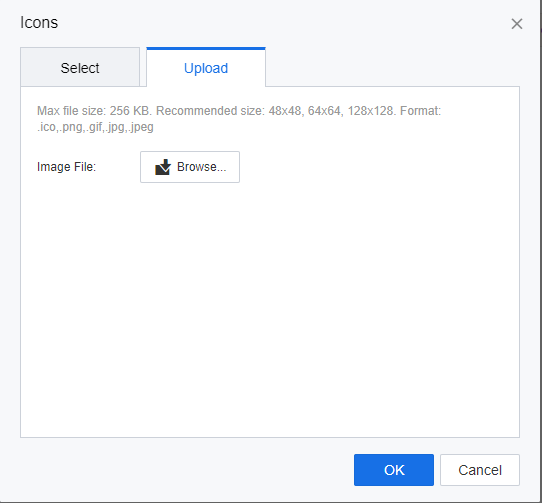
If the icons obtained by VDC from the app servers in the previous step are incorrect, or administrators want to change the icons, click Select Again and select default icons or upload new ones in the Icons window.
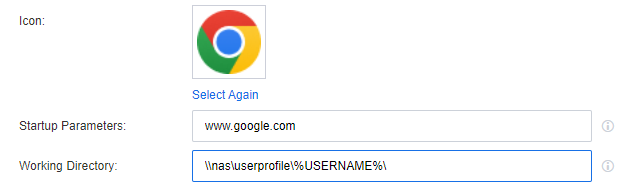
If published apps require special startup parameters to implement specific features, you can enter the parameters in Startup Parameters. For example, to set Google Chrome as the default browser upon startup, enter www.google.com in this field.
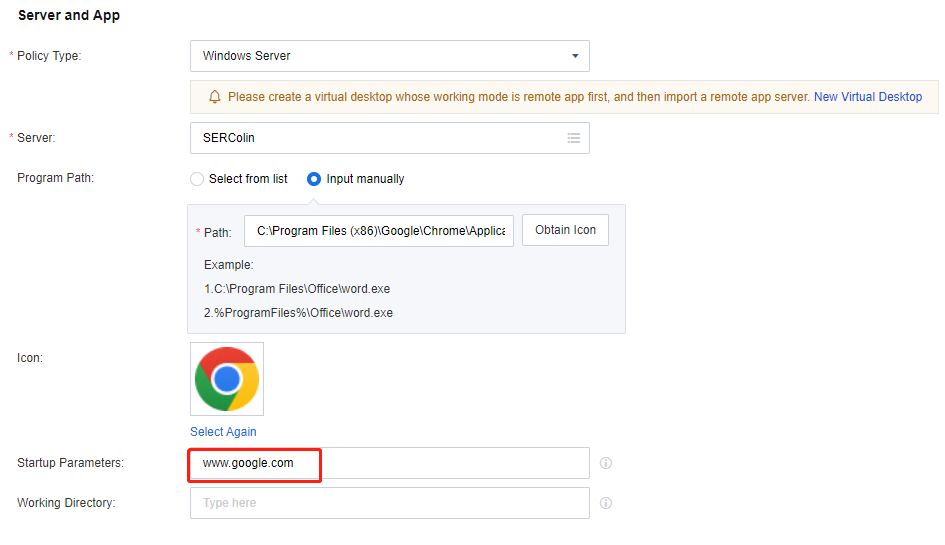
Suppose published apps include upload or download features that involve interaction with data locally stored on the app servers. In that case, you can configure the parameters in the Working Directory to specify a default calling path different from the apps’ installation paths for the software to use these features.
Complete the settings under Advanced as required, and click Save to complete the configuration for creating remote app resources.
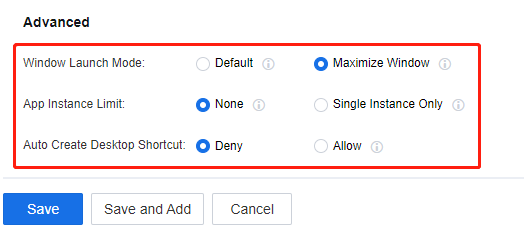
Note: Default: Open it according to the program’s default settings, whether the program is displayed in a windowed mode or maximized as defined by the program’s defaults.
Maximize Window: When the program starts, it opens as a maximized window.
None: Start the program in its default form. Specifically, click on the program resource once again. This action will either enable a new instance of the program or open an existing one, depending on the program’s default startup configuration.
Single Instance Only: When you click on a program resource once again, only the running program will be shown instead of opening a new one.
Auto Create Desktop Shortcut: Once permission is allowed, the application icon will be automatically generated on the Windows client. Clicking on the icon will open the application. (Initially, it will redirect to the VDI client login page. After the first successful login, the login certificate will be configured, eliminating the need for repeated logins in the future.)
Create a User Policy Set
Creating Remote App 2.0 Policy Set
Scenario
It is suitable for downloading and installing the Remote App 2.0 protocol Agent on the application server and creating a user policy group on the VDC. The policy group can only set the remote app, which involves access account, device resources, storage directory, and access privileges. After the user associates this policy set, the relevant policy set will take effect.
Precautions
- Only suitable for scenarios where Remote App2.0 protocol Agent is downloaded and installed on the application server.
- The user policy set is only effective for the associated user. After completing the setting, it needs to be associated with the corresponding user.
Steps
Log in to the VDC console, in Policies > Policy Sets, create a new policy set, set Remote App & Session-Based Desktop Policy, and select Protocol V2.0.
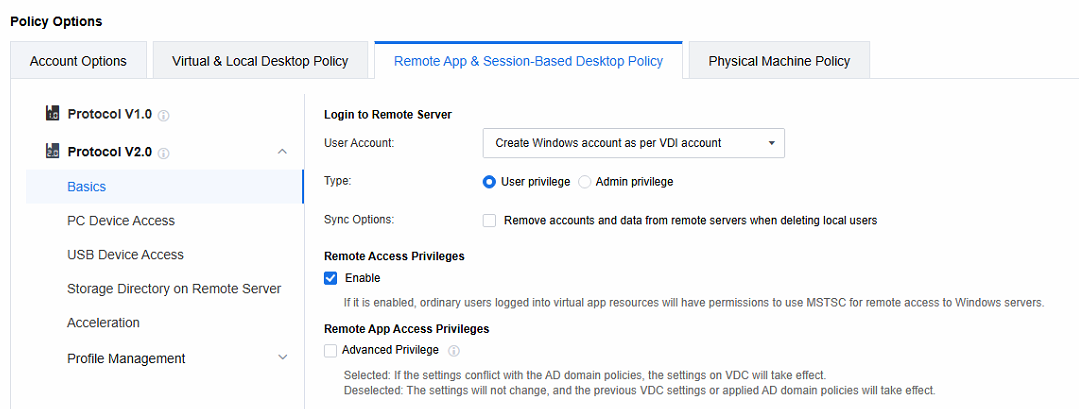
- Set the policies related to the Login to Remote Server. When the remote application server is not added to the AD domain, select Create Windows account as per VDI account; when the remote application server is added to the AD domain, select Use VDI account.


Note: Create Windows account as per VDI account: When a session is accessed, a Windows local account is automatically generated on the application server and linked to the VDI account. Any subsequent remote sessions accessed via this VDI account will use this Windows account to connect to the application server.
Type: Manage the privileges of Windows accounts auto-created on the application server. Categorize them into two types:
a. User privilege: Add relevant accounts to the Remote Desktop Users and Users groups. This enables them to perform common operations within the allowed scope.
b. Admin privilege: Assign accounts to the Administrators group. These accounts have high-level privileges for system management tasks, but strict access control is needed to ensure security.
Sync Options: After deleting the VDI account, the Windows accounts and user directories created automatically on the application server are also deleted (daily at 4 a.m.).
Use VDI account: It’s often used in Active Directory domain scenarios. As the application server runs in a domain environment, the domain account can be the Windows account for server login. Also, the VDI account is a domain account, so you can use the VDI login username and password to log in to the application server.
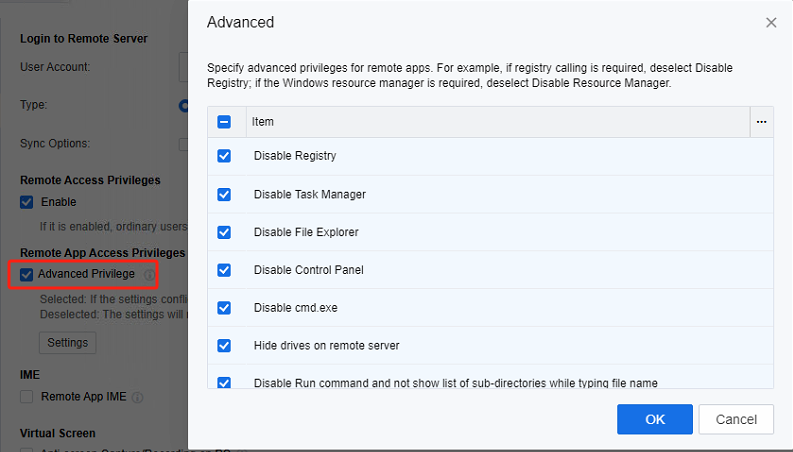
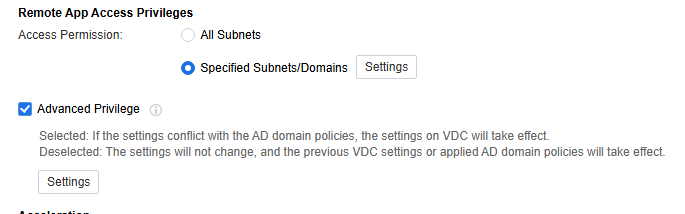
- By default, the option of Remote Access Privileges is checked. Once this function is enabled, AD domain users will obtain permission to remotely connect to the application server within the domain user context. Subsequently, the application server will add these AD domain users to the local Remote Desktop Users group. In contrast, if this option is not checked, AD domain users will only be added to the local Remote Desktop Users group when they are actually connected to the application server. Moreover, after the AD domain users disconnect from the application server, they will automatically be removed from this group, thereby achieving the goal of restricting privileges.
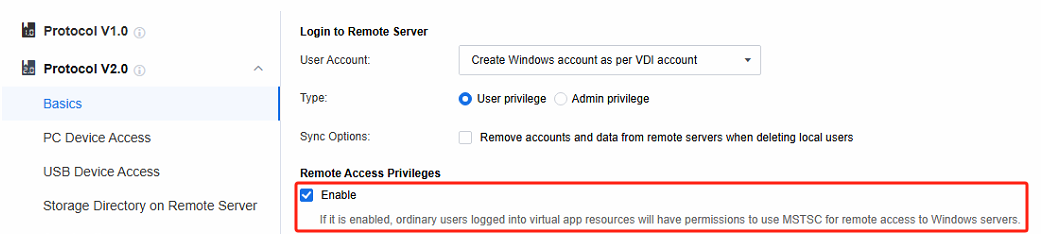
- Remote App Access privileges are key for configuring Windows settings on the remote app server. When server settings are configured via AD domain group policy in an AD domain environment, uncheck Enable. This stops the VDC advanced privilege settings from taking effect, preventing conflicts with the AD domain policy. It helps maintain a stable config environment, ensuring AD domain group policy settings work smoothly and have precedence.

- For a detailed description of other policies for the Remote app 2.0 protocol, please refer to Section 3.1 Remote app 2.0 Policies.
Creating Remote App 1.0 Policy Set
Scenario
It is suitable for downloading and installing the Remote App1.0 protocol Agent on the application server and creating a user policy group on the VDC. The policy group can only set the remote app part, which involves access account, device resources, storage directory, and access privileges. After the user associates this policy set, the relevant policy set will take effect.
Precautions
- Only suitable for scenarios where Remote App2.0 protocol Agent is downloaded and installed on the application server.
- The user policy set is only effective for the associated user. After completing the setting, it needs to be associated with the corresponding user.
Steps
Log in to the VDC console, in Policies > Policy Sets, create a new policy set, set Remote App & Session-Based Desktop Policy, and select Protocol V1.0.

Set the policies related to Login to Remote Server. When the remote application server is not added to the AD domain, select Create Windows account as per VDI account. When the remote application server is added to the AD domain, select Use VDI account.


Note: Create Windows account as per VDI account: When a session is accessed, a Windows local account is automatically generated on the application server and linked to the VDI account. Any subsequent remote sessions accessed via this VDI account will use this Windows account to connect to the application server.
Type: Manage the privileges of Windows accounts auto-created on the application server. Categorize them into two types:
a. User privilege: Add relevant accounts to the Remote Desktop Users and Users groups. This enables them to perform common operations within the allowed scope.
b. Admin privilege: Assign accounts to the Administrators group. These accounts have high-level privileges for system management tasks, but strict access control is needed to ensure security.
Sync Options: After deleting the VDI account, the Windows accounts and user directories created automatically on the application server are also deleted (daily at 4 a.m.)..
Use VDI account: It’s often used in Active Directory domain scenarios. As the application server runs in a domain environment, the domain account can be the Windows account for server login. Also, the VDI account is a domain account, so you can use the VDI login username and password to log in to the application server.
-
Configure the devices and resources available in the session.

-
Configure storage directory and access privileges.
-
Set acceleration-related policies and screen watermarks.
-
For a detailed description of other policies for the Remote app 1.0 protocol, please refer to Section 3.2 Remote app 1.0 Policies.
Publish App Resources
User creation and association
Scenario
After the remote app resources and policy sets are created, you need to create users and roles, associate policy sets with users, and associate remote app resources with users through roles.
Precautions
Association changes between policy sets, users, roles, and resources will only take effect after the client logs out and logs in.
Steps
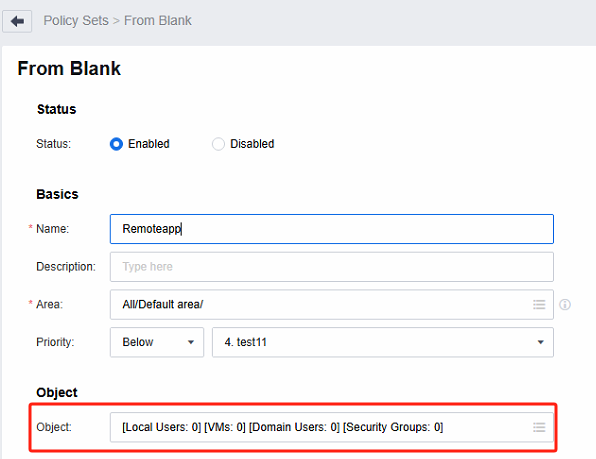
Log in to the VDC console, create a new role in Services > Roles, associate this role with the user (user created in step 2), and associate the created remote application resource.
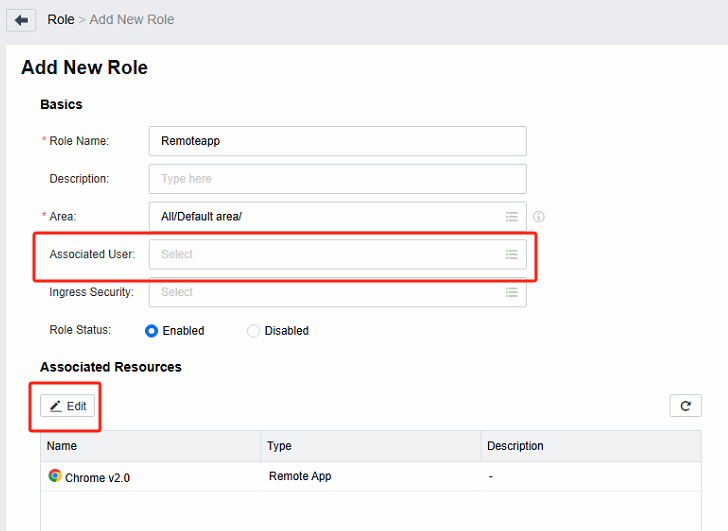
Create a new user in Services > Users and associate roles for the user.
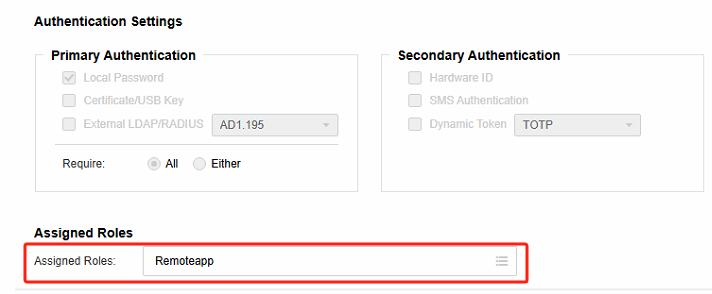
Associate the policy with the user in Policies > Policy Sets and save it.
Access and Use the Endpoint
Scenario
Use Windows, Linux, and MAC client access to remote application resources.
Precautions
Supported endpoint types are Windows endpoint, Linux endpoint, and MAC endpoint.
Steps
- Open the Chrome browser on the Windows PC, enter https://VDC address:443, enter the username and password, and log in to the PC client.

- After logging in, you can see and click to use the published remote application resources.
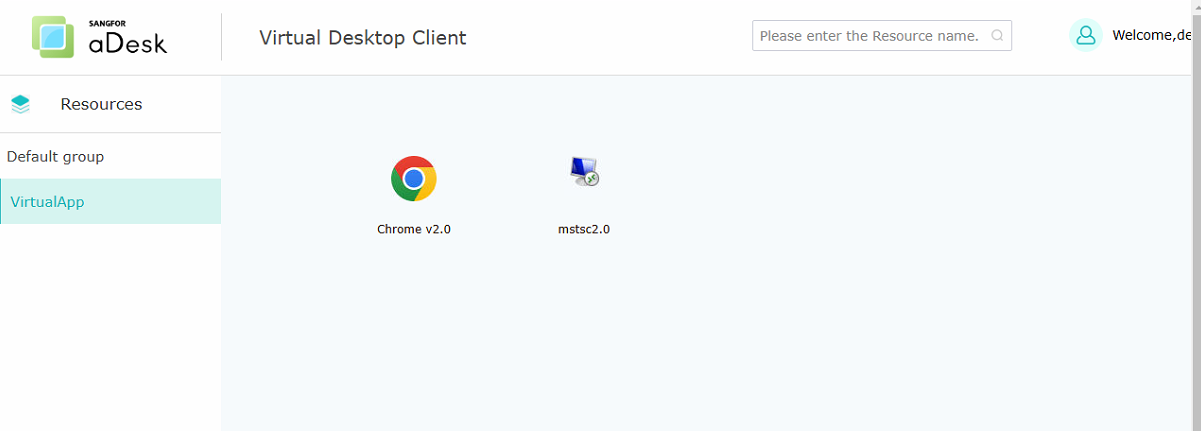
- Suppose the published remote application is mstsc.exe, and when using the mstsc application to log in to the remote host, In that case, the relevant shortcut will be passed through (for example, when the client types "win + key combination" or "alt + tab" and other shortcuts, the shortcut will be applied on the remote host, not locally), close to the user’s usage habits. The optimization is available for both Remote App 1.0 and 2.0 protocols.
Integrated Active Directory Domain Deployment
If the customer scenario is in an AD domain environment, the relevant configuration needs to follow the requirements:
- Configure the connection to the AD domain server on the VDC.
- Import domain users into VDC or through group mapping, role mapping, etc.
Note: For the first two configuration steps, please refer to the relevant chapters of LDAP authentication and user import in the SANGFOR_VDC_v5.9.6_User Manual.
In the user policy set, select Use VDI account.(refer to section )
The application server needs to be configured to automatically add domains (refer to section 2.1.1), and its DNS needs to be specified as the server address that can resolve the AD domain name.
If you need to link a VDC policy set with an AD domain security group, please configure the association between the AD domain security group and the policy set.

Note: In the case of a Persistent mode virtual machine, refrain from adding the application server template to the domain, as this will impact the deployment of the virtual machine to the domain.
In the case of a Non-persistent mode virtual machine, kindly add the application server template to the domain. Ensure that the non-persistent mode virtual machine template is not shared with the persistent mode virtual machine template.
If the DNS of the application server cannot resolve the AD domain name, the server will fail to add the domain.
The security group associated with the security group policy must be within the Base DN range of the LDAP authentication settings.
Privileges and Policies Management
Remote app 2.0 Policies
The policies in this chapter apply to scenarios where the Remote app 2.0 protocol Agent is downloaded and installed on the application server. Only the following connection scenarios are currently supported: Windows, Linux, and MAC clients connecting to Win server in the 2016 – 2022 version range.
Basics
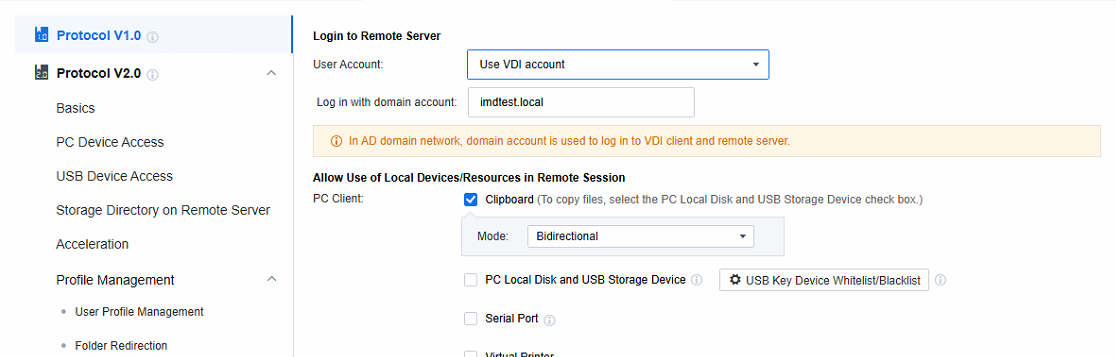
Login to the Remote Server
Log in to the VDC console, in Policies > Policy Sets, create a new policy set, set Remote App & Session-Based Desktop Policy, and select Protocol V2.0.

Set the policies related to Login to Remote Server. When the remote application server is not added to the AD domain, select Create Windows account as per VDI account; when the remote application server is added to the AD domain, select Use VDI account.


Note: Create Windows account as per VDI account: When a session is accessed, a Windows local account is automatically generated on the application server and linked to the VDI account. Any subsequent remote sessions accessed via this VDI account will use this Windows account to connect to the application server.
Type: Manage the privileges of Windows accounts auto-created on the application server. Categorize them into two types:
a. User privilege: Add relevant accounts to the Remote Desktop Users and Users groups. This enables them to perform common operations within the allowed scope.
b. Admin privilege: Assign accounts to the Administrators group. These accounts have high-level privileges for system management tasks, but strict access control is needed to ensure security.
Sync Options: After deleting the VDI account, the Windows accounts and user directories created automatically on the application server are also deleted (daily at 4 a.m.)..
Use VDI account: It’s often used in Active Directory domain scenarios. As the application server runs in a domain environment, the domain account can be the Windows account for server login. Also, the VDI account is a domain account, so you can use the VDI login username and password to log in to the application server.
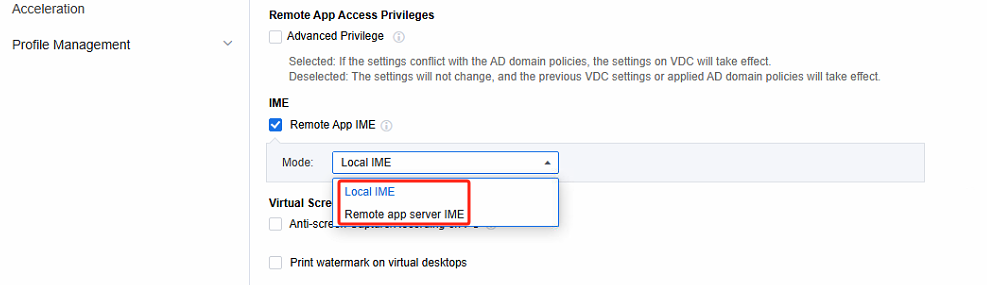
Remote Access Privileges
By default, the Remote Access Privileges is selected. Once this function is enabled, AD domain users will obtain permission to remotely connect to the application server within the domain user context. Subsequently, the application server will add these AD domain users to the local Remote Desktop Users group. In contrast, if this option is not selected, AD domain users will only be added to the local Remote Desktop Users group when they are connected to the application server. Moreover, after the AD domain users disconnect from the application server, they will automatically be removed from this group, thereby achieving the goal of restricting privileges.

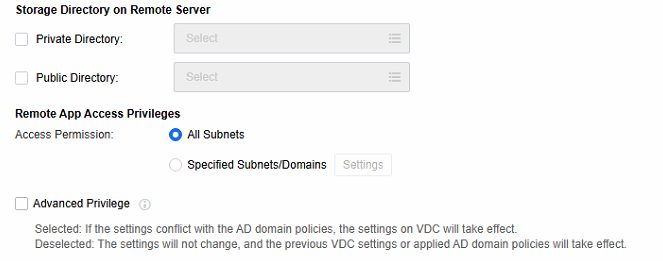
- Remote App Access Privileges
Remote App Access privileges are key for configuring Windows settings on the remote app server. When server settings are configured via AD domain group policy in an AD domain environment, uncheck Enable. This stops the VDC advanced privilege settings from taking effect, preventing conflicts with the AD domain policy. It helps maintain a stable config environment, ensuring AD domain group policy settings work smoothly and have precedence.
IME(Input Method Editors)
Both the local input method and the server input method can be configured. When Local IME is chosen, when the user uses the remote application, the text input method will employ the input method on the local endpoint instead of the one installed on the application server. In contrast, if Remote app server IME is selected, the text input method will employ the method on the remote app server.
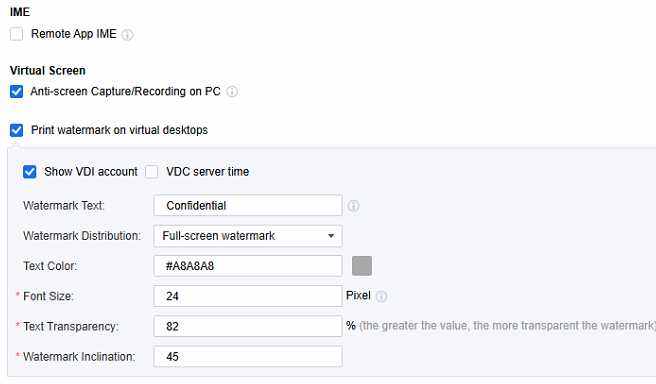
Virtual Screen
Select Anti-screen Capture/Recording on PC. With this function enabled, users can use the PC endpoint software to take screenshots of remote applications, record videos, and overlay the screen. As a result, the application screen during screen capture or recording will be displayed as a black screen, thereby enhancing the security of remote applications. It should be noted that this function only supports access on the Windows 10/11 and MAC clients.
Select Print watermark on virtual desktops. The screen watermark function is similar to that in the VDI desktop. You can set parameters such as the watermark content, distribution, color, font, and transparency, enabling the watermark to be displayed on the remote application screen.
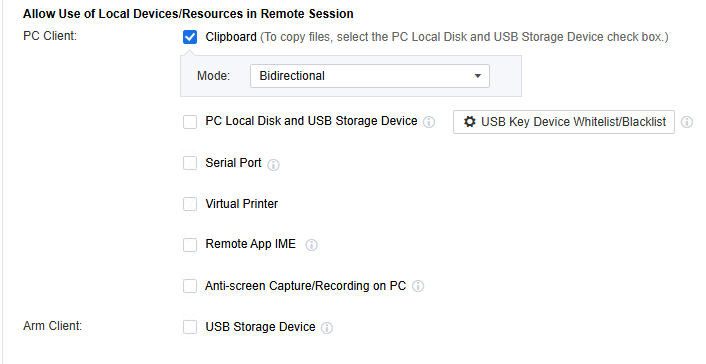
PC Device Access
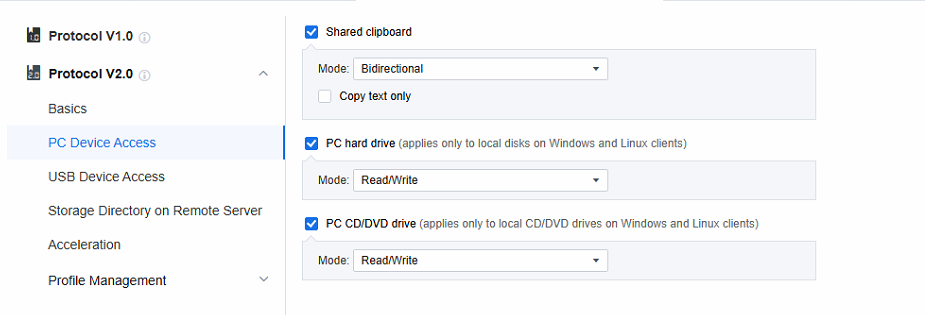
Shared clipboard: You can configure clipboard copy operations (using Ctrl + C/Ctrl + V) between remote applications and local endpoints. Specifically, you can choose to enable Bidirectional, which allows data to be copied from the server to the local device and vice versa. Alternatively, you can set it to only permit copying Server to Local or Local to Server. Moreover, based on these settings, you can further customize it to only allow the copying of text. In this case, copying of pictures, files, and other non-text elements will be restricted.
PC hard drive/PC CD/DVD drive: You can configure the local endpoint (either a Windows or Linux endpoint) to map its hard drive/ CD/DVD to the remote application server. This enables remote applications to use these drives. Additionally, you can set the mapped hard drive/ CD/DVD in either Read-only mode or Read/Write mode.
USB Device Access
Map USB storage device to hard drive: In this mode, USB storage devices at the local endpoint can be mapped into remote application servers for use by remote applications; compared to traditional USB mapping, disk mapping mode provides faster read and write speed.
Map USB CD/DVD drive to hard drive: In this mode, the USB CD/DVD drive device of the local endpoint can be mapped into the remote application server for remote application use; compared with the traditional USB mapping, the disk mapping mode can provide faster read and write speed.
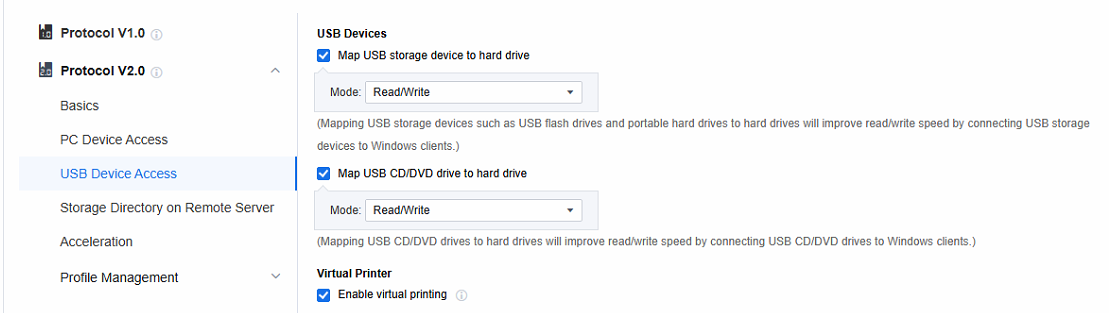
- The Virtual Printer function only applies to the local endpoints of Windows or Linux. Its main function is to enable the calling of printers within a remote application. It uses the screen transfer network to transfer the print files to the local endpoints. Subsequently, the local endpoints connect to the printers for printing. In principle, the entity that performs the printing in virtual printing is the local endpoint rather than the remote application server. Therefore, the remote application server doesn’t need to map the printer devices or establish network connections to the printers. As long as the local endpoint can access and use the printer after logging into the remote application from the local endpoint, the remote application can also make use of the printer.
Storage Directory on Remote Server
Scenario
Suppose you need to use relevant file or data storage directories while using remote applications. In that case, you can set the storage directory. The directories include the P**ersonal directory and the P**ublic directory.
Precautions
-
You are required to set up the storage server.
-
It’s necessary to ensure that the remote application server can access port 445 of the storage server.
Steps -
First, build the remote app storage server. Refer to Chapter 1.5 Storage Server Deployment.
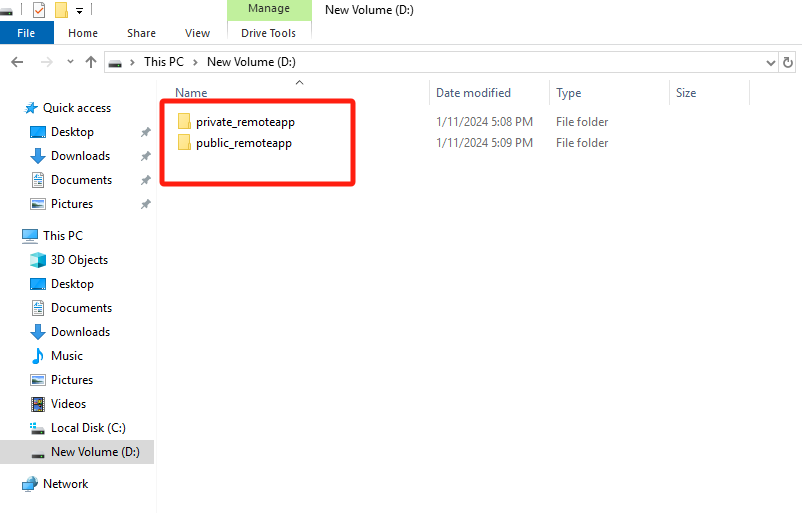
Log in to the file server VM and create five two folders, a private directory (private_remoteapp) and a public directory (public_remoteapp) for remote apps.
Configure the private_remoteapp and public_remoteapp directories.
The private_remoteapp directories have the same working mechanism as the public_remoteapp directories. Ensure that shared directories to be created are accessible to local file server users. The following uses the private_remoteapp directory as an example to describe how to create a shared directory:
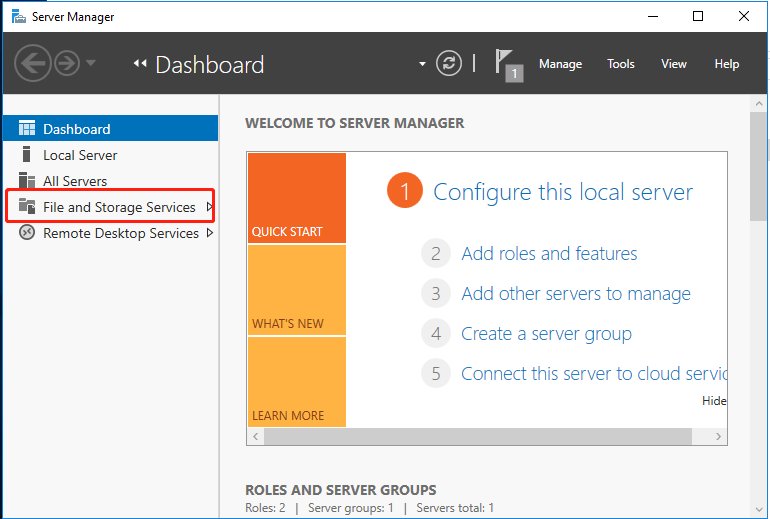
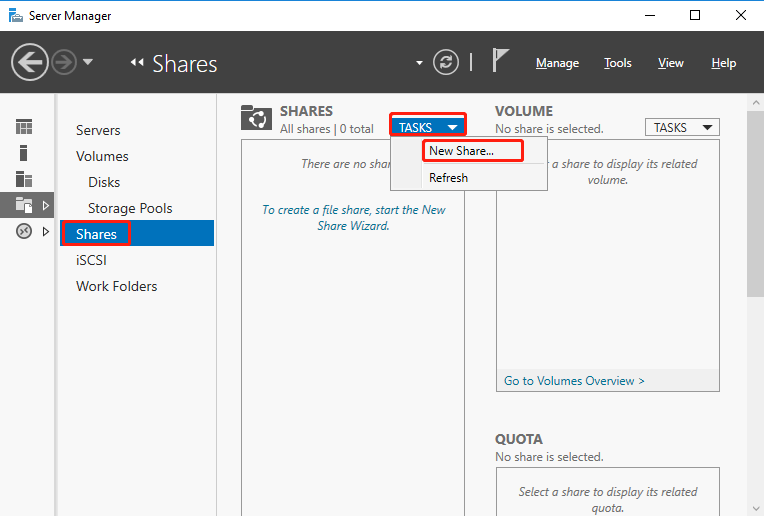
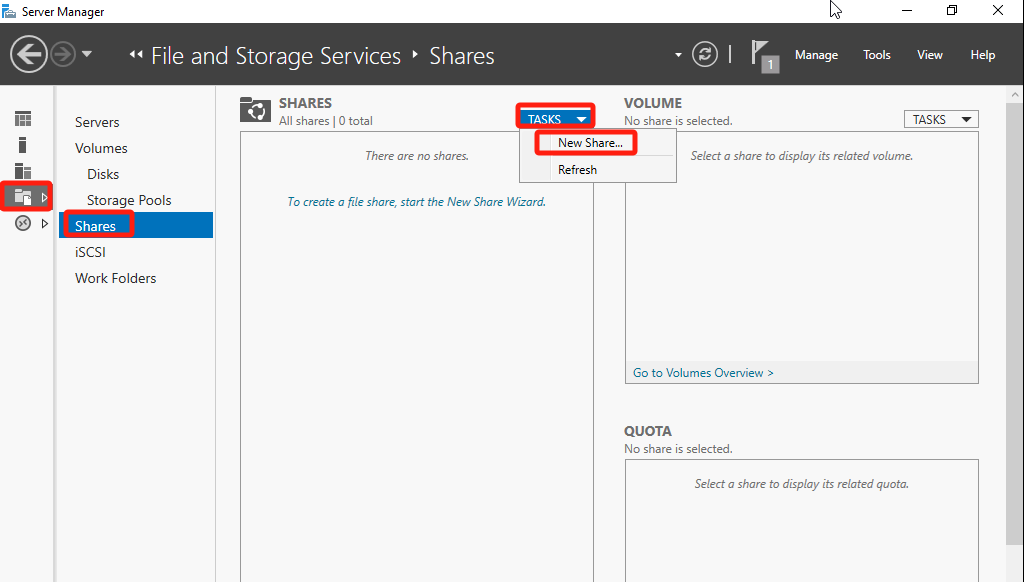
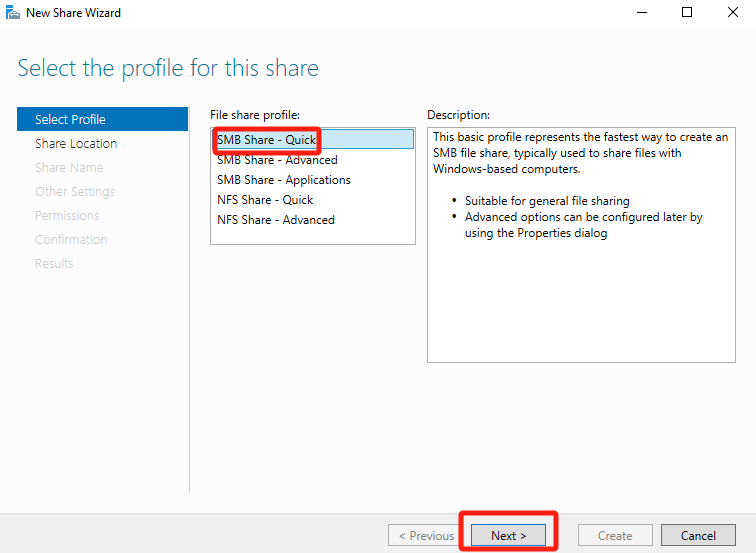
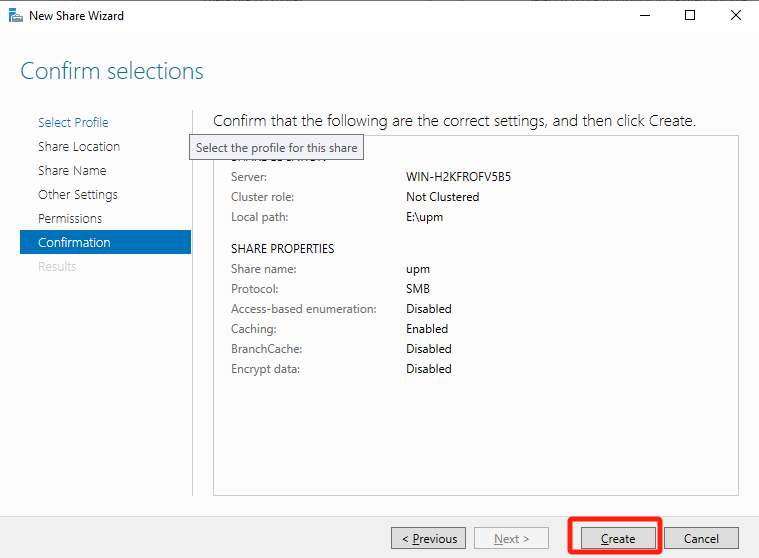
Open Server Manager, go to File and Storage Services > Shares, click TASKS, and select New Share.
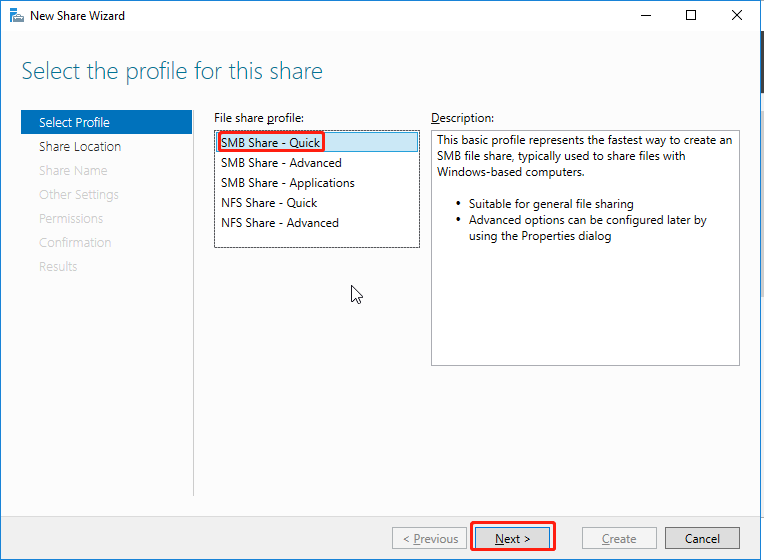
On the Select Profile page, select SMB Share – Quick and click Next.
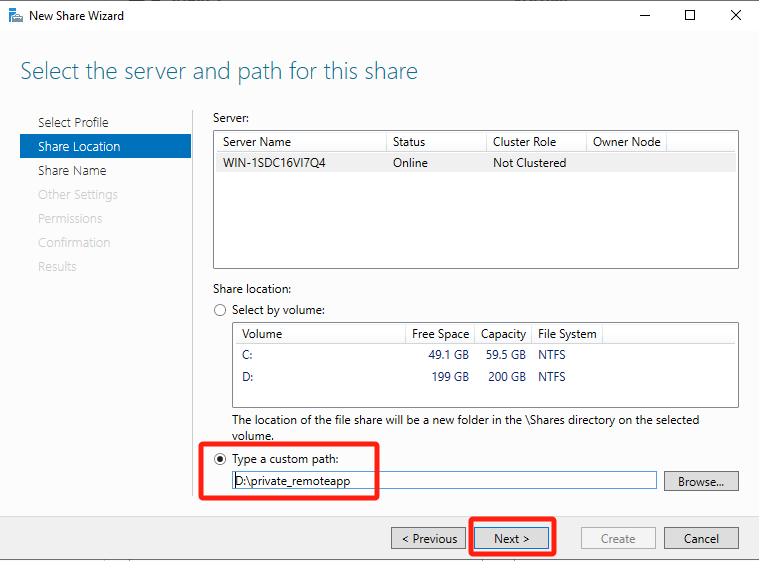
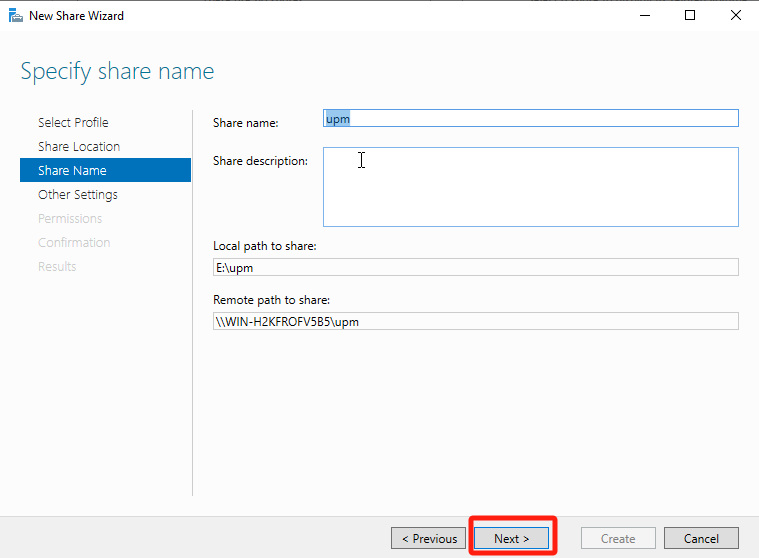
On the Share Location page, select Type a custom path, click Browse, select the newly created private directory, and click Next.
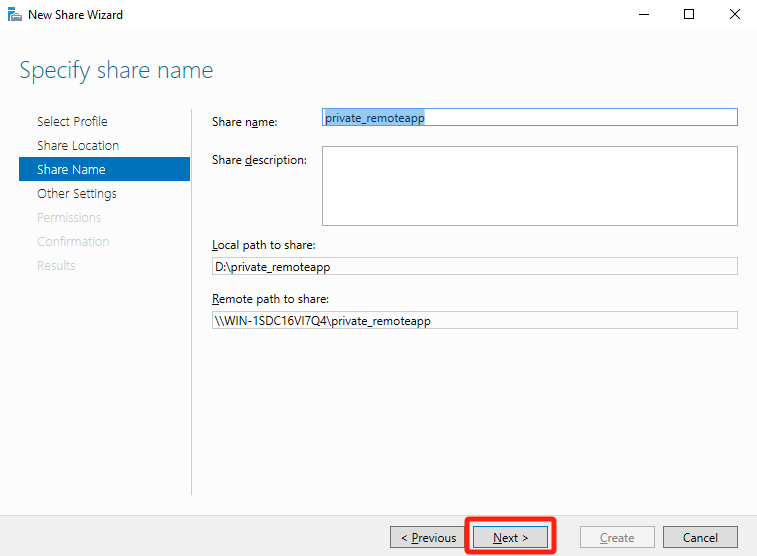
On the Share Name page, enter a name in the Share name text box and click Next.
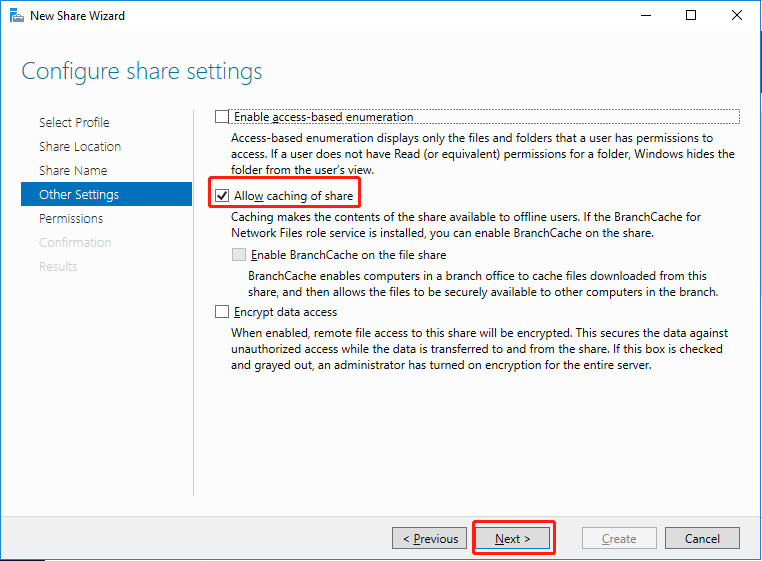
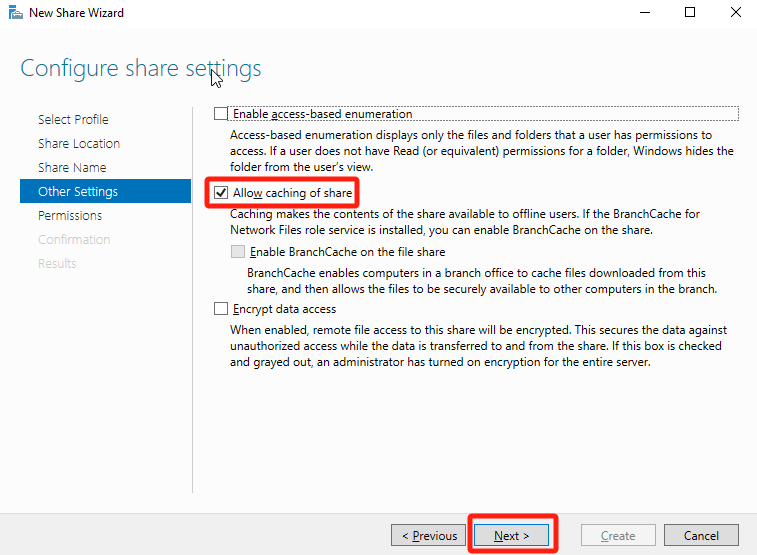
On the Other Settings page, select Allow caching of share and click Next.
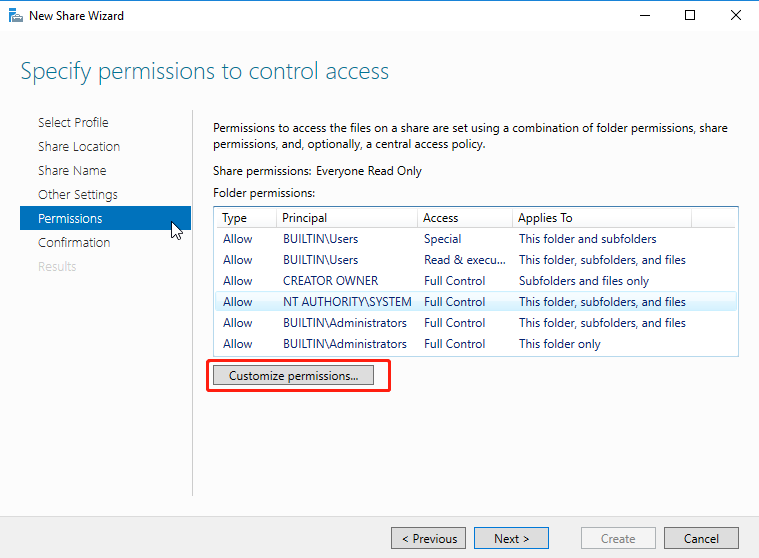
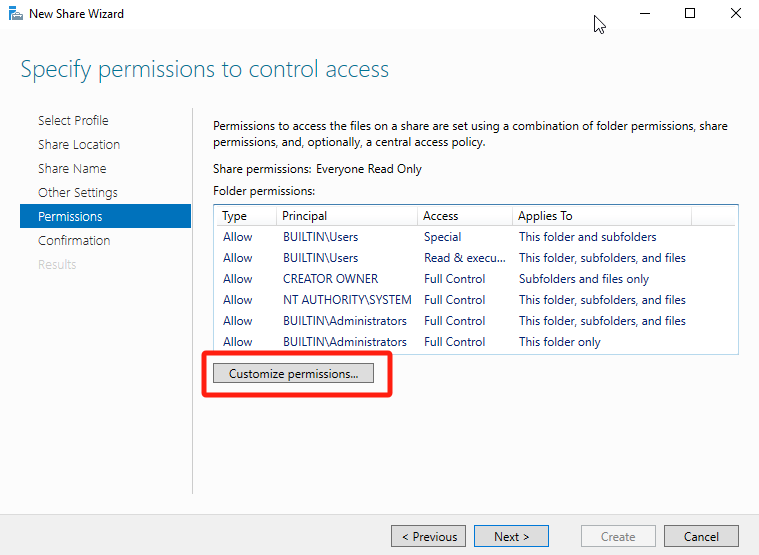
On the Permissions page, click Customize permissions.
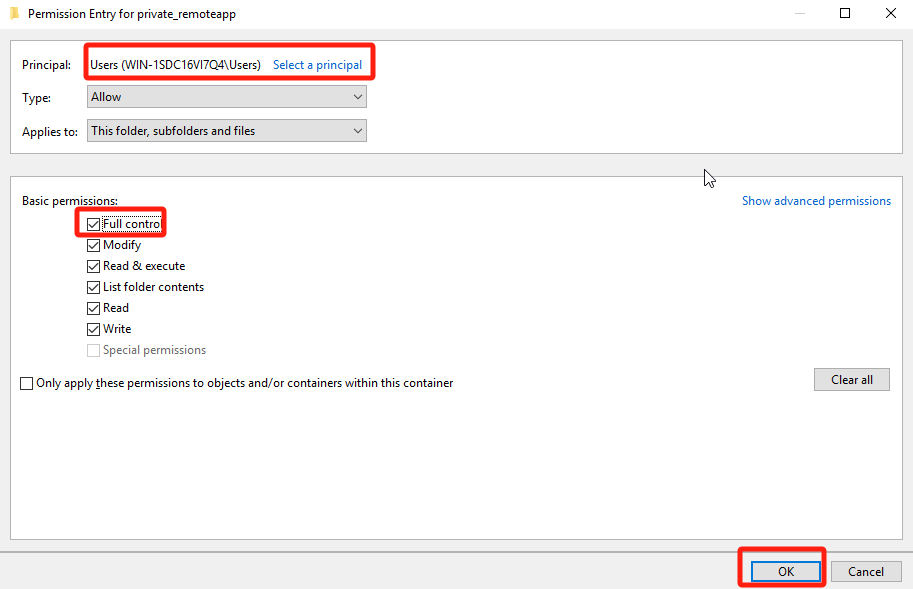
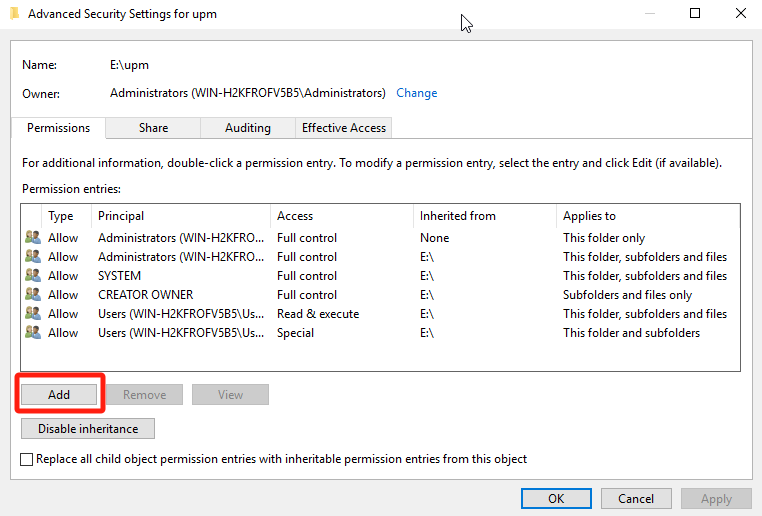
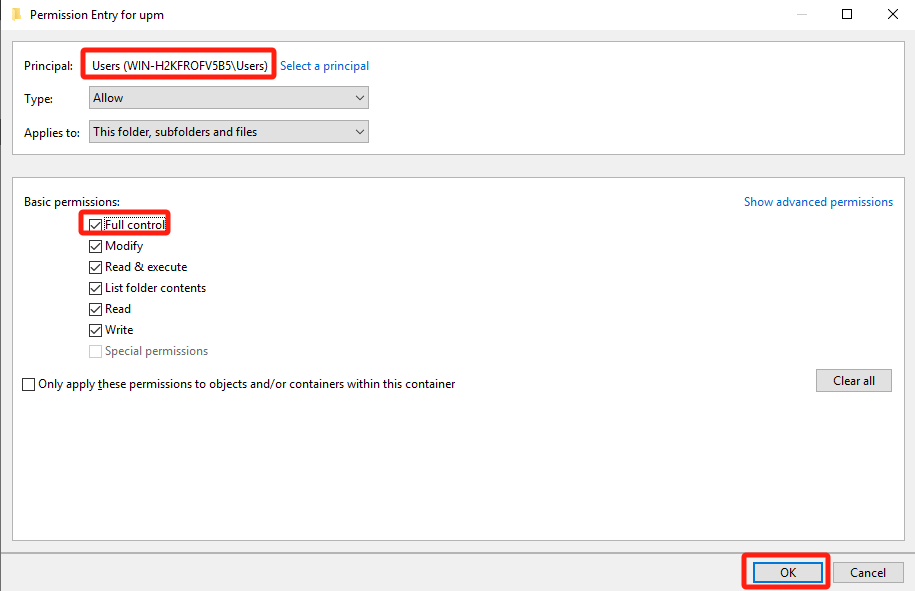
On the Permissions tab of the Advanced Security Settings for private_remoteapp page, click Add and grant Full Control permissions on this directory to the Users security group of the file server.
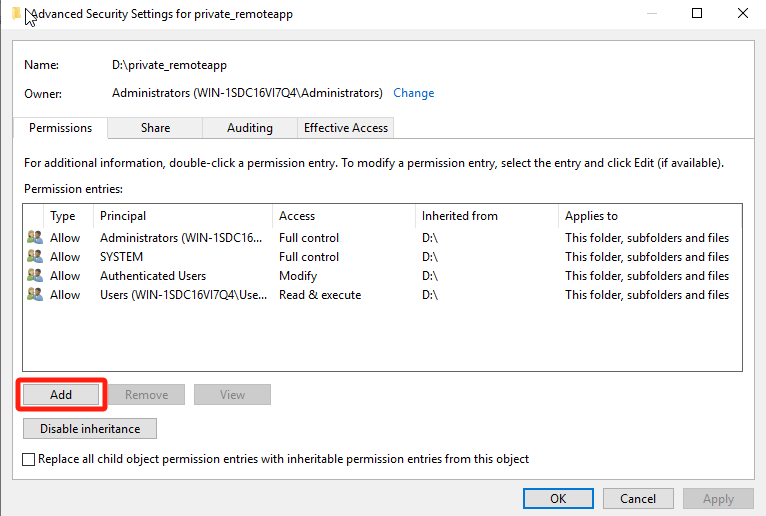
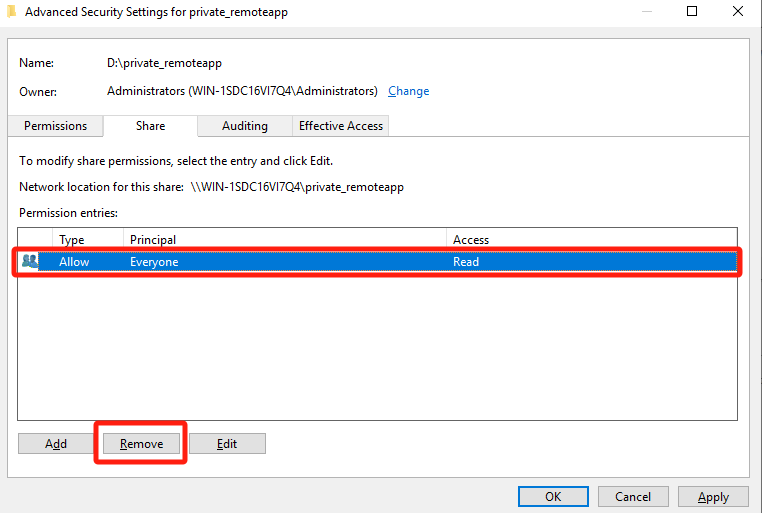
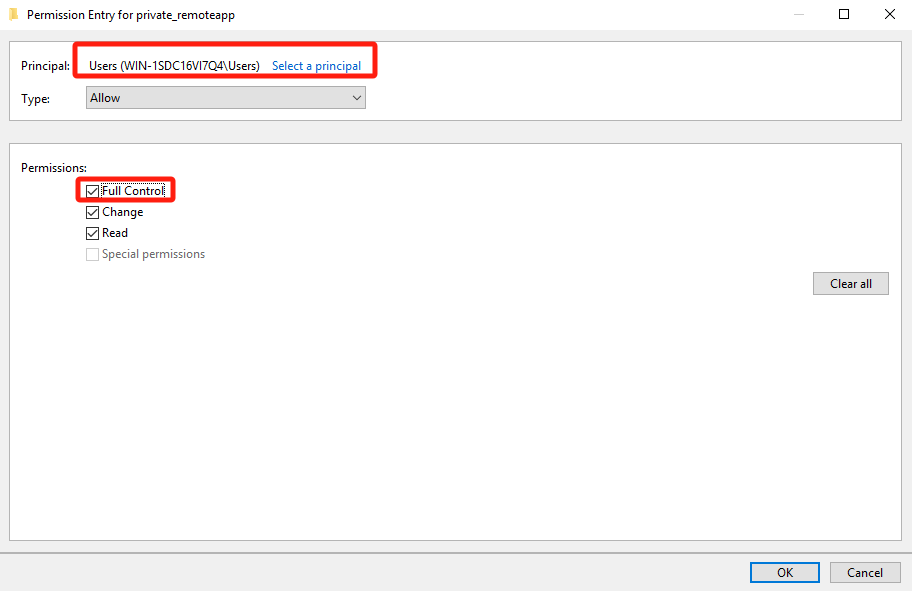
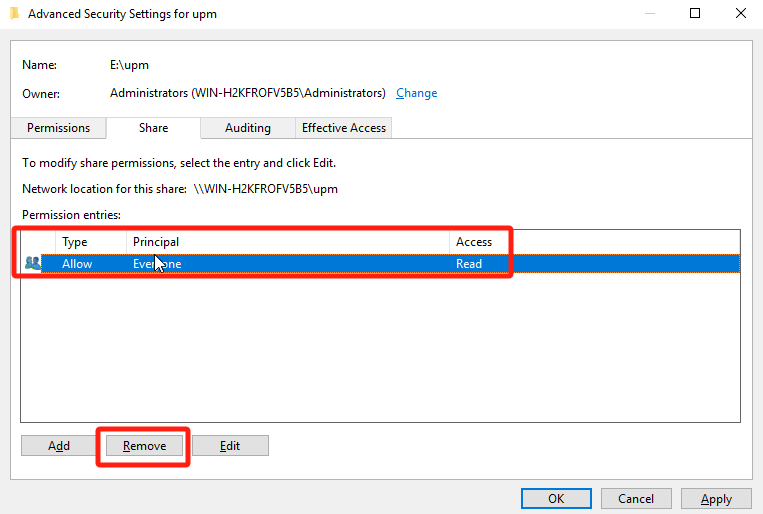
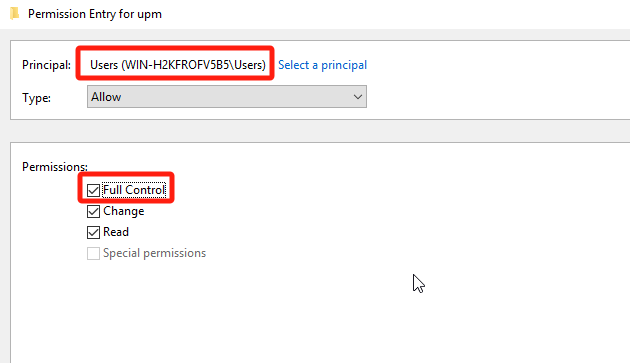
On the Share tab of the Advanced Security Settings for private_remoteapp page, remove the permissions granted to the Everyone security group, grant Full Control permissions to the Users (secure group of the file server), and click OK.
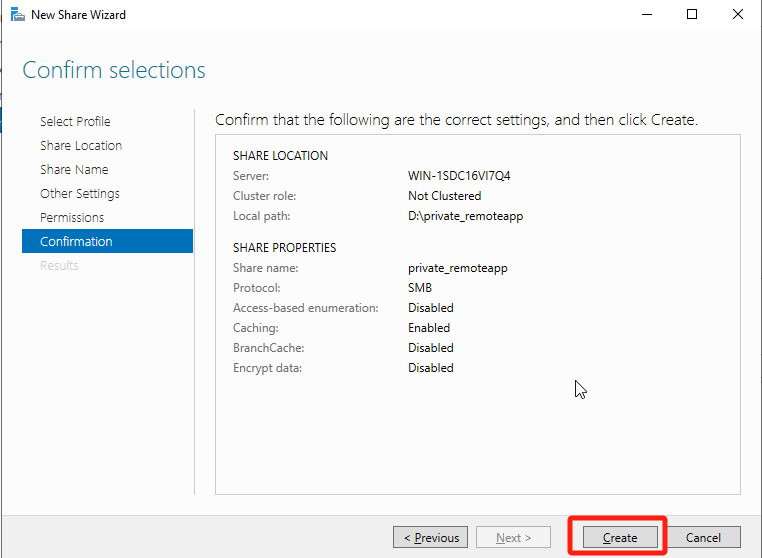
On the Confirmation page, click Create to complete the configuration.
-
Configure quotas.
Administrators can set quotas for shared folders that serve as remote app private_remoteapp directories, limiting the amount of data users can store in the shared directory. The configuration process is as follows: -
Create a quota template.
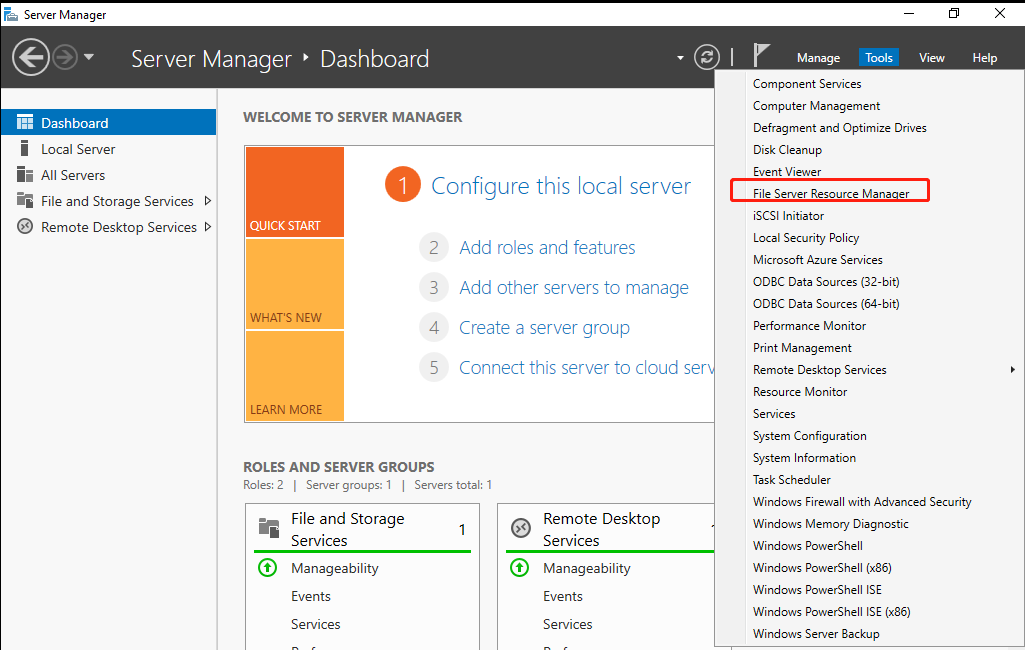
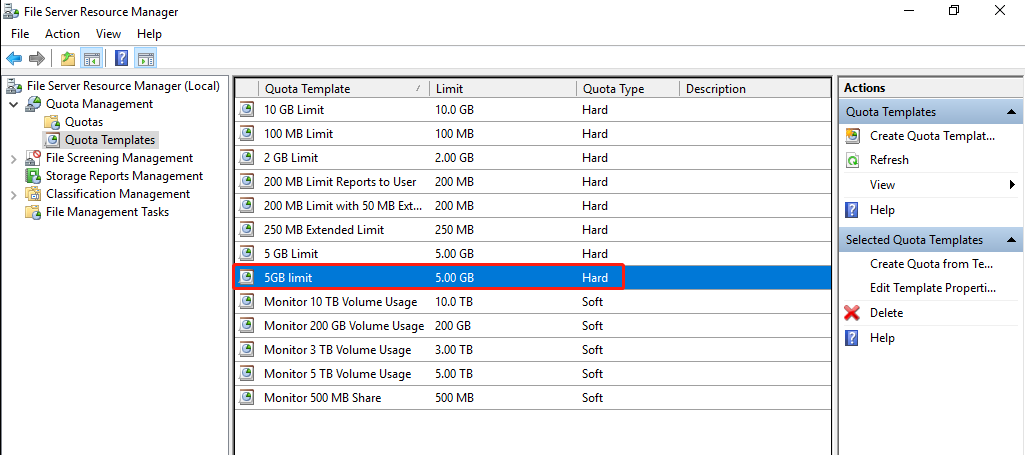
Open Server Manager, click Tools, and select File Server Resource Manager.
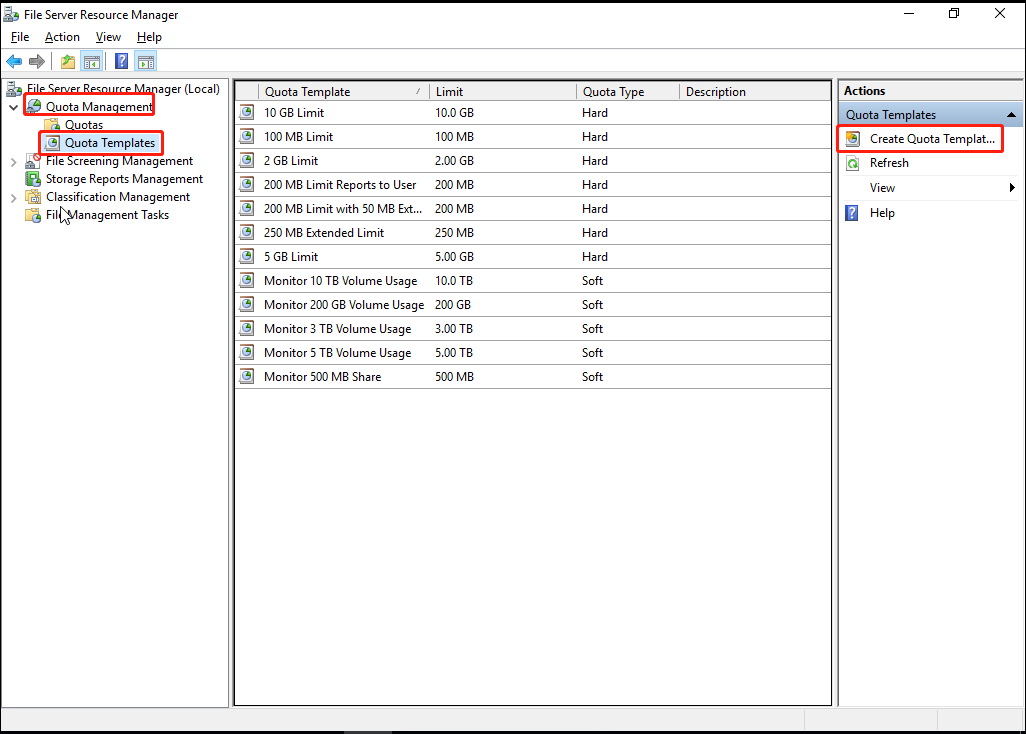
Go to Quota Management > Quota Templates and click Create Quota Template.
In the Copy properties from the quota template (optional) drop-down list, select 100 MB Limit and click Copy. Enter a name in the Template name text box, change the Limit value to 5GB, select Hard quota: Do not allow users to exceed limit, and click OK.
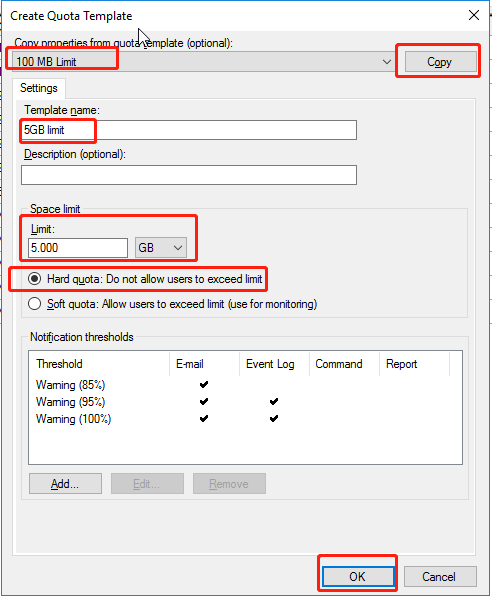
Note: The shared directory quota template specifies the maximum storage space users can use in the shared directory. In actual scenarios, you can configure the template based on the service requirements and name it after its space limit to facilitate subsequent configuration and maintenance.
Go back to the Quota Templates page. The newly created quota template appears.
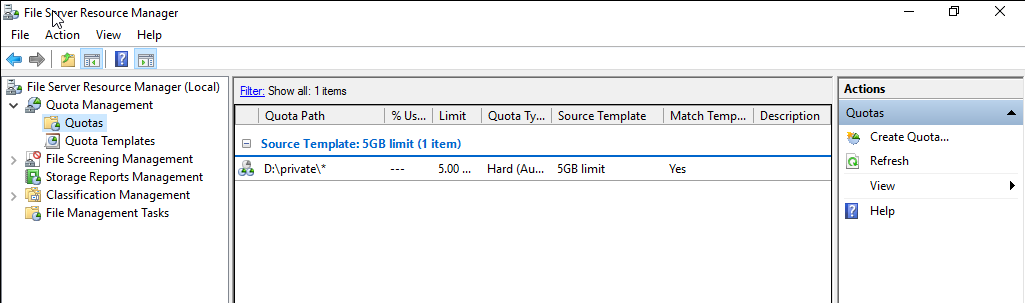
- Create quotas on shared directories.
Open File Server Resource Manager, go to Quota Management > Quotas, and click Create Quota.
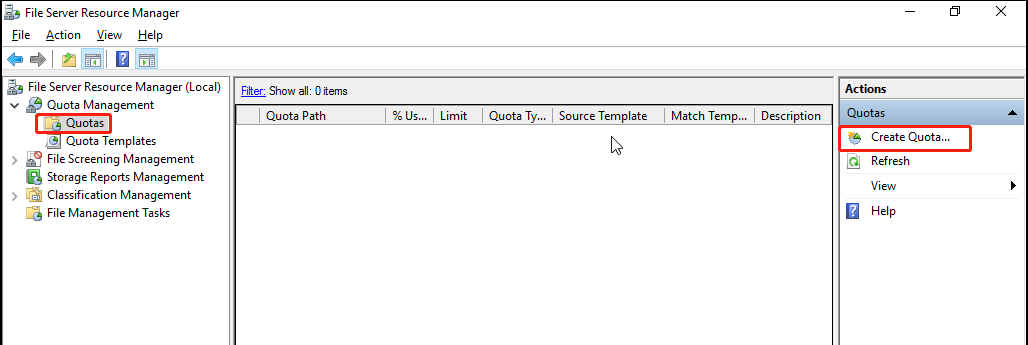
Click Browse corresponding to the Quota path and select the private_remoteapp directory. Then, select Auto apply template and create quotas on existing and new subfolders, Derive properties from this quota template (recommended), 5GB Limit, and click Create.

- Create Storage Server
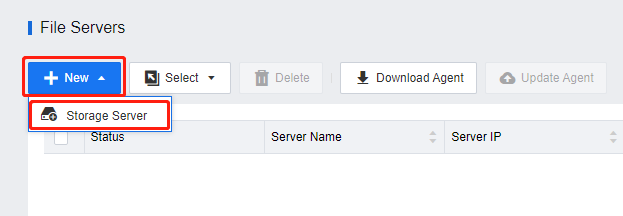
Log in to the VDC console and go to Assets > File Servers. On the File Servers page, click New and select Storage Server.
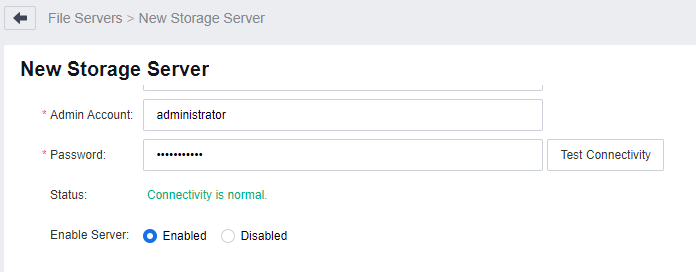
In the Basics section of the New Storage Server page, set the basic attributes of the storage server as required, click Test Connectivity, and ensure the Status shows Connectivity is normal.
- Add a Private Directory.
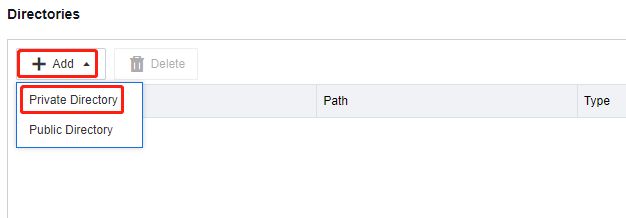
In the Directories section, click Add and select Private Directory.
On the Add Private Directory page, select the shared directory created as a private directory on the storage server and click OK.
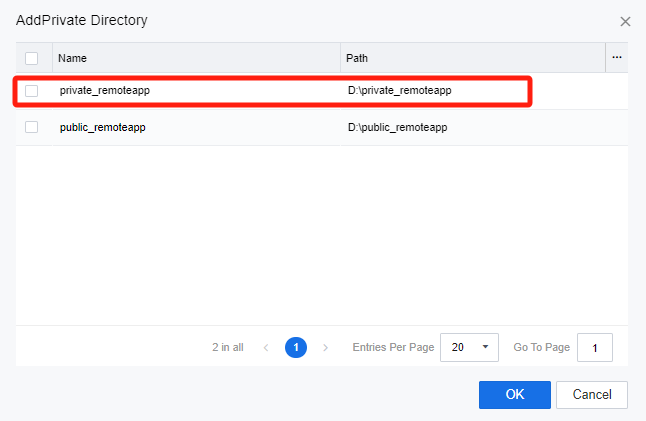
Note: The shared directories will only be available on the storage server if the connectivity to the storage server is tested and connected successfully.
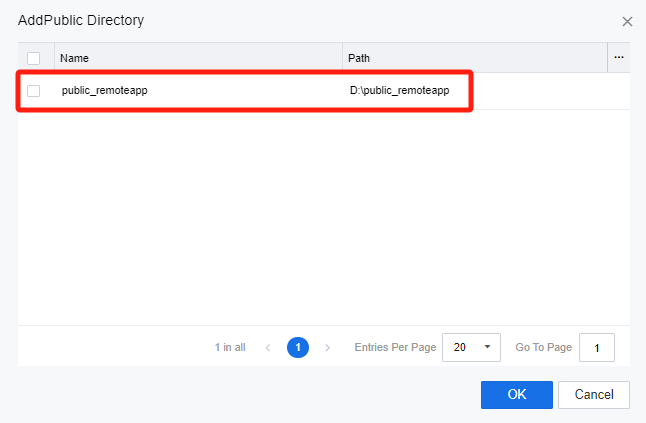
- Add a Public Directory.
In the Directories section, click Add and select Public Directory.
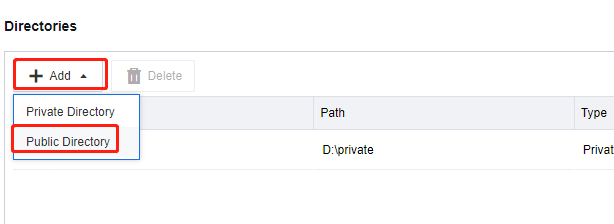
On the Add Public Directory page, select the shared directory created as a public directory on the storage server and click OK.
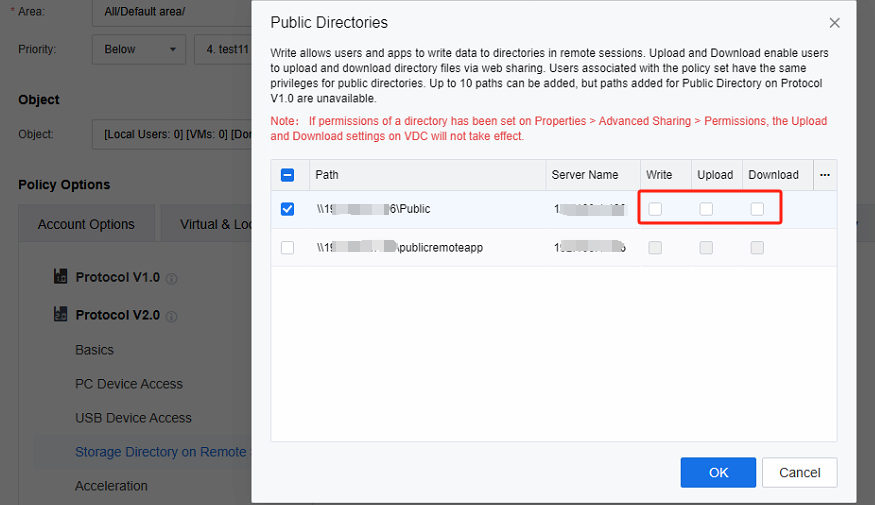
In the Remote App & Session-Based Desktop Policy of the policy set, check the private directory and the public directory, and select the corresponding directory.

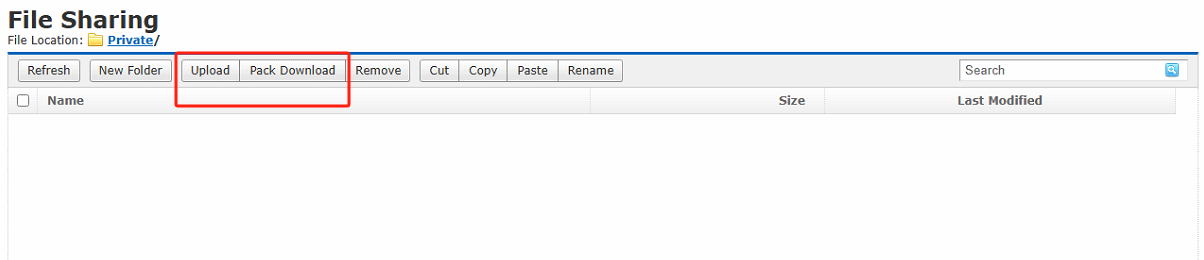
Select the Private Directory. It should be noted that the Upload and Download mentioned here refers to the permission that the endpoint possesses after accessing this directory via the web rather than the permission of the Remote app to access this directory. By default, the remote app has both read and write permissions for the personal directory.

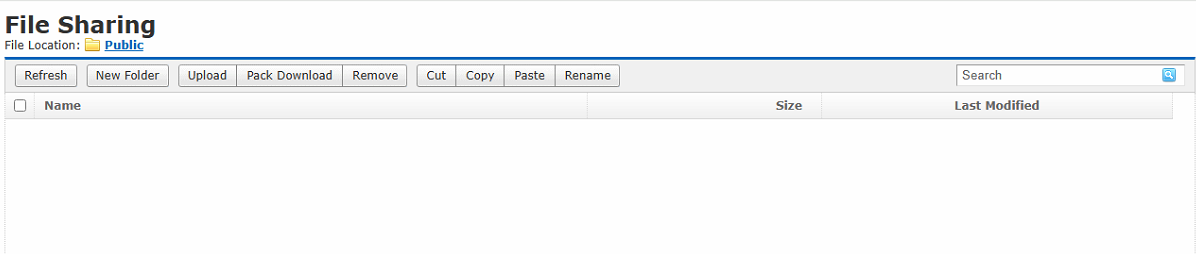
Select the Public Directory. By default, the remote app has read-only permissions to the public directory. However, after checking the Write checkbox, it will acquire additional write permissions. Moreover, the Upload and Download operations are designed so that the endpoint can access this directory via the web.
Save the policy set, log in with the VDI client, and open the remote app. Take the browser as an example. You can save the webpage as the Chrome page and save it to the storage directory, as follows:
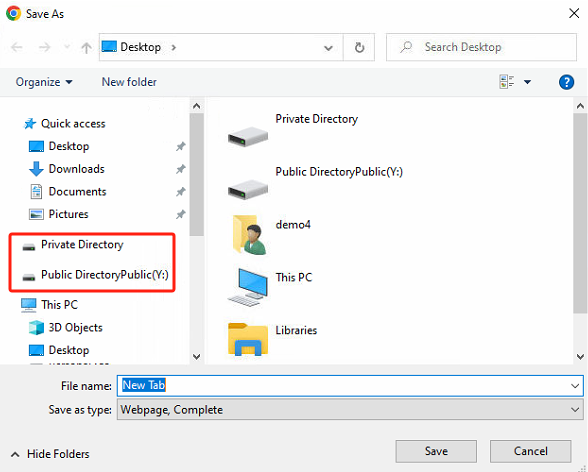
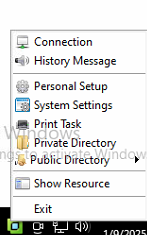
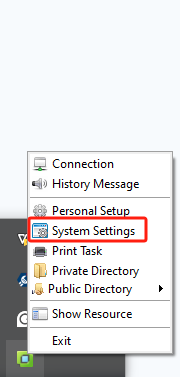
Right-click the VDI client icon in the lower right corner of the endpoint. This action allows you to access the private directory and public directory directly from the endpoint via the web. Moreover, the upload and download permissions configured within the VDC policy set will be applicable in this context.
Acceleration
Scenario
The VDC can be configured for the remote application’s image quality, audio quality, and network protocol to adapt to different usage scenarios.
Precautions
None.
Steps
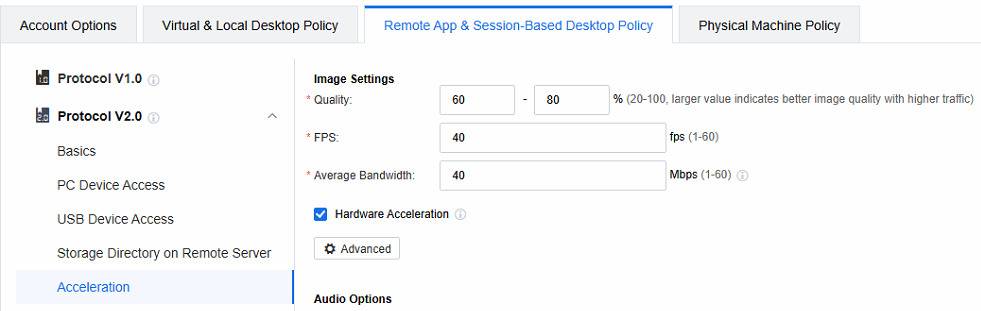
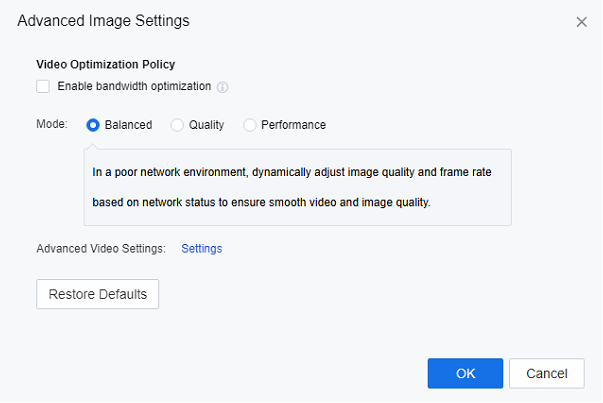
Image Settings
Log in to the VDC console. You can configure the image quality in the Remote App & Session-Based Desktop Policy. The larger the percentage value you set, the better the image quality. However, it should be noted that a larger value also means correspondingly higher traffic.
-
The FPS and Average Bandwidth are usually kept by default. If you publish a 3D application, it is recommended that the FPS be changed to 60 fps to improve the user experience.
The Hardware Acceleration function can use hardware devices on the remote application server to enhance the image quality. In the scenario of publishing a 3D application, hardware acceleration must be checked.
-
If you publish a video application, you can set detailed parameters for the video quality when the application plays the video.
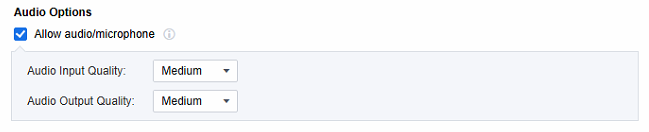
Audio Options
You can configure whether to permit remote applications to allow audio and microphone. Meanwhile, you can also set the audio input and output quality, covering options like low, medium, high, and lossless. It should be noted that the higher the audio quality, the higher the traffic bandwidth it will occupy. Therefore, please configure it based on actual requirements.
Transfer Encryption
Check Enable to encrypt the transfer channel.

Network Settings
The network protocol type of the remote application can be configured as TCP, UDP, or Adaptive. Additionally, the Keepalive Duration can be adjusted as needed. When the duration of network interruption surpasses the set keepalive duration, a reconnection prompt will appear.
In the customer environment where network interruptions frequently occur, even if the network interruption is minor, the reconnection prompt box will pop up immediately, significantly affecting the user experience. In such cases, it is advisable to increase the keepalive duration to prevent the reconnection prompt box from popping up too often.

Profile Management
Scenario
Like virtual desktop scenarios, remote applications can implement user profile management (UPM) and folder redirection. It ensures that user personalization settings for remote applications are maintained even after the application server undergoes restoration or overwrite operations.
Precautions
Profile management requires additional storage space, which can be third-party CIFS storage or UPM virtual drive. If you use a UPM virtual drive, you need to build a virtual storage server first.
Steps
- First, build the virtual storage server. Refer to Chapter 1.5 Storage Server Deployment.
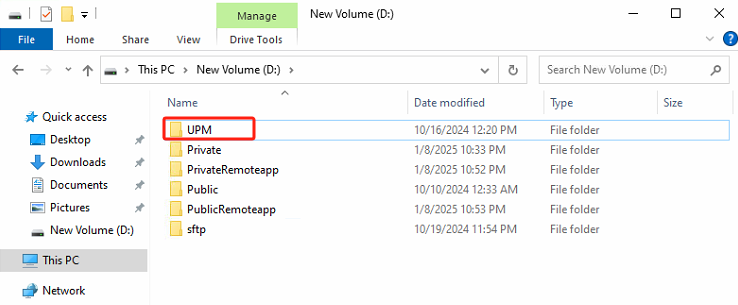
Log in to the file server VM and create a new folder and directory for user profiles(UPM).
- The UPM directory configuration requires only the creation of a shared directory accessible to local users of the file server, which can be configured as follows:
Open Server Manager, go to the File and Storage Services > Shares screen**, and click TASKS > New Share**.
Select SMB Share – Quick in the File share profile and click Next.
In Share Location, select Type a custom path, choose the created UPM directory (UPM), and click Next.

In Share Name, fill in the share name and click Next.
In Other Settings, select Allow caching of share and click Next.
In Permissions, click Customize permissions.
Under the Advanced Security Settings > Permissions tab, click Add to give the local Users(secure group of the file server) Full Control permissions over the folder.
Under the Advanced Security Settings > Share tab, remove the permissions of the Everyone security group, add the permissions of the local Users(secure group of the file server) as Full Control, and click OK.
Finally, click Create.
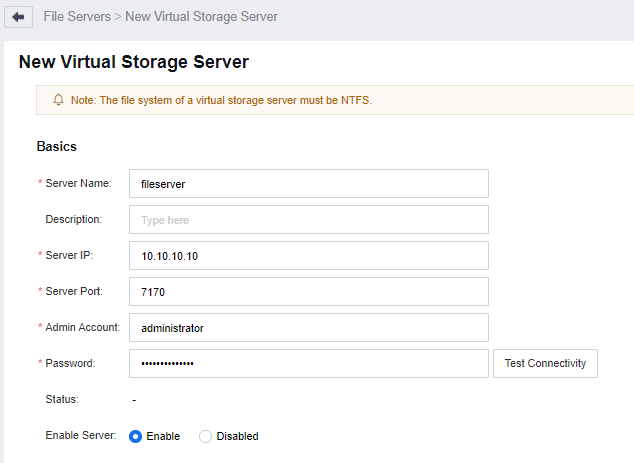
Log in to the VDC console, enter the Assets > File Servers interface, click New, select Virtual Storage Server, and enter the New Virtual Storage Server configuration interface.
- Fill in the basic attributes of the virtual storage server according to the actual scenario, and then click Test Connectivity to confirm it Passed the connectivity test.
- Add UPM Drive. In the Virtual Drives list, click Add, select UPM Drive, and enter the Add UPM Drive configuration window.

Check the shared directory created on the virtual storage server for the UPM drive and click OK.
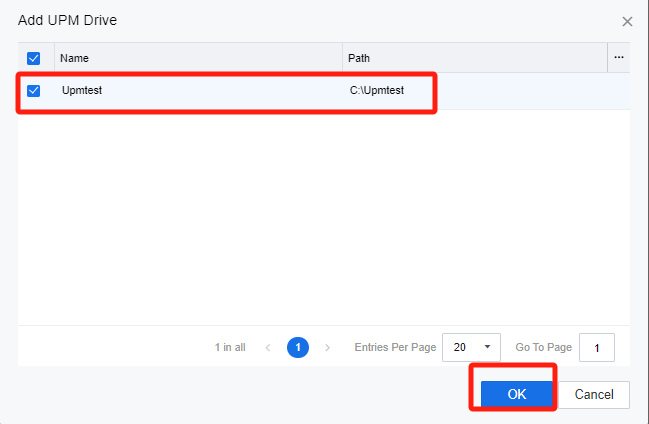
Note: After the virtual storage server test connection is successful, the shared directory on the virtual storage server will be shown here to offer choices. If the connection to the virtual storage server fails, the directory cannot be obtained.
In the Remote App & Session-Based Desktop Policy, navigate to Profile Management. Check the User Profile checkbox, and then specify the configuration path that requires redirection. By default, %userprofile% encompasses all user’s personalized configurations.
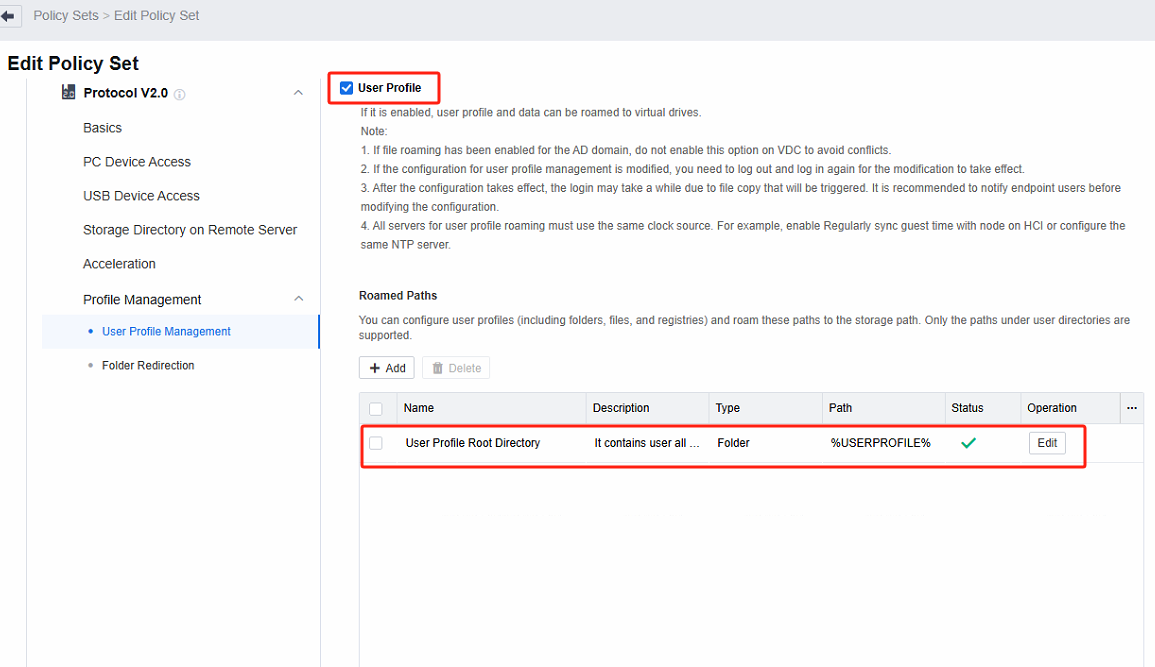
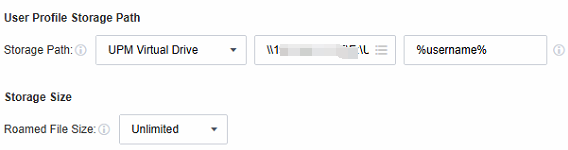
- Configure the storage path to the UPM virtual drive on the virtual storage server, leaving other settings at their default values. Once the configuration is saved, the user’s personal profile will be retained even if the remote application server undergoes restoration, overwrite, or update. It ensures that users can access and use their personalized settings upon each login.
- Apart from user profile management, it is also possible to redirect specific folders. The configuration is similar to that of user configuration management. However, only the relevant folders shown in the Folder Redirection interface are supported for redirection. In contrast, other folders, such as the registry editor (regedit), files, and so on, cannot be configured flexibly.

Note: The differences between User Profile Management and Folder Redirection:
User profile management is similar to AD domain roaming. When a user logs in and out, it interacts with the remote host. This interaction enables the synchronization of configuration files locally within the system, the file location can be accessed and managed.
In contrast, folder redirection involves redirecting the operations related to system folders to a remote host. Within the system, the file location is associated with this redirected setup, facilitating seamless access and management of files as if they were stored in the local system folders while being hosted remotely.
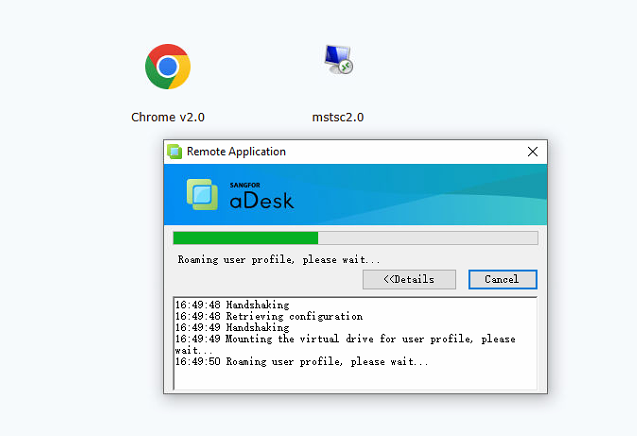
Log in via the VDI client and click on the published remote application resource. It will now display a prompt indicating that it is Roaming user profile. You can conduct the profile redirection test for remote applications. For example, you can create a favorites folder on Chrome browsers. The favorites folder will remain even after the remote application server (set to the non-persistent mode) is restarted and restored.
Remote App 1.0 Policies
Scenario
The remote app1.0 policy is suitable for the scenario where a remote app1.0 agent is installed on a remote application server, and the supported policy and function are different from that of remote app2.0.
Precautions
None.
Steps
Login to the Remote Server
Log in to the VDC console, in Policies > Policy Sets, and create a new policy set. Navigate to Remote App & Session-Based Desktop Policy, and select Protocol V1.0.
Set the policies related to Login to Remote Server. When the remote application server is not added to the AD domain, select Create Windows account as per VDI account; when the remote application server is added to the AD domain, select Use VDI account.


Note: Create Windows account as per VDI account: When a session is accessed, a Windows local account is automatically generated on the application server and linked to the VDI account. Any subsequent remote sessions accessed via this VDI account will use this Windows account to connect to the application server.
Type: Manage the privileges of Windows accounts auto-created on the application server. Categorize them into two types:
a. User privilege: Add relevant accounts to the Remote Desktop Users and Users groups. This enables them to perform common operations within the allowed scope.
b. Admin privilege: Assign accounts to the Administrators group. These accounts have high-level privileges for system management tasks, but strict access control is needed to ensure security.
Sync Options: After deleting the VDI account, the Windows accounts and user directories created automatically on the application server are also deleted (daily at 4 a.m.)..
Use VDI account: It’s often used in Active Directory domain scenarios. As the application server runs in a domain environment, the domain account can be the Windows account for server login. Also, the VDI account is a domain account, so you can use the VDI login username and password to log in to the application server.
Allow Use of Local Devices/Resources in Remote Session
Clipboard: You can configure it to Duplicate Data to Server, Duplicate Data to Local Desktop, and Bidirectional. If it involves copying files, you need to check the PC Local Disk and USB Storage Device checkbox as well.
PC Local Disk and USB Storage Device: Files saved by application resources can be stored on the PC local disk and USB storage. (In the PC client scenario, the USB storage device will be mapped as a drive, which needs to be plugged in before the user logs in. The USB storage device inserted after opening the session will not be recognized)
Serial Port: Support serial port for remote application mapping.
Virtual Printer: The Virtual Printer function only applies to the local endpoints of Windows or Linux. Its main function is to enable the calling of printers within a remote application. It uses the screen transfer network to transfer the print files to the local endpoints. The local endpoints are used to connect to the printers for printing. In principle, the entity that performs the printing in virtual printing is the local endpoint rather than the remote application server. Therefore, the remote application server doesn’t need to map the printer devices or establish network connections to the printers. As long as the local endpoint can access and use the printer after logging into the remote application from the local endpoint, the remote application can also make use of the printer.
Remote App IME: Both the local input method and the server input method can be configured. When Local IME is chosen, when the user uses the remote application, the text input method will employ the input method on the local endpoint instead of the one installed on the application server. In contrast, if Remote app server IME is selected, the text input method will employ the method on the remote app server.
Anti-screen Capture/Recording on PC: With this function enabled, users can use the PC endpoint software to take screenshots of remote applications and record videos. As a result, the application screen during screen capture or recording will be displayed as a black screen, thereby enhancing the security of remote applications. It should be noted that this function only supports access scenarios on the Windows 10/11 and MAC clients.
ARM Client’s USB storage device: supports read-only and read/write modes.
Storage Directory on Remote Server
Refer to Chapter 3.1.4.
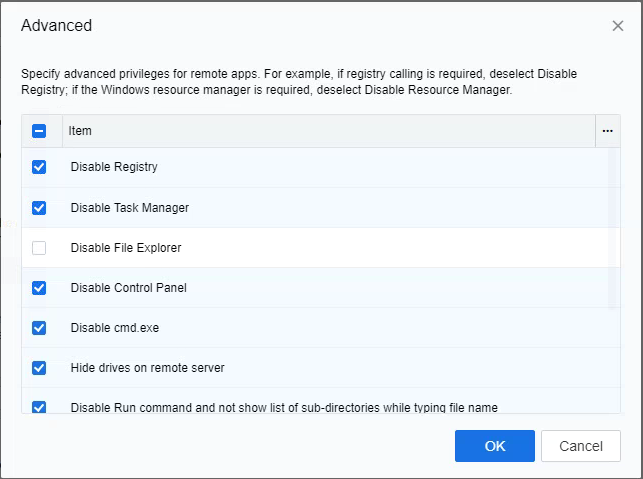
Remote App Access Privileges
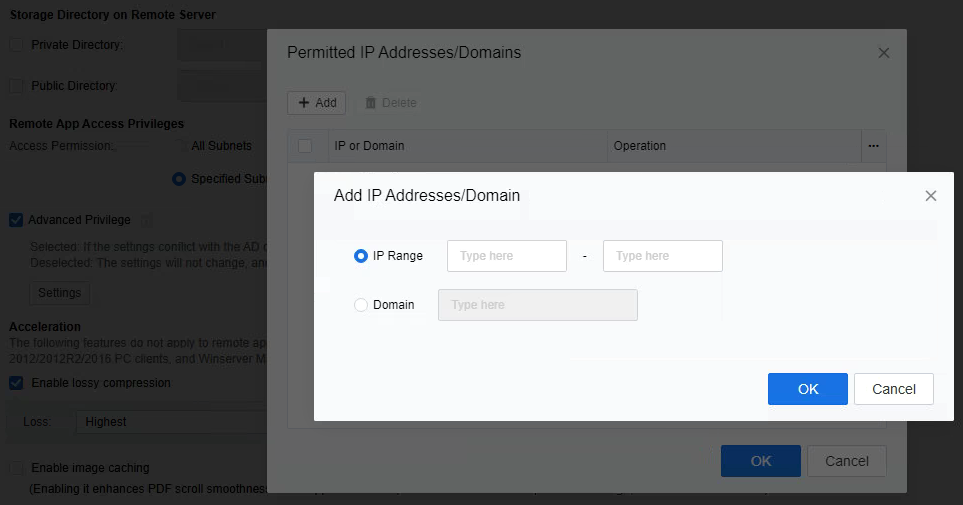
-
Configure the access permissions for the endpoint service. Specifically, setting the network segments that remote applications can access is possible. For example, Chrome browsers can be restricted to accessing only specific IP addresses or domain names.
-
Remote App Access privileges are key for configuring Windows settings on the remote app server. When server settings are configured via AD domain group policy in an AD domain environment, uncheck Enable. It stops the VDC advanced privilege settings from taking effect, preventing conflicts with the AD domain policy. It helps maintain a stable config environment, ensuring AD domain group policy settings work smoothly and have precedence.
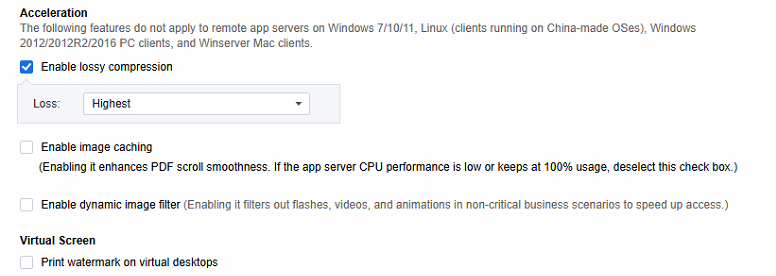
- Acceleration
This function is only suitable for ARM thin client access scenarios, and the winserver needs to use the 2008/2008R2 version for transmission parameter tuning when the protocol experience is poor. The current mode has been deprecated. It is recommended that non-thin client endpoint access be used first.
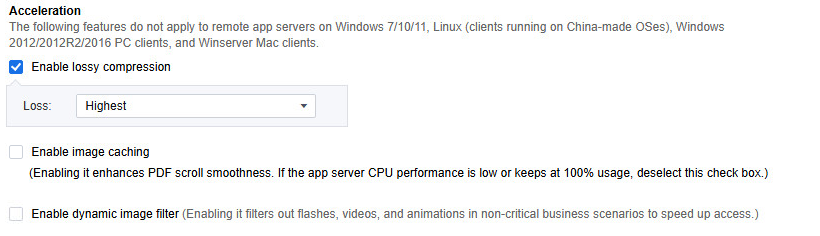

Lossy compression: Lossy compression can reduce the picture flow. Options such as Highest indicate the compression quality. The higher the compression quality, the higher the picture flow, and the better the picture quality.
Image caching: Local cache optimization for PDF document applications, smoother use, not recommended when the CPU consumption of the application server is high.
Dynamic image filter: After enabling, the application speed of dynamic image scenes can be improved.
Virtual Screen
Select Print watermark on virtual desktops. The screen watermark function is similar to that in the VDI desktop scene. You can set parameters such as the watermark content, distribution, color, font, and transparency, enabling the watermark to be displayed on the remote application screen.

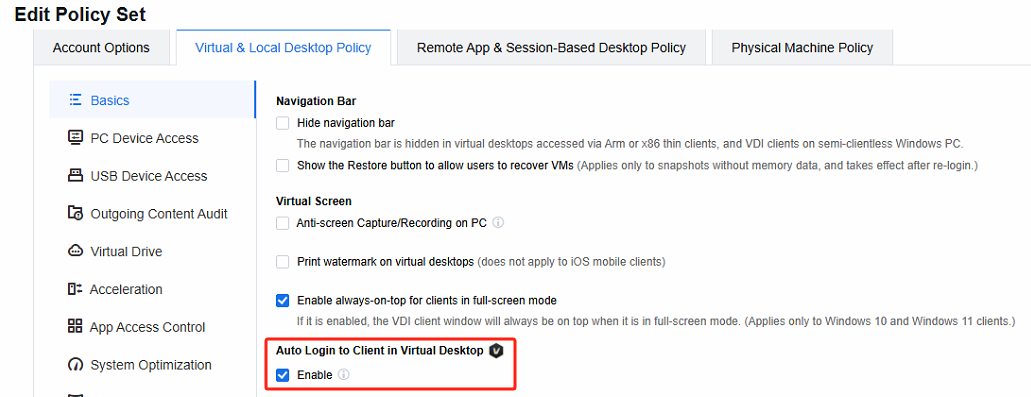
Auto Login to Client in Virtual Desktop
Scenario
After the user logs in to the virtual desktop via the VDI client, the system will automatically log the user into the VDI client within the virtual machine without the user’s awareness or the need for additional authorization. Simultaneously, a shortcut to the remote application will be automatically created on the virtual machine’s desktop. This setup enables the user to seamlessly access and use the remote application once they log in to the virtual machine.
Precautions
Only Windows and Linux virtual machines support this function.
The remote assistance function is not supported after the desktop nested remote app function takes effect.
Switch (preempt/log out) the outer client side and the inner client side will log out synchronously.
Endpoint policies, contextual policies, and ingress security-related policies are not effective for inner clients, and Atrust and UDM login are not supported;
Multi-layer nesting is not supported; only 1-layer nesting is supported, that is, logging in to the second VDI desktop in the VDI desktop. The nested SBC function cannot be used in the second VDI desktop.
Steps
Log in to the VDC console, edit the corresponding policy set, navigate to Virtual & Local Desktop Policy, and check Auto Login to Client in Virtual Desktop.
- Edit the corresponding remote application resource in Resources, and set the Auto create desktop shortcut as Allow.
- Install the VDI client in the virtual machine in advance. After the VDI client side is installed inside the virtual machine, the subsequent outer VDI client can transmit relevant parameters to automatically log in on the inner client.
- The actual effect is that after the user logs in to the virtual desktop using the VDI client side, the remote application icon will be automatically generated on the desktop, and the user can directly open it without logging in to the client.
Dual Display and DPI Synchronization
Scenario
The remote application now supports a dual-screen display, covering both duplicate and extended screen modes to enhance users’ convenience. It allows users to drag the remote application effortlessly across the primary and secondary screens. Additionally, the remote application display can synchronize with the DPI of the local endpoint. It ensures seamless integration between the application screen and the local system, thus significantly enhancing the user experience.
Precautions
- In the dual-screen scenario, the remote application supports a maximum of 2K resolution (the single-screen scenario supports a maximum of 4K resolution), and requires endpoint hardware support.
- The dual-screen display only supports remote application servers for Win Server 2012 and above.
- The dual-screen display only supports Windows clients.
Steps
-
The dual-screen display function is supported by default under the remote app 1.0 and 2.0 protocols, and no additional configuration is required.
-
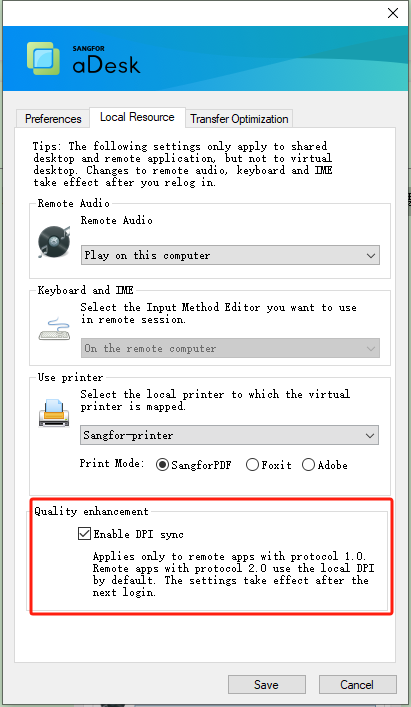
Under the remote app2.0 protocol, the DPI synchronization function is supported by default; under the remote app1.0 protocol, the DPI synchronization function must be manually enabled at the endpoint, as shown below.
Remote Application Server Policy
Scenario
Establish relevant policies on the remote application server for managing the remote application sessions connected to it. Such policies should cover session policy, load balancing policy, and overload protection.
Precautions
Remote application server policies are in effect by default for all remote application servers.
Steps
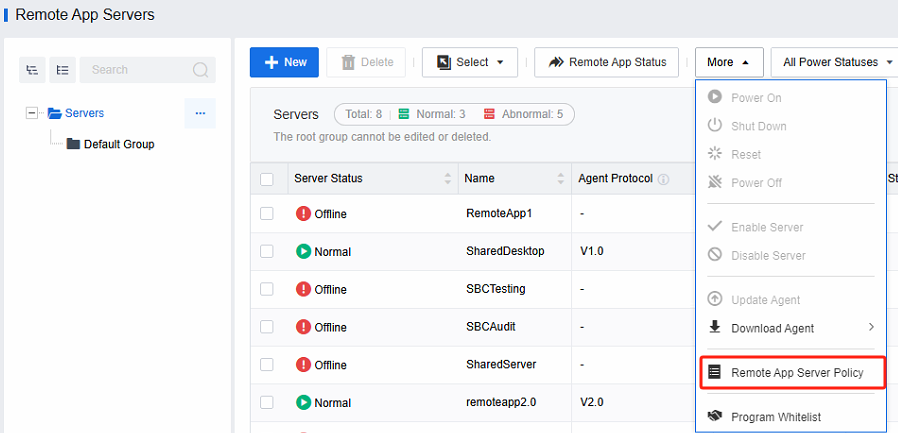
- Log in to the VDC console and open Remote App Server Policy in Assets > Remote App Servers.
- Configure remote application server policy based on actual needs.
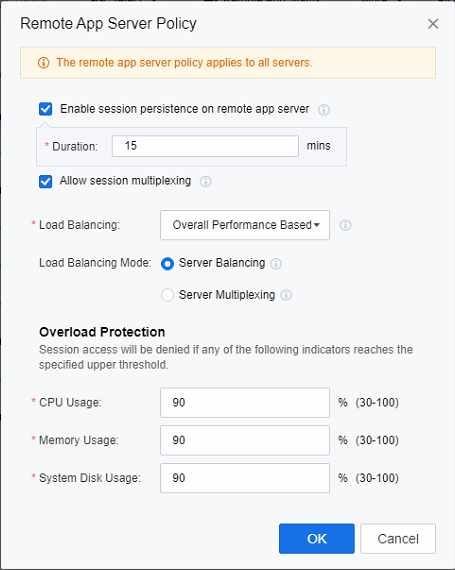
Note: Session persistence on remote app server: Prevent the client network disconnection, the use of the remote application state is lost, and the minimum session persistence time is 5 minutes.
Session multiplexing: This feature allows applications published on the same application server to be accessed through the same session.
Load Balancing: According to the set load balancing algorithm, new sessions are assigned to a specific host, and 6 strategies are supported by default (Session Based, CPU Usage Based, Memory Usage Based, System Disk Usage Based, Disk I/O Latency Based, and Overall Performance Based).
Load Balancing Mode: Server Multiplexing refers to when a user uses multiple remote applications; these application sessions will be allocated to the same server even if the server has reached the load resource limit. Load Balancing will assign the user’s new application session to other servers when the load reaches the upper limit.
Overload Protection: Overload protection is carried out for CPU, memory, and system disk usage. When the server attribute exceeds the set value, the server will refuse new session access.
-
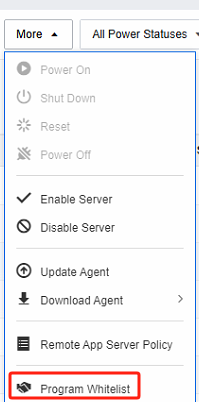
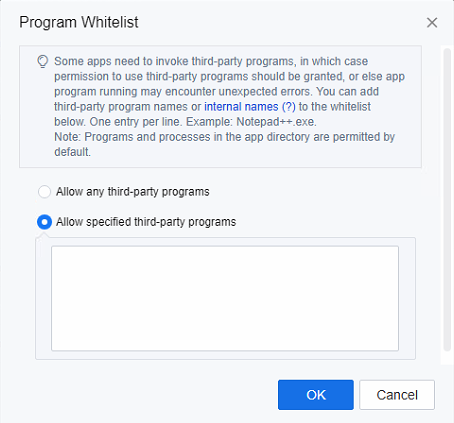
Some applications need to be called to other programs while in use (the programs/processes in the directory where the application is located are allowed by default). You can configure the Program Whitelist and add the programs.
Operation and Maintenance Management
Application Server Management
Scenario
Administrators monitor application server status (CPU, memory, disk I/O, etc.), resource usage trends, and related alerts in the VDC console.
Precautions
None
Steps
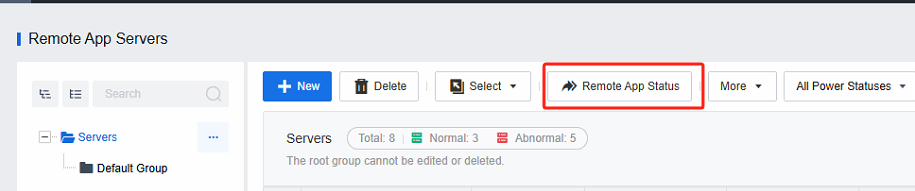
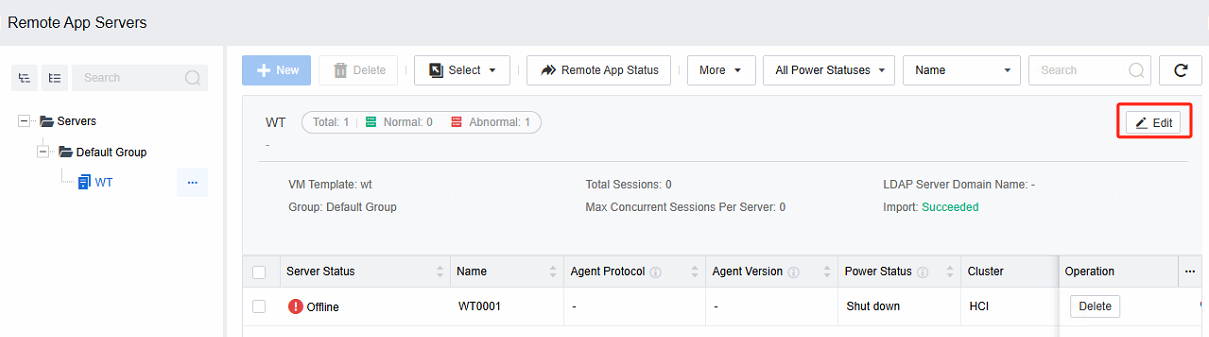
Log in to the VDC console to view the current usage status of the application server cluster in Remote App Servers.
-
If the state of some hosts is abnormal, it means that the communication between the VDC and the agent port of the server is abnormal, or the server is offline, etc.

-
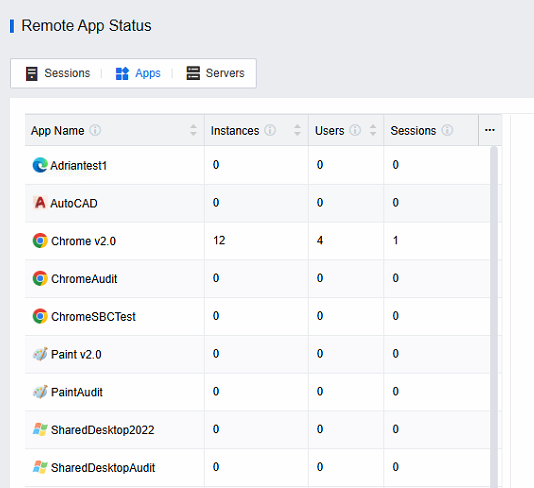
Remote App Status can be viewed at Remote App Servers.
-
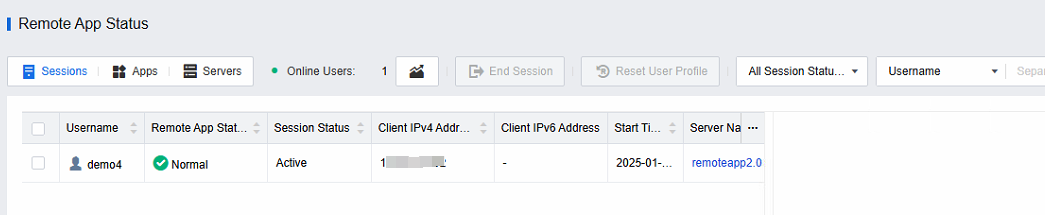
In the Remote App Status interface, you can view the detailed status description of the current application server (CPU, memory, system disk usage, I/O latency) and the current number of remote application sessions on each server.
-
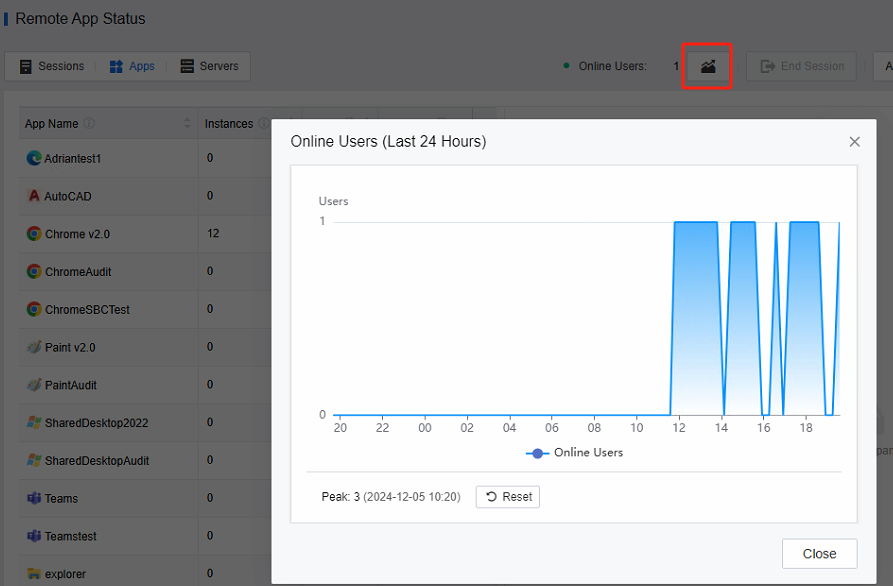
View session access trends for application servers.
-
Suppose an alert on the VDC prompts the application server to exceed the overload protection parameters. In that case, the application server-related resources have exceeded the limit value set by the remote application policy, and the administrator needs to pay attention.
Application Session Monitoring and Remote Assistance
Scenario
- Administrators monitor the access status and user usage of application sessions on the VDC console.
- Remote assistance for specific application sessions.
Precautions
None
Steps
- Log in to the VDC console, and in Remote App Servers > Remote App Status, select the Apps tab to view the user and server information the application is accessing.
- Select the Sessions view to view all remote application sessions on the current platform and specific user names, session status, client IP, session start time, server name, server address, server collection, session disconnection time, session idle time, etc.
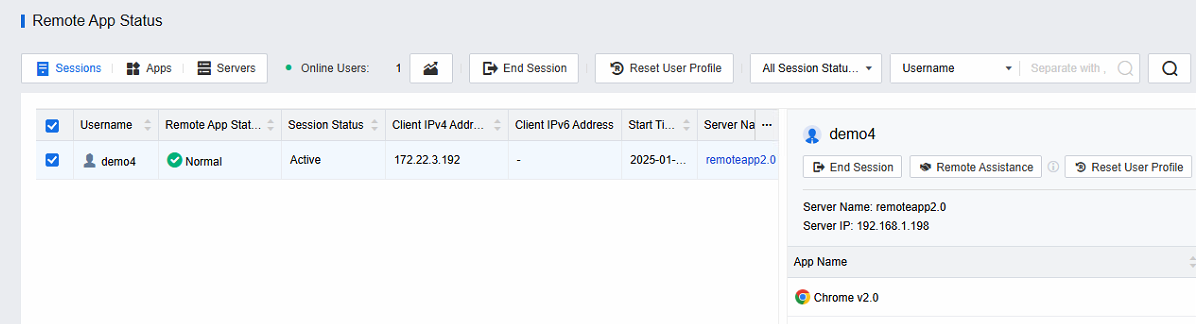
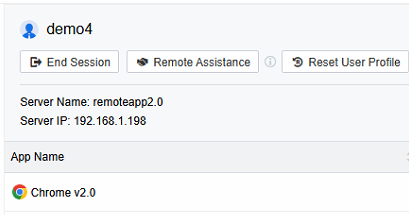
- Click on a specific user session to select end session or remote assistance.
Change in Resources
Change Application Resource
Scenario
Administrators are capable of adding or deleting the application resources accessible to users and configuring parameters related to applications.
Precautions
None.
Steps
- Modify (add, delete) the application resources available to the user, confirm the roles associated with the user, edit the corresponding roles, and add/delete application resources, as shown below:
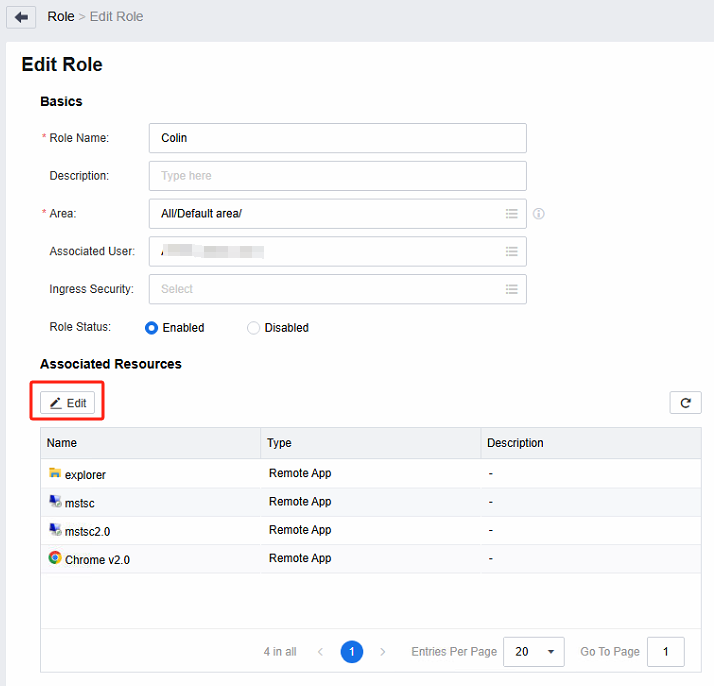
Note: These changes take effect after the user logs out and then logs in again.
- Modify the application startup parameters. As in the following example, the user will open the www.google.com website by default when opening the Chrome browser.
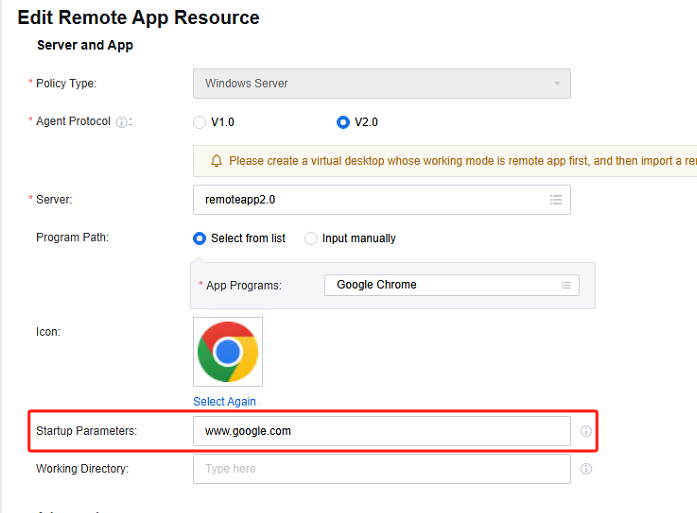
Note: This operation doesn’t require the user to log out and in again. It will come into effect once the configuration is saved after modification.
Change Resource Pool
Add/remove/replace application servers
Scenario
-
Add an application server: When the amount of user access gradually increases, and the application server gradually exceeds its load, an application server can be added to meet user access and usage requirements.
-
Delete/replace an application server: When some application server resources need to be withdrawn from the resource pool for other purposes, the application server can be deleted or replaced at this time.
Precautions
None.
Steps
Log in to the VDC console, edit the corresponding application resources, and re-select the Server where the application resources are located to add/delete the corresponding server resources. This operation does not need to be logged out and re-logged in by the client side and can take effect after saving the configuration on VDC.
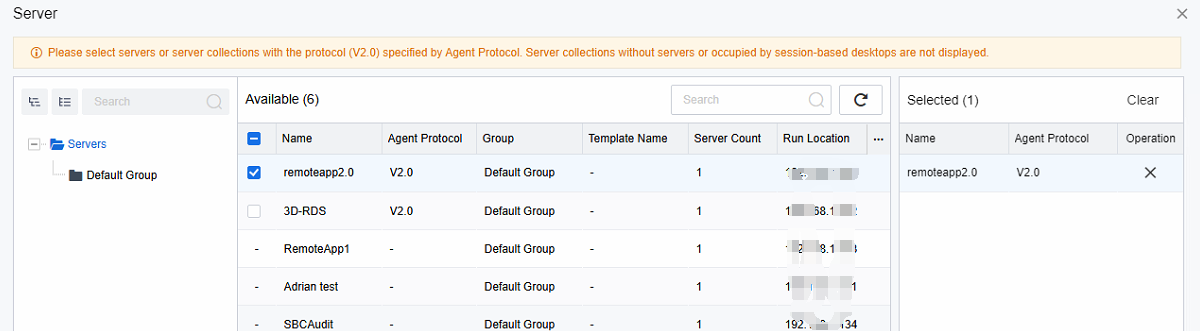
Note: Ensure that the application’s installation path on each server is the same as the program path.
Taking the Chrome browser as an example, if Chrome is not installed on the program path on a server when a user accesses this server to obtain Chrome applications, they will not be able to obtain Chrome applications for use.
Application Server Hardware Expansion
The application server hardware expansion is the HCI virtual machine hardware configuration expansion. You can edit the virtual machine to modify the configuration.
Note: Modifying the virtual machine hardware configuration requires restarting. Please be sure to coordinate the change window in advance.
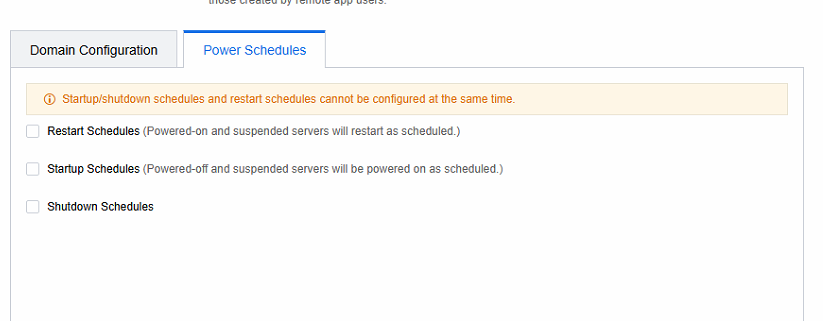
Application Server Power Plan
Scenario
It is necessary to turn the application server on and off regularly and restart it to reduce the problems that the operation may cause.
Precautions
The restart schedule is only effective for virtual machines that are powered on or suspended.
Steps
Log in to the VDC console and select the server collection in Remote App Servers to edit the configuration information.
- Select a specific schedule in the Power Schedules.